Fax Server
Introduction
About this Document
The AXS Guard Fax How To is intended for technical personnel and system administrators looking to implement the AXS Guard Fax Module. It consists of a conceptual section, outlining the components and capabilities of the Fax Module, and a configuration section, where we explain the client and server-side configuration. Following is an overview of the contents.
Examples used in this Guide
All setups and configuration examples in this guide are executed as an advanced administrator. Some options are not available if you log in as a full administrator or a user with lower access privileges.
As software development and documentation are ongoing processes, the screenshots shown in this guide may slightly deviate from the current user interface.
Main Concept and Features
What is the Fax Module?
The AXS Guard Fax Module is a heavy duty telecommunication system supporting:
-
Up to 8 Fax Lines
-
Sending facsimile, including batch jobs via a connected workstation in a Novell, Windows or Unix network
-
Receiving facsimile via e-mail or a networked printer in a Novell, Windows or Unix network
-
PCL 5 and PostScript printers
-
Shared use of the available modem(s)
-
Multiples queues, e.g. per department
-
Fax Reporting via e-mail
-
Advanced Logging
Supported Hardware and Regions
The AXS Guard Fax module is only available in the BENELUX. The following fax modems are supported and can only be installed by Able:
-
MultiTECH 2834ZDX
-
MultiTECH 5656ZDX
Client-Side Printer Drivers
When a document is sent to a fax queue, the AXS Guard extracts special codes to process the fax. To allow the extraction of these codes from non-text documents, you must install the appropriate printer driver on the client. The driver ensures that the AXS Guard can extract the necessary codes when processing a fax.
-
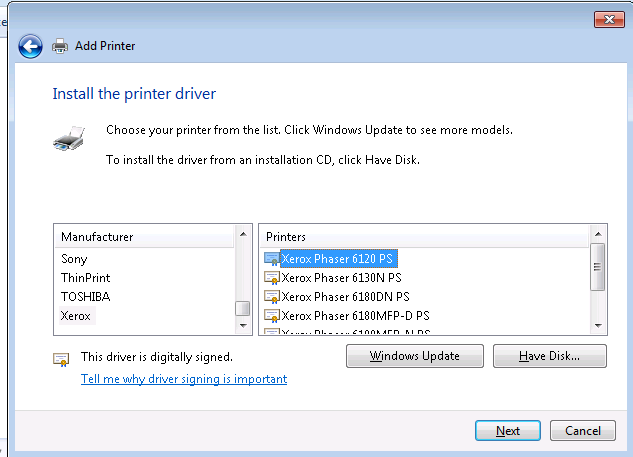
All Windows Operating Systems Prior to MS Server 2008: Install the Laserjet 4M/L PS printer driver.
-
MS Server 2008 and after: Install the Xerox Phaser 6120 PS printer driver (also works with Linux).
Outgoing Faxes
The AXS Guard Fax module functions as a TCP/IP network printer. It offers the ability to submit faxes from any networked computer, in any order, and in any quantity. The fax network printer is installed on the client, allowing the user to send faxes directly from programs such as MS Word, but also from custom ERP software supporting HylaFAX or free fax clients, such as Frog Fax. The AXS Guard uses several fax codes to handle fax delivery.
Whenever a user sends a fax, the job is entirely handled by one of the AXS Guard fax queues; If there’s a busy signal or no answer, the AXS Guard will try automatically to send it later. If configured, the sender receives a report showing the transmission status, the number of sent pages, etc.
Outgoing documents can be in any format; the AXS Guard Fax module automatically converts each document to a form suitable for transmission (either PostScript or TIFF/F).
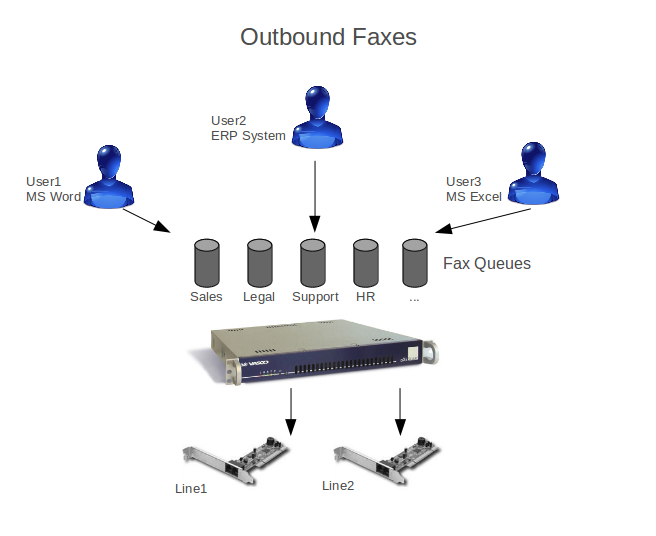
Queuing
Queuing or spooling refers to the process of placing data in a temporary working area for another program to process. Documents formatted for faxing are stored into an area on the AXS Guard disk before being sent by one of the modems. Faxes typically can send out only a single document at a time and this requires seconds or minutes to do so, depending on the load and the baud rate of the modem. With spooling, multiple processes can write documents to a fax queue without waiting. As soon as a process has sent its document to the spool device, the process can perform other tasks, while a separate faxing process operates the modem(s).
The AXS Guard allows you to create as many fax queues as needed, e.g. per department or per floor. A user can have access to one or multiple fax queues. Queues are added by a system administrator on the AXS Guard and the client.
Info
The number of fax queues is not related to the number of installed modems. It is possible to add more queues than modems.
Load Balancing
In computer networking, load balancing is a technique to distribute a workload evenly across two or more computers, network links, CPUs, hard drives, or other resources, in order to get optimal resource utilization, maximize throughput, minimize response time, and to avoid system overload.
The AXS Guard Fax module provides load balancing, as it automatically assigns a fax line to an incoming fax job. This process is totally transparent to the users and depends entirely on the job load. The fax process on the AXS Guard decides which line to assign and when. Mapping fax queues to a dedicated fax line is not supported, e.g. you cannot assign fax line x to the sales queue.
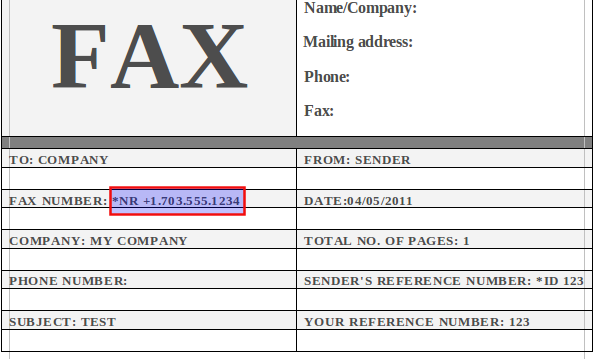
Codes for Outgoing Faxes
The AXS Guard Fax module uses special codes to determine the recipient’s fax number, the transmission delay and the fax ID. The codes are not visible to the recipient, as they are removed before transmission.
Important
Install the appropriate drivers for non-text documents.
| Code | Definition | Required? |
|---|---|---|
|
This code must be followed by a single space and a fax number. Forwards slashes and periods may be used for clarity. Country codes must be preceded by a |
yes |
|
This code must be followed by a single space and is used to delay the transmission. Use the |
no |
|
This code must be followed by a single space and is used to tag the fax with a specific ID. The ID is used for reporting purposes. One ID may be used for a single fax sent to multiple recipients. The ID is not related or linked to a fax number. |
no |
Example: Using the Fax Codes
*NR 02/555.1234 (local)
*NR +1.703.555.1234 (international)
*TM 20:30
*ID 123
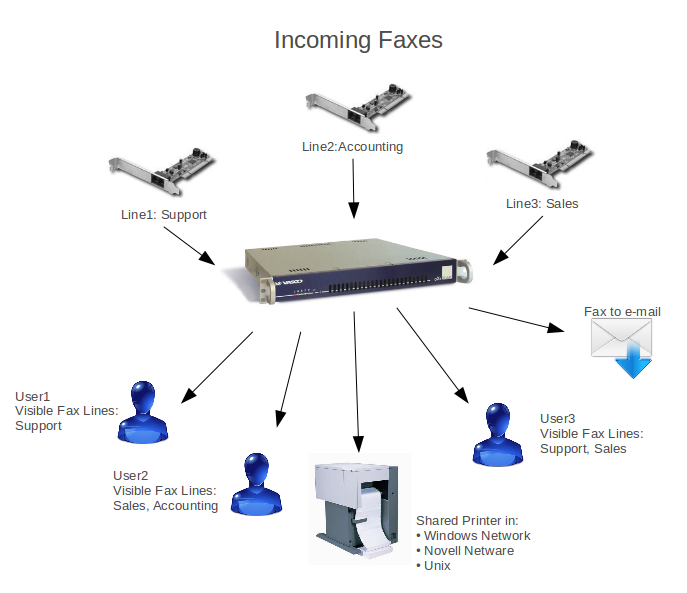
Incoming Faxes
Incoming facsimile are stored in a receiving area as TIFF/F (read "TIFF Class F") or PDF files and may be automatically delivered by mail and/or printed. The status can be used to monitor the send and receive queues, as well as the state of the AXS Guard Fax server.
Reporting and Logging
Fax transmission reports can be sent by e-mail and/or can be sent to a network printer if you prefer paper reports for recordkeeping. Printers may be connected to either:
-
A Unix network (LPR)
-
A Windows network
-
A Novell Netware network
E-mail Reports can be sent as attachments in the following formats:
-
PDF
-
TIFF
The following configurations apply to e-mail as well as printed reports:
-
You can configure the AXS Guard so that is sends / prints a global fax report, listing all in- and outgoing fax traffic
-
You can configure reports on the fax line level
-
You can configure reports on the fax queue level
The different options are explained in Fax Server Configuration
For e-mail addresses to be retrieved by the fax system, users need to be
registered on the AXS Guard with their Windows login. A Windows PC using
the fax system is identified by the AXS Guard via the user’s Windows
login. The AXS Guard looks for the user’s e-mail alias or the user name
itself (if no aliases are defined). It then concatenates the alias /
user name with the registered domain to build the e-mail address. If the
Windows login is not present in the AXS Guard user list, a report is
sent to the Windows username@domain.
Example: Fax Report by e-mail
Domain: microsoft.com
User: bill
E-mail alias: Bill.Gates
If a fax is sent by this user, a transmission report is e-mailed to
Bill.Gates@microsoft.com.
Info
Only use lower-case characters for the user name.
The AXS Guard fax logs provide detailed information about:
-
The history of outgoing and incoming faxes.
-
Transmission details, such as the sender, the destination and the status.
-
The fax code extraction process.
Fax Server Configuration
Overview
In this chapter, we explain the server-side configuration of the fax system. Topics covered include:
-
Activating the Fax Feature
-
Printer Settings
-
Configuration of Fax Lines
-
Creating Queues
-
E-mail notification and reporting settings
Activating the Fax Feature
-
Log on to the AXS Guard as explained in the System Administration Guide.
-
Navigate to System > Feature Activation.
-
Extend the Fax tree in the left pane.
-
Check the Fax option as shown below and update your settings.

Important
The Fax option can only be activated by Able.
Printer Settings
-
Log in to the AXS Guard.
-
Navigate to Fax > Printers
-
Click on the
+button to add a new printer. -
Enter the appropriate settings and save.
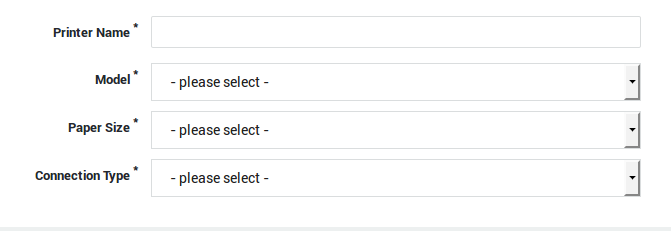
General Printer Settings
| Parameter | Description |
|---|---|
Printer Name |
Enter a name for your printing device. Use lower-cases without spaces. Start with an alphabetic character. The following characters can be alphanumeric characters, including special characters such as |
Model |
Select the printing device from the drop-down list. Only PCL-5 or PostScript printers are supported. All HP and HP-compatible printers use PCL-5. |
Paper Size |
Select the desired paper size from the drop-down list (Letter or A4). |
Network Specific Settings
Parameter |
Description |
|---|---|
Computer Name |
Enter the FQDN or the UQDN of the network printer. |
LPR Parameter |
|
| Parameter | Description |
|---|---|
Server |
Enter the server’s IP address or FQDN. |
Queue |
Enter the name of the Netware printer queue. |
User Name |
Enter the Netware user name. |
Password |
Enter the Netware User Password twice for verification |
| Parameter | Description |
|---|---|
Service Name |
Enter the Windows service name. Use the NetBIOS name. |
User Name |
Enter the Windows User Name. |
Password |
Enter the Windows User Password twice for verification |
Checking the PSTN Device Settings
Before you start configuring your fax lines, ensure that the PSTN settings are correct. The PSTN device settings are preconfigured by Able. In case of an issue, contact your reseller .
-
Navigate to Network > Devices > PSTN
-
Click on the appropriate Physical Device in the table
-
Ensure that the type is set to
Fax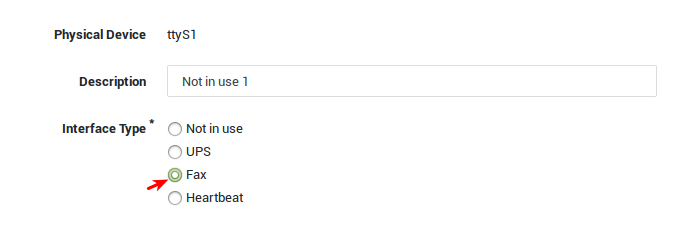
Field |
Description |
|---|---|
Physical Device |
The name of the serial device as seen by the appliance’s operating system, e.g. |
Description |
Enter a description for the device (optional). |
Interface Type |
|
Configuring your Fax Lines
-
Navigate to Fax > Lines
-
Select a Fax Line in the table
-
Configure the appropriate settings and update your configuration.
Important
Fax Modems can only be added by Able personnel. System administrators can only modify line parameters.
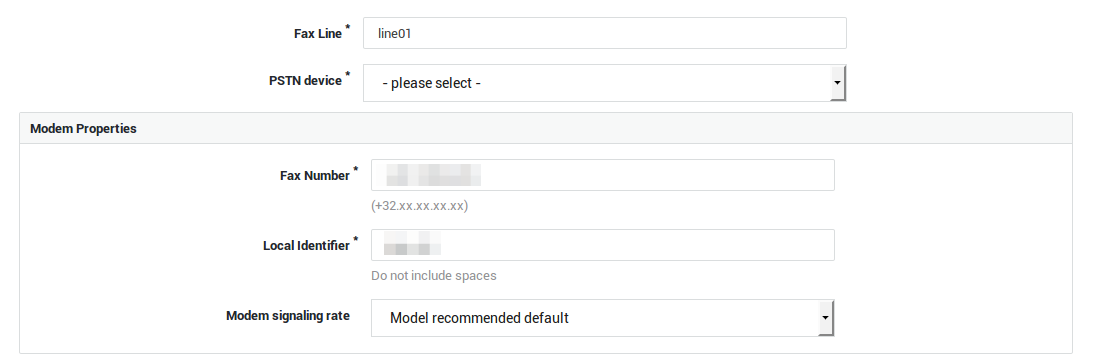
Parameter |
Description |
|---|---|
Fax Line |
This is the name of the Fax Line. It cannot be modified. |
PSTN Device |
Select the correct PSTN Device from the drop-down list. Only PSTN devices of the |
Fax Number |
Enter the fax number of the selected PSTN device. Use the following format: |
Local Identifier |
The local identifier is the string which identifies the sender. The local identifier may not contain any spaces. |
Modem Signaling Rate |
Set the baud rate of the attached modem. Use the recommended default. |
In |
Select this option to allow incoming faxes. |
Out |
Select this option to allow outbound faxes. |
Number of rings before answer |
Enter the number of rings before a call is answered. This is useful if your phone and fax device are connected to the same line to differentiate between calls. |
Printer |
Select the printer for incoming faxes from the drop-down list.
|
Number of Copies |
Enter the number of copies to be printed for each fax. |
Enter e-mail address(es) of the recipient. |
|
E-mail Attachment Format |
Select TIFF or PDF. |
Dial Prefix |
Enter the prefix to make external calls. This is often |
Creating Queues
-
Navigate to Fax > Queues.
-
Click on the
+sign to add a new queue. -
Enter the settings as explained in the table below.
-
Save your configuration.
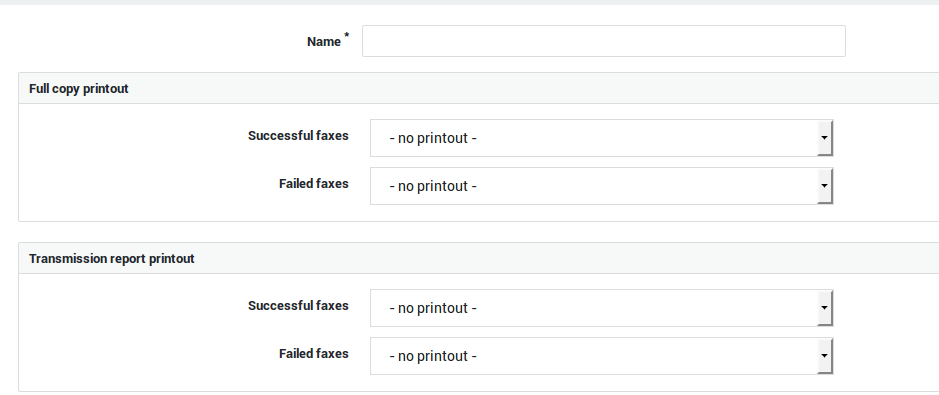
Parameter |
Description |
|---|---|
Name |
Enter a name for the new Fax Queue. This is the name as seen by the end-user when he / she sends a fax. |
Full copy printout & Transmission report printouts |
|
Notification e-mail |
Enter the e-mail address(es) to which notifications of successful and / or failed transmissions should be sent. |
Attach full copy of successful fax |
Select this option to attach a full copy of successful fax transmissions. Possible formats are TIFF or PDF. |
Attach full copy of failed fax |
Select this option to attach a full copy of failed fax transmissions. Possible formats are TIFF or PDF. |
E-mail fax attachment format |
Select the desired e-mail attachment format. Faxes will be sent as an e-mail attachment in the specified format. |
Override Local Identifier from line |
Enter a different identifier to override the local identifier. Use this option if replies to fax messages originating from this queue need to be sent to a specific source, i.e. a source different from the one specified under Fax > Lines. |
Maximum dial attempts |
Specify the maximum number of retries. Dialing attempts without carrier detection also count as a try. |
Maximum transmission tries |
Specify the maximum number of retries. For this limit to be reached, a carrier must be detected. Attempts without carrier detection do not count as a try. |
Reporting and MS-Specific Settings
-
Navigate to Fax > General
-
Enter the settings as explained in the table below.
-
Update your settings
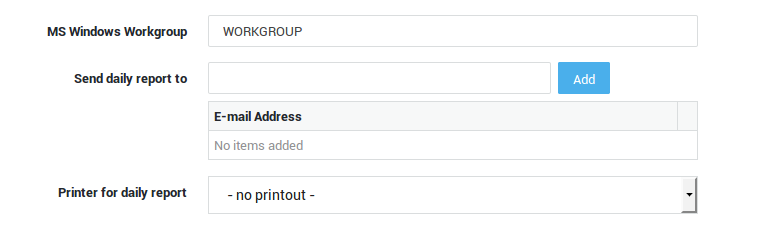
| Parameter | Description |
|---|---|
MS Windows Workgroup |
Enter the name of your workgroup if the AXS Guard is connected to a Windows network. In most cases, the default name |
E-mail address for daily report |
A daily report of all fax traffic is sent to the specified address(es) by e-mail. |
Printer for daily report |
Select the appropriate printer for a paper copy of your daily fax reports. |
Client Configuration
Overview
In this chapter, we explain the client-side configuration of the AXS Guard Fax service. Topics covered include:
-
Installing the Fax functionality in Windows 7
-
Setting the paper size
-
Creating a Fax Document, using the Fax codes.
The client configuration is similar for previous Windows versions. Consult your Windows documentation if necessary.
Installing the Fax in Windows 7
-
Log on to Windows as a System Administrator.
-
Go to the Control Panel.
-
Select View devices and printers.
-
Click on Add a printer.
-
Select Add a network, wireless or Bluetooth printer. Windows will automatically browse the network for available printers.
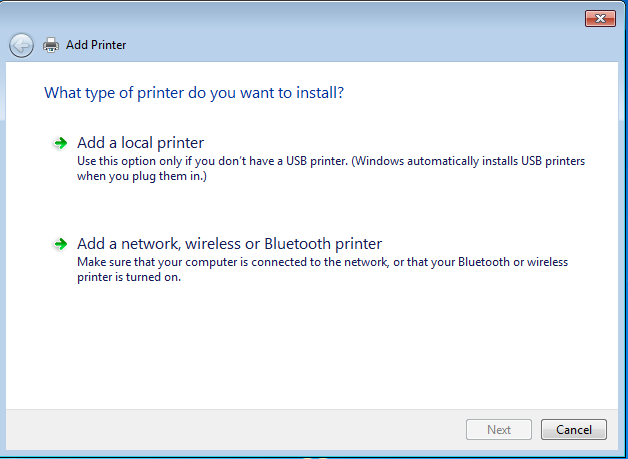
-
Select the appropriate fax queue from the list. In this setup, we use
faxas the queue name.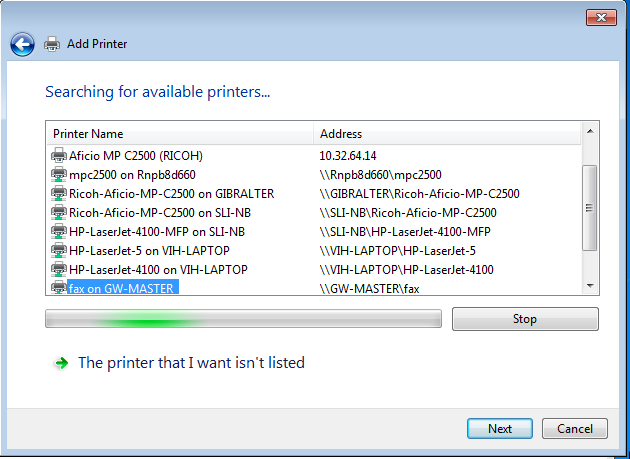
-
Click on OK to locate a PostScript printer driver. Install one of the drivers.
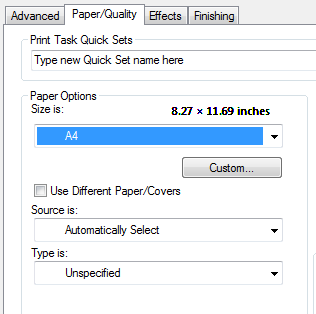
Setting the Paper Size
-
Click on the Start button and select Devices and Printers.
-
Select the appropriate fax queue.
-
Right click on the fax queue and select Printing preferences.
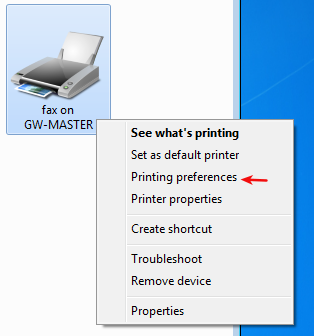
-
Select the desired paper size (only letter and A4 are supported).
Creating a Fax Document
To create a fax:
-
Start your favorite Word processor.
-
Create a new file or start from an existing fax template.
-
Use a font that is sent as outline (Courier, Times New Roman, etc.)
Info
Free fax templates can be downloaded from the Internet.
-
Use the correct fax codes.
-
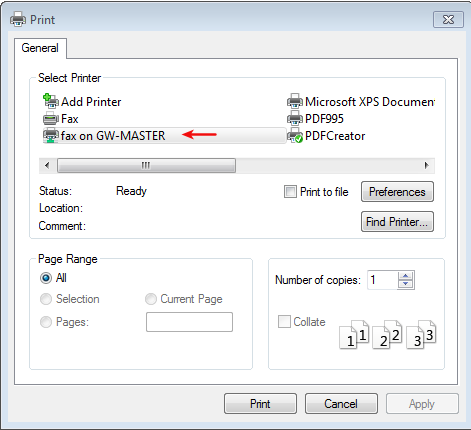
When finished, print the file to the approriate fax queue as you would with an ordinary printer, using File > Print.
Status and Logs
Overview
In this chapter, we explain how to access the fax logs and the status of:
-
The Fax Printers
-
Outgoing Faxes
-
Received Faxes
Printer Status
The Printer Status provides information about:
-
Current Jobs
-
Jobs residing in the spool, i.e. waiting to be printed
-
Server Information
-
Information related to debugging
Checking the status:
-
Log in to the AXS Guard appliance.
-
Navigate to Fax > Status > Printers

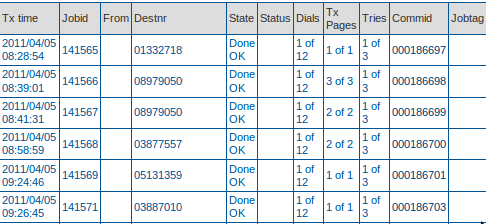
Viewing Pending Transmissions
In Out Pending, you can view which faxes are awaiting to be sent.
Status information includes, but is not limited to:
-
Job IDs
-
Destination numbers
-
The number of dialing attempts per fax
-
The number of transmitted pages per fax
To view pending transmissions:
-
Log on to the AXS Guard as explained in the System Administrator Guide.
-
Navigate to Fax > Status > Out Pending.
Viewing Sent Faxes
Via Out Done, you can access an overview of faxes which were sent
successfully during the day. Status information includes, but is not
limited to:
-
The transmission time per fax
-
Job IDs
-
Destination numbers
-
The number of dialing attempts per fax
-
The number of transmitted pages per fax
To access an overview of sent faxes:
-
Log on to the AXS Guard as explained in the System Administration Guide.
-
Navigate to Fax > Status > Out Done.
Viewing and Downloading Received Faxes
To view and download received faxes:
-
Log on to the AXS Guard as explained in the System Administration Guide.
-
Navigate to Fax > Status > In.
-
Click on the Adobe icon to view the PDF version.
-
Click on the Save icon to view the TIFF version.

Fax Logs
Overview
There are 2 types of logs:
-
Summary logs, which provide a clear overview of sent and received faxes.
-
Detailed logs of sent and received faxes. These logs contain all the details of your fax transmissions and are mainly used for advanced troubleshooting.
All logs are kept by date in descending order. Logs are periodically compressed to save disk space. This process is automatic.
Accessing the Fax Logs
To access the Fax Logs:
-
Log in to the AXS Guard appliance.
-
Navigate to Fax > Logs.
-
Select the desired option, i.e.
Summary In,Summary Out,Detailed OutorDetailed In. -
Select the desired log file (date).
Summary In Logs
The summary in logs contain summarized information about:
-
When a fax message was received (time)
-
The line that handled the incoming transmission
-
The idendity of the sender
-
The number of transmitted pages
-
The duration
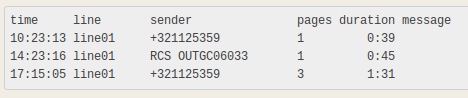
You can use the data of the summary in log to look up details about a certain fax transmission in the according detailed in log, e.g. the number of the sender, the time, etc.
Detailed In Logs
The detailed in logs contain detailed information about:
-
The line that answered a certain incoming call.
-
Information about the fax device that handled an incoming fax.
-
Information about incoming calls without a successful handshake.
-
Information about the transmission speed (baud rate).
-
The entire processing of the fax, such as the conversion to a pdf document for email transmission.

Summary Out Logs
The summary out logs contain summarized information about:
-
The time and job id of the outgoing transmission
-
The sender
-
The destination
-
The number of pages per job
-
The duration per transmission
-
The job status, e.g. a remote fax fails to answer
-
The state of transmissions (transmissions are identified by their job id)
Possible states are:
-
submit: The fax has been submitted for processing -
requeued: The fax has been been placed in a queue for later processing -
done: The transmission is complete -
killed: the job was cancelled for a technical reason and the sender has been notified.
You can use the data of the summary out log to look up details about a certain fax transmission in the according detailed out log, e.g. the job id, the sender, etc.
Detailed Out Logs
The detailed out logs contain detailed information about:
-
Details about the sending fax device (hardware)
-
The line that was used for transmission
-
Information about unsuccessful outgoing calls
-
The entire processing of the fax, such as the conversion from the ascii format to a tif or ps document suitable for transmission.
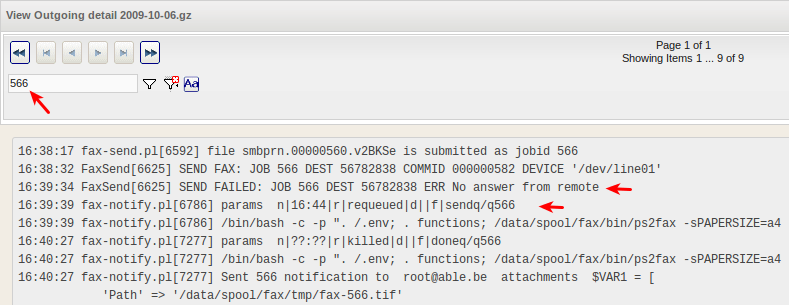
Example: Looking up details of a failed fax transmission
Based on the summary out log in Summary Out Logs, we see that job 566 was killed at 16:40:27. You can use this job id to look up details in the corresponding detailed out log.
Simply navigate to Fax > Logs > Detailed Out and select the appropriate log date. Use the job id as a search filter and press enter. The transmission of the fax failed, because there was no answer from the remote machine. The fax was requeued.
Support
If you encounter a problem
If you encounter a problem with AXS Guard, follow the steps below:
-
Check the troubleshooting section of the feature-specific manual.
-
Check the knowledge base on this site for information about special configurations.
-
If no solution is available in any of the above sources, contact your AXS Guard vendor.
Contact Information
(+32) 15-504-400
support@axsguard.com