Reverse Proxy
Introduction
About this Document
This document is intended for technical experts and system administrators. It explains the security concepts and configuration of the AXS Guard reverse proxy feature to secure HTTP(S), FTP and RDG applications.
Examples used in this Guide
All setups and configuration examples in this guide are executed as an advanced administrator. Some options are not available if you log in as a full administrator or a user with lower access privileges.
As software development and documentation are ongoing processes, the screenshots shown in this guide may slightly deviate from the current user interface.
Introduction to the Reverse Proxy
WAF Functionalities
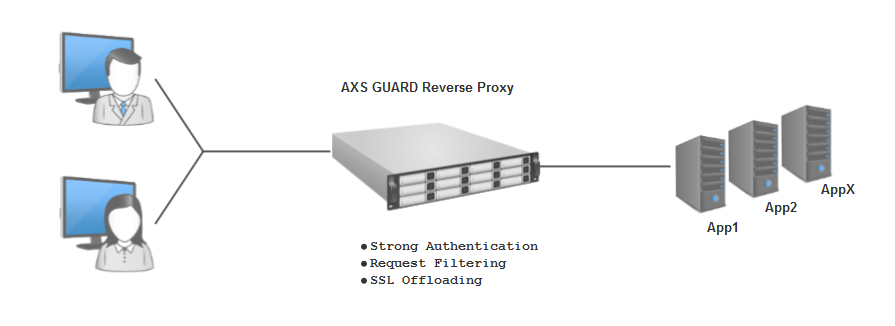
The AXS Guard Reverse Proxy improves performance, scalability, and security by offloading tasks from the backend servers.
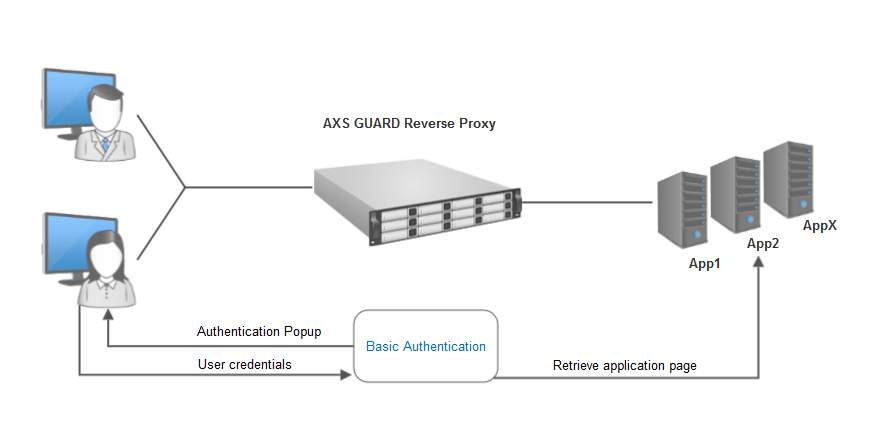
AXS Guard combines the functionality of a Web Application Firewall (WAF) with a powerful reverse proxy. This WAF-enabled reverse proxy serves as a gateway for internet client requests, ensuring secure communications by authenticating clients and directing their requests to the appropriate LAN server.
By acting as a shield, the WAF prevents potential attacks and exploits on the LAN server. The integrated WAF component provides advanced security features like request filtering, RFC compliance, strong authentication and brute-force attack prevention.
Moreover, the WAF-enabled reverse proxy offloads SSL processing from the application servers, resulting in improved performance and scalability. Overall, it provides secure access to internal resources, safeguards sensitive data, and enhances network security.
Using a Reverse Proxy vs. Port Fowarding
Port forwarding is to be avoided due to its inherent security risks. With port forwarding, application servers are directly accessible from the Internet which means their potential vulnerabilities can be exploited more easily. If an application server is compromised, your private data and secure network may be at risk.
Using a Reverse Proxy vs. a DMZ
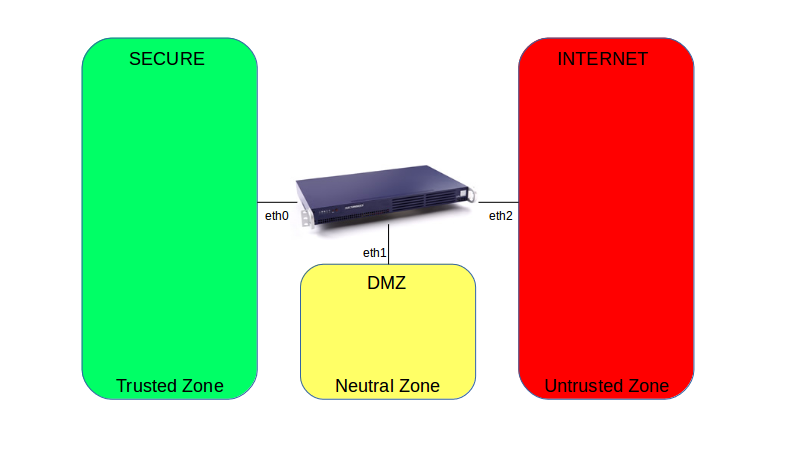
Another method to allow access to applications and web servers is through a DMZ. A DMZ solves the problem of access to private data in the secure LAN, for instance access to a database server. However, DMZ servers are directly accessible from the Internet and therefore susceptible to attacks. For this reason, the AXS Guard firewall does not allow connections from the DMZ to the secure LAN by default. Advanced firewall rules are required.
From / To |
to SEC |
to DMZ |
to INT |
From SEC |
configuration allowed |
configuration allowed |
configuration allowed |
From DMZ |
use advanced firewall rules |
configuration allowed |
configuration allowed |
From INT |
use advanced firewall rules |
configuration allowed (dmzf) |
use advanced firewall rules |
Reverse Proxy Features
Supported Protocols
| Type | Description |
|---|---|
TCP/IP protocols |
HTTP/1.0, HTTP/1.1, HTTP/2.0 and FTP |
Application protocols |
WebSocket, RPC over HTTP, MAPI over HTTP, EWS and RDP (via remote desktop gateway) |
Info
For applications using other protocols, a VPN connection is recommended.
RFC Compliance
The reverse proxy is designed to filter potentially dangerous requests which could cripple your application server.
The AXS Guard appliance protects your application servers by only allowing a specific set of characters in browser requests, a.k.a. character escaping. The character set is defined in RFC 2396.
For example, spaces in URLs are converted to %20. Note that query strings are not escaped. Query strings are the characters which follow an interrogation mark ? in a URL, e.g. http://www.imdb.com/find?s=all&q=the+great+escape&x=0&y=0.
The AXS Guard reverse proxy also protects your application against buffer overflows. Not all applications can handle extensively long URLs. Requests containing such URLs may result in unwanted program behavior or can even crash your application server.
Request Filtering
The AXS Guard Reverse Proxy works at the URL level and inspects HTTP traffic to ensure it is RFC-compliant. It can also modify the contents of URLs, a.k.a. URL replacement.
Administrators can specify restrictions on top of the enforced RFC standards to block URLs or parts thereof through the use of regular expressions (PCRE).
Exceptions can be configured to allow specific requests which would otherwise match a blocked request. The default configuration of the AXS Guard Reverse Proxy server is optimized for applications running on Microsoft IIS, such as the Outlook Web Access server.
Example: Combining allowed and denied requests
Assume you want all URLs containing the word scripts to be blocked,
e.g. http://www.example.com/scripts/adduser.php, while a specific URL
containing the word scripts should be allowed, e.g.
http://www.example.com/scripts/subscribe-infosession.php. The AXS
Guard reverse proxy allows you to specify an exception for /scripts/subscribe-infosession.php.
Denied Requests
Option |
Description |
|---|---|
Deny Following Requests |
Requests for URLs that match any of the specified patterns will be blocked. You can use PCRE to define patterns:
|
Allow Following Requests |
Must be used to overrule denied requests. Requests for URLs that match any of the specified patterns will be allowed. Use the same regex syntax as explained above. |
Understanding the .* Pattern in PCRE: Matching Any Character Zero or More Times
When .* are used together, it forms a pattern that can match any sequence of characters (except for newlines) of any length. It will greedily match as many characters as possible.
Suppose we have the following string: Hello, World!.
The PCRE pattern H.*o will match the entire string Hello.
- The
Hmatches the letter H. - The
.*matches any number of characters, in this case, it matches ello, W. - The
omatches the letter o.
Therefore, the match is "Hello".
It's important to note that .* can sometimes lead to unintended or inefficient matching, as it can match across multiple parts of a string. In such cases, it's advisable to use more specific patterns if possible to avoid unexpected matches.
Allowed Requests
URL restrictions can be overruled by adding a full URL entry or a part thereof, and by using the same regex syntax as explained in the denied requests section.
Base URL Protection
Base URL protection is a method to protect your web server against unauthorized access. This is achieved by restricting access to a defined set of URLs. Check the documentation of your application server to verify which URLs it publishes by default and which are the ones that need special protection.
A web server such as www.vasco.com has several URLs:
-
www.vasco.com/public -
www.vasco.com/private -
www.vasco.com/support
By adding /public/ as a base URL, only www.vasco.com/public is
accessible to the public. Other requests are redirected to the allowed
URL, e.g. an incoming request for www.vasco.com/private would be
redirected to www.vasco.com/public.
Example: Microsoft OWA 2003
When running a Microsoft OWA 2003 server, only the following URLs should be accessible:
-
/exchange/ -
/exchweb/ -
/public/
Info
- Include a forward slash
/before and after each entry. - If multiple base URLs are defined, any unauthorized request is automatically redirected to the base URL on top of the list. In our example, that would be
/exchange/
Access Control
IP address restrictions play a crucial role in safeguarding your web applications against undesirable visitors. By implementing these restrictions, system administrators can selectively grant access based on specific IP addresses. This valuable feature effectively thwarts unwanted visitors and shields your applications from automated cyberattacks.
When enforcing access restrictions for IP ranges, it is essential to utilize the CIDR notation, such as 192.0.2.0/24. Without defined restrictions, connections originating from any IP address will be permitted by default, unless alternative configurations are specified within the AXS Guard firewall.
By defining IP address restrictions, you can confine connections solely to the designated IP addresses or ranges. Consequently, any connections originating from other IP addresses will be promptly denied.
Predefined Applications
The AXS Guard Reverse Proxy server allows you to choose from a list of preconfigured applications.
When you choose a preconfigured application, the correct configuration settings are automatically applied, e.g. the base URLs, RFC compliance checks, authentication URLs, NTLM suppression, etc.
Additionally, some automatic redirects are also activated depending on the selected application.
Application |
Description |
|---|---|
Unlisted application |
Select this option if you don’t know the specifics of the application server or if you wish to enforce authentication for a basic web server or an application which does not provide its own authentication. |
Citrix 3 |
Citrix Metaframe 3 allows you to run applications you have at work from anywhere in the world. For detailed information about Citrix products, visit: http://www.citrix.com |
Citrix 4 |
Citrix Metaframe 4 allows you to run applications you have at work from anywhere in the world. For detailed information about Citrix products, visit: http://www.citrix.com |
Citrix Access 4 |
Application server for Citrix Access Gateway, Version 4.0. For detailed information about Citrix products, visit: http://www.citrix.com |
Microsoft CRM |
Microsoft Dynamics CRM is a customer relationship management software package developed by Microsoft. |
Citrix NetScaler |
Citrix NetScaler is an all-in-one web application delivery controller (ADC). |
OWA 2013 |
Same as above, but version 2013. Also use this application for RPC over HTTPS, MAPI and EWS. Two authentication types are available:
Note that basic authentication is required for MAPI and EWS services, as NTLM is suppressed by default by the reverse proxy. See the official Microsoft documentation for additional information about how to configure your Exchange server for basic authentication. |
OWA 2016 |
Same as above, but version 2016. Also use this application for RPC over HTTPS, MAPI and EWS. Two authentication types are available:
Note that basic authentication is required for MAPI and EWS services, as NTLM is suppressed by default by the reverse proxy. See the official Microsoft documentation for additional information about how to configure your Exchange server for basic authentication. |
OWA 2019 |
Same as above, but version 2019. Also use this application for RPC over HTTPS, MAPI and EWS. Two authentication types are available:
Note that basic authentication is required for MAPI and EWS services, as NTLM is suppressed by default by the reverse proxy. See the official Microsoft documentation for additional information about how to configure your Exchange server for basic authentication. |
XenApp 5 |
Citrix XenApp is a Windows application delivery system that manages applications in a datacenter and delivers them as an on-demand service to users anywhere using any device. For detailed information about Citrix products, visit: http://www.citrix.com |
XenApp 7 |
Citrix XenApp is a Windows application delivery system that manages applications in a datacenter and delivers them as an on-demand service to users anywhere using any device. For detailed information about Citrix products, visit: http://www.citrix.com |
Zimbra |
Zimbra Collaboration Server. |
Custom Applications
The AXS Guard appliance offers a set of predefined applications for ease of administration.
However, advanced administrators can also define and configure their own, custom applications. Once a custom application has been added, it will appear as a selectable application under HTTP(S) > Server.
Please note that this option is intended for advanced administrators with an extensive knowledge of HTTP. Contact support@axsguard.com if you wish to permanently add an application that does not appear in the list of predefined applications or if you are experiencing configuration difficulties.
Single Point of Access
Virtual Hosts
The term Virtual Host refers to the practice of running more than one
web site or application, such as company1.example.com and
company2.example.com on a single machine.
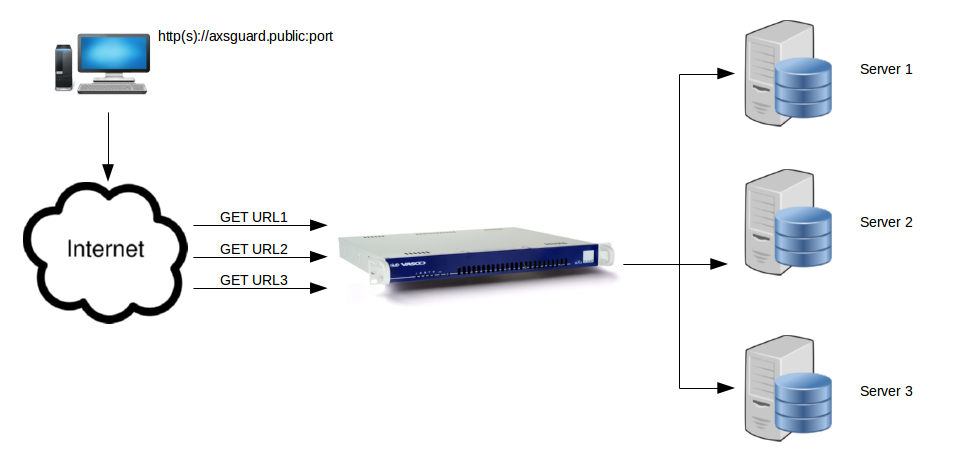
The AXS Guard Reverse Proxy server is the single point of Internet
access towards your applications in the secure LAN; you want to respond
differently for company1.example.com and company2.example.com. The
Reverse Proxy will select the correct application based on the URL which
is entered by users on the Internet.
Multiple applications with different hostnames can be made available to
Internet users, while only a single public IP address is needed on port
443 or 80. It is advised to use multiple hostnames rather than multiple
ports, as ports which deviate from the RFC standards (80 and 443) may
not be allowed by intermediate Internet firewalls or routers and may be
confusing to end users. Hostnames are also easier to remember than port
numbers. The use of non-standard ports requires users to specify a port
number after the URL, e.g. http://www.companyname.com:8080.
Each reverse proxy entry must have a unique IP address, port and hostname. Multiple hostnames (FQDNs) can be specified for a single application.
Catch-All Entry for Unmatched Virtual Hosts
Assume you have 3 active reverse proxy entries pointing to the public IP address 62.58.227.146.
-
External hostname: first.yourdomain.com > External IP: 62.58.227.146 > Internal IP: 192.168.0.2
-
External hostname: second.yourdomain.com > External IP: 62.58.227.146 > Internal IP: 192.168.0.3
-
External hostname: third.yourdomain.com > External IP: 62.58.227.146 > Internal IP: 192.168.0.4
Assume there is also a DNS record dns.random.net somewhere on the
Internet which is pointing to 62.58.227.146. This DNS record is out of
your control, i.e. created by mistake or even intentionally.
If a user on the Internet goes to dns.random.net or 62.58.227.146,
(s)he will end up at first.yourdomain.com, i.e. the first active entry
in your reverse proxy list. To prevent this behavior, we recommend that
system administrators create a "catch-all" reverse proxy entry, without
an external hostname. The entry should point to an internal server with
an "Unauthorized" or "Domain not found" page.
Examples
Example 1: One reverse proxy entry using port 443
In this scenario, it is recommended to leave the hostname field empty. This way, all names resolving to the specified IP address will be allowed by the Reverse Proxy. If a hostname is entered, only requests matching the entered FQDN will be allowed by the AXS Guard Reverse Proxy Server.
Info
If a hostname is specified, you cannot use the public IP address in the browser’s URL field. Both the hostname and IP address must be added if needed.
Example 2: One public IP address with multiple reverse proxy entries using port 443
The IP address and port number are predefined. This means only the
hostname can be used to point to the correct server in the secure LAN. A
server with the following hostname intranet.yourdomain.com and AXS
Guard authentication can be used to connect to the intranet webserver.
Another host, e.g. owa.yourdomain.com, can be added to connect to your
corporate MS Outlook Web Access server.
A third Reverse Proxy entry can be added for your company website. In
this case you could add www.yourdomain.com as a hostname or you can
choose not to specify a hostname at all.
-
In the first case, all non-matching FQDNs resolving to the Reverse Proxy’s IP are blocked as a security precaution.
-
In the second case, any FQDN which resolves to this IP address provides a connection to the company website.
HTTP and SSL
Introduction
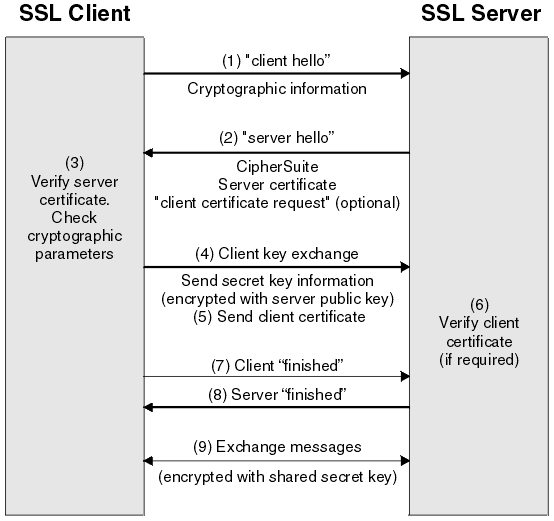
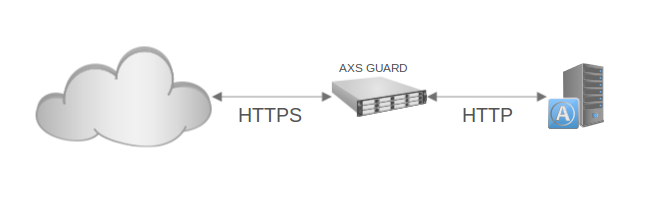
An HTTPS connection is a secured HTTP connection. All data in the connection is encrypted using the Secure Sockets Layer (SSL) protocol (illustrated below). SSL is based on the public/private key (PKI) encryption model. The public key is published via a digital certificate stored on the secure web server.
SSL Offloading
SSL offloading relieves an application server of the processing burden of encrypting and/or decrypting traffic sent via SSL, the security protocol that is implemented in every Web browser. The processing can be offloaded to the AXS Guard, which is designed to perform SSL termination.
Enabling HTTPS for external connections is therefore strongly encouraged, as all data travels over the insecure Internet. SSL can be enabled separately for each reverse proxy entry.
The AXS Guard is capable of generating and signing certificates and
supports the integration of trusted (CA) SSL certificates. The latter
are imported via the AXS Guard web-based administrator tool. Note that
only PKCS#12 and PEM certificates are supported. See the PKI manual
for more information about managing certificates on the AXS Guard
appliance.
SSL for Internal Connections
Using HTTPS for communications between the AXS Guard Reverse Proxy and the application server(s) in the secure LAN is not recommended, as this produces encryption overhead. However, some applications only support HTTPS. For these servers it is more convenient to allow HTTPS, rather than modifying their configuration.
Important
You must use a secure connection towards the AXS Guard if the application only supports TLS or SSL.
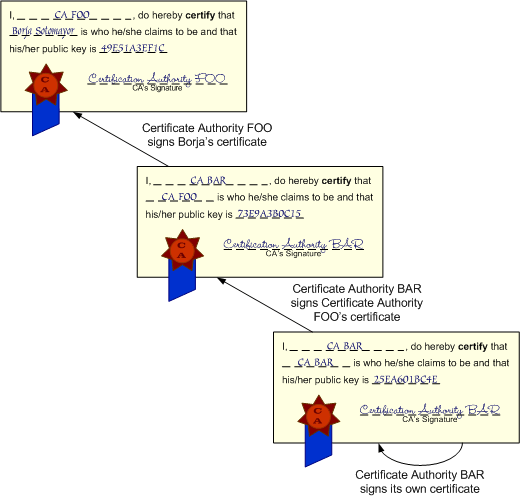
Digital Certificates
A digital certificate is a computer file containing information which uniquely identifies its owner. The information consists of the owner’s public key, the expiration date of the certificate, the name of the Certificate Authority (CA), a unique name (host name), the signature of the CA , and other descriptive data. Certificates are encoded by the CA’s private key and can be verified with the CA’s public key. Any unauthorised changes to the certificate file generate a warning message in the client’s browser.
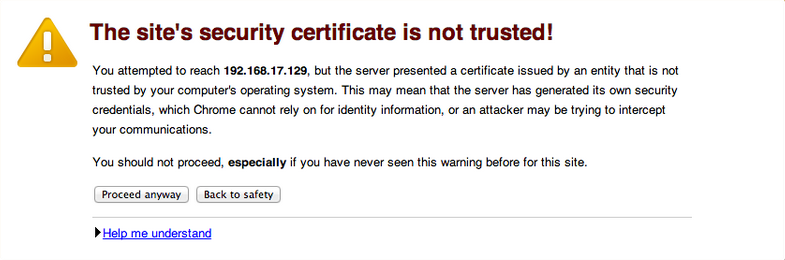
Self-Signed Certificates
A company may choose to create and sign its own certificate. This means the company acts as a CA and signs its own certificate. When you connect to a website with a self-signed certificate, a warning message similar to the image below appears.
Certificates Signed by a Trusted CA
Rather than signing their own certificate, companies may choose to purchase a certificate from a trusted known CA. A trusted CA is an independent network entity, responsible for the issuance and management of digital certificates. When you connect to a website that has a certificate signed by a trusted CA, your browser will not generate a warning message.
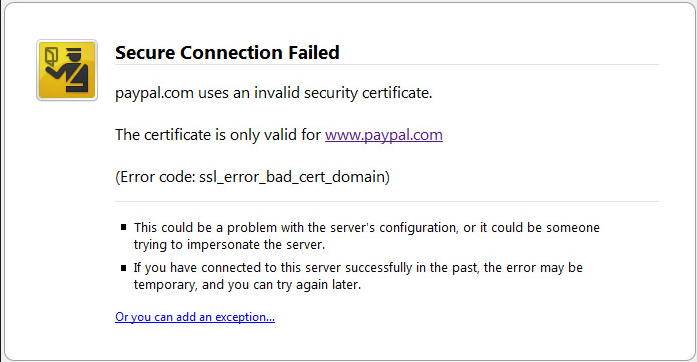
Domain Name Mismatch
The warning message Domain Name Mismatch occurs when the FQDN entered in the browser’s URL field does not match the host name used in the server certificate. This is to inform users that the contacted site may not be the actual intended site (man-in-the-middle attack).
The same message appears when a site changes its name (FQDN) without
purchasing a new certificate that includes the changed name or when
entering the server’s public IP address in the browser’s URL field, e.g.
https://127.0.0.1, rather than the FQDN.
Important
If you change the Certificate Connection Name in an existing Reverse Proxy entry, you must use a new certificate with the correct host name.
Authentication
Overview of Supported Methods
Credential replacement Session management Basic authentication Form-based authentication Push notifications
The AXS Guard appliance offers a variety of authentication methods. Once a method has been selected, it applies to all reverse proxy entries. Detailed information about AXS Guard authentication methods is available in the AXS Guard Authentication How To, which is accessible via the Documentation button.
The following authentication methods are supported by the AXS Guard reverse proxy:
-
DIGIPASS and OATH tokens, which generate secure, one-time passwords.
-
Cronto Mobile App with push notifications.
-
Directory Service password (LDAP authentication).
-
RADIUS authentication.
-
Password authentication.
-
Combinations of the methods above.
The following authentication types are supported by the reverse proxy:
-
No authentication: In this case, the AXS Guard reverse proxy only filters incoming requests and ensures that these are RFC-compliant; authentication is provided by the application server if available.
-
Basic authentication: An authentication popup is presented to the user. The AXS Guard response includes a
WWW-Authenticateheader, indicating it expects basic authentication. DIGIPASS authentication is strongly recommended with basic authentication, as the password is sent over the wire in Base64 encoding, which can easily be converted to plain text. -
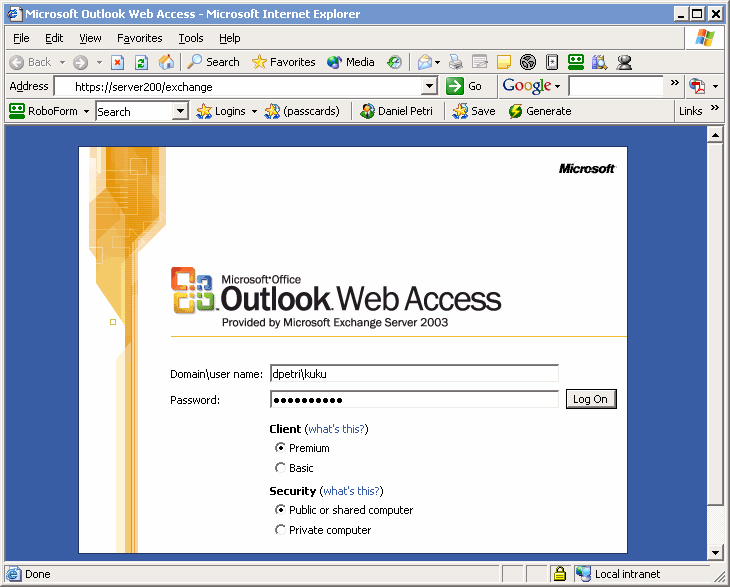
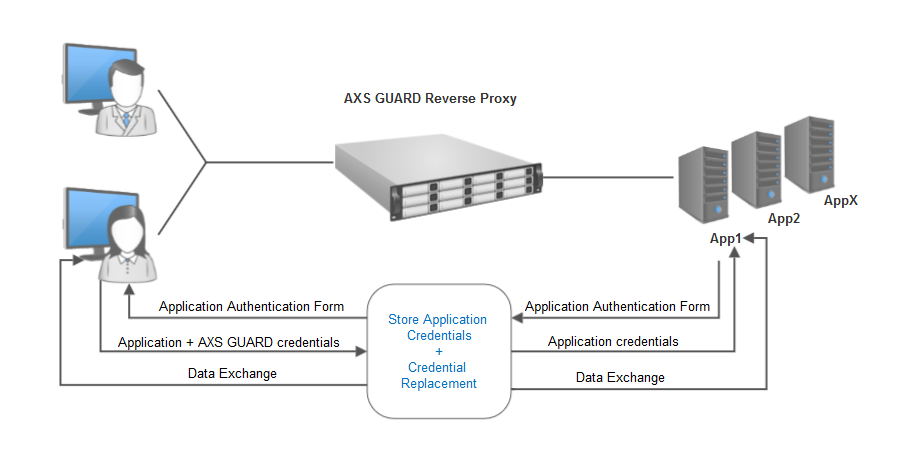
Credential replacement: This type of authentication requires form-based authentication on the application server. The AXS Guard reverse proxy retrieves the application server’s login page, e.g. the Outlook Web Access login page, and presents it to the client. The client logs in using an AXS Guard password, e.g. a one-time password generated by a DIGIPASS token, which is intercepted and replaced with the user’s application credentials. The application password is securely stored in the user’s AXS Guard profile manually or via password auto-learning. This method allows you to enforce strong authentication for your applications while providing a single sign-on experience to the user.
-
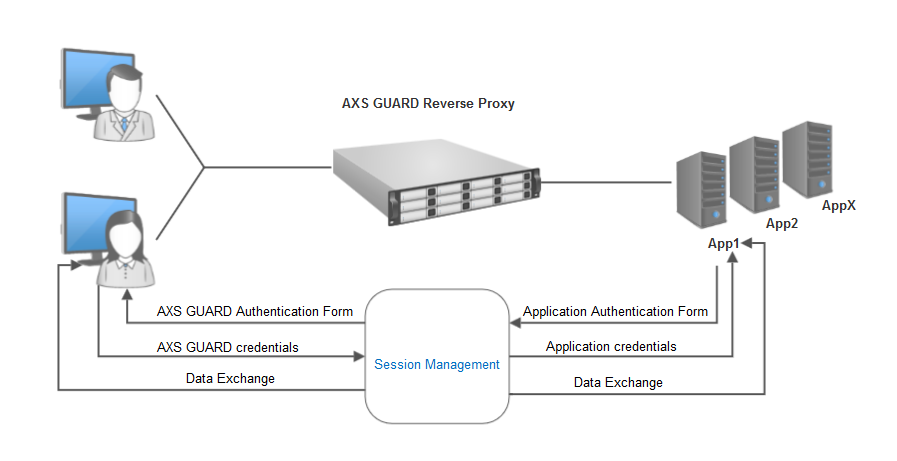
Session management: Users are invited to log in via the configured AXS Guard login page. If the login is successful, a session cookie will be created and the user will be redirected to the configured application. This method allows you to enforce strong authentication while providing a single sign-on experience to the user.
-
Session management with credential replacement: Combines the features of credential replacement with session management, i.e. provides a single sign-on experience with a custom login page.
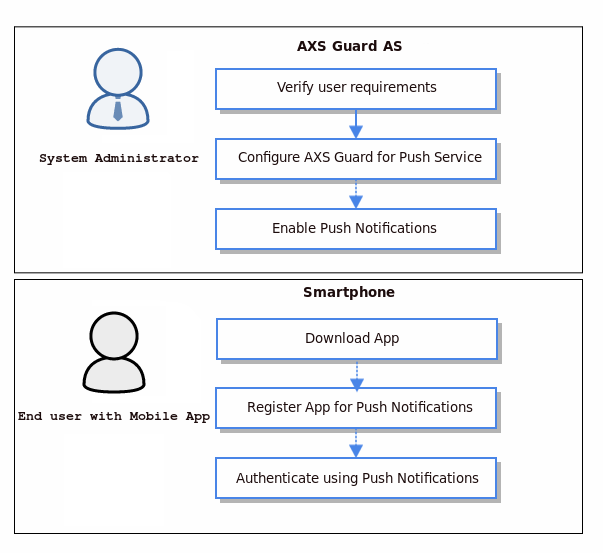
Strong Authentication with Push Notifications
The Cronto Mobile App leverages the widespread adoption of smartphones and provides an easy-to-use, portable transaction authentication solution for web applications.
The user experience is straightforward: users simply have to point their mobile phone camera at the screen, and all transaction details appear on the phone ready for verification.
The Cronto App is customized to for each deployment to meet the client’s branding and other requirements and is delivered to end users via application stores. Contact sales@axsguard.com for additional information.
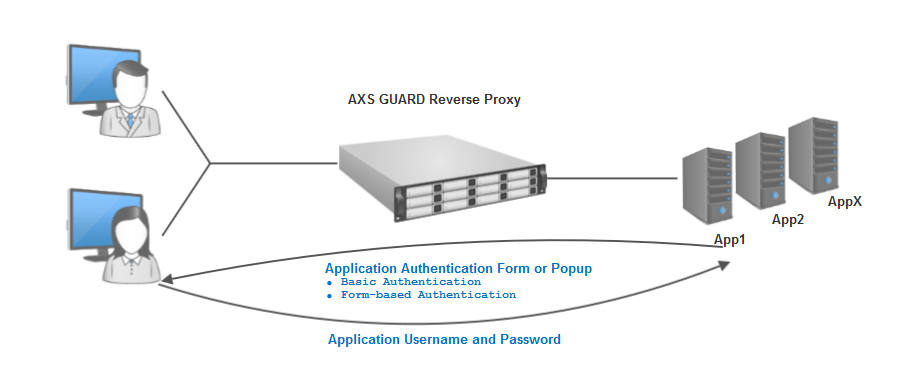
Basic Authentication
Basic authentication is a method which enables users to provide their credentials through a pop-up window:
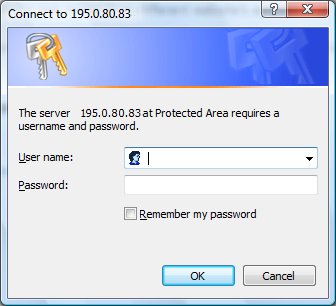
The AXS Guard prompts for user credentials when a web page is requested. No requests are forwarded to the application server as long as the requesting user is not successfully authenticated with the AXS Guard.
Important
2FA is strongly recommended with basic authentication, as passwords are transmitted in Base64 encoding, which can be easily converted to plain text.
Because of its concept and design, basic authentication cannot be implemented simultaneously on the application server and the AXS Guard. For example, enabling basic authentication on a Microsoft Outlook Web Access 2003 server and the AXS Guard is technically impossible. Use credential replacement if authentication is required on the AXS Guard and the application server.
Credential Replacement
Concept and Requirements
Credential replacement Form-based authentication Application server credentials
Credential replacement can only be used if the application server uses form-based authentication, i.e. the user credentials are entered in a form which is incorporated in the web page, rather than a pop-up window.
Form-based authentication
-
Users log in via the login page of the application server, e.g. an Outlook Web Access login screen.
-
User enter their AXS Guard credentials, such as a one-time password generated by a DIGIPASS token.
-
If the authentication is successful, the user’s application credentials - securely stored on the AXS Guard - are forwarded to the application server; the user is automatically and transparently authenticated with the application.
Application Credentials
Credential replacement only works if the user’s application server credentials are known by the AXS Guard. The credentials must be entered and updated via the administrator tool or via the application’s login page if password auto-learning has been enabled on the AXS Guard appliance. Users must be granted access to the administrator tool to enter or update their application credentials, unless password auto-learning has been enabled.
The following application username formats are accepted:
-
Classic usernames, e.g.
Bob,Alice -
Windows login names, e.g.
DOMAIN\user(this format is not supported by RDG servers) -
Internet-style usernames, e.g.
user@domain
Password Auto-learning
The AXS Guard reverse proxy features a password auto-learning option, so that users can provide or update their application server password via the login screen of the application. The AXS Guard safely stores the provided application server password in the user’s AXS Guard profile for future use.
The password auto-learning feature allows you to implement DIGIPASS
authentication; the user authenticates with the AXS Guard using his /
her application password in combination with a one-time password
generated by a DIGIPASS token. The application password and the one-time
password are entered as a single string using a separator string between
both passwords. The password separator string is defined by the system
administrator, e.g. applicationpassword#@#axsguardpassword.
After successful authentication, the one-time password is stripped by the AXS Guard; the remaining part of the entered authentication string (the application password) is saved in the user’s AXS Guard profile for future use and forwarded to the application server.
Important
The application password should always precede the password separator string and the AXS Guard password, otherwise authentication will fail.
-
A user on the Internet enters his application password, a password separator string and a one-time password generated by a DIGIPASS token.
-
The AXS Guard verifies the submitted one-time password.
-
If the one-time password is valid, the application password is saved in the user' AXS Guard profile for future use.
-
The saved application password is forwarded to the application server to authenticate the user.
The next time the user logs in, (s)he will only have to enter a one-time password, as the application password was already provided in a previous session.
Session Management
Session management is an easy solution to secure unprotected websites. It offers the possibility to use a customized login page for your applications and can be used with or without credential replacement. Users will be invited to log in via the configured AXS Guard login page. If login is successful, a session cookie will be created and the user will be redirected to the configured URL or application.
Application-provided Authentication
The following authentication methods are supported:
-
No authentication
-
Basic authentication
-
Form-based authentication
Allowed Combinations
The following authentication combinations are supported by the AXS Guard reverse proxy. Invalid combinations will trigger a validation message.
AXS GUARD / Application |
None |
Basic Authentication |
Form-based Authentication |
None |
Supported |
Supported |
Supported |
Basic Authentication |
Supported |
Not supported |
Supported |
Credential Replacement |
Not supported |
Not supported |
Supported |
Session Management |
Supported |
Supported |
Supported |
Session Management with Credential Replacement |
Not Supported |
Supported |
Supported |
NTLM Suppression
NTLM is suppressed by default by the reverse proxy as it is a connection-oriented protocol which is considered insecure for external authentication. The authentication is associated with the TCP connection, rather than the individual HTTP requests it transports.
Using NTLM authentication over the Internet would jeopardize the security of your application server by allowing authenticated requests from a first client, followed by unauthenticated requests from a second client. This means the application server would wrongfully associate the privileges of the first client with those of the second client.
If you have application servers which are configured for NTLM authentication, we strongly recommended that you reconfigure them to either enforce form-based or basic authentication.
Brute Force Attack Protection
The AXS Guard can be configured to block brute force attempts at the following levels:
-
The user level: consecutive failed logins from the same user are blocked, regardless of the source IP from which a suspected attack originates. Anonymizers are herewith rendered ineffective.
-
The host level: consecutive failed logins from the same source IP are blocked, regardless of the account that is used to launch a suspected attack.
As soon as an attack is detected and a user account is locked, AXS Guard administrators are notified via e-mail. See the Authentication guide for additional information.
Feature Activation
-
Log in to the AXS Guard appliance.
-
Go to System > Feature Activation.
-
Enable the reverse proxy option and update your configuration.

Getting Help
Click on the help button in the top right corner for assistance.
HTTP Servers
Creating Login Pages
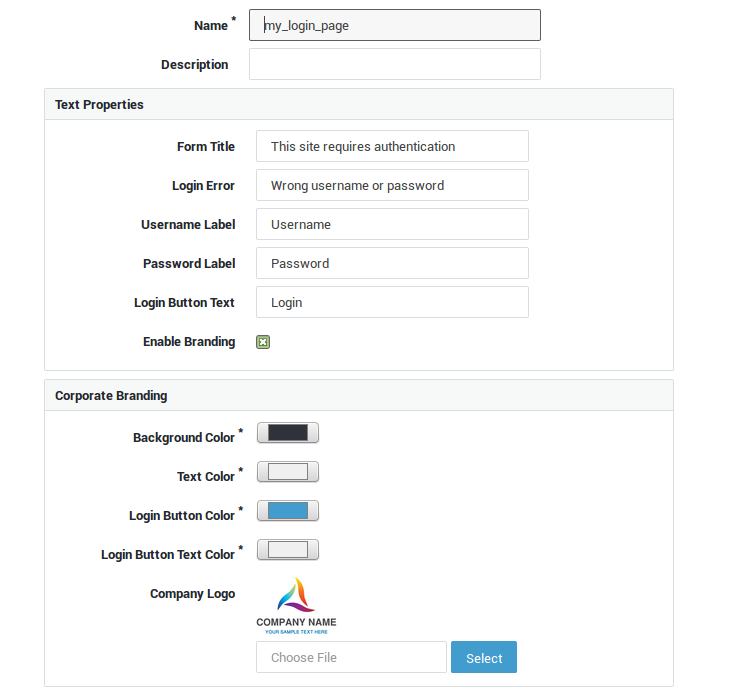
Go to Reverse Proxy > HTTP(S) > Login pages to add custom login pages for applications for which you intend to use session management.
Field |
Description |
|---|---|
Name |
Enter a unique name for your login page. You will be able to select your saved login pages under Reverse Proxy > HTTP(S) > Servers > Name > Authentication for applications which will be using Session Management. |
Description |
Provide a brief description for your login page here (optional). The description will be visible in the Login Page drop-down list. |
Form Title |
The page title is shown at the top of the login page. The default message is "This site requires authorization". |
Login Error |
The error message to be shown when user authentication fails. The default message is "Login failed!". |
Username Label |
The label for the username field in the login page. The default string is "Username". |
Password Label |
The label for the password field in the login page. The default string is "Password". |
Login Button Text |
The text to be shown on the login button. The default text is "Login". |
Enable Branding |
Enable to configure the color scheme and corporate logo of your login page. Additional options will appear. |
Background Color |
Select the background color of the login page. If your are using Internet Explorer, you must enter the HTML color code. Each color code contains the "#" symbol and 6 letters or numbers. Only the hexadecimal format is supported, e.g. #2F323A. |
Text Color |
Select or enter the text color of the login page. If your are using Internet Explorer, you must enter the HTML color code. Each color code contains the "#" symbol and 6 letters or numbers. Only the hexadecimal format is supported, e.g. #2F323A. |
Login Button Color |
Select the color of the login button. If your are using Internet Explorer, you must enter the HTML color code. Each color code contains the "#" symbol and 6 letters or numbers. Only the hexadecimal format is supported, e.g. #2F323A. |
Login Button Text Color |
Select the text color for the login button. If your are using Internet Explorer, you must enter the HTML color code. Each color code contains the "#" symbol and 6 letters or numbers. Only the hexadecimal format is supported, e.g. #2F323A. |
Company Logo |
Upload your company logo. The logo will be shown on the login page. Use one of the following formats: jpeg, gif or png. 5Mb is the maximum allowed file size. |
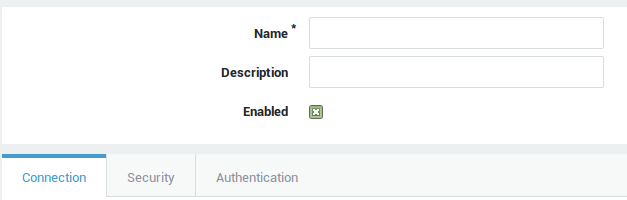
Creating HTTP(S) Entries
-
Go to Reverse Proxy > HTTP(S) > Servers.
-
Click on the
+button. -
Enter the options and parameters as explained in the tables below.
-
Save the entry when finished.
| Option | Description |
|---|---|
Name |
Enter a name for the reverse proxy entry. |
Description |
Add a description for the reverse proxy entry (optional field). |
Enabled |
Check to enable the entry, uncheck to disable the entry. |
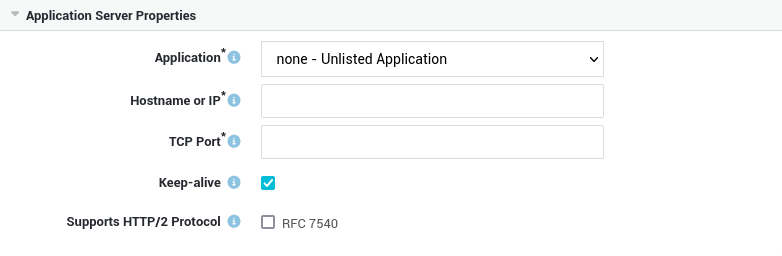
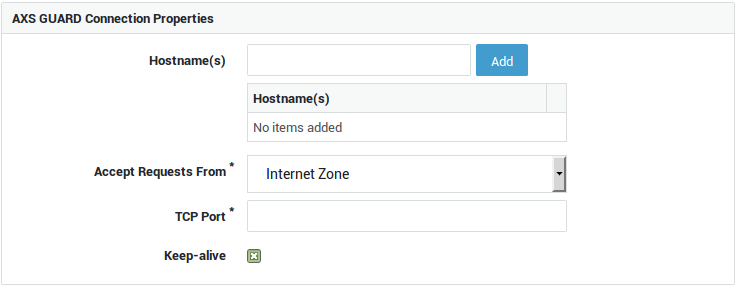
Connection Settings
| Option | Description |
|---|---|
Application |
A set of predefined applications is available to simplify configuration. Appropriate filters are automatically added for each application type, for example the public, exchange and exchweb OWA base paths. Select Unlisted Application to configure your own, custom application server. |
Hostname or IP |
The hostname or IP address of the application server in your network. |
TCP Port |
The TCP port on which the application server is listening. |
Keep-alive |
Check to enable persistent connections between the AXS Guard appliance and the application server. |
Supports HTTP/2 Protocol |
Enables the HTTP/2 protocol for application servers which support it (RFC 7540). HTTP/2 is the evolution of the HTTP application layer protocol and focuses on making more efficient use of network resources. Several tools are available for debugging, testing and using HTTP/2, e.g. curl. |
| Option | Description |
|---|---|
Hostname(s) |
The names entered in this field must match the names you configured in your public DNS record(s). A unique hostname is required for each application server in your network. If left empty, any name which resolves to the public IP of the AXS GUARD will point to the application server specified in the first reverse proxy entry. It is therefore recommended to add a catch-all entry. |
Accept Requests From |
Select the zone. The Custom Zone option allows you to define your own zone. |
Accept Requests on Interface(s) |
Select the appropriate Internet and/or DMZ interfaces. This field only appears if you selected Custom Zone. |
Accept Requests on IP Address(es) |
Enter one or multiple public IP addresses. This allows you to restrict connections to specific IPs, rather than allowing connections to an entire zone. This field only appears if you selected Custom Zone. |
TCP Port |
Enter the external port to be used by Internet clients. |
Keep-alive |
Check to enable persistent connections between the client and the AXS Guard appliance . |

| Option | Description |
|---|---|
Response Timeout |
This field allows system administrators to specify a timeout for reverse proxy requests. 60 seconds is the system default. Change this value if you have an application server which takes an excessive amount of time to answer requests. Lowering the value will allow the reverse proxy to exit gracefully and inform users more quickly that a timeout has occurred. Increase this value if you have an application server which routinely takes a longer time to answer requests. |
Security Settings
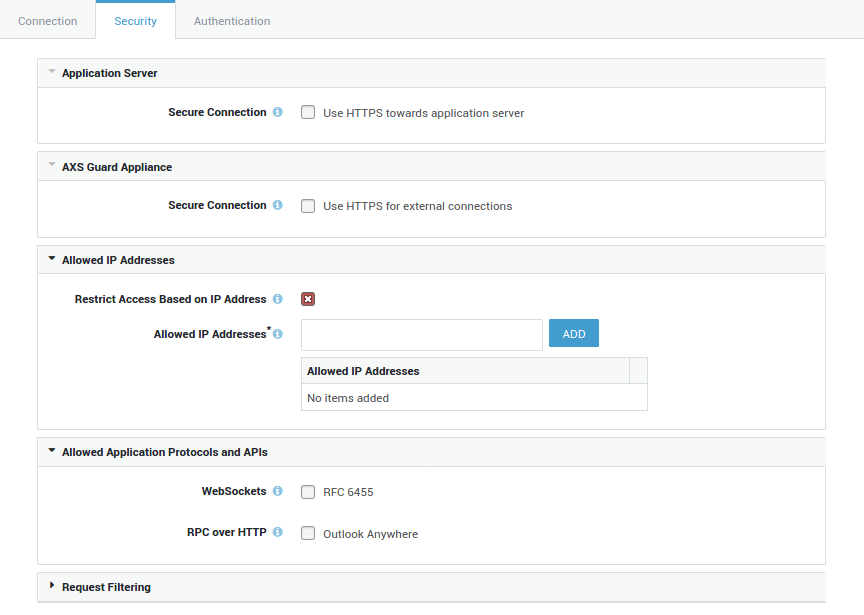
| Option | Description |
|---|---|
Secure Connection |
Select to enable SSL or TLS between the AXS Guard appliance and your application server. |
| Option | Description |
|---|---|
Secure Connection |
Select to enforce SSL or TLS between Internet clients and the AXS Guard appliance. |
Certificate Common Name (CN) |
Enter the name to be used in the SSL certificate. The browser of the client will issue a Domain Name Mismatch warning if the FQDN entered in the URL field does not match the CN of the certificate. You may use an unqualified domain name if the certificate is issued for a server in your system domain, e.g. application. The system domain will automatically be appended to the provided name. The AXS Guard system domain is configured under System > General. Use a fully qualified domain name (FQDN) ending with a period if the certificate is issued for a server in another domain, e.g. |
Certificate |
Select the appropriate certificate from the drop-down list. Go to PKI > Certificates for an overview of configured certificates, to import or to create a new server certificate for your reverse proxy entry. Select |
Current Certificate |
This read-only field shows the details of the configured certificate. |
| Option | Description |
|---|---|
Restrict Access Based on IP Address |
Enable to allow IP address restrictions. To protect system assets, prevent unauthorized access and lower the risk of attacks, it often makes sense to limit user connections to a specific IP address or IP address range. |
Allowed IP Addresses |
Enter the IP ranges or addresses which are allowed to connect. Connections originating from other IP addresses will be denied. Following are examples of valid entries: |
| Option | Description |
|---|---|
WebSockets |
Check to support the WebSocket protocol. WebSocket is a protocol which provides full-duplex communications over a single TCP connection (RFC 6455). |
WebSocket Endpoint(s) |
This option is only visible if the WebSockets option has been enabled. Enter your WebSocket application endpoints, e.g. |
RPC over HTTP |
Enable to support client applications which use RPC over HTTP, such as Outlook Anywhere. |
Option |
Description |
|---|---|
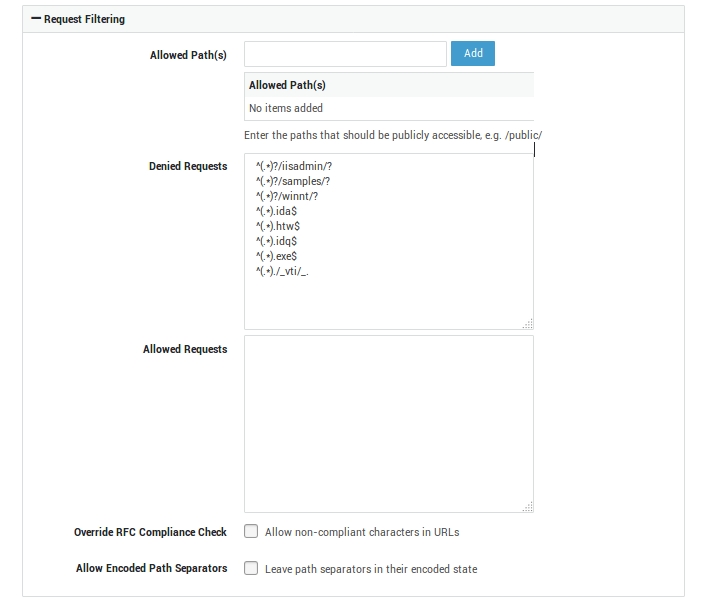
Allowed Path(s) |
One of the security features of the reverse proxy is the possibility to enforce URL restrictions. For example, an application server has various URLs which are accessible from the Internet. Let’s assume the following paths are accessible: |
Denied Requests |
URLs matching the specified patterns or parts thereof, will be blocked. You can use regular expressions to define patterns. See the section about request filtering for additional information. |
Allowed Requests |
URLs matching the specified patterns or parts thereof, will be allowed. Use the same regex syntax as explained in the request filtering section. |
Override RFC Compliance Check |
The reverse proxy is designed to filter potentially dangerous requests which could cripple your application server. One of the actions taken by the AXS GUARD appliance to protect your application servers is to only allow a specific set of characters in browser requests. This character set is defined in RFC 2396. As not all applications and servers follow the RFCs, for example Microsoft’s Outlook Web Access application, this option has been implemented to allow non-compliant characters in URLs. The non-compliant characters are automatically converted to RFC-compliant characters by the reverse proxy. |
Characters Allowed in URLs |
RFC 3986 provides guidelines regarding which characters may be used safely within URLs. Unsafe characters can lead to unexpected behavior. Here you can specify a set of characters that are allowed in URLs, using regular expressions. |
Allow Encoded Path Separators |
The reverse proxy decodes encoded URL characters by default. This may cause some applications, such as SAP business applications, to return unintended responses. Enable this option to allow URLs which contain encoded path separators, e.g. |
Authentication Settings
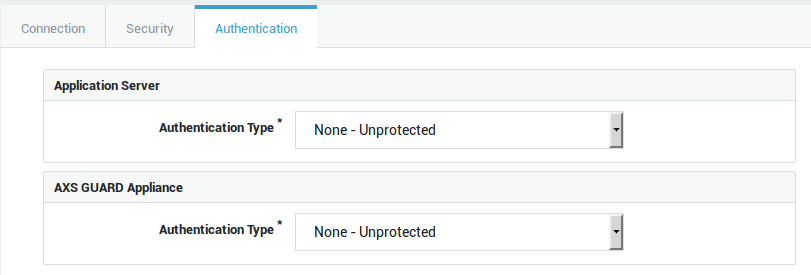
Authentication Type |
Options |
|---|---|
Application Server |
|
AXS GUARD |
|
Field |
Description |
Applies to |
|---|---|---|
Password Auto-learning |
Enable to allow users to enter and update their application password when they log in to the application. The password will be stored in the user’s AXS GUARD profile (under Users & Groups > Users > Username > Reverse Proxy) so that it can be used for future sessions. The application server password has to be entered by users as follows: |
Credential replacement and Session management with credential replacement. |
Auto-learning Split String |
The password separator string to be used for Password Auto-learning. |
Credential replacement and Session management with credential replacement. |
Login Page |
This option is only available for applications that use session management. Select the login page for your application server. Go to Reverse Proxy > HTTP(S) > Login Pages to add and configure your own login pages. |
Session management with or without credential replacement. |
Session Timeout |
The session timeout property specifies the time-out period assigned to the AXS GUARD session. If the user does not refresh or request a page within the time-out period, the session ends. 30 minutes is the system default. |
Session management with or without credential replacement. |
URL Rewriting

| Option | Description |
|---|---|
| Preserve Hostname | When disabled, remote servers are mapped into the space of the AXS Guard reverse proxy server. The reverse proxy does not act as a proxy in the conventional sense, but appears to be a mirror of the remote server. When enabled, the AXS Guard reverse proxy will be instructed to preserve and retain the original Host: header from the client browser when constructing the proxied request to be sent to the target server. Enabling this option is mostly useful in special configurations like proxied mass name-based virtual hosting, where the original Host: header needs to be evaluated by the backend server.This option is enabled by default. |
User Authentication
This authentication policy only applies to HTTP(S) servers; it does not affect RDG and FTP servers.
-
Log in to the appliance.
-
Go to Authentication > Services.
-
Select Reverse Proxy.
-
Select the desired authentication policy.
-
Update your configuration.
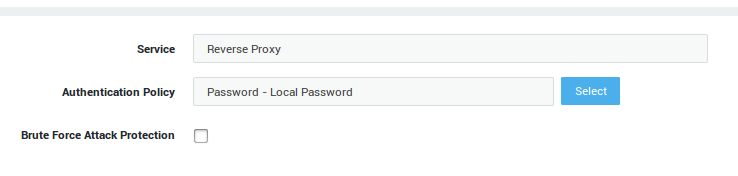
| Field | Description |
|---|---|
Service |
The AXS Guard service to be configured. This field cannot be edited. |
Authentication Policy |
The authentication policy determines how users must authenticate to access the service. Go to Authentication > Advanced > Policy for an overview of policies configured on your system. |
Brute Force Attack Protection |
Enable to protect the selected service against brute force attacks as configured under Authentication > General. |
AXS Guard Service |
Authentication Policy |
|---|---|
Reverse Proxy HTTP |
|
Reverse Proxy RDG |
|
Application Credentials for Credential Replacement
-
Go to Users & Groups > Users.
-
Select the appropriate user in the list.
-
Select the reverse proxy tab to enter the reverse proxy application credentials.
-
Update the user profile.
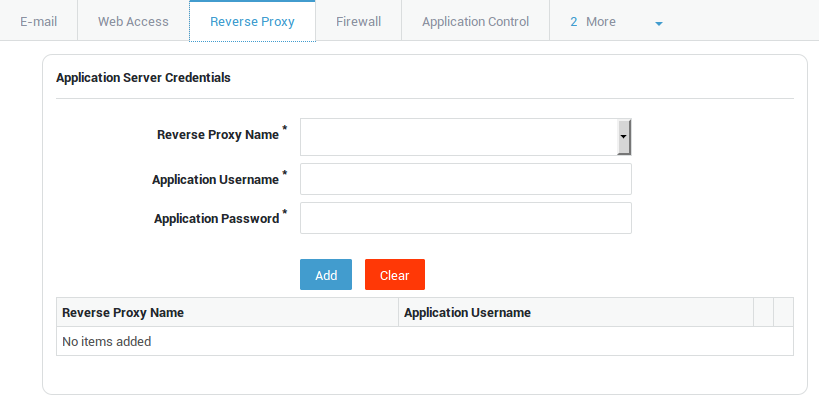
| Field | Description |
|---|---|
Reverse Proxy Name |
Select the appropriate HTTP(S) or RDG reverse proxy entry from the drop-down list. Go to the reverse proxy menu in the left pane to add a new entry or to enable configured reverse proxy entries. |
Application username |
The username as known on the application or RDG server. |
Application password |
The password associated with the specified username. |
Important
- Users can only update their AXS Guard profile if their tool access level is set to
useror above. To verify if a user has access to his / her profile, go to Users & Groups > Users > Username and select the AXS Guard Administration tab. - If password auto-learning is enabled, the application password is automatically added to the user’s AXS Guard profile when users enter it in the password field of the application’s login page.
- Do not use the
DOMAIN\usernameformat, e.g.EXAMPLE\bobfor RDG entries.
Adding Custom Applications
-
Go to Reverse Proxy > HTTP(S) > Applications.
-
Click on the
+icon. -
Configure the application options and save your configuration.
This option is intended for advanced administrators only (also see Custom Applications) and must be specifically enabled under System > Feature Activation > Reverse Proxy.
Accessing the HTTP(S) Logs
-
Log in to the AXS Guard appliance.
-
Go to Reverse Proxy > HTTP(S) Logs.
-
Click on the appropriate reverse proxy entry to view its logs.
-
Select the desired log type (rewrite, error, access).
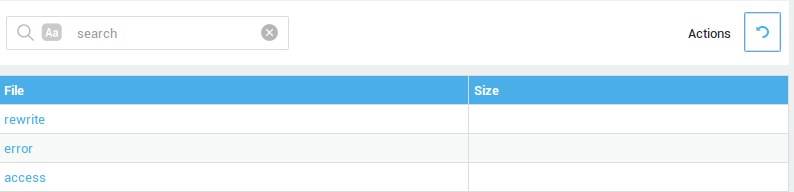
| Log Entry | Description |
|---|---|
Rewrite |
Shows the patterns which have been applied, the URLs which have been rewritten, redirected and/or denied. |
Error |
Shows any errors that occurred during login attempts. |
Access |
Shows details about every connection attempt. |
FTP Servers
Passive and Active FTP
The FTP mode being used is determined by the client. Both modes are supported by AXS Guard, as long as the FTP connection tracker is correctly configured. See Network > NAT > NAT Helpers.
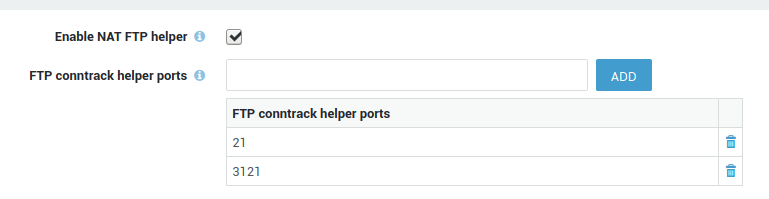
Important
FTP connection tracking does not work with SFTP , as this traffic is encrypted.
Creating FTP Entries
-
Go to Reverse Proxy > FTP > Servers.
-
Click on the
+button. -
Enter the parameters as explained in the tables below.
-
Save the entry.
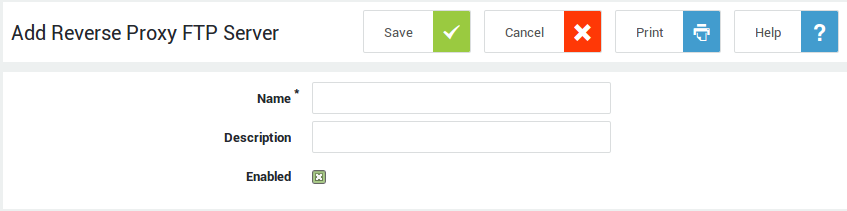
Option |
Description |
|---|---|
Name |
Enter a name for the entry, using lower cases without spaces, starting with an alphabetic character and thereafter any number of alphanumeric characters and/or the special characters: back slash (), hyphen (-), underscore (_), full stop(.), or the "at" symbol (@). |
Description |
A description for the new FTP entry (optional). |
Enabled |
Check to enable the FTP entry. |
Connection Settings
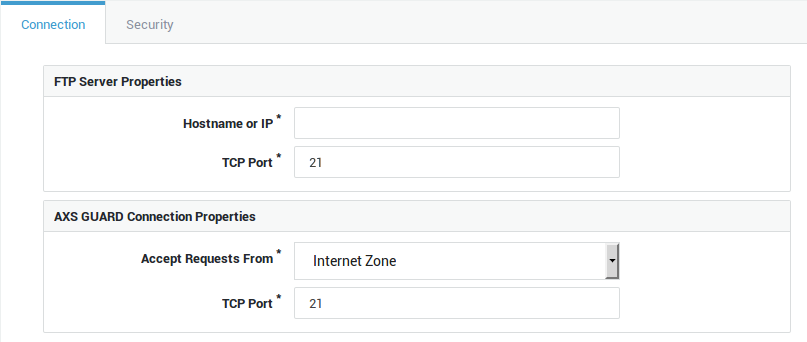
Option |
Description |
|---|---|
Hostname or IP |
Enter the IP address or hostname of the FTP server in your network. |
TCP Port |
The TCP port on which the FTP server is listening. 21 is the system default. |
Option |
Description |
|---|---|
Accept Requests From |
Select the zone. The Custom Zone option allows you to define your own zone. |
Accept Requests on Interface(s) |
Select the appropriate Internet and/or DMZ interfaces. This field only appears if you selected Custom Zone. |
Accept Requests on IP Address(es) |
Enter one or multiple public IP addresses. This allows you to restrict connections to specific IPs, rather than allowing connections to an entire zone. This field only appears if you selected Custom Zone. |
TCP Port |
Enter the external port to be used by Internet clients. 21 is the system default. |
Security Settings

Option |
Description |
|---|---|
Allowed Host(s) |
You can limit FTP access to a single IP or a list of IPs. The IPs must be entered in a comma-separated list without spaces. An asterisk (*) means that requests from any source host are accepted and is the system default configuration. |
Info
Create a firewall policy if you wish to block or allow specific network ranges. You can also create dedicated firewall rules and add them to the stat-int and / or the stat-dmz policy (whichever applies).
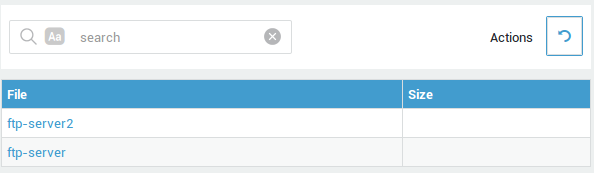
Accessing the FTP Logs
-
Log in to the AXS Guard appliance.
-
Go to Reverse Proxy > FTP > Logs.
-
Click on the appropriate FTP entry to view its logs.
Log file |
Description |
|---|---|
delegate.log |
The log file where everything is logged. |
errors.log |
The log file where errors are logged. |
system_ip:port.ftp.gz |
The log file where all file transfers are logged. |
RDG Servers
About RDG
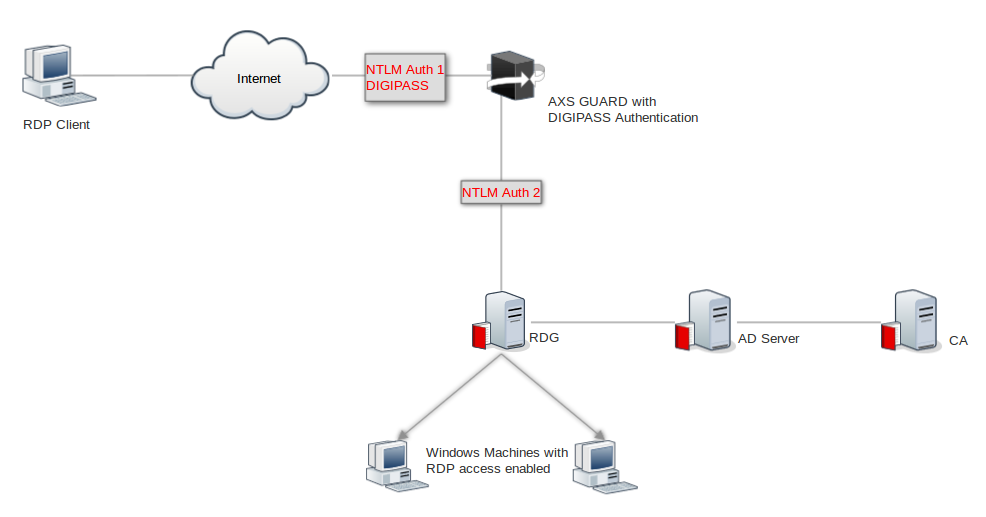
A Remote Desktop Gateway (RD Gateway) server is a type of gateway that enables authorized users to connect to remote computers on a corporate network from any computer with an Internet connection. RD Gateway uses the Remote Desktop Protocol (RDP) along with the HTTPS protocol.
In earlier versions of Remote Desktop Connection, people couldn’t connect to remote computers across firewalls and network address translators because port 3389 - the port used for Remote Desktop connections - is typically blocked to enhance network security. However, an RD Gateway typically uses TCP port 443, which transmits data through a Secure Sockets Layer (SSL) tunnel.
The AXS Guard appliance allows you to implement strong authentication for Remote Desktop Connections passing through a Remote Desktop Gateway.
See RDG Configuration Example for a step-by-step configuration example. For other RDG setups, check the knowledge base on this site.
Creating RDG Entries
Name & Description
-
Go to Reverse Proxy > RDG > Servers.
-
Click on the
+button. -
Enter the parameters as explained in the tables below.
-
Save the entry.

Option |
Description |
|---|---|
Name |
Enter a name for the RDG entry, using lower cases without spaces, starting with an alphabetic character and thereafter any number of alphanumeric characters and/or the following allowed special characters: back slash (\), hyphen (-), underscore (_), full stop(.) or the "at" sign (@). |
Description |
A description for the RDG entry (optional). |
Enabled |
Check to enable the RDG entry. Uncheck to disable the RDG entry, e.g. when troubleshooting. |
Connection & Security Settings
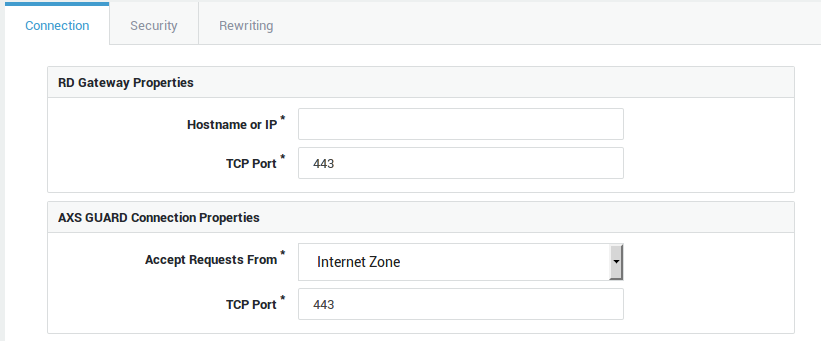
Option |
Description |
|---|---|
Hostname or IP |
The FQDN or IP address of the RD Gateway in your network. |
TCP Port |
The TCP port on which the RD Gateway is listening. 443 is the system default. |
Option |
Description |
|---|---|
Accept Requests From |
Select the zone. The Custom Zone option allows you to define your own zone. |
Accept Requests on Interface(s) |
Select the appropriate Internet and/or DMZ interfaces. This field only appears if you selected Custom Zone. |
Accept Requests on IP Address(es) |
Enter one or multiple public IP addresses. This allows you to restrict connections to specific IPs, rather than allowing connections to an entire zone. This field only appears if you selected Custom Zone. |
TCP Port |
Enter the TCP port to be used by Internet clients. 443 is the default port for RD Gateway connections. |

| Option | Description |
|---|---|
Secure Connection |
This option cannot be disabled as SSL is the default configuration for RD Gateways. |
| Option | Description |
|---|---|
Secure Connection |
This option cannot be disabled as SSL is the default configuration for RD Gateways. |
Certificate Common Name (CN) |
Enter the name to be used in the SSL certificate. Clients will issue a connection warning or show an error if the public hostname of the RD Gateway does not match the CN of the certificate. You may use an unqualified domain name if the certificate is issued for a server in your system domain, e.g. |
Certificate |
Select the appropriate certificate from the drop-down list. Go to PKI > Certificates for an overview of configured certificates, to import or to create a new server certificate for your reverse proxy entry. Select |
Current Certificate |
This read-only field shows the details of the configured certificate. |
Re-sign Remote Apps |
Enable this option if the RD Gateway and the AXS GUARD reverse proxy certificates differ. Remote applications are signed by the RD Gateway server certificate to ensure authenticity. By enabling this option, the signature of the remote application is verified and re-signed using the reverse proxy certificate. This option is enabled by default. |
User Authentication
Option |
Description |
|---|---|
Authentication type |
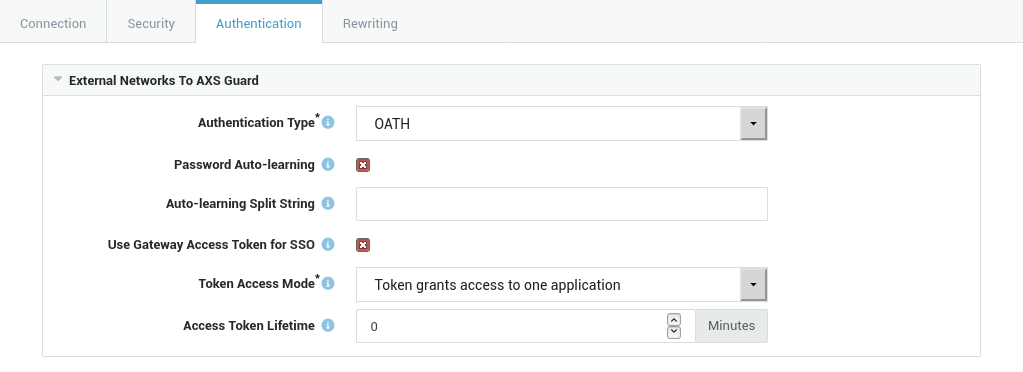
Every RDG connection to the reverse proxy must be authorized. The authentication is intercepted and verified by the AXS Guard appliance. Afterwards, the user’s back-end credentials, configured in Users & Groups ▸ Users, are forwarded to the Remote Desktop Gateway in the secure LAN. Choose the appropriate autentication type from the list. OATH authentication is the default selection. |
Password Auto-learning |
Enable to allow users to enter and update their application password when they log in to the application. The password will be stored in the user’s AXS Guard profile (under Users & Groups ▸ Users ▸ Username ▸ Reverse Proxy) so that it can be used for future sessions. The application server password has to be entered by users as follows: If the option is disabled, users must enter their application server credentials (under Users & Groups ▸ Users ▸ Username ▸ Reverse Proxy) by logging in to the AXS Guard web-based administrator tool. Note that users must be granted access to the tool to perform this action. |
Auto-learning Split String |
The password separator string to be used for Password Auto-learning. The system default is no separator. |
Use Gateway Access Token for SSO |
Check this option to enable an alternative method for authenticating and authorizing the RD Gateway connection using the Pluggable Authentication & Authorization Cookie. The gateway access token provides a Single Sign-on mechanism for RDP applications at the gateway level. This option requires the use of the AXS Guard RDP client add-on and Password Auto-learning to be enabled. |
Token Access Mode |
Select the appropriate mode of operation for the RDP Gateway Access Token:
|
Access Token Lifetime |
Specify a timeout for authenticated sessions. The default value is 0 minutes, which disables the token lifetime and means that authenticated sessions never expire. |
AXS Guard Service |
Authentication Policy |
|---|---|
Reverse Proxy HTTP |
|
Reverse Proxy RDG |
|
Back-end Credentials
-
Go to Users & Groups > Users.
-
Select the appropriate user in the list.
-
Select the reverse proxy tab to enter the reverse proxy application credentials.
-
Update the user profile.
| Field | Description |
|---|---|
Reverse Proxy Name |
Select the appropriate HTTP(S) or RDG reverse proxy entry from the drop-down list. Go to the reverse proxy menu in the left pane to add a new entry or to enable configured reverse proxy entries. |
Application username |
The username as known on the application or RDG server. |
Application password |
The password associated with the specified username. |
Important
- Users can only update their AXS Guard profile if their tool access level is set to
useror above. To verify if a user has access to his / her profile, go to Users & Groups > Users > Username and select the AXS Guard Administration tab. - If password auto-learning is enabled, the application password is automatically added to the user’s AXS Guard profile when users enter it in the password field of the application’s login page.
- Do not use the
DOMAIN\usernameformat, e.g.EXAMPLE\bobfor RDG entries.
Rewriting Options
Option |
Description |
|---|---|
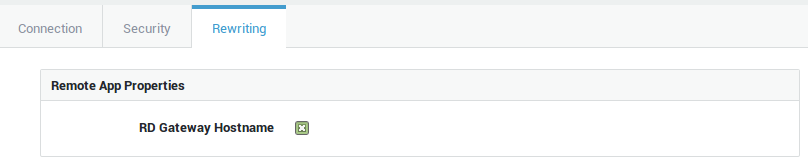
RD Gateway Hostname |
Enable this option if the RD Gateway and the AXS GUARD reverse proxy certificates differ. If enabled, the value of the |
Accessing the RDG Logs
-
Log in to AXS Guard appliance.
-
Go to Reverse Proxy > RDG > Logs.
-
Click on the appropriate RDG entry to view its logs.
Log file |
Description |
|---|---|
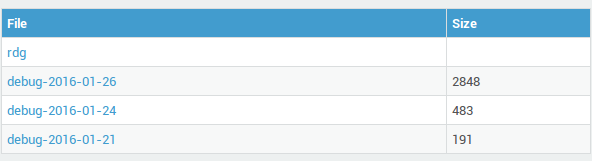
debug-YYYY-MM-DD |
Provides information about the RDG reverse proxy server process which controls all RDG entries. |
debug (within RDG entry) |
Is only available if debug logging has been enabled in the RDG profile and only shows information about a specific RDG profile. |
access |
Log files organized per date. Shows all RDG authentication requests. |
HTTP Configuration Examples
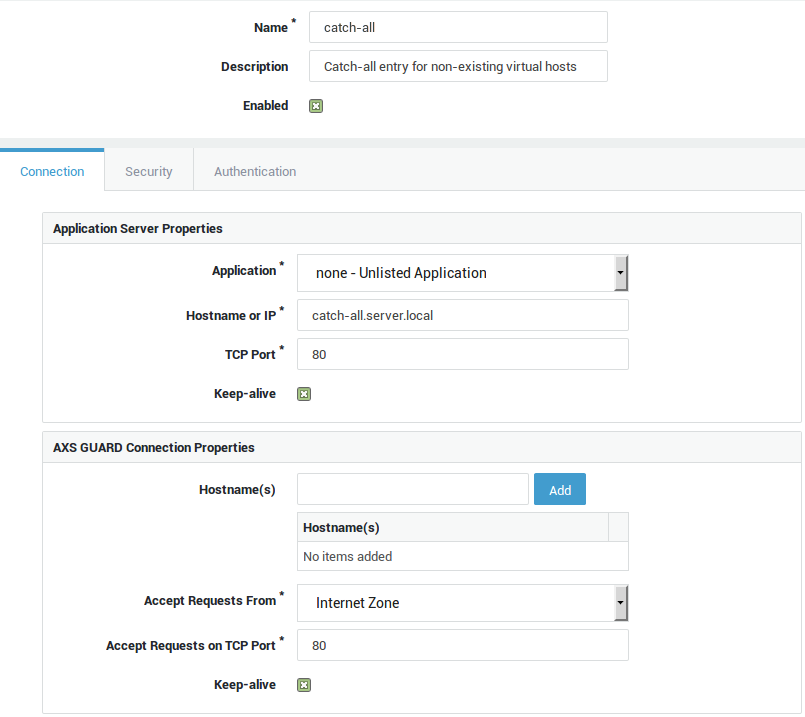
Catch-All Entry for Unmatched Virtual Hosts
-
Go to Reverse Proxy > HTTP(S) > Servers
-
Add a new entry with the following settings:
-
AXS GUARD Hostname: leave empty
-
Hostname or IP of application server: the IP or name of a server in your LAN which serves a "Domain does not exist" page
-
Application: None, unlisted
-
Other settings: use defaults
-
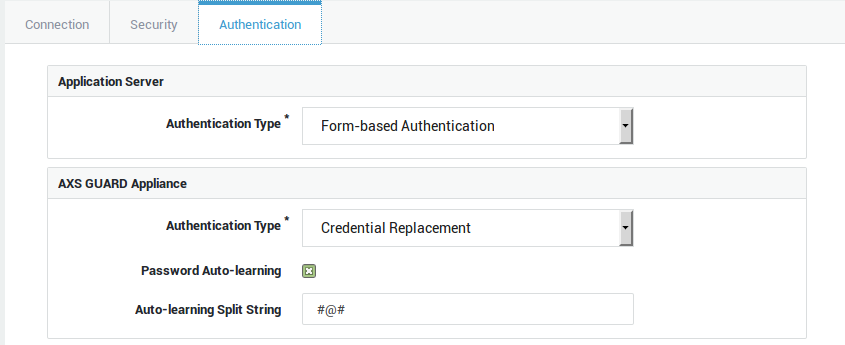
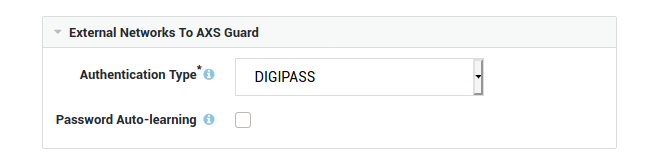
Microsoft OWA 2016 with Credential Replacement and Password Auto-learning
-
Go to Reverse Proxy > HTTP(S) > Servers
-
Add a new entry with the following settings:
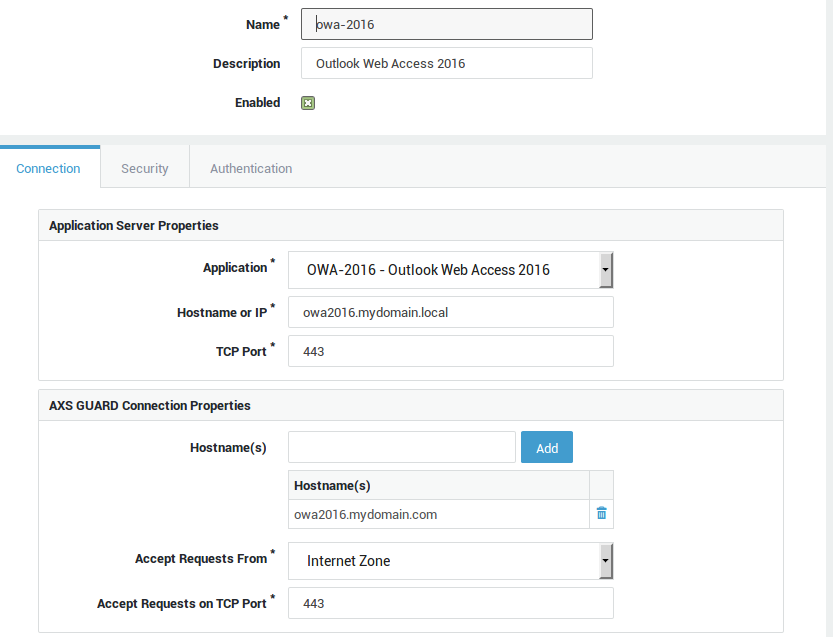
-
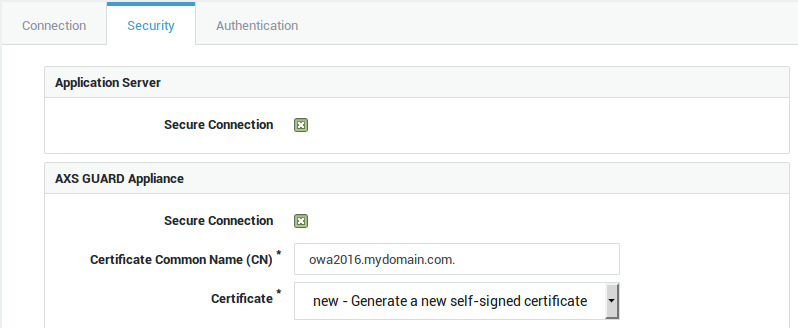
Select the security tab and configure the settings as shown below:
Important
Notice the period after the CN.
-
Select the authentication tab and configure the settings as shown below:
-
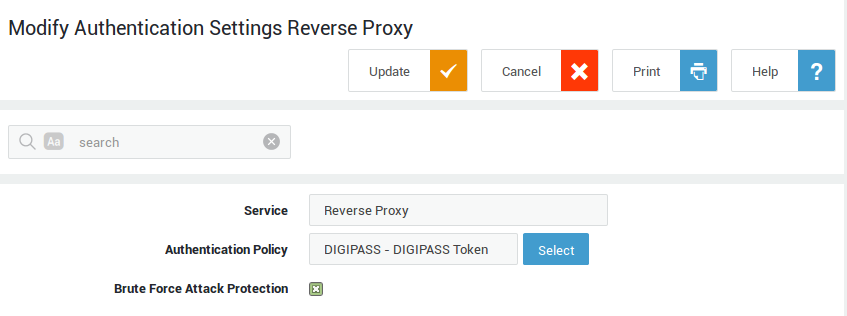
Go to Authentication > Services and configure the authentication policy and brute force protection options for the reverse proxy service.
RDG Configuration Example
Overview
In this section, we explain how to configure DIGIPASS authentication on the AXS Guard in order to securely access an RDP-enabled host from the Internet.
We will be using self-signed certificates on the AXS Guard appliance and the RDG server in this example. Note that self-signed certificates must be added to the client’s trusted root certificates for the RDP connection to succeed. This step is not required when using certificates that have been signed by a trusted root CA.
-
Internet domain:
vascotest1.com -
Internal domain:
vascotest1.local -
AXS Guard internal hostname:
rdg.vascotest1.local -
RDG server hostname:
srv-dc.vascotest1.local -
Target RDP host:
winclient3.vascotest1.local
Required Server Roles and Features
The following roles and features must be installed and properly configured on your Windows server:
-
Active Directory
-
Certificate Authority
-
DNS Server
-
RPC over HTTP
-
Remote Desktop Services (RDG)
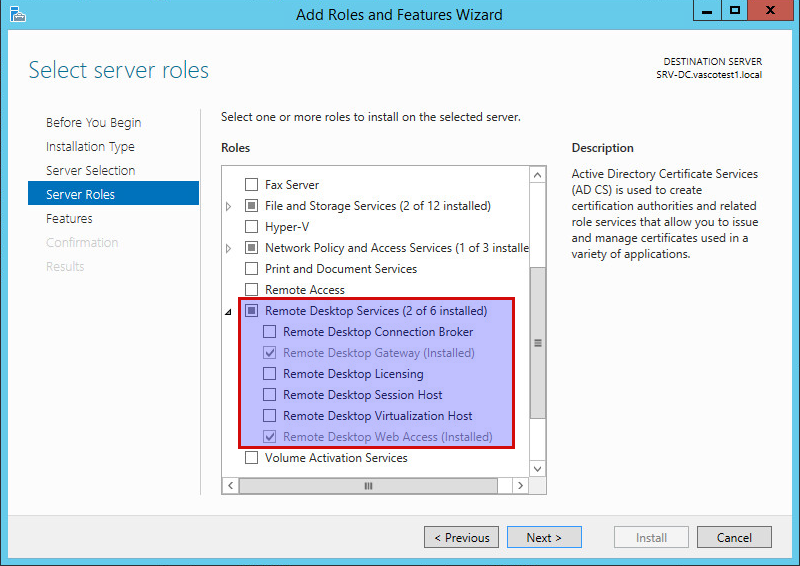
Info
In production environments, the roles and features mentioned above will most likely be installed on separate machines for security reasons.
Creating a Certificate for the RDG Reverse Proxy
-
Start the mmc console on the Windows CA, e.g. by starting the Windows PowerShell and typing
mmc. -
Select file > Add/Remove Snap-in.
-
Select Internet Information Services in the left pane.
-
Click on Add and then on OK.
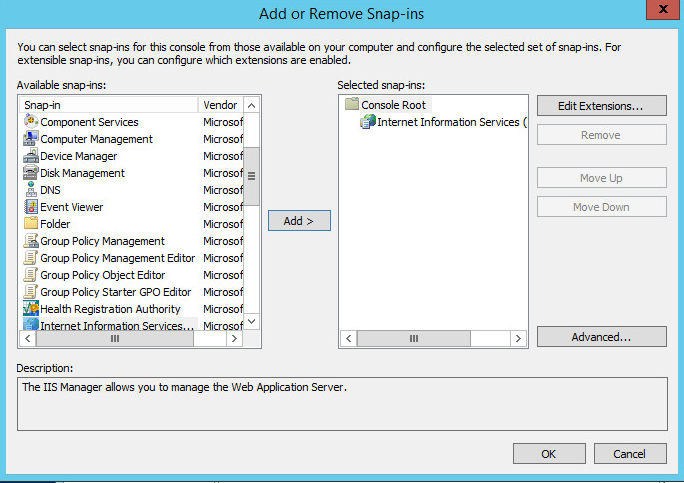
-
Under Console Root, select Internet Information Services.
-
Select the server name under Start Page.
-
Double-click on Server Certificates.
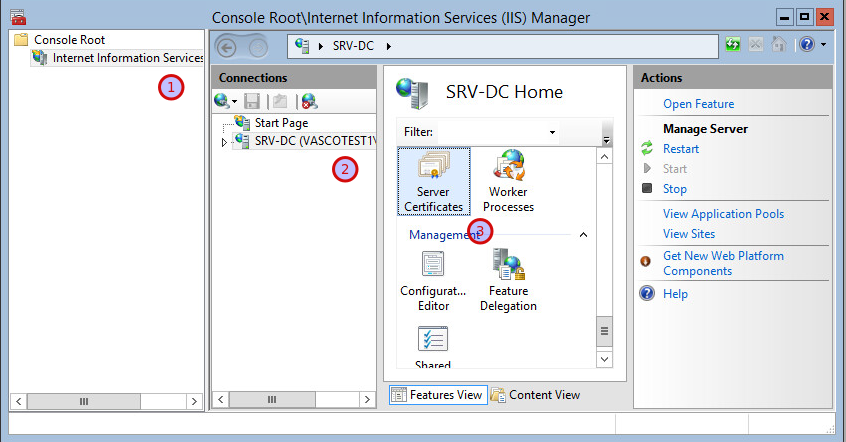
-
Create a self-signed certificate.
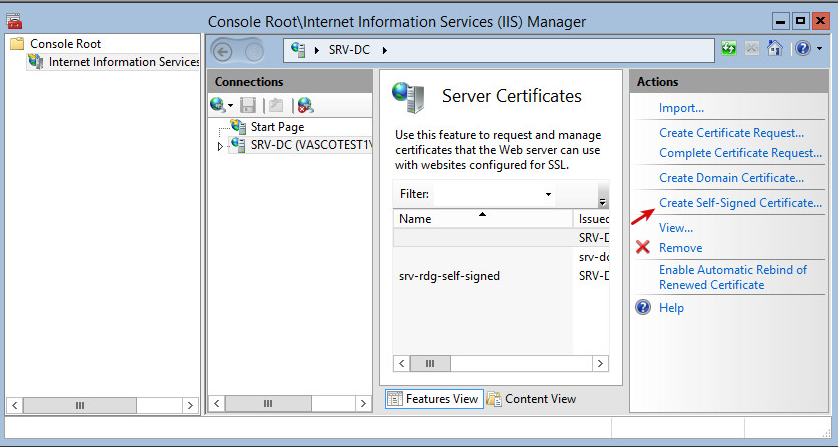
-
Export the self-signed certificate to a location where you can easily find it. This certificate will be used to secure connections between the Internet client and the AXS Guard appliance.
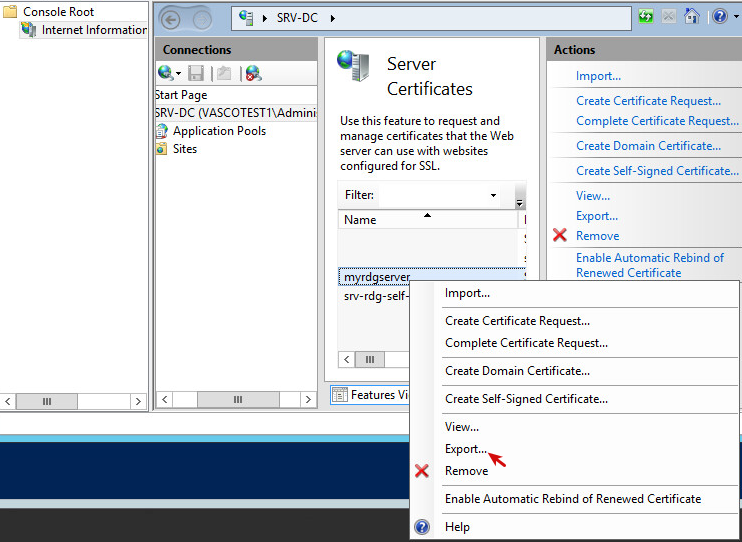
-
Convert the self-signed certificate to a PEM or PKCS12 format in order to import it on the AXS Guard appliance, e.g. with openssl:
openssl pkcs12 -in certificate.pfx -out certificate.pem -nodes
On the AXS Guard Appliance
Go to PKI > Certificates to generate or import a self-signed certificate for the reverse proxy or create a certificate directly in the RDG reverse proxy configuration screen. See the PKI How To for detailed information about the use and configuration of the AXS Guard PKI. This document can be downloaded by clicking on the Documentation button in the AXS Guard administrator tool.
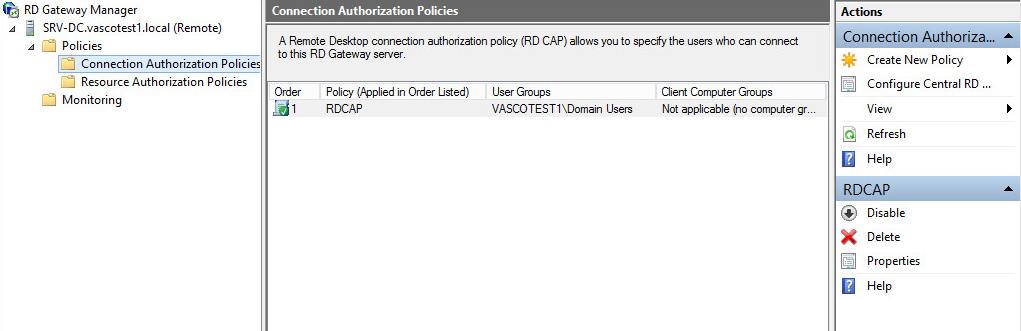
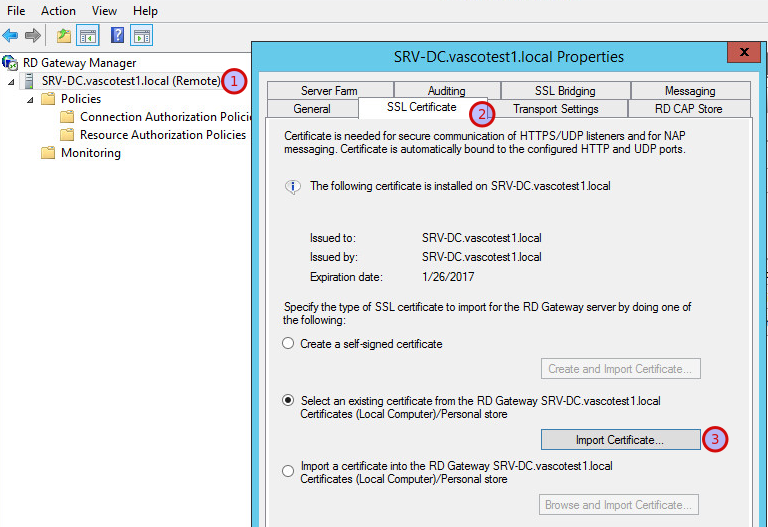
Configuring the Remote Desktop Gateway
-
Open the RD Gateway Manager console on your Windows server.
-
Add a Connection Authorization Policy (RDCAP) and Resource Authorization Policy (RDRAP).
-
Configure the server certificate of the Windows RDG server. This certificate will be used to secure connections between the AXS Guard appliance and the Windows RDG server.
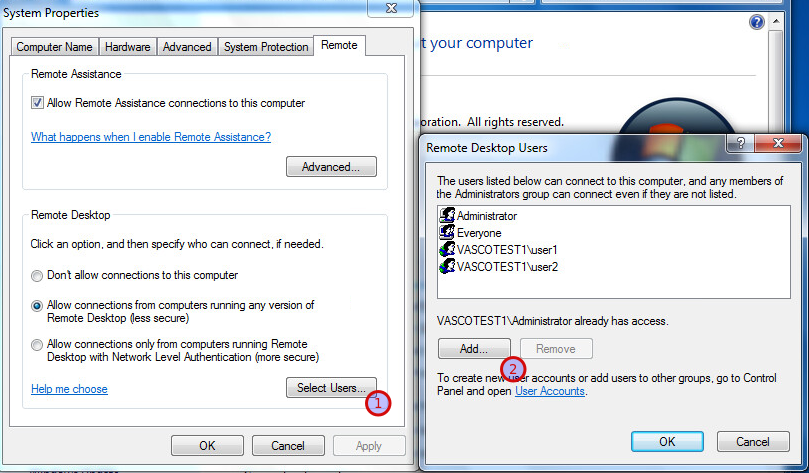
Selecting Remote Desktop Users
-
Log in the the remote desktop server as an administrator.
-
Open the control panel and go to system and security > System.
-
Click on remote settings.
-
Click on
Select Users. -
Add the users who can connect to the computer and press OK.
Creating the RDG Reverse Proxy Entry
In this example, we assume that the AXS Guard PKI has already been initialized. For more information about the AXS Guard PKI, see the AXS Guard PKI How To, which can be downloaded by clicking on the Documentation button in the configuration tool.
-
Log in to the AXS Guard appliance.
-
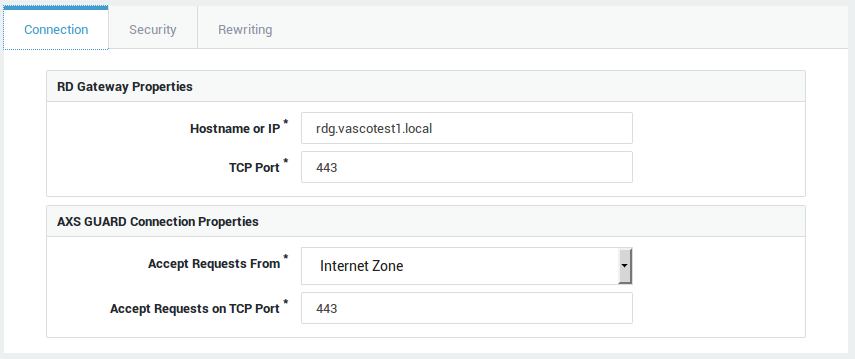
Go to Reverse Proxy > RDG > Servers and add a new entry.
-
Enter a name and description for the new entry. Make sure the entry is enabled.
-
Configure the settings.
-
Select
Generate a new self-signed certificate. This certificate will be used to secure the connections between the clients and the AXS Guard reverse proxy server. -
Enable the
Re-sign Remote Appsoption, since the certificates used by the RDG reverse proxy and the RDG server differ.Info
Alternatively, you can import a self-signed certificate generated on your Windows server. Note that this certificate must be converted to a PEM or PKCS12 format before it can be imported on the AXS Guard appliance under PKI > Certificates.
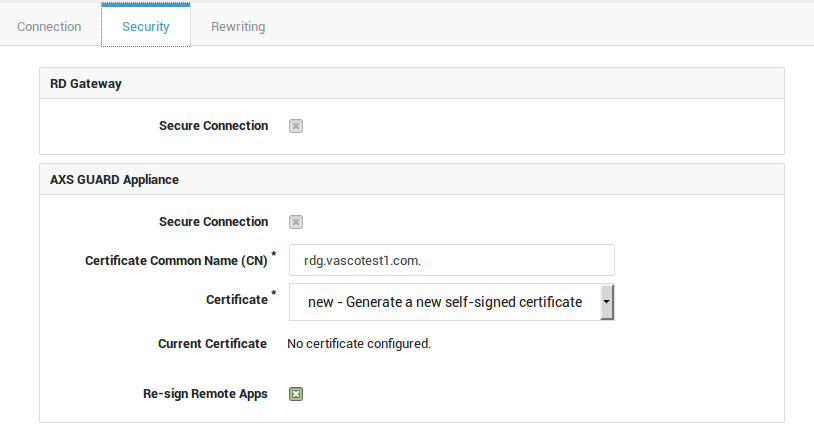
Info
Notice the period after the CN.
-
Enable the
RD Gateway Hostnameoption to rewrite thegatewayhostnameparameter in downloaded RDP configuration files so that it matches the Certificate Connection Name of the RDG reverse proxy certificate.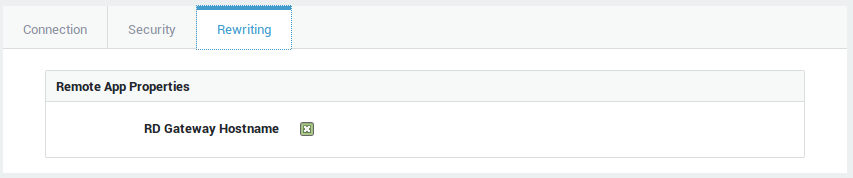
-
Select the appropriate authentication type and save your configuration.
Configure the Reverse Proxy Back-end Credentials and DIGIPASS
-
Go to Users & Groups > Users.
-
Select a user who can connect to the RDP server.
-
Select the reverse proxy tab in the user’s profile.
-
Select the appropriate reverse proxy name.
-
Configure the application credentials.
-
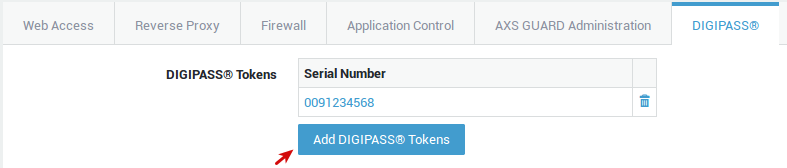
Select the DIGIPASS tab.
-
Assign a DIGIPASS token to the user (if one has not yet been assigned).
-
Update the user profile.
-
Repeat the same steps to grant access to other users.
RDP Client Configuration
Important
This step is not required if you are using certificates that have been signed by a commercial CA.
-
Log in to the RDP client as an administrator.
-
Start a browser and log in to the AXS Guard appliance.
-
Go to PKI > Certificates.
-
Export the certificate used by the reverse proxy (RDG entry) to a convenient location.
-
Add the exported certificate to the client’s trusted root certificates by double-clicking on the certificate file.
-
Select
Place all certificates in the following storewhen prompted. -
Select the
Trusted Root Certification Authoritiescontainer and click OK. -
Complete the wizard and answer
Yesto import the self-signed certificate.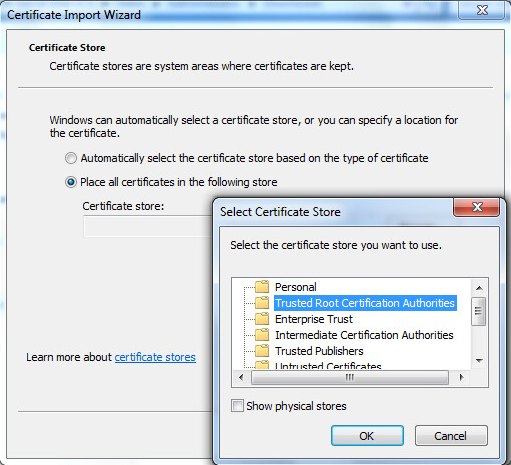
Testing the RDP Connection
-
Log in to the RDP client as a regular user.
-
Create a remote desktop connection.
-
Enter the name of the remote computer (RDP server) in the general tab. This name must be resolvable by the Windows RDG server. Make sure the adequate A records have been added to your DNS server.
-
Enter the username using the
DOMAIN\usernameformat, e.g.VASCOTEST1\user1.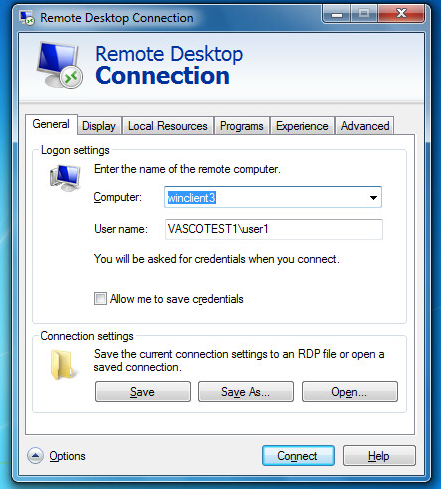
-
Select the advanced tab and click on settings.
-
Select
Use these RD Gateway server settings. -
Change the internal (local) server name to the external server name (this is the name with the
vascotest1.comdomain in this example) of the AXS Guard appliance. -
Select
Allow me to select lateras the logon method and click on OK.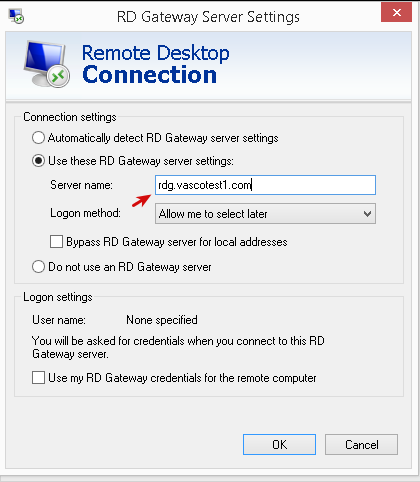
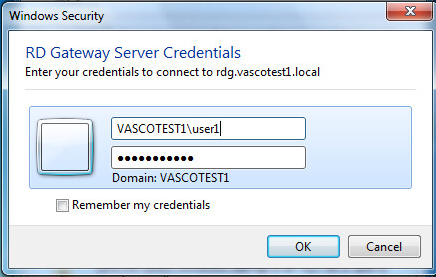
-
Click on the
connectbutton. -
Enter the RDG username using the
DOMAIN\usernameformat, e.g.VASCOTEST1\user1(RDG account). -
Enter the server PIN followed by the DIGIPASS one-time password.
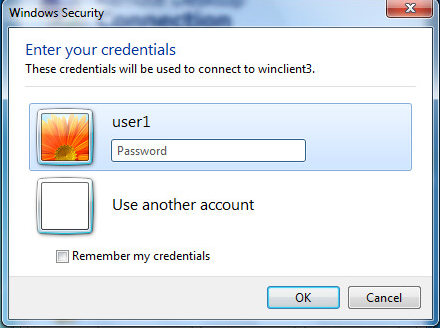
-
Click on OK
-
Enter the RDP password when prompted and press OK (RDP account).
Troubleshooting
I don’t have access to the Reverse Proxy menu in the Administrator Tool
Any newly purchased software needs to be activated (System > Feature Activation > Reverse Proxy)
I cannot authenticate with the Reverse Proxy
Try authenticating directly on the internal server using its internal IP address and port number to rule out configuration problems.
One user cannot authenticate with the Reverse Proxy
-
If credential replacement is used, verify the user’s application credentials.
-
Try authenticating directly on the application server using the internal IP address and port number to rule out configuration problems.
-
Ensure the user account is not locked on the AXS Guard or the application server.
Credential replacement does not work
-
Ensure the application credentials have been properly configured on the AXS Guard. Go to Users & Groups > Users to verify the application credentials. Have users update their credentials if necessary.
-
If the user credentials exist, verify if they match the user credentials on the application server.
I can’t connect to the FTP server server on a custom port (other than port 21)
When using a port different than the standard TCP port for FTP , the AXS Guard appliance needs to be rebooted.
I am getting an error message: Bad Gateway
Verify the settings for the connection towards the application server. Use port 443 is when a secure connection has been configured.
I am getting an error message indicating that the page must be viewed over a secure channel
Verify the settings for the internal connection. Make sure port 443 is used when a secure connection has been configured.
I don’t have access to the password auto-learning option
Only advanced AXS Guard administrators have access to this option. Log on to the Administrator Tool with an advanced administrator account. More information about AXS Guard administrator levels is available in the AXS Guard System Administration How To, which can be accessed by clicking on the permanently available Documentation button in the Administrator Tool.
The secure connection option does not work
Make sure the webmail feature is not enabled, as it uses port 443 by default.
When a Certificate Connection Name is entered, the system domain is automatically appended.
Add a period to the certificate connection name to override this behavior.
I get an error when changing the Certificate Connection Name
When you change the name of your Certificate Connection Name in a Reverse Proxy entry, you need to upload a new certificate with the correct hostname.
Support
If you encounter a problem
If you encounter a problem with AXS Guard, follow the steps below:
-
Check the troubleshooting section of the feature-specific manual.
-
Check the knowledge base on this site for information about special configurations.
-
If no solution is available in any of the above sources, contact your AXS Guard vendor.
Contact Information
(+32) 15-504-400
support@axsguard.com