DIGIPASS Authentication for RDP-enabled Computers (pGina plugin)
Introduction
About this Document
In this document, we explain how to set up DIGIPASS authentication for RDP-enabled computers in the secure LAN of an AXS Guard appliance, using the pGina plugin.
We used pGina version 3.2.4.0 to write this document.
Additional Documentation
The following documentation may be useful if you are unfamiliar with certain AXS Guard concepts and parameters presented in this paper:
-
The Directory Services How To, which explains how to synchronize your AD server with the AXS Guard appliance (LDAP sync).
-
The Authentication How To, which explains the concept of RADIUS, DIGIPASS authentication and authentication policies.
-
The System Administration Guide, which explains the concept of port forwarding.
-
The VPN manuals, where we explain the concepts, use and configuration of the various VPN solutions available on the AXS Guard appliance.
Concept

-
The client makes an RDP connection to the RDP-enabled computer, which is either directly accessible by port forwarding or via a VPN tunnel.
-
The RDP-enabled computer with the pGina plugin prompts for authentication.
-
After entering the credentials (AD password + OTP), the pGina plugin sends the AD password and one-time password to the AXS Guard using the RADIUS protocol.
-
The AXS Guard validates the one-time password and forwards the AD password to the AD back-end for validation.
-
If validation is successful, the AXS Guard sends a RADIUS accept message to the pGina client, after which an authenticated RDP session is established.
Prerequisites and Requirements
-
The AXS Guard must be synchronized with your AD server (Domain Controller). See the Directory Services documentation for details.
-
The RDP-accessible machines must be joined to your domain.
-
RDP must be enabled on the machines you wish to be accessible.
-
RDP-enabled machine(s) must be accessible either by port forwarding or via a VPN tunnel.
-
The pGina plugin must be installed and correctly configured on the RDP-enabled computers.
-
The pGina plugin may not be installed on the AD back-end, otherwise authentication will fail.
Configuration
On AXS Guard
-
Set up LDAP synchronization on the AXS Guard.
-
Assign a DIGIPASS to the appropriate user(s).
-
Add a computer entry for the RDP-enabled machine (Computers).
-
Add the computer to the list of RADIUS clients (Authentication > RADIUS > Clients).
-
Set the authentication policy for the computer to DigipassAndDirectoryService (Authentication > Services).
On the RDP-enabled Computer
-
Download and install the pGina plugin on the RDP-enabled machine. Make sure to install all necessary components if they are not already installed.
-
Configure the plugin so that it authenticates against the AXS Guard.
Local Machine Plugin
-
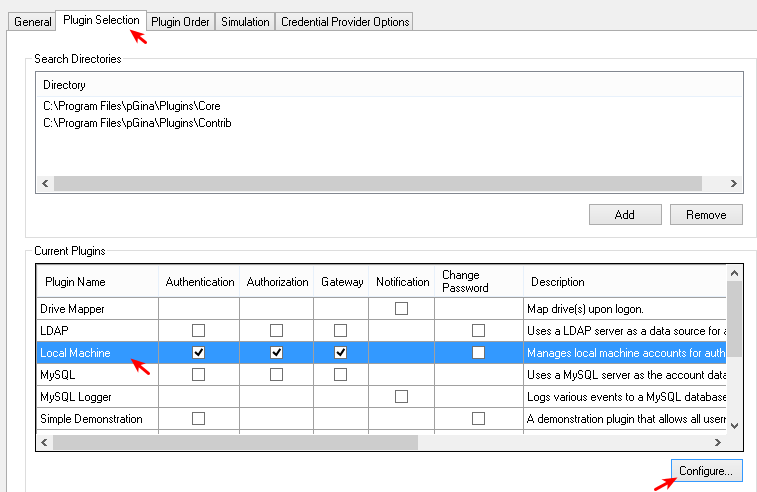
Start the pGina plugin.
-
Select the second tab (Plugin Selection).
-
Select Local Machine
-
Click Configure.
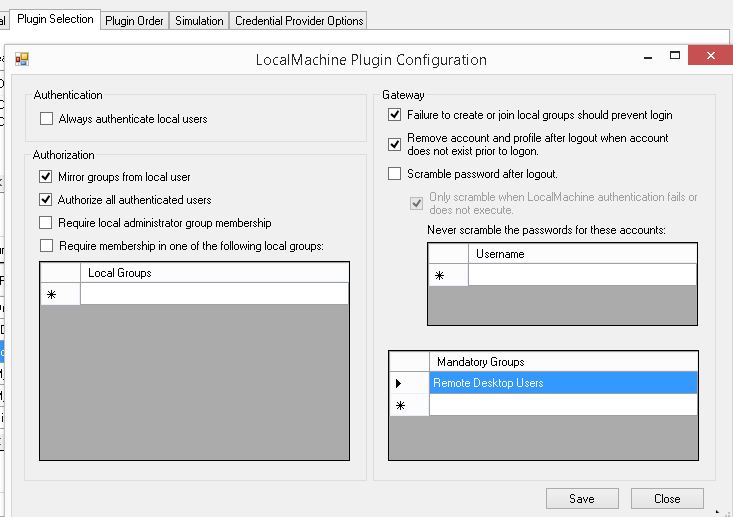
Authentication
Disable Always authenticate local users.
Authorization
-
Enable Mirror groups from local users.
-
Enable Authorize all authenticated users.
-
Disable Require local administrator group membership.
-
Disable Require membership in one of the following local groups.
Gateway
-
Enable Failure to create or join local groups should prevent login.
-
Add Remote Desktop Users as a mandatory group.
-
Save the configuration.
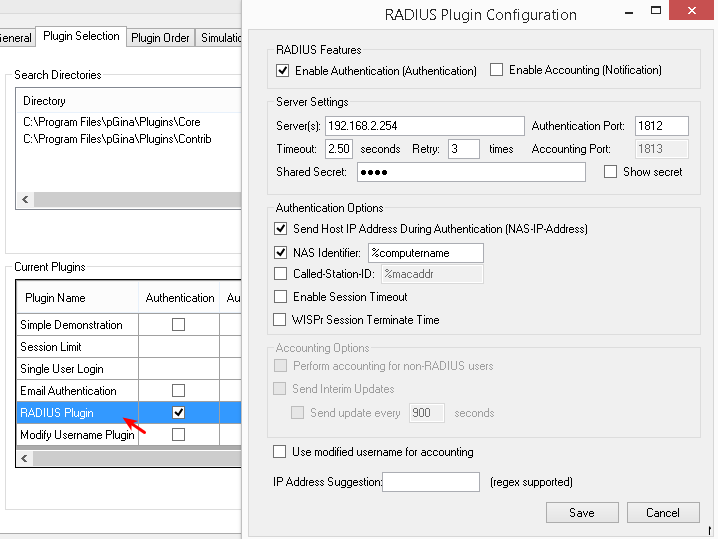
RADIUS Plugin
RADIUS Features
-
Select RADIUS Plugin.
-
Click Configure.
-
Enable Authentication.
-
Enter the RADIUS server settings (i.e. the IP address of the AXS Guard and RADIUS authentication port).
-
Enter the shared secret.
Authentication Options
-
Enable Send Host IP Address During Authentication (NAS-IP-Address).
-
Enable NAS Identifier. Use
%computernameas the identifier. -
Save your configuration.
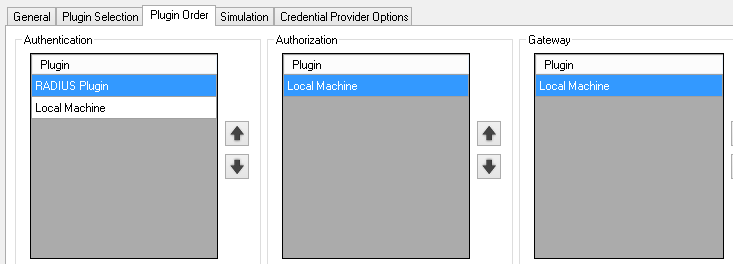
Plugin Order
-
Select Plugin Order.
-
Configure the order as shown below.