AXS Guard Cloud 
Introduction
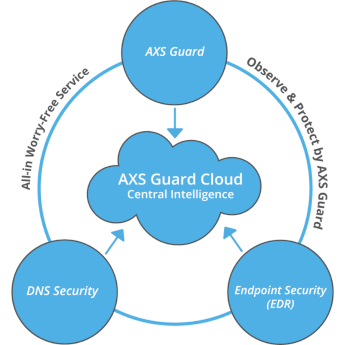
The AXS Guard Cloud is part of AXS Guard’s Observe & Protect solution. It provides a web-based management interface with various tools and dashboards, allowing authorized administrators and MSSPs to remotely and securely oversee AXS Guard firewall deployments. This document provides guidance on how to use the AXS Guard Cloud for efficient monitoring, management, and analysis of threat intelligence data, generated by its various components.
Features
| Tasks | Description |
|---|---|
| Manage large-scale installations | Configure firewall, proxy, and DNS settings for distribution to AXS Guard appliances. Register new appliances. |
| View operational information | Access license status and customer contract details. |
| Troubleshoot systems | Identify and resolve issues within deployed AXS Guard firewall systems. |
| Configure DNS security | Customize settings and DNS filters for mobile devices and workstations that are running the SecureDNS agent. |
| Consult threat intelligence data | Access and use threat intelligence data from multiple sources for analysis and decision-making. |
| Configure alerts | Set up email alerts for security or operations, a simple way to stay informed. |
| Role-Based Access Control | Provides granular control over user permissions within the system (cloud access management). |
Requirements
Requesting Cloud Access
To access the AXS Guard Cloud, first-time users must complete and submit the required form. This form serves as a crucial step in the onboarding process, facilitating the collection of necessary information and ensuring that users adhere to the prescribed protocols for cloud access.
Login Credentials
AXS Guard Cloud uses Google or Microsoft sign-in (including custom domain accounts) and is accessed through a web browser.
Supported Browsers
| Browser | Version |
|---|---|
| Google Chrome | Current versions only |
| Microsoft Edge | Current versions only |
| Mozilla Firefox | Current versions only |
| Safari | Current versions only |
| Opera | Current versions only |
Browser Extensions
Browser extensions can impact the performance and user experience, as they have the ability to run extra code on every page you open, potentially causing pages to hang or become unresponsive.
If you encounter any issues while interacting with a dashboard or if it becomes invisible, ensure that all your browser plugins are disabled or add a security exception for the AXS Guard Cloud.
Threat Intelligence
About
Threat intelligence provides real-time visibility into security events and anomalies across your organization. By aggregating and analyzing key indicators like abnormal login behavior, suspicious endpoint activity, malicious DNS requests, quarantined emails, and blocked users and hosts, you can proactively identify and respond to emerging threats.
The AXS Guard Cloud also monitors operational integrity by flagging critical issues such as stopped services, web access failures, certificate expiration warnings, and disk space alerts. This intelligence-driven approach reduces risk, enhances situational awareness, and strengthens cybersecurity resilience. All data is systematically organized and clearly presented through intuitive dashboards.
Data Filters
Filtering threat intelligence data, provided through the various dashboards, is achievable using KQL and Lucene query syntax. UI filters are also available for convenience, allowing authorized users to narrow down data sets or options based on specific criteria.
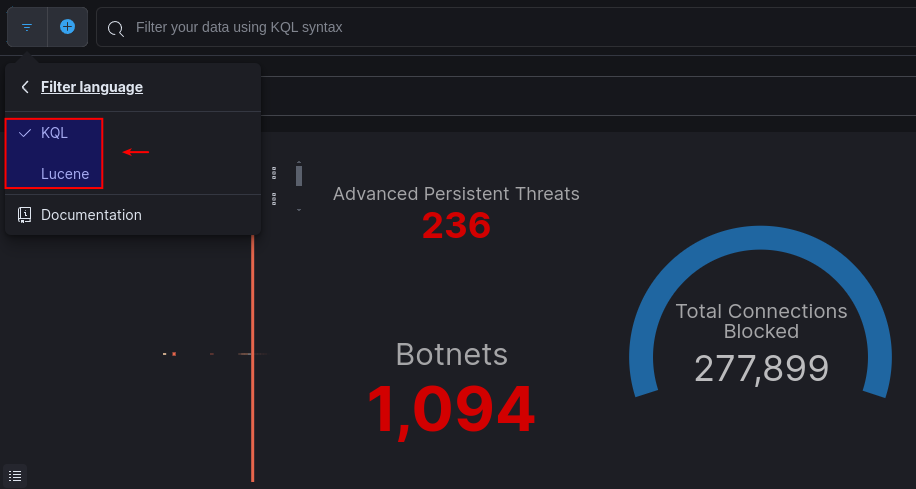
With filters, administrators and MSSPs can quickly identify issues, isolate devices for closer inspection, and troubleshoot systems more efficiently. This capability also enables them to adjust their cybersecurity strategy more effectively.
Tutorial
For users looking to enhance their proficiency in navigating dashboards and using data filters, we offer a comprehensive online tutorial. This tutorial provides step-by-step guidance on maximizing the effectiveness of dashboards, along with insights into leveraging filters for refined data analysis.
Dashboards
AXS Guard Central
Introduction
The AXS Guard Central dashboard provides a clear overview of all deployed appliances, their license number, contract IDs, current operational status and health.
Via this dashboard, authorized system administrators and MSSPs can register new appliances and securely log in to deployed AXS Guard appliances or PAX units (version restrictions apply).
The AXS Guard central dashboard simplifies routine system maintenance tasks, such as pushing new firewall rules to an appliance and allows MSSPs or system administrators to remotely identify and troubleshoot issues.
Column selection
You can adjust the number of columns by clicking the icon in the right corner of the dashboard.
- Click the icon. (1)
- Use the add and remove buttons in the dialog box, then save your changes. (2)

Registering Appliances
Requirements
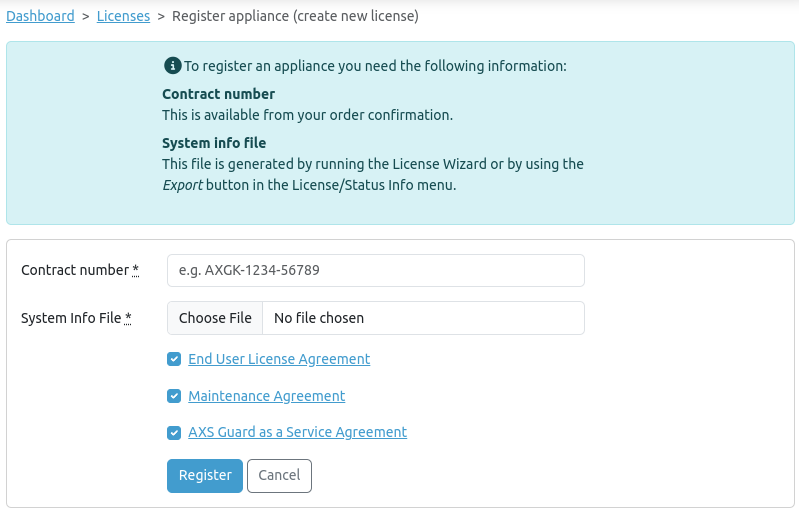
The following is required to register your AXS Guard appliance:
- The Contract Number (e.g.,
AXGK-1234-56789orEVAL-1234-56789for product evaluation), as found in your AXS Guard order confirmation. - The
systeminfo.txtfile, which must be downloaded directly from your AXS Guard appliance when running the License Wizard.
To register an appliance, log in to the AXS Guard cloud, then navigate to the AXS Guard Central dashboard. Click on register appliance to start the registration proces and follow the on-screen instructions.

Contact Management
-
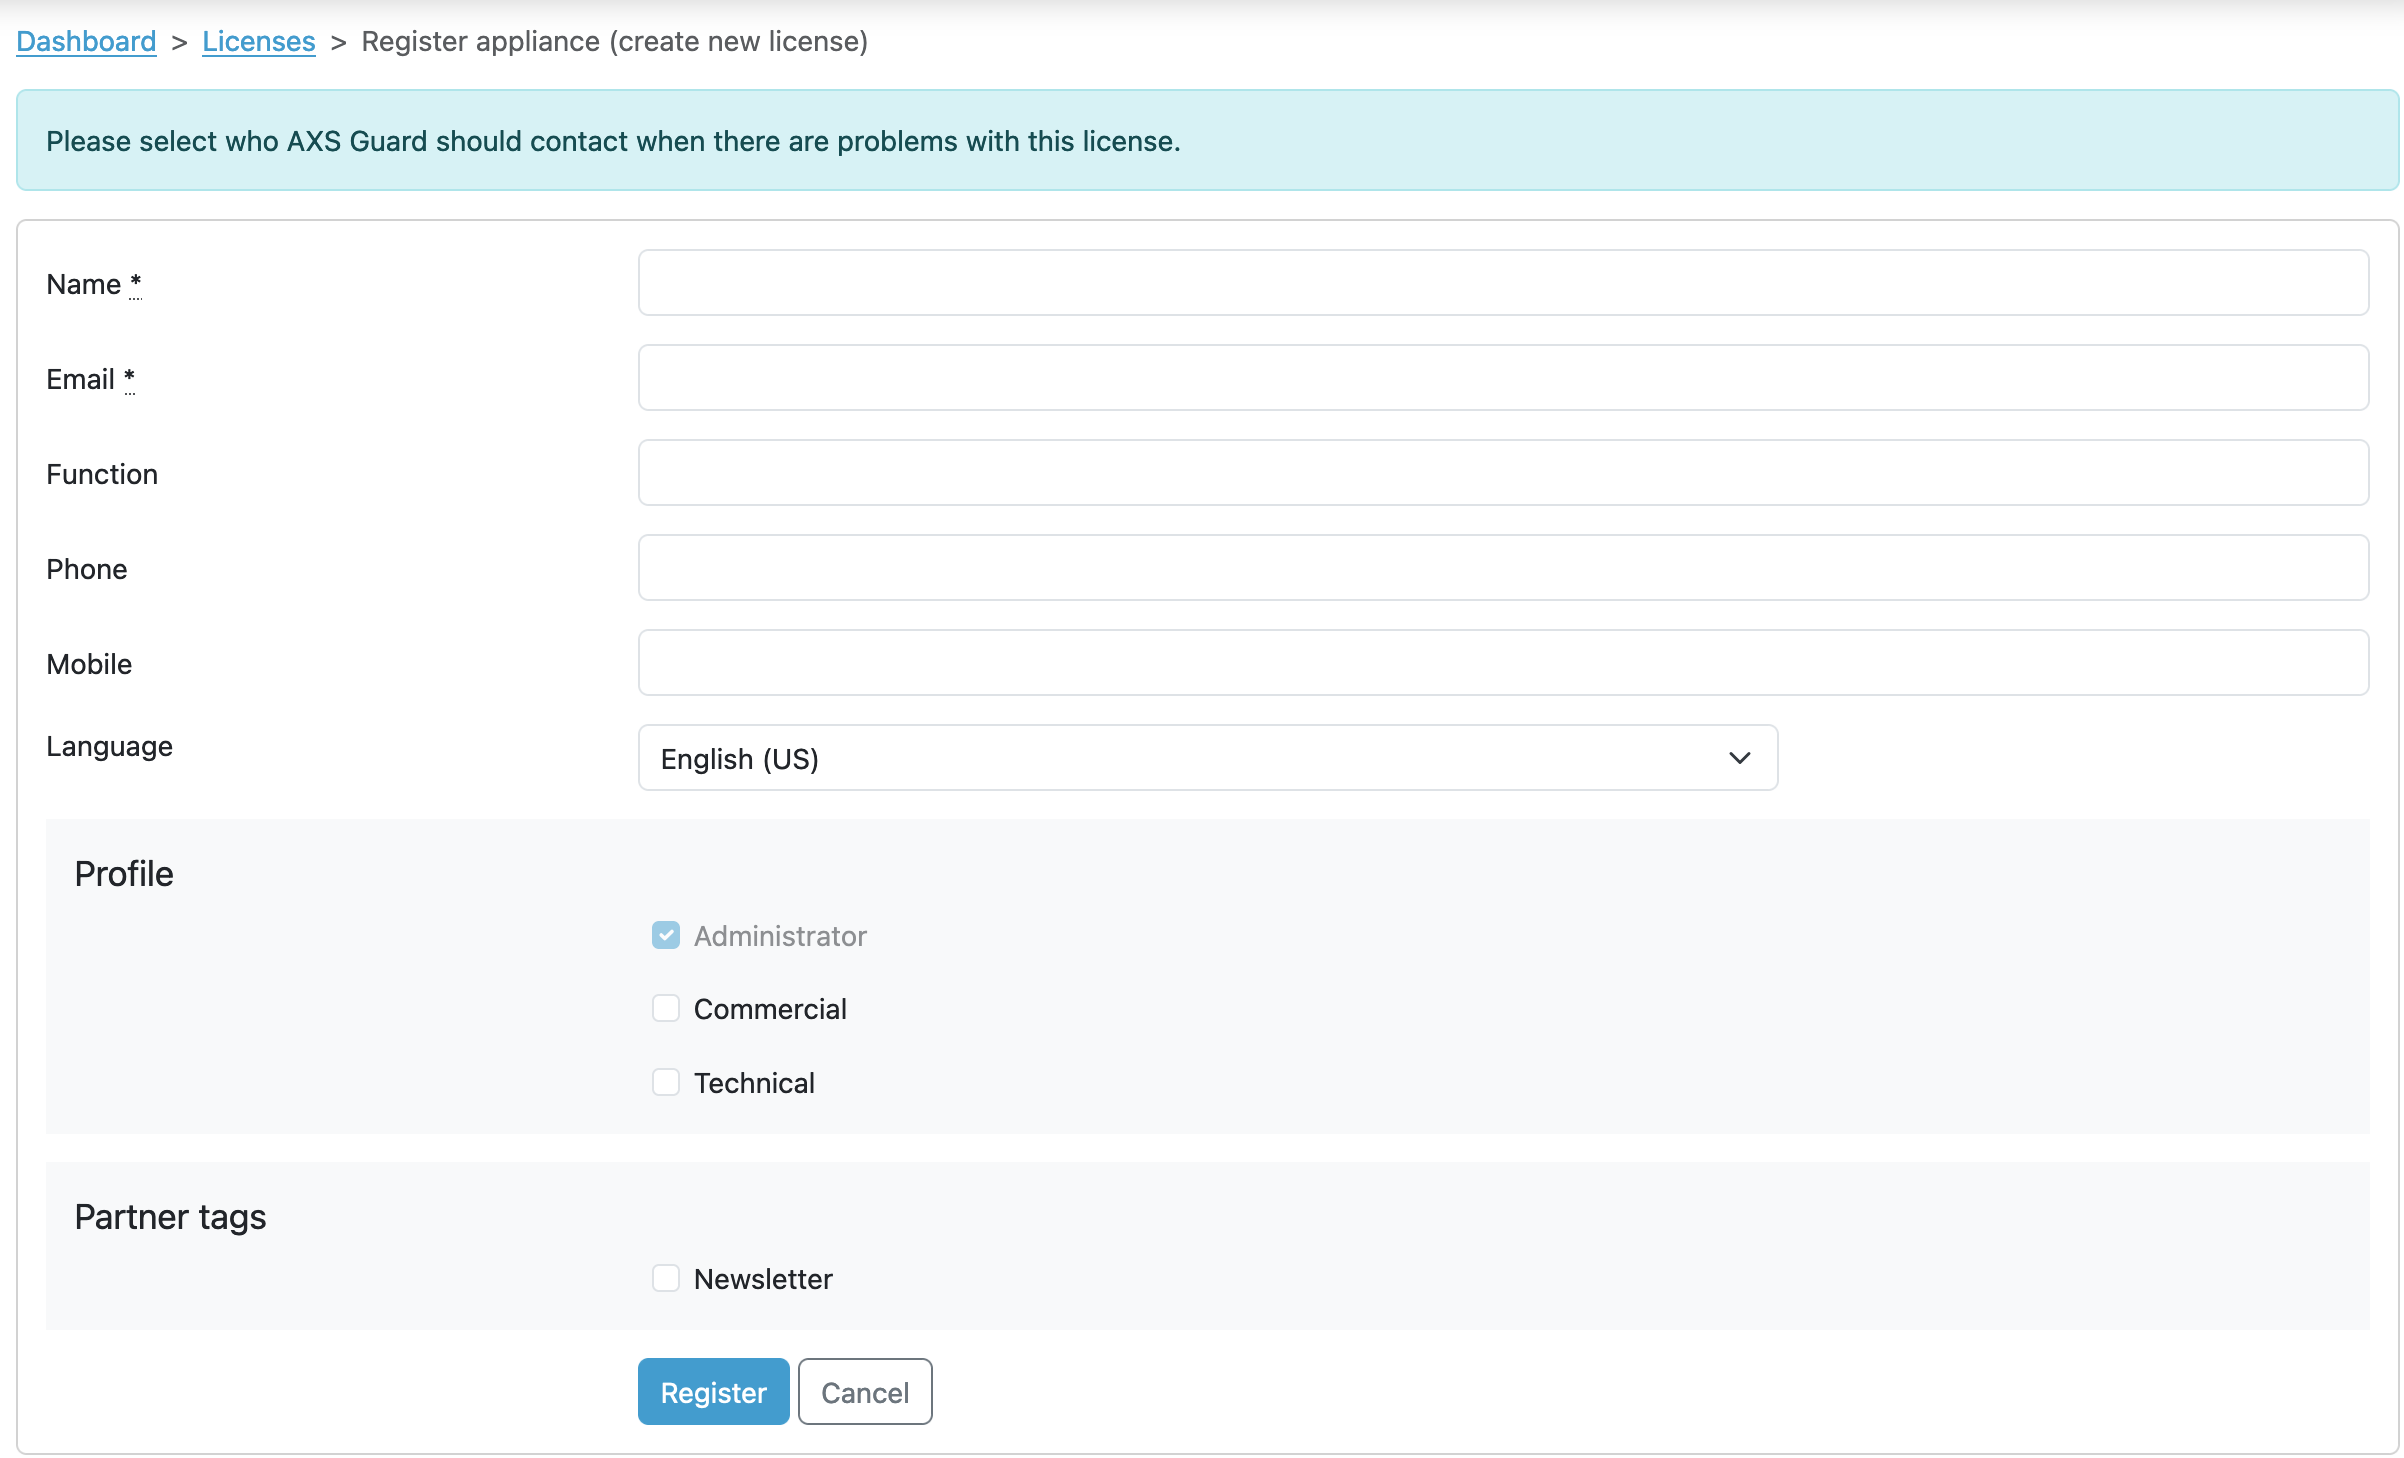
If no contacts are found during registration, you will be required to add an administrator contact in step 2 of the registration process.
-
In case of existing contact information: Select an existing contact within your company context. This contact will automatically become the administrator, responsible for managing AXS Guard appliances and serving as a potential customer support contact. You can also add a new administrator profile if you do not wish to select an existing contact for this role.

Best Practices
System administrators should ensure that contact information in the AXS Guard Cloud remains accurate and current. Only cloud users who are assigned the system administrator role can manage contact information.
Remote Login
Secure remote login capabilities, helpful for system administration and troubleshooting, require AXS Guard version 11.0.15 or PAX version 4.2.0 or later.
IT administrators can use remote login to manage and troubleshoot appliances without being physically present at the location. This capability is particularly valuable for maintaining and updating systems in different geographical locations, reducing downtime, and minimizing the need for on-site assistance.
AXS Guard Firewall
AXS Guard version 11.0.15 or later is required.
- Log in to the AXS Guard Cloud.
- Navigate to the AXS Guard Central dashboard.
- Enter your license number or contract ID into the search field.
- Click on the login button.

PAX Units
PAX software version 4.2.0 or later is required.
- Log in to the AXS Guard Cloud.
- Select the AXS Guard Central dashboard and enter the contract ID or license number of your AXS Guard appliance, e.g.
0000-00012345. -
Click on the license number.

-
Select the Personal AXS Guard tab.
-
To access the PAX unit you'd like to log into, click on the corresponding license ID, e.g.
0001-00012345.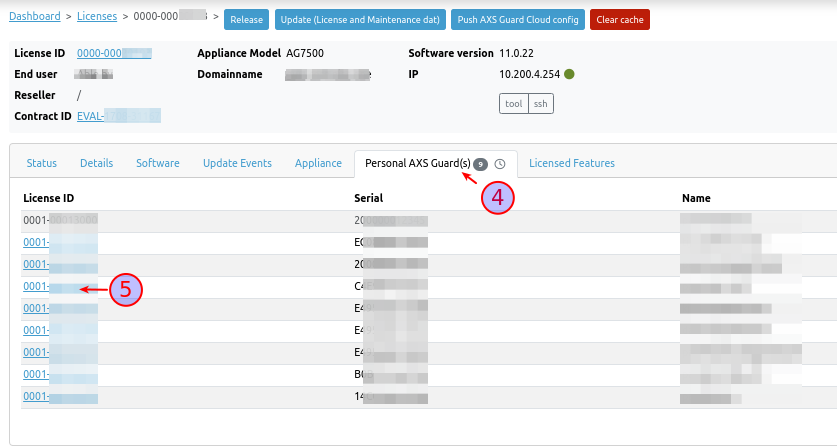
-
Click on the login button.

The login page of the PAX unit will open in a new browser tab. Log in with the credentials that you configured on the server side.
System Details
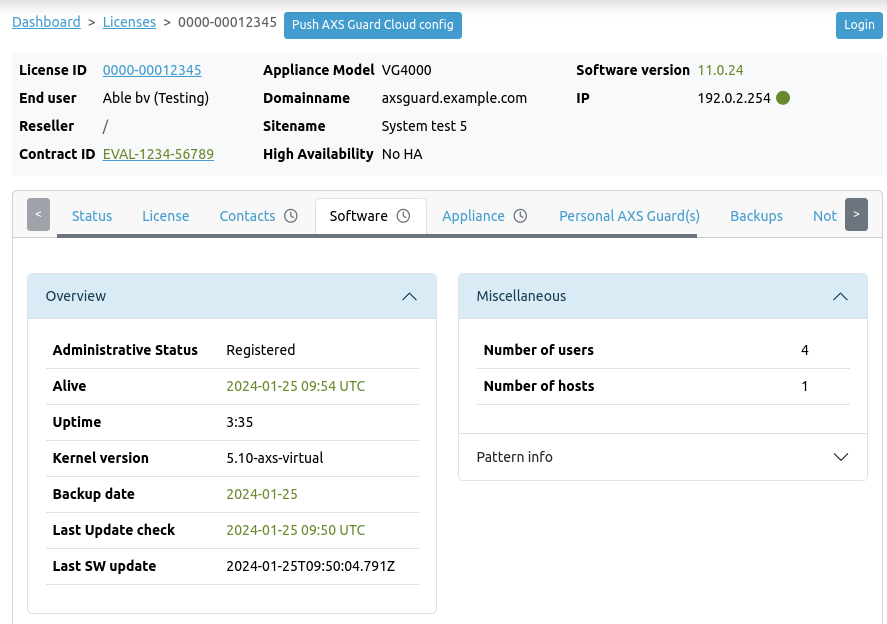
Log in to the AXS Guard cloud, navigate to the AXS Guard Central dashboard and click on the license number of an appliance to access its details.

After clicking on the license number, additional details will be visible, including status information, license information, contacts, software details, update events, appliance statistics, connected Personal AXS Guard units, configuration backups, and licensed features.
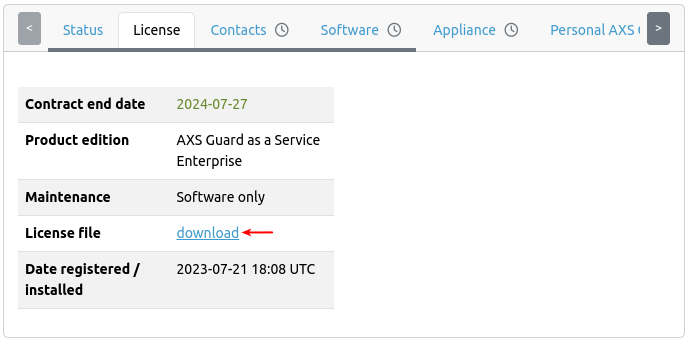
System administrators can download the license.dat file via the License tab, which is required to make an AXS Guard appliance fully operational.
Pushing Config Settings
Via system details, authorized users can also propagate AXS Guard configuration settings, such as firewall rules, GeoIP filters, DNS filters, and web filters, to a single appliance. This is achieved by using the Push AXS Guard Cloud Config button and requires the creation of a configuration profile via the Management page.
Important
The use of the Push AXS Guard Cloud Config button is only required if you encounter issues with automated configuration updates. Configuration updates are automatically handled by the AXS Guard Cloud, provided that a configuration profile has been assigned.

QRadar EDR
The IBM Security® QRadar® EDR dashboard delivers comprehensive visibility into your network infrastructure, empowering real-time endpoint analysis and facilitating extended searches to uncover and counteract dormant threats. Installation of a QRadar® EDR agent (Nano OS) on each endpoint is a prerequisite.
SentinelOne EDR
Through the SentinelOne Management Console you can manage your endpoints by deploying agents to laptops, servers and IoT devices, monitor threats and security alerts, roll back attacks using SentinelOne's Rollback feature to undo changes made by ransomware, and configure policies to set security rules for different customer sites or departments.
Contracts
Through this page, authorized users can access contract information, consult a list of activated system features, find details about software bundles, and download contract certificates by clicking on a specific contract ID in the table.
Column selection
You can adjust the number of columns by clicking the icon in the right corner of the dashboard.
- Click the icon. (1)
- Use the add and remove buttons in the dialog box, then save your changes. (2)

DNS Security
The DNS security dashboard serves as a centralized interface, providing real-time insights and analytics into malicious DNS queries generated by networked devices. This comprehensive tool enables administrators to monitor and analyze DNS traffic, detect potential threats, and assess the overall health of the network.
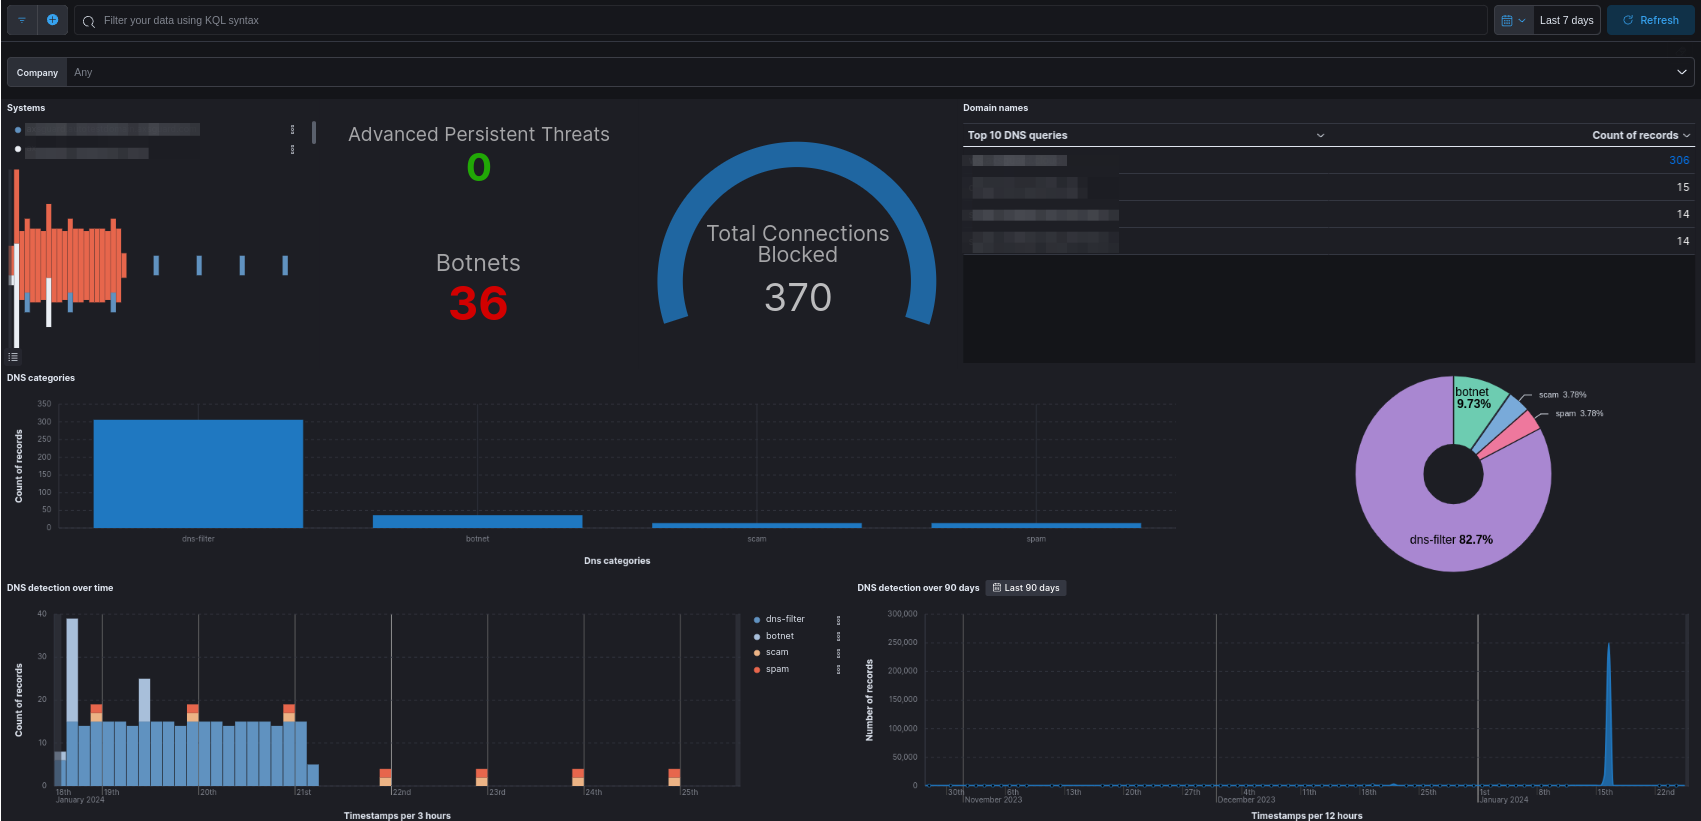
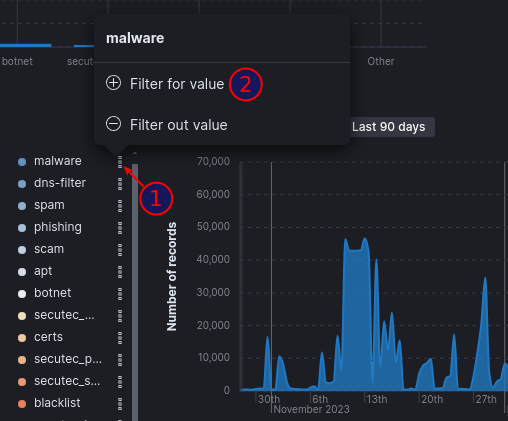
DNS queries are categorized based on the threat they represent. Filtering data is possible through the use of KQL syntax.
Examples of KQL filters

ag.dns.category.keyword: dns-filter: shows all blocked DNS queries that matched a DNS filter.host.name.keyword: axsguard.yourdomain.com: shows all DNS queries blocked by this AXS Guard appliance.ag.dns.category.keyword: botnet: shows all blocked DNS queries that matched a botnet filter.source.hostname: johndoe-laptop: shows all blocked DNS queries originating from this host.source.ip.keyword: 192.0.2.50: shows all blocked DNS queries originating from this IP address.
Combine multiple filter conditions with the AND and OR operators, e.g.:
host.name.keyword: "axsguard.example.com" and ag.dns.category.keyword: "botnet"
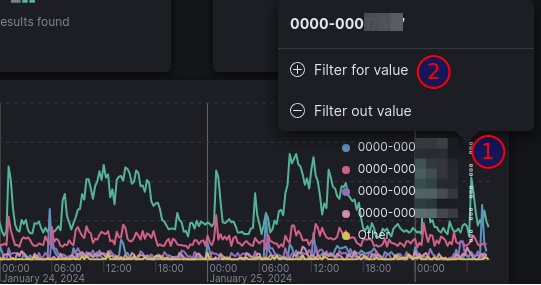
Filters can also be created by clicking on elements in the dashboard, as demonstrated in the example below.
For users looking to enhance their proficiency in navigating dashboards and utilizing filters, we offer a comprehensive online tutorial. This tutorial is designed to provide step-by-step guidance on maximizing the effectiveness of dashboards, along with insights into leveraging filters for refined data analysis.
Alerts
Via this dashboard, MSSPs and administrators can view various types of alerts:
- Endpoint Alerts: Notifications or warnings generated by IBM Security QRadar EDR when suspicious or potentially malicious activities are detected on endpoints within a network. Endpoints are individual devices such as computers, servers, laptops, smartphones or other devices that connect to a network.
- SecureDNS: Events related to APTs and botnets that are blocked by AXS Guard’s DNS security feature.
- Configuration: Configuration alerts play a vital role in proactive IT management, allowing administrators to promptly address issues and maintain a secure and well-functioning IT environment.
- AG Alerts: Alerts that are generated by AXS Guard appliances, e.g. certificate expiration warnings and failed login notifications.
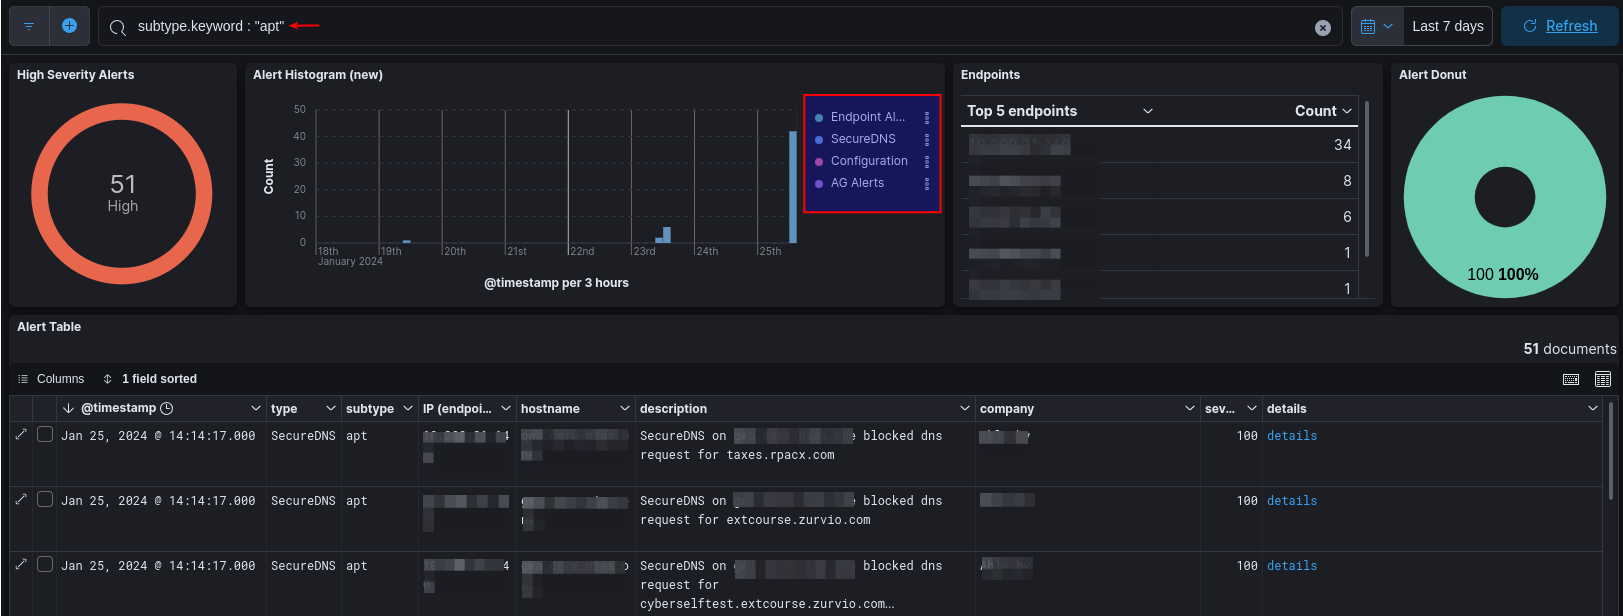
Filtering alert data is possible through the use of KQL syntax. To effectively manage security alerts, consider setting up alert forwarding, which sends notifications directly to administrators via email according to their specified preferences.
Examples of KQL filters

subtype.keyword: apt: shows all events related to advanced persistent threats (APT).type: SecureDNS: shows all events related to SecureDNS.type: Event and subtype: warning: shows warnings generated by AXS Guard.event.description: shutdown: shows system shutdown events.
Combine multiple filter conditions with the AND and OR operators, e.g.:
type: "Event" and subtype: "fatal"
Filters can also be created by clicking on elements in the dashboard, as demonstrated in the example below.
For users looking to enhance their proficiency in navigating dashboards and utilizing filters, we offer a comprehensive online tutorial. This tutorial is designed to provide step-by-step guidance on maximizing the effectiveness of dashboards, along with insights into leveraging filters for refined data analysis.

Monitoring
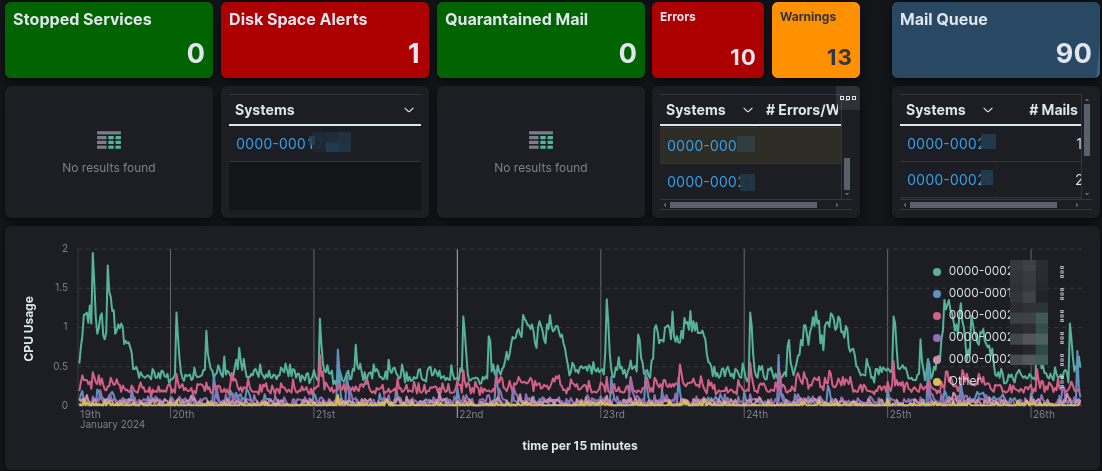
This dashboard allows authorized users to review and analyze AXS Guard appliances for availability, operations, performance, security incidents and other related processes.
It is only accessible to authorized administrators and MSSPs to ensure that AXS Guard appliances are performing as expected and to mitigate problems as they become apparent.
Customization
Click in the top right corner of a metric to customize its settings.
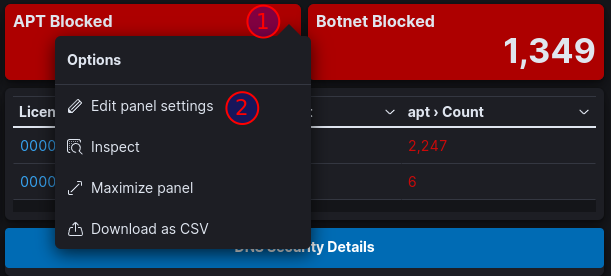
Data filters can be created with KQL syntax or by clicking on elements in the dashboard, as demonstrated in the examples below.
link_license: 0000-00012345 and @timestamp >= 90: Events related to license 0000-00012345 that are 90 days old or more.
For users looking to enhance their proficiency in navigating dashboards and utilizing filters, we offer a comprehensive online tutorial. This tutorial is designed to provide step-by-step guidance on maximizing the effectiveness of dashboards, along with insights into leveraging filters for refined data analysis.
Configuration Profiles
About
Configuration profiles offer administrators and MSSPs a standardized workflow to centrally manage various AXS Guard settings, such as firewall rules, GeoIP, DNS and web access filters.
Management
- Navigate to the Management page.
-
Click on the Add button.

-
Enter an appropriate profile name and description, then press the Submit button.

Assignment
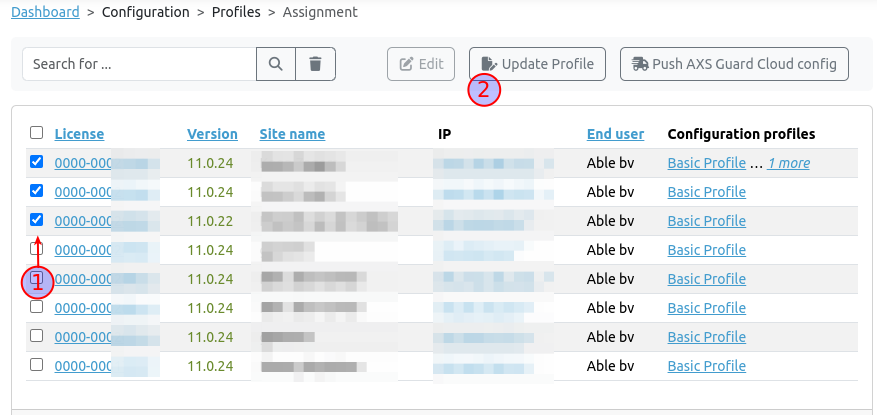
Profiles must be assigned to appliances, which are identified by their license number, in order to allow the AXS Guard Cloud to push configuration settings in bulk.
To use the Push AXS Guard Cloud config functionality, ensure that the selected appliances are running AXS Guard software version 11.0.15 or higher.
- Navigate to the Assignment page.
-
Select the relevant licenses and click on Update Profile.
-
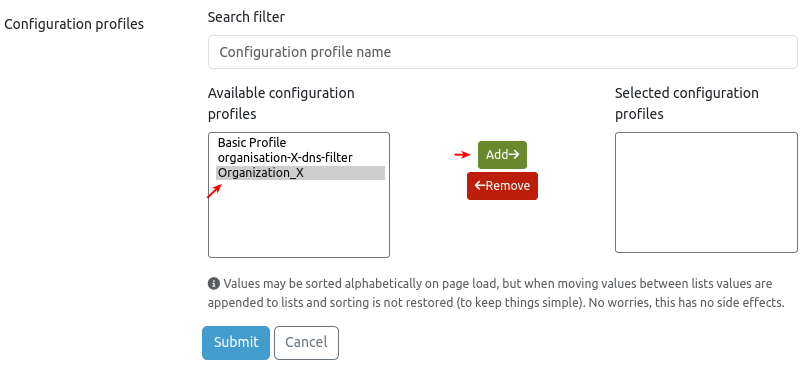
Choose the desired profile(s) for assignment.
-
Complete the assignment process by adding the selected profile(s).

Firewall
Via the firewall rule pages, authorized users can configure AXS Guard firewall rules for deployment to large-scale installations. For a detailed explanation of AXS Guard firewall rules, please refer to the AXS Guard firewall documentation.
Limitations
Multi-port rules are only supported on appliances running version 11.2.5 or higher. Please note that such rules will not be pushed to appliances running earlier versions.
Rules containing excluded IP addresses and FQDNs will be pushed to appliances running earlier versions, but the exclusions will be ignored and not enforced. To enforce these exclusions, please upgrade your AXS Guard appliance to version 11.2.5 or later.
Towards Rules
Towards rules pertain to network traffic destined for the AXS Guard appliance itself, including traffic for services like OpenVPN or SSTP, as well as control protocols like ICMP.
- Navigate to Towards Rules and click on the Add button in the top right corner.
- Enter the requested information and make sure to assign the new rule to the correct configuration profile.
-
Click on the Submit button.
Important - AXS Guard Configuration Required
In the AXS Guard user interface, rules configured via the AXS Guard Cloud will be shown with a cm-e (central management) prefix, e.g., cm-e-rulename.

For rules to take effect, they must be assigned to a policy by a system administrator. Refer to the AXS Guard firewall documentation for additional information and configuration steps.
Through Rules
Through rules apply to network traffic passing through the AXS Guard appliance from one firewall zone to another, for example, from a client in the Secure LAN to a server in the DMZ or on the Internet.
To configure new rules, navigate to through rules and follow the same steps as explained in the towards rules section.
Important - AXS Guard Configuration Required
In the AXS Guard user interface, rules configured via the AXS Guard Cloud will be shown with a cm-e (central management) prefix, e.g., cm-e-rulename.

For rules to take effect, they must be assigned to a policy by a system administrator. Refer to the AXS Guard firewall documentation for additional information and configuration steps.
Lists
About
Lists are fundamental for configuring DNS security. Through lists, system administrators can control how the SecureDNS agent and mobile devices that have been set up to use Private DNS should handle DNS queries. Lists can contain various data, such as IP addresses, domain names (including FQDNs), and URLs. Each data entry in a list must adhere to specific formatting requirements for accurate processing.
| Supported Data Entries | Example |
|---|---|
| Fully Qualified Domain Names (FQDNs) | www.example.com |
| Partially Qualified Domain Names | mail |
| Wildcard Domain Names | *.example.com |
| URIs (Uniform Resource Identifiers) | https://www.google.com |
| IP Addresses (IPv4 only) | 192.168.1.1 |
| CIDR Notation (IPv4 only) | 192.168.1.0/24 |
Mixing Data Entries
Administrators can combine different sorts of data within a single list, such as IP addresses, URLs and FQDNs. See the example below. The AXS Guard Cloud will interpret and handle each list entry appropriately based on the provided data.
List Types
There are two types of lists: predefined lists and custom lists. Predefined lists are maintained by the AXS Guard Cloud and cannot be modified. Names of such lists always start with a predef prefix, e.g. predef-ads. In contrast, custom lists enable administrators to add entries not found in predefined lists, allowing them to fine-tune security policies to meet their organization's specific needs.
Categories
A category is a collection of lists that share a common purpose or theme, e.g. phishing, pornography, malware, etc. Categories help organize, manage and assign related lists, making it easier to configure and maintain security policies. There are two types of categories: predefined categories and custom categories. Predefined categories are provided by the system and cannot be modified. With custom categories, administrators can organize lists according to their specific needs and security requirements.
graph LR
    A[Lists] -->|add to| B[Category]
    B -->|assign to| C[Security Policy]
Viewing Predefined Lists
For an overview of predefined lists:
- Navigate to Lists > Predef Lists.
-
Click on a list name to view its details.

Adding Custom Lists
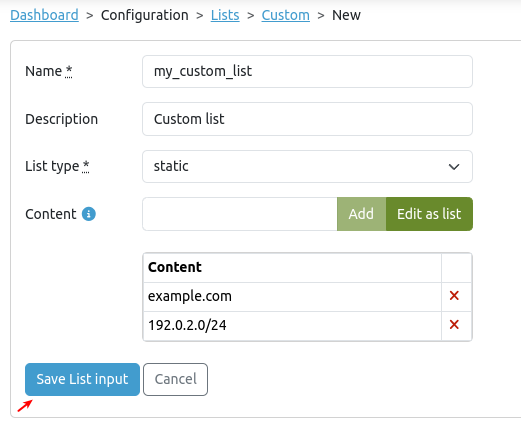
To add a custom list:
- Navigate to Lists > Custom Lists.
-
Click on the add button.

-
Enter the parameters as explained in the table below and save your list when finished.
| Parameter | Description |
|---|---|
| Name | Enter a name. Ensure this name is unique and does not match any existing entries. |
| Description | Enter a description. |
| List Type | Lists must contain UTF-8 encoded data, with each item listed on a separate line. Line endings must be LF (Line Feed) or CRLF (Carriage Return + Line Feed).
|
| Content | Enter the list items, using a separate line for each item (static lists only). |
| URL | Enter the URL (dynamic lists only). |
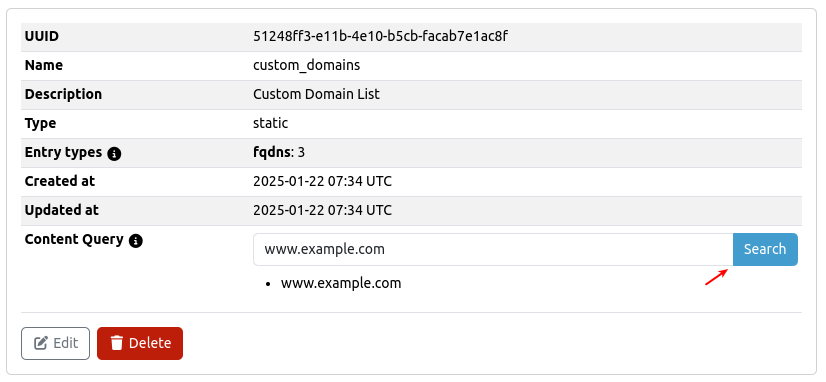
Content Query
Use the search button to query the content of a custom list.
Adding Lists to Categories
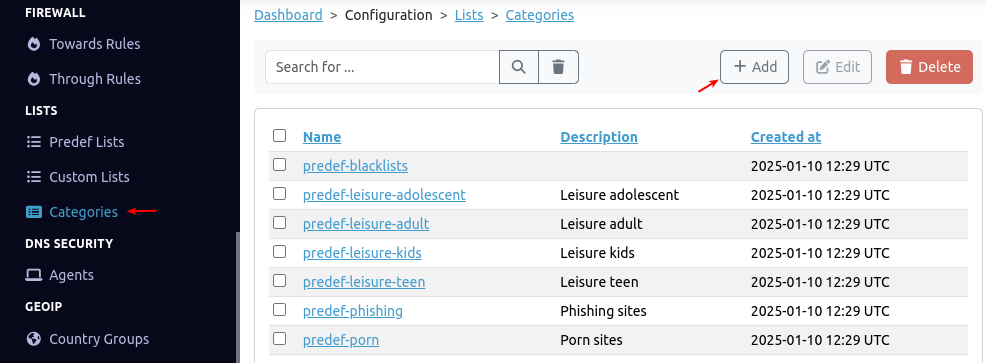
Lists are assigned to security policies through categories. The process begins with list creation, followed by assigning lists to a category, and finally, by assigning a category to a security policy. To create a category:
- Navigate to Lists > Categories.
-
Click on the add button.
-
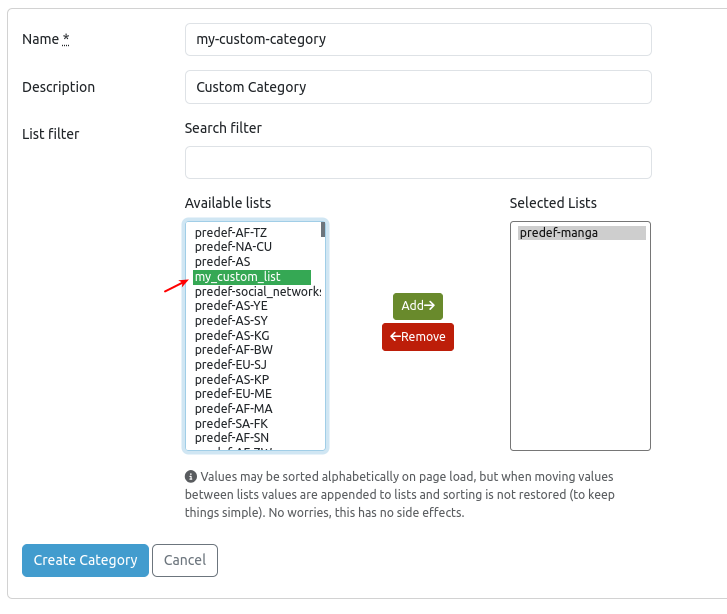
Enter the parameters as explained in the table below, then create your category. After creation, the category can be assigned to a security policy, such as a DNS filter.
| Parameter | Description |
|---|---|
| Name | Enter a name. Ensure this name is unique and does not match any existing entries. |
| Description | Enter a description. |
| Available lists | These are predefined and custom lists that are available for selection. Add and remove lists as appropriate. Use a search filter to quickly identify a specific list. |
DNS Security
Introduction
DNS security plays a crucial role in cybersecurity by protecting users and devices from inadvertently being exposed to various threats, such as malware, ransomware, malicious domains, and botnet infrastructures. Beyond threat prevention, DNS security also serves to enforce company policies by blocking access to inappropriate or restricted content, such as pornography.

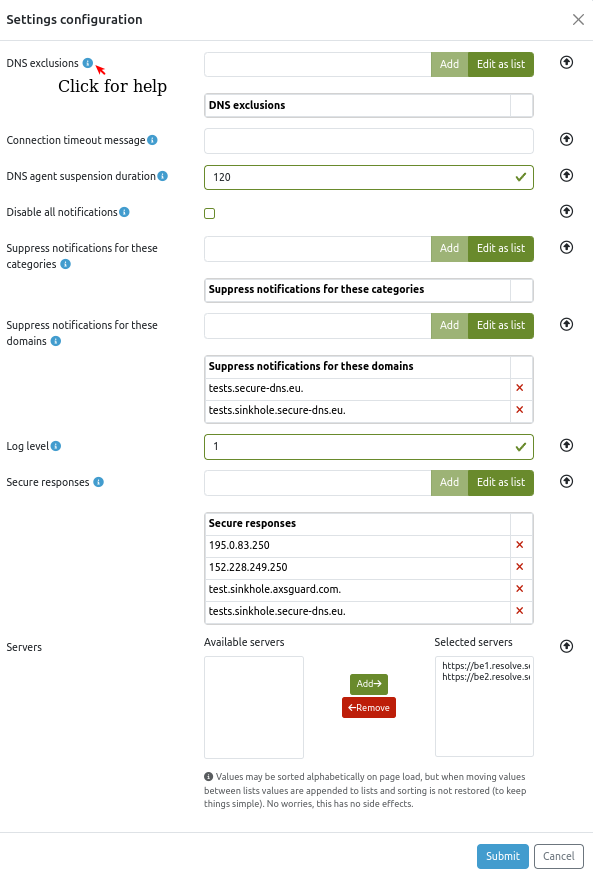
This page allows authorized administrators to configure API settings and DNS filters for mobile devices using Private DNS and workstations that are running the SecureDNS agent. Settings can be applied at three levels: group (1), company (2), and device (3).
graph LR
  A[#9312; Group Settings] -->|inherit| B[#9313; Company Settings] -->|inherit| C[#9314; Device Settings];
  B -->|override| A;
  C -->|override| B;
Settings
Go to DNS Security > Agents to configure group-level, company-level or device-level settings.

Tip
- Group Settings: Apply to all companies or organizations within the selected group.
- Company Settings: Apply to a specific company or organization and are enforced on all SecureDNS agents and mobile devices within that organization. Can be used to override group settings.
-
Device Settings: Apply to a specific device within a company, with the configuration enforced on that specific device. Can be used to override company settings.
Mobile Devices
You can configure DNS security on your mobile devices (Android and iOS) via the Private DNS settings. This ensures that all DNS traffic is securely routed through the AXS Guard DNS Cloud using DNS over TLS (DoT), protecting it from eavesdropping. It also ensures that DNS filters are actively enforced, supporting your organization's efforts to uphold its security policies.
The specific configuration steps vary slightly depending on whether you're securing Android or iOS devices, but the underlying principles remain the same.
To add a mobile device:
- Go to DNS Security > Agents.
-
Click on the Add mobile device button.

-
Enter a hostname. This unique name will be used to identify the device on your network and to monitor its DNS queries.

-
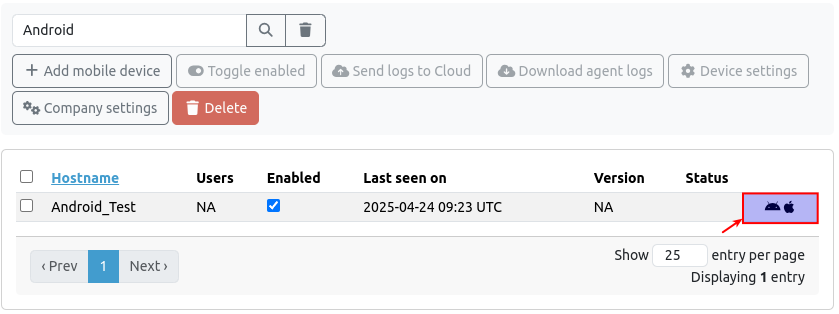
Look for the hostname that you added in the previous step and click on the icon that matches your mobile device.
| Device | Configuration settings |
|---|---|
Click on the Android icon to obtain the address to enter in your Private DNS settings, e.g. xyz1-xyz2-xyz3-xyz4-xyz5-xyz6-xyz7-xyz8.dnsserver.axsguard.cloud. |
|
To configure DNS security on iOS devices, click the Apple icon to download the required configuration file. This file, with a .mobileconfig extension, can be conveniently distributed through several methods. For individual users, you can simply email the file as an attachment; opening it on an iPhone or iPad will guide the user through the profile installation. Alternatively, for users nearby, AirDrop offers a quick and seamless transfer. Organizations managing multiple devices can leverage the efficiency of hosting .mobileconfig files on a web server, allowing users to download and install the profile by simply clicking a link on their iOS device. Furthermore, for centrally managed deployments, Mobile Device Management (MDM) solutions provide a robust and scalable way to distribute these configuration profiles to all enrolled devices. |
DNS Filters
DNS filters control DNS query handling for workstations that are running the SecureDNS agent and mobile devices using Private DNS . The filters make use of lists that are organized into categories based on common themes (e.g., Advertising, Malware, Social Media). Administrators can assign each category as an allow, block, or notification list, determining the overall action for all lists within that category. Furthermore, lists within a category can be independently enabled or disabled, providing granular control over filtering behavior.
| List Type | Description |
|---|---|
| Allow Lists | If a domain is included here, the client will be allowed to resolve it, regardless of any blocks enforced by Secutec DNS servers. |
| Block Lists | Domains in these lists are blacklisted, and the blocks are recorded in the DNS security dashboard. |
| Notification Lists | Domains in these lists are monitored for frequent access. While DNS resolution isn't blocked, user and client activity is tracked in the DNS security dashboard to assist administrators in identifying potential security risks. |
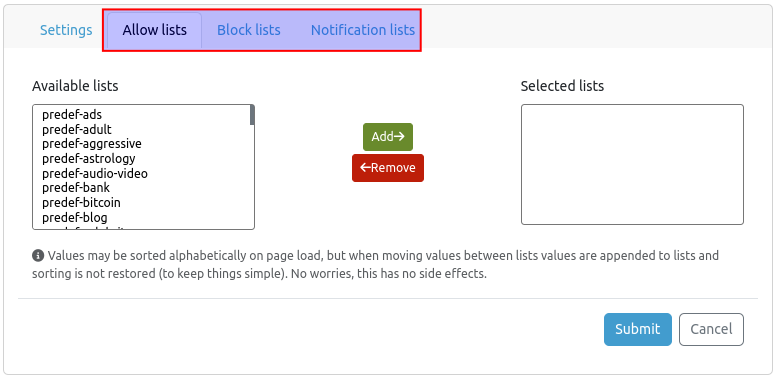
This is the DNS resolution priority, from highest to lowest:
- Company-Level Allow Lists: Domains on these lists are processed first.
- Company-Level Block Lists: Domains on these lists are processed next, unless they are allowed by a company-level allow list.
- Global-Level Allow Lists: Domains on these lists are processed next, unless blocked by company-level filters.
- Global-Level Block Lists: Domains on these lists are processed next, unless allowed by company-level or global-level allow lists.
- Secutec Filter: Finally, if a domain is flagged as malicious by Secutec and is not on any allow list, it will be blocked.
Testing DNS
Verifying Blocked Domains
You can test the DNS configuration of your devices with the nslookup or the dig command. Use one of the Fully Qualified Domain Names (FQDNs) in the table below to evaluate your configuration, for example:
~$ nslookup blacklist.axsguard.cloud
Server:     10.200.32.254
Address:    10.200.32.254#53

Non-authoritative answer:
Name:   blacklist.axsguard.cloud
Address: 195.0.83.240
Alternatively, you can try to connect to one of the FQDNs with a web browser. A successful test will trigger an error message, indicating the site could not be reached.
| FQDN | Category |
|---|---|
| test.sinkhole.secure-dns.eu | Test |
| test.axsguard.cloud | Test |
| blacklist.axsguard.cloud | Blacklist |
| phishing.axsguard.cloud | Phishing |
| botnet.axsguard.cloud | Botnet |
| apt.axsguard.cloud | APT |
| certs.axsguard.cloud | Certs |
| malware.axsguard.cloud | Malware |
| spam.axsguard.cloud | Spam |
| scam.axsguard.cloud | Scam |
| newdomain.axsguard.cloud | New Domain |
| maldom.axsguard.cloud | Malicious Domain |
| uncategorized.axsguard.cloud | Uncategorized |
Verifying a Successful Test
Blocked requests will populate the DNS Security dashboard. Use the hostname of a device as a filter to locate specific entries.

GeoIP Filtering
About
GeoIP filtering (or geo-blocking) restricts network traffic based on geographic location. By blocking connections to and from specific countries, you can significantly reduce your organization’s attack surface and eliminate unnecessary exposure to known high-risk regions.
Country Groups
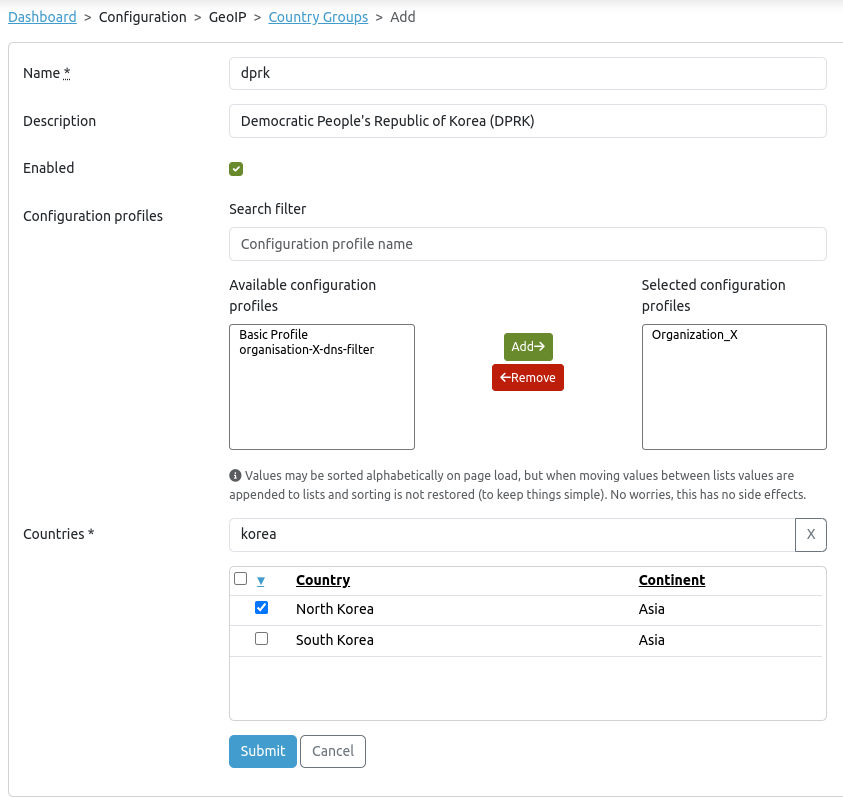
Through the Country Groups page, authorized users can configure GeoIP filters for deployment to large-scale AXS Guard installations.
CAUTION
Cloud configurations override local settings; existing GeoIP configurations will be overwritten.
- Navigate to GeoIP > Country Groups to add a new filter.
- Configure the appropriate settings, select the desired countries and make sure to assign the new filter to the correct configuration profile.
- Click on the Submit button.
Web Filters
About
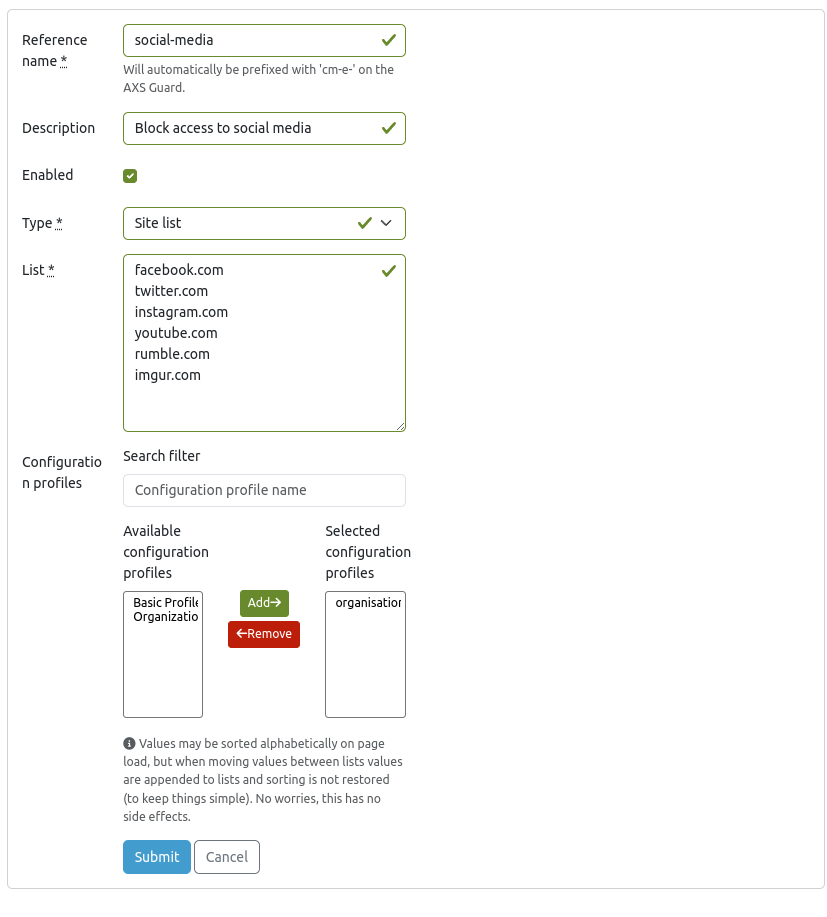
Web filters control access to specific URLs and websites. Through the URL Lists page, authorized users can configure web and DNS filters for deployment to large-scale AXS Guard installations.
URL Lists
- Navigate to Webfilter > URL Lists to add a new filter.
- Configure the filter settings and make sure to assign the new filter to the correct configuration profile.
- Click on the Submit button.
Important - AXS Guard Configuration Required
In the AXS Guard user interface, filters configured via the AXS Guard Cloud will be shown with a cm-e (central management) prefix, e.g., cm-e-filtername.

For web and DNS filters to take effect, they must be assigned to an AXS Guard proxy ACL or domain filter (DNS) by a system administrator. See the AXS Guard Web Access and DNS Security documentation for further information and configuration steps.
Alert Forwarding
Overview
Alert forwarding enables administrators and Managed Security Service Providers (MSSPs) to receive alerts via email, providing a straightforward method for standard monitoring purposes.
Administrators can access an overview of all available alert forwardings under Alerts > Forwarding. There, administrators will find:
| Field | Description |
|---|---|
| Name | The name of the forwarding rule. |
| Description | A short explanation of what the rule does. |
| Severity Range | The range of alert severity levels this rule applies to. |
| Event Classes | The type of events this rule will forward alerts for. |
| Enabled | Whether the rule is currently active. |

Points of attention
- Quick Updates: The overview screen allows administrators to quickly enable or disable rules using the checkboxes next to each entry. The changes are saved automatically.
- Group-Level Configuration: It's important to note that alert forwarding rules are configured at the group level. This means they apply to all users within a specific group. Each rule is independent, meaning changes to one rule won't affect others.
- Duplicate emails: If a user belongs to multiple groups with overlapping forwarding rules, they might receive the same alert twice.
Adding New Rules
The standard toolbar at the top of the screen includes an Add button for creating new forwarding rules. Clicking this button will take you to a dedicated screen for setting up a new rule.
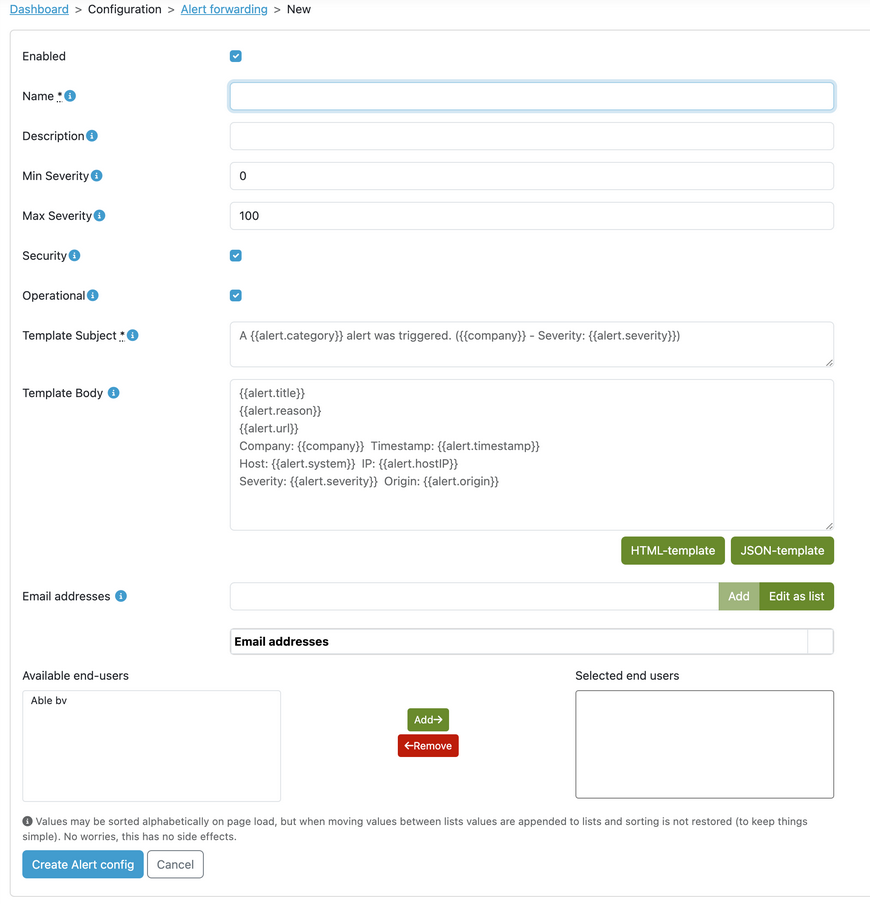
| Field | Description |
|---|---|
| Enabled | Specifies whether alert forwarding is enabled or disabled. Emails will never be sent when a rule is disabled. Rules are enabled by default. |
| Name | The designation for the alert forwarding. This field is used solely within the AXS Guard Cloud to facilitate easy recognition of the configured alert forwardings. It must not be left empty. |
| Description | Similar to the name, but it can remain empty. |
| Min and Max severity | Sets the minimum and maximum severity levels for the alerts that the user wishes to receive. By default, they are set to 0 and 100, respectively, which encompasses all alerts. Both limits are inclusive, ensuring that the severity range covers the entire spectrum. |
| Security and Operational | All alerts are classified as either security or operational alerts. The checkboxes allow administrators to specify which class of alerts they would like to receive. Both classes are checked by default. |
| Template subject and body | Allows administrators to create templates for the email subject and body when alerts are forwarded. Emails can be customized by inserting alert details within curly braces like this: {{alert.reason}}. These placeholders will automatically be replaced with the corresponding information. The system provides default templates in both HTML and JSON formats, which can be modified to fit your specific needs. |
| Email addresses | A list builder for entering email addresses. If an alert matches the rule, an email will be sent to each address using the specified templates. |
| End-users | Lastly, administrators can specify which group of end-users should receive alerts. |
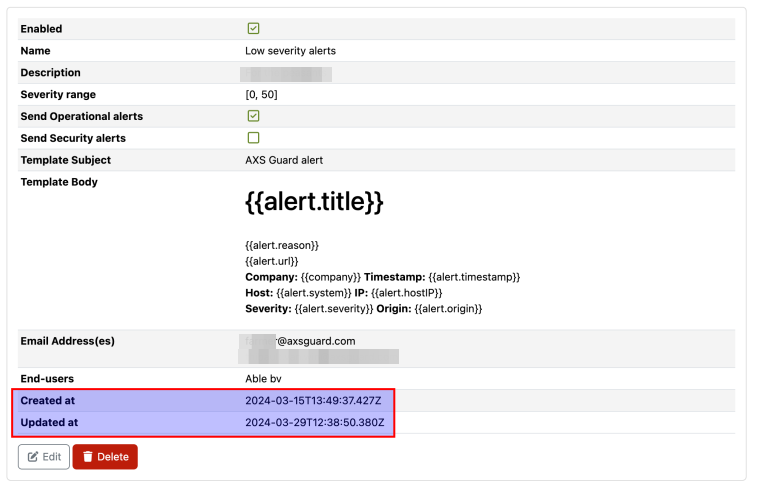
Two timestamps will be added when an alert is created: created at and updated at.
Tips
- Edit, duplicate, or delete rules directly from the overview page.
- Sort by name or description for easier organization.
- Bulk update and advanced filters are not yet available.
- The table headers allow sorting by name or description.
Template Customization
The AXS Guard Cloud uses Jinja2 to process email templates, but some limitations apply.
Allthough Jinja2 offers powerful features, some are restricted for security reasons. Firstly, statements like {% for loop %}) are not allowed, while comments {# this is a comment #} are permitted. The following expressions are allowed: {{ variable }}. System administrators can use any available alert variable to configure email templates. The use of Jinja2 operators, for example, to divide severity by 10, is not permitted.
Viewing Alerts
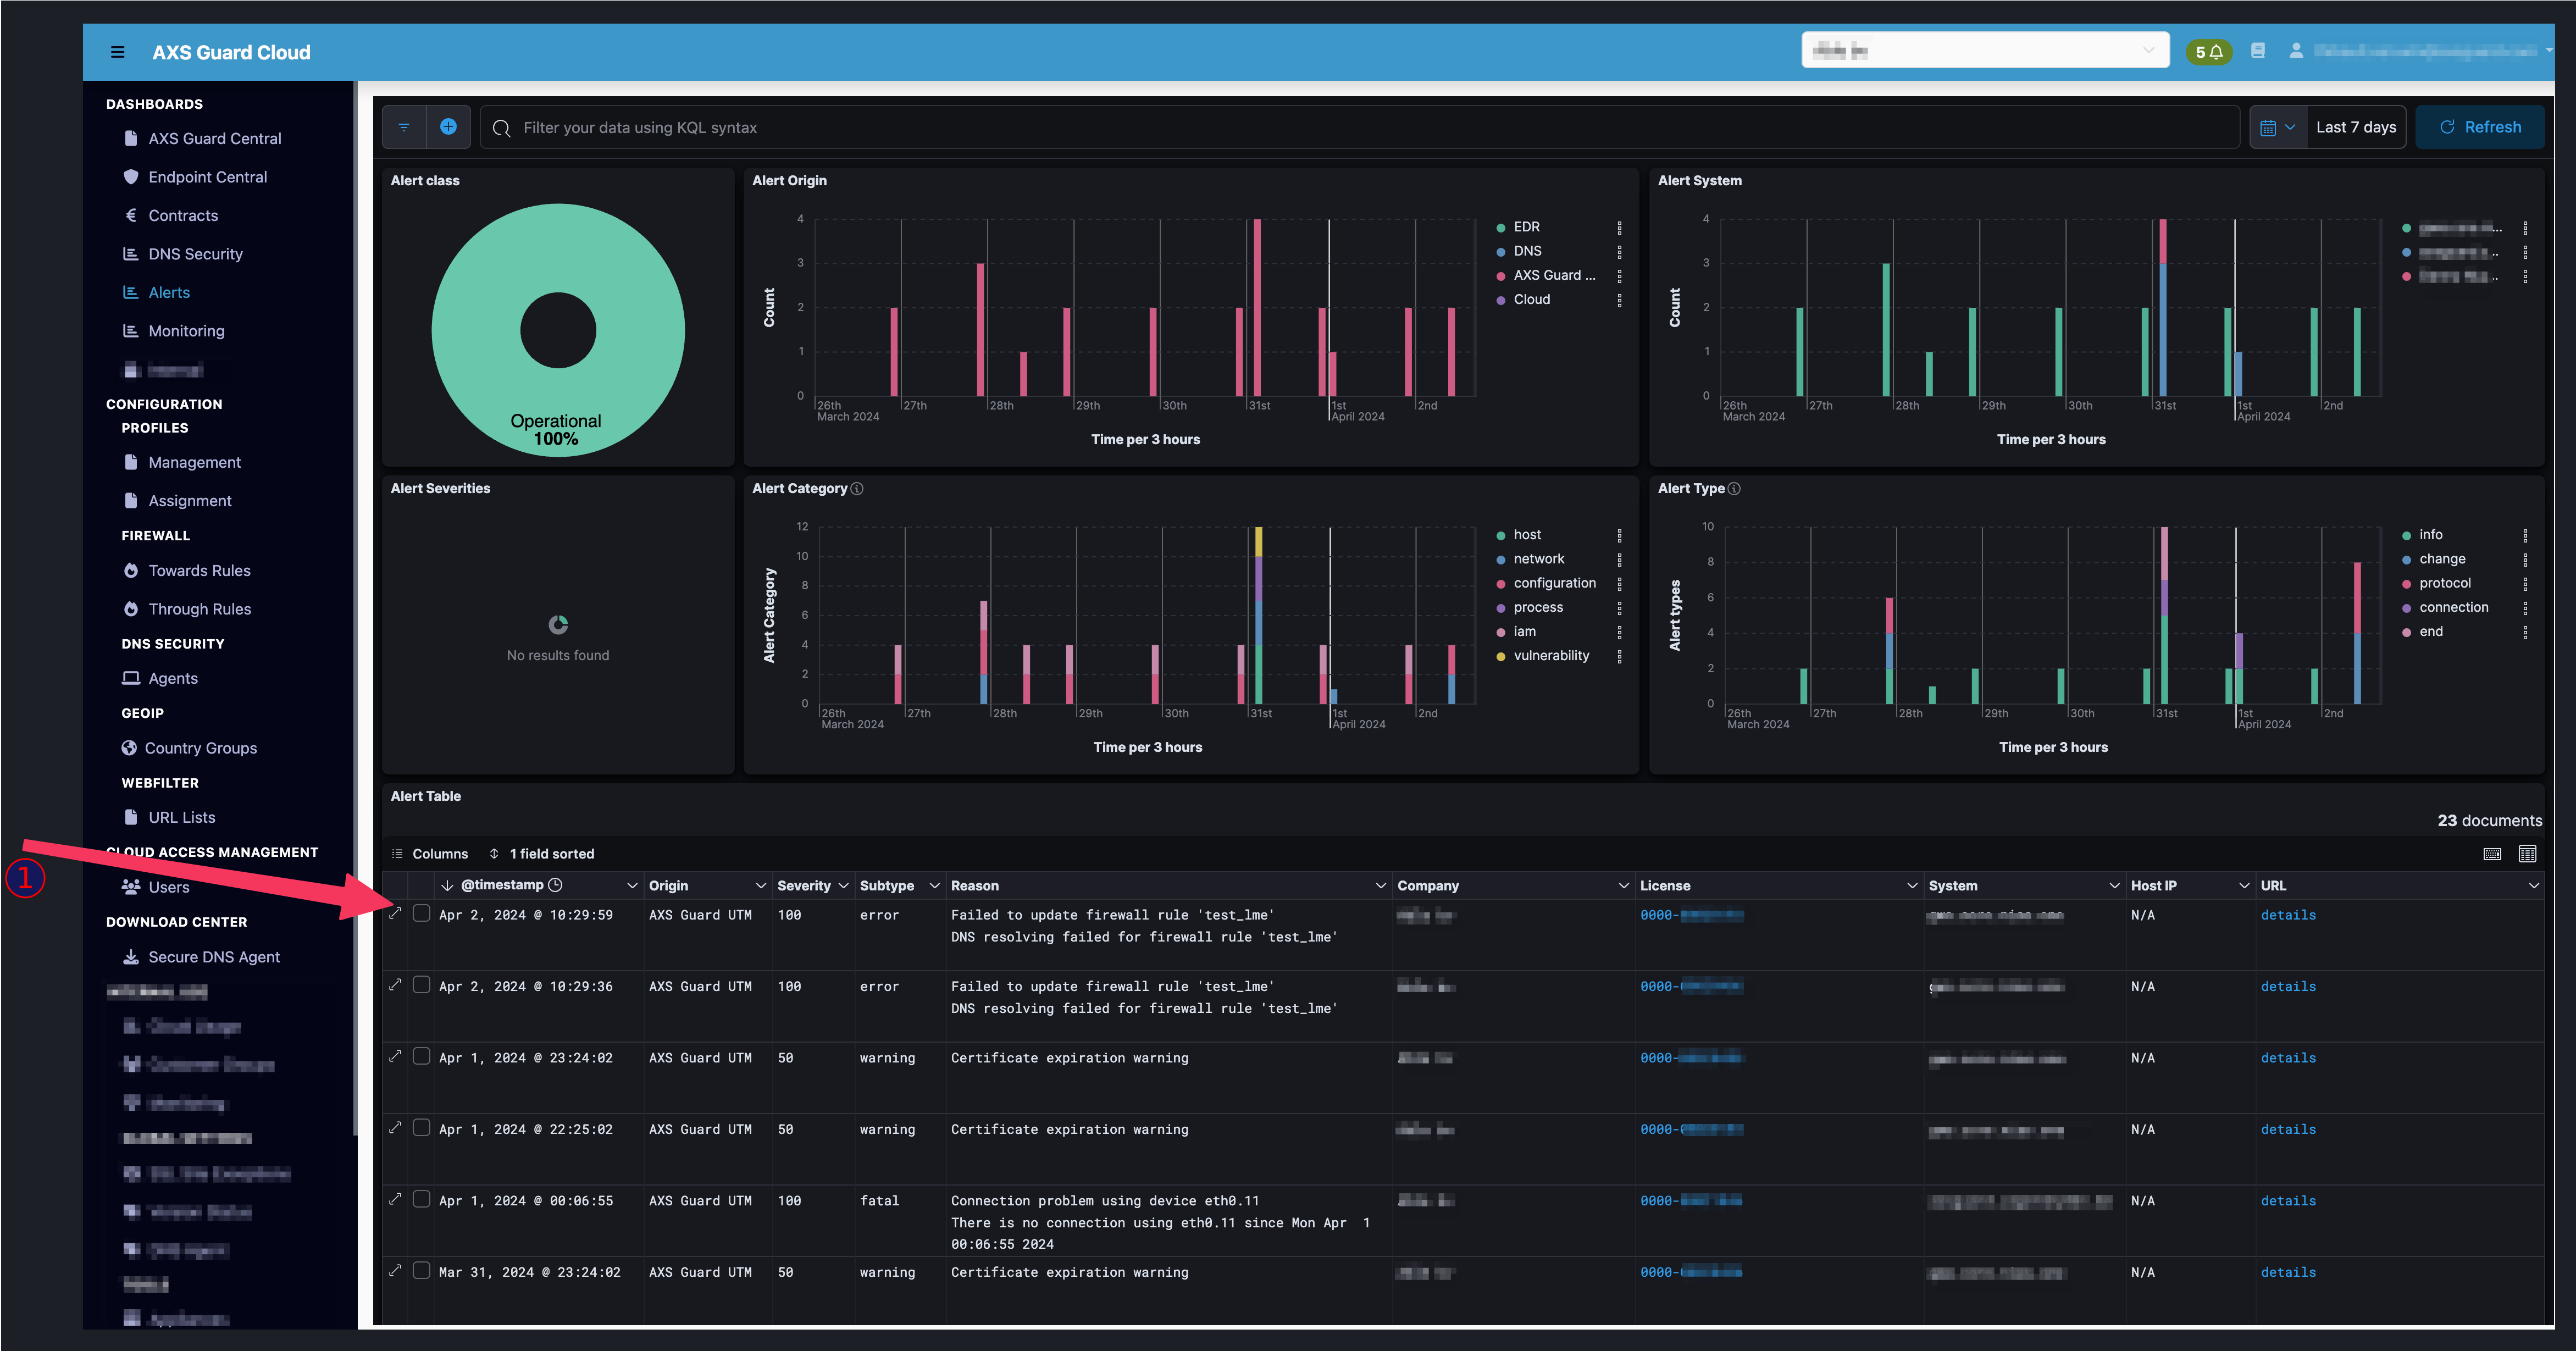
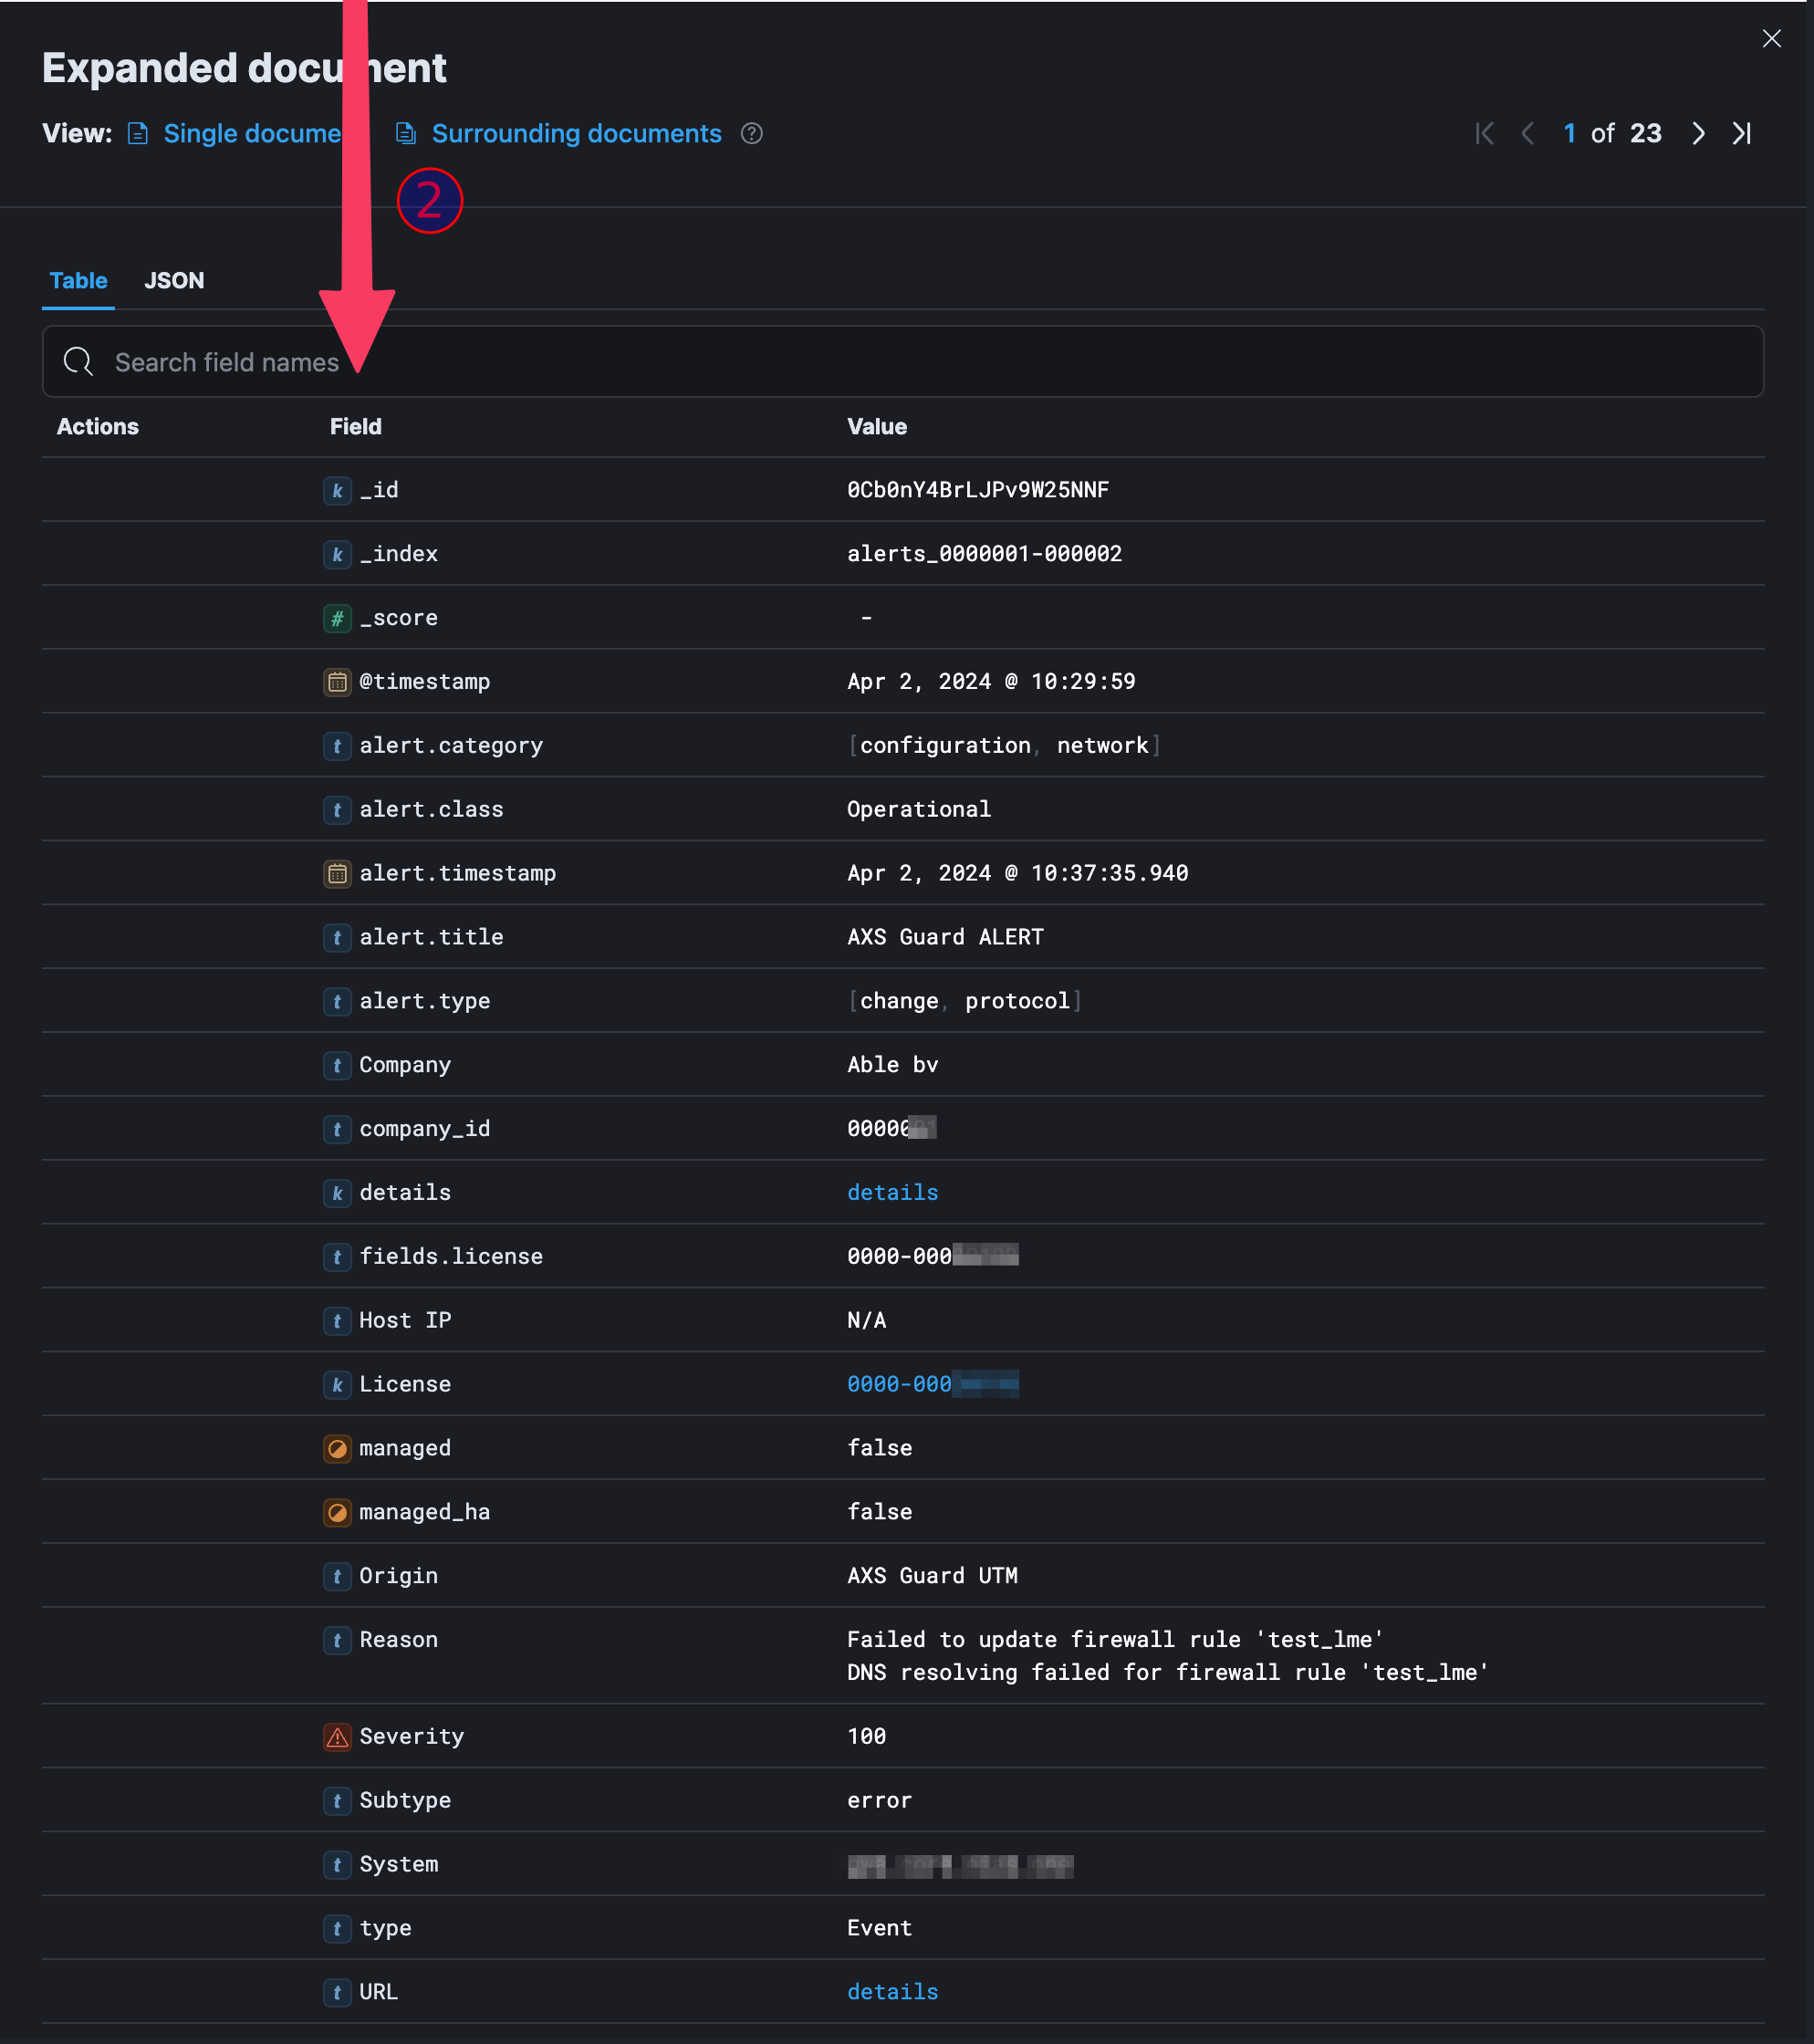
All alerts contain the same fields with a consistent naming convention. They can be viewed by expanding an alert via Dashboards > Alerts.
Cloud Access Management
Introduction
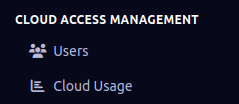
Via Cloud Access Management, system administrators can manage AXS Guard Cloud users, and grant or revoke access to specific parts of the system.
Key Concepts
- Users: Individuals who interact with the AXS Guard Cloud and require access to its functionalities. Users are assigned one or more specific roles. In addition to roles, more granular access can be granted through permission groups.
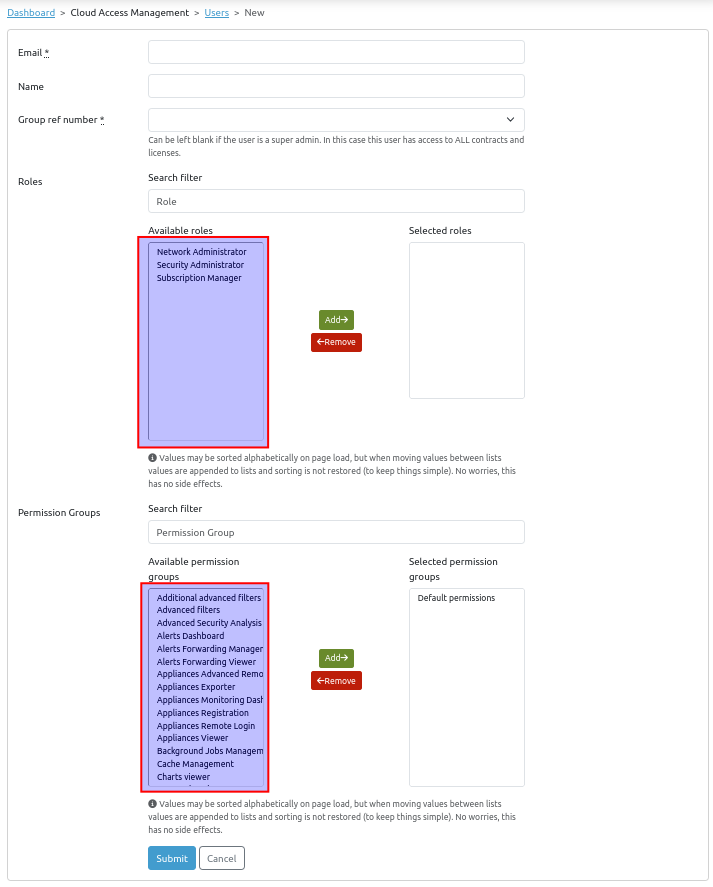
- Roles: Predefined user categories that group together related permissions, representing a specific function or responsibility within the organization. Roles are assigned to users and determine their overall access level.
- Permission Groups: Sets of permissions that grant access to specific functionalities, features, or data within the system. These are more granular than roles and can be assigned to users, providing a very specific and tailored access control. Permission groups can only be managed by AXS Guard personnel.
- Permissions: Individual access rights that determine what a user can do within the system (view, edit, manage, etc.). Permissions are grouped into Permission Groups and can only be managed by AXS Guard personnel.
Role-Based Access Control
Important Considerations
Caution
- Roles and permission groups can only be managed by AXS Guard personnel.
- Users managing other users can only assign roles and permission groups that they themselves possess.
- Not all roles and permission groups are visible to all users.
- It is essential to assign roles and permissions thoughtfully, granting only the necessary access to each user.
Roles
The following roles have been defined, each tailored to specific responsibilities and access requirements:
- Network Administrator:
- Primary Function: Manages and configures network infrastructure.
- Typical Access: Ability to manage firewalls, switches, VPNs, and other network-related settings.
- Security Administrator:
- Primary Function: Manages security policies and monitors system access.
- Typical Access: Access to monitor access logs, manage security incidents, and configure access controls.
- Subscription Manager:
- Primary Function: Oversees customer or internal subscription plans.
- Typical Access: Access to billing information, service levels, account statuses, and the ability to manage subscriptions.
Permission Groups
Permission Groups offer a more fine-grained approach to access control. Here are some examples of Permission Groups, each controlling access to specific features:
- Filtering and Data Views:
- Advanced filters on contracts and licenses pages.
- Show applied discounts on contracts and licenses pages.
- Show the sales widget on the contracts page.
- View contact information
- Show customer groups
- Show lists and categories
- Show license information
- Show license backups information
- Show license comments
- Download License dat files
- Show license notes
- Alerts and Monitoring:
- Viewing various types of alerts
- Managing alert forwardings
- Viewing alert forwardings
- Managing internal alerts
- View appliance monitoring details
- View security alerts
- View authentication events, login anomalies, netflow data, etc.
- View DNS queries and blocked threats
- System and Configuration Management:
- Register new appliances
- Manage background jobs
- Manage Configuration Profiles
- View Configuration Profiles
- Manage DNS Agents
- Manage DNS Agents root configuration
- Manage endpoint security
- Manage firewall rules
- Manage GeoIP filters
- Manage license backups
- Manage license notes
- Manage URL lists
- Manage supported software versions
- Prepare and ship Personal AXS Guards
- Allow advanced secure remote login to an appliance
- Allow secure remote login to an appliance
- Allow downloading DNS Agent binaries
- Manage user account settings
- Manage user information
- Reporting and Analysis:
- Exporting appliance information
- Exporting contract information
- Exporting license information
- View metric system charts
- View usage logs
- Show format and params columns in usage logs
- View company information
- General Access:
- Default user permissions (preferences, landing page, confirming account, viewing received notifications)
Users
The Role-Based Access Control feature offers a robust and flexible way to manage user access within the system. By understanding the available roles and permission groups, security administrators can assign the correct level of access to each user, enhancing security and optimizing the workflow.
The following table illustrates how roles in the previous system are mapped to the new Role-Based Access Control system:
| Previous System Role | New System Role |
|---|---|
| Admin | Security Administrator |
| Technical | Network Administrator |
| Sales | Subscription Manager |
User Management
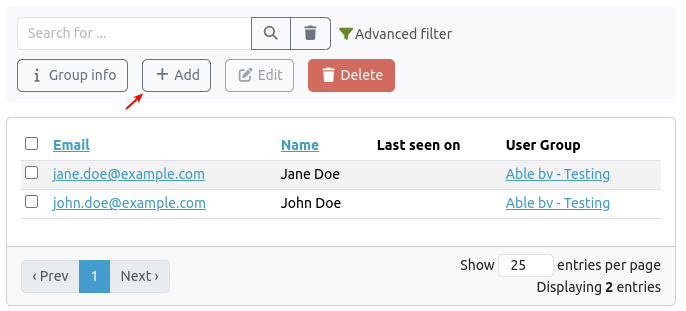
Go to Cloud Access Management > Users to add, modify or remove users.
The following is an example of how to add a new user:
-
Click on the Add button.
-
Enter the user's email address and name, then select the appropriate group.
-
Select the desired roles and permission groups , then click on the Submit button.
Impersonation
The impersonation feature allows administrators to seamlessly switch into the view of another user without requiring their credentials. By clicking the impersonate button, they can experience the platform exactly as the selected user would, enabling them to test roles, permissions and validate user-specific settings.
- Go to Cloud Access Management > Users.
-
Click on the e-mail address of a user.

-
Click on the impersonate button.

-
To end impersonation, select stop impersonation in the top right corner.

User Preferences
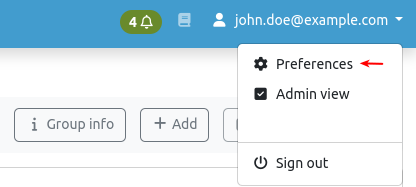
By clicking on the username in the top right corner and selecting preferences, users can customize their personal AXS Guard Cloud settings, such as homepage preferences and the session timeout.
Cloud Usage
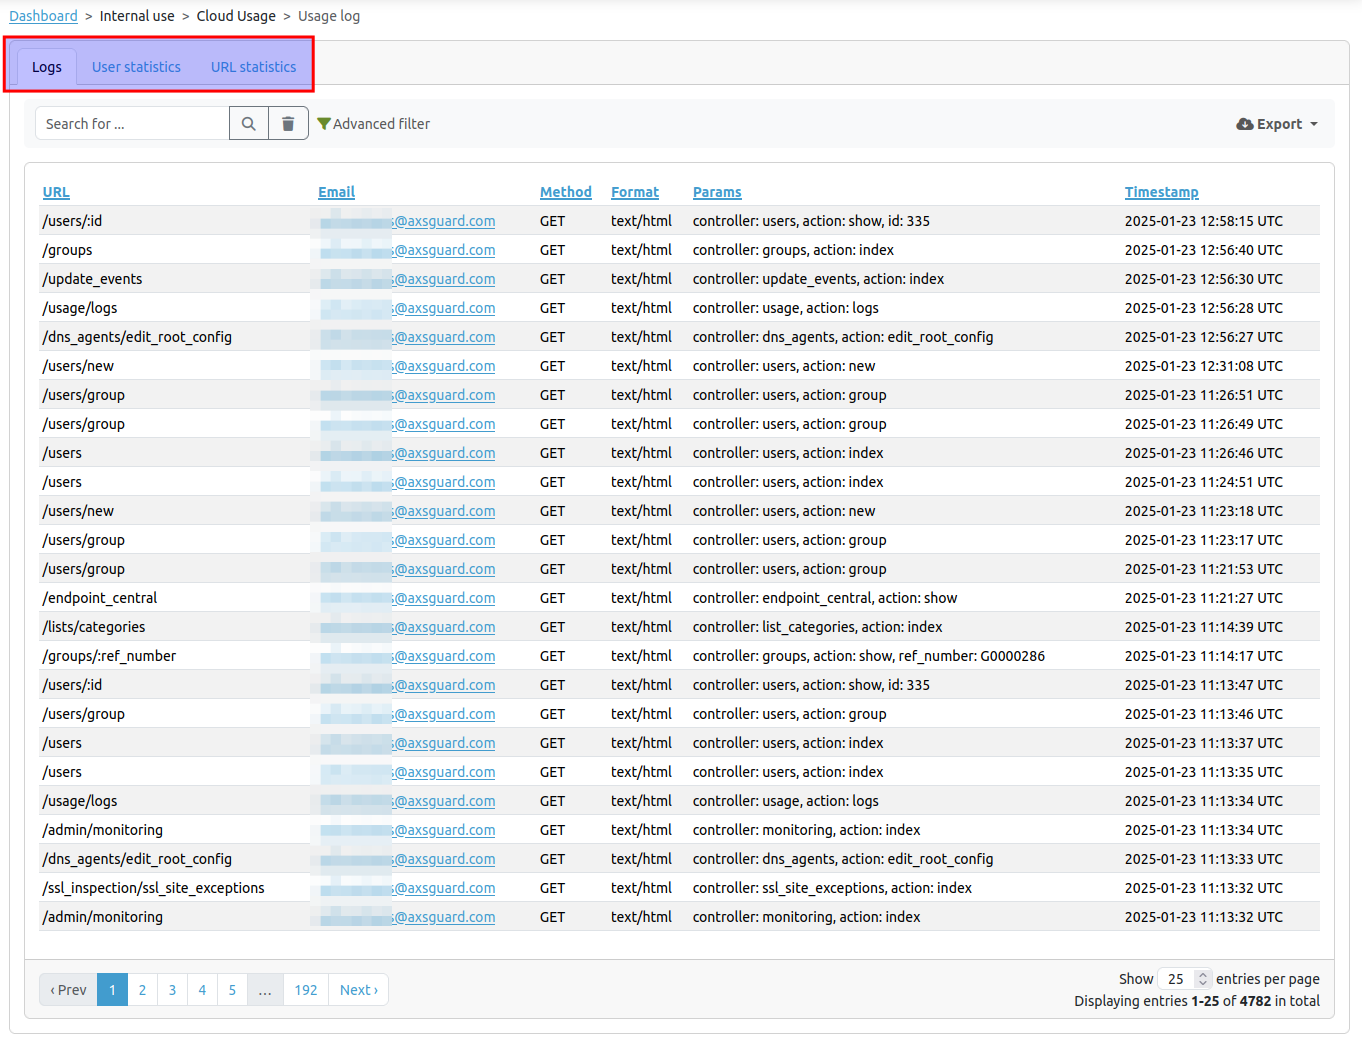
Go to Cloud Access Management > Cloud Usage for a log of user activity, specifically related to interactions within the system. Here you will find a detailed record of various requests made, showing what was accessed, by whom, and when.
Download Center
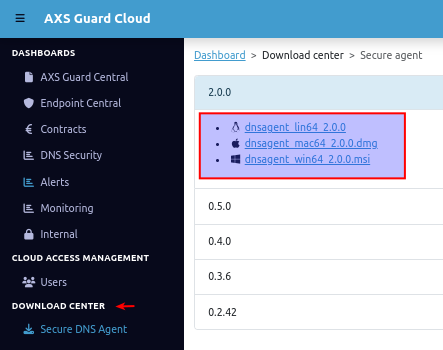
The download center provides a centralized and organized location for users to securely download client software, such as the SecureDNS agent, the AXS Guard SSO tool and the RDP client.
Support
If you encounter a problem
If you encounter any issues with the AXS Guard Cloud, don't hesitate to reach out to our technical support department.
Contact Information
(+32) 15-504-400
support@axsguard.com
