L2TP
Introduction
About this Document
The AXS Guard L2TP How To serves as a reference source for technical personnel and system administrators. It explains how to configure the AXS Guard L2TP server and how to set up an L2TP VPN tunnel.
Examples used in this Guide
All setups and configuration examples in this guide are executed as an advanced administrator. Some options are not available if you log in as a full administrator or a user with lower access privileges.
As software development and documentation are ongoing processes, the screenshots shown in this guide may slightly deviate from the current user interface.
Basic Concepts of L2TP
Overview
In this section, we provide a basic explanation of the L2TP protocol. Topics covered in this section include:
-
A definition of L2TP
-
A brief history of L2TP
-
The benefits of using L2TP
Introduction to L2TP
The Layer 2 Tunneling Protocol (L2TP) is a tunneling protocol used with Virtual Private Networks (VPNs) based on the IPsec framework. It enables roaming users to establish a secure connection to the private network of their company HQ using an L2TP client. The aim is to allow users to securely access documents, e-mails or any other network resources via the Internet as if they were operating from their own desk. The L2TP client software is available on any Windows version.
L2TP is able to authenticate users, create a virtual tunnel, encrypt and compress the data traveling within the tunnel. The tunnel itself is not encrypted; only the data is. L2TP supports networks with more than one network operating system. This means it can operate over IPX, NetBEUI, and IP networks.
Although L2TP acts like a Data Link Layer 2 protocol (of the OSI model), L2TP is in fact a Session Layer 5 protocol, and uses the registered UDP port 1701.
Important
By default, the Windows client will try to establish an unencrypted tunnel using UDP port 1701, which is insecure. This will fail, because the port is closed on the AXS Guard. For security, this process has been wrapped into IPsec.
L2TP History
Published in 1999 as proposed standard RFC 2661, L2TP has its origins primarily in two older tunneling protocols for PPP: Cisco’s Layer 2 Forwarding (L2F) and Microsoft’s Point-to-Point Tunneling Protocol (PPTP). A new version of this protocol, L2TPv3, was published as proposed standard RFC 3931 in 2005. L2TPv3 provides additional security features, improved encapsulation, and the ability to carry data links other than simply PPP over an IP network (e.g., Frame Relay, Ethernet, ATM, etc).
Benefits of L2TP
L2TP provides strong security benefits, such as:
-
Authentication
-
Data Encryption
-
Data Integrity
The security benefits as listed above, are implemented by the IPsec framework. For detailed information about IPsec, see the AXS Guard IPsec How To, which is accessible via the Documentation button in the Administrator Tool.
IPsec security occurs at two levels: the user level and the machine level, as explained further.
-
User-level Authentication: The user must be authenticated before he or she is able to send data over the L2TP tunnel. This is done by entering a user name and a password.
-
Machine-level Authentication: machine-level Authentication is performed by the IPsec framework through the exchange of X.509 certificates during the establishment of the IPsec connection.
Info
User-level authentication is presently limited to a static password. More authentication methods may become available in future versions.
For more information about X.509 certificates and the Public Key Infrastructure through which they are managed and implemented, see the AXS Guard PKI How To, which can be accessed via the Documentation button in the Administrator Tool.
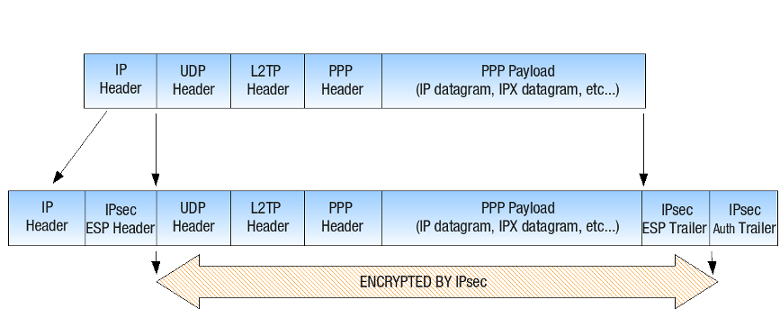
The structure of L2TP packets before and after encapsulation by IPsec is illustrated below.
DHCP Ranges
Overview
L2TP clients are automatically assigned an IP address by the AXS Guard L2TP server using DHCP.
DHCP (Dynamic Host Configuration Protocol) is a network application protocol used by network devices (DHCP clients) to automatically obtain configuration information for operation in an Internet Protocol network. DHCP reduces the system administration workload, allowing devices to be added to the network without any manual intervention.
The IP address which is assigned to an L2TP client affects routing; if the L2TP client and server are in a different IP range, standard routing is applied. If the ranges match, the AXS Guard L2TP server uses Proxy ARP. Both scenarios are explained in the following sections.
About Proxy ARP
Proxy ARP is a technique in which a host, usually a router, answers ARP requests intended for another host by supplying its own physical address. By "pretending" to be another host, the AXS Guard correctly routes the traffic back to the requesting host. Proxy ARP is defined per RFC 1027. For more information about ARP, see the appropriate online resources.
Client and Server IP in Different IP Ranges
In this scenario, the client’s L2TP interface has an IP address in a different IP range than the LAN of the AXS Guard L2TP server (illustrated below). Standard routing applies.

-
The L2TP client with IP 10.0.0.1 sends a request to a server in the AXS Guard LAN. This server has IP 192.168.250.200.
-
The server receives the request and replies using the client’s IP address 10.0.0.1 as its destination.
-
Since this IP address (10.0.0.1) is in a different range than the AXS Guard LAN, the packet is automatically routed through the L2TP interface (gateway) of the AXS Guard.
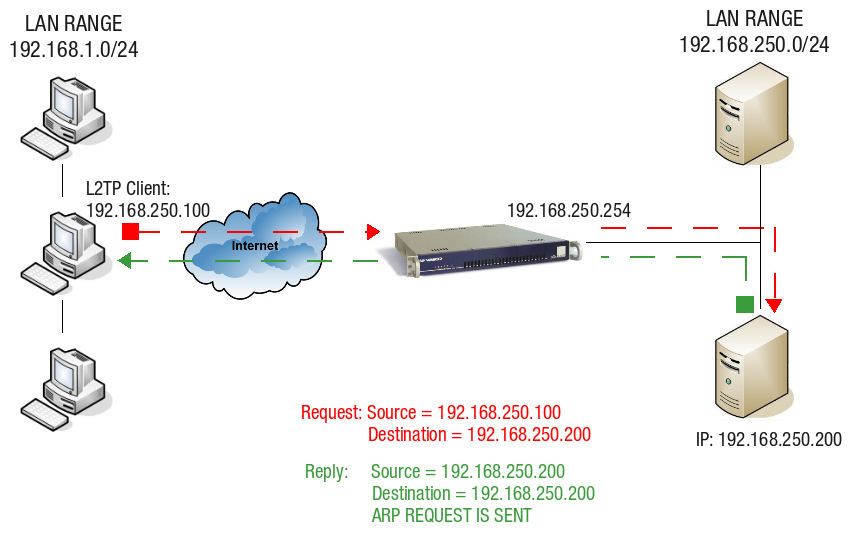
Client and Server IP in the Same IP Range
The client’s L2TP interface has an IP address in the same IP range as the LAN IP of the AXS Guard L2TP server, as illustrated below. Traffic can only be routed correctly using Proxy ARP.
-
The L2TP client with IP 192.168.250.100 sends a request to a server in the AXS Guard LAN. This server has IP 192.168.250.200. The request is sent to the default gateway, which is the AXS Guard.
-
The server replies using the client’s IP address 192.168.250.100 as its destination. Since this address is within the same IP range as the AXS Guard LAN, the contacted server “thinks” it can reply directly via the LAN using ARP.
-
This is not the case, since the reply needs be routed back to the originating client and not the LAN. The AXS Guard solves this problem by using Proxy ARP.
L2TP Server Configuration
Configuration Overview
-
Go to Feature Activation > VPN to enable the AXS Guard IPsec and L2TP features.
-
Go to PKI and issue the certificates required for the server and clients.
-
Go to VPN > IPsec > Server to configure the IPsec server certificate.
-
Go to VPN > L2TP to configure the L2TP DHCP settings.
-
Go to VPN > IPsec > Tunnels to enable the L2TP tunnel definition.
-
Go to Authentication > Services to configure the authentication policy for L2TP clients.
-
Configure your clients.
Enabling the L2TP Feature
-
Log on to the AXS Guard appliance.
-
Navigate to System > Feature Activation.
-
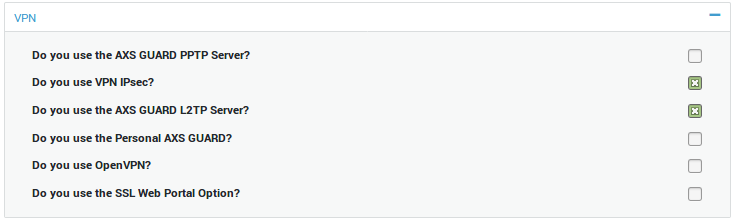
Expand the VPN menu, enable the following options and update your configuration.
-
Do you use VPN IPsec?
-
Do you use the AXS Guard L2TP Server?
-
About Server and Client Certificates
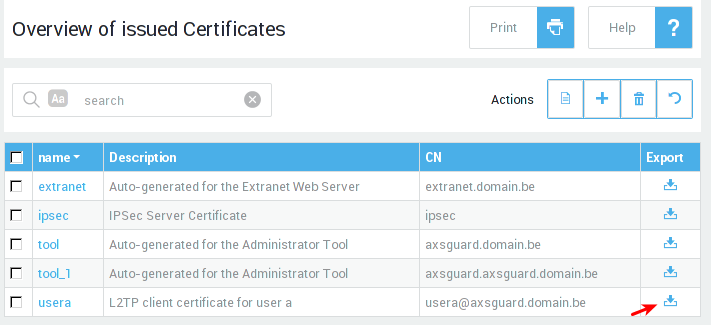
You must use the AXS Guard CA (PKI > Certificates) to create the appropriate L2TP client and server certificates. How to use the AXS Guard PKI is explained in the PKI How To, which can be downloaded by clicking on the Documentation button in the administrator tool. What follows is an overview of what is covered in this how to.
-
How to initialize the AXS Guard CA
-
How to generate various certificates
-
How to import, export and revoke certificates
-
How to configure automatic notifications related to PKI.
Important
A separate client certificate is required for each L2TP user.
Server Certificate Configuration
The server certificate is used for machine-level authentication, i.e. to identify the L2TP server.
-
Log on to the AXS Guard appliance
-
Navigate to VPN > IPsec > Server.
-
Enable X509 Authentication.
-
Select the appropriate server certificate. Go to PKI > Certificates to create or import certificates.
-
Update your configuration.
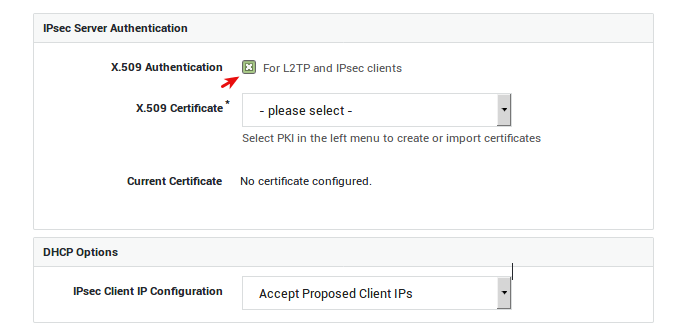
| Option | Description |
|---|---|
X.509 Authentication |
Enable this option if you intend to configure IPsec tunnels for L2TP and other IPsec clients. The X.509 certificate is used by the IPsec server to identify itself to IPsec clients, a.k.a. road warriors. Go to PKI > Certificates to import or create certificates for the IPsec server and its clients. |
Server Certificate |
Select the appropriate server certificate. Go to PKI > Certificates for an overview of available certificates or to create or import a new server certificate. |
| Option | Description |
|---|---|
IPsec Client IP Configuration |
Select whether or not IPsec clients should obtain an IP address from a DHCP server in your network. |
DHCP Server IP |
This field is only visible if you selected to use DHCP for IPsec clients. Enter the IP address of a DHCP server in your secure LAN. |
| Option | Description |
|---|---|
Select Network Interfaces |
This option is only available if Internet redundancy is enabled on your system. Check to specify the network interfaces that should handle IPsec traffic. |
Interfaces to bind IPsec |
This field only appears if your enabled the previous option. Select the network interfaces to be used by the IPsec server. You can only select Internet interfaces; DMZ interfaces cannot be selected. |
NAT-Traversal
NAT-Traversal is a technique to establish and maintain TCP/IP connections which traverse network address translation (NAT) gateways. It is required when the client, the server or both are natted, which is most often the case with L2TP. A natted IP is an IP address that is rewritten (translated) in the IP headers as traffic passes through a router or a firewall. In most cases, only IP addresses in private ranges are rewritten.
| IP Ranges |
|---|
10.0.0.0 - 10.255.255.255 |
172.16.0.0 - 172.31.255.255 |
192.168.0.0 - 192.168.255.255 |
Info
- NAT-Traversal is enabled by default. For more details about NAT-Traversal, see the AXS Guard IPsec How To, which can be accessed via the Documentation button in the AXS Guard administrator tool.
- Windows Vista, Windows Server 2008 and following versions of Windows do not support IPsec NAT-T security associations by default.
DHCP Configuration
In this section, we explain how to configure general AXS Guard L2TP server settings, such as:
-
DHCP Settings
-
DNS Settings
-
WINS Settings
Info
For details about DHCP, Netmask Settings and DNS, see the AXS Guard System Administration How To, which can be accessed via the Documentation button in the Administrator Tool.
-
Log on to the AXS Guard appliance.
-
Navigate to VPN > L2TP > DHCP.
-
Enter the settings as explained in the table below.
-
Update your configuration.
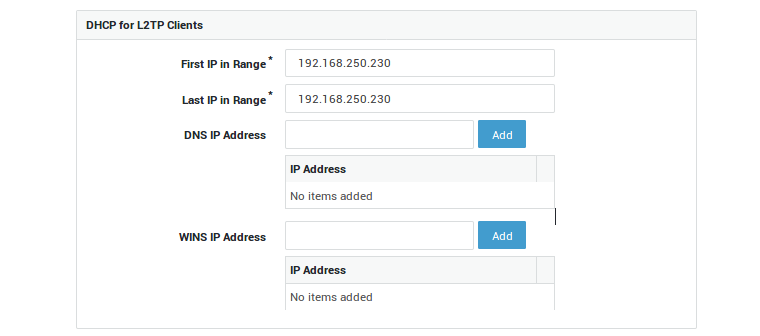
| Option | Description |
|---|---|
First IP in Range |
The first IP address of the IP address pool reserved for L2TP clients. The IP range may be a subrange of the secure LAN IP range, in which case ARP proxying is used. Proxy ARP is a technique in which a host, usually a router, answers ARP requests intended for another host by supplying its own physical address. By "pretending" to be another host, the AXS GUARD appliance correctly routes the traffic back to the requesting host. Proxy ARP is defined per RFC 1027. |
Last IP in Range |
The last IP address of the IP address pool reserved for L2TP clients. |
DNS IP Address |
Specify the DNS server(s) to be used by the remote L2TP client. This is usually the secure LAN IP of the AXS GUARD appliance or the IP address of your primary Domain Controller. |
WINS IP Address |
Specify the WINS server(s) to be used by the remote L2TP client. WINS stands for Windows Internet Naming Service and is Microsoft’s implementation of DNS. Note: The AXS GUARD appliance cannot be used as a WINS server. |
Important
- AXS Guard is not a WINS server, nor can it be used for that purpose. The WINS server is usually the primary domain controller in your Windows domain.
- Make sure that the L2TP DHCP IP ranges do not overlap those of the AXS Guard DHCP server (under Network > DHCP); otherwise routing problems may occur.
L2TP Tunnel Settings
Points of Attention
-
Enable the L2TP Tunnel before you configure the client.
-
The local network range is set automatically when you enable the L2TP feature. This range is based on the secure LAN configuration of your AXS Guard appliance. If a different range is required, you must specify it manually.
-
The L2TP implementation on the AXS Guard is wrapped into IPsec. See the IPsec How To for information about the tunnel parameters shown in this section.
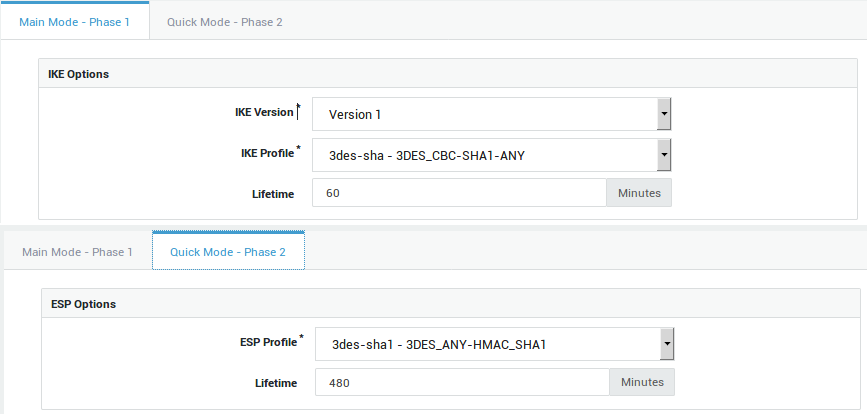
Windows-specific Server Configuration
-
Log on to the AXS Guard appliance.
-
Navigate to VPN > IPsec > Tunnels.
-
Click on L2TP.
-
Enable the tunnel and verify the IKE and ESP profiles:
-
IKE version: Version 1
-
IKE profile: 3des-sha - 3DES_CBC-SHA1-ANY
-
ESP profile: 3des-sha1 - 3DES_ANY-HMAC_SHA1
-
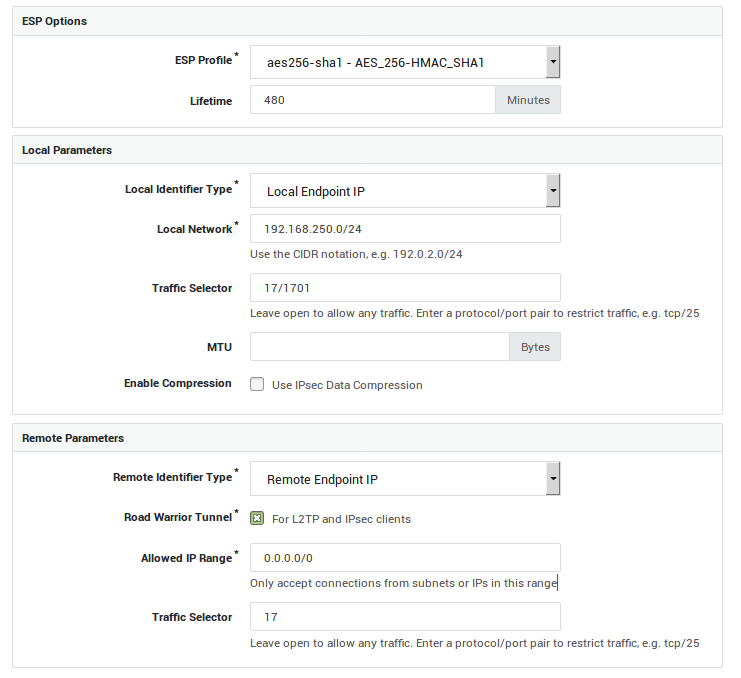
Server Configuration for Android and IOS Devices
-
Log on to the AXS Guard, as explained in the System Administration How To, which is accessible via the Documentation button in the Administrator Tool.
-
Navigate to VPN > IPsec > Tunnels.
-
Add and enable a new L2TP definition with the following settings:
Phase 1 (Authentication)
-
Authentication: Pre-shared Key (PSK)
-
IKE version: 1
-
IKE profile: aes256-sha
-
Enter a pre-shared key
-
Remote IP Type: Any
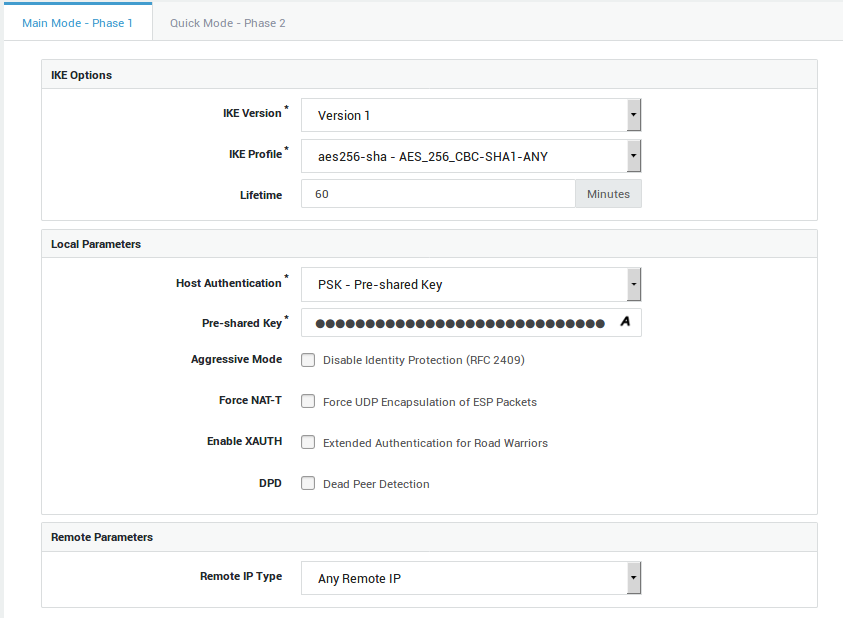
Phase 2 (IPsec Configuration)
-
ESP profile: aes256-sha1
-
Local identifier type: Local endpoint IP
-
Local network: the LAN IP of the AXS GUARD appliance
-
Allowed protocol and ports: 17/1701
-
Remote identifier type: Remote endpoint IP
-
Road Warrior Tunnel: enabled
-
Remote network within: 0.0.0.0/0
-
Allowed protocol and ports: 17
Granting Access to L2TP
In order for a user to make a connection, his/her group must first be allowed L2TP access. Note that permissions can be overruled at the user level.
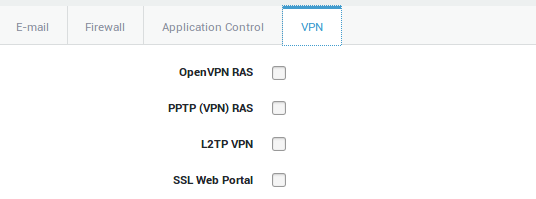
Group-level Access
-
Navigate to Users & Groups > Groups
-
Select the appropriate group
-
Select the VPN tab
-
Check the appropriate VPN option
-
Click on update to save your settings
User-level Access
-
Log on to the AXS Guard appliance.
-
Navigate to Users & Groups > Users.
-
Click on the user who requires access to the AXS Guard L2TP VPN server.
-
Select the VPN Tab.
-
If L2TP is enabled in the user’s group, select use group configuration. If not, set this option to on to overrule the group configuration.
-
Update your configuration.
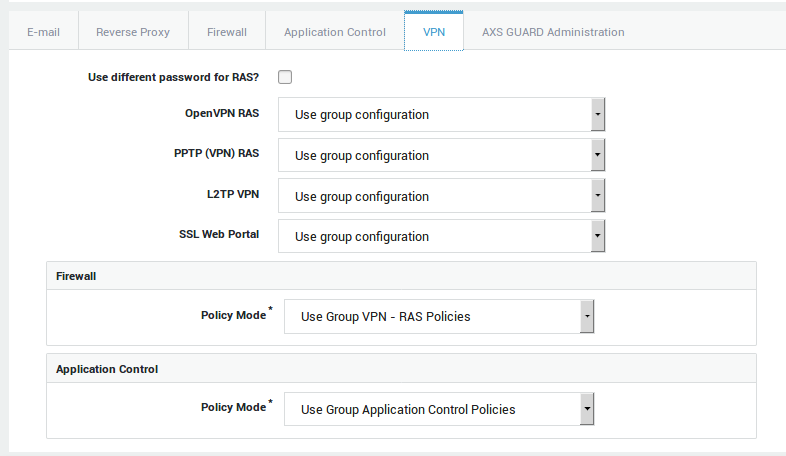
VPN Password Settings
You have the option to specify a different password for L2TP (VPN) access. If none is specified, the user will have to log in with the password entered in his / her user profile.
Firewall and Application Control Policies for Remote Access
By default, the AXS Guard system-level Firewall Policy is applied. The system-level Firewall Policy enforces the strictest security (For information about firewall policies, see the AXS Guard Firewall How To, which can be accessed via the Documentation button in the Administrator Tool).
You can specify a different Firewall Policy to be applied for L2TP (VPN) access. The VPN Firewall Policy may be modified / customized while the client is connected. Changes are applied on the fly and occur without connection loss.
Important
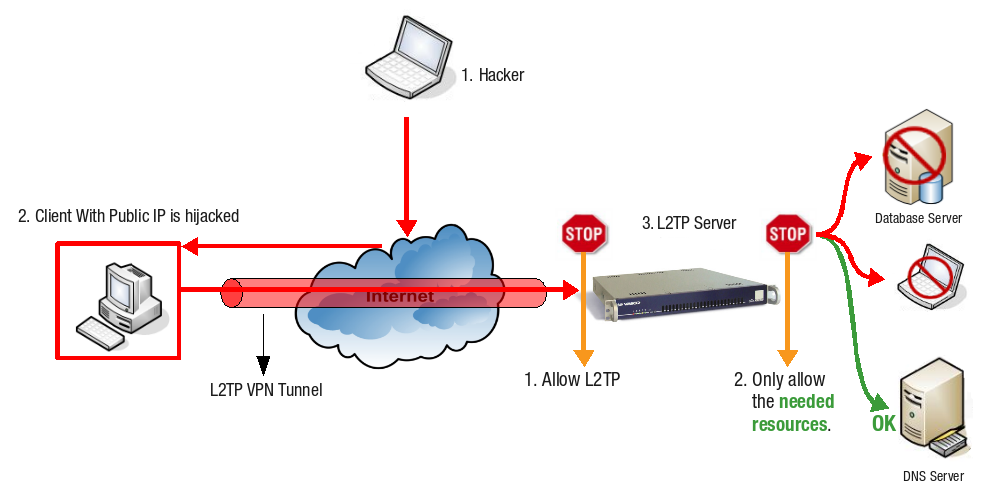
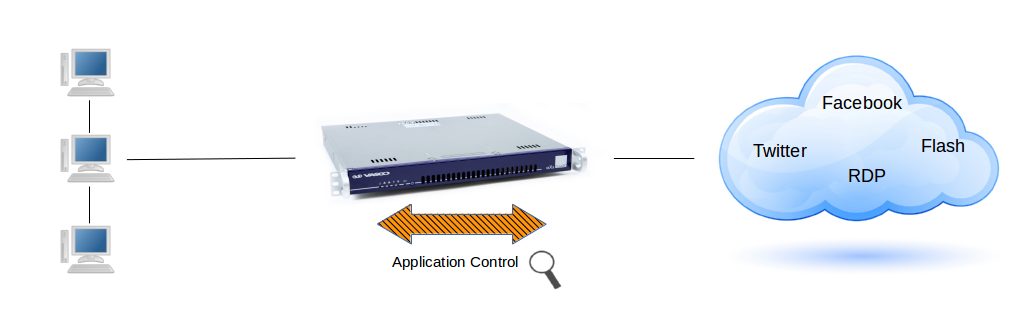
- It is critical to implement the strictest Firewall Policies at the AXS Guard system level. This offers adequate protection in case the client’s security is compromised. Allowed network traffic must be restricted to the resources that are needed by the L2TP client (see the illustration below).
- Do not use the AXS Guard
no-restrictionsand theint-no-restrictionsFirewall Policies as these seriously jeopardize your network security. Use these for testing only.
-
A attacker on the Internet scans public IP addresses for open services and vulnerabilities.
-
The attacker hijacks the client which has a public IP address.
-
The attacker can execute code posing as the hijacked computer and can access the resources of the corporate LAN through the hijacked computer’s L2TP connection.
Info
A predefined Firewall Policy, fwd-access-lan, is available on the AXS Guard for administrators who do not wish to customize the VPN Firewall configuration.
Recommendations for system administrators:
-
Create strict, separate AXS Guard Firewall Policies for L2TP VPN access in agreement with your company security policies. How to create and assign Firewall Policies is explained in the AXS Guard Firewall How To, which is accessible via the Documentation button in the Administrator Tool.
-
Implement a strong Firewall on the client side, either via software or through hardware. Make sure to allow outbound traffic for the following UDP ports: 500 and 4500 (required for IPsec).
-
Make sure to allow IP Protocol 50 (ESP).
About Application Control
The application control system monitors the application layer (layer 7 of the OSI model) of the network. This is also known to as Deep Packet Inspection (DPI), a form of computer network packet filtering that examines the data part of a packet as it passes the AXS Guard, searching for defined criteria, such as protocols or websites, to decide whether the packet may pass or needs to be blocked. The AXS Guard also collects and reports statistical information about all layer 7 traffic.
The application control system allows application-layer detection of protocols, regardless of the port being used. This means that it is possible to both detect known protocols on non-standard ports, e.g. http traffic on ports other than 80, and also the opposite, e.g. detect Skype traffic on port 80. The system will also detect and block access to certain file types, such as multimedia files (if enabled).
Group-level Configuration
-
Navigate to Users & Groups > Groups.
-
Click on the appropriate group name.
-
Select the VPN tab to specify the VPN firewall and application control policies.
-
Update your configuration.
Option |
Description |
|---|---|
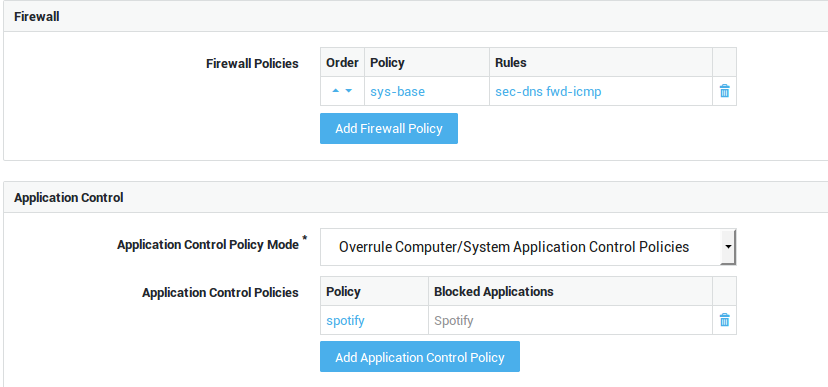
Add Firewall Policy |
Select specific firewall policies for group members who connect to the corporate network with a VPN client, such as a PPTP client. Go to Firewall > Policies > Dynamic for an overview of defined firewall policies. |
| Option | Description |
|---|---|
Use computer/system application control policies |
Enforce the system-wide policies, assigned under Application Control > General and the computer-level policies, if any. |
Add to computer/system application control policies |
Assign specific policies to this group, in addition to the system-wide policies configured under Application Control > General and computer-level policies, if any. |
Overrule computer/system application control policies |
Do not enforce the system-wide policies and computer-level policies, but only the specified policies. The specific policies will be enforced when a member of the group successfully authenticates. |
User-level Configuration
-
Navigate to Users & Groups > Users.
-
Click on the appropriate username.
-
Select the VPN tab and select the appropriate firewall and application control policy modes as explained below.
-
Update your configuration.
| Option | Description |
|---|---|
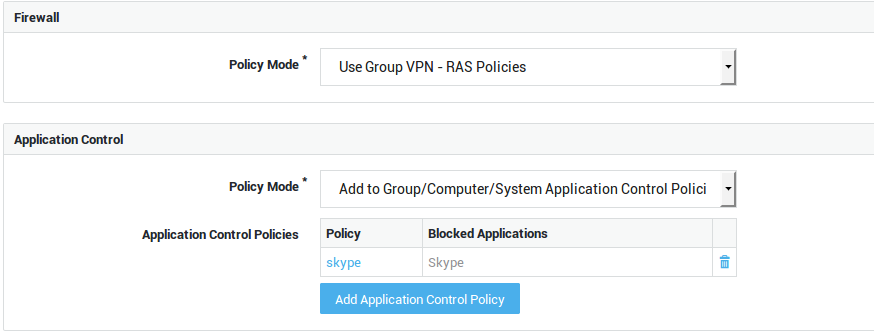
Use Group Firewall Policies |
Select this option if you wish to apply the same firewall policies for VPN use as defined in the user’s group. |
Add to Group Firewall Policies |
Select this option to add specific policies for VPN use, in addition to the user’s group firewall policies. |
Overrule Groups Firewall Policies |
Select this option to overrule the group firewall configuration and specify unique policies for the user. |
| Option | Description |
|---|---|
Use group application control policies |
Only enforce the policies as configured for the user’s group. |
Add to group application control policies |
Enforce the policies as configured for the user’s group and the policies that are specified in the user profile. |
Overrule group application control policies |
Only policies configured at the user, computer and system levels are enforced. Group policies are not enforced. |
Overrule Group / Computer / System Application Control Policies |
Only the application control policies configured at the user level are enforced. |
User Authentication
-
Go to Authentication > Services.
-
Select the L2TP VPN service.
-
Select the desired authentication policy, e.g. DIGIPASS.
-
Update your configuration.

AXS Guard Service |
Authentication Policy |
|---|---|
PPTP / SSTP / L2TP |
|
Configuration Examples
Windows 7
Overview
In this chapter, we explain how to set up your L2TP client in Windows 7. Major steps include:
-
Verifying Windows 7 NAT-T settings.
-
Importing an X.509 certificate issued by the AXS Guard CA.
-
Creating a new connection with the connection wizard.
-
Testing your L2TP connection.
NAT Traversal in Windows 7
By default, Windows Vista, Windows Server 2008 and following versions of Windows do not support IPsec NAT-T security associations.
If you have to put your L2TP server behind a NAT device and use an IPsec NAT-T environment, you must create a registry value on the Windows VPN client.
-
Start regedit as an administrator
-
Go to
HKEY_LOCAL_MACHINE\SYSTEM\CurrentControlSet\Services\PolicyAgent -
Add the following DWORD (32-bit) entry:
AssumeUDPEncapsulationContextOnSendRule -
Modify the value data as follows:
-
0: A value of 0 (zero) configures Windows so that it cannot establish security associations with servers that are located behind NAT devices. This is the default value. -
1: A value of 1 configures Windows so that it can establish security associations with servers that are located behind NAT devices. -
2: A value of 2 configures Windows so that it can establish security associations when both the server and the Windows VPN client computer are behind NAT devices.
-
-
Restart your computer to apply the new registry settings.
Info
See http://support.microsoft.com/kb/926179/en-us for reference.
Importing X.509 Certificates
-
Log on to Windows 7 with administrator privileges.
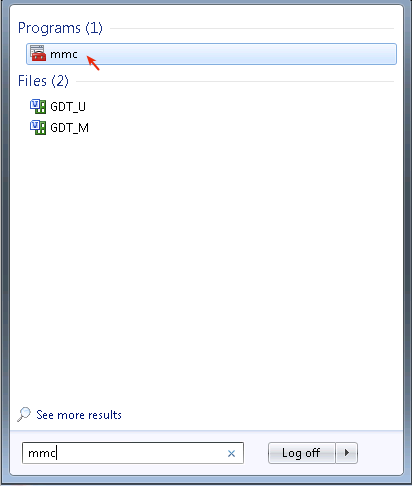
-
Run the Microsoft Management Console (Start > Run > mmc).
-
In the File Menu, select Add/Remove Snap-in.
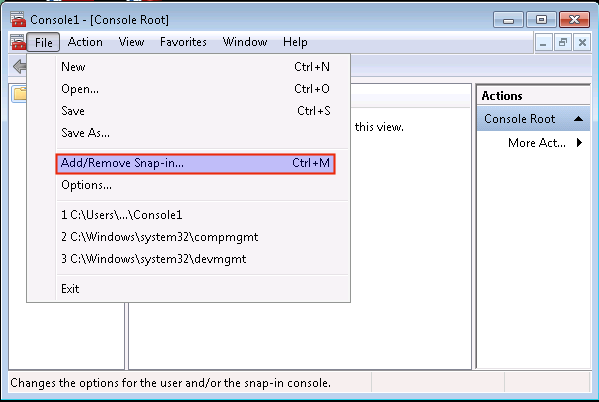
-
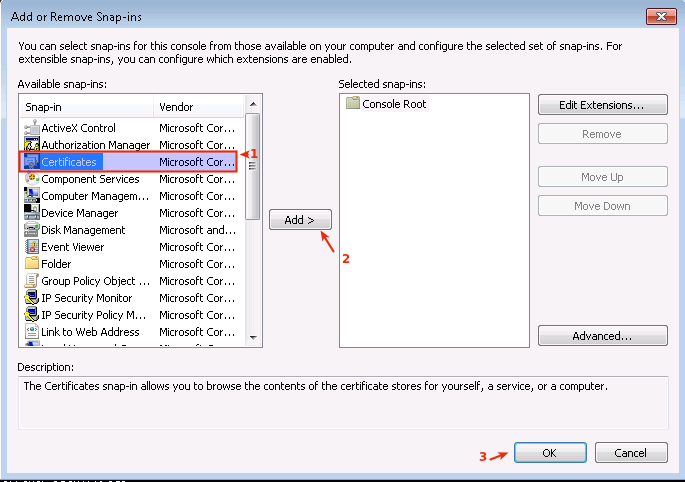
Select Certificates
-
Click on Add
-
Click on OK.
-
Select Computer Account.
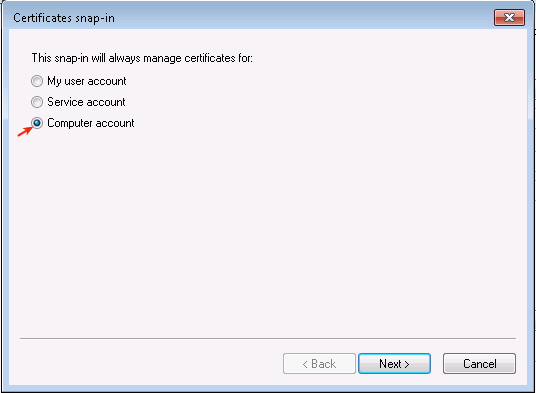
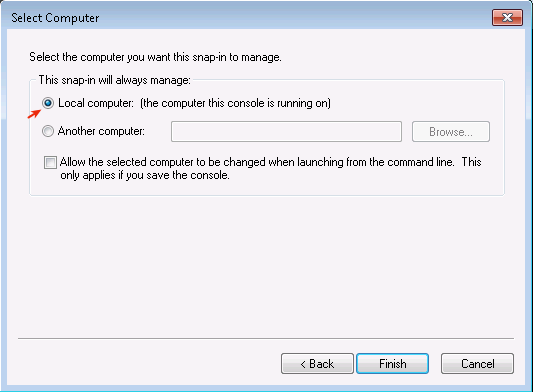
-
Select Local Computer.
-
Click on Finish.
-
Close the Add standalone Snap-in Window.
-
Expand Certificates in the Microsoft Management Console.
-
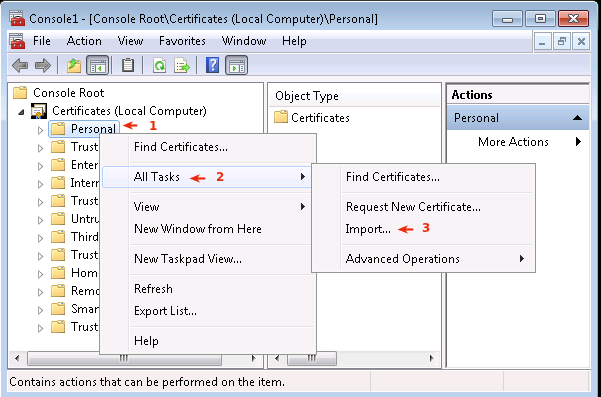
Select the Personal Folder as shown below.
-
Right-click on the Personal Folder.
-
Select All Tasks.
-
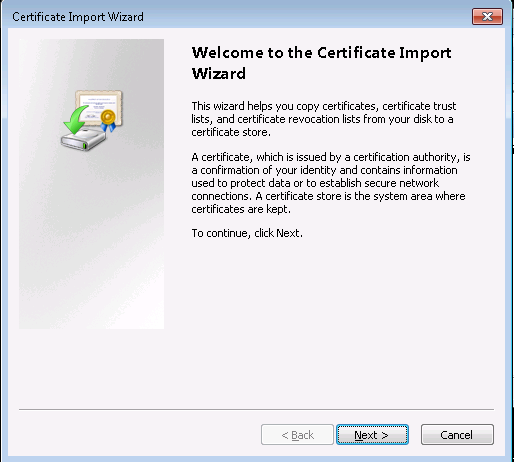
Click on Import.
-
Click on Next.
-
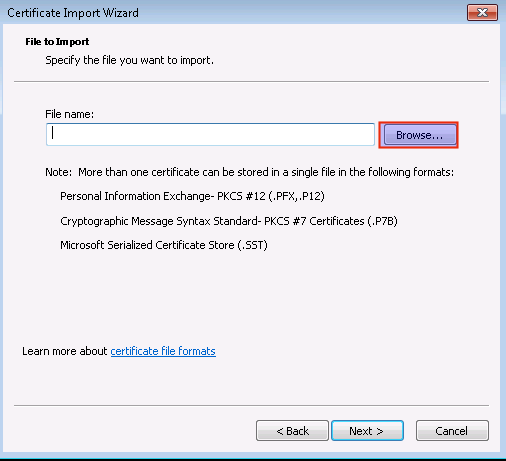
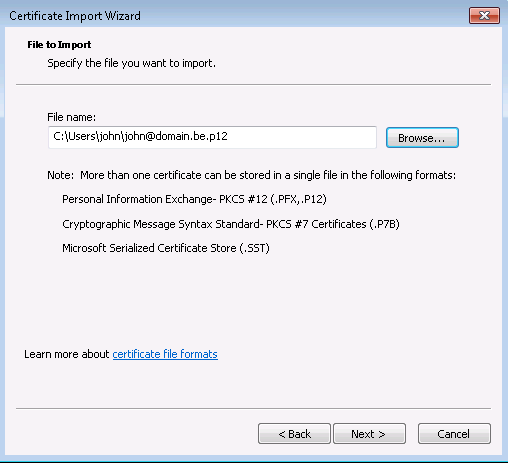
Click on Browse.
-
Set the Files of type option to
*.pfx* p12as shown below. -
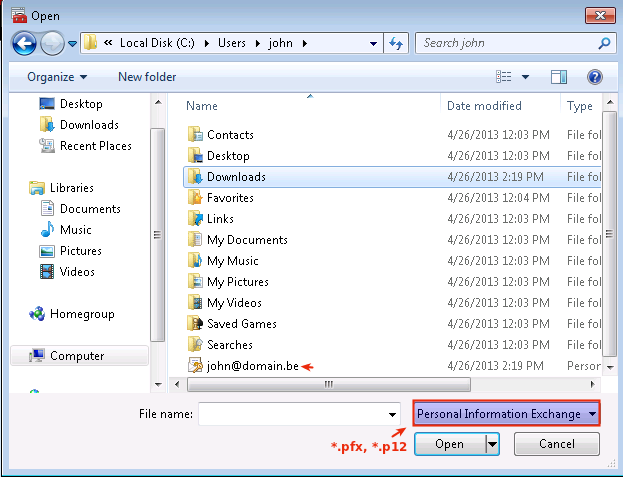
Navigate to the Directory where you stored the X.509 client Certificate.
-
Select the Certificate file.
-
Click on Open.
-
Click on Next.
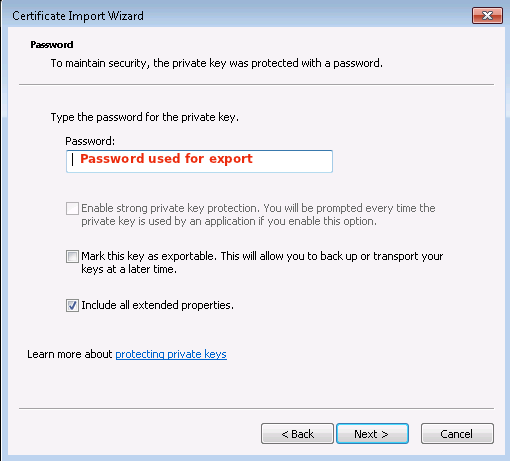
-
Enter the password of the Certificate. This is the same password that you used to export the Certificate on the AXS Guard. It is not the CA passphrase.
-
Click on Next.
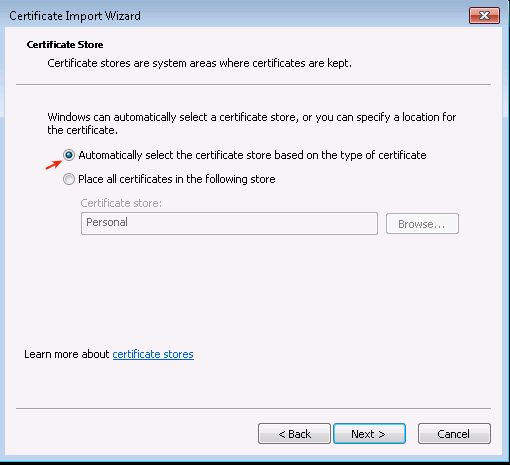
-
Choose Automatically select the certificate store based on the type of certificate.
-
Click on Next.
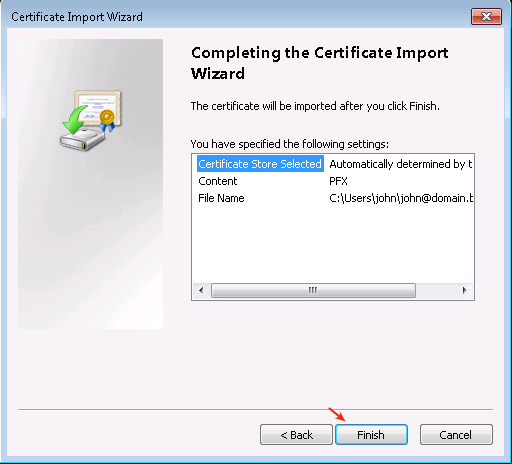
-
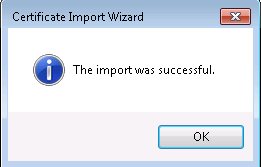
Click on Finish to complete the Certificate import process.
L2TP Connection Wizard
-
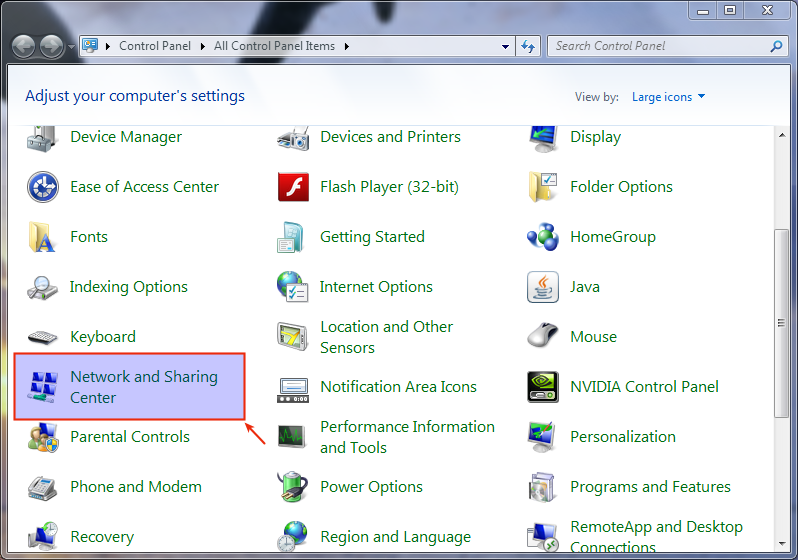
Open the Windows 7 Control Panel
-
Click on Network and Sharing Center.
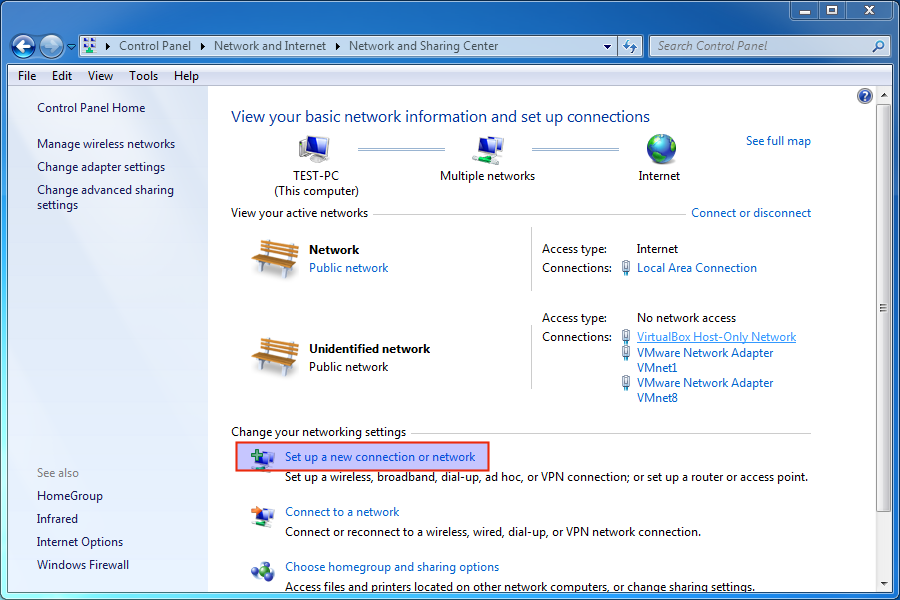
-
Click on Set up a new connection or network.
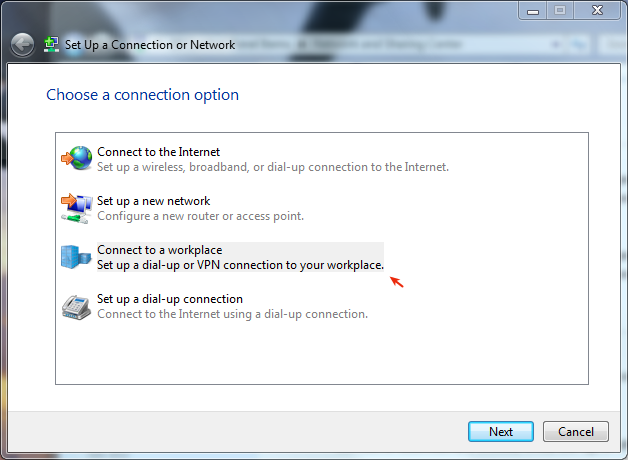
-
Select Connect to a workplace.
-
Create a new connection.
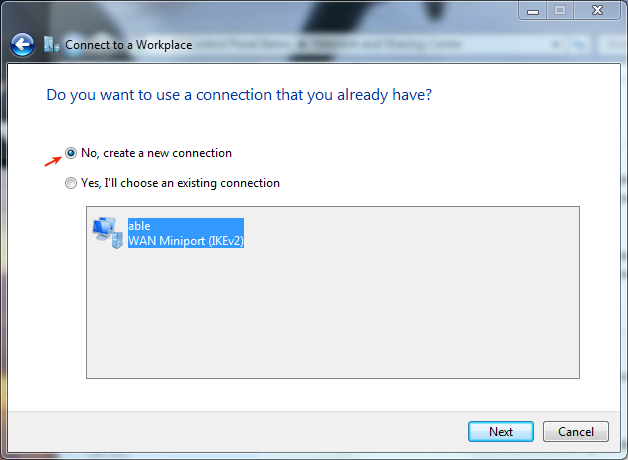
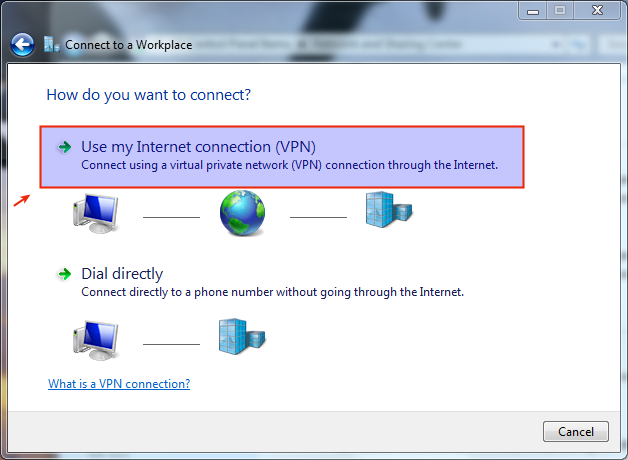
-
Select Use my Internet connection (VPN).
-
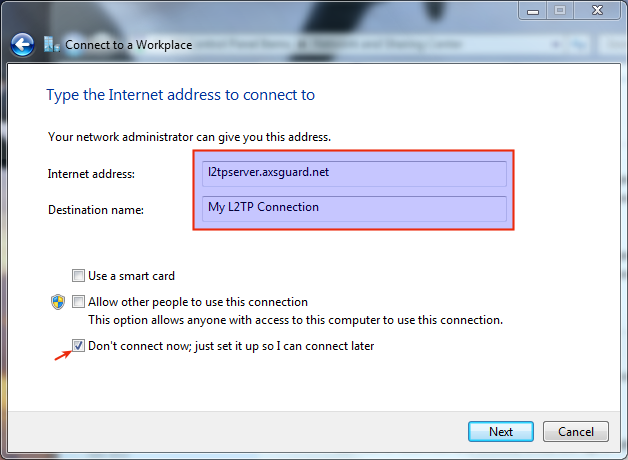
Enter the following information:
-
The L2TP server’s FQDN or IP address
-
A name for the connection
-
Select Don’t connect now
-
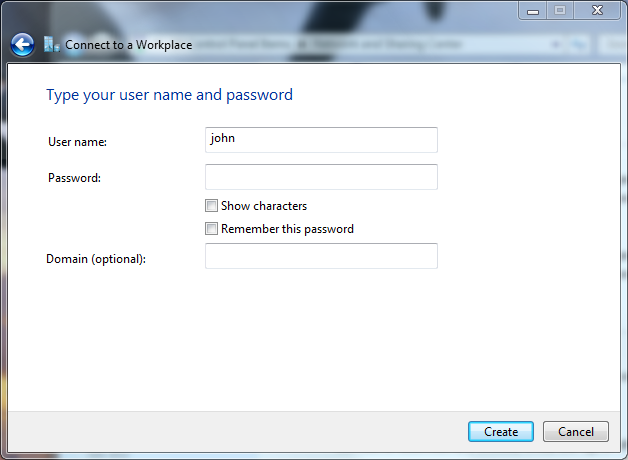
-
Enter the AXS Guard user name and click Create.
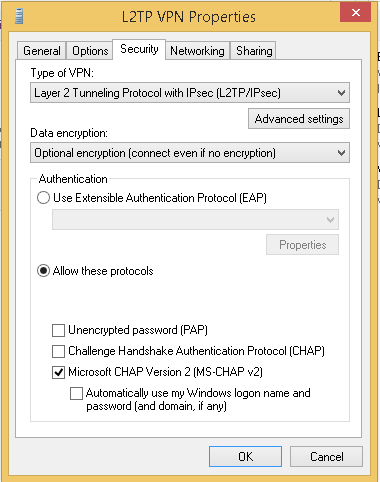
Connection and Authentication Settings
-
Select Change adapter settings in the Network and Sharing Center.

-
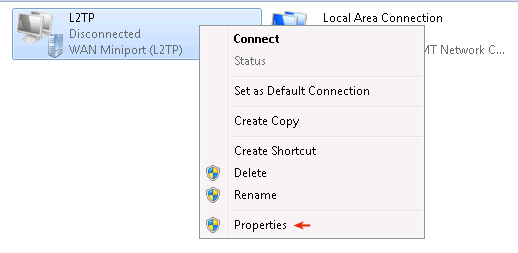
Right-click on the newly created L2TP connection and select properties.
-
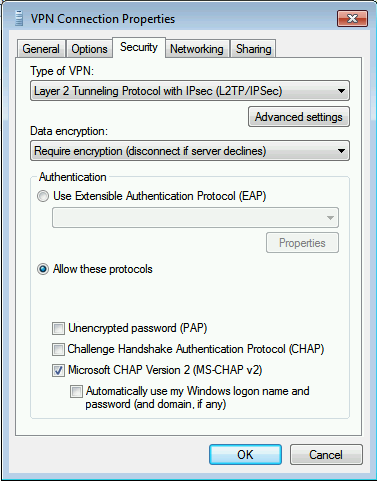
Select the security tab and configure the settings as shown below.
-
Set the Type of VPN to L2TP / IPsec
-
Set the data encryption to Require encryption
-
Check Allow these protocols and select MS-CHAP v2.
-
Important
CHAP will not work if the authentication policy on the AXS Guard appliance is set to DirectoryService.
Testing your Connection
-
Click on the Network icon in the Windows toolbar
-
Select your L2TP connection and click on connect.
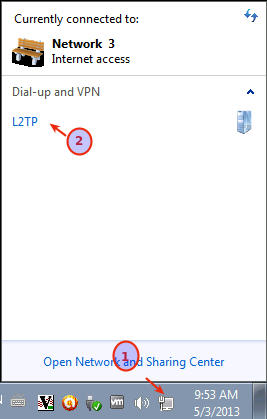
If the connection is successful, the connection icon, e.g. L2TP, will show a connected state.
Ping the LAN IP address of the AXS Guard appliance:
-
Click on Start > Run.
-
Enter
cmd. -
Press enter or click on OK.
-
In the command prompt, enter ping followed by the LAN IP address of the AXS Guard, e.g.
ping 192.168.35.128.
To know your AXS Guard LAN IP address, navigate to Network > Devices > Eth and click on the Logical Device name of the secure type (S).
Ping the internal host name of the DNS server in your network, e.g.
ping axsguard.yourdomain.com. If you cannot ping the host, verify your
DNS settings.
-
On the AXS Guard, navigate to System > General, where you can find the host name.
-
If you are using an Active Directory (AD) DNS Server, make sure to add the AXS Guard to its DNS repository. Consult your AD documentation if necessary.
Windows 8
Getting Started
In this chapter, we explain how to set up your L2TP client in Windows 8.
Before you begin:
-
Verify your Windows 8 NAT-T settings and reconfigure them if necessary.
-
Import an X.509 certificate issued by the AXS Guard CA.
L2TP Connection Wizard
-
Open the Windows 8 Control Panel and complete the wizard to create a new connection.
-
Once the connection is created, go to the Windows 8 side panel to edit its properties:
-
Select the security tab and configure your connection as follows:
-
Type of VPN: Layer 2 Tunneling Protocol with IPsec (L2TP/IPsec)
-
Data encryption: Set "Require encryption"
-
Allow these protocols: "MS-CHAP v2"
-
-
Save your configuration by clicking on OK.
Important
CHAP will not work if the authentication policy on the AXS Guard appliance is set to DirectoryService.
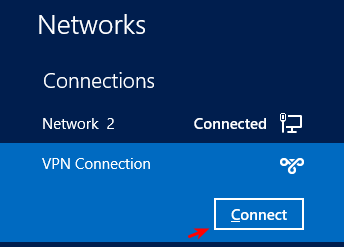
Testing your Connection
-
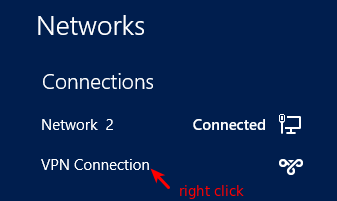
Go to the Windows 8 side pane.
-
Select the VPN connection you’ve created and click "Connect".
-
Enter your credentials when prompted, then ping a machine in your network.
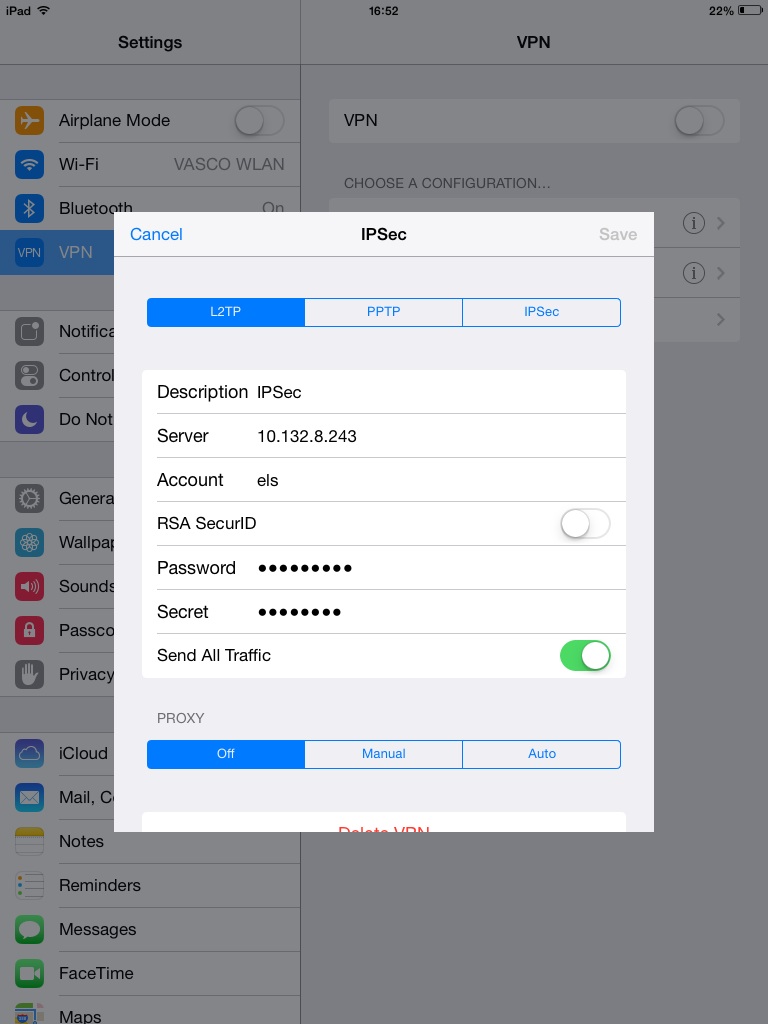
IOS and Android
Points of Attention
-
Use PSK
-
Ignore the RSA SecureID option
-
On IOS, enable "Send All Traffic"
VPN L2TP iPhone, iPad and iTouch Instructions
See https://www.strongvpn.com/setup_ios_l2tp.shtml
Android L2TP/IPsec Instructions
See https://www.vpnreactor.com/android_l2tp_ipsec.html
Troubleshooting
I have installed a 3rd party IPsec VPN client.
If you have installed another (3rd party) Windows IPsec VPN client, it may have modified the Windows system in such a way that the standard L2TP client becomes unusable.
-
Uninstall the 3rd party IPsec client (if possible) and create a new L2TP connection from scratch.
-
Consult the 3rd party IPsec VPN client documentation if the problem persists.
The L2TP connection fails.
-
Verify the L2TP Tunnel Definition.
-
Make sure the correct X.509 Certificate has been properly imported.
-
Make sure the MMC settings have been saved.
-
Make sure that the L2TP connection properties are correct.
-
If you are sitting behind a firewalled router, make sure that it allows outbound traffic to UDP ports 500 and 4500. Make sure to allow ESP traffic (IP Protocol 50). On some routers, this is also known as VPN passthrough.
-
If you have installed a software Firewall, make sure to allow outbound traffic to UDP ports 500 and 4500 and allow ESP traffic (IP Protocol 50).
-
Make sure that you have selected the correct server Certificate (navigate to VPN > IPsec > General).
-
Make sure that the L2TP Tunnel is enabled.
-
Check whether a different password has been assigned for VPN access.
-
Check the NAT traversal settings on the client.
CHAP authentication fails
CHAP will not work if the authentication policy for L2TP has been set to
DirectoryService.
NAT Traversal does not seem to work.
Reboot the client after changing its registry. Changes are not always applied on the spot.
The L2TP connection works, but I cannot access any resources in the AXS Guard secure network.
Make sure that the user has appropriate firewall rights and was assigned adequate Application Control Policies. For information about the AXS Guard firewall, see the AXS Guard Firewall How To, which can be accessed via the Documentation button in the Administrator Tool.
Support
If you encounter a problem
If you encounter a problem with AXS Guard, follow the steps below:
-
Check the troubleshooting section of the feature-specific manual.
-
Check the knowledge base on this site for information about special configurations.
-
If no solution is available in any of the above sources, contact your AXS Guard vendor.
Contact Information
(+32) 15-504-400
support@axsguard.com