IDS & IPS
Introduction
About this Document
This AXS Guard IPS How To guide serves as a reference source for technical personnel or system administrators.
Examples used in this Guide
All setups and configuration examples in this guide are executed as an advanced administrator. Some options are not available if you log in as a full administrator or a user with lower access privileges.
As software development and documentation are ongoing processes, the screenshots shown in this guide may slightly deviate from the current user interface.
General Concepts
Overview
In this section, we explain the concepts underpinning the AXS Guard Intrusion Prevention System (hereafter IPS) Module. Topics covered in this section include:
-
The situation of the IPS Module on the AXS Guard and within the IP Protocol Stack
-
IPS control mechanisms: Preprocessors and Dynamic Rules
-
IPS Actions
-
False Positives
-
Corrective Actions
What is IPS?
IPS stands for Intrusion Prevention System and is a preemptive approach to network security. IPS identifies potential software exploits and takes immediate action against them. The actions to be taken are based on existing Preprocessors and a set of Dynamic Rules divided in Classes.
Situation of IPS
Unlike Firewalls, which only filter network traffic based on packet header information, the IPS checks the content of network packets for unusual signatures. A packet may be dropped by the IPS, while allowed by the firewall, e.g. if certain TCP traffic is allowed by the firewall, but the packet’s content is flagged as malicious by the IPS. Broadly speaking, the IPS Module provides an additional layer of security by monitoring network traffic from and to the Internet / DMZ.
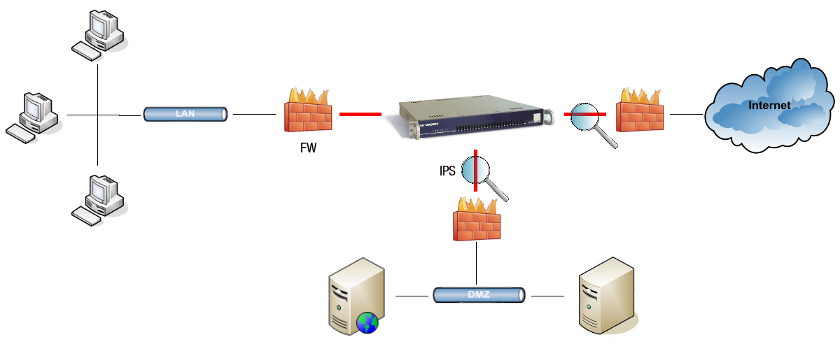
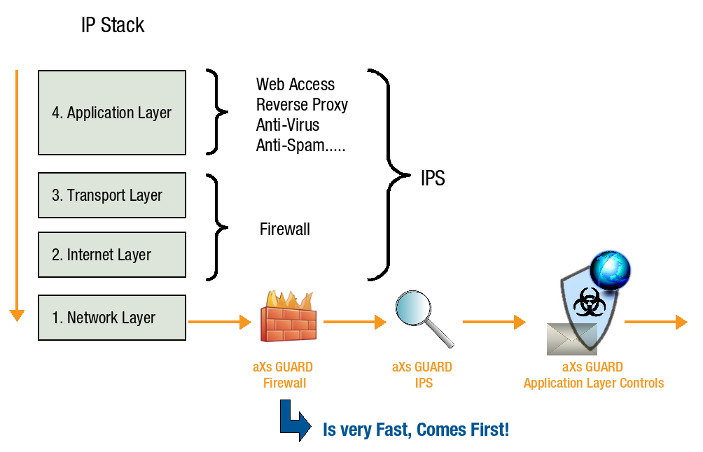
IPS in the IP Protocol Stack
IPS monitors all layers of the IP Protocol Stack. IPS checks occur after firewall checks and before application layer checks, e.g. e-mail and Web Access controls.
Control Mechanisms of IPS
Overview
The AXS Guard IPS Module uses two mechanisms to check incoming and outgoing packet signatures, as illustrated below. The first mechanism consists of Preprocessors, which are hard-coded in the IPS system. The second mechanism uses a database of Dynamic Rules, which can be tweaked by system administrators.
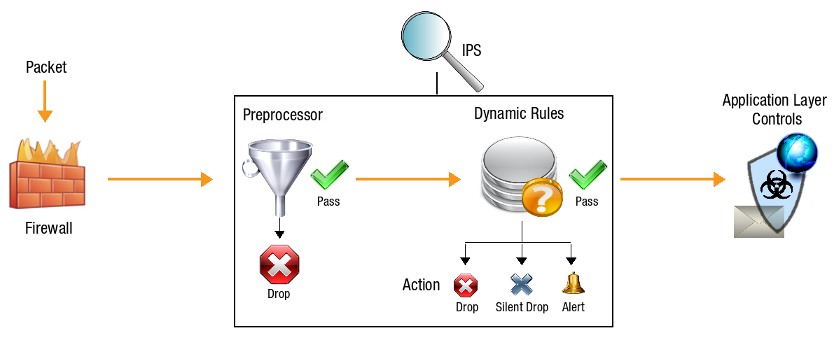
Preprocessors
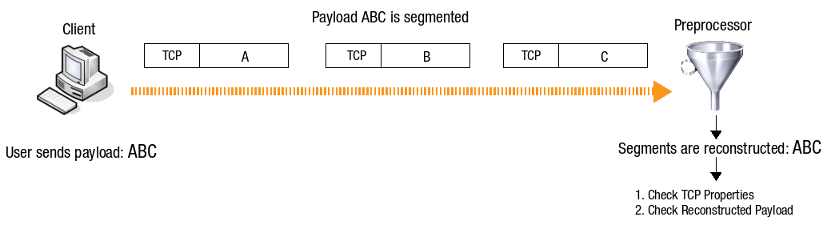
Preprocessors are the hard-coded components of the IPS Module and are automatically triggered whenever necessary. They are activated before the Rule-based detection engine and look for protocol behavior which is commonly considered as unusual or suspect, e.g. port scans. Preprocessors also support further analysis, such as reconstructing TCP segments (illustrated below) or the collection of certain statistical information.
Dynamic Rules
IPS Rules contain the necessary information to detect several types of malicious network activity. Rules consist of packet signatures, malicious program lists and anomaly-based detection techniques to identify and / or block known and potentially unknown attacks. In short, they are blueprints of attack patterns. Rules are organized in Classes which describe the type of attack, e.g. an attempted Denial of Service Attack. In turn, the Classes are organized in Categories, e.g. chat, DoS, etc. The table below provides some examples of Classes.
| Class Type | Description |
|---|---|
Attempted-Recon |
A remote host is running some type of scanning software in an attempt to detect software or network vulnerabilities. |
Attempted-Dos |
A remote host is running some type of software in an attempt to cripple computer resources in your network, a.k.a. a Denial of Service attack. |
Trojan-Activity |
Activity involving a malicious program pretending to be a legitimate application or file. |
Policy-Violation |
A host in your network is running a program that may be in violation with your company’s computer policies. |
IPS Rules are dynamic because:
-
They are updated daily after registration.
-
They can be activated / deactivated by system administrators.
-
Their actions can be tweaked. As soon as malicious network activity is detected, the IPS performs a specific action as specified in the Rule.
IPS Actions
An IPS action is a decision which determines how detected network traffic should be handled. The actions can be tweaked by system administrators, e.g. to reduce the amount of false positives.
| Action | Description |
|---|---|
Pass |
Network traffic is allowed. |
Alert |
Network traffic is logged, allowed and the AXS Guard administrator is notified by e-mail. |
Drop |
Network traffic is logged, dropped and the AXS Guard administrator is notified by e-mail. |
Silent Drop |
Network traffic is dropped without notifying the AXS Guard administrator. |
Info
Silent Drops reduce the amount of AXS Guard notification e-mails, making IPS network troubleshooting and / or follow-up easier for administrators.
False Positives and False Negatives
Altering the configuration of the IPS to decrease false positives might prevent attacks from being detected and blocked. It is not recommended to alter the default configuration, unless you are fully aware about possible consequences.
When the IPS incorrectly identifies legitimate activity as malicious, a false positive has occurred. When the IPS fails to identify malicious activity, a false negative has occurred. It is not possible to eliminate all false positives; in most cases, reducing the occurrences of false positives increases the occurrences of possible false negatives, which constitutes a security risk. Many organizations choose to decrease false negatives at the cost of increasing false positives, which means that more malicious events are detected and / or blocked, but more analysis resources are needed to differentiate false positives from true malicious events.
Corrective Measures
Every IPS Rule includes the necessary information and references describing how to counter an attack. It is up to system administrators to assess and decide whether Corrective Actions should be taken or not (see the image below). The type of attack information provided in the Rules is explained in the table below.
| Information Type | Description |
|---|---|
Summary |
A short description of the attack. |
Detailed Information |
Detailed information for advanced administrators, such as datagram types, protocol IDs and sequence numbers used by the attack. |
False Negatives |
Information about possible false negatives. |
Additional References |
External references pertaining to the attack, if any. |
Ease of Attack |
The level of difficulty to set up or initiate the attack. |
Corrective Action |
The steps which should be taken by system administrators to counter the attack. |
Impact |
Information about possible consequences of the attack. |
False Positives |
Information about possible false positives. |
Attack Scenarios |
Information about the purpose, expectations and motivations of the attack. |
IPS Configuration
Configuration Overview
-
Go to https://www.snort.org/ and sign up.
-
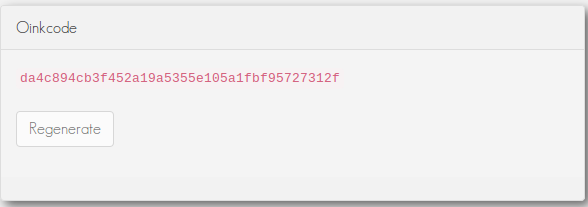
Copy your Oinkcode.
-
Log in to the AXS Guard appliance, go to System > Feature Activation and enable the IPS feature.
-
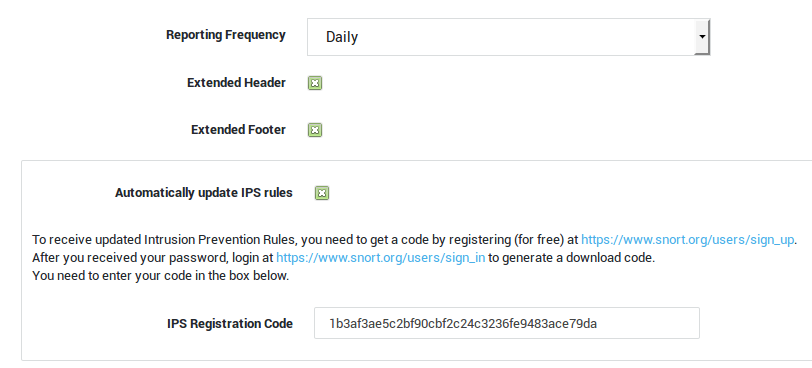
Go to Monitoring > Intrusion Prevention > General and copy the Oikcode to the IP Registration Code field.
-
Update your AXS Guard configuration.
Online Registration
-
Go to: https://www.snort.org/
-
Sign up for an account. After registration, a message with further instructions is sent to the e-mail address associated with your account.
-
Log in to your account and copy the Snort Oinkcode. Enter this code in the IPS general settings on the AXS Guard appliance.
Feature Activation
-
Log in to the AXS Guard.
-
Navigate to System > Feature Activation > Monitoring.
-
Check the Do you use the AXS Guard IPS? option and update your configuration.

General Settings
-
Go to Monitoring > Intrusion Prevention > General.
-
Enter the settings as explained in the table below.
-
Update your configuration.
| Field | Description |
|---|---|
Reporting Frequency |
Select the frequency of IPS e-mail reports from the drop-down list (Daily / Hourly / every 15 minutes). Reports are sent to the e-mail address(es) specified under System > General. |
Extended Header |
If this option is enabled, additional headers will be included in the IPS reports. These provide additional information about detected network activities and preventive measures to be taken. |
Extended Footer |
If this option is enabled, additional footers will be included in the IPS reports. In the footers you will find additional information about abnormal network activities. |
Automatic Updates of IPS Rules |
If this option is enabled, the AXS Guard IPS engine will automatically download new rule sets on a daily basis (recommended). |
Registration Code for Rule Updates |
Your Snort Oinkcode. |
Viewing IPS Categories and Rules
Overview
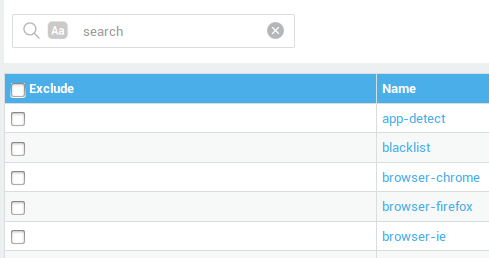
IPS Rules are organized in categories. Each Category describes the type of software or protocol used to perform an attack, e.g. pop3, backdoor, etc. Categories contain the individual Rules, with their own classification. Rules can only be downloaded automatically by the AXS Guard once the online registration has been completed. The Categories and Rules can be viewed by following the procedure explained below.
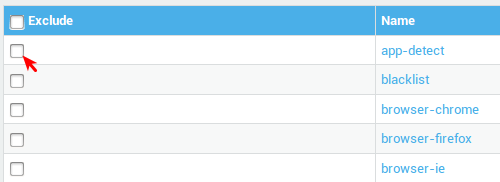
IPS Categories
-
Log on to the AXS Guard appliance.
-
Navigate to Monitoring > Intrusion Prevention > Rules.
IPS Rules
Click on the category name to view included rules.

Activating and Deactivating Categories and Rules
Overview
Altering the default configuration of the IPS to decrease false positives might prevent attacks from being detected and blocked. It is not recommended to alter the default configuration, unless you are fully aware about potential consequences.
You can activate and deactivate (exclude) an entire category of rules or select rules individually. The procedure is explained further.
Excluding Categories
-
Log on to the AXS Guard appliance.
-
Navigate to Monitoring > Intrusion Prevention > Rules.
-
Check the category of rules you wish to deactivate (exclude).
-
Save your configuration.
Info
Excluding IPS rules for services which are not running in your network (and therefore not susceptible to attack) improves overall system performance, e.g. if you are not running a Coldfusion Web Server, disable the web-coldfusion category.
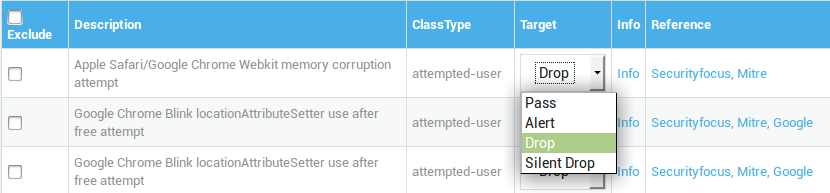
Excluding Rules
-
Click on a category name to access its rules.
-
Uncheck the rule(s) to be excluded.
-
Update your configuration.

Configuring IPS Targets
Altering the default configuration of the IPS engine to decrease false positives might prevent attacks from being detected and blocked. It is not recommended to alter the default configuration, unless you are fully aware about potential consequences.
-
Log in to the AXS Guard appliance.
-
Navigate to Monitoring > Intrusion Prevention > Rules.
-
Click on the desired category.
-
Select the desired action for a specific rule from the target drop-down list.
-
Update your configuration.
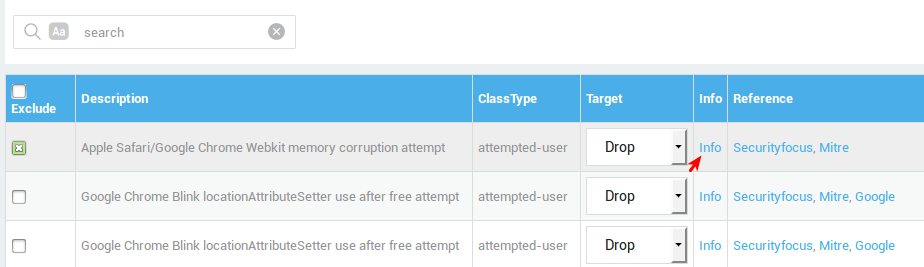
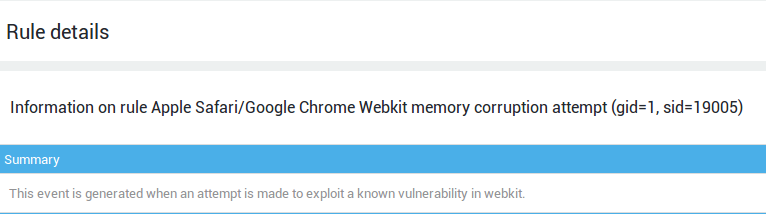
Viewing Rule Information
Embedded Information
-
Log in to the AXS Guard appliance.
-
Navigate to Monitoring > Intrusion Prevention > Rules.
-
Select the desired category.
-
Click on Info to view the embedded information.
External References
Click on the Reference link(s), if any. They lead to information on the Internet where more specific details are provided about the attack. Guidance for system administrators is also provided.
Logging
Overview
The IPS logs contain two types of entries. An entry can be Preprocessor-based or Rule-based. Preprocessor-based entries are displayed between brackets. Rule-based entries are not and list the Category of the exploit in capitals, followed by the Class Type.
IPS Logs
-
Log in to the AXS Guard appliance.
-
Navigate to Monitoring > Logs > IPS.
-
Click on the desired log file (date).
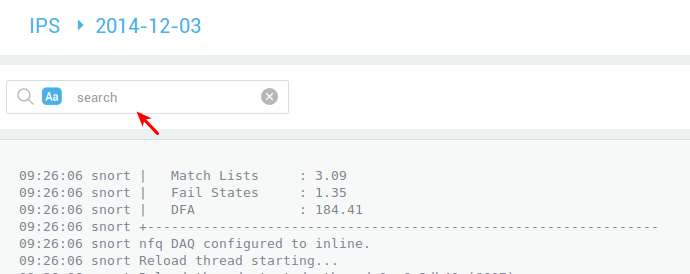
Info
Use a search filter to look for a specific log entry.
Example: locating the IPS rule which blocked certain traffic:
-
Select the rule category.
-
Click on the appropriate category Name, e.g. attack-responses.
-
Enter
25as a search string in the search filter field and press enter.
14:43:54 snort snortrule: ACTION=Drop   MSG=Reset outside window        GID=129 SID=15  REV=1   CLASSIFICATION=Potentially Bad Traffic  PRIORITY=2      PROTO=TCP       SRC=194.78.97.254       SPT=40332       DST=212.27.48.6 DPT=25
14:43:54 snort snortrule: ACTION=Drop   MSG=Reset outside window        GID=129 SID=15  REV=1   CLASSIFICATION=Potentially Bad Traffic  PRIORITY=2      PROTO=TCP       SRC=194.78.97.254       SPT=40332       DST=212.27.48.6 DPT=25  , repeated 1 times
Network Security Logs
About
The network security logs are a compilation of information related to traffic dropped by the AXS Guard firewall, the IPS, SecureDNS, GeoIP filtering and the application control system.
-
Go to System > Logs > Network Security.
-
Click on the desired log file to open it.
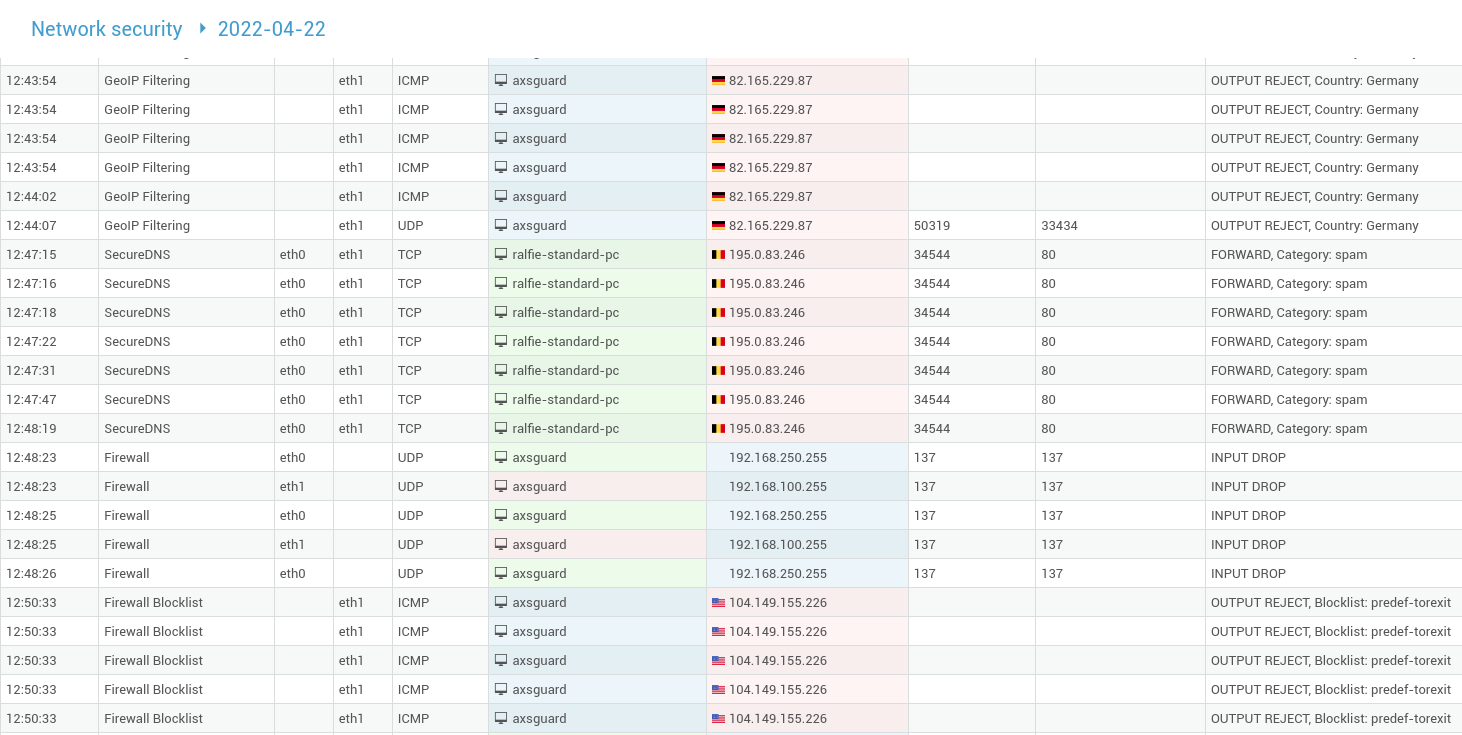
| Field | Description |
|---|---|
Time |
The time at which the log entry was created. |
Triggered by |
The feature that blocked the network traffic, e.g. Application Control, GeoIP filtering, etc. |
In |
The network device on the receiving end of the connection. |
Out |
The forwarding network device. |
Source IP |
The IP of the sending host. |
Source Port |
The source port used by the sending host. |
Destination IP |
The IP of the receiving host. |
Destination Port |
The destination port on the receiving host. |
Comment |
The action taken by the application in the |
Statistics
System statistics like CPU usage, memory usage, and disk space are crucial for understanding a system's health. See our system administration guide for additional information.
Troubleshooting
The IPS Module fails to start. If you see the following message:
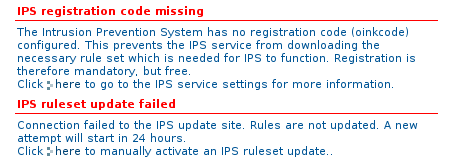
Make sure you followed the registration procedure.
Why is authorized traffic is blocked by the IPS?
The IPS operates between the Firewall and Application Control Modules. In the event authorized traffic is blocked and no entries are available in the Firewall and / or Application Control logs:
-
Check the IPS logs.
-
Use the Search Filters.
-
Disable the Rule blocking the traffic only if necessary.
Important
Disabling Rules might prevent attacks from being detected and blocked. This is not recommended, unless you are fully aware of potential consequences. It is highly recommended to read the included Rule information and to take the suggested corrective actions before you decide to disable the IPS Rule definitively.
Proxy Server timeouts with Internet Explorer
Proxy Server timeouts may occur when the IPS blocks network traffic to malicious websites, i.e. when a toolbar containing spyware or malware has been installed in Internet Explorer. Following is a troubleshooting example of a log entry.
12:29:59 snort [1:6250:2] SPYWARE-PUT Adware hotbar runtime detection -
hotbar user-agent [Classification: Misc activity] [Priority: 3]: {TCP}
192.168.254.2:38985 > 62.23.182.133:80
-
Update the client’s anti-virus and / or anti-malware software, if present and scan the system.
-
If the IPS log contains the following entry: SSLv2 openssl get shared ciphers overflow attempt, download and install the latest Microsoft Updates to update the SSL libraries.
-
If the timeouts persist, exclude the IPS SSLv2 openssl get shared ciphers overflow attempt Rule in the Web-Misc Category.
Support
If you encounter a problem
If you encounter a problem with AXS Guard, follow the steps below:
-
Check the troubleshooting section of the feature-specific manual.
-
Check the knowledge base on this site for information about special configurations.
-
If no solution is available in any of the above sources, contact your AXS Guard vendor.
Contact Information
(+32) 15-504-400
support@axsguard.com