Web Access
Introduction
About this Document
In this document, we explain the concepts and features underpinning the AXS Guard proxy server. The AXS Guard proxy server reduces the chance of a security breach.
Proxy servers add an additional layer of security between your internal network and outside traffic. Because proxy servers can face the internet and relay requests from computers outside the network, they act as a buffer.
Examples used in this Guide
All setups and configuration examples in this guide are executed as an advanced administrator. Some options are not available if you log in as a full administrator or a user with lower access privileges.
As software development and documentation are ongoing processes, the screenshots shown in this guide may slightly deviate from the current user interface.
Concepts and Features
Overview
In this chapter, we explain the concepts and features underpinning the AXS Guard Web Access Module (Proxy Server). Some key definitions are provided in order to help you better understand its operation and configuration.
What is a Proxy Server?
Concept and Definition
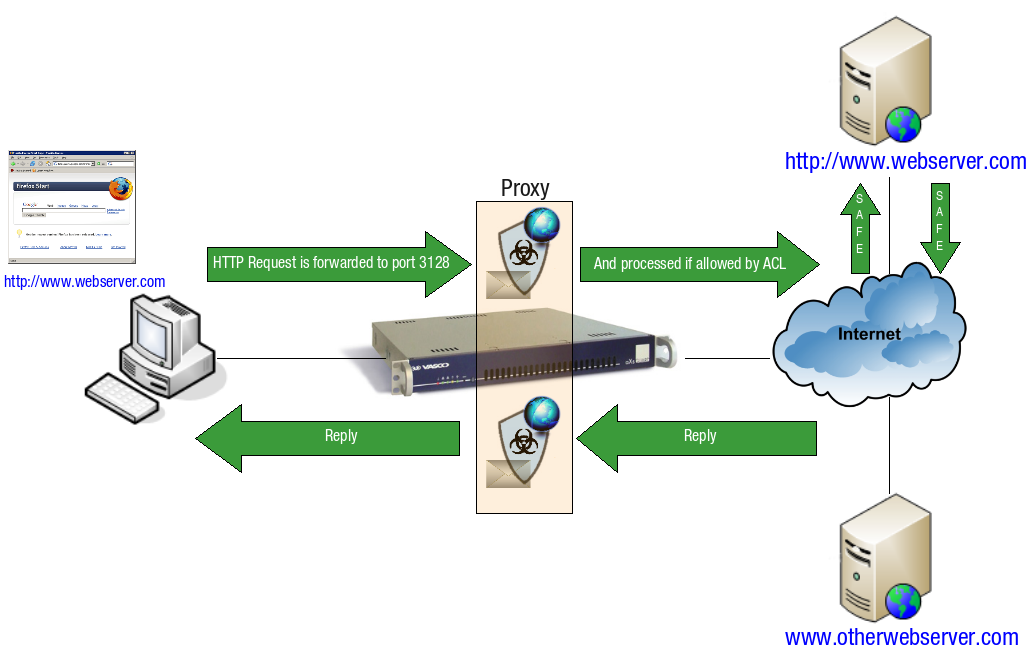
The AXS Guard Web Access Module (Proxy Server), as illustrated below, is an application layer control module, which services requests on behalf of its clients by forwarding these requests to their destination. It listens on port 3128.
-
A client connects to the AXS Guard, requesting a web page on an Internet server.
-
The AXS Guard makes a separate connection to the Internet server and requests the page on behalf of the client, if allowed by the Access Control List (ACL). ACLs are explained in Web Access Filters.
-
Optionally, the client’s request or the server’s response may be altered / blocked by the AXS Guard depending on the applicable Web Access Access Control List (ACL). If the request is allowed by the AXS Guard Proxy, it may still be blocked by the Anti-Virus and / or Anti-Spyware Module, based on the automatically downloaded Virus Pattern files and / or Site Lists.
If the page is cached, it is provided to the requesting client without contacting the Internet server (see Content Caching).

Advantages and Properties
Advanced Internet Access Control and Monitoring
The use of the AXS Guard Web Access Module (Proxy Server) offers several advantages over direct connections:
-
Allowed websites can be tailored to the user’s needs level via Authentication: You can enforce user authentication for Web Access. Not only do users in the LAN have to authenticate to access the Internet, but the accessible pages / servers depend on the user’s Web Access rights.
-
The AXS Guard Proxy increases speed and saves bandwidth through the Caching of Web Pages: Each time a page is accessed on the Internet, a copy is kept on the AXS Guard. This is the same principle applied with browser caching. This technique not only allows to retrieve web pages more rapidly, but also allows an important reduction in HTTP traffic and saves bandwidth.
-
Statistics and Reporting: User authentication facilitates the tracking of accessed and blocked web pages at the user level. These functions are explained in Web Access Logs and Statistics and Reporting.
-
Content Scanning: You can implement filters (ACLs). to control access to web sites, servers or specific URLs. These filters can be applied to any AXS Guard security level, such as the user level, the group level, the computer level or system-wide.
For more information about AXS Guard Security levels, refer to the System Administration How To, which is accessible by clicking on the permanently available Documentation button in the Administrator Tool.
Advanced Anti-Malware Protection
Anti-virus Anti-spyware Anti-phishing (Also see Web Access Filters). You benefit from:
-
Anti-Virus Protection: Viruses can easily be transmitted by visiting web sites containing malicious code. All Web traffic is scanned to prevent clients from being infected. Note that this isn’t the case when web traffic is not channeled through the Web Access Module.
-
Anti-Spyware Protection: Spyware is software installed on a client without the user’s knowledge or consent. This software secretly gathers information about this user while he/she navigates the Internet and is mostly used for advertising purposes. The Web Access Module offers Anti-Spyware Protection if this Module is purchased and activated.
-
Anti-Phishing Protection: Phishing is a fraudulent process used by attackers attempting to acquire sensitive information such as user names, passwords and credit card details. This is done by posing as a trustworthy entity in electronic communications.
Customizable Authentication Page and Notification Messages
You can change the default AXS Guard Proxy Server login / blocking page to display your company logo and even add custom notification messages, such as custom instructions, warnings and disclaimers. The login / blocking page is displayed when:
-
Users need to authenticate for Web Access.
-
An unauthorized page is blocked.
Supported Protocols
Introduction
A protocol is a formal description of formats and rules computers must follow in order to successfully exchange messages. Protocols can describe low-level details of machine-to-machine communication, such as the order in which bits and bytes are sent across a wire, or high-level exchanges between applications, such as the way in which two programs transfer a file across the Internet, e.g. the File Transfer Protocol.
The AXS Guard Web Access Module provides access control and security for high-level protocols such as HTTP, HTTPS and FTP. These protocols are briefly explained in the following subsections.
HTTP
The HyperText Transfer Protocol or HTTP is a protocol which is used by
clients on the Internet to retrieve web pages from a web server. It is a
high-level application protocol operating by default on TCP port 80. If
another port is used, it has to be specified in the URL, e.g.
www.someserver.com:83
HTTP defines how messages should be formatted and transmitted and which actions web browsers should take in response to certain commands, for instance when a URL is entered in a web browser. HTTP traffic uses cleartext transmission, which allows its content to be monitored and scanned. There are two versions of HTTP, 1.0 and 1.1, which are briefly described below. In-depth information about both versions of HTTP is available in RFC 1945 (HTTP/1.0) and RFC 2616 (HTTP/1.1).
HTTP/1.0
Typically, an HTTP client initiates a request and opens a new connection
for each new request. It establishes a Transmission Control Protocol
(TCP) connection to a particular port on a host (port 80 by default). An
HTTP server listening on that port waits for the client to send a
request message. Upon receiving the request, the server sends back a
status line, such as HTTP/1.0 200 OK and a message of its own.
HTTP/1.0 is a stateless protocol because each command is executed
independently, without taking previous commands into account.
HTTP/1.1
HTTP/1.0, in its documented form, made no provision for persistent connections. Some HTTP/1.0 implementations, however, use a Keep-Alive header to request that a connection persists. Because this design did not interoperate with intermediate proxies, HTTP/1.1 specifies a more general solution.
HTTP/1.1 makes persistent connections the default. HTTP/1.1 clients, servers, and proxies assume that a connection will be kept open after the transmission of a request and its response. The protocol does allow an implementation to close a connection at any time, in order to manage its resources, although it is best to do so only after the end of a response.
Because an implementation may prefer not to use persistent connections if it cannot efficiently scale to large numbers of connections or may want to cleanly terminate one for resource-management reasons, the protocol permits it to send a Connection: close header to inform the recipient that the connection will not be reused.
HTTP/1.1 is the most commonly used version in today’s implementations.
HTTPS
The HTTPS protocol is the secure version of the HTTP protocol. Its functioning is almost identical, except that all traffic is encrypted using Secure Socket Layer (SSL) technology. This prevents eavesdropping and offers protection against man-in-the-middle attacks.
With HTTPS, the client uses the server’s public key to encrypt the data transmission. The public key of the server is included in the Public Certificate (More information about Public Certificates is available in the AXS Guard IPsec How To, which is accessible by clicking on the permanently available Documentation button in the Administrator Tool).
By convention, URLs which require an SSL connection start with HTTPS rather than HTTP. A TCP port may be specified in an HTTPS URL. If none is specified, port 443 is used by default.
Unlike HTTP, HTTPS is a stateful protocol. HTTPS reuses the same connection, rather than opening a new one for each request.
FTP
FTP is a file transfer protocol for exchanging and manipulating files over the Internet. An FTP client may connect to an FTP server to manipulate files on that server.
FTP runs exclusively over TCP. By default, it listens on port 21 for incoming connections. A connection to this port from the FTP client forms the control stream on which commands are passed from the FTP client to the FTP server and on occasion from the FTP server to the FTP client.
FTP uses a separate connection for control and data. This means that for the actual file transfer, a different connection is required which is called the data stream.
Content Scanning
Introduction
AXS Guard provides several content scanning options to protect your network from viruses and other malware.
There are 3 types of content scanning licenses that customers can choose from, which are briefly explained in the next sections.
Basic Content Scanning
-
URL filtering
-
ClamAV antivirus protection
-
Protection against other malware lists (Under Anti-malware > Status > Others)
Threat Intelligence Comfort
-
Filtering based on custom and predefined word Lists.
-
URL filtering
-
The Trend Micro antivirus engine.
-
The ClamAV antivirus engine for additional protection against malware, Trojans and other malicious threats.
-
Protection against other malware lists (Under Anti-malware > Status > Others)
Threat Intelligence Premium
To counter the activities of increasingly ambitious and inventive hackers, we developed the AXS Guard Enterprise Content Scanning solution, which uses over 70 antivirus engines and domain blacklists, in addition to a variety of tools for extracting useful information from the analyzed content.
This solution also incorporates Google Safe Browsing, which automatically recognizes and blocks any questionable links in corporate emails.
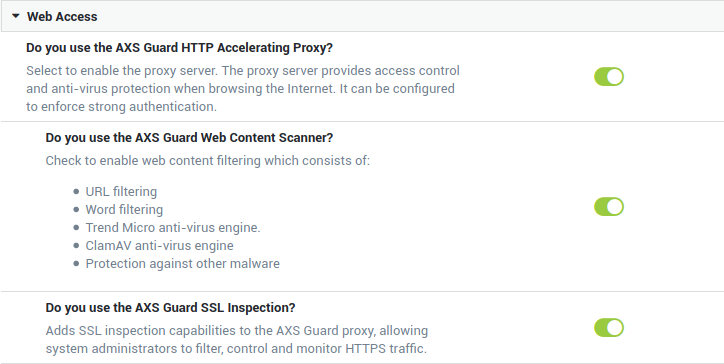
A Threat Intelligence Premium pack is required to use the SSL inspection feature.
Web Access Filters
Introduction
Web Access Filters or Access Control Lists (ACL), as shown below, control the access to specific URLs and websites. They consist of:
-
Categories which are composed of Site or Word Lists related to specific content
-
Times, which determine when the defined content should be blocked, allowed or ignored
Once an ACL has been configured, it can be assigned to an AXS Guard user, group, computer or the entire system (a.k.a. a system-wide configuration). Computer and system-wide filters are activated on the fly, while group and user filters are only activated after authentication.

Always apply the strictest settings for system-wide configurations. Enforce authentication where possible.
Content Categories
A category is a class or division that encompasses a list of URLs or words with particular shared characteristics. Examples of categories include, but are not limited to:
- Pornography
- Malware & Phishing
- Social media platforms
- Software updates
- Gaming and video streaming platforms
- Advertising
Mime Types
MIME stands for Multipurpose Internet Mail Extensions. A MIME type tells the browser or user agent what type of file it is dealing with, so that it can launch the adequate program to open the file. There are many different MIME types. The most common ones are related to audio and video streaming. A list is available here.
Example: mp3 files
If you visit a web page where you can download music and click on the
link of an mp3 file, the browser will be told it’s dealing with an
audio/mpeg MIME type and start a media player.
Any MIME type can be blocked by the AXS Guard proxy server. Note that a MIME type can only be blocked at the system level; if a given type is blocked, it is blocked for all users, regardless of individual user privileges.
List Types
A List is a set of defined websites, URLs, IP addresses or key words which trigger a certain action when detected by the AXS Guard. Two types of Lists can be defined on the AXS Guard, as explained below.
Site Lists
May contain websites, URLs or IP addresses which are either blocked, allowed or ignored depending on the configuration.
Word Lists
A Word list is a collection of words. Each word is assigned a certain score. If the maximum score is reached or exceeded, the page in which the specified word occurs is blocked.
Site and Word Lists may be generated automatically or manually.
Word Lists can only be used in an allow scenario as a blocked item; you cannot allow or ignore Word Lists.
How do Words Work
There are two different types of Word Lists that can be used on the AXS Guard:
-
Banned Words and
-
Weighted Words.
Banned Words
The web page is blocked immediately whenever any banned Word is detected
in the page. For example, if you define the word sex as a banned Word,
then pages containing that word will be blocked, even if the page
contains other legitimate information. For this reason, banned Words
should be used very sparingly. A Word which is assigned a score of 0
is always blocked.
Weighted Words
Weighted Words enable you to block content much more accurately. A score is assigned to each Word in the list. The AXS Guard calculates a total score for the web page a user is trying to access. The calculated total score determines whether the page is blocked or allowed. The resulting total score is compared to the maximum score configured at the scenario level (see Block and Allow Scenarios). AXS Guard generates an error if invalid syntax is used to build Words. Use the syntax as explained further in this guide.
-
Assigned scores can be negative.
-
A Word which is assigned a score of
0is always blocked (banned Word). -
Upon detection of a Word, the specified score of that Word is applied only once, even if it appears multiple times in the requested page.
-
The following maximum scores are recommended:
50for young children,100for older children and160for adolescents.
A web site containing the Words sex and education can be allowed, if the Word education is assigned a negative score. This negative score cancels the positive score created by the Word sex.
Some examples of Word lists, the appropriate syntax and effects are provided in Creating a new List.
Automatically Updated vs. Manually Updated Lists
-
Automatic Lists: These lists contain malafide and potentially dangerous sites. An automatic list can either be a site list or a Word list. The sites and / or Words in these lists are automatically updated and blocked, based on their IP address, the FQDN or the score attributed to detected word combinations. The AXS Guard provides predefined Site Lists (that are automatically updated, similar to Anti-Virus patterns), which are also included in the unrestricted ACL. The Site Lists which are included in the unrestricted ACL can be disabled by creating a custom ACL. The automatic lists are devided into categories in relation to the filtered content. A few examples are: predef-aggressive, predef-spyware, etc. Over 230.000 malafide sites are included in the lists.
-
Manually Defined Lists: Site and Word Lists can be maintained manually by entering IP addresses and character strings either matching an entire URL or a part thereof (for site lists) or words with a score (for Word lists). For instance, entering gambling in a site list matches all URLs containing the word gambling. Wilcards can be used to make the matches even more generic.
Time Restrictions
Time Restrictions define start and stop times for a Web Access Filter for each day of the week. This means you can enforce different Web Access scenarios within the same day, e.g. a scenario which applies during office hours and a scenario which applies after office hours.
Example: Using different scenarios
After office hours, you could allow access to social networking sites, while blocking them during office hours.
If the defined time is set to 24/7, only one scenario is applied. Whenever a web page is requested, the appropriate scenario is automatically applied. Days for which no time restrictions have been defined, automatically fall under the outside the defined times category.
Block and Allow Scenarios
An ACL combines Times and Site Lists. Each ACL determines whether access to certain pages is allowed or not during a specific time. Web Access control is achieved either by blocking everything and defining exceptions, i.e. a block scenario or by allowing everything and specifying sites to which access is blocked, i.e. an allow scenario.
Different ignore lists can be applied during and outside the defined time restrictions.
Block Scenario
The Block scenario blocks access to all sites, except to the ones which are specifically allowed. Select the desired Allow Lists (see List Types).
Allow Scenario
The Allow scenario allows access to all websites, except to the sites which are specifically blocked and / or the sites containing Words of which the total score is equal to or exceeds the maximum score after being processed by the AXS Guard.
Important
If the maximum score is set to 0, Word lists are discarded.
Example: Block and Allow Scenario
Assume you need to create a Web Access Filter (ACL) which only allows access to the corporate Intranet and the Virgin Express reservation site during office hours. Access to any other websites is prohibited during office hours (see the time restriction in the Web Access Filter below).
-
First, a Time Restriction defining the office hours must be created, e.g. 8:00 AM until 5:00 PM.
-
Second, a Site List, in which the corporate URL(s) and the Virgin Express site are included and allowed, must be created.
-
Once this Site List is configured, create a new ACL, select the Block Scenario during the specified Time Restriction and check the Site List containing the corporate URL(s) and the Virgin Express site in the Allowed Site List.
-
To permit access to other websites during off hours, select the Allow scenario outside the specified Time Restriction and make the desired selections.
Web Access Filter
The Time Restriction is set as follows: Working Hours (8:00 AM until 5:00 PM)
-
During the Time Restriction (8:00 AM – 05:00 PM)
-
Scenario = Block Scenario
-
Allowed Sites:
-
Corporate Intranet:
intranet.mycompany.com -
Virgin Express Site:
www.virgin-express.com/skylights.cgi?adlt=1&sex =m
-
-
-
Outside the Time Restriction (05:01 PM – 07:59 AM)
-
Scenario = Allow Scenario
-
Blocked Site List: Phishing Sites, Gambling Sites, Porn Sites.
-
Exceptions Site List: Virgin Express Site:
www.virgin-express.com/skylights.cgi?adlt=1&sex =m
-
Example: Banning Sites during Working Hours using only Word Lists
Assume you wish to grant access to any site during working hours, except to certain leisure sites, e.g. chat sites, sport sites, etc. In this example, we use the predefined time restriction Working Hours. Outside the time restriction, everything is allowed.
-
Create a new ACL and ensure that the Working Hours time restriction has been selected.
-
Set the scenario to Allow scenario and specify exceptions.
-
Add the predefined Word lists predef-leisure-adolescent and predef-leisure-adult. These contain the words which must be banned, e.g. javachat, if the maximum score is reached or has been exceeded. In the details of the predef-word-chat list, you will see that the word javachat has a score of
50. -
Specify the maximum score, i.e. the score which may not be reached or exceeded. In this example, we set the maximum score to
200. -
Add the newly created ACL to the system level (Under Web Access > General > System web access filter).
Result:
If the calculated score of a page equals or exceeds 200, it is blocked. Note that the score of a Word is not cumulative. If a Word occurs multiple times in a page, its score is only calculated once. For example, if the word javachat is detected 4 times, a score of only 50, not 200, is taken into account.
Ignore Site Lists
Ignore lists are used to allow access to an authorized web page which contains one or more URLs that should be ignored, e.g. advertising banners. The content to be ignored is automatically replaced by an AXS Guard logo, while the rest of the page is displayed normally.
Different ignore lists can be enforced during and outside defined time restrictions.
-
Time Restriction: 24/7 – Every day of the week.
-
Scenario = Block Scenario
-
Allowed Sites:
-
Corporate Intranet:
intranet.mycompany.com -
Virgin Express Site:
www.virgin-express.com/skylights.cgi?adlt=1&sex =m -
Yahoo:
www.yahoo.com
-
-
Ignored Sites:
mybanner.com
-
Result
The advertising banners are not displayed when visiting the allowed
sites, e.g. www.yahoo.com, if either the Fully Qualified Domain Name
(FQDN) or the IP address pointing to the banner is correctly entered in
the Ignore List.
Other Controls & Features
Besides Internet browsing Acceleration and Content Filtering, the AXS Guard Web Access Module allows the implementation of additional security checks, such as:
-
the blocking of dangerous file extensions,
-
defining allowed TCP ports
-
customizing the default Web Access login page.
File Extensions and Ports
Blocking file extensions
Administrators can block content based on a list of file extensions, for
instance files with scr or pif extensions. This provides additional
security, as some executable files are automatically downloaded and
executed while a site is being visited. Such files can potentially
execute malicious code and compromise the integrity of a client
operating system.
File extension blocking is enforced system-wide and cannot be disabled per user, group or computer.
Safe proxy ports
System administrators can define which ports are allowed trough the AXS Guard proxy, e.g. ports 80, 21 and 443, which are standard ports used on the Internet. Ports can be added as required.
Trend Micro Anti-Virus and Anti-Spyware
The Trend Micro Anti-Virus and Anti-Spyware Module is a process running on top of the AXS Guard Web Access Module. This means that web traffic is scanned for malicious content, such as spyware and viruses.
The Trend Micro Anti-Virus and Anti-Spyware Module automatically downloads the latest pattern files. Web pages can only be accessed if at least one of the activated content scanners (Trend Micro or ClamAV) has updated pattern files.
In case users are no longer able to access the Web via the AXS Guard Proxy, administrators should check if the latest pattern files have been downloaded. Administrators are notified by e-mail as soon as the patterns have been updated (illustrated below), but the process can be triggered manually as well.
The ClamAV Anti-Virus Engine
ClamAV is an open source antivirus engine designed for detecting Trojans, viruses, malware and other malicious threats. It is the de facto standard for mail gateway scanning. It provides a high performance mutli-threaded scanning daemon and an intelligent tool for automatic signature updates. The core ClamAV library provides numerous file format detection mechanisms, file unpacking support, archive support, and multiple signature languages for detecting threats.
This antivirus engine is available with Basic and Standard Content Scanning.
Customizing the Web Access Login Page
You can change the default AXS Guard Web Access login / blocking page to display your company logo. The selected logo then replaces the AXS Guard default logo. You can also add custom notification messages, such as instructions, warnings and disclaimers in standard text or in HTML (see the example below).
The Web Access module displays a blocked page message when users try to access an unauthorised URL or site. The message explains why the user is blocked and how to proceed next. The Web Access service presents an authentication page when users initially connect to the Web. Users must authenticate to obtain Web Access rights.
Administrators can customize messages that are produced in case of certain events. The following messages can be configured:
-
Default Message
-
Not Authenticated
-
Authenticated but not allowed
-
User Logged In
-
User Must Log In
-
Computer not allowed to log
-
Computer not allowed because it is logged over VPN
-
User logged out
-
Logout failed
-
User authenticated
-
Redirect to requested page
-
Error deauthenticating
Template parameters, i.e. REFERERURL, REMOTEIP and USER, are
available for use in custom messages. These parameters are replaced with
their appropriate values (explained below) and displayed when certain
Web Access events are triggered, e.g. when a user fails to authenticate.
-
REFERERURL: The URL a user is trying to access via the AXS Guard proxy. -
REMOTEIP: The IP address of the computer that is requesting a web page via the AXS Guard proxy. -
USER: The AXS Guard username of the person who is authenticated or logged out.
The selected logo is also used for the Webmail login page.
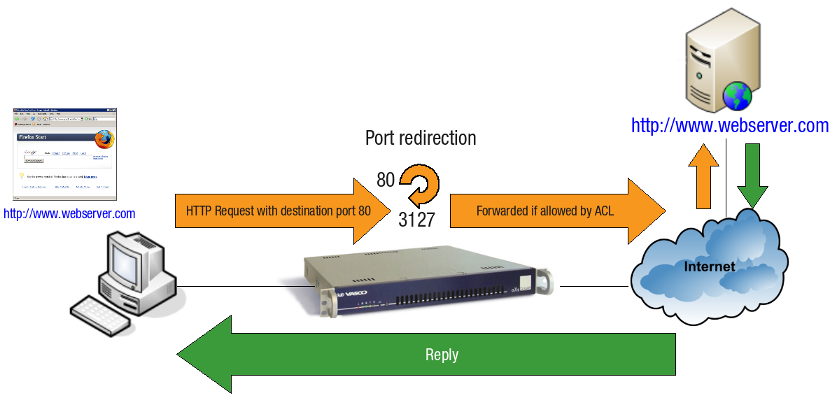
Transparent Proxy
The AXS Guard appliance can be used as a transparent proxy as illustrated below. Transparent proxies are also commonly known as intercepting proxies. The AXS Guard transparent proxy listens on TCP ports 3127 (HTTP) and on 3130 (HTTPS).
Transparent proxies are commonly used to prevent users from abusing or bypassing company web access policies and to ease administrative burden, since no client-side browser configuration is required.
You cannot use the transparent proxy if linked authentication is disabled. Authentication must be linked for this option to work. See User Authentication for additional information.
HTTP Example
HTTP requests are automatically redirected to port 3127 of the AXS Guard proxy server.
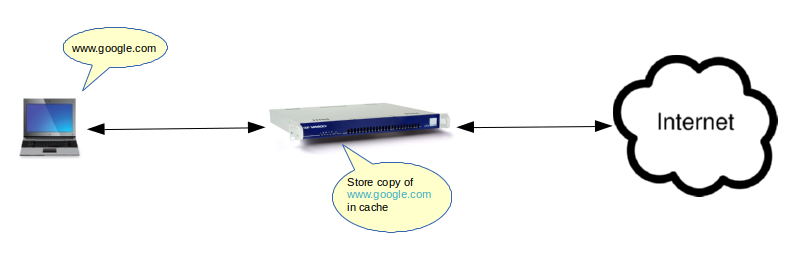
Content Caching
Web caching is the process by which web documents (e.g. HTML pages, images) are temporarily saved in order to reduce bandwidth usage, server load, and perceived lag. The web cache stores copies of documents passing through it; subsequent client requests may be satisfied from the cache if certain conditions are met.
Web caches can be deployed in a variety of ways. User agent caches, such as those in web browsers, are private caches, operating on behalf of a single user. Intermediaries can also implement shared caches that serve more than one person, such as the AXS Guard Web Access Module (illustrated below).
Stale vs. Fresh pages
Copies of pages on the AXS Guard Web Access Module may be out of date once a page has been updated at the source. Out-of-date web pages are often referred to as stale, while current pages are often referred to as fresh. The Web Access Module has a system to keep track of fresh and stale pages. Tags are used to prevent fresh pages from being retrieved in response to new requests. If a page is stale, it is automatically refreshed. Although caching improves efficiency, it is possible that in some instances the refresh procedure fails. In such a case, the bowser cache should be cleaned. The AXS Guard also has a built-in tool to clean the Web Access Module cache.
Cache Size
The Cache Size determines the maximum amount of disk space which should be reserved to cache web documents.
Proxy Multithreading
Multithreading can help to handle multiple client requests simultaneously, thereby improving the overall performance of the AXS Guard proxy server. This is particularly beneficial in high-traffic environments where the server needs to handle a large number of requests at once or for organizations that are using SSL inspection.
The workers directive allows you to specify the number of worker processes that the AXS Guard proxy server should use. By default, the proxy server operates in single-process mode, which means it only uses one worker. To enable multithreading, you need to increase the number of workers.
You can adjust this number based on the capabilities of your AXS Guard appliance and the amount of traffic you expect it to handle. Note that a separate cache is allocated for each worker.
User Authentication
Overview
The following authentication options are available for web access:
-
Linked Authentication: Linked authentication is the default AXS Guard configuration and combines authentication for Firewall and Web Access rights.
-
Unlinked Authentication: Firewall and Web Access authentication are kept separate. This type of authentication is used in environments with a Terminal Server that doesn’t support Virtual IP addresses.
-
Basic Authentication: In the context of an HTTP transaction, basic access authentication is a method for an HTTP user agent to provide a user name and password when making a request. Basic authentication is defined in RFC 2617
-
Kerberos Authentication: A secure method to authenticate users in a network, based on a ticketing system.
-
Ident Authentication: Ident requests are forwarded from a terminal server to the AXS Guard proxy to identify the user.
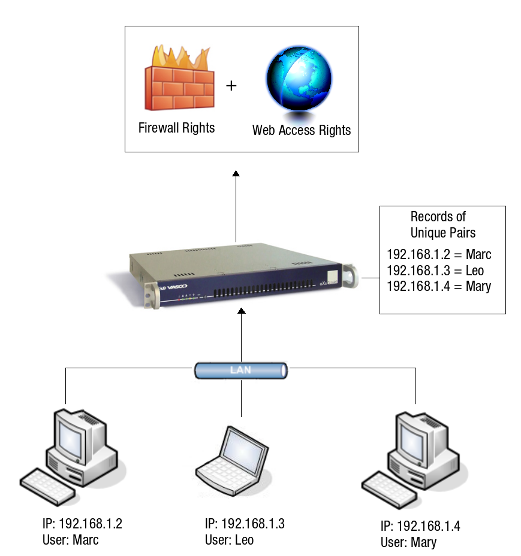
Linked Authentication
Linked authentication is the default AXS Guard configuration and combines authentication for Firewall and Web Access rights. With linked authentication, users are mapped to the computer’s IP address on which they authenticate, making the user and IP address a unique pair. Based on this unique pair, the defined AXS Guard user and group Firewall and Web Access rights are assigned, as shown in the image below.
Each user / IP address pair must be unique: two or more users cannot authenticate with the AXS Guard on the same computer (IP). If users authenticate with a Terminal Server, linked authentication is impossible, since all users originate from one IP address (the Terminal Server’s IP). In that case, unlinked authentication must be used.
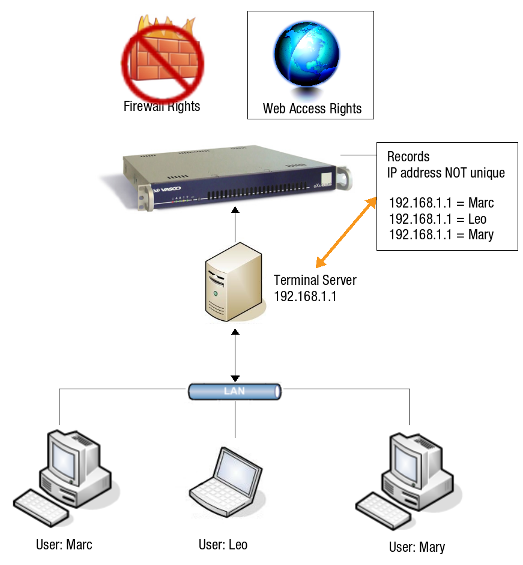
Unlinked Authentication
Unlinked authentication is not the default AXS Guard configuration. Unlinked means that Firewall and Web Access authentication are kept separate. Unlinked authentication must only be used if:
-
users in your network authenticate with a Terminal Server.
-
you have a special NAT setup, which causes all users in the network to use the same source IP address.
In other words, the user / IP address pairs are not unique, contrary to Linked Authentication. As a consequence, it is impossible to detect the origin of all communication protocols at the user level, which is necessary for effective Firewall protection. Linking Web Access and Firewall Authentication without unique user / IP pairs would be insecure.
Unlinked authentication only allows Web Access authentication via a browser session. The user authentication data is transferred via the user’s browser session parameters. The AXS Guard checks whether the session is authenticated. Firewall authentication is not allowed.
Info
Unlinked Authentication can be configured as the system-wide default if you have a network where some users authenticate with a Terminal Server while others don’t, or if you have a Terminal Server supporting Virtual IP addresses.
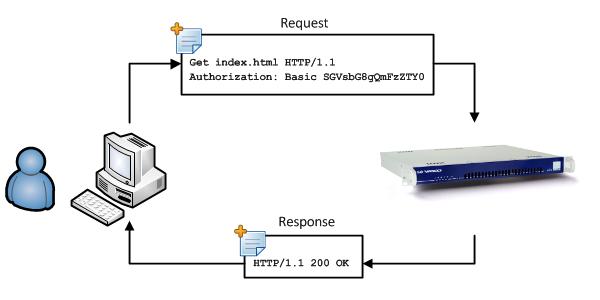
Basic Authentication
This option is only available with unlinked authentication. Users will be invited to authenticate via a browser popup when they attempt to access the Internet. Configured computer ACLs don’t apply in this case. Web access is only authorized after authentication, including access to sites configured in system-wide ACLs (under System > Web Access > General). After authenticating, the user’s group and / or user level ACLs are applied. If no user or group ACLs exist, the system-wide ACLs are applied. Basic authentication can be configured at the following levels:
-
The computer level, i.e. for a given system in your network. Users who attempt to connect to the Internet from that system (IP) will be invited to log in via a basic authentication popup.
-
The system level, i.e. a system-wide configuration that applies to all computers and users. Any user who attempts to access the Internet will be invited to log in via a basic authentication popup.
Kerberos Authentication
Kerberos is a secure method for authenticating service requests in a computer network. For in-depth information about the Kerberos protocol, see the the Authentication guide on this site.
Advantages
-
Users are asked to enter a password only once per work session and can transparently access all their authorized AXS Guard services without having to re-enter their password for the duration of the session. This is also known as Single Sign-On.
-
When requested, the application servers in the network must also prove their authenticity to the client. This characteristic is known as mutual authentication.
-
Kerberos encrypts all messages (tickets and authenticators) passing between the various participants during the authentication process.
-
When users change their password, it is changed for all supported AXS Guard services at once. The AXS Guard never communicates directly with the Key Distribution Center; the service tickets are submitted to the services via the client that wants to access them.
-
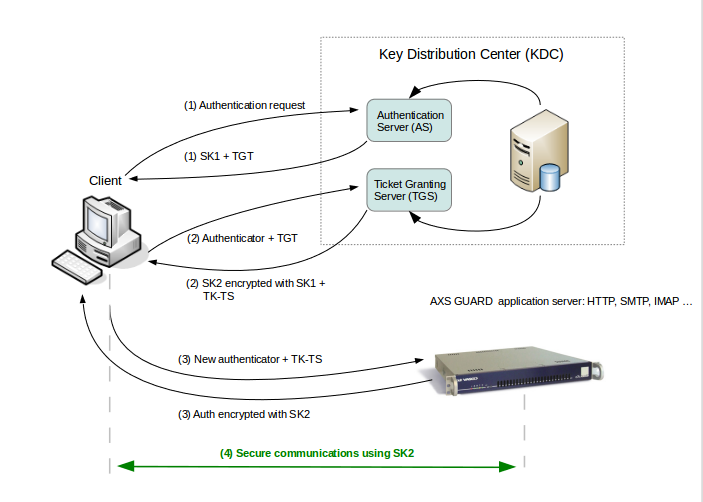
Authentication exchange: The client asks the authentication server (AS) for a ticket to the ticket-granting server (TGS). The authentication server looks up the client in its database, then generates a session key (SK1) for use between the client and the TGS. Kerberos encrypts SK1 using the client’s secret key. The authentication server also uses the TGS’s secret key (known only to the authentication server and the TGS) to create and send the user a ticket-granting ticket (TGT).
-
Ticket-granting service exchange: The client decrypts the message and recovers the session key (SK1), then uses it to create an authenticator containing the user’s name, IP address and a time stamp. The client sends this authenticator, along with the TGT, to the TGS, requesting access to the target server. The TGS decrypts the TGT, then uses the SK1 inside the TGT to decrypt the authenticator. It verifies information in the authenticator, the ticket, the client’s network address and the time stamp. If everything matches, the request is accepted. The TGS then creates a new session key (SK2) for the client and target server to use, encrypts it using SK1 and sends it to the client. The TGS also sends a new ticket containing the client’s name, network address, a time stamp and an expiration time for the ticket — all encrypted with the target server’s secret key — and the name of the server.
-
Client/server exchange: The client decrypts the message and gets the SK2. Finally ready to approach the target server, the client creates a new authenticator encrypted with SK2. The client sends the session ticket (already encrypted with the target server’s secret key) and the encrypted authenticator. Because the authenticator contains plaintext encrypted with SK2, it proves that the client knows the key. The encrypted time stamp prevents an eavesdropper from recording both the ticket and authenticator and replaying them later. The target server decrypts and checks the ticket, authenticator, client address and time stamp. For applications that require two-way authentication, the target server returns a message consisting of the time stamp plus 1, encrypted with SK2. This proves to the client that the server actually knew its own secret key and thus could decrypt the ticket and the authenticator.
-
Secure communications: The target server knows that the client is who he claims to be, and the two now share an encryption key for secure communications. Because only the client and target server share this key, they can assume that a recent message encrypted in that key originated with the other party.
Ident
The Ident Protocol, defined per RFC 1413, is an Internet protocol that helps identify the user of a particular TCP connection. This simplifies management in that you do not have to match IP addresses to computers to regulate web traffic.
Using Ident for user authentication has several benefits over the SSL (SSO) or proxy login methods, primarily that the user does not need to enter username and password credentials for Web Access. Instead, an Ident server running on the citrix client system will automatically provide the Windows username to the AXS Guard proxy server.
Important
- Linked Authentication must be disabled for Ident to work.
- An Ident server must be running on your terminal server.
- The AXS Guard proxy server waits no longer than 2 seconds for the ident server’s response. If no answer is received within 2 seconds, the user’s computer level web access rights are applied.
Security Considerations with Ident
One disadvantage of the Ident protocol is that it is relatively easy for a user who has broken or intentionally compromised his / her computer to spoof a user with potentially more access rights.
Another disadvantage is that if the AXS Guard proxy server cannot contact an Ident daemon, the processing of web requests can be delayed for a long time (up to several minutes). This is normally not a problem if you follow these two recommendations:
-
Allow port 113 through all internal software firewalls. Don’t treat the Windows Firewall as nothing more than a simple "all on" or "all off" capability; you may need to explicitly allow port 113 even though the firewall is "on". Consult the documentation of your OS for information on how to configure the firewall.
-
Allow port 113 through all internal network infrastructure devices (hubs, routers, etc.). Some network infrastructure devices allow all traffic indiscriminately by default , but others block "uncommon" types of traffic, such as traffic related to port 113.
Authentication and Web Access Filter Priorities
General Recommendations
Always use the strictest security for system-wide configurations. Enforce authentication where possible.
Filter Priorities
There are two distinct methods by which a Web Access Filter is assigned to an IP address as illustrated below:
-
System and computer level Web Access is assigned by the AXS Guard at boot time. These access types do not require user Authentication. Nothing is allowed at the system level by default. This is the most secure and recommended setting.
-
Group and user level Web Access rights are assigned dynamically and require user authentication. This is the recommended and most secure procedure.
After receiving a request, the AXS Guard’s Web Access Module checks which Web Access Filter (ACL) is applicable, i.e.
-
a system (system-wide)
-
a computer
-
a group or
-
a user level filter.
A user or group ACL is only assigned after successful authentication. The IP address requesting Web Access is automatically linked to one of the four security levels as illustrated below.
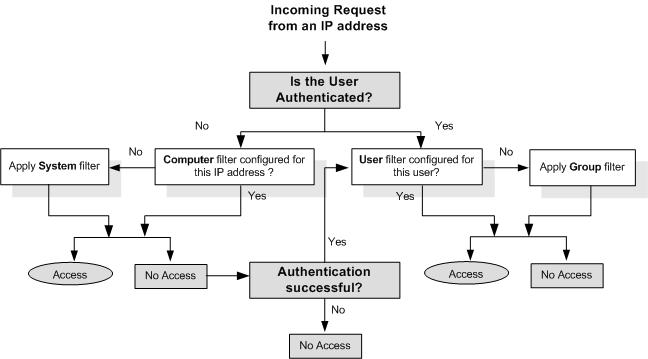
An ACL is assigned to a requesting IP addresses as follows:
-
The AXS Guard system level filter is assigned by default in the absence of any other filter;
-
An existing filter at the computer level overrules the AXS Guard system level filter;
-
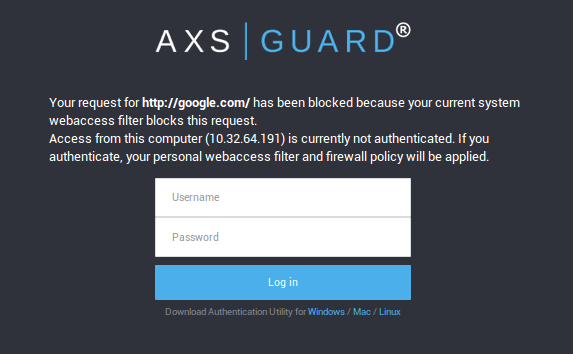
Denial of Web Access at the system or computer level prompts the user for authentication (illustrated below), except if the user is already authenticated;
-
The AXS Guard assigns the defined group level Web Access rights following a successful authentication, unless a user level filter exists, in which case
-
The filter defined for the user overrules the group level filter.
List Priority based on the Allow Scenario:
-
Exceptions (allowed sites which are normally blocked)
-
Ignore lists; sites to ignore explicitly. The content of such sites, e.g. commercial banners, is replaced with an AXS Guard logo
-
blocked lists (sites to block explicitly)
-
everything else is allowed
** List Priority based on the Block Scenario**:
-
Allowed (sites to allow explicitly)
-
ignore lists (sites to ignore explicitly. Their content is replaced with an AXS Guard logo)
-
everything else is blocked
Important
The Web Access login screen can also be accessed by typing tool in the URL field of your browser. It can also be customized. Details about user authentication are available in the AXS Guard Authentication How To, which is accessible via the Documentation button in the Administrator Tool.
Supported Authentication Methods
Web Access Rights determine the type of Web pages users may or may not visit and are based on the provided AXS Guard user credentials.
AXS Guard allows the implementation of several Authentication Methods, such as DIGIPASS Authentication, for Web Access. The setups and configuration of these Authentication Methods are explained in the AXS Guard Authentication How To, accessible via the Documentation button in the Administrator Tool.
Handling Plain Text Protocols
HTTP
A client initiates a request to browse a web site on the Internet. Typically, web sites are hosted on servers which listen for incoming connections on port 80. Other ports may be used.
Rather than connecting directly to the web server, the client’s request is handled by the AXS Guard proxy, which inspects it according to the configured ACL.
-
Assuming the request is allowed by the ACL, the AXS Guard proxy server checks whether the web page is already cached. If the page is not yet cached, the AXS Guard proxy server terminates the connection and initiates a new connection towards the web server on behalf of the client. The requested web page is then retrieved by the AXS Guard proxy.
-
Once the page is retrieved, it is scanned for the presence of computer viruses and other malware prior to being cached. By caching the new content, future client requests for the same content are accelerated.
-
The scanned web page is finally forwarded to the client.
Important
- It is highly recommended to enforce web access controls, so content can be scanned for computer viruses and other malware.
- It is not recommended to implement firewall policies which allow clients to access web servers directly. This prevents the AXS Guard proxy from scanning, inspecting and blocking potentially malicious and harmful content in web pages.
FTP
FTP connections can be handled by the AXS Guard proxy server, which inspects their content.
When a client attempts to connect to an FTP server with a web browser, the AXS Guard proxy inspects the connection and either allows or denies it based on the configured ACL and its list of safe proxy ports.
There is a difference between actual FTP traffic, which uses port 21 and
sites that use a Fully Qualified Domain Name (FQDN) which happens to
contain the word ftp. ftp://ftpserver.somedomain.com is not the same
as http://ftpserver.somedomain.com.
Actual FTP Traffic
The AXS Guard proxy server allows FTP traffic, as port 21 is added to the safe proxy ports list by default. This is a system-wide configuration, which means that all users can access FTP servers via the proxy if authorized by the configured ACL, even if a user’s personal firewall configuration blocks FTP.
To prevent users from accessing FTP servers via the AXS Guard proxy, simply remove port 21 from the safe proxy ports list.
-
A client initiates a request to browse an FTP site on the Internet, e.g.
ftp://ftp.somedomain.com. In most cases, FTP servers are configured to listen for incoming connections on port 21. -
Rather than connecting directly to the FTP server, the FTP request is handled by the AXS Guard proxy, which inspects it.
-
If port 21 appears in the safe proxy ports list and the destination server is allowed by the ACL, the FTP request is forwarded to the FTP server.

FQDNs Containing the Word FTP
If you make an HTTP connection to a server which "appears" to be an FTP
server, because the FQDN starts with or contains the word ftp as
illustrated below, traffic is handled by the AXS Guard proxy server the
same way as any other HTTP request.
Handling Secure Protocols
HTTPS
HTTPS is a secure, stateful protocol which uses end-to-end encryption.
Default Proxy Behavior
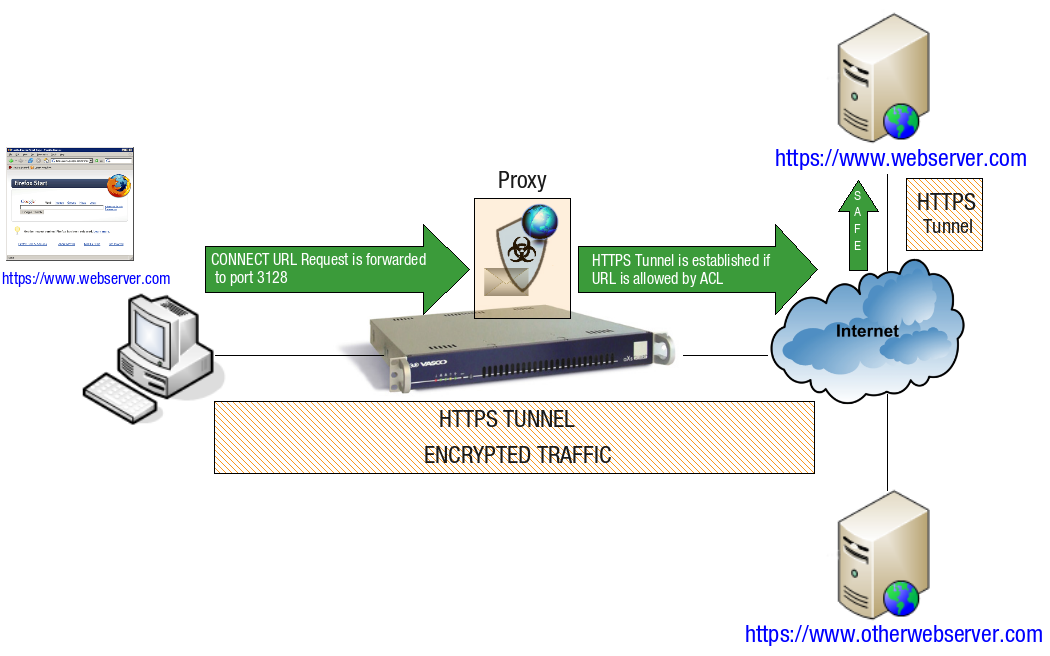
A single connection is used for all requests. By default, it is not possible to scan HTTPS traffic, because it is encrypted. Manipulating HTTPS traffic is also known as a man-in-the-middle or MITM attack.
-
The browser connects to the AXS Guard proxy server and sends a
CONNECT URLrequest for a tunnel to the remote HTTPS server, as illustrated below. -
Once the
CONNECTmessage is received, the AXS Guard proxy automatically tunnels the HTTPS request if the requested URL is allowed by the configured ACL and port 443 is listed in the safe proxy ports.
Only the initial CONNECT URL is checked by AXS Guard. By default,
HTTPS content cannot be inspected because it is encrypted. If the
initial URL is not allowed by the configured ACL, the AXS Guard proxy
server will simply refuse the connection.
Important
- It is highly recommended to enforce web access controls, so content can be scanned for computer viruses and other malware.
- It is not recommended to implement firewall policies which allow clients to access web servers directly. This prevents the AXS Guard proxy from scanning, inspecting and blocking potentially malicious and harmful content in web pages.
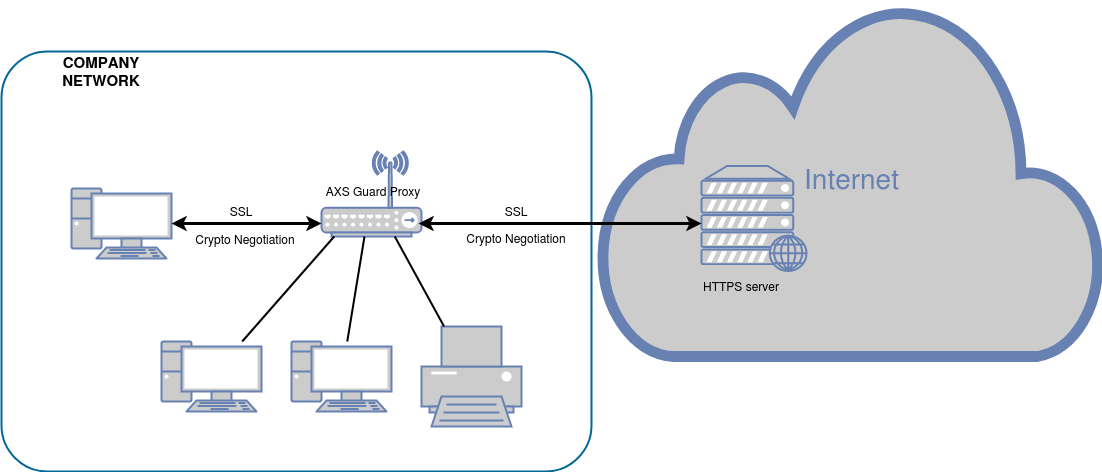
SSL Inspection
Over the last few years many popular web sites including Google, Youtube, Reddit and Facebook have started enabling HTTPS encryption by default. This means that without configuring SSL inspection, proxies have limited filtering, monitoring and logging capabilities.
AXS Guard supports man-in-the-middle SSL filtering a.k.a. HTTPS Inspection, which will allow you to more effectively monitor web traffic passing through the proxy server.
SSL Inspection requires a Threat Intelligence Premium license.
-
The user connects to a secure website using a browser, which is configured to use the AXS Guard proxy server.
-
The AXS Guard proxy server processes the request and decides how to handle it. There are 3 possibilities, depending on the proxy server configuration: either AXS Guard will establish a TCP tunnel (CONNECT URL), refuse the connection or - in case SSL inspection is enabled - intercept the connection for further processing.
-
In case of the latter, the certificate of the destination server is retrieved by AXS Guard.
-
This certificate is then validated by AXS Guard, which will generate a new, man-in-the-middle certificate resembling the original certificate of the destination server.
-
The client gets the man-in-the-middle certificate instead of the original certificate of the destination server, which allows the AXS Guard proxy to scan the traffic between the client and the destination server. The man-in-the-middle certificate is also cached by AXS Guard for reasons of performance.
-
The user will be able to navigate the website as usual; only the certificate information will be altered. If the page is blocked by an ACL, the user will be redirected to the AXS Guard blocked notification page.
Important
Considerations & Challenges
Certain web applications may not function properly when decrypted. You may also want to exclude certain domains for any other reason, including legal or privacy reasons, e.g. sites which provide online banking services. See How to configure SSL Inspection.
The following technologies are known to cause issues with SSL inspection:
-
SSL Pinning
-
OCSP Stapling
-
Secure WebSocket
-
Mutual Authentication
Mutual Authentication
The SSL handshake may be disrupted when using AXS Guard's SSL inspection in conjunction with mutual authentication. Mutual SSL relies on the trust established by exchanging certificates. SSL inspection breaks this trust because it introduces a middleman that presents its own certificate to the client, creating potential trust issues. When AXS Guard presents its own certificate first, it causes the client to reject the connection.
Addressing the disruption in the SSL handshake resulting from the integration of mutual authentication can be effectively resolved by incorporating an SSL exception.
Optimizing SSL Inspection
Using multiple workers or threads with SSL inspection can offer several benefits, especially in terms of performance and scalability.
By employing multiple workers, the AXS Guard proxy server can process SSL inspection tasks in parallel. Each worker operates independently, allowing for concurrent handling of multiple SSL connections. This parallelism can significantly enhance the overall processing speed and efficiency.
Multiple workers enable the proxy server to handle a higher volume of SSL traffic simultaneously. This improves throughput, reduces latency and enhances the overall user experience for clients accessing the web through the proxy.
Browser Configuration Methods
Introduction
The Web Access (proxy) service listens on TCP port 3128. To access web pages via the AXS Guard Proxy Server:
-
The Web Access Feature must be activated.
-
The AXS Guard must be configured as the client’s proxy server.
-
If you are using WPAD (proxy auto-discovery for clients), your must create the appropriate DNS records, so that clients can correctly resolve the IP address of the WPAD and proxy server.
There are several methods to configure the proxy setting of your clients:
-
Manually, by changing the connection settings of the client’s browser.
-
Automatically, either by using WPAD or by installing the AXS Guard SSO utility.
Manual Browser Configuration
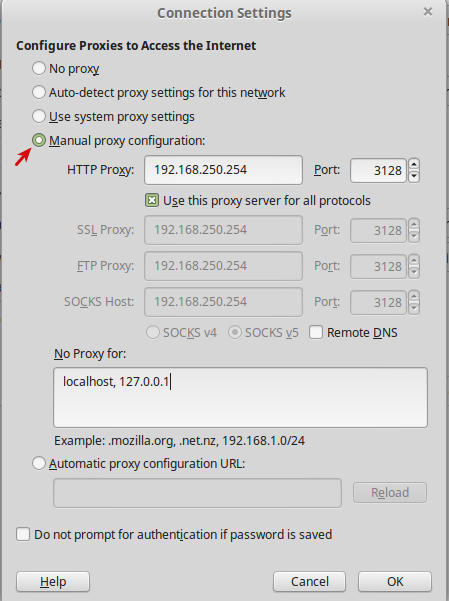
Enter the LAN IP and proxy port (3128) of the AXS Guard proxy server in the browser’s connection settings. In the example below, we use Firefox. Please note that proxy configuration methods vary depending on the Internet browser. Consult your browser’s documentation for the correct steps.
Important
If you are planning to use Kerberos authentication, you must enter the FQDN of the AXS Guard appliance in the browser’s proxy configuration field instead of its IP address. The FQDN must be resolvable by all clients in the network or authentication will fail. See the Authentication manual for additional information about Kerberos.
Automated Configuration using WPAD
AXS Guard supports the Web Proxy Auto Discovery (WPAD) protocol. This protocol allows browsers to automatically locate proxy servers in a network.
The WPAD protocol works as follows:
-
The client’s browser attempts to resolve
wpad.your.domain.comwhereyour.domain.comis the client’s configured domain.wpad.your.domain.comshould resolve to the LAN IP of the AXS Guard appliance. -
The browser connects to the AXS Guard appliance and looks for the proxy information in the wpad.dat file. The hostname in the wpad.dat file must also be resolvable by the client.
-
The client’s browser automatically updates its proxy configuration with the hostname in the wpad.dat file.
You can configure the proxy settings to exclude certain hosts. Clients will hereby be allowed to establish a direct connection with these hosts, i.e. the proxy will be bypassed. (Also see WPAD Configuration).
Info
If you are using a third-party DNS server instead of AXS Guard, e.g. a Microsoft DNS server, you must add the appropriate DNS records for wpad.your.domain.com and the proxy server’s hostname in the wpad.dat file to your DNS repository. Both must be resolvable by the clients in your network.
Example: Typical WPAD Configuration with a Microsoft DC
-
Enable "automatic proxy detection" via a GPO.
-
Add the appropriate DNS records for the AXS Guard appliance and the proxy hostname specified in the wpad.dat file. Both must be resolvable by the clients.
-
Configure a default ACL on the AXS Guard, e.g.
predef-no-porn.
Automated Configuration using the SSO Utility
The Single Sign-On (SSO) tool can be downloaded directly from the AXS Guard Cloud. It makes AXS Guard authentication transparent to users and can be configured to automatically adjust the user’s system proxy settings, so that all client requests are secured, filtered and logged by the AXS Guard proxy server.
For details about the SSO tool, see the Single Sign-On Utility (SSO) manual, which is available via the Documentation button in the web-based administrator tool.
Using the Transparent Proxy
No client-side configuration is required. See Transparent Proxy Configuration.
Proxy Server Configuration
Configuration Overview
-
Enable the Web Access feature.
-
Configure a time restriction or use a predefined time restriction.
-
Create your own site list(s) or use (a) predefined site list(s).
-
Create a category to add your site list(s) or predefined site lists.
-
Create a new ACL and add the appropriate categories and times or use the predefined ACLs and times.
-
Assign the ACL to a user, a group, a computer or the system, a.k.a. a system-wide implementation.
-
Configure the authentication policy for web access, e.g. DIGIPASS authentication.
-
Configure your clients to use the AXS Guard proxy server.
Feature Activation
The web access feature and its subcomponents must be enabled prior to configuration. Note that certain subcomponents require a specific license. See our software bundles page for additional information and details or contact sales@axsguard.com if you have any questions.
-
Log in to the AXS Guard appliance as a system administrator.
-
Go to System > Feature Activation.
-
Enable the Web Access features.
Time Restrictions
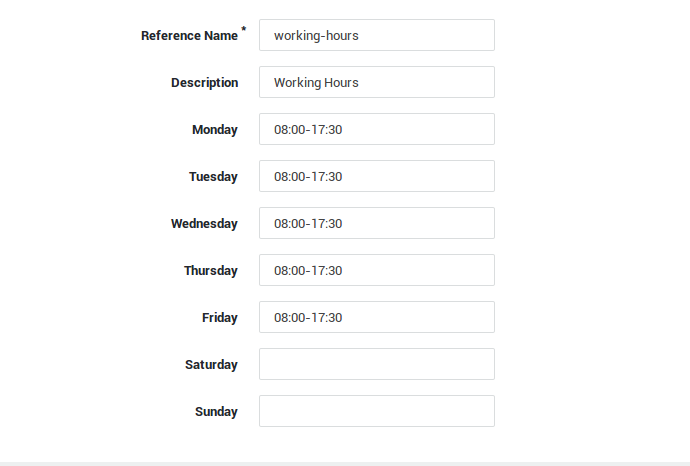
Time Restrictions allow administators to define a start and stop times for a Web Access Filter (ACL). For your convenience, ready-to-use Time Restrictions are readily available on AXS Guard.
Creating new Time Restrictions
-
Log on to the AXS Guard appliance.
-
Navigate to Web Access > Filters > Times.
-
Click on Add New.
-
Enter the settings as explained in the table below.
-
Save your configuration.
| Field | Description |
|---|---|
Reference Name |
Enter a name for the Time Restriction, using lower cases without spaces, starting with an alphabetic character and thereafter any number of alphanumeric characters. Only the following special characters are allowed: back slash |
Description |
Enter a description for the Time Restriction (optional). |
Day of the Week |
Enter the time frame for each day of the week in the |
Viewing and Modifying Time Restrictions
-
Log on to the AXS Guard appliance.
-
Navigate to Web Access > Filters > Times.
-
Click on the Time Restriction’s Reference Name to view its configuration details.
-
Modify the configuration as needed.
-
Update your configuration.
Important
Can click on Edit as New to create a new Time Restriction based on an existing one.
Site and Word Lists
A List can either be composed of:
-
a number of web sites, IP addresses or URLs for which access may be allowed, ignored or blocked (see List Types).
-
a Word List.
The predefined lists are always accessible, regardless of whether you purchased the basic or standard content scanning license. These lists are updated automatically and facilitate the configuration of the Web Access Module.
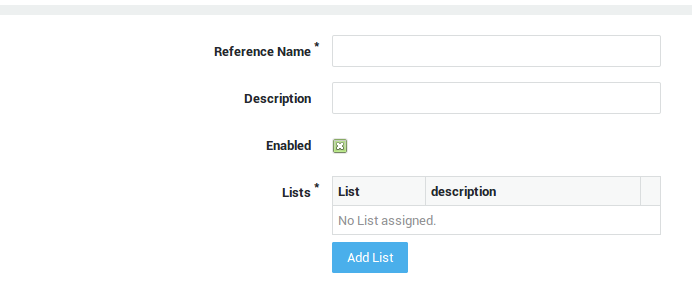
Creating a new List
-
Log on to the AXS Guard appliance.
-
Navigate to Web Access > Filters > Lists.
-
Click on Add new.
-
Enter the settings as explained in the table below.
-
Save your configuration.
Field |
Description |
|---|---|
Reference Name |
Enter a Site List name, using lower cases without spaces, starting with an alphabetic character and thereafter any number of alphanumeric characters. Only the listed special characters are allowed: back slash |
Description |
Enter a description for the site list (optional). |
Enabled |
Check to enable the list. Uncheck to disable the list. |
List Type |
Select the list type, i.e. site list or word list.
|
Site List Format
You can either enter a part of the URL or the entire URL to be matched.
URLs that are processed by the AXS Guard have the following layout:
protocol://site/ The protocol is often http or ftp, e.g.
http://www.axsguard.com/.
To match all sites containing the word microsoft, microsoft must be
added as a single line entry. The result is that
http://www.microsoft.com/, ftp://ftp.microsoft.com/ and
http://be.microsoft.com/ will match when entered in the URL field of
the client’s browser and the configured action will be taken.
You can use wild characters to define patterns:
-
A question mark
?matches any character, e.g. the stringhttp://www.?unet.com/matcheshttp://www.eunet.comandhttp://www.uunet.com. -
An asterisk
*matches any charachter(s), e.g.www.*bematches withhttp://www.vrt.be,http://www.standaard.beand alsohttp://www.antebe.com. -
A
^forces the expression to match the beginning of the URL, e.g.^vrt.bematchesvrt.be, but notmanbijthond.vrt.be. -
A
$forces the expression to match the end the URL, e.g.vrt.be/teletekst$matchesvrt.be/teletekst, but notvrt.be/nieuws.
Word List Syntax
<myword><myscore>
where myword:
-
is a word or a sentence (spaces may be included but are matched as entered)
-
regular expressions are not supported
-
may not contain
<or>
where myscore can be:
-
a negative number, e.g.
-50 -
a postive number, e.g.
50 -
0(zero) > banned word; the page is blocked regardless of the maximum score specified in the scenario.
or
<myword>,<mysecondword>[,<otherword>]*<myscore>
-
i.e. two or more words seperated by comma; the score is only applied if all words match.
-
spaces outside the brackets are not allowed and produce a validation error.
Example 1: Protocol-specific match
Assume that you wish to grant access to a specific host, e.g.
ftp.somesite.com, which is running several services, such as FTP, HTTP
and HTTPS. Only group X should be allowed access to the host, 24 hours a
day, 7 days a week. FTP access is denied, while HTTP and HTTPS access to
the server should be allowed.
-
Create a Site List in which
http://ftp.somesite.comandhttps://ftp.somesite.comare allowed, e.g. somesite-allow. -
Create another Site List in which access to
ftp://ftp.somesite.comis denied, e.g. somesite-deny. -
Create a new ACL and select the Block Scenario.
-
Select somesite-deny as a Blocked Site List. Specify somesite-allow as an Exception Site List.
-
Assign the ACL to group X.
Example 2: Weighted Words
<slut><10> - Adds 10 to the count against the string slut. i.e.
sluts, slut!, abslutxyz.
<slut>,<horny><50> - Adds 50 to the count when the strings slut and
horny are detected in the same page.
<breast>,<medical><-30> - Subtracts 30 from the count when the strings
breast and medical are detected in the same page.
<education><-25> - Subtracts 25 from the count when the string
education is detected in the page.
Example 3: How Scores are calculated
The following syntax:
<test>,<rabbit><50>
Adds 50 to the score when both test and rabbit are detected in the
page; nothing is added when only one of both words is detected.
However, this syntax:
<test><50>
<rabbit><50>
Adds 50 if one of the words is detected and adds 100 if both are detected.
Viewing and Modifying Lists
-
Log in to the AXS Guard appliance.
-
Navigate to Web Access > Filters > Lists.
-
Click on a List’s Reference Name to view or modify its configuration.
Important
- You can also disable or enable Lists in this screen.
- Predefined lists cannot be modified.
- Use a search filter to easily locate configured site lists.
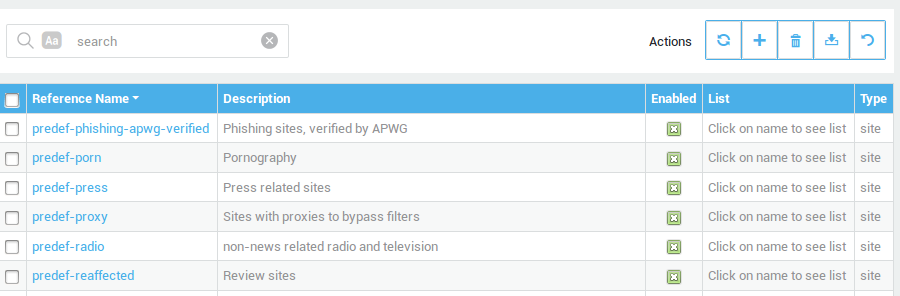
About Predefined Lists
For convenience, predefined Lists are available on the AXS Guard. Two types exist:
-
Automatically updated Lists: These lists are automatically updated, e.g. blacklists such as predef-aggressive. An overview of automatically updated Site Lists is available in the table below. These lists are always available, regardless of whether you purchased the basic or standard content scanning license.
-
Others: These lists are predefined to facilitate the configuration of the Web Access Module, e.g. the predef-porn Site List, which prevents access to porn sites.
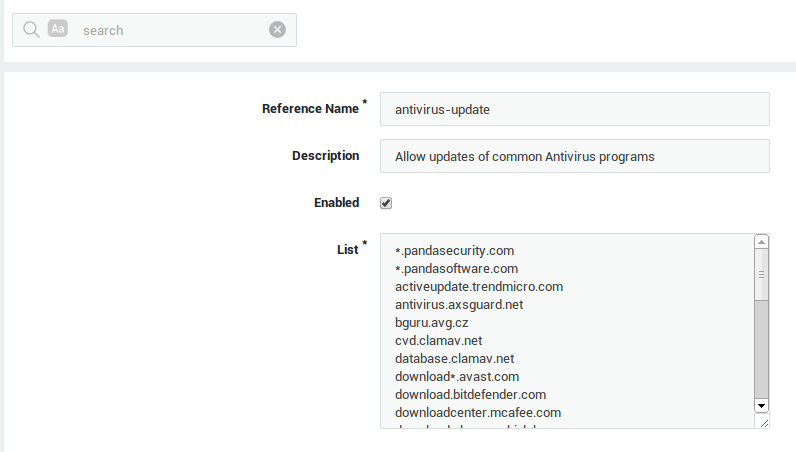
To access the Predefined Site Lists, follow the same steps as explained above. The image below shows an example of a Predefined Site List.
| List | Description |
|---|---|
antivirus-update |
Allows access to servers hosting essential updates for Anti-Virus software. |
predef- |
Denies access to sites containing potentially offensive and dangerous content, such as violence, drug abuse, phishing, spyware, etc. ( |
microsoft-update |
Allows access to Microsoft update servers. |
predef-porn |
Denies access to sites containing pornographic material. |
predef-porn-overrule |
Allows access to bonafide sites, which indicentally include words, such as sex |
Info
- Anti-Virus update servers should be added specifically for the Anti-Virus software you are using on your clients. To know which update servers are being used by your software, consult your Anti-Virus software documentation.
- On the AXS Guard, select the antivirus-update Site List, click on Edit as New and add the Anti-Virus update servers.
- Add the updated List to the appropriate category and ACL. Then assign the ACL to the appropriate user, group, computer or the system (system-wide).
Creating Categories
Word Lists and Site Lists must be added to a Category before:
-
they can be added to an ACL
-
they are activated.
For your convenience, some predefined categories are available on the AXS Guard.
To create a new category
-
Log on to the AXS Guard appliance.
-
Navigate to Web Access > Filters > Categories
-
Click on Add new.
-
Enter the settings as explained in the table below.
-
Save your configuration.
Info
You can also create a new category based on an existing category. To do so, navigate to Web Access > Filters > Categories, select the desired category reference name and click on Edit as new.
| Field | Description |
|---|---|
Reference Name |
Enter a name for the new category, e.g. |
Description |
Enter a description (optional). |
Enabled |
Check to enable the category. Uncheck to disable the category. |
Lists |
Add the desired list(s) by clicking on the Add List button. Lists are created under Web Access > Filters > Lists. |
Web Access Filters (ACLs)
Web Access Filters combine:
-
Time Restrictions
-
Lists
For your convenience, predefined Web Access Filters are readily available on AXS Guard.
Creating a new Web Access Filter
-
Log on to the AXS Guard appliance.
-
Navigate to Web Access > Filters > ACL.
-
Click on Add new.
-
Enter the configuration settings as explained in the table below.
-
Save your configuration.
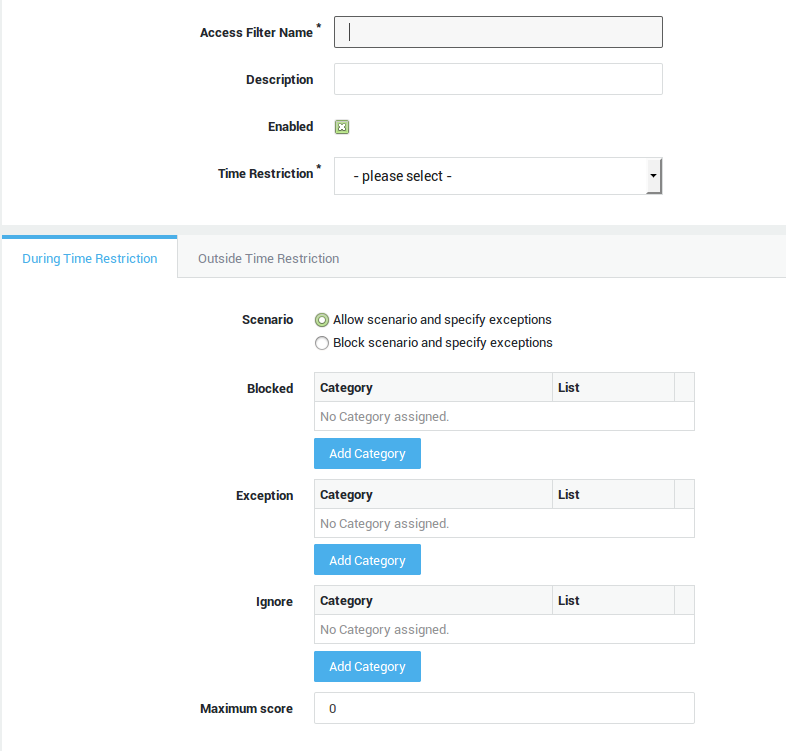
Field |
Description |
|---|---|
Access Filter Name |
Enter an ACL name, using lower cases without spaces, starting with an alphabetic character and thereafter any number of alphanumeric characters. Only the following special characters are allowed: back slash |
Description |
Enter a description for the ACL (optional). |
Enabled |
Check to enable the ACL. An ACL can also be enabled or disabled in the ACL list. |
Time Restriction |
Select the desired time restriction. Go to Filters > Times for an overview of configured time restrictions. |
Scenario |
Choose the scenario to be enforced during and outside the selected Time Restriction.
|
Important
ACLs are not enforced if they are disabled, even if they are assigned to a user, a group, a computer or the system (system-wide).
Viewing and Modifying Web Access Filters
-
Log on to the AXS Guard appliance.
-
Navigate to Web Access > Filters > ACL.
-
Click on an
Access Filter Namein the list to view its configuration.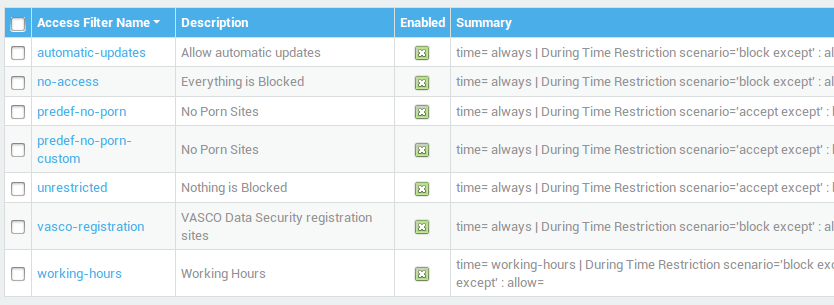
Info
- To create a new ACL based on an existing one, click on the Access Filter Name, then click on Edit as New.
- Ensure the Enabled option is checked if you wish to use the ACL. ACLs are only enforced if enabled.
Predefined Web Access Filters
For convenience, predefined Web Access Filters are readily available on the AXS Guard (see the table below).
| Field | Description |
|---|---|
automatic-updates |
Allows 24 hour access to Anti-Virus and Microsoft update servers. |
no-access |
Web Access is not allowed. |
predef-no-porn |
Allows 24 hour access to all sites, except sites containing pornographic and potentially offensive content (blacklisted sites). |
unrestricted |
Allows 24 hour access to all sites, except blacklisted sites. |
working-hours |
During working hours: Blocks all access, except to allowed sites. Outside working hours: Allows access to all sites, except blacklisted sites. |
Info
- Anti-Virus update servers should be added specifically for the Anti-Virus software you are using on your clients. To know which update servers are being used by your software, consult your Anti-Virus software documentation.
- On the AXS Guard, select the antivirus-update Site List, click on Edit as New and add the Anti-Virus update servers.
- Add the updated List to the appropriate category and ACL. Then assign the ACL to the appropriate user, group, computer or the system (system-wide).
System-Wide Proxy Settings
Content Scanning
Maximum File Size for Downloads
You can set the maximum size of files that can be downloaded via the AXS
Guard proxy server. If this size is exceeded, i.e. an attempt is made to
download a file larger than the specified size, a
preventing off_t overflow message will appear in the logs.
-
Navigate to Web Access > Proxy Server.
-
Enter the desired maximum file size (Mb).
-
Update your configuration.

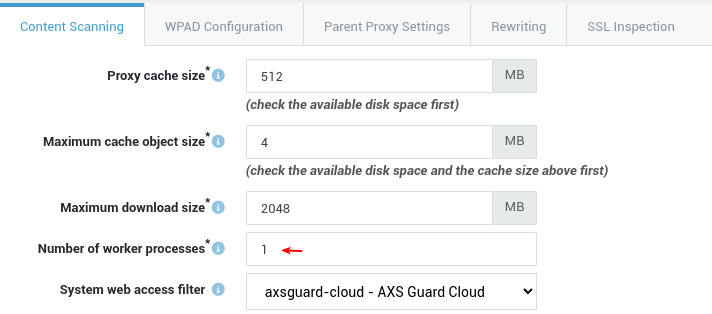
Worker Processes
Distributing the workload among multiple workers or threads allows for more efficient use of system resources, such as CPU and memory, which is especially important on systems where SSL inspection is enabled. Note that a separate cache is allocated for each worker.
-
Navigate to Web Access > Proxy Server and select the Content Scanning tab.
-
Configure the number of worker processes. The AXS Guard proxy server uses 1 worker process by default.
-
Update your configuration.
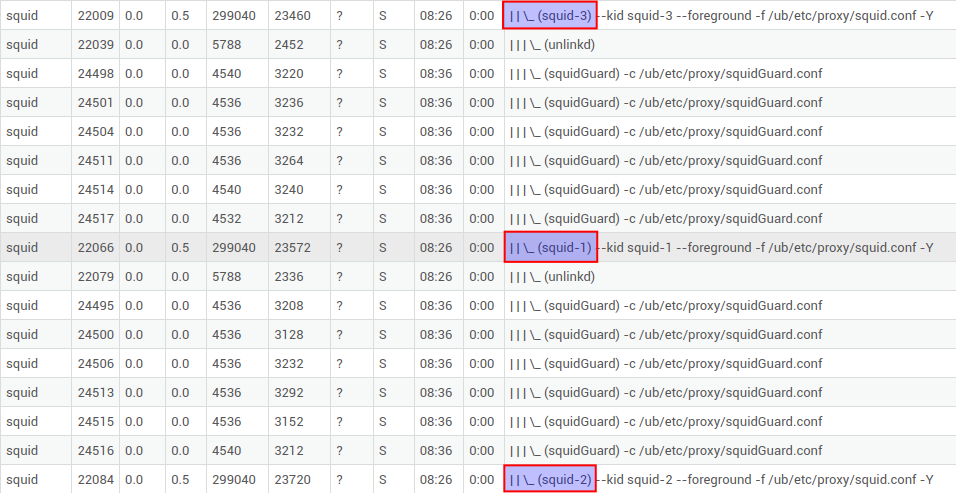
Administrators can configure up to 5 workers. You can verify the number of configured workers via the AXS Guard CLI or by navigating to System > Status > Processes:
Blocking Mime Types
-
Navigate to Web Access > Proxy Server.
-
Add the MIME type to be blocked. A list is available here.
-
Update your configuration.

Add the following MIME types:
-
video/x-ms-asf -
application/vnd.ms.wms-hdr.asfv1 -
application/x-mms-framed -
video/x-ms-asf -
application/vnd.ms.wms-hdr.asfv1 -
application/x-mms-framed
Important
Added MIME types will be blocked at the system-level.
Application Control Policy Selection
The application control system monitors the application layer (layer 7 of the OSI model) of the network. This is also known to as Deep Packet Inspection (DPI), a form of computer network packet filtering that examines the data part of a packet as it passes the AXS Guard, searching for defined criteria, such as protocols or websites, to decide whether the packet may pass or needs to be blocked.
AXS Guard also collects and reports statistical information about all layer 7 traffic. See the Application Control How To for additional information.
| Fields and buttons | Description |
|---|---|
Add application control policy |
Click to select and assign application control policies. Go to Application Control > Policies for an overview of policies on your system or to edit and configure application policies. |
Policy |
Shows the name of the assigned policy as defined under Application Control > Policies. |
Blocked applications |
A comma-separated list of applications which are blocked by the application control policy. |
Other Settings
Important
Always use the strictest security for system-wide configurations. Enforce authentication where possible.
| Field | Description |
|---|---|
Proxy Cache Size |
Enter the maximum disk space to be reserved for the proxy cache, measured in Mb. 100 Mb is the system default. |
Maximum Cache object Size |
Caching eliminates the need to repeatedly download the same data. Enter the maximum allowed cache object size (in Mb). Objects exceeding the specified size are not cached. |
URLs or IPs of streaming videos to cache |
Enter the IP address(es) or URL(s) of frequently accessed videos to preserve bandwidth and increase download performance. |
System Web Access Filter |
Enter the Web Access Filter to be applied at the system level (system-wide configuration). Enforce the strictest security at this level as it applies to all users and computers which connect to the Internet via the AXS Guard proxy. |
Block File Extensions |
Define file extension(s) to be blocked. Each extension must be added individually. This is a system-wide configuration, which means that specified extensions will be blocked for all users connecting to the Internet trough the AXS Guard proxy. Do not include periods in the file extension list; use |
Safe Proxy Ports |
Add or remove the port(s) to be allowed or denied by the proxy server, e.g. remove port 21 if you wish to prevent access to FTP sites. This is a system-wide configuration, which means the specified ports will be accessible by all users and computers which connect to the Internet via the AXS Guard proxy. |
Enable cache when Antivirus is active |
Speeds up downloads, but may cache malicious content. |
Clear cache on Antivirus update |
Clears the cache each time virus pattern files are updated. Note that the proxy server is restarted each time the cache is cleared, which may result in disconnects. |
WPAD Configuration
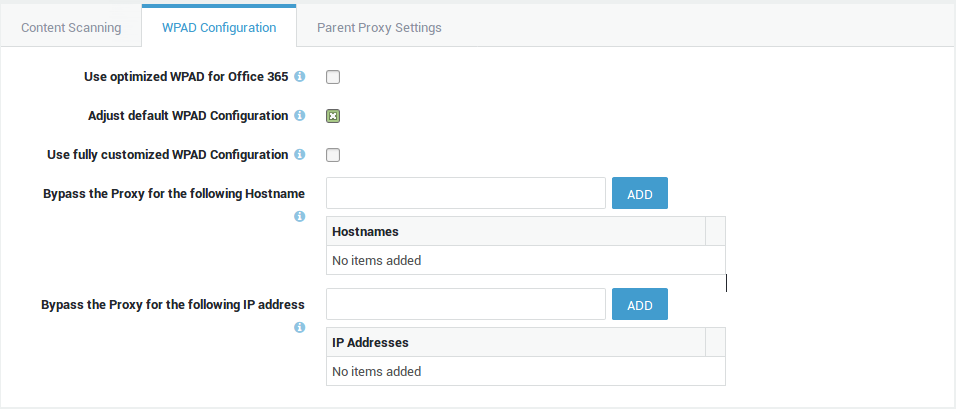
You can customize the automatic proxy configuration to exclude specific destination hosts and IP addresses. This allows clients to connect to the specified hosts or IPs directly, instead of connecting via the AXS Guard proxy. You can also add your own, fully customized WPAD configuration by checking the "Enable custom WPAD config" option.
Example 1: Connecting to trusted hosts in your LAN
Assume that you have a policy that prevents users from to changing their browser settings and that you configured all browsers to automatically download their proxy configuration from the AXS Guard. By default, the client will use the AXS Guard proxy to connect to any host, including trusted hosts in your internal network. If you specify these hosts as an exception, the client will be able to connect to them directly.
Example 2: Solving NTLM-related issues
If you are experiencing problems with a trusted server that uses NTLM authentication, you can add its IP address or hostname as an exception.
Default AXS Guard WPAD configuration
//We (www.is.co.za) run a central cache for our customers that they
//access through a firewall - thus if they want to connect to their intranet
//system (or anything in their domain at all) they have to connect
//directly - hence all the "fiddling" to see if they are trying to connect
//to their local domain.

//Replace each occurrence of company.com with your domain name
//and if you have some kind of intranet system, make sure
//that you put it's name in place of "internal" below.

//We also assume that your cache is called "cache.company.com", and
//that it runs on port 8080. Change it down at the bottom.

//(C) Oskar Pearson and the Internet Solution (http://www.is.co.za)

    function FindProxyForURL(url, host)
        {
            //If they have only specified a hostname, go directly.
            if (isPlainHostName(host))
                    return "DIRECT";

            //These connect directly if the machine they are trying to
            //connect to starts with "intranet" - ie http://intranet
            //Connect  directly if it is intranet.*
            //If you have another machine that you want them to
            //access directly, replace "internal*" with that
            //machine's name
            if (shExpMatch( host, "intranet*"))
                return "DIRECT";
            // enter the hostnames and/or IP addresses to surf without proxy
            // NO_PROXY

            //Connect directly to our domains (NB for Important News)
            // if (dnsDomainIs( host,"company.com"))
            //If you have another domain that you wish to connect to
            //directly, put it in here
            //              dnsDomainIs(host,"sistercompany.com"))
            //    return "DIRECT";
            if (shExpMatch( host,"company.com"))
                    return "DIRECT";
            if (shExpMatch( host,"*.company.com"))
                    return "DIRECT";

            //So the error message "no such host" will appear through the
            //normal Netscape box - less support queries :)
            if (!isResolvable(host))
                    return "DIRECT";

            //We only cache http, ftp and gopher
            if (url.substring(0, 5) == "http:" ||
                            url.substring(0, 6) == "https:" ||
                            url.substring(0, 4) == "ftp:"||
                            url.substring(0, 7) == "gopher:")

            //Change the ":8080" to the port that your cache
            //runs on, and "cache.company.com" to the machine that
            //you run the cache on
                    return "PROXY cache.company.com:8080; DIRECT";

            //We don't cache WAIS
            if (url.substring(0, 5) == "wais:")
                    return "DIRECT";

            else
                    return "DIRECT";
        }
| Option | Description |
|---|---|
Use optimized WPAD for Office 365 |
For reasons of performance, Microsoft advises against the use of proxy servers for accessing their cloud services. If enabled, the system’s default WPAD configuration will be updated so that clients have direct access to Office 365 services. This option will be automatically enabled if you run the Office 365 configuration wizard. |
Adjust default WPAD Configuration |
Check to adjust the system’s default WPAD configuration. To download the system default WPAD configuration file, start a browser and go to http://axsguard_lan_ip/wpad.dat. |
Use fully customized WPAD Configuration |
Enable this option to add your own, fully customized WPAD configuration. Note that knowledge of the WPAD protocol is required. See online resources for further information. |
Custom WPAD Configuration |
Copy and paste the contents of your custom WPAD configuration file into this field. It will replace the system’s default WPAD configuration. |
Bypass the Proxy for the following Hostname |
Entered hostnames will be directly accessible. You can enter unqualified and fully qualified hostnames, e.g. host, host.example.com. Regular expressions are also allowed, e.g. *.example.com will match any host in the example.com domain. Note: If the specified hosts cannot be accessed, check your firewall configuration. |
Bypass the Proxy for the following IP address |
Entered IP addresses will be directly accessible. Use IPv4 addresses only, e.g. 172.16.0.1. You can also add IP ranges, e.g. 172.16.0.0/24. Note: If the specified IP addresses cannot be accessed, check your firewall configuration. |
URL Rewriting
You may find yourself in a situation where you will need to redirect all URLs from a domain e.g. example.com to another domain, e.g. example.org. Via this page, advanced system administrators can configure URL redirection or URL substitution.
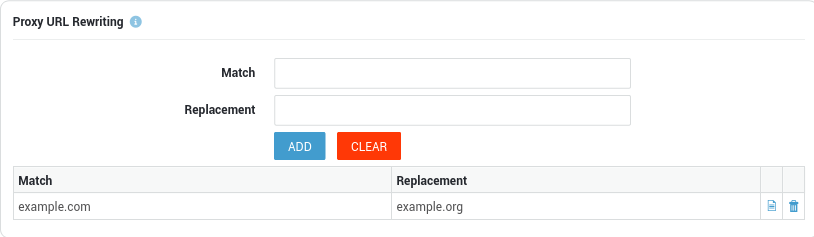
Tip
You can test your configuration with curl, e.g.
curl -I example.com -x axsguard.mydomain.com:3128 user:password
The web access logs will show the corresponding entry, e.g.
client.mydomain.com - - [08/Aug/2022:10:00:03 +0200] "HEAD http://example.org/ HTTP/1.1" 200 502 173 TCP_MEM_HIT:HIER_NONE
SSL Inspection
With SSL inspection, you can scan and monitor encrypted web traffic (HTTPS). The configuration of this feature is explained in How to configure SSL Inspection.
Transparent Proxy Configuration
Introduction
The AXS Guard appliance can
be used as a transparent proxy server. This requires the
web-transparent-proxy NAT redirection rules to be enabled.
When redirection is enabled, all traffic towards TCP port 80 is intercepted and redirected to port 3127 for further inspection. Similarly, traffic towards TCP port 443 is intercepted and redirected to port 3130.
For details about NAT, see the System Administration and Firewall documentation.
HTTP Traffic
-
Log on to the AXS Guard appliance.
-
Navigate to Network > NAT > Port Redirection.
-
Enable the web-transparent-proxy NAT redirection rule.
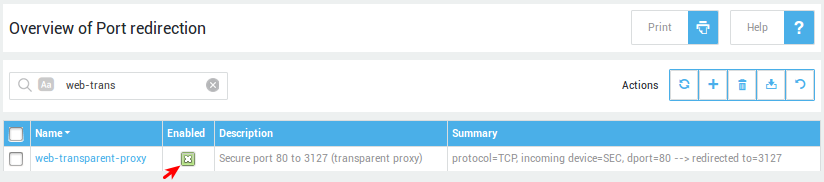
HTTPS Traffic
-
Log on to the AXS Guard appliance.
-
Navigate to Network > NAT > Port Redirection.
-
Enable the
web-transparent-proxy-sNAT redirection rule.
User Authentication
Authentication Policy and Brute Force Protection Settings
-
Go to Authentication > Services.
-
Select Firewall and Web Access.
-
Select the desired authentication policy.
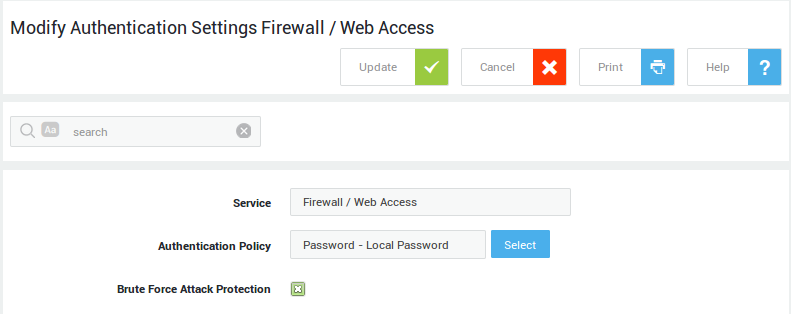
| Field | Description |
|---|---|
Service |
The AXS Guard service to be configured. This field cannot be edited. |
Authentication Policy |
The authentication policy determines how users must authenticate to access the service. Go to Authentication > Advanced > Policy for an overview of policies configured on your system. |
Brute Force Attack Protection |
Enable to protect the selected service against brute force attacks as configured under Authentication > General. |
Linked Authentication (Recommended Setup)
To link Web Access and Firewall Authentication:
-
Log on to the AXS Guard appliance.
-
Navigate to Authentication > General.
-
Allow Firewall and Web Access Authentication.
-
Link Web Access and Firewall Authentication.
-
Update your configuration.

Unlinked Authentication
Use the recommended settings for your network topology as explained in the AXS Guard Authentication How To, which is accessible via the Documentation button in the Administrator Tool.
Important
You cannot use the transparent proxy if linked authentication (firewall and web access) is disabled. Authentication must be linked for this option to be functional.
Basic Authentication
At the system level:
-
Log in to the AXS Guard.
-
Go to Authentication > General.
-
Enable the options as shown below
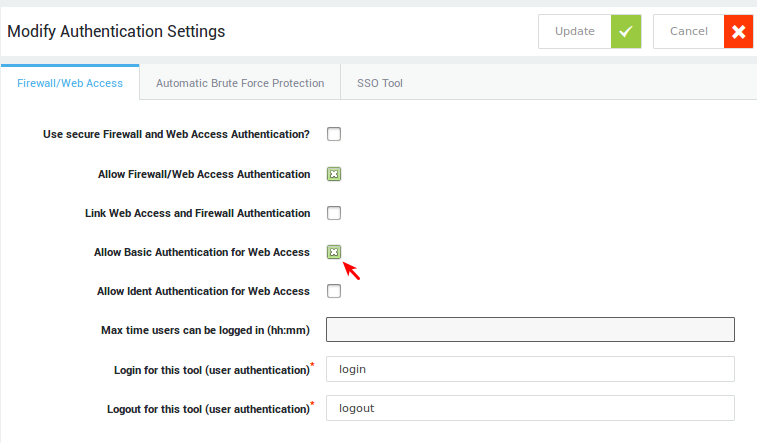
At the computer level:
-
Go to Computers.
-
Select the appropriate computer from the list.
-
In the Authentication Linking tab, select "overrule system authentication setting".
-
Disable linked authentication by unchecking the "Link Web Access and Firewall Authentication" option.
-
Check the option "allow authentication" and "allow basic authentication for web access".
-
Save your changes.
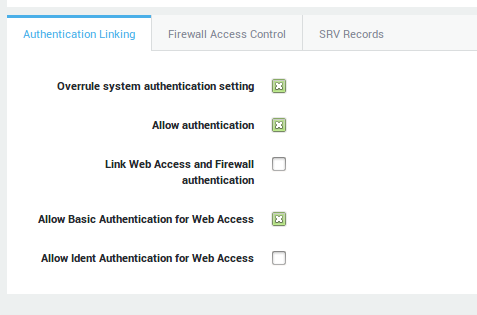
Kerberos Authentication
See the Authentication How To or the configuration examples for step-by-step instructions.
Server-Side Configuration
If you are planning to enforce Kerberos authentication for web access, you must:
-
Unlink firewall and web access authentication under Authentication > General, as explained in the Authentication How To.
-
Add A and PTR records to your DNS server for the KDC and the AXS Guard.
-
Verify the system time on the KDC and the AXS Guard. The use of NTP is recommended.
-
Sync your AD users as explained in the Directory Services How To.
-
Forward reverse DNS lookups for the KDC.
-
Configure user web access privileges.
-
Generate the keytab file for web access.
-
Allow Kerberos authentication for web access as shown below.
-
Adjust the proxy settings on the clients.
Client-Side Configuration
No special configuration is required for Windows clients that joined your AD domain, except if you are planning to use Kerberos authentication for web access. In that case, browsers should be configured to use the AXS Guard as their proxy server.
Important
Using Kerberos for Web Access
Enter the proxy server name and not the IP address when you configure the browser proxy settings of a Kerberos client.
Important items to remember:
- The proxy server name must be resolvable by the client (added to the AXS Guard computer list).
- Make sure Web Access and Firewall authentication are unlinked (under Authentication > General).
- Make sure that Kerberos authentication is enabled for Web Access (under Authentication > General).
Other items to verify:
- Make sure to enable Kerberos (GSSAPI) in your client software, e.g. your mail client.
- Install and configure a Kerberos client if necessary, e.g.
kiniton Linux clients. - Check the system time on the client. It must be accurate for Kerberos to work. It is recommended to synchronize your clients with a time server.
- Make sure the client can correctly resolve the KDC as well as the AXS Guard. A and PTR records are required for the KDC as well as the AXS Guard.
- Verify if the user accounts exist on the AXS Guard.
- Make sure there is a valid keytab file for every service that is required by the clients.
- Make sure there are no duplicate SPNs.
Ident
-
Log on to the AXS Guard.
-
Navigate to Computers.
-
Select the computer on which the ident process is running, e.g. a citrix server in your network.
-
Select Overrule system authentication setting.
-
Uncheck Link Web Access and Firewall authentication.
-
Check Allow Ident Authentication for Web Access.
-
Save your configuration.
Info
For a system-wide configuration, go to Authentication > General, uncheck Link Web Access and Firewall authentication and check Allow Ident Authentication for Web Access.
Web Access Login Page Configuration
In this section, we explain how to customize your AXS Guard Web Access login and blocking page. You can customize:
-
The logo which appears on the login page.
-
Notification messages, such as instructions, disclaimers or warnings which must appear on the login page.
-
Standard text and HTML are supported.
Message Configuration
-
Log on to the AXS Guard appliance.
-
Navigate to Web Access > Localization.
-
Enter the desired messages in the appropriate fields either using standard text or HTML.
-
Update your configuration.
| Template Parameter | Description |
|---|---|
REFERERURL |
Is replaced with the blocked URL a user is trying to access via the AXS Guard proxy. |
REMOTEIP |
Is replaced with the IP address of the computer which is requesting a web page via the proxy. |
USER |
Is replaced with the AXS Guard user ID of the person who is logged in. |
Logo Configuration
Logo types:
-
Ignore Logo: is shown when a user accesses a page that contains items listed in an ignore filter, e.g. commercial banners.
-
Web Access authentication logo: The logo that appears on the Web Access login page.
Important
If you do not configure a Web Access authentication logo, the logo configured under System > Customer is used instead.
-
Navigate to Web Access > Localization.
-
Scroll all the way to the bottom of the page.
-
Click browse to select the desired logo (PNG, GIF and JPG are supported formats).
-
Update your configuration when finished.
Anti-Virus and Anti-Spyware Configuration
Overview
The Trend Micro and ClamAV Anti-Virus and Anti-Spyware Module automatically download pattern files to ensure your network is protected against the latest viruses and spyware. Users will not be able to access web pages as a security precaution, until anti-virus pattern files are initially downloaded. The pattern files are required to scan the web pages and e-mail traffic for potential viruses and spyware.
Important
Some of the following settings apply to Web Access and other to the E-mail service (as indicated by the title in the GUI). The first 5 parameters are used for both services. An explanation of the settings is also available via the Help button.
-
Log on to the AXS Guard appliance.
-
Navigate to Anti-malware > Preferences
-
Configure the settings as explained in the tables below.
-
Update your configuration.
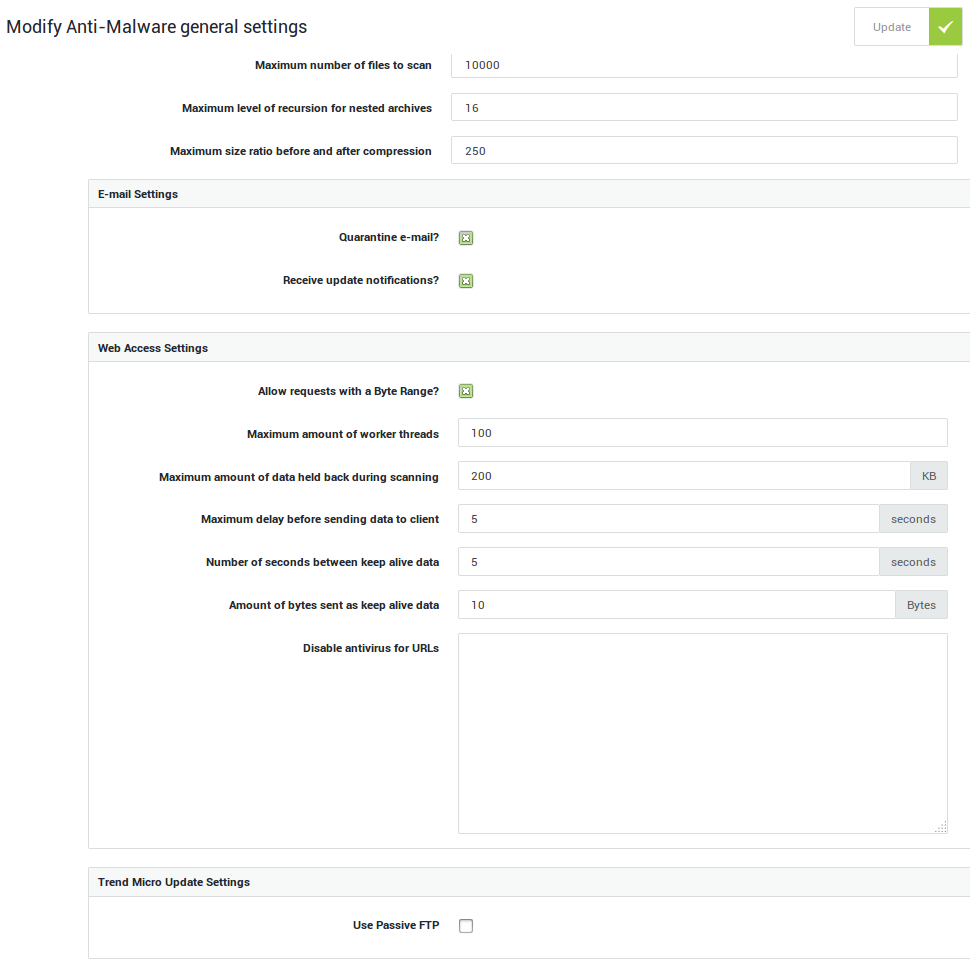
General Settings
| Parameter | Description |
|---|---|
Do not scan data larger than |
Expresses the maximum amount of data in MegaBytes that may be received by the anti-virus scanners (or anti-virus web proxy) in general that is subject for virus scanning. If more data is received, the data is not scanned for viruses, or scanning is aborted. Web Access will send all data to the client as is, without any further anti-virus processing. Likewise for the E-mail service: the data will be ignored by the anti-virus scanners, and the E-mail is further processed as is. A value of zero disables this limit, enabling scanning on all data irrelevant of its size. This is the minimum value, whereas the maximum value is ten GigaBytes with a default of one hundred MegaBytes. |
Do not scan files larger than |
Maximum allowed size in MegaBytes of a file subject for scanning. This value also holds for an archive (compressed file) in general, and internally to any of the files that emerge after it has been extracted. Files that are larger are ignored for any further anti-virus processing. The minimum value is set to one MegaByte, whereas the maximum value is ten GigaBytes with a default of twenty five MegaBytes. |
Maximum number of files to scan |
Maximum allowed number of files to scan (e.g. in an archive, directory). The minimum is set to one, with a default of ten thousand files, and a maximum up to one hundred thousand. |
Maximum level of recursion for nested archives |
Nested archives are scanned recursively, e.g. if a Zip archive contains a RAR file, all files within it will also be scanned. This options specifies how deeply the process should be continued. The default recursion depth is set to sixteen, with a minimum value of one and a maximum value of thirty two. |
Maximum size ratio before and after compression |
The compression ratio is a term used to quantify the reduction in data-representation size produced by a data compression algorithm. The default value is set to two hundred and fifty, with a minimum value of one and a maximum value of one thousand. |
Email-specific Settings
| Parameter | Description |
|---|---|
Quarantine e-mail? |
Check this option to prevent immediate deletion of e-mails carrying viruses. AXS Guard holds the most recent deflected virus carriers safely in quarantine temporarily. This allows retrieval (for a limited period) of e-mails which have been erroneously identified as virus carriers. |
Receive update notifications? |
Check this option to be notified by e-mail when the AXS Guard anti-virus engine downloads new updates. Notifications are sent to the e-mail addresses specified under System > General. |
Web Access-specific Settings
| Parameter | Description |
|---|---|
Allow request with a Byte-Range? |
Check to enable or uncheck to disable Byte Range requests. This option is disabled by default (for security reasons). Some sites only work if this option is enabled, e.g. Windows update servers and video streaming websites that are being accessed with an iPhone, such as YouTube. When Byte Range requests are enabled, files can be downloaded 1 byte at a time. Infected files may therefore remain undetected, since there is a sectional retrieval and reassembly of potentially malicious content may occur. Caution is advised. |
Maximum amount of worker threads |
The maximum number of worker sub processes (children or threads) to spawn. After the maximum has been reached, no further processes are created, and only the workers present at that time can be used to process any client requests. If the maximum number of simultaneous connections for that amount of worker processes has been reached, the service will not be available for new incoming client requests, resulting in a connection timeout. If this happens frequently, increase the value. The default is set to 100 threads, with a minimum of 5 and a maximum of 1024. |
Maximum amount of data held back during scanning |
The maximum amount of quarantined data (in KiloBytes) destined for the client, until scanned. When the file has been scanned and is clean, the data is released to the client. This amount of data is first received from the target server before it goes to the client. Increasing this value will result in a (possibly) larger delay before the download starts in the client browser. It should be noted as well that if the target data is larger than the keep-back buffer and a virus is detected, the download may not result in a virus error page, but may be broken instead. The minimum value is 20 KiloBytes, up to a maximum of 20 MegaBytes, with a default of 200 KiloBytes. |
Maximum number of seconds before sending data to a client |
This setting complements the previous field "Maximum amount of data held back during scanning". It specifies how many seconds data should be held before it is sent to the client. Trickling only occurs after this period has elapsed. This way, files that are received fast are more secure and a user can still get a virus report page for files bigger than specified in the "Maximum amount of data held back during scanning" parameter. A value of 0 will disable the keep-back time period. The default value is 5 seconds, and the maximum value is 300. |
Number of seconds between keep alive data |
After trickling time (seconds), some bytes are sent to the browser to keep the connection alive. Trickling starts when the "Maximum amount of data held back during scanning" is received from the target server and/or when the Maximum number of seconds before any data is sent to client has elapsed, and there is still data coming in from the target server. By default, a period of 5 seconds is defined to generate a trickle for the client, with a minimum of 1 second and a maximum of 60 seconds. |
Amount of bytes sent as keep alive data |
Trickling bytes sent to the browser (every trickle time) to keep the connection alive. This amount is best kept as small as possible; it is only meant to keep the connection alive. The more data is sent to the client before the data of the request has been scanned for viruses, the higher the risk contaminated data has already been sent to the client before it is detected. A value with a minimum of 1 Byte up to a maximum of 512 KiloBytes is accepted, 10 Bytes being the system default. |
Disable anti-virus for URLs |
List of trusted URLs for which anti-virus scanning is not required. The protocol in the URL should not be included. Wildcards may be used to specify URLs. A wildcard is marked with an asterisk sign * and may be used in the domain part (only in front) and in the path of the URL (front or back). |
Example: Disabling antivirus for URLs
www.example.com > Only this URL is whitelisted
www.example.com/* > Domain www.example.com is completely
whitelisted
*example.com/index.html > index.html is whitelisted for domain
example.com and all its subdomains, e.g. www.example.com,
apps.example.com, shop.app.example.com, etc.
*/*.gif > All files with a .gif extension are whitelisted
www.example.com/novirus* > All URLs for the domain
www.example.com starting with the string novirus are whitelisted
www.example.com/*novirus* > All URLs for the domain
www.example.com including the string novirus somewhere after the
/ are whitelisted.
Trend Micro Update Settings
| Parameter | Description |
|---|---|
Use Passive FTP |
Activating this option forces Trend Micro to download its anti-virus pattern updates using passive FTP rather than active FTP, which is safer. |
Updating ClamAV Patterns
AXS Guard automatically checks for new patterns every 15 minutes.
-
Log on to the AXS Guard appliance.
-
Navigate to Anti-Malware > Status > ClamAV.
-
Click on Update anti-virus patterns.
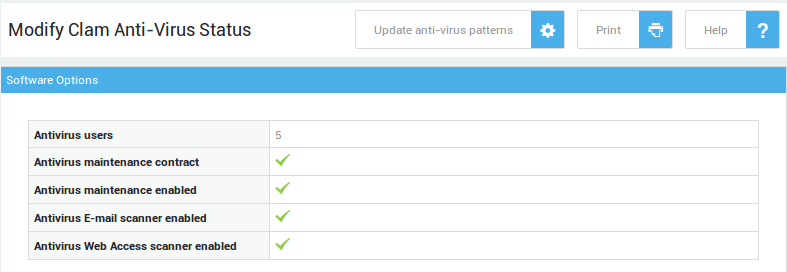
Updating Trend Micro Patterns
AXS Guard automatically checks for new patterns every 15 minutes.
-
Log on to the AXS Guard appliance.
-
Navigate to Anti-Malware > Status > Trend Micro.
-
Click on Update anti-virus patterns. The updates should start downloading and updating immediately, after which users can access the Web.

Updating other anti-spyware and anti-phishing Patterns
AXS Guard automatically checks for updates every 3 hours.
-
Log on to the AXS Guard appliance.
-
Navigate to Anti-Malware > Status > Others.
-
Click on Check for anti-spyware and anti-phishing pattern updates.
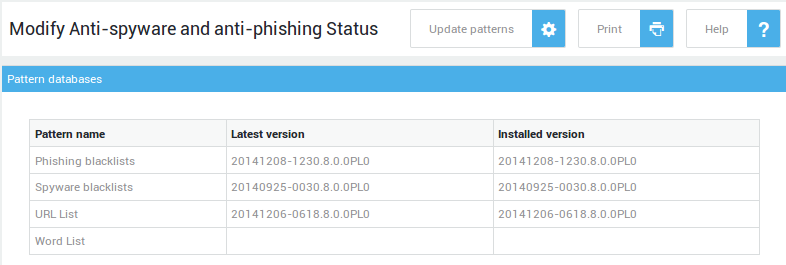
How to configure SSL Inspection
Requirements
A Threat Intelligence Premium pack is required to enable the SSL inspection feature on your system. Contact sales@axsguard.com to upgrade or purchase a license. To verify your license details:
-
Log in to your AXS Guard appliance as an administrator.
-
Go to System > License > Protection Pack.

The Web Access feature and its subcomponents must be enabled, as explained in Feature Activation.
A CA certificate must be configured to allow the AXS Guard proxy server to process, inspect and scan HTTPS traffic.
Configuring a Certificate Authority
Using the Built-in CA
To inspect HTTPS (SSL) traffic, AXS Guard needs to be able to sign man-in-the-middle certificates that are presented to the clients. In order to sign these certificates, system administrators can either use the built-in CA or import their own CA certificate.
The built-in CA must be initialized prior to using it for SSL inspection, otherwise an error will appear when saving your proxy server configuration. Note that this step is only required if the CA has not already been initialized.
To initialize the built-in CA:
-
Log in to the AXS Guard appliance as an administrator.
-
Go to PKI > Built-in CA.
-
Click on the initialize button.
Using an External CA
Administrators have the option to use an imported CA certificate instead of the built-in CA to sign man-in-the-middle certificates for SSL inspection. To import a CA certificate:
-
Log in to the AXS Guard appliance as a system administrator.
-
Go to PKI > Certificates.
-
Click on the import button.
-
Enter the information as requested and follow the on-screen instructions to upload your CA certificate.
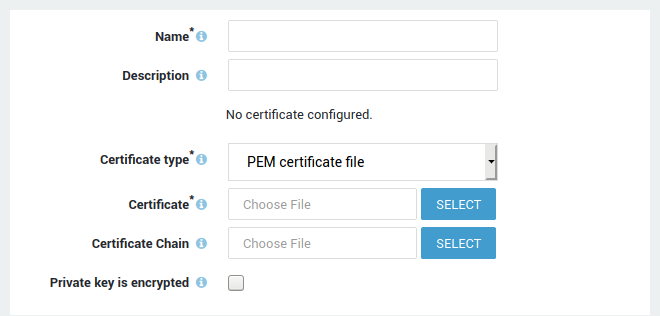
Configuring SSL Exception Lists
Introduction
SSL exception lists allow you to bypass SSL inspection for specific domains and subdomains.
Certain web applications may not function properly when decrypted and can be added to an SSL exception list as a workaround. You may also want to exclude certain domains for any other reason, including legal or privacy reasons, e.g. sites which provide online banking services.
Exception lists with predef and cm prefixes are updated automatically and cannot be modified.
Manual Configuration
-
Log in to AXS Guard as an administrator.
-
Go to Web Access > SSL Exceptions.
-
Click on the add new button.
-
Enter domains that should not be scanned as shown in the example below.
-
Saving the list will make it available for selection under Web Access > Proxy Server > SSL Inspection.
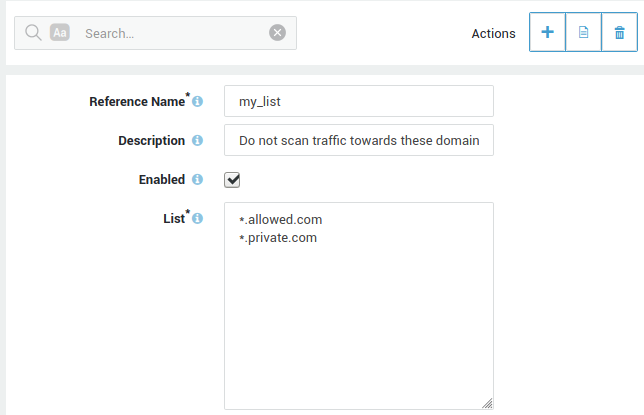
Automated Lists
Automated lists are downloaded from the Cyber Resilience Portal and will appear automatically after installing your appliance. They contain a number of carefully selected domains that are excluded from SSL inspection. Note that these lists cannot be deleted from the system, only disabled.
Proxy Server Configuration
Deployment Options
The deployment options allow you to select the networks to scan.
-
Log in to AXS Guard as an administrator.
-
Go to Web Access > Proxy Server and select the SSL inspection tab.
-
Enable SSL inspection.
-
Configure the appropriate scenario.
In the example below, only HTTPS traffic originating from the
172.16.0.0/24 and 192.168.5.0/24 networks will be scanned. If you
wish to scan HTTPS traffic originating from all networks, just select
the entire network scenario.
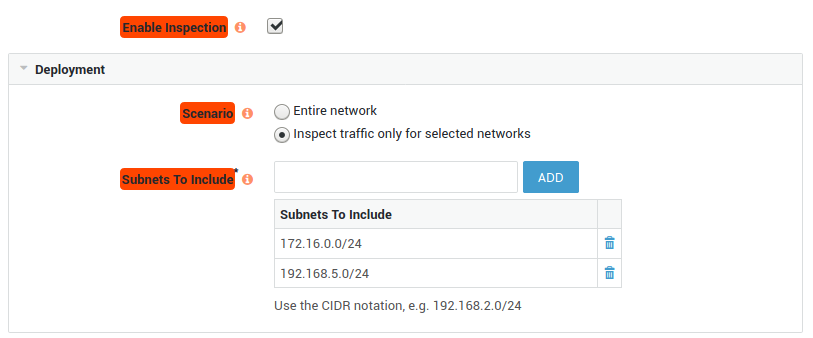
Defining Exceptions
Exceptions allow you to bypass the AXS Guard SSL inspection engine for certain networks and domains. Note that domain lists must be present on the system before they can be selected here.
For best performance, we recommend using the default automated list that is provided via the Cyber Resilience Portal.
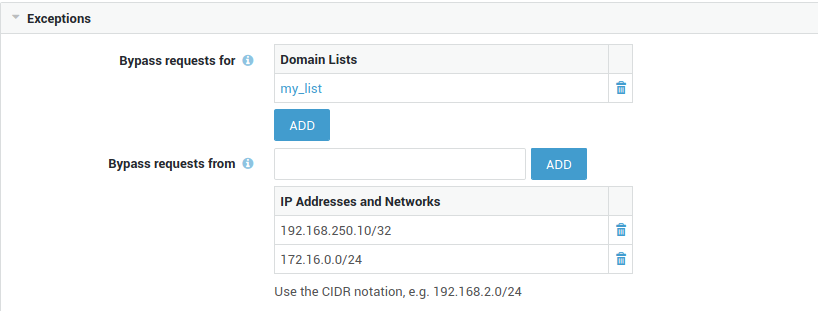
Important
Certain web applications may not function properly when decrypted. You may also want to exclude certain domains and networks for any other reason, including legal or privacy reasons, e.g. sites which provide online banking services.
CA Settings
Select the CA certificate to be used for signing man-in-the-middle certificates.
The system default configuration uses the built-in CA. Note that the built-in CA must be initialized prior to using it for SSL inspection. If the built-in CA is not initialized, an error message will appear when attempting to save your configuration.
In case you wish to use your own CA certificate instead of the AXS Guard built-in CA to sign man-in-the-middle certificates, navigate to PKI > Certificates and click on the import button to import your CA certificate. Once your certificate is imported, it will be available for selection here.

Transparent Proxy for SSL Inspection
See Transparent Proxy Configuration for configuration instructions.
Client-side Configuration
Browser Configuration
See Browser Configuration Methods
Importing the CA Certificate
The CA certificate used by the SSL inspection engine must be added as a trusted root CA on all clients that will be scanned. There are 2 possibilities:
-
You used the system default configuration, which means the built-in CA is used to sign man-in-the-middle certificates for SSL inspection.
-
You imported your own CA certificate under PKI > Certificates to sign man-in-the-middle certificates for SSL inspection.
Exporting and importing the AXS Guard CA Certificate
-
Log in to AXS Guard as an administrator.
-
Go to PKI > Built-in CA.
-
Click on the export CA button to save the CA certificate.
-
Install this certificate on every client for which SSL inspection will be enforced. See the documentation of your operating system for additional information and certificate installation instructions.
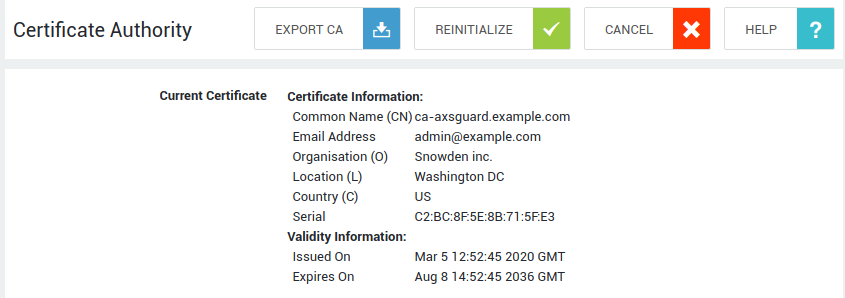
Using your own CA Certificate
To install the certificate on your clients, consult the documentation of your operating system for additional information and installation instructions.
Configuration Examples
Overview
In this section, we provide some basic configuration examples based on predefined Web Access Filters. To configure Web Access, you must log on to the AXS Guard with administrator privileges. This procedure is explained in the AXS Guard System Administration How To, which is accessible via the Documentation button in the Administrator Tool.
System-Wide Access for Anti-Virus and Microsoft Updates
Important
Always use the strictest security for system-wide configurations. Enforce authentication where possible.
-
Navigate to Web Access > Server.
-
Select automatic updates as your system web access filter as shown below.
-
Click on Update.
Allow Web Access to a Specific Group and allow Updates
Purpose
The purpose is to allow Anti-Virus and Microsoft updates for all connected clients (system-wide setting), also at night and when users are not authenticated. In addition, only one specific group is allowed Web Access to all sites, except porn sites and other sites containing malicious and potentially offensive material.
-
Follow the same steps as explained above.
-
Navigate to Users and Groups > Groups and select the group for which Web Access must be allowed.
-
In the Web Access tab, select predef-no-porn as the Web Access filter as shown below.
-
Click on Update.
Allow Web Access to a Specific Group except one User
-
Follow the same steps as explained above.
-
Navigate to Users and Groups > Users and select the user to whom Web Access must be denied.
-
Click on the user’s Web Access tab.
-
Check the Overrule Group Web Access option.
-
Select the automatic-updates – Allow Automatic Updates ACL.
-
Click on Update.
Info
Web Access Rights at the user level overrule the settings configured at the group level.
Deny Web Access to a Specific Group, except One User
Purpose
-
A specific group is denied Web Access, except for Anti-Virus and Microsoft updates.
-
One member of the group is allowed Web Access, with the exception of porn sites and and other sites containing malicious and offensive material.
Configuration
-
Navigate to Users and Groups > Groups and select the group to which Web Access must be denied.
-
In the Web Access Filter tab, select the automatic-updates – Allow Automatic Updates ACL.
-
Navigate to Users and Groups > Users and select the user of the group denied above. This is the user who is allowed Web Access.
-
In the user’s Web Access tab, ensure the Overrule Group Web Access Filter option is checked (see below).
-
Select the predef-no-porn ACL as shown below.
-
Click on Update.

Windows Server Update Services Centralization
Purpose
-
Centralize critical Windows updates and Anti-Virus updates on one server, i.e. an Active Directory (AD) server. This not only saves bandwidth, but also allows system administrators to control and apply system updates more efficiently.
-
Allow access to updates 24 hours a day, 7 days a week.
-
Workstations (clients) are denied access to the update servers.
Configuration
-
Deny Web Access at the AXS Guard system level.
-
Navigate to Web Access > Server.
-
Set the System Web Access Filter to no access.
-
Click on Update.
-
-
Allow Access to the Microsoft and Anti-Virus update servers from your AD server.
-
Navigate to Computers.
-
Click on the Computer Name of your AD server.
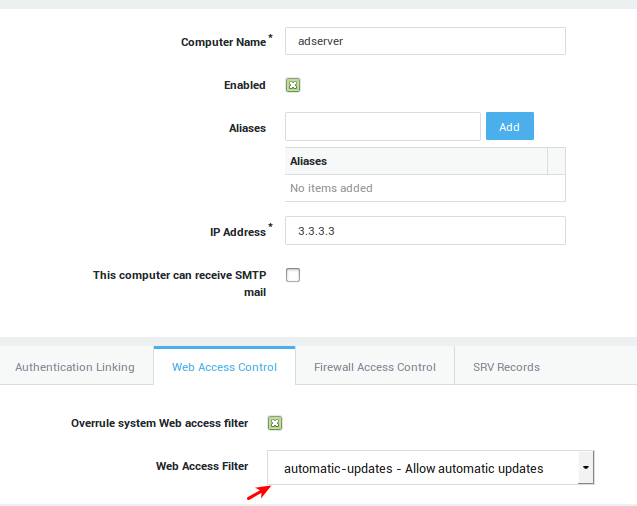
-
Click on the Web Access Control Tab.
-
Check the Overrule system Web Access Filter.
-
Set automatic updates – Allow automatic updates as the Web Access Filter.
-
Click on Udpate.
-
Configure the group and user-level Web Access rights according to your needs.
Result
Only the AD server has access to Microsoft and Anti-Virus update servers. The downloaded updates are centrally managed and pushed to the clients via the AD server and download bandwidth is saved.
-
The IP addresses or FQDNs of the Anti-Virus update servers must be added to a Site List. To know which update servers are being used by your anti-virus software, consult your Anti-Virus software documentation.
-
On the AXS Guard, select the antivirus-update Site List, click on Edit as New and add the Anti-Virus update servers.
-
Add the updated Site List to the appropriate category and ACL. Then assign the ACL to the appropriate user, group, computer or the system (system-wide).
Kerberos for Web Access with Windows 2008 Server (Automatic Configuration)
Overview
In this section we explain how to set up Kerberos authentication for Web Access using automatic keytab file generation (proxy with automatic keytab files) where the AXS Guard domain is the same as the Kerberos realm (back-end domain) and where the Kerberos back-end is also your DNS server. Following is a list of machines involved in the setup:
-
Kerberos back-end: Windows 2008 Enterprise Server (Standard Active Directory Domain Controller / domain =
ad.domain.be/ FQDN =config4416vm0.ad.domain.be/ IP = 192.168.28.4/22) -
A Windows 7 client in the Windows 2008 domain (domain =
ad.domain.be, IP = 192.168.28.8/22) -
AXS Guard with Web Access (proxy) and Directory Services features enabled (domain =
ad.domain.be/ FQDN =axsguard.ad.domain.be/ IP = 192.168.28.7/22)
DNS Configuration
-
Log in to your Windows 2008 server with an administrator account.
-
Click on start > all programs > administrative tools > DNS.
-
Expand "Forward Lookup Zones" and select your domain (
ad.domain.bein this example). -
Add the following records:
-
A and PTR record for your KDC
config4416vm0.ad.domain.be> 192.168.28.4 -
A and PTR record for
axsguard.ad.domain.be> 192.168.28.7
-
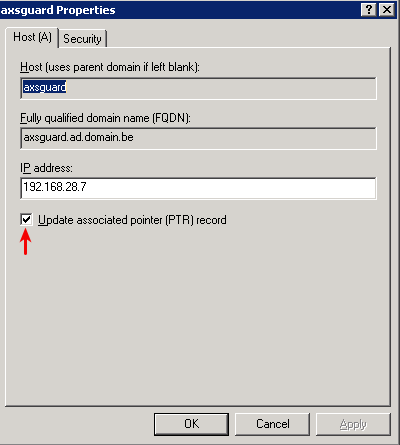
Verifying the System Time
Kerberos has strict time requirements. If the time is off on any of the machines involved in the authentication process, authentication will fail. It is recommended to synchronize all your hosts with a time server, e.g. ntp.vasco.com.
AXS Guard
Navigate to Network > General to verify the time settings.
Windows 2008 Server
Log in to your server with an administrator account and check if the system time is accurate. Adjust it if necessary.
How to Synchronize the Time with and External NTP server on Windows Server 2008
-
Log in to your PDC Server and open the command prompt.
-
Stop the W32Time service:
C:\>net stop w32time -
Configure the external time sources, type:
C:\> w32tm /config /syncfromflags:manual /manualpeerlist:”0.pool.ntp.org, 1.pool.ntp.org, 2.pool.ntp.org” -
Make your PDC a reliable time source for the clients. Type:
C:\>w32tm /config /reliable:yes -
Start the w32time service:
C:\>net start w32time -
The windows time service should begin synchronizing the time. You can check the external NTP servers in the time configuration by typing:
C:\>w32tm /query /configuration -
Check the Event Viewer for any errors.
Windows 7 Kerberos Client
Follow the same steps as provided for Windows 2008. To repair the Windows Time Service, proceed as follows:
-
Open a command prompt and run the following commands
-
net stop w32time -
w32tm /unregister(ignore the error message) -
w32tm /unregister -
w32tm /register -
net start w32time
Syncing AD Users
You need to make sure that user accounts are created on the AXS Guard for every user who will authenticate via Kerberos. See the Directory Services How To for configuration instructions.
-
Log in to your AXS Guard appliance.
-
Go to Directory Services > General and configure as shown below.
-
Next, go to Users & Groups > Users to verify whether the users have been correctly synchronized.
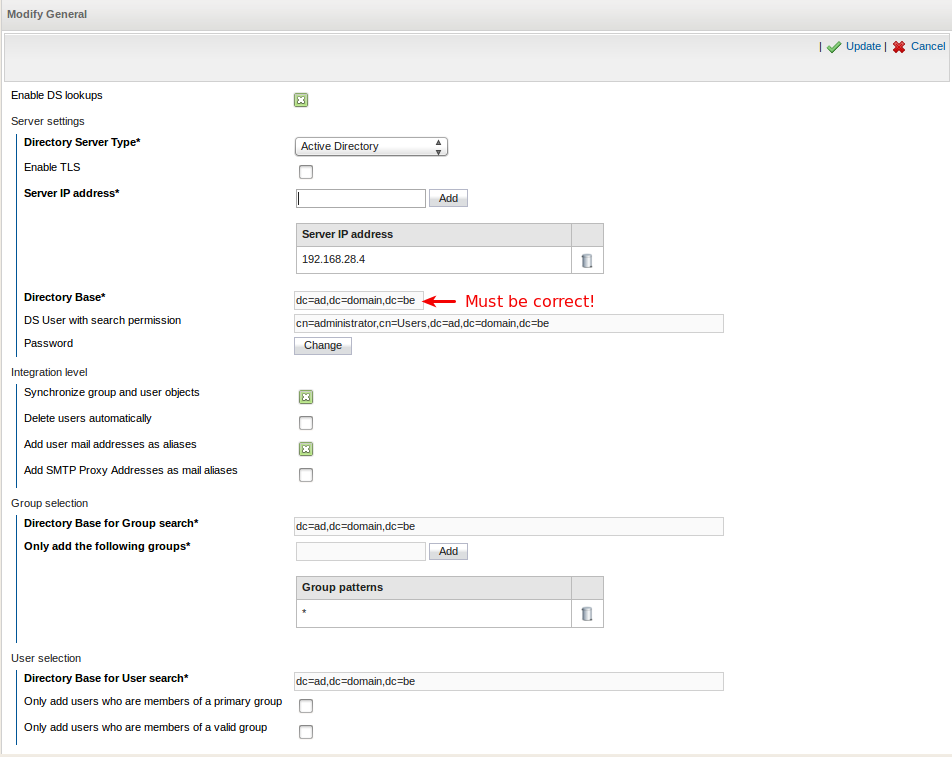
DNS Forwarding
Make sure to forward reverse lookups for the KDC:
-
Go to Network > DNS > Forwarding
-
Add a PTR record for the KDC (in this example
4.28.168.192.in-addr.arpa>192.168.28.4) -
Update your configuration
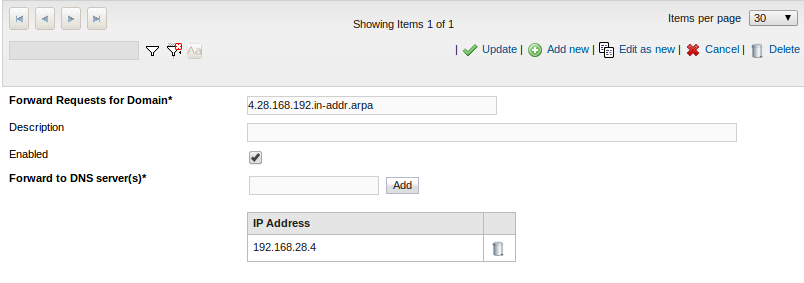
Configuring User Web Access Privileges
Ensure that users have the appropriate Web Access rights. Rights can be configured at the group or user level.
Group Level Configuration
-
Go to Users & Groups > Groups
-
Select the appropriate group. In this example we use the default domain_users group:

User Level Configuration
-
Go to Users & Groups > Groups
-
Select the appropriate user
-
Configure the desired Web Access Policy for the user. In this example we allow the user unrestricted access to any site.
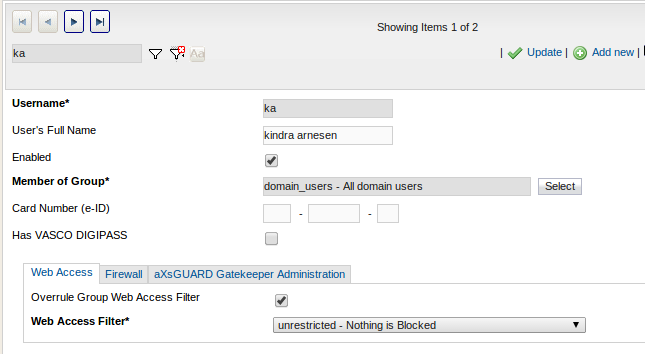
Generating a Keytab File for Web Access
-
Go to Authentication > Kerberos > General.
-
Enable Kerberos.
-
Enter the AD credentials of a user who can create computers and accounts on the KDC.
-
Verify the hostname of the AXS Guard and update it if necessary (default =
axsguard). -
Generate the keytab file(s) for the required service(s).
-
Update your configuration.
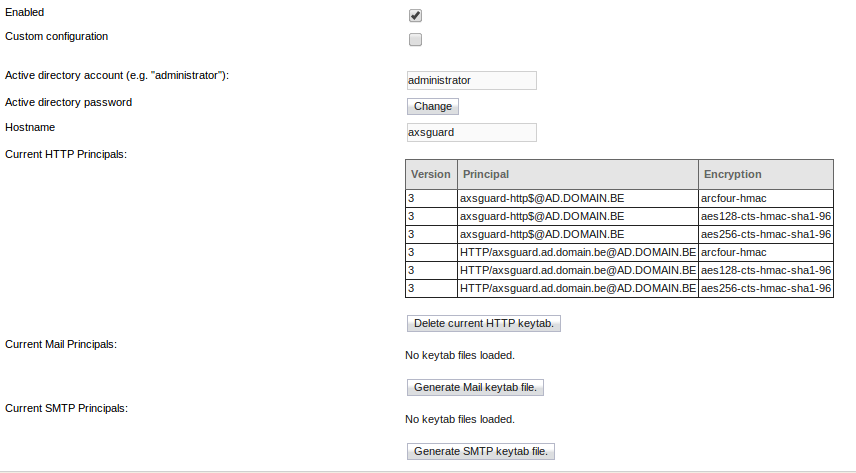
Web Access Authentication Settings
-
Unlink firewall and web access authentication as explained in the Authentication How To.
-
Allow Kerberos authentication for web access as shown below.
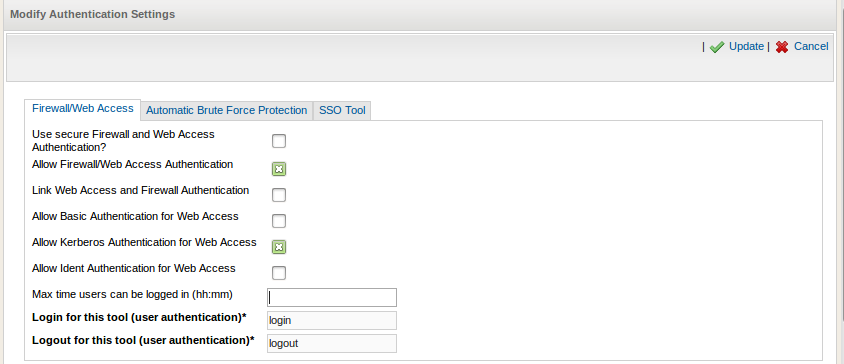
Client Proxy Settings
Configure the Internet browser on the client, so that it uses the AXS Guard as its proxy server. In this example, we use a Windows 7 client with Firefox. For other operating systems and browsers, see the appropriate documentation or online resources.
Important
Do not use the proxy server’s IP address, but its FQDN, e.g. axsguard.ad.domain.be, otherwise authentication will fail.
-
Log on to Windows 7
-
Start Firefox
-
Go to Firefox > Options > Options
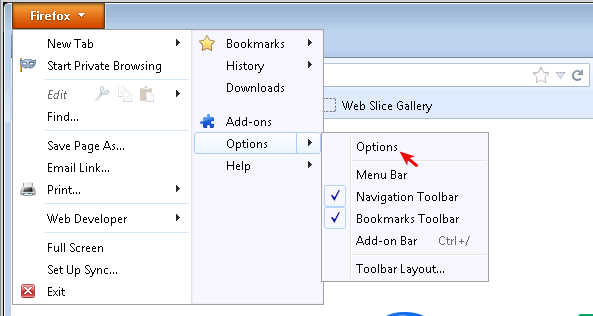
-
Click on Advanced and select the "Network" tab.
-
Click on "Settings" (configure how Firefox connects to the Internet)
-
Select "Manual proxy configuration"
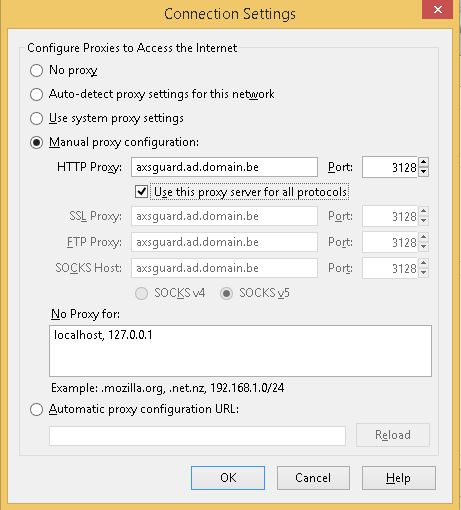
-
Enter the FQDN and port of the proxy server, i.e.
axsguard.ad.domain.beport 3128 -
Check "Use this proxy server for all protocols"
-
Click on OK to save your settings
-
Restart Firefox and go to a website.
Kerberos for Web Access with Windows 2008 Server (Custom Configuration)
Overview
In this section we explain how to manually set up Kerberos authentication for Web Access (proxy with custom keytab files) where the AXS Guard domain is different from the Kerberos back-end domain and where the Kerberos back-end is also your DNS server. Following is a list of machines involved in the setup:
-
Kerberos back-end: Windows 2008 Enterprise Server (Standard Active Directory Domain Controller / domain =
ad.domain.be/ FQDN =config4416vm0.ad.domain.be/ IP = 192.168.28.4/22) -
A Windows 7 client in the Windows 2008 domain (domain =
ad.domain.be, IP = 192.168.28.8/22) -
AXS Guard with Web Access (proxy) and Directory Services features enabled (domain =
mydomain.com/ FQDN =axsguard.mydomain.com/ IP = 192.168.28.7/22)
DNS Configuration
-
Log in to your Windows 2008 server with an administrator account.
-
Click on start > all programs > administrative tools > DNS.
-
Expand "Forward Lookup Zones" and select your domain (
ad.domain.bein this example). -
Add the following records:
-
A and PTR record for your KDC
config4416vm0.ad.domain.be> 192.168.28.4 -
A and PTR record for
axsguard.ad.domain.be> 192.168.28.7
-
Verifying the System Time
Kerberos has strict time requirements. If the time is off on any of the machines involved in the authentication process, authentication will fail. It is recommended to synchronize all your hosts with a time server, e.g. ntp.vasco.com.
AXS Guard
Navigate to Network > General to verify the time settings.
Windows 2008 Server
Log in to your server with an administrator account and check if the system time is accurate. Adjust it if necessary.
How to Synchronize the Time with and External NTP server on Windows Server 2008
-
Log in to your PDC Server and open the command prompt.
-
Stop the W32Time service:
C:\>net stop w32time -
Configure the external time sources, type:
C:\> w32tm /config /syncfromflags:manual /manualpeerlist:”0.pool.ntp.org, 1.pool.ntp.org, 2.pool.ntp.org” -
Make your PDC a reliable time source for the clients. Type:
C:\>w32tm /config /reliable:yes -
Start the w32time service:
C:\>net start w32time -
The windows time service should begin synchronizing the time. You can check the external NTP servers in the time configuration by typing:
C:\>w32tm /query /configuration -
Check the Event Viewer for any errors.
Windows 7 Kerberos Client
Follow the same steps as provided for Windows 2008. To repair the Windows Time Service, proceed as follows:
-
Open a command prompt and run the following commands
-
net stop w32time -
w32tm /unregister(ignore the error message) -
w32tm /unregister -
w32tm /register -
net start w32time
Generating a Keytab File for Web Access
A keytab file for web access (HTTP) must be generated on the Windows 2008 server. You must then import this file on the AXS Guard.
-
Log in to your Windows 2008 server with an administrator account.
-
Open a command prompt
-
Run the following command:
ktpass -princ HTTP/axsguard.ad.domain.be@AD.DOMAIN.BE -mapuser ad\administrator -pass administrator_password -ptype KRB5_NT_PRINCIPAL -crypto All -out webaccess.keytab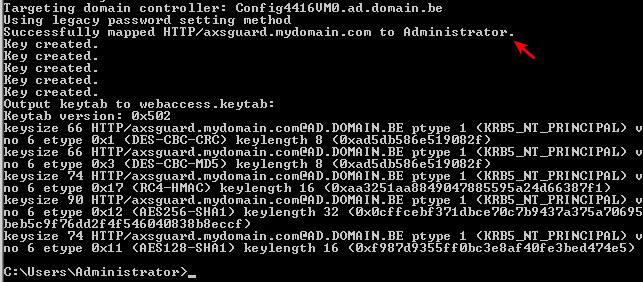
-
Save the keytab file to a secure location, so that you can access it later. The keytab file must be imported on the AXS Guard.
Syncing AD Users
You need to make sure that user accounts are created on the AXS Guard for every user who will authenticate via Kerberos. See the Directory Services How To for configuration instructions.
-
Log in to your AXS Guard appliance.
-
Go to Directory Services > General and configure as shown below.
-
Next, go to Users & Groups > Users to verify whether the users have been correctly synchronized.
Configuring User Web Access Privileges
Ensure that users have the appropriate Web Access rights. Rights can be configured at the group or user level.
Group Level Configuration
-
Go to Users & Groups > Groups
-
Select the appropriate group. In this example we use the default domain_users group:
User Level Configuration
-
Go to Users & Groups > Groups
-
Select the appropriate user
-
Configure the desired Web Access Policy for the user. In this example we allow the user unrestricted access to any site.
Importing Keytab Files and Kerberos Settings
Import the keytab file created on your Windows 2008 server.
-
Go to Authentication > Kerberos > General
-
Enable Kerberos and select "Custom Configuration"
-
Verify the hostname and realm. Adjust them if necessary. They must match the FQDN that you used to generate your keytab file; i.e.
axsguard.ad.domain.be -
Click on "Choose File" and locate the keytab file that you created earlier.
-
Update your configuration.
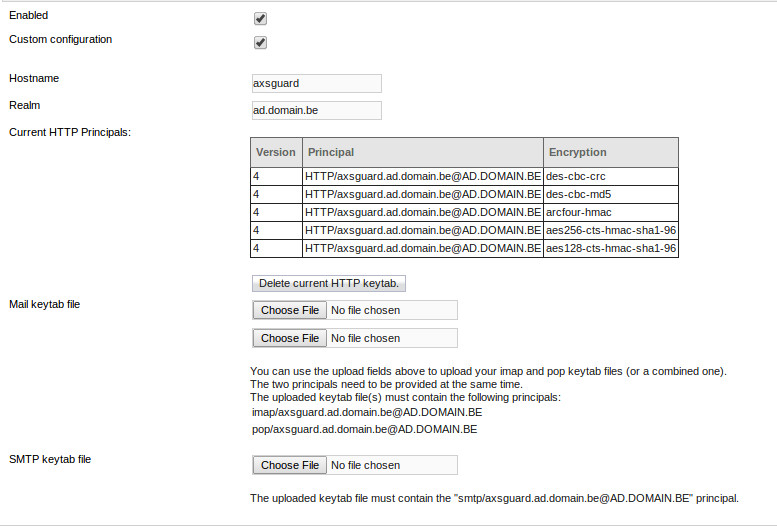
Web Access Authentication Settings
-
Unlink firewall and web access authentication as explained in the Authentication How To.
-
Allow Kerberos authentication for web access as shown below.
Client Proxy Settings
Configure the Internet browser on the client, so that it uses the AXS Guard as its proxy server. In this example, we use a Windows 7 client with Firefox. For other operating systems and browsers, see the appropriate documentation or online resources.
Important
Do not use the proxy server’s IP address, but its FQDN, e.g. axsguard.ad.domain.be, otherwise authentication will fail.
-
Log on to Windows 7
-
Start Firefox
-
Go to Firefox > Options > Options
-
Click on Advanced and select the "Network" tab.
-
Click on "Settings" (configure how Firefox connects to the Internet)
-
Select "Manual proxy configuration"
-
Enter the FQDN and port of the proxy server, i.e.
axsguard.ad.domain.beport 3128 -
Check "Use this proxy server for all protocols"
-
Click on OK to save your settings
-
Restart Firefox and go to a website.
Web Access Tools
Overview
In this section, we explain the various Web Access Module tools:
-
The URL Checker.
-
The URL Blocker.
-
Rebuilding the Web Access cache.
URL Checker
The URL Checker allows AXS Guard system administators to:
-
See whether a given URL or site is blocked or allowed.
-
Determine which ACL or Site List is blocking that URL or site.
This tool is useful to look up a blocked site which has been automatically flagged as malicious by the Trend Micro Anti-Virus and Anti-Spyware Module.
Important
Escaped URL characters are not decoded and do not return a result.
-
Log on to the AXS Guard appliance
-
Navigate to Web Access > Tools > URL Checker.
-
Enter the settings as explained in the table below.
| Field / Button | Description |
|---|---|
Blocked URL |
The URL or IP address to be checked. |
Site List to be used |
The site list to be searched. If none is selected, the URL checker searches through all available site lists. |
Web Access Filter to be used |
Select the ACL to be searched. If none is selected, the URL checker searches through all available ACLs. |
Check |
Click this button to check the entered URL / IP. |
Clear |
Click this button to clear an entry. |
Info
Specifying an ACL or Site List accelerates the search.
Rebuilding the Web Access Cache
-
Log on to the AXS Guard appliance.
-
Navigate to System > Tools > Actions.
-
Click on the Rebuild Proxy Cache button.
| Button | Description |
|---|---|
Reboot |
Click to reboot the AXS Guard appliance. |
Shut Down |
Click to shut down the AXS Guard appliance. |
Rebuild (Empty) Proxy Cache |
This option is only available if the Content Scanning Feature (proxy server) is enabled. The proxy cache must be rebuilt only if the cache size has been reduced or if the cache has been corrupted due to an incorrect shutdown, e.g. a power failure. |
Web Access Logs
The Web Access logs are organized in a table and are ordered
chronologically by default. The most recent log is listed first. Logs
are labeled using the YYYY-MM-DD format. The log size is expressed in
Kilobytes (KB).
-
Log on to the AXS Guard appliance.
-
Navigate to Web Access > Logs.
-
Click on the desired log date / log type to view the log entries.
Log Types
| Field | Description |
|---|---|
Access |
Web resources that were accessed via the proxy. |
Block |
Log entries showing URLs that were blocked by the AXS Guard proxy. |
Ignore |
Log entries showing URLs that were ignored by the AXS Guard proxy, i.e. replaced with an AXS Guard logo in the user’s browser. |
Access Log Entries
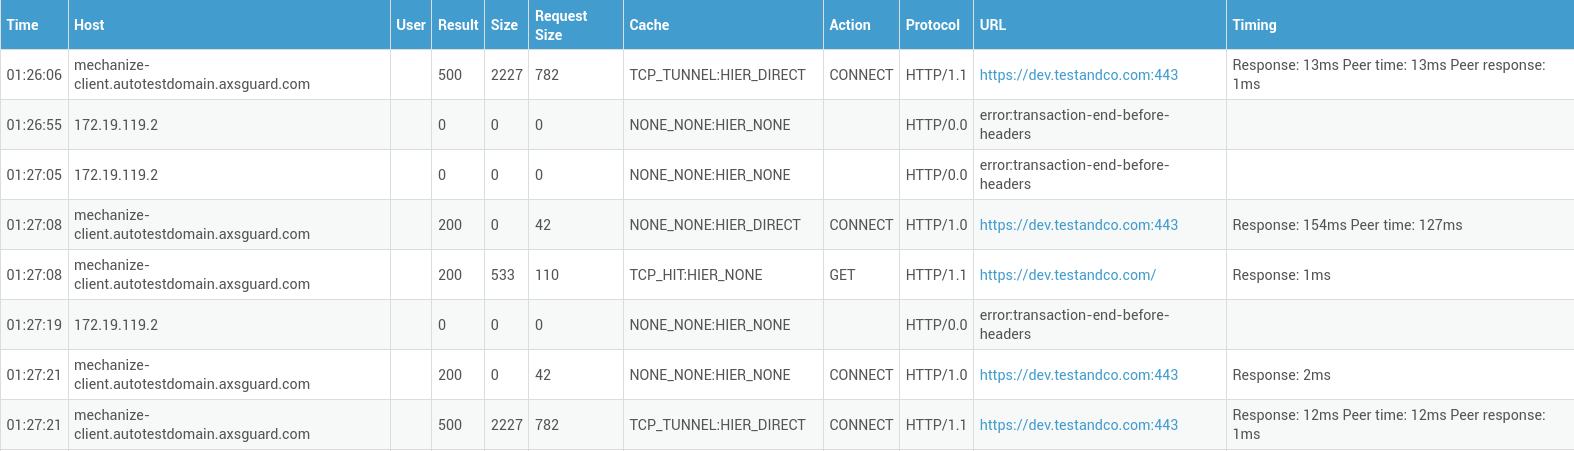
Entry |
Description |
|---|---|
Time |
The time the web page was requested via the proxy. |
Host |
The IP address or hostname of the host that initiated the request. |
User |
The user who initiated the request. |
Result |
HTTP status code. |
Size |
The size of the response in bytes. |
Request Size |
The size of the request in bytes. |
Cache |
A web access result code indicating if the request was served by the proxy server cache or not. |
Action |
The action performed by the proxy server:
|
Protocol |
HTTP protocol version. |
URL |
The URL that was requested. |
Timing |
Information regarding the duration of the request.
|
Access Log Result Codes
| Code | Description |
|---|---|
TCP_HIT |
A valid copy of the requested object was in the cache. |
TCP_MISS |
The requested object was not in the cache. |
TCP_REFRESH_HIT |
The requested object was cached but STALE. The IMS query for the object resulted in "304 not modified". |
TCP_REFRESH_FAIL_HIT |
The requested object was cached but STALE. The IMS query failed and the stale object was delivered. |
TCP_REFRESH_MISS |
The requested object was cached but STALE. The IMS query returned the new content. |
TCP_CLIENT_REFRESH_MISS |
The client issued a "no-cache" pragma, or some analogous cache control command along with the request. Thus, the cache has to refetch the object. |
TCP_IMS_HIT |
The client issued an IMS request for an object which was in the cache and fresh. |
TCP_SWAPFAIL_MISS |
The object was believed to be in the cache, but could not be accessed. |
TCP_NEGATIVE_HIT |
Request for a negatively cached object, e.g. "404 not found", for which the cache believes to know that it is inaccessible. |
TCP_MEM_HIT |
A valid copy of the requested object was in the cache and it was in memory, thus avoiding disk accesses. |
TCP_DENIED |
Access was denied for this request. |
TCP_OFFLINE_HIT |
The requested object was retrieved from the cache during offline mode. The offline mode never validates any object. |
TCP_STALE_HIT |
The object was cached and served stale. This is usually caused by stale-while-revalidate or stale-if-error. |
TCP_ASYNC_HIT |
A background request (e.g., one started by stale-while-revalidate) resulted in a refresh hit. |
TCP_ASYNC_MISS |
A background request (e.g., one started by stale-while-revalidate) resulted in a miss; i.e., the cached object (if any) was updated). |
UDP_HIT |
A valid copy of the requested object was in the cache. |
UDP_MISS |
The requested object is not in this cache. |
UDP_DENIED |
Access was denied for this request. |
UDP_INVALID |
An invalid request was received. |
UDP_MISS_NOFETCH |
During frequent failures, a cache in hit only mode will return either UDP_HIT or this code. Neighbours will thus only fetch hits. |
NONE |
Seen with errors and cachemgr requests. |
Blocked Log Entries
| Entry | Description |
|---|---|
Time |
Indicates when the page was blocked. |
Host |
The IP address or hostname of the host that initiated the request. |
User |
The user who initiated the request. |
ACL |
The name of the ACL blocking the request. |
List |
The name of the site list that triggered the match. |
Action |
The action taken by the proxy server, e.g. a |
URL |
The URL that was requested. |
Ignore Log Entries
Here you will find log entries showing URLs that were ignored by the AXS Guard proxy, i.e. replaced with an AXS Guard logo in the user’s browser. Select the desired ignore log date.
Anti-Virus Logs
Overview
The antivirus logs allow you to check the following:
-
The status of a given antivirus database
-
When pattern updates were executed
-
URLs that were blocked as the result of a detected virus and which client initiated the request
-
Online information about detected viruses
Summary Logs
-
Log on to the AXS Guard appliance.
-
Navigate to Anti-Malware > Logs > Summary > Web Access.
-
Click on the desired log date to view the log entries.
| Time | Client IP | URL | Scanner(s) |
|---|---|---|---|
Time of the request |
The requesting client IP |
The URL that was accessed |
The antivirus scanner which detected the virus, followed by the name of the virus. |
Info
Click on the name of the detected virus to access its online information.
Detailed Anti-Virus Logs
-
Log on to the AXS Guard appliance.
-
Navigate to Anti-Malware > Logs > Detailed.
-
Click on the name of the desired antivirus engine:
-
ClamAV
-
Trend Micro
-
Havp: an integration engine for web access used by Trend Micro and ClamAV.
-
-
Click on the desired log date to view the log entries.
Statistics and Reporting
About
Web Access reports provide valuable information about the following activity:
-
Requests per client.
-
Hourly requests.
-
Most frequently accessed websites.
-
Blocked requests.
-
Blocked sites.
Reports are generated for the selected period. Reports of client requests, hourly requests and most accessed websites include allowed and blocked requests.
Important
- Misuse of information included in these reports may be punishable by law.
- System administrators are encouraged to consult their local privacy legislation (GDPR).
- Usernames in reports can be obfuscated on demand. Contact the Able support center for assistance.
Generating Reports
-
Go to Reports > Web Access Usage.
-
Select the period for which a report must be generated.
-
Click on the appropriate more link.
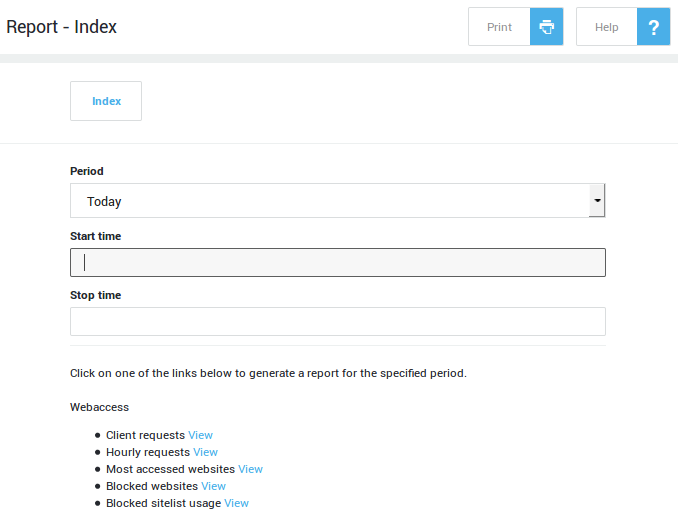
Example report
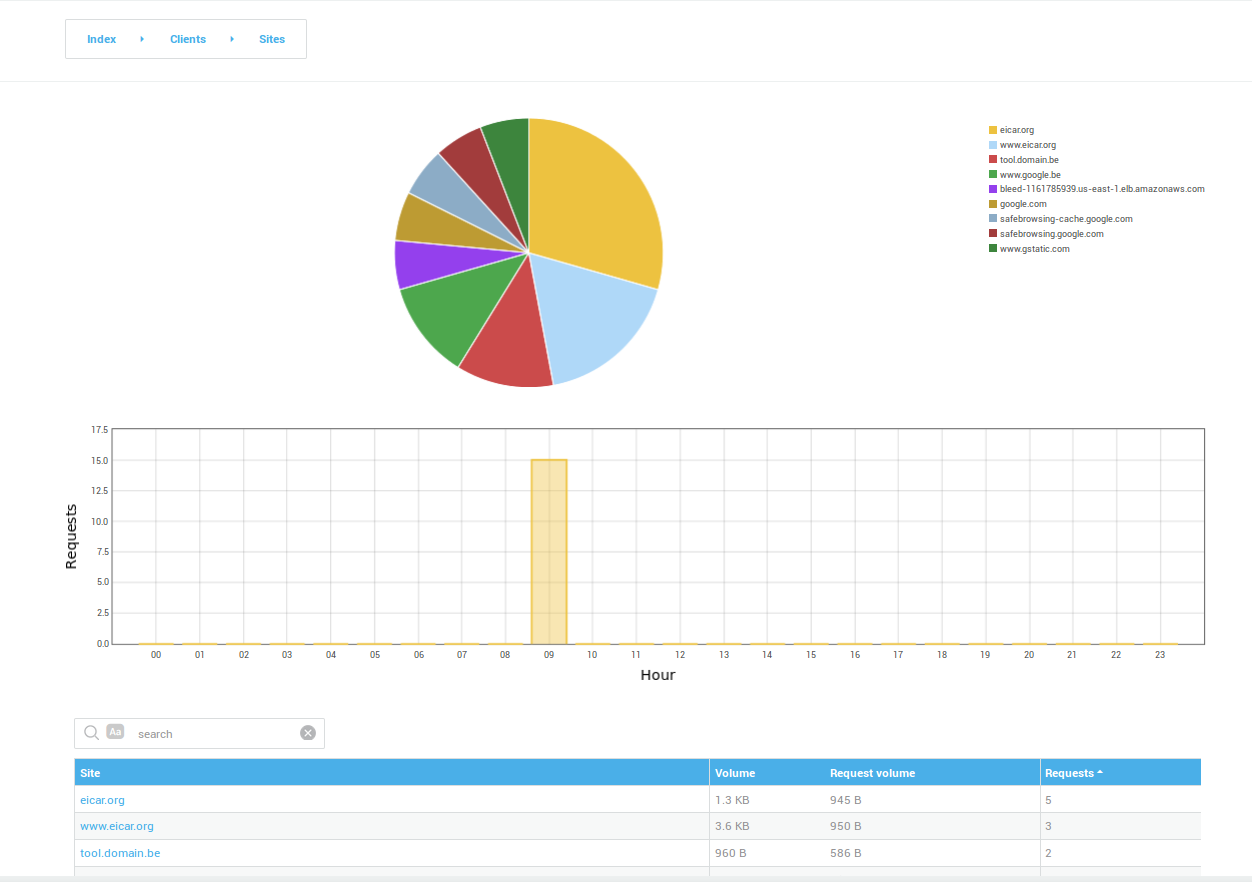
Data Compression
Statistical information is automatically compressed after 2 months to free up disk space on the AXS Guard appliance. Client and site details will no longer appear in reports which cover data that is over 2 months old.
Statistics
System statistics like CPU usage, memory usage, and disk space are crucial for understanding a system's health. See our system administration guide for additional information.
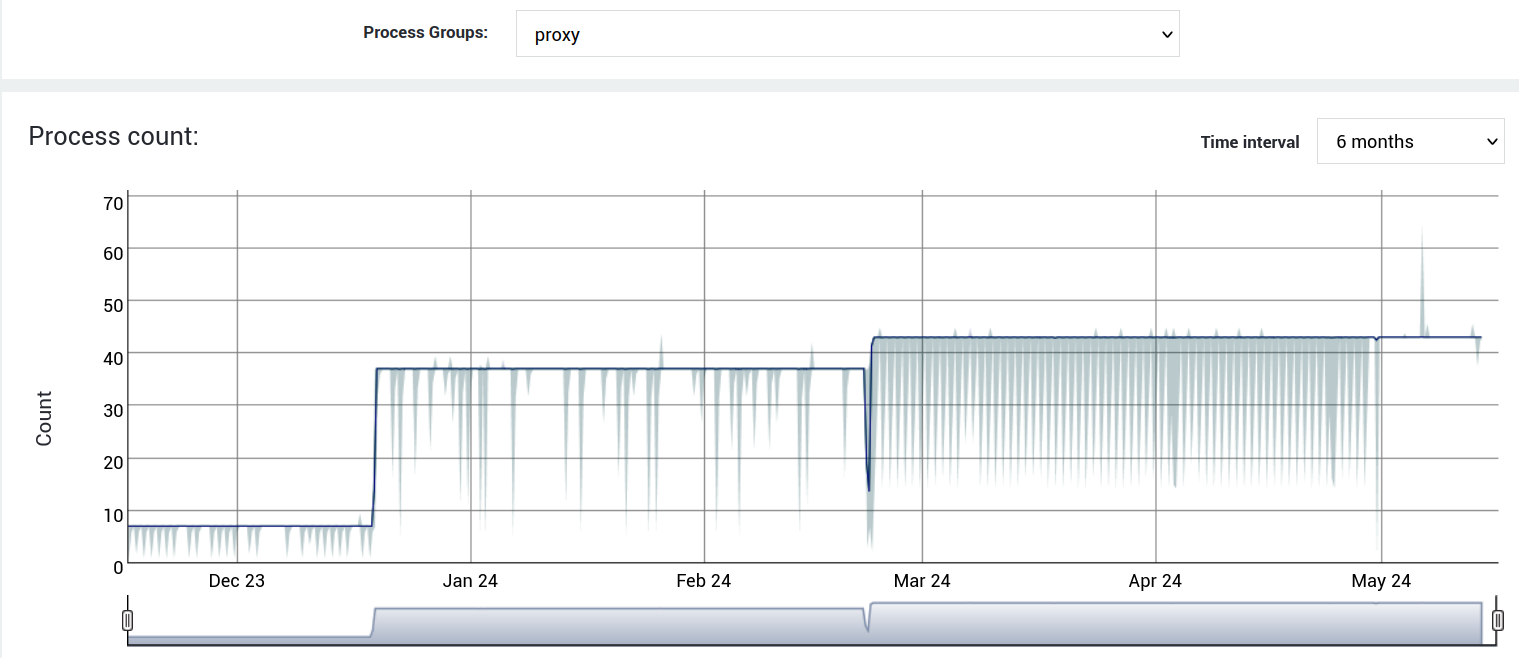
Troubleshooting
I cannot see the Web Access Filters submenu
-
Log on to the AXS Guard Administrator Tool as explained in the System Administration How To, which is accessible viq the Documentation button in the Administrator Tool.
-
Navigate to System > Feature Activation.
-
Make sure the AXS Guard Web Content Scanner option is checked.
I cannot access to the AXS Guard Administator Tool with my user account
-
Check your browser’s proxy settings.
-
Check that the user account is allowed access to the Administrator Tool, as explained in the System Administration How To. Try to log on with a different administrator account (if available).
-
Disable the Proxy in your browser and connect to the AXS Guard LAN IP address on port 82. The procedure is explained in the AXS Guard System Administration How To. If you can access the AXS Guard without the Proxy, the problem is probably Firewall related. Consult the AXS Guard Firewall How To for more information.
-
Ensure that port 82 is added to the safe proxy ports, as this is port used by the Administator Tool via the Proxy.
I cannot access to the login page
-
Check your browser’s proxy settings.
-
Ensure that port 83 is listed in the safe proxy ports, as this port must be allowed to access the logon page.
-
Ensure that the Anti-Virus and Anti-Spyware patterns have been updated. Navigate to Anti-malware > Status and update if necessary.
I cannot access any website
-
If user authentication is enforced by your company policy (recommended), ensure that your are successfully authenticated, either with the SSO Utility or via the Web Access Guest login page.
-
Check your browser’s proxy settings.
-
Verify if the Anti-virus and Anti-spyware patterns have been updated. Navigate to Anti-malware > Status. Update them if necessary.
-
Verify the Web Access logs and check which ACL blocks the request. Edit the ACL accordingly.
I cannot access a specific website
-
Verify the Web Access logs, as explained in chapter 7. Verify which ACL blocks or ignores the request and edit the ACL accordingly.
-
If no logging is available, check the browser’s (advanced) proxy settings. Ensure that the the browser is configured to use the AXS Guard Proxy for other protocols, e.g. FTP.
-
If the site was available in the past and your AXS Guard configuration remained unchanged, make sure the Anti-virus and Anti-spyware patterns have been updated. Navigate to Anti-malware > Status and update if necessary.
-
If all of the steps above offer no result, check the IPS logging. For information, see the AXS Guard IPS How To.
I cannot access any FTP site even though this is allowed by the AXS Guard ACL
Check the browser’s advanced proxy settings. Verify if the browser is configured to use the AXS Guard Proxy for FTP traffic.
The legislation in my country does not allow any disclosure of private information via (electronic) reports.
Able offers the option to obfuscate user names in its electronic Web Access reports. Contact Able Support if you need to enable this option.
Users can download a blocked file via FTP.
There is currently no way to detect a downloaded extension if the FTP server does not advertise the extension in the URL. The only option is to block the FTP server alltogether.
I’m having issues with NTLM authentication
Specify the server as an exception (see WPAD Configuration).
WPAD, Windows 7 and Internet Explorer 8
Microsoft has implemented a feature to stop checking for a WPAD server after a few failed attempts. If the computer fails to detect the proxy settings once, it will not try again. This is a problem if you decide to configure your network to support Proxy Auto Detect later on.
If it fails to find a proxy and manages to connect to the Internet without one, Windows will set the following key in the Windows registry:
HKEY_CURRENT_USER\Software\Microsoft\Windows\CurrentVersion\Internet Settings\Wpad\
WpadDecision = 0
Apparently, this “feature” can be disabled using the following DWORD registry key:
HKEY_CURRENT_USER\Software\Microsoft\Windows\CurrentVersion\Internet Settings\Wpad\WpadOverride = 1
For more information, check the following links:
-
http://blog.frankleonhardt.com/2011/wpad-and-windows-7-and-internet-explorer-8/
-
http://kb.k12usa.com/Knowledgebase/Proxy-Auto-Detect-WPAD-Issues-With-IE-Windows-7
I get a "preventing off_t overflow" error in the web access logs.
This occurs when users are trying to download files which exceed the permitted file size. Increase the file size under Web Access > General.
Kerberos doesn’t work at all.
Kerberos has strict time constraints. Verify if all hosts (the KDC, AXS Guard and clients) are correctly synchronized with a time server. If the time is off, authentication will fail.
Problems can also occur if you generated keytab files on the AXS Guard and then uploaded your own, custom keytab files. As a result, duplicate principal entries (SPNs) will be created on the AD server and clients will try to authenticate using NTLM instead of Kerberos.
Verify your DNS settings and records. A and PTR records must exist for the KDC and the AXS Guard. Make sure that all Kerberos clients can resolve the IP addresses and names of the KDC and AXS Guard. Consult the documentation of your DNS server if necessary.
Activation Errors when generating keytab files.
This happens when you generate keytab files automatically after importing your own, manually generated keytab files. As a result, duplicate principal entries (SPNs) will be created on the AD server, which leads to errors.
Only one SPN should be set for each service. Multiple SPNs can cause clients to connect to the wrong system or the ticket may be encrypted with the wrong key.
To check if duplicate entries exist, run the following command on your AD server:
setspn -X
If duplicates are found, you will see something like this:
Checking domain DC=ad,DC=domain,DC=be
Processing entry 0
HTTP/axsguard.ad.domain.be is registered on these
accounts:
CN=Jon Do,CN=Users,DC=ad,DC=domain,DC=be
CN=axsguard,CN=Users,DC=ad,DC=domain,DC=be

found 1 group of duplicate SPNs.
-
Open a command prompt on your AD server.
-
Run adsiedit.msc
-
Connect.
-
Look for the users returned by the
setspn -Xcommand (see above). -
Remove them.
-
Regenerate your keytab files.
Useful Links
Kerberos authentication is not working on a specific client.
-
Make sure that the application is correctly configured to use Kerberos (GSSAPI) authentication. Check the documentation of your application if necessary.
-
Check the system time on the client. It must be accurate for Kerberos to work. It is recommended to synchronize your clients with a time server.
-
Make sure the client can correctly resolve the KDC as well as the AXS Guard. A and PTR records are required for the KDC as well as the AXS Guard.
-
Verify if the user account exists on the AXS Guard.
-
Make sure there is a valid keytab file for the requested service and that there are no duplicate SPNs (see above).
Web Access specific settings.
-
Linked authentication must be disabled.
-
Kerberos must be specifically allowed for Web Access.
-
Use the FQDN of the AXS Guard in the client’s browser proxy settings and not its IP address, otherwise Kerberos authentication will fail. An example of a correct proxy configuration would be:
axsguard.mydomain.com:3128
Important
Using the IP address will result in errors and entries in the authentication logs similar to the ones shown below.

I cannot export the HTTP principal from the Active Directory
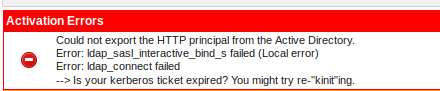
-
Go to Directory Services > General.
-
Verify if the directory base is correct.
-
Log on to your DNS server and verify if all DNS records are present. Restart your DNS server to avoid DNS caching issues.
-
If your DNS server is correctly configured and you still cannot export the HTTP principal, restart the AXS Guard DNS cache service.
Support
If you encounter a problem
If you encounter a problem with AXS Guard, follow the steps below:
-
Check the troubleshooting section of the feature-specific manual.
-
Check the knowledge base on this site for information about special configurations.
-
If no solution is available in any of the above sources, contact your AXS Guard vendor.
Contact Information
(+32) 15-504-400
support@axsguard.com