QRadar® EDR Dashboard
Introduction
The IBM Security® QRadar® EDR suite is an integral component of AXS Guard’s Observe & Protect cybersecurity solution.
It operates as a self-learning system, leveraging its AI capabilities to detect system and network anomalies. However, human interaction is essential for inspecting and taking action on alerts.
This manual is a guide for administrators and IT professionals, providing instructions on configuring and using the QRadar EDR dashboard to proactively identify, investigate, and neutralize cyberthreats in real-time.
Requirements
To manage and monitor your endpoints via the QRadar EDR dashboard, you will need:
| Requirement | Description |
|---|---|
| Access to the Cyber Resilience Portal | First-time users must complete and submit the required form for onboarding. |
| User credentials for the QRadar EDR dashboard | These are provided in your order confirmation. You will be required to change your password when logging in for the first time. |
| A Google or Microsoft Authenticator app | Two-factor authentication (2FA) is required to log in to the QRadar EDR dashboard. |
| A modern web browser | For example: Firefox, Chrome, Safari. |
| QRadar EDR Agent | Only endpoints where the QRadar EDR Agent is correctly installed can be monitored via the QRadar EDR dashboard. |
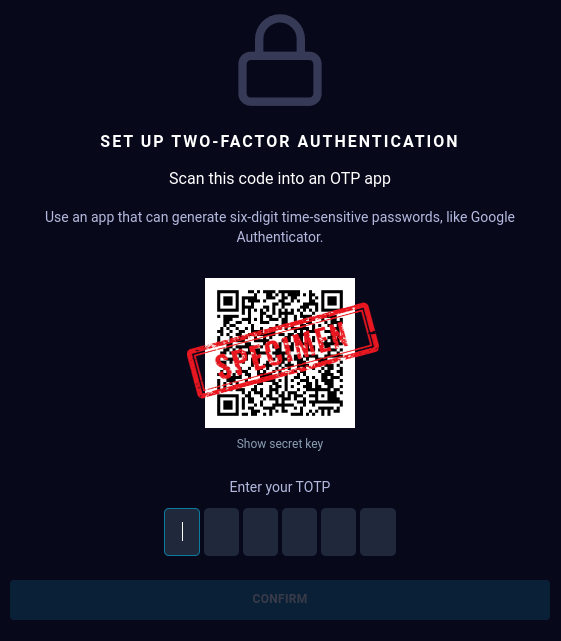
Enrollment using QR code
- Go to the QRadar EDR dashboard.
- Enter the QRadar EDR credentials provided in your order confirmation.
- Scan the QR code when prompted using your Google or Microsoft Authenticator app.
-
Enter a new password when prompted.
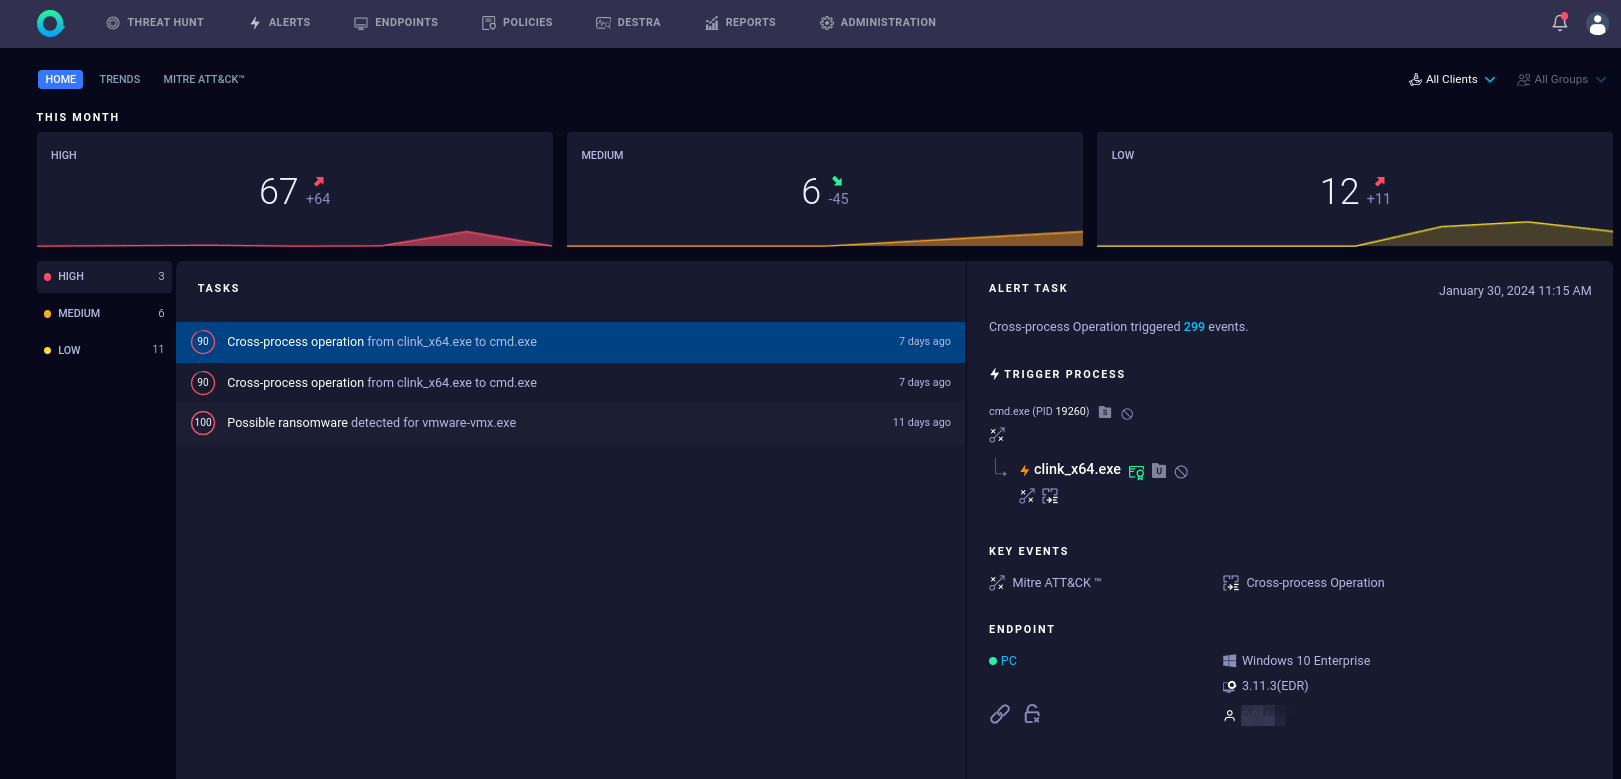
QRadar EDR Dashboard
The QRadar EDR Dashboard provides authorized users with an optimized remediation workflow to monitor infrastructure, handle incidents, hunt for threats, and manage endpoints.
| Page | Description |
|---|---|
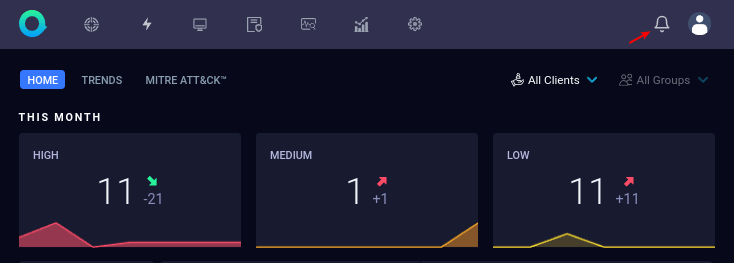
| Home | Overview of unhandled threats, classified by severity. |
| Trends | Graphs of the current situation and trends. |
| MITRE ATT&CK™ | The MITRE ATT&CK™ framework represents adversary tactics that are used in a cyberattack. It documents common tactics, techniques, and procedures that can be used in advanced persistent threats against enterprise networks. |
Endpoints
QRadar EDR Agent
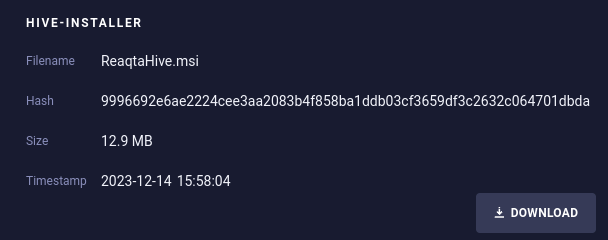
Only endpoints where the QRadar EDR Agent is correctly installed can be monitored via the QRadar EDR dashboard. The installer must be downloaded or distributed via the QRadar EDR dashboard in the Cyber Resilience Portal. 2FA is required.
- Log in using the QRadar EDR credentials provided in your order confirmation.
- Go to Administration > Update Manager.
- Select the appropriate Hive Package.
-
Select the Installer Download tab.

-
Click Download.
-
Install the agent using the appropriate parameters for your environment.
Important
To automatically distribute new versions of the agent to existing endpoints in your infrastructure, please refer to the Update Manager section.
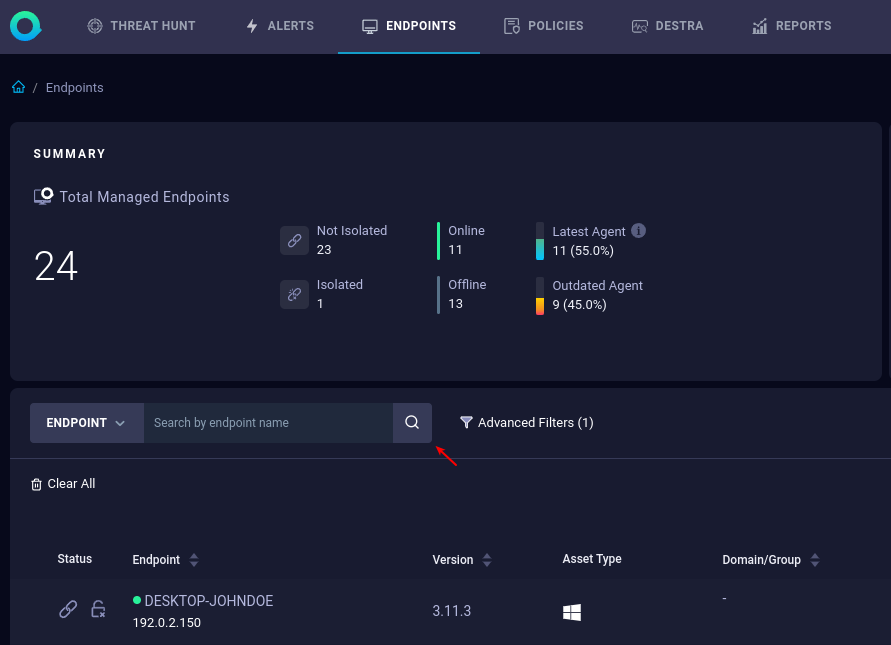
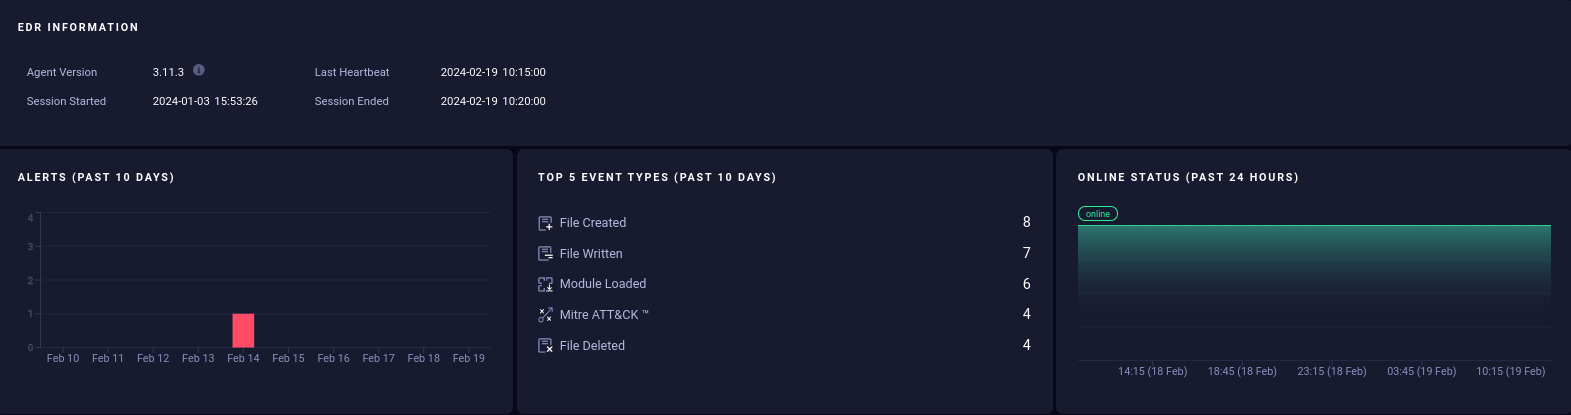
Agent Status
You can verify the successful installation of the agent via the QRadar EDR dashboard in the Cyber Resilience Portal.
- Select Endpoints in the top pane.
- Search the endpoint by entering its name, e.g.
DESKTOP-JOHNDOE.
A green dot indicates that the endpoint was successfully registered and is now being monitored.
Modes of Operation
The QRadar EDR agent operates in EDR (detection) mode by default. This mode prioritizes the identification and monitoring of potential security incidents and threats within your network, rather than actively preventing them.
Operating in EDR mode, as opposed to EPP (protection) mode, enables the agent to gather data without disrupting ongoing processes or affecting system performance. This facilitates unobtrusive monitoring and reduces the likelihood of false positives or disruptions.
| Mode | EDR | EPP |
|---|---|---|
| Focus | Focused primarily on detecting and responding to threats after they have been identified by the system. | When a protection policy is enabled, the QRadar EDR agent switches from EDR mode to EPP mode and automatically blocks any process that triggers the policy. When the agent blocks a process, it creates an alert. |
| Functionality | Gathers data, analyzes behavior, and helps to investigate and contain incidents. | Acts as an active shield against attacks. |
Managing Endpoints
You can monitor the processes, services, and connections that are active on endpoints in your environment.
Additionally, you have the capability to download files from an endpoint, enable anti-ransomware detection, update policies, and isolate endpoints from the network. Furthermore, you can download forensic data and remotely uninstall the QRadar EDR Agent from an endpoint.

For additional information and detailed steps, please refer to the official IBM Security QRadar EDR documentation.
Alerts
IBM Security QRadar EDR generates alerts based on predefined policies and behavioral analysis, providing detailed information about detected threats, including their severity, context, and affected endpoints.
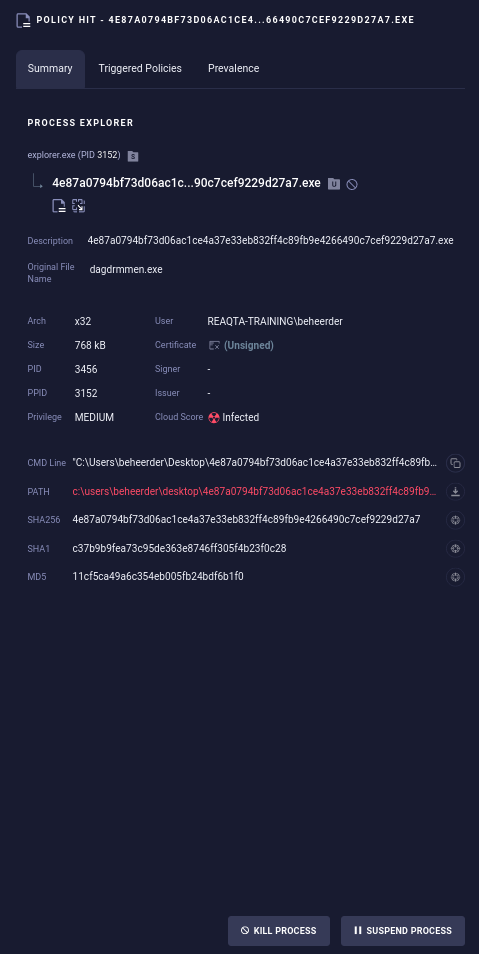
Each alert necessitates analysis by reviewing every action performed by the process that triggered it. The QRadar EDR platform evaluates each action to determine the potential source of the threat. A remediation plan can then be developed for each alert, aimed at eliminating, deleting, and recovering any damage caused by the threat.
To streamline the process and prioritize high-priority events, users can configure alert thresholds and filters to reduce noise and focus on critical events.
Analyzing Alerts
-
Log in to the QRadar EDR dashboard and click on the alert that you want to analyze.

-
Press the Analyze Alert button.
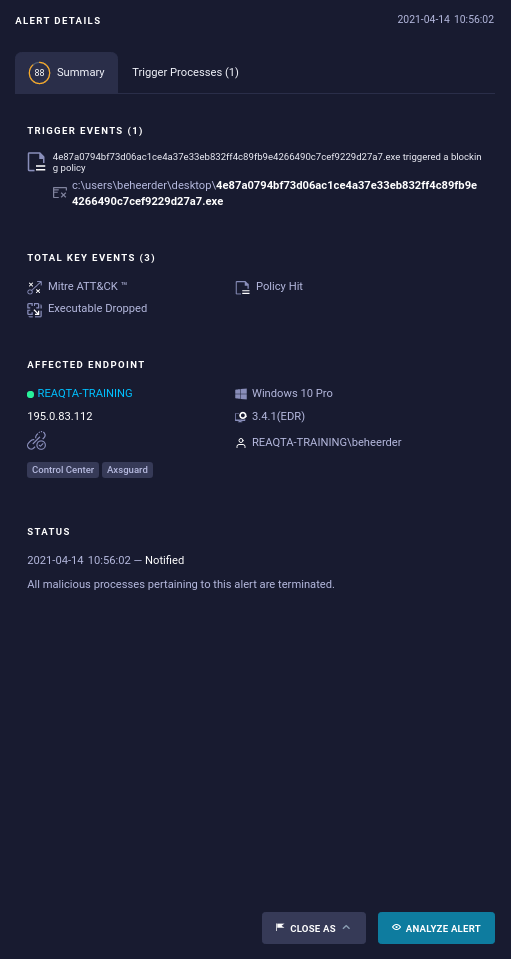
-
If needed, you can:
- Run commands using a shell
- Collect forensic data
- Isolate the endpoint

-
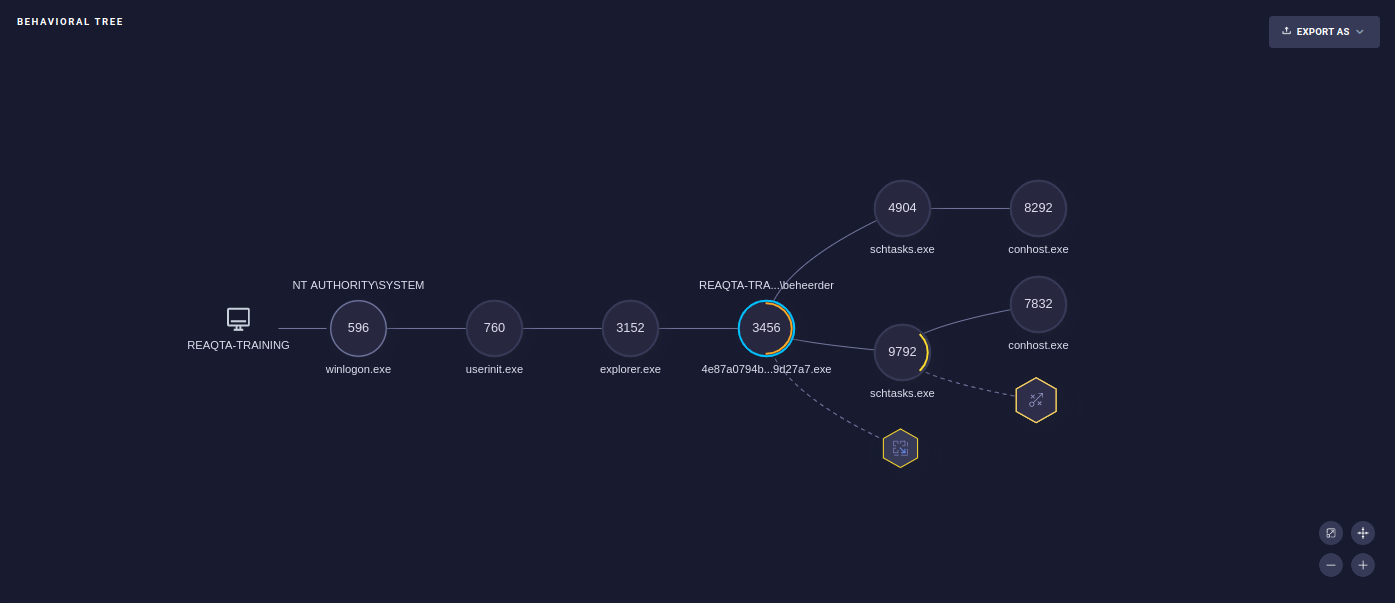
The behavioral tree provides a comprehensive overview of the actions performed by an application, including what it has created, started, killed, downloaded, and more. Clicking on each block will provide detailed information about the corresponding action.
-
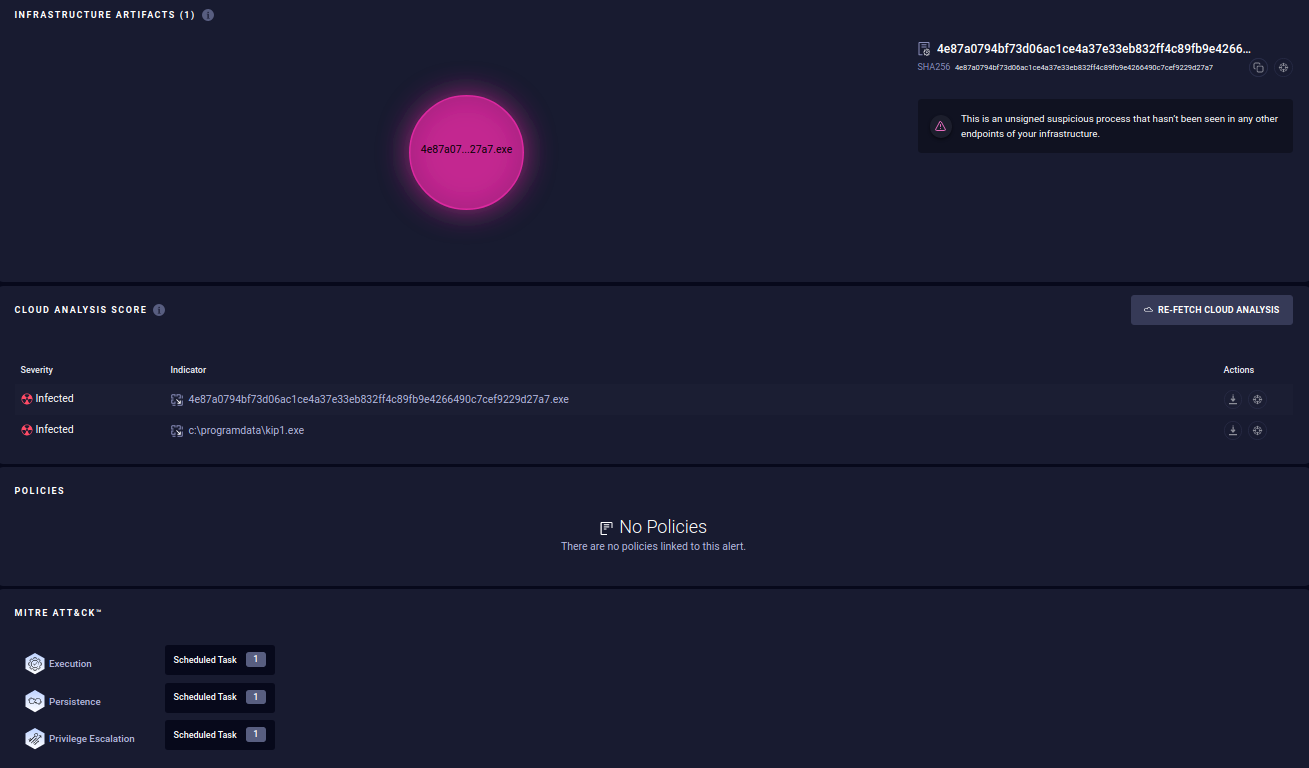
The Infrastructure Artifacts, Cloud Analysis Score, and MITRE Att&ck provide information about the threat that has occurred.
-
Events will display every action performed by the application along with its corresponding severity level. Using the advanced filter, you can select severities such as Low, Medium, and High. This enables you to pinpoint the actions that potentially created the threat.

-
Clicking on the event line will open a summary of the process causing harm. Here, you can choose to either terminate or suspend the specific process.
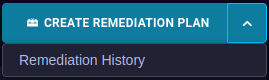
Remediation Plan
If an alert indicates malicious behavior, you'll want to revert the actions of the associated process. This can be achieved by creating a Remediation Plan.

This plan provides a step-by-step guide on the harm caused by a process and how it can be reversed. Note that not all actions can be reverted. Once the plan is executed, you can review the Remediation History to see what has been successfully reverted.
For additional information and detailed steps, please refer to the official IBM Security QRadar EDR documentation.
Managing Alerts
To prevent benign applications from triggering alerts, you will need to whitelist them.
Whitelisting will allow them to always run without any alerts, while blacklisting will automatically block specified applications and trigger alerts when an attempt is made to launch them.
Blacklisting offers an Alert Only option. If configured, the monitored process is not killed but will generate a policy hit alert.
Closing Alerts
When closing an alert, you will need to indicate whether it was triggered by benign (good) or malicious (bad) behavior.
By classifying the alert as either benign or malicious, you contribute to teaching the AI about future threats. If you have any doubts or suspect a potential threat, you can initiate a proactive hunt for further investigation. This feature is also useful when analyzing alerts to gather additional information.
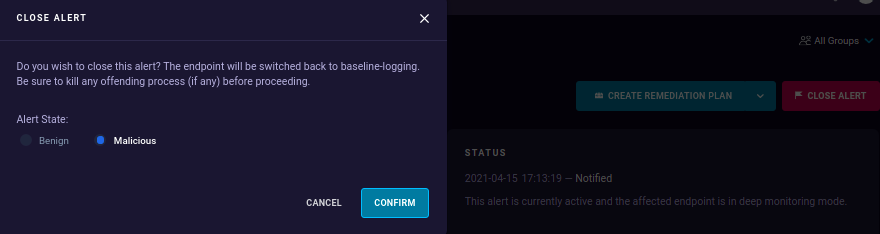
A brief note can be added to the alert, explaining the reason for its occurrence.

Policies
Overview
Policies are essentially a set of rules that instruct the QRadar EDR agent on how to behave on the endpoints it is deployed on.
| Policy Type | Description | Functionality | Override Capability |
|---|---|---|---|
| Whitelist | Suppresses alert generation for false positives or specific behaviors. | Can override protection policies. | Yes |
| Blacklist | Automatically blocks specified applications and generates alerts. Offers an Alert Only mode. | Takes precedence over other policies. Cannot be whitelisted. | No |
| Protection | Switches the agent mode from EDR to EPP and automatically terminates specific triggers, such as cross-process operations and ransomware behavior. Generates alerts for suspicious behavior. | Can be whitelisted. | Yes |
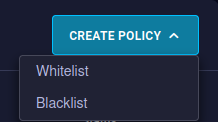
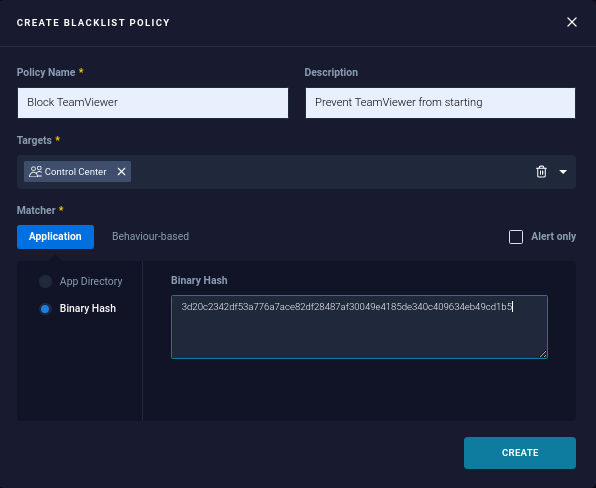
Creating Policies
- Log in to the QRadar EDR dashboard (2FA is required).
-
Select the Policies tab in the top pane.

-
Click on Create Policy and select the desired policy type.
-
Complete the next policy fields:
- Policy Name: Provide a descriptive name for the policy that reflects the specific behavior you are targeting.
- Description: Optionally, provide a brief description of the policy's intended purpose.
- Targets: This parameter defines the scope of the policy application, specifying whether it applies globally or only within specific groups.
- Matcher: Describes the matching criteria for the policy to get triggered. Two types of matchers are found here based on application and behavior.
- Alert Only: This option applies to blacklists only. When configured, the monitored process will not be terminated but will instead generate a policy hit alert.
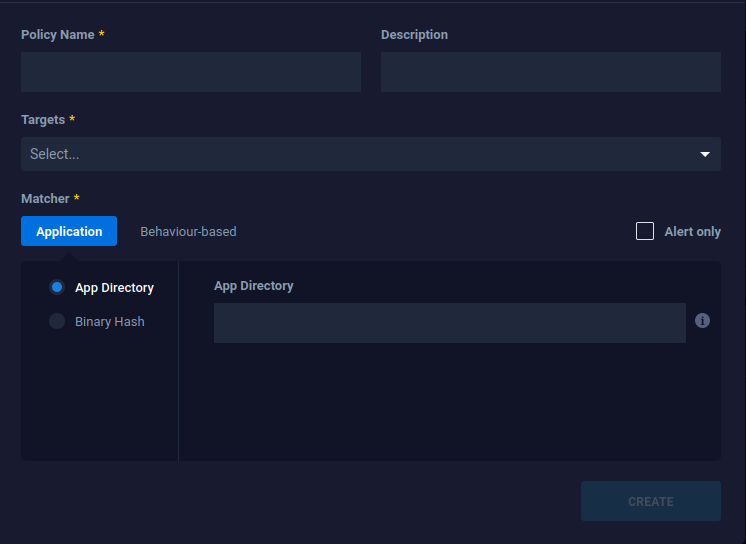
-
Finish by clicking on the Create button.

Examples
Numerous configuration examples are available on the official QRadar EDR website, showcasing a range of policies based on application and behavior.
These examples offer valuable insights into configuring QRadar EDR to effectively monitor and respond to security threats.
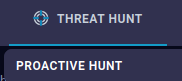
Using Threat Hunt
Threat hunting is a proactive approach within the QRadar EDR solution to actively search for potential indicators of compromise (IOCs) and hidden threats lurking within your endpoints. Additionally, it provides an easy method for creating policies.
- Log in to the QRadar EDR dashboard (2FA is required).
-
Select the Threat Hunt tab and click on Proactive Hunt.
-
Search for the appropriate application.
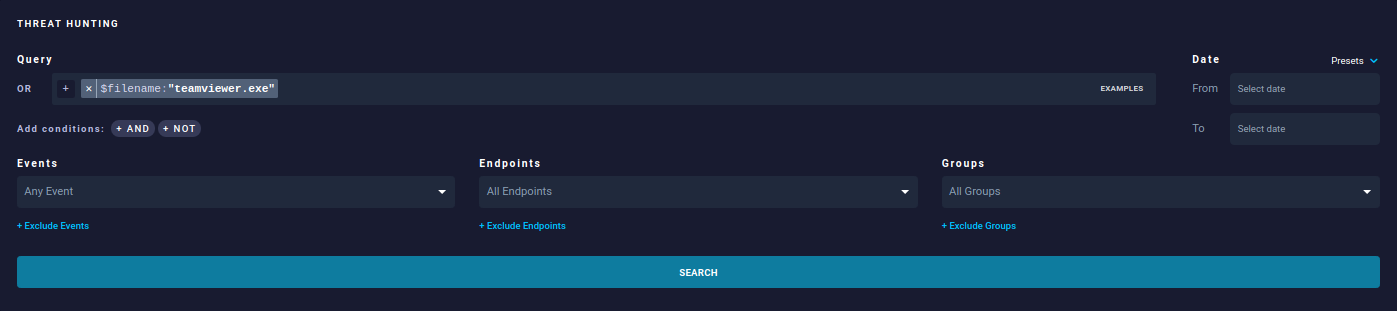
-
Click on one of the lines below the search results.
-
Copy the SHA256 hash.
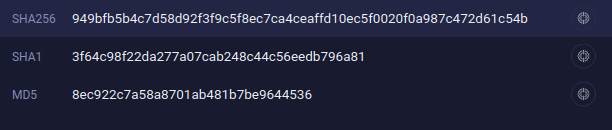
-
Go to the Policies tab.
-
Create a policy and select Whitelist or Blacklist.
-
Complete the required policy fields.
-
Paste the SHA256 hash that you copied in step 5.
-
Finish by clicking on the Create button.
Managing Policies
QRadar EDR policy management involves the creation, deletion, prioritization, deployment, and monitoring of policies that govern the behavior of the QRadar EDR agent on your endpoints.
See the official QRadar EDR website for examples and details on policy management.
DeStra
Introduction
QRadar EDR DeStra stands for Detection Strategy and is a powerful feature within the IBM Security QRadar EDR solution that allows you to create custom detection policies based on the Lua programming language, specific to your organization's needs and threat landscape.
These policies run directly on your endpoints, providing an extra layer of protection beyond preconfigured models.
Benefits
- Identify novel threats: Detect emerging threats or those unique to your organization that might evade pre-built policies.
- Reduce false positives: Fine-tune detection logic to minimize alerts for harmless activities.
- Meet compliance requirements: Create DeStra policies to align with specific regulatory standards.
- Enhance security posture: Proactively hunt for threats and close security gaps in your environment.
Considerations
- Technical expertise: Writing Lua scripts requires some programming knowledge.
- False positives: Careful design and testing are crucial to avoid generating unnecessary alerts.
- Performance impacts: Complex DeStra scripts might consume more resources on your endpoints.
Creating a DeStra
- Log in to the QRadar EDR dashboard (2FA is required).
-
Select the DeStra tab in the top pane.

-
Click the Create Detection button. From there a DeStra pull-down is displayed, allowing you to complete the next steps:
- Provide a name to reflect the specific behavior you are looking for across your endpoints.
- Choose one or more binding events to apply the customized logic to.
- Choose the relevant operating system(s).
- Select the target, which represents the scope of the policy.
- Choose the blank script environment to fill in the required logic for identifying specific events. To whitelist behavior triggered by a DeStra policy, editing the policy script is necessary. See the ReaQta DeStra Docs for additional information and instructions.
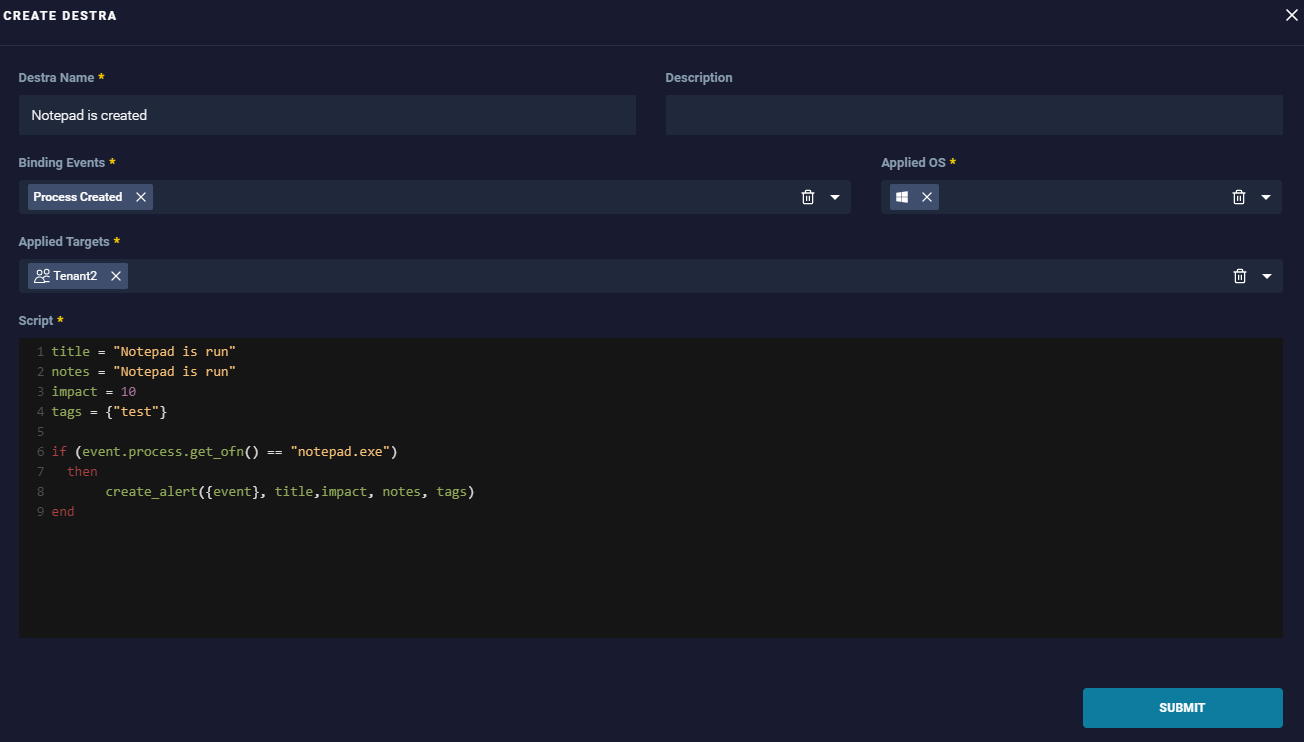
-
Finish by clicking on the Submit button.
Reports
QRadar EDR reports offer invaluable insights into your endpoint security posture, empowering you to proactively identify and respond to threats. Here are some key benefits:
- Gain a consolidated overview of endpoint detections, threats, user activity, and device status, providing a clear picture of your security landscape.
- Get actionable intelligence: Prioritize threats based on severity, potential impact, and affected endpoints, facilitating a swift response and resource allocation.
- Track security trends over time to identify emerging threats and measure the effectiveness of your security measures.
- Compliance reporting: Generate reports that comply with specific regulations, simplifying audits and demonstrating your security posture.
Scheduled Reports
Set up these reports to run automatically at predefined intervals (daily, weekly, monthly), providing regular updates on your security state. They're ideal for staying informed about ongoing threats and trends. For additional information and detailed steps, please refer to the official IBM Security QRadar EDR documentation.

Ad Hoc Reports
Create these reports on-demand for specific needs, like investigating a suspected incident or monitoring a particular endpoint. They offer flexibility and in-depth analysis when you need it most. For additional information and detailed steps, please refer to the official IBM Security QRadar EDR documentation.
Notifications
Setting up e-mail notifications in QRadar EDR can be a valuable tool for improving your security posture. It can help you to increase awareness of security threats, respond to incidents more quickly, and streamline your security operations.
- Log in to the QRadar EDR dashboard (2FA is required).
-
Click the bell icon in the upper right corner of the screen.
-
Click the wheel icon at the bottom of the Notifications section.
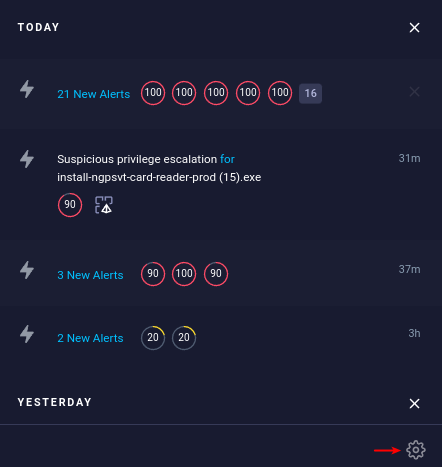
-
From there, you can configure the SMTP settings and set e-mail notifications on various items.
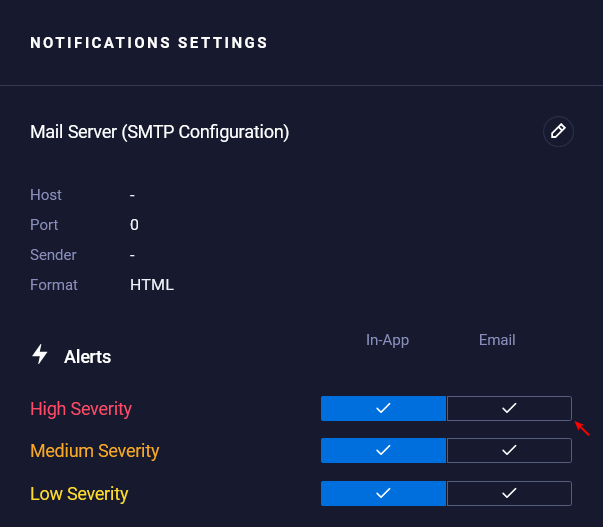
For additional information and detailed steps, please refer to the official IBM Security QRadar EDR documentation.
Administration
This section provides a general overview of the QRadar EDR Administration menu. The table below summarizes the features that are accessible from this menu, along with their availability conditions and brief descriptions.
| Feature | Availability | Description |
|---|---|---|
| Cyber Assistant | Available | Automation tool that learns from the users how alerts are closed. |
| Anti-Malware Settings | Licensed Only | Configure anti-malware scanning and exclusions. |
| Quarantined files | Licensed Only | View and manage files flagged as potential threats. |
| Audit logs for UI activity | Available | Track user actions within the administration interface. |
| Download files from endpoints | Available | Download files directly from managed devices. |
| Hive License page | Available | Review license details and manage activation. |
| Update Manager for Agent Distributions | Available | Update and manage agent software versions on devices. |
| User and Group Management | Available | Create, edit, and manage user accounts and groups. |
| API Application configuration and Documentation | Licensed Only | Configure and access documentation for API integrations. |
| Alert Forwarding configuration | Deployment-specific | Manage how security alerts are forwarded. |
Cyber Assistant
The Cyber Assistant is an automation tool that runs on the QRadar EDR Brain that learns from users how alerts are closed. It then uses this knowledge to suggest closing open incidents as false positives or true positives, depending on how users closed similar incidents. Cyber Assistant can also automatically close false positives, create allowlist policies, and change the impact score of alerts.
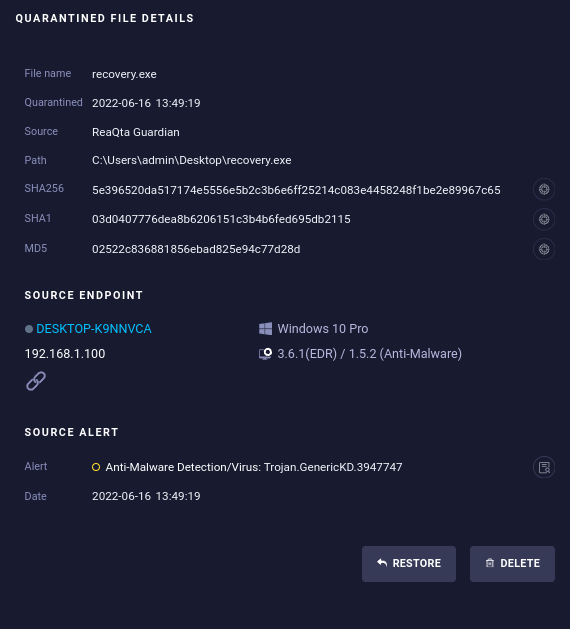
Quarantined Files
As a system administrator, you can restore a quarantined file if it's safe, or delete a quarantined file if it's not safe. For additional information and detailed steps, please refer to the official IBM Security QRadar EDR documentation.
Audit Logs
This page shows shows all audit logs, which include the following:
| Field | Description |
|---|---|
| Date | Date and time of the event. |
| Username (IP address) | Username of the user who performed the action, along with their IP address. |
| Action | Specific action performed by the user. |
| Description | Additional details about the action, if available. |
| Status | Outcome of the action, indicating whether it succeeded or failed. |
| Filter (Basic/Advanced) | Options for filtering events based on specific criteria. |
| Export as CSV | Button to export the filtered data as a CSV file. |
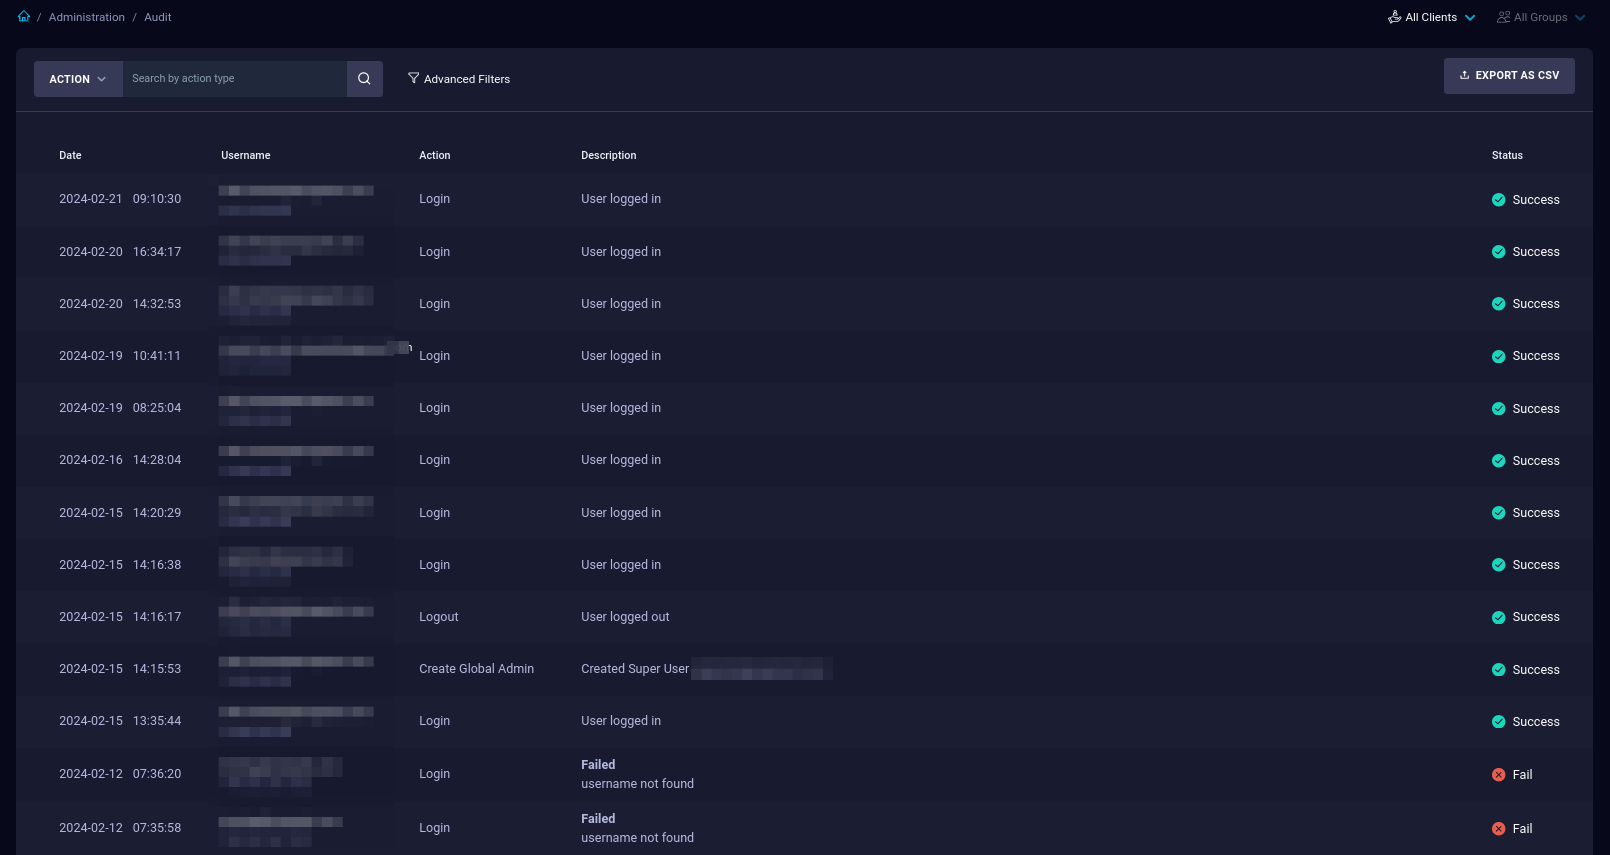
For information about basic and advanced filters, please refer to the official IBM Security QRadar EDR documentation.
Downloads
The Downloads page provides a list of the files downloaded from an endpoint during alert analysis. The list includes the file name, number of requests to the endpoint to retrieve the file, size of the file, and expiration date.

License
The License page displays information about the current license.

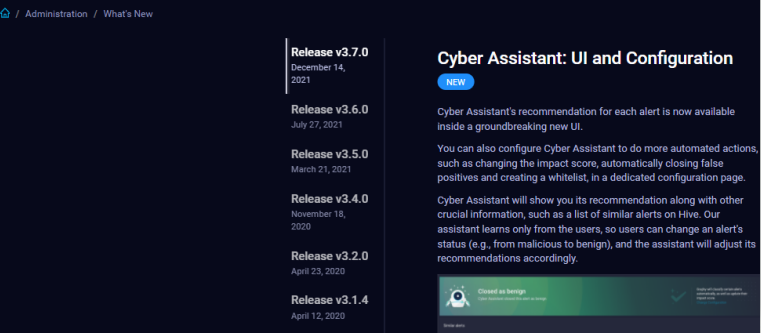
What's New
This page is an online release notes document that lists information about the current and previous QRadar EDR releases.
Update Manager
Update and manage QRadar EDR agent distributions for your deployments with the update manager.

- Upload QRadar Agent installation packages with the Create Distribution button.
- Automatically distribute new versions of the agent to existing endpoints in your infrastructure.
- You can distribute packages to specific groups for a controlled upgrade strategy.
- You can filter the page results based on group and customer (MSSP) or search the list based on OS type.
- You can sort the list by distribution or version by clicking the appropriate column name.
-
Select a distribution to open the Agent Distribution Details.
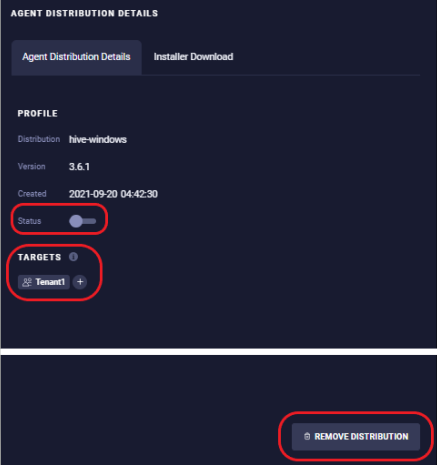
-
The Status slider enables or disables the distribution.
- The Targets shows the current distribution targets. Select
+to modify the targets. - Use the Remove Distribution button to delete the agent distribution.
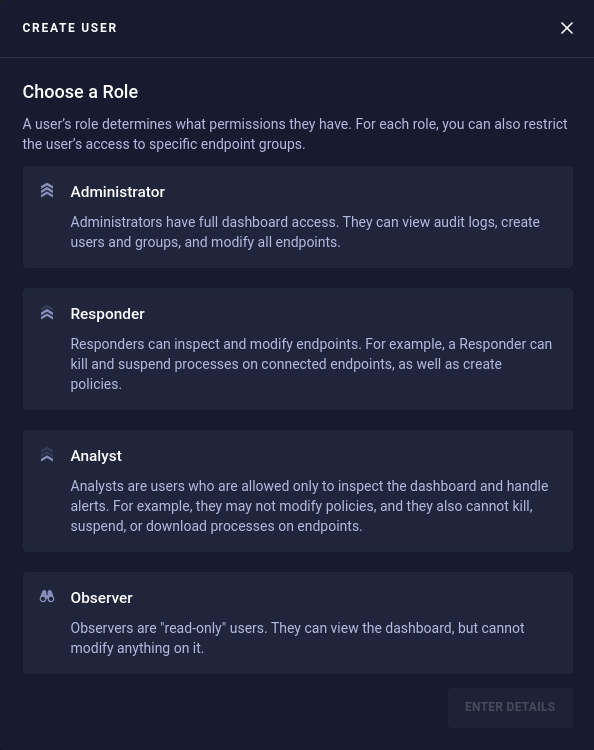
Managing Dashboard Users
As an administrator, you can manage other QRadar EDR dashboard users. Go to Administration > Manage Users, where you will find the following information:
| Field | Description |
|---|---|
| Status | Status of the user: enabled or disabled |
| Name | Full name of the user |
| Username | Email address and login name of the user |
| Role | User's role determining their permissions |
For additional information about creating users and user roles, please refer to the official IBM Security QRadar EDR documentation.
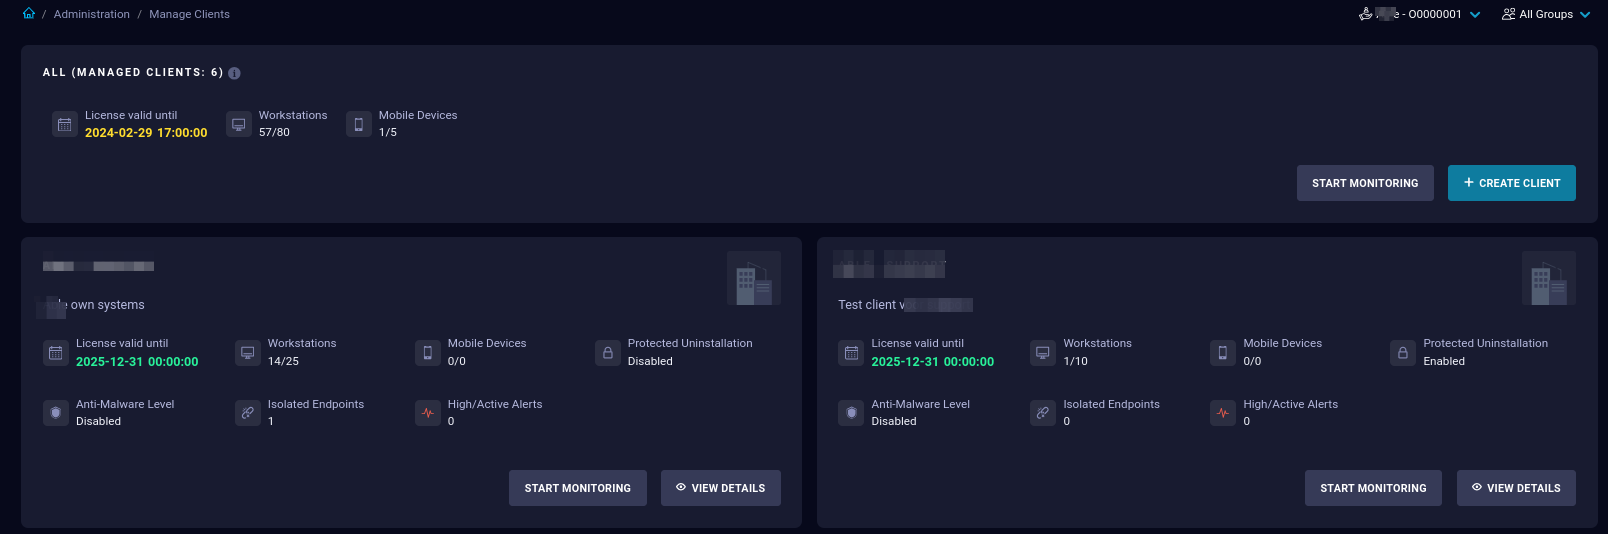
Managing Clients
This page is only available in an MSSP Hive installation to users with appropriate access permissions and allows you to create and manage clients, a.k.a. tenants. From this page you can:
- View the License status, Anti-Malware level, and Endpoint Counts
- Create a Client
- Open the client dashboard with the Start Monitoring button
- Open the client details with the View Details button
API Applications
Via this page you can create and manage API application IDs and key pairs for API integrations.

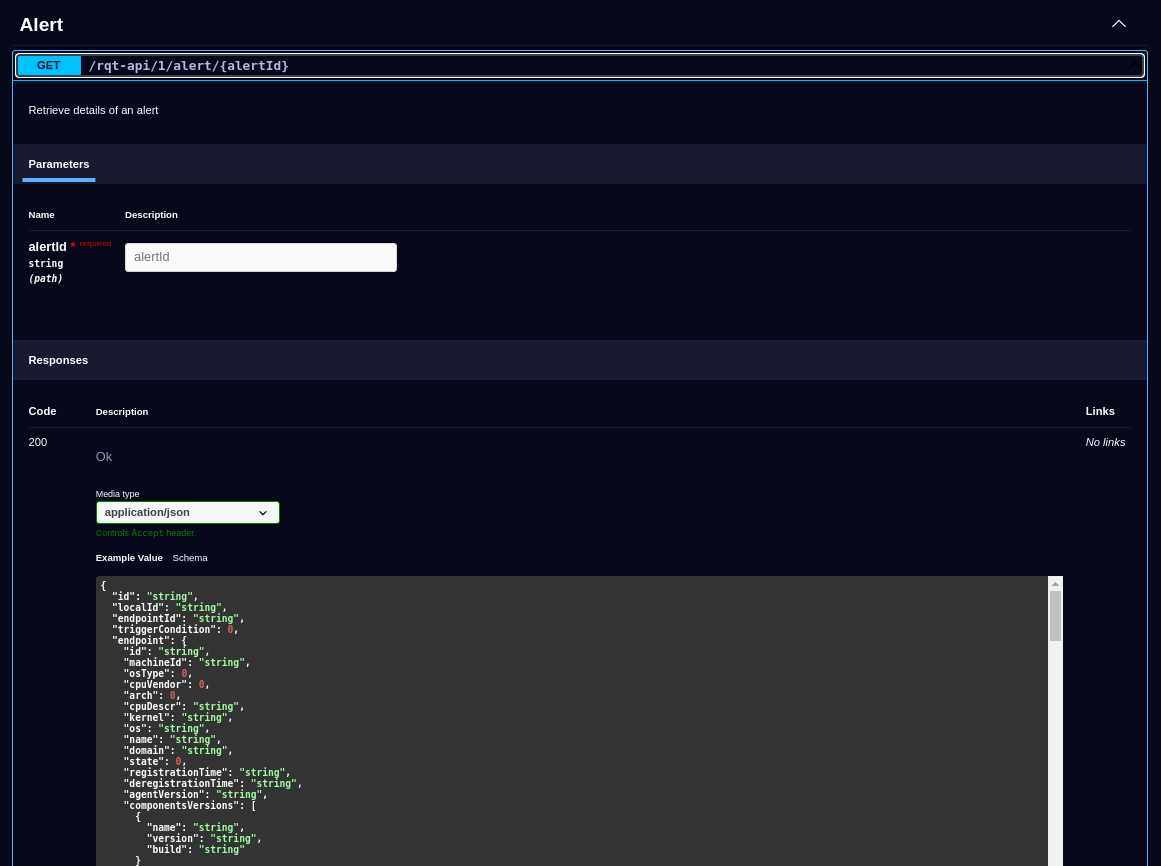
The API Documentation page lists all available API endpoints.
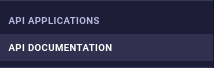
Select an endpoint to expand its details:
Forward Alerts
Via this page, authorized users can forward alerts to external, 3rd party solutions such as a SIEM or Remote Syslog Server.
- This is an optional configuration component, enabled during deployment.
- Event data is exported on a 5-minute interval, which is not configurable.
- The following formats are available: syslog, CEF, and JSON.
- You can create multiple Forwarding Rules.
Select the New Forwarding Rule button to create a rule.

Support
If you encounter a problem
If you encounter any issues with the QRadar EDR dashboard, don't hesitate to reach out to our technical support department.
Contact Information
(+32) 15-504-400
support@axsguard.com