Firewall Guide
Introduction
About this Document
This document serves as an introduction to the AXS Guard firewall. It is intended for system administrators and technical personnel who are already familiar with network security and TCP/IP.
The AXS Guard firewall is built on the iptables framework. As part of the Netfilter subsystem in the Linux kernel, iptables enables fine-grained control over packet filtering, network address translation (NAT), and traffic classification.
By leveraging this proven technology, the AXS Guard firewall offers stateful inspection, connection tracking, and customizable rule sets that allow administrators to define precise security policies across multiple network zones.
Examples used in this Guide
All examples and configurations in this guide assume you are logged in as an advanced administrator. Some options may not be visible if you have lower access privileges (e.g., full administrator or regular user).
Due to ongoing software development and documentation updates, the screenshots in this guide might look slightly different from the current user interface.
Essential Terminology
Overview
This section will lay the groundwork for understanding and configuring your AXS Guard firewall by defining key terms and concepts that appear throughout this guide. A firm grasp of this terminology is crucial for successful firewall implementation.
Topics covered in this section include:
- A general definition of firewalls and their purpose.
- Essential terminology for understanding how the AXS Guard firewall operates.
- Predefined rules & policies.
What are Firewalls?
A firewall acts as a security barrier, safeguarding your network from unauthorized access. It achieves this by examining network traffic and blocking any connections that are unwanted or not authorized. In the following section, we will briefly explain some key terminology to enhance your understanding of the AXS Guard firewall's operation and configuration.
Security Structure
Rules
A rule is the most granular element of the AXS Guard firewall. It describes the traffic to be matched and dictates how that traffic is processed – whether it is accepted, dropped, or logged. Rules must be added to a policy to be enforced.
Policies
A policy is a logical collection of one or multiple firewall rules, organized in a specific, critical order. Policies can be applied to various AXS Guard security levels, i.e. individual users, groups, computers, or the system level.
Security Levels
The level defines the scope at which a firewall policy is applied (user, group, computer, or system-wide). System-wide settings should be the most stringent by default, as they apply to all connected devices and computers. This aligns with the principle of Zero Trust.
Firewall Rights
This is a general term referring to the firewall permissions and restrictions applied at a specific security level, determining what type of traffic a given user, group, or computer is allowed or forbidden to send across the network.
Firewall Policy Scopes
Firewall rules must be added to a firewall policy to be enforceable. These policies, in turn, must be assigned to a user, a group, a computer, or implemented at the system level. These assignment levels define the scope of the policy.
Static Policies
System-wide policies, referred to as static policies within the administrator tool, govern the network traffic of all hosts connected to the AXS Guard LAN. They are also required to allow internet access to AXS Guard services, such as OpenVPN. On the LAN side, these policies are enforced independently of user authentication and mandate the implementation of the most stringent security to align with the zero-trust model.
Dynamic Policies
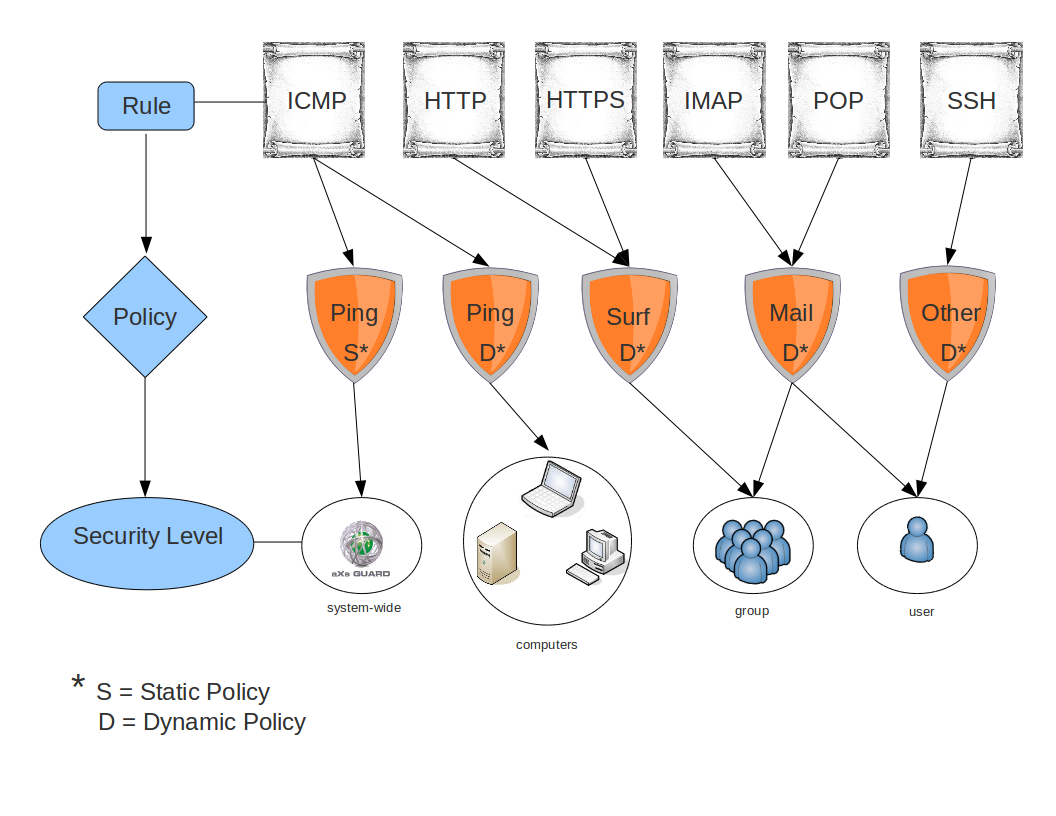
In contrast, computer, group, and user-level firewall policies, referred to as dynamic policies in the administrator tool, only apply to a specific computer, group, or user to whom they are assigned. User and group policies are enforced after successful authentication with the AXS Guard appliance (identity-based security). Computer policies are enforced as soon as the associated computer or device is online. The illustration below explains the relationship between rules, policies, and the four AXS Guard levels at which policies can be assigned.
Summary
| Policy Type | Applies To | Enforcement | Scope & Use Cases |
|---|---|---|---|
| Static | All computers, groups, and users. | Permanent. Enforced independently of user authentication. | These are system-wide policies. They should enforce the most stringent security, aligning with a zero-trust model. Static policies must also be used to provide access to external AXS Guard services (Internet & DMZ). |
| Dynamic | Specific computers, groups, or users. | Computer policies: Enforced once the device is online. User & Group policies: Enforced after successful authentication against AXS Guard (SSO). |
These policies offer granular control, applying only to assigned entities. They enable identity-based security for users and groups, ensuring specific access rights are granted only after identity verification. Computer policies activate immediately when a device connects, providing immediate control over its network behavior. |
Predefined Rules & Policies
Introduction
The AXS Guard firewall comes with a set of factory-predefined rules and policies that you can use right out of the box. You can easily create custom rules and policies using the AXS Guard's web-based administrator tool or the Cyber Resilience Portal, or you can use predefined ones as a template for your own modifications. This is done with the Edit as New function.
Firewall rules and policies can be recycled and aren't necessarily active right after creation. AXS Guard offers the flexibility to create rules and policies for future use, and to assign a single policy to different groups, users, or computers. There's no need to delete rules or policies that are no longer immediately relevant; you can simply disable them.
The Power of Policies
Policies allow for the easy and central management of a vast number of rules. Here are some key advantages:
- Centralized Management: A large number of related rules can be managed efficiently through policies.
- Scalability: A single firewall policy can be linked to many users (e.g., by using a group policy).
- Flexibility: Policies are recyclable, meaning they can be saved, enabled, or disabled as needed.
Example
Consider the following scenario to see the advantage of firewall policies: An office with 500 users is divided into 6 groups. All users need access to the AXS Guard email system, which consists of 4 specific email services: POP, IMAP, SMTP, and LDAP (for the address book). This translates to 4 firewall rules.
- Without firewall policies: Adding these 4 rules individually to 500 users would require 2,000 configuration actions (4 rules x 500 users).
- With firewall policies at the user level: You would add the 4 rules to 1 policy and then assign that policy to 500 users, resulting in just 505 configuration actions (4 rules + 1 policy creation + 500 assignments).
- With firewall policies at the group Level: The most efficient approach involves adding the 4 rules to 1 policy and then assigning that policy to the 6 groups. This drastically reduces the effort to only 11 configuration actions (4 rules + 1 policy creation + 6 assignments).
Firewall Concepts
SPI & Connection Tracking
About
Connection tracking, also known as stateful packet inspection (SPI), is a technique used in network security to monitor and keep track of the state of network connections. It involves examining the packets of a connection and maintaining a record of the connection's current state and status, such as its source and destination addresses, ports, and sequence numbers.
Benefits
-
Improved security: Connection tracking enables network administrators to monitor network connections and detect potential security threats, such as suspicious network activity, attacks, or unauthorized access attempts. By maintaining a record of the state of network connections, connection tracking can help prevent malicious traffic from entering or leaving a network.
-
Enhanced network performance: Connection tracking can quickly identify established connections and allow packets to be forwarded directly to the appropriate destination without additional processing.
-
Simplified network management: Connection tracking can help simplify network management by providing a centralized view of network connections and traffic. This can help administrators quickly identify and troubleshoot network issues, and make informed decisions about network security policies.
Overall, connection tracking is an important technique for network security and management. It provides network administrators with greater visibility and control over network traffic, enabling them to improve security, performance, and reliability of their network infrastructure.
Connection States
There are 5 different connection states: New, Established, Related, Invalid and Assured.
| State | Description |
|---|---|
| New | This is the state for the first packet of a connection. It indicates that the firewall's connection tracking system has not seen any previous packets belonging to this flow. For TCP, this is typically the SYN packet. |
| Established | After the initial handshake (e.g., SYN-ACK for TCP) and traffic has been seen in both directions, the connection state changes to Established. This means the firewall recognizes it as an ongoing, legitimate conversation. |
| Related | This state is for connections that are related to an already established connection but aren't part of the same primary flow. Common examples include FTP data connections or ICMP error messages responding to an Established connection. This often requires "connection helpers" or ALGs (Application Layer Gateways) in the firewall to understand the relationship. |
| Invalid | This state is assigned to packets that cannot be identified as belonging to any known connection, or that are malformed, out of sequence, or otherwise "unexpected." These packets are often dropped by firewalls as a security measure. |
| Assured | This state is an internal flag within the connection tracking system. It means that a connection has been "confirmed" or "assured" after a certain amount of successful two-way traffic. This is important for managing the connection tracking table; "assured" connections are less likely to be dropped if the system starts running out of tracking entries. |
FTP Example
Certain protocols, such as IRC (chat), FTP (File Transfer Protocol), ICQ (instant messaging), etc., require special handling due to their unique connection requirements.
For instance, FTP connections use two different channels to exchange information: one to control the connection and another to send data. The control channel is established first, and then the second channel for data is negotiated within the payload section of the first connection. However, this negotiation is not visible to the firewall, and as a result, the firewall may deny the second connection for security reasons.
![]()
To address this problem, connection tracking is used to examine the payload of the first connection. When the negotiation for the data channel is detected, a second connection is initiated based on the first one and assigned a related state. This second connection is then used for data transfer, ensuring that the firewall allows the traffic.
With connection tracking, it becomes possible to establish secure connections for special protocols that require multiple channels. This helps to prevent security issues and ensures that the network operates effectively.
NAT Helpers
In the context of connection tracking, NAT (Network Address Translation) helpers are modules that are used to assist with the tracking of certain types of network protocols that use dynamic port assignments or other non-standard network communication patterns.
| NAT Helper | Description |
|---|---|
FTP conntrack Helper Ports |
Tracks so-called active FTP connections (ports 21 and 20). |
VPN PPTP Helper |
Tracks TCP port 1723 and the associated GRE tunnel. |
IRC Helper |
Tracks IRC connections on TCP port 6667. |
H.323 Helper |
NAT helper for the H.323 protocol (VoIP). It supports RAS, Fast Start, H.245 Tunnelling, Call Forwarding, RTP/RTCP and T.120 based data and applications including audio, video, chat, whiteboard, file transfer, etc. |
SIP Helper |
NAT helper for the SIP protocol (VoIP). |
SNMP Helper |
NAT helper for the SNMP protocol. This is the ‘basic’ form of SNMP-ALG, as defined per RFC 2962. It modifies IP addresses inside SNMP payloads to match IP-layer NAT mapping. |
TFTP Helper |
NAT helper for the TFTP protocol, which tracks TFTP connections on UDP port 69. |
Amanda Helper |
NAT helper for the Amanda backup tool protocol. |
Firewall Zones
About
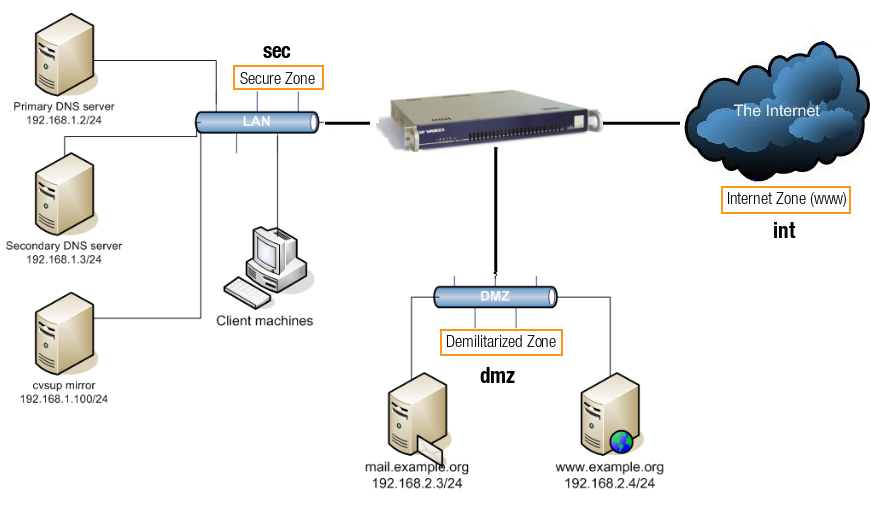
A firewall zone is a logical grouping of network interfaces or subnets that share a common security policy and are subject to the same access control rules. Firewalls leverage these zones to strictly control the flow of network traffic and enforce security policies between distinct segments of a network. Typically, three primary zones are defined.
Zone Types
| Network Zone | Description |
|---|---|
Secure Zone (SEC) |
This zone encompasses the organization's internal network, containing trusted devices and sensitive data. It is characterized by the highest level of security, with outbound traffic generally permitted and inbound traffic heavily restricted and scrutinized. It includes the combination of all LAN devices and Virtual Private Network (VPN) devices, such as IPsec and OpenVPN devices. |
Internet Zone (INT) |
All network devices that are connected to the Internet. This zone represents the public, untrusted network outside the organization's control. It is the most exposed zone, with all inbound and outbound traffic subject to rigorous inspection and filtering by the firewall to protect the internal network from external threats. |
Demilitarized Zone (DMZ) |
This is a perimeter network that provides a buffer between the secure internal network and the untrusted Internet. It hosts publicly accessible services, such as web servers, email servers, and DNS servers, that need to be accessible from the Internet but must be isolated from the internal network to limit the impact of a potential breach on these public-facing systems. Traffic to and from the DMZ is carefully controlled by the firewall, often with stricter rules for inbound traffic than for outbound traffic. |
Important
By default, separate LANs within your network are shielded from each other, meaning network traffic between them is not allowed. To allow traffic between segments, you'll need to configure the appropriate firewall rules and policies.
Traffic Flows
Definition
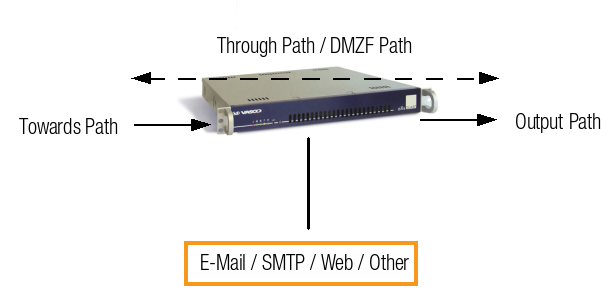
Traffic flows describe the direction of network traffic as it is processed by the AXS Guard firewall, based on the traffic's origin and destination. These flows determine how traffic interacts with the iptables chains (INPUT, FORWARD, and OUTPUT) and influence the security policies applied. There are three primary types of traffic flows: towards, through and output.
Flow Types
| Flow Type | Description | iptables Chain |
|---|---|---|
| Towards | Traffic destined for a service running on the AXS Guard appliance (e.g., OpenVPN or SMTP). | INPUT |
| Through | Traffic passing through the appliance from one network zone to another (e.g., LAN to DMZ or Internet). | FORWARD |
| Output | Traffic generated by the AXS Guard appliance itself (e.g., system updates, DNS queries). | OUTPUT |
Security Levels
AXS Guard enforces network security on 4 levels:
System Level
AXS Guard system-wide security, which applies to all users and devices that are connected to the LAN. Always apply the strictest settings at this level. Ideally, user authentication should always be enforced and nothing should be allowed by default at this level (zero trust).
Computer Level
These are AXS Guard security rights assigned to a workstation, server, printer, or any other networked device in the secure LAN. They should be limited to the minimum necessary, such as access to update servers on the Internet. For workstations, it is recommended to enforce user authentication and assign appropriate group- and user-level access rights (identity-based firewalling).
Group Level
Pertains to security rights associated with a group of AXS Guard users.
User Level
User-level security rights are associated with a specific AXS Guard user and can be used to override rights assigned at the group level, for example if a user needs specific job-related access privileges which are not defined at the group level.
Identity-based Security
Introduction
The AXS Guard firewall is designed to enforce identity-based security, where firewall policies are dynamically applied, based on the authenticated user or device. These policies, or scenarios, govern network access for users depending on their authentication status and assigned network privileges.
Firewall policies can be tailored and enforced at multiple security levels within the AXS Guard system, enabling granular control over who can access what resources under different scenarios. Each possible user or device state corresponds to a distinct firewall scenario, as explained in the following section.
Scenarios
This section explains the various AXS Guard firewall scenarios that apply to users and devices that are connected to the secure LAN. A diagram illustrating these scenarios is included below.
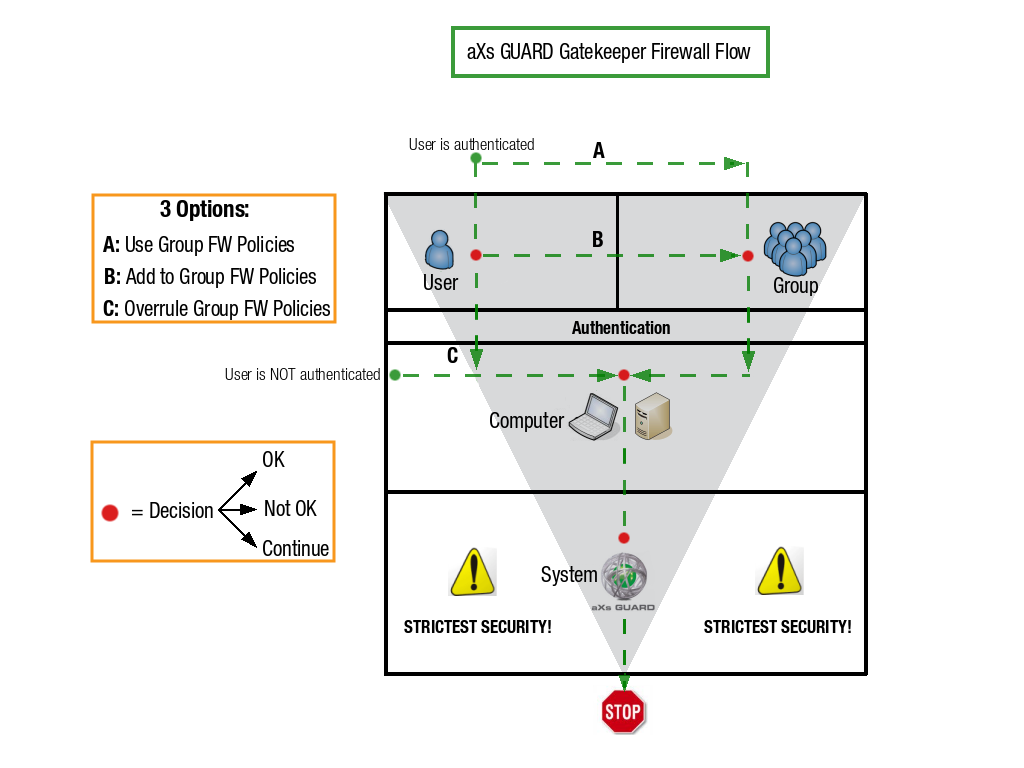
Authenticated Users
This scenario applies to authenticated users. Depending on the user's configuration, one of the following firewall policy application methods (A, B, or C) will be used, always followed by the computer and AXS Guard system policies:
- A. Group Firewall Policies: The firewall rights of users are based solely on their AXS Guard group membership.
- B. Combined Group and User Policies: The user's specific firewall rights are applied first (if any). These are then combined with the firewall rights derived from their AXS Guard group membership (as in A). Specific firewall rights can be assigned directly to users, which can either be more restrictive or more permissive than their group policies.
- C. Overruling Group Policies: The user's group firewall policies are overruled and do not apply. Only the user's specifically assigned firewall rights are in effect.
In addition to the above, the following policies are always applied:
- Computer Policies: The user's AXS Guard computer firewall policies apply (if configured). These policies are based on the computer's IP address.
- System Policies: The AXS Guard system-wide policy applies. Any traffic not explicitly allowed at the system level is blocked (zero trust).
Unauthenticated Users
This scenario applies to unauthenticated users. Since no user information is available, only the following policies are applied:
- Computer Policies: If configured, AXS Guard computer firewall policies apply, based on the computer's IP address.
- System Policies: The AXS Guard system-wide policy applies. Any network traffic not explicitly allowed at this level is blocked (zero trust).
Computer-level Security
This firewall scenario applies to all computers, servers, printers, tablets and other networked devices. Authentication does not apply in this case.
- Computer Policies: If configured, AXS Guard computer firewall policies apply. These policies are linked to a device's IP address.
- System Policies: The AXS Guard system-wide policy applies. Any network traffic not explicitly allowed at this level is blocked (zero trust).
Best Practices for Computer Firewall Rights
Computer firewall rights should ideally only be assigned to servers or devices with static IP addresses that require specific, limited access to the internet (e.g., to Microsoft update servers). In all other scenarios, using user and group-based firewall rights is highly recommended (identity-based firewalling).
Relying heavily on computer-level firewall rights presents several inherent drawbacks:
- Security Risk: Bypassing the authentication process (user identification) is inherently insecure.
- Exposure to Misuse: If rights are assigned at the computer level rather than the user or group level, your network may be exposed to risks like the misuse of the computer's IP address or unauthorized access to network resources.
- Maintenance Challenges: Maintaining a list of computers is significantly more difficult than managing users, especially in large organizations.
- Lack of Granularity for Shared Devices: You cannot assign user-specific firewall rights at the computer level. If multiple users share a single computer, granular control requires user authentication.
- Troubleshooting Complexity: Troubleshooting network problems becomes harder with manually-maintained computer lists. User authentication, conversely, automatically links each user to an IP address, making tracking, monitoring and troubleshooting much simpler.
Prioritize User Authentication: Implement user authentication whenever possible. The Single Sign-On (SSO) tool allows users to seamlessly authenticate with AXS Guard after logging on to their client PC.
System-level Security
This scenario applies to:
- Unauthenticated users.
- Computers that are not listed in the AXS Guard computer list.
At this level, only system-wide firewall policies apply, and any unspecified traffic is blocked by default (zero trust). Maximum security and restrictions should always be enforced here, meaning permissions must only be granted at the group or user level.
Firewall Rules
Naming Conventions
| Prefix | Description |
|---|---|
sec- |
Traffic destined for a secure network interface. |
int- |
Traffic destined for an Internet interface. |
dmz- |
Traffic sent to a DMZ interface. |
all-assistance |
Rules used for remote assistance (technical support). |
fwd- |
Traffic traveling through the AXS Guard firewall (forwarded traffic). |
dmzf- |
DMZ filtering rules. |
pr- & pf- |
Automatically-generated port redirection and port forwarding rules. |
cm- |
Rules pushed via the Cyber Resilience Portal. |
predef- |
Blocklists, which are updated automatically via the Cyber Resilience Portal, e.g. Tor exit nodes. |
predef-geo- |
GeoIP filters, which are updated automatically via the Cyber Resilience Portal. |
Advanced Rules
The AXS Guard firewall leverages iptables, offering system administrators significant flexibility to configure advanced rules for specific use cases.
While advanced firewall rules provide powerful customization, incorrect use can lead to insecure configurations. If you're not familiar with iptables, avoid using them. AXS Guard is not liable for any insecure configurations resulting from the improper use of advanced rules.
Advanced firewall rules always take precedence over other configured rules on the system. Misconfigurations can inadvertently disable essential rules needed for remote support or automatic system updates.
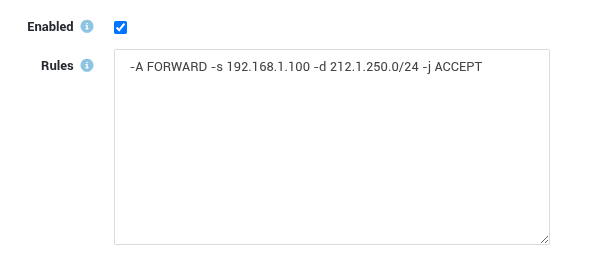
To create advanced firewall rules, consult the relevant man pages or online documentation, such as the iptables manual. An example of an advanced rule is provided below. Omit the iptables command itself; only use the options and parameters as shown in the example:
Match Types
A match refers to a condition or set of conditions that a network packet must meet for a specific firewall rule to be applied to it. There are 4 types of matching:
-
Generic matches.
-
Protocol matches, e.g. UDP and TCP matches.
-
Matches based on the traffic flow.
-
Special matches.
Protocol Match
| Match | Description |
|---|---|
Protocol |
Only matches when the packet contains the specified protocol. |
Source |
Only matches when the packet contains the specified source IP address. You can add multiple source IP addresses to a rule or define entire subnets to be matched, e.g. |
Destination |
Only matches when the packet contains the specified destination IP address or FQDN. You can add multiple destination IP addresses or FQDNs to a rule or define entire subnets to be matched, e.g. |
| Match | Description |
|---|---|
Source Port |
Only matches when the packet contains the specified source port. A range of ports can be specified using the |
Destination Port |
Only matches when the contains the specified destination port. A range of ports can be specified using the |
Flow-based Match
Traffic Flow |
Description |
|---|---|
Towards |
Matches the specified interface type, i.e. Secure, DMZ or Internet. |
Through |
|
DMZ |
Matches traffic from the Internet to the DMZ; the in- and out-interfaces are already defined and there are no other special matching criteria. |
Limit Match
There are many different types of special matches. An important special
match is the limit match.
The limit match restricts the number of matches to reduce risks
associated with Denial Of Service (DoS) attacks. The purpose of DoS
attacks is to cripple network services by flooding them with irrelevant
traffic.
The limit match has two rules, limit and limit burst. limit
determines the number of allowed matches per second, and limit burst
determines the data packets which may be accepted above the set limit.
Packets that are accepted after the limit has been exceeded are
counted cumulatively and not per second. An allowed packet which causes
the limit burst threshold to be exceeded, is dropped.
AXS Guard automatically applies an unmodifiable burst value of twice
the limit value. For example, if the limit is set to 1 packet per
second, the limit burst value is automatically set to 2 packets.
Target Actions
A target action specifies the action to perform on matched network traffic. Possible target actions are listed and explained in the table below. Actions are color-coded, allowing system administrators to quickly visualize whether traffic was blocked or accepted.
| Target | Description |
|---|---|
Accept |
The packet is accepted and may continue its route. Accepted network traffic is not logged by default. To log accepted traffic, the |
Drop |
Prohibits a packet from passing. Sends no response to the sending host. The packet is discarded. Logging is enabled by default. |
Reject |
Prohibits a packet from passing, but also notifies the sending host. Logging is enabled by default. By rejecting rather than dropping unwanted packets, TCP aborts the connection and the sending application immediately gets a notification that the connection has failed, which is a security risk. The less connection information is provided to potential attackers, the more secure. Use security through obscurity. Use the reject option for troubleshooting and testing only. |
Log Only |
This target allows administrators to configure firewall rules that log matching packets without taking any action, such as ACCEPT, DROP or REJECT. It is designed to enhance network monitoring and troubleshooting capabilities. Administrators can gain insights into packet flows by observing logged data without directly impacting the network traffic. This feature facilitates effective rule set development, security auditing, and streamlined troubleshooting processes. |
Zone Restrictions
Creating firewall rules involves specifying where traffic is coming from and where it's going to. To maintain your network's security, AXS Guard places strict limitations on certain interface combinations (zone combinations) within firewall rules. These limitations exist because some combinations are inherently dangerous and could severely compromise your network's security and integrity.
For example, AXS Guard specifically disallows rules that would allow traffic directly from the Internet (INT) to your local area network (LAN). To manage traffic from the Internet to your DMZ, you should use dedicated DMZ filter rules.
What happens if you try to configure a prohibited combination?
If you attempt to create a rule with a dangerous or prohibited interface combination, AXS Guard will generate an error message and prevent the rule from being created. In cases where the interface combination can't be validated during configuration (e.g., if no incoming interface is selected), AXS Guard will automatically drop packets that match these invalid combinations.
| FROM TO | LAN | Internet | DMZ |
|---|---|---|---|
| LAN | Accept | Accept | Accept |
| Internet | Drop | Drop | Drop (See DMZ Filter Policies) |
| DMZ | Drop | Accept | Accept |
Firewall Policies
Naming Conventions
| Name | Description |
|---|---|
stat- |
Static policy name prefix. |
stat-XXX |
|
Predefined Policies
Static Policies
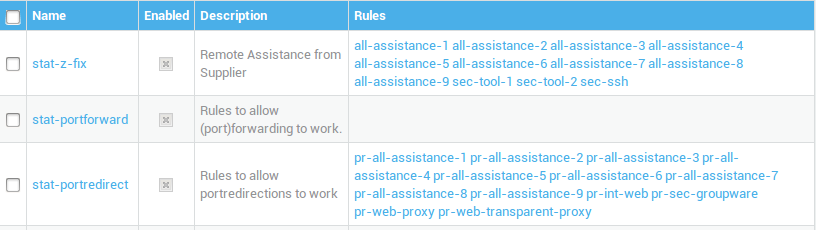
Factory default static policies are preconfigured to support essential functionalities, such as remote support and ICMP traffic. We recommend against disabling these policies.
Static policies operate independently of user authentication. They apply to all users, computers, servers, printers, and other devices that are connected to the AXS Guard network. Rules added to a static policy are activated instantly, requiring no authentication.
-
stat-portredirect: This policy cannot be modified and contains automatically added port redirection rules (NAT). -
stat-z-fix: This policy cannot be modified.
| Rule | Description |
|---|---|
all-assistance1 to 5 |
These Rules enable remote assistance from the supplier, accepting packets received on an AXS Guard Internet interface via ports 22 (SSH), 3128 (AXS Guard proxy) and 82 (AXS Guard administrator tool). |
sec-tool 1 and 2 |
These Rules allow the use of the AXS Guard administrator Tool from the secure LAN and only accepts packets destined to ports 82 and 83 on a secure AXS Guard interface. |
sec-ssh |
This Rule allows the use of the Secure Shell (SSH) from the secure LAN and only accepts packets for port 22 (SSH) on a secure AXS Guard interface. |
stat-int: This policy grants access to services that are permanently available via an AXS Guard Internet interface, for example:
| Rule | Description |
|---|---|
int-smtp |
This Rule allows the AXS Guard mail system to function on the Internet, only accepting TCP packets which use port 25 (SMTP) and are received by an AXS Guard Internet interface. |
int-ident |
This Rule enables the Identification Protocol on an AXS Guard Internet interface. The Identification Protocol provides the possibility to determine the identity of a user of a particular TCP connection. Provided with a TCP port number pair, it returns a character string identifying the owner of that connection on the server’s system. The Rule only accepts packets for TCP port 113 on an AXS Guard Internet interface. |
int-icmp |
This Rule allows ICMP packets to enter the AXS Guard system on an Internet interface, making it possible to use the ping or traceroute command from the Internet towards the AXS Guard. This can be useful for troubleshooting purposes. This Rule only accepts packets which use the ICMP protocol and are received by an AXS Guard Internet interface. |
stat-sec: This policy grants access to services which listen on a secure AXS Guard interface (LAN), for example:
| Rule | Description |
|---|---|
sec-ntp |
Enables automatic updating of the AXS Guard clock from the secure LAN. Only accepts packets which use TCP and UDP port 123 (NTP) and are received by a secure interface on the AXS Guard. |
sec-dns |
Allows the AXS Guard DNS system to work on the secure LAN. Only accepts packets which use UDP port 53 (DNS) and are received by an AXS Guard secure interface. |
sec-proxy |
Allows the AXS Guard proxy system and intranet to work on the secure LAN side. Only accepts packets which use TCP port 3128 (proxy server) and are received by a secure interface on the AXS Guard. This rule also allows ICMP packets coming from a secure LAN interface to enter the AXS Guard. (i.e. ping or traceroute) |
sec-icmp |
Allows ICMP packets from secure interfaces to be received by the AXS Guard (i.e. ping, traceroute). |
sec-dhcp |
Allows the AXS Guard to distribute IP addresses to hosts in the secure LAN. Only accepts packets which use TCP port 67 (DHCP) and are received by a secure interface on the AXS Guard. |
sec-auth |
Allows authentication with the AXS Guard from hosts in the secure LAN. |
stat-dmz: This policy grants access to services which are available via an AXS Guard DMZ interface.
| Rule | Description |
|---|---|
dmz-ident |
Allows the Identification Protocol to work on an AXS Guard DMZ interface. Only accepts packets which use TCP port 113 (ident). |
dmz-icmp |
Allows ICMP packets to enter the AXS Guard from the DMZ. (i.e. ping or traceroute) Only accepts packets which use the ICMP protocol and are received on an AXS Guard DMZ interface. |
dmz-smtp |
Allows the transmission of e-mail coming from the DMZ zone. Only accepts packets which use TCP port 25 (SMTP) and are received by an AXS Guard DMZ interface. |
-
stat-portforward: This policy cannot be modified and contains automatically added NAT rules. -
stat-dmzfilter: This policy contains all DMZ filtering rules. It only has one rule by default,dmzf_drop_all, which drops all traffic. Rules to allow specific network traffic from the Internet to the DMZ should be added to the policy and placed before the defaultdmzf_drop_allrule. -
stat-forward: The firewall rules in this policy are not actual port forwarding rules; they're automatically added to allow the firewall to accept incoming connections on the ports you intend to forward. Administrators can disable port forwarding rules by navigating to Network > NAT > Port forwarding.
Key Considerations for Static Policies
Rules cannot be added to predefined system policies, although there are some exceptions.
- Rules can be added to the
stat-int,stat-sec,stat-dmzandstat-dmz-filterpolicies. Adding rules here simplifies customer support and troubleshooting. - New rules for these policies should have the same input interface.
- For through rules, a new static policy must be created, using the appropriate
fwdrules.
Dynamic Policies
Dynamic policies operate at the user, group, or computer level. There are two types, explained below:
User & Group Policies
User and group policies are enforced once a user has successfully authenticated. They exclusively affect the authenticated user. A significant advantage is that if you add a rule to a dynamic policy while a user is currently logged in, it will take effect immediately. There's no need for the user to log off and back in for the new rule to take effect.
Computer Policies
Computer policies should only be used for servers and machines with restricted administrator access and static IP addresses. For workstations, always enforce user authentication. Unlike user and group policies, a computer policy is enforced as soon as the machine is online. Computer policies are tied to the computer's assigned IP address.
Key Considerations for Dynamic Policies
The dynamic policies no-restrictions, int-no-restrictions, and dmz-no-restrictions, are designed solely for testing and troubleshooting purposes; they should never be used in a production environment. Using these policies will eliminate firewall security, leaving your system vulnerable.
Ordering Rules in a Policy
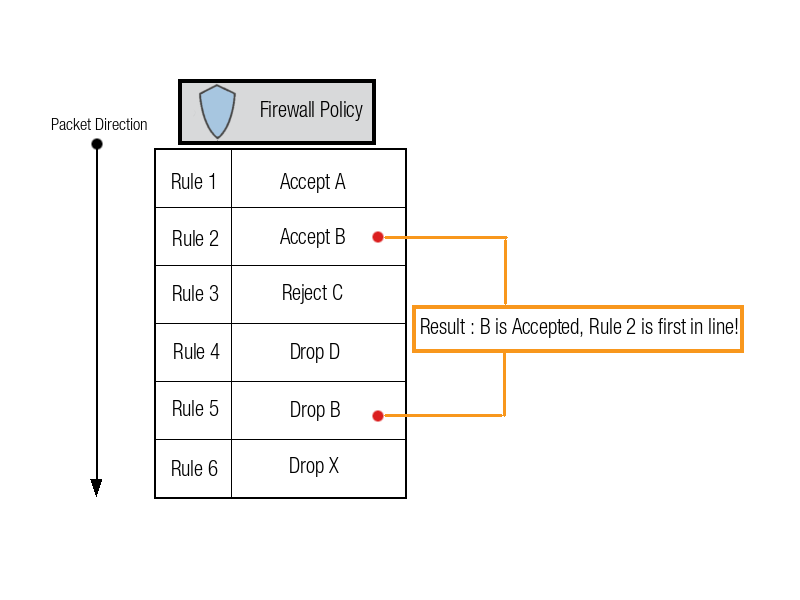
The Importance of Ordering Rules in a Policy
- The order of rules in a policy is critical because the first rule that matches traffic is always applied, regardless of any subsequent rules.
- Advanced rules always take precedence over all other rules. If used incorrectly, they can lead to an insecure network environment.
- You cannot change the order of rules in factory default policies.
AXS Guard firewall policies use best match and first match rule evaluation methods. This means the order of rules within a policy is critical because the firewall processes them sequentially from top to bottom and applies the first rule that matches the traffic.
If a broader rule appears before a more specific one, it can unintentionally capture and act on traffic that should have matched the specific rule, potentially blocking or allowing traffic inappropriately. Proper rule ordering ensures that specific exceptions are evaluated before general rules, maintaining both security and functionality.
Based on the example below: if the intention is to drop traffic B, rule 5 must be placed before rule 2. Another option is to remove rule 2 from the firewall policy.
Reordering Static Policies
The order of static policies is critical because the firewall evaluates them sequentially from top to bottom, stopping at the first match, whether to allow or block the traffic.
As a result, a broad policy placed higher in the list can unintentionally permit traffic that a more specific block policy further down was intended to deny.
To prevent this behavior, it is best practice to place specific allow or deny policies (to match particular types of traffic, sources or destinations) above more general ones. This ensures that specific matches are always enforced first.
GeoIP Filtering
About
GeoIP filtering, also known as geo-blocking, is a technology that restricts internet traffic based on geographic location. This feature enables you to control access to your network or applications depending on where users are located.
It is particularly effective in blocking malicious traffic from specific regions, including both manual and automated cyberattacks that often overwhelm system logs.
GeoIP filtering works by using dedicated IP address lists, which are automatically updated via the Cyber Resilience Portal. These lists are not editable but can be enabled or disabled as needed. In firewall and network security logs, GeoIP filters are identified by a predef-geo prefix.
By implementing GeoIP filters, organizations can significantly reduce exposure to cyberattacks, spam, ransomware, and other threats simply by denying traffic from high-risk regions. For optimal protection, it is recommended to only allow traffic to and from countries where your organization actively does business.
Important
This feature must be activated before use and requires a comfort or premium threat protection license. See the section about licensing for additional information.
Levels of Operation
Global Configuration
Enabling a GeoIP filter means it will affect all AXS Guard users, groups and computers that are connected to the appliance (global configuration). Whitelists allow you to unblock specific IP addresses included in GeoIP filters, thereby overriding the global configuration.
Overriding the global configuration can be useful when legitimate services, partners, or remote employees need access from countries that are otherwise blocked by a GeoIP filter. For example, if your organization restricts all traffic from outside a specific region but collaborates with a trusted vendor in that region, their IP address can whitelisted to ensure uninterrupted communication without compromising the overall security.
Granular Configuration
GeoIP filters can also be applied at the user, group, and computer levels. However, doing so requires administrators to create specific firewall rules that define the appropriate geographic sources and destinations. These rules must then be assigned to a policy, and the policy must be subsequently assigned to the relevant user, group, or computer.
For example, by applying GeoIP filters granularly on the LAN, administrators can enforce stricter geographic restrictions on critical machines without impacting general network users. This approach ensures enhanced security for key devices while maintaining normal operations for the rest of the office network.
Traffic Matching
Global GeoIP filters are preconfigured to block incoming, outgoing and forwarded traffic.
Lists
Block Lists
An IP block list (or blacklist) is a list of IP addresses and IP address ranges that you don't want anywhere near your systems. These are addresses that have been flagged for performing specific malicious activities like spamming, attempting mass exploitation or targeted cyberattacks, brute-forcing, and more. The firewall will drop all traffic to and from an IP address found on a block list. There are two types of block lists:
- Predefined block lists (
predef-prefix): These are automatically maintained lists which cannot be edited; only enabled or disabled.
Updates are handled by the system. - Custom block lists: These are created and managed manually by system administrators.
Block lists can be overridden by whitelists, to explicitly allow traffic.
Whitelists
The function of whitelists is to override entries in block lists or GeoIP filters. Any IP address or range on a whitelist will always be allowed, regardless of whether it also appears on a block list. This ensures that critical connections are never inadvertently blocked by broader blocking rules.
Example
Assume that a predefined block list blocks IP address 8.8.8.8. You can overrule this by creating a whitelist with the same IP address.
Levels of Operation
Block lists and whitelists apply to all AXS Guard users, groups and computers and are part of a system-wide configuration. User, group and computer-level block lists are not supported.
Whitelists cannot be used to overrule dynamic firewall policies assigned at the user, group or computer level. They only allow you to overrule IP address entries in block lists and GeoIP filters.
Traffic Matching
Lists can be configured to match on incoming, outgoing and forwarded connections.
System-Wide Firewall Checks
Denial Of Service Checks
A Denial-of-service attack (DoS attack) or a distributed denial-of-service attack (DDoS attack) is an attempt to make a computer resource unavailable to its intended users.
Although the means, motives, and targets of a DoS attack may vary, they generally consist of the concerted, malevolent efforts of individuals. Their goal is to prevent an Internet service from functioning, temporarily or indefinitely.
When the DoS check is enabled, the AXS Guard firewall defends your network against this type of attack. Enabling this option is highly recommended when running web servers or any other kind of service which is publicly available.
Malformed Packet Filtering
A network packet containing a bad checksum or other invalid values is considered malformed or invalid. Hackers sometimes craft such packets to gain unauthorized access or to trigger unwanted network communication behavior. Packets can also sustain damage due to a hardware failure along their route. The AXS Guard firewall, leveraging its underlying netfilter and iptables capabilities, automatically prevents such packets from entering your network.
Advanced Packet Validation
The AXS Guard firewall includes special checks that detect and manage problematic packets at a global level. For instance, it identifies packets from a TCP connection that didn't establish correctly via the standard 3-way handshake, or packets that appear malformed or unusual (e.g., containing bad headers or checksums).
AXS Guard also actively prevents asymmetric routing. If asymmetric routing is detected, you'll notice a Bad 1 new not syn entry in the firewall logs, indicating that a return packet arrived without a corresponding outgoing connection initiated by the firewall.
Firewall Configuration
Overview
This chapter details the process of creating firewall rules, organizing them into policies, and subsequently assigning these policies to specific users, groups, computers, or applying them system-wide. We'll also cover the configuration of other essential security settings, such as DoS (Denial-of-Service) protection, to further harden your network's defenses.
Denial of Service Checks
- Log in to your AXS Guard firewall.
- Go to Firewall > Limits.
-
Configure the options as explained in the table below and update your configuration.

| Options | Description |
|---|---|
| Enable Firewall Denial Of Service checks | Enable to protect your network against Denial of Service (DoS) attacks. When the DoS threshold is exceeded, excess packets will be dropped. AXS Guard monitors and blocks the following packets: ICMP Echo Requests and TCP packets with the RST flag set. |
| DoS threshold | The threshold at which the DoS protection activates is 25 packets per second, which is the system's default configuration. A BAD3: DOS entry in the firewall logs indicate that the DoS protection system has identified and dropped a packet associated with a detected DoS attack. |
| Drop invalid packets | This toggles the dropping of invalid packets, marked by BAD2 in the logs. A packet can be invalid for multiple reasons, mostly because there is a genuine network anomaly. This includes:- Asymmetric routing or reflection attacks (SYN, ACK flags are set) - Null scans, a stealth scan technique (no flags set) - Xmas scans, a stealth scan technique (FIN, PSH, URG flags are set) - Sequence jumps, possible session hijacking when larger jumps than expected occur - Malformed packets, when the checksum or headers are incorrect |
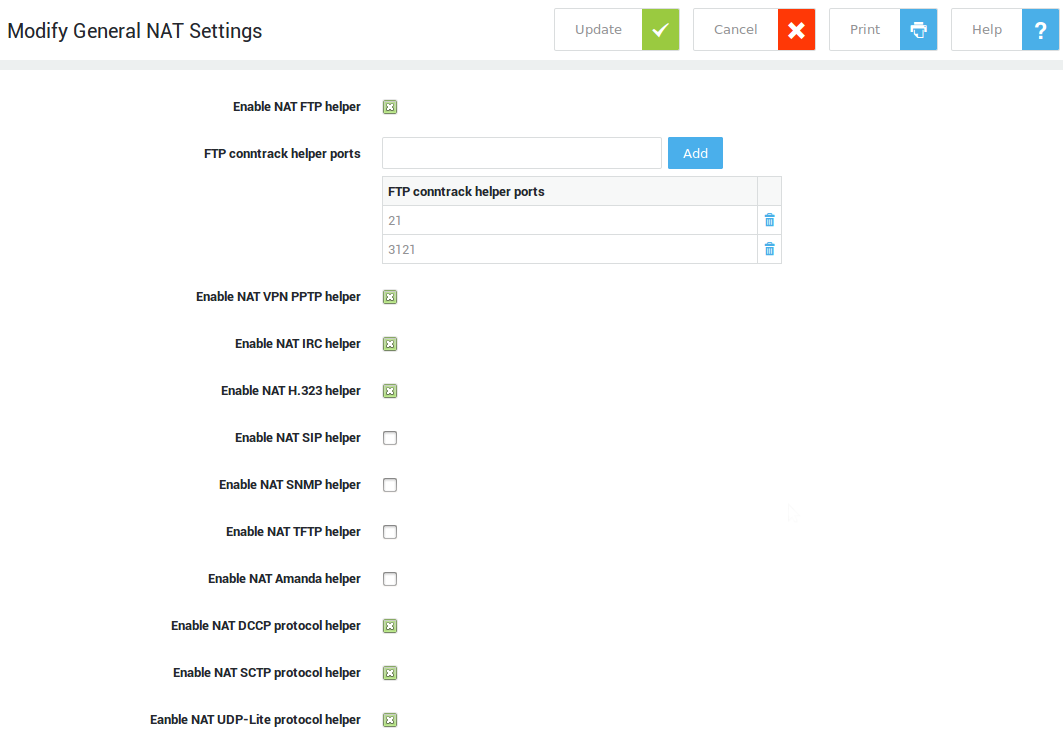
NAT Helpers
-
Navigate to Network > NAT > NAT Helpers.
-
Enable or disable the NAT helpers that are required in your network.
-
Update your configuration.
Predefined Rules & Policies
Introduction
The AXS Guard firewall comes with a set of factory-predefined rules and policies that you can use right out of the box. These predefined rules and policies cannot be edited directly; instead, you can use them as a template for your own custom configurations. This is done using the Edit as New function, which allows you to duplicate a predefined rule or policy and then modify the copy. You can easily create other custom rules and policies from scratch using the AXS Guard's web-based administrator tool and the Cyber Resilience Portal.
Accessing Rules
-
Log in to AXS Guard and navigate to Firewall > Rules.
-
Click on Towards / Through / DMZ Filter.
-
Click on the name of a rule to view its configuration details.

Accessing Policies
To view policies, simply log in to AXS Guard and navigate to Firewall > Policies. Here, you can click on Static to see all static policies, or Dynamic to view dynamic policies. Once you've selected a category, click on the name of any policy to inspect the rules it contains.
Assigning Policies
User Level
In this example, we explain how to assign a policy to a user. The policy will be enforced after successful authentication (SSO).
- Navigate to Users & Groups > Users.
- Click on the appropriate username.
- Select the Firewall tab.
- Select the appropriate firewall policy mode:
- Add to group firewall policies
- Overrule group firewall policies
-
Click on add firewall policy.
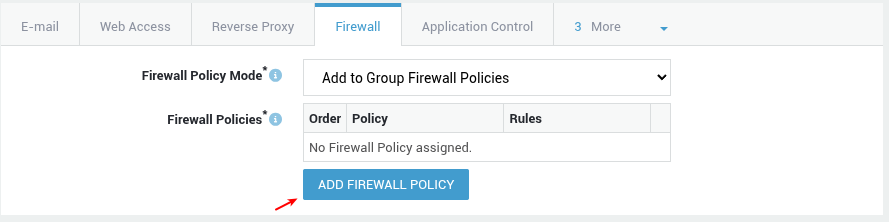
-
In the popup window, click on the name of a dynamic policy to assign it.
- Update your configuration once all policies have been assigned.
Group Level
In this example, we explain how to assign a policy to a group. The policy will be enforced after successful authentication (SSO).
- Navigate to Users & Groups > Groups.
- Click on the appropriate group name.
- Select the Firewall tab.
-
Click on add firewall policy.
-
In the popup window, click on the name of a dynamic policy to assign it.
- Update your configuration once all policies have been assigned.
Computer Level
In this example, we explain how to assign a policy to a computer. The policy will be enforced whenever the computer is online. Also see our recommendations regarding computer policies.
- Navigate to Computers.
- Select the Firewall Access Control tab.
-
Click on add firewall policy.
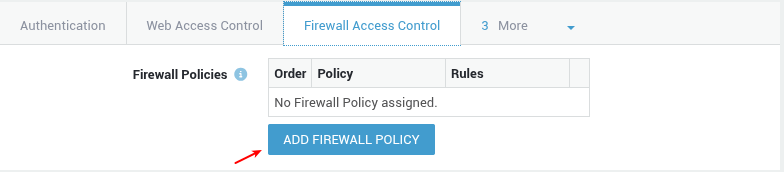
-
In the popup window, click on the name of a dynamic policy to assign it.
- Update your configuration once all policies have been assigned.
System Level
In this example, we explain how to enable a system-wide policy. System-wide security applies to all users and devices that are connected to the LAN. Always enforce the strictest security at this level. Also see our recommendations regarding system-wide policies.
- Navigate to Firewall > Policies > Static.
-
Enable the appropriate static policy.

Custom Rules & Policies
Introduction
This section explains how to create and activate a custom firewall policy. The process involves three steps: first, defining your rules — you can either create new ones or include predefined rules into your custom policy. Next, you'll need to assign these rules to a policy. Finally, you must assign the policy to a specific user, group, computer, or apply it to the entire system.
Creating Rules
Towards, Through & DMZ
- Log in to your AXS Guard appliance.
- Go to Firewall > Rules > Towards / Through / DMZ Filter.
- Click on Add New.
- Configure the rule settings and options as explained in the table below.
-
Save the rule. Once the rule is saved, it can be assigned to a policy.
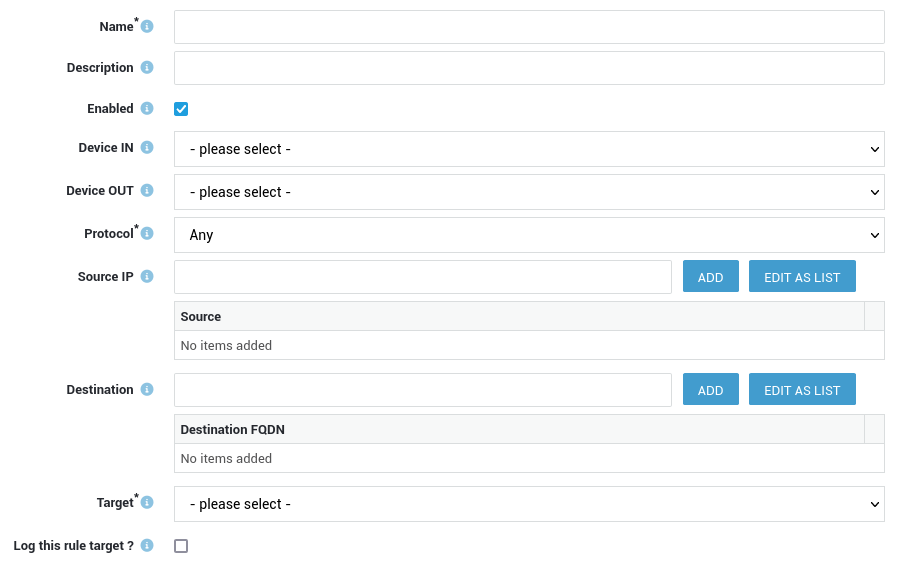
| Option | Description |
|---|---|
Name |
The name of the new firewall rule, e.g. |
Description |
An optional description for the rule. |
Last Updated |
Some rules are automatically updated via the Cyber Resilience Portal, e.g. rules related to Microsoft services. This field indicates when a rule was last updated via the Cyber Resilience Portal. |
Enabled |
Check to enable the rule. Uncheck to disable the rule. |
Device In |
Select the device(s) where matching data enters. Leave open to match any device. |
Device Out |
Select the device(s) where matching data exits. Leave open to match any device. |
Protocol |
Select the protocol to be matched. With TCP and UDP, you can specify source and destination ports. |
Source |
Valid values are:
If a subdomain is resolved by the AXS Guard appliance, its IP address will also be added to the rule. E.g. axsguard.com will match:
|
Source Port |
Enter the source ports to be matched by the rule. You can specify individual ports (e.g. |
Source List |
Choose the appropriate source lists containing geographic identifiers to define which regions should be allowed or blocked by this firewall rule. |
Destination |
Enter a destination FQDN, e.g. FQDN rules are applicable to both the main domain and its subdomains. This means that you can create a single rule to encompass traffic related to a domain and all of its subdomains. For example, a rule for If a subdomain is resolved by the AXS Guard appliance, its IP address will also be added to the rule. E.g. axsguard.com will match:
|
Destination List |
Choose the appropriate destination lists containing geographic identifiers to define which regions should be allowed or blocked by this firewall rule. |
Destination Port |
Enter the destination ports to be matched by the rule. A port range can be specified using the |
Target |
Select the appropriate target for matching traffic. When selecting If enabled, allowed traffic causing the limit burst threshold to be exceeded will be dropped to prevent attempted DoS attacks. |
Log this Rule Target |
If enabled, matching traffic is logged. |
Limit this Rule Target |
The limit match restricts the number of matches to reduce risks associated with Denial Of Service (DoS) attacks. The purpose of DoS attacks is to cripple network services by flooding them with irrelevant traffic. The limit match has two rules, limit and limit burst. limit determines the number of allowed matches per second, and limit burst determines the data packets which may be accepted above the set limit. Packets that are accepted after the limit has been exceeded are counted cumulatively and not per second. An allowed packet which causes the limit burst threshold to be exceeded, is dropped. Administrators can configure the limit rate per second, which is set to 5 by default. |
Limit rate per second |
This field only appears if you selected to limit the number of target actions (limit this rule target). Enter the number of target actions allowed per second. 5 is the system default configuration. |
Used in |
Shows the policies in which the firewall rule is included, if any. |
The rule is now created, but not enforced. To enforce the rule, you must assign it to a policy and then assign the policy to a user, group, computer (dynamic policies) or the system (static policies).
Important
When creating a firewall rule, you can select different values for the Device In and Device Out fields.
LANdesignates any Ethernet interface that is set to thesecuretype.SECdesignates all secure interfaces, including VPN interfaces, e.g. LAN, IPsec and PAX.
Advanced Rules
Please see our recommendations about the use of advanced firewall rules. Advanced rules are activated instantly; you cannot assign them to a policy. Their behavior mirrors that of static policies.
- Log in to your AXS Guard appliance.
- Go to Firewall > Rules > Advanced.
-
Enter your advanced rule(s) and save your configuration. Use a separate line for each rule.
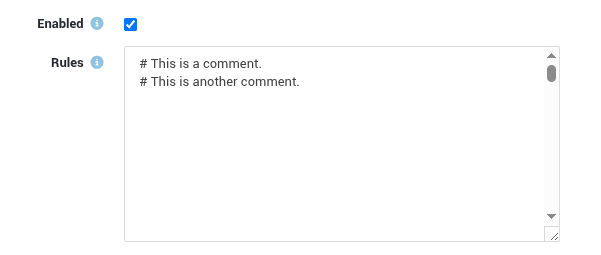
Tip
To add notes or temporarily disable rules, simply preface any line with a # to comment it out.
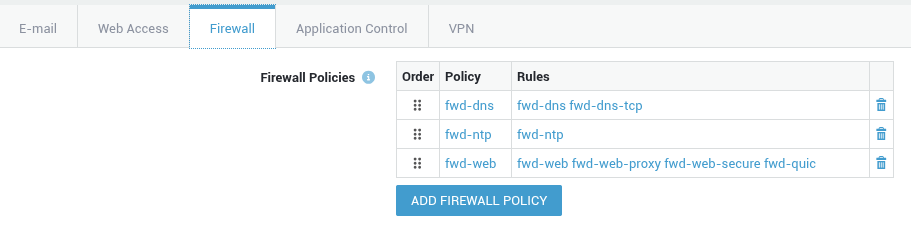
Creating Policies
Dynamic Policies
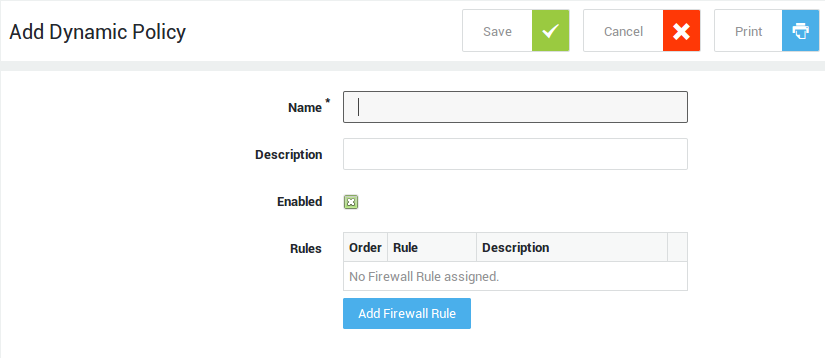
-
Navigate to Firewall > Policies > Dynamic.
-
Click on Add new.
-
Configure the options and settings as explained in the table below.
-
Click on Add Firewall Rule to search and add firewall rules.
-
Save your policy. Once the dynamic policy is created, it must be assigned to a user, group or a computer in order to be enforced.
| Options | Description |
|---|---|
Name |
Enter a name for the firewall policy. |
Description |
Provide a description for the firewall policy (optional). |
Enabled |
Check to enable the policy. Uncheck to disable the policy. |
Add Firewall Rule |
Click to select the firewall rule(s) to be added to the policy. |
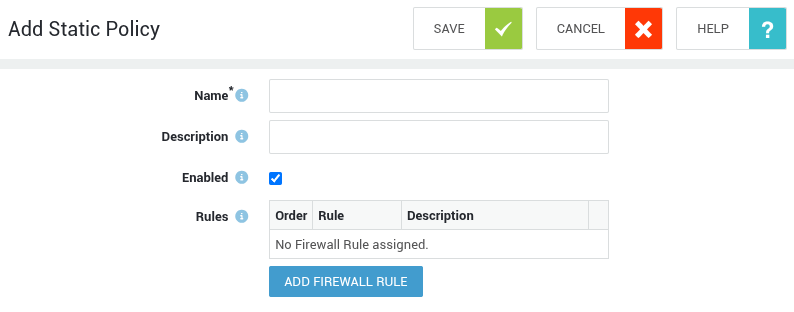
Static Policies
-
Navigate to Firewall > Policies > Static.
-
Click on Add new.
-
Configure the options and settings as explained in the table below.
-
Click on Add Firewall Rule to search and add firewall rules.
-
Save your policy. Once the static policy is created and enabled, it is enforced.
| Options | Description |
|---|---|
Name |
Enter a name for the firewall policy. |
Description |
Provide a description for the firewall policy (optional). |
Enabled |
Check to enable the policy. Uncheck to disable the policy. |
Add Firewall Rule |
Click to select the firewall rule(s) to be added to the policy. |
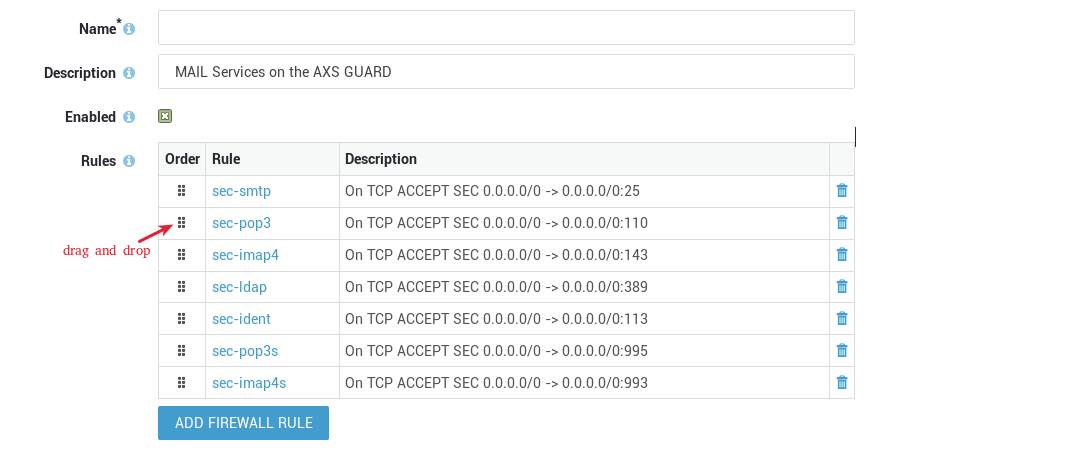
Reordering Policy Rules
Establishing a clear rule hierarchy within firewall policies is essential for effective traffic control. See our section about the importance of ordering rules in a policy for additional information. Please note that you cannot change the rule order in certain predefined firewall policies.
- Log in to your AXS Guard appliance.
- Go to Firewall > Policies > Static / Dynamic.
- Select the appropriate policy.
- Drag and drop the rules until you reach the desired order.
-
Update your configuration.
Assigning Policies
See the section about policy assignment.
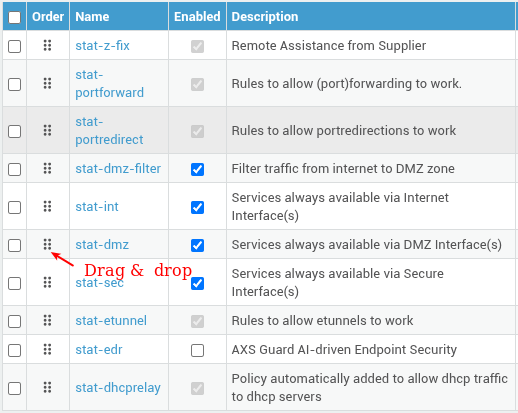
Reordering Static Policies
Establishing a clear policy hierarchy is essential for effective traffic control. See our section about the importance of reordering static policies for additional information.
- Log in to your AXS Guard appliance.
- Go to Firewall > Policies > Static.
-
Drag and drop the policies until you reach the desired order.
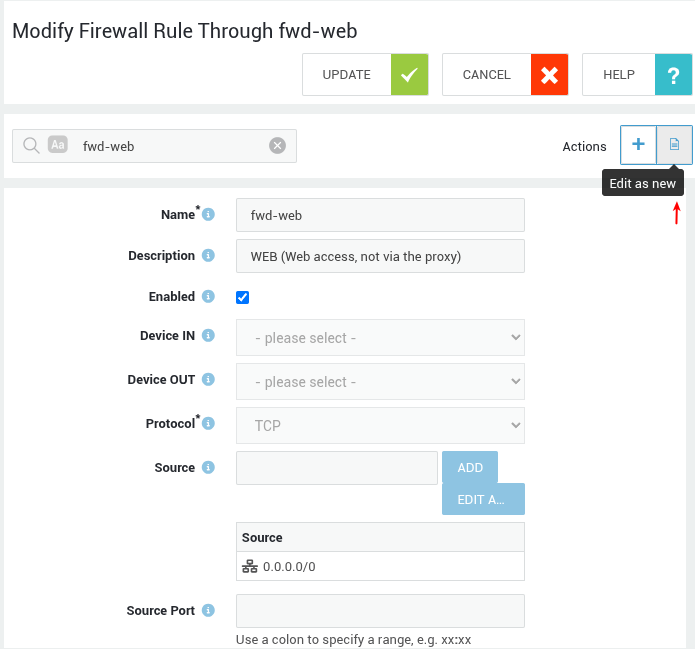
Edit as New
You can use predefined rules and policies as a template for your own modifications with the Edit as New button. Instead of building a new rule or policy from scratch, which can be a complex and time-consuming process, you can quickly clone an existing one. This drastically reduces the effort required to create similar or slightly modified configurations.
Rules
- Log in to your AXS Guard appliance.
- Go to Firewall > Rules > Towards / Through / DMZ Filter.
- Select the appropriate rule by clicking on its name.
- Click on the Edit as New button.
-
Modify the rule, then save your settings.
Policies
- Log in to your AXS Guard appliance.
- Go to Firewall > Policies > Static / Dynamic.
- Select the appropriate policy by clicking on its name.
- Click on the Edit as New button.
-
Modify the policy, then save your settings.
Examples
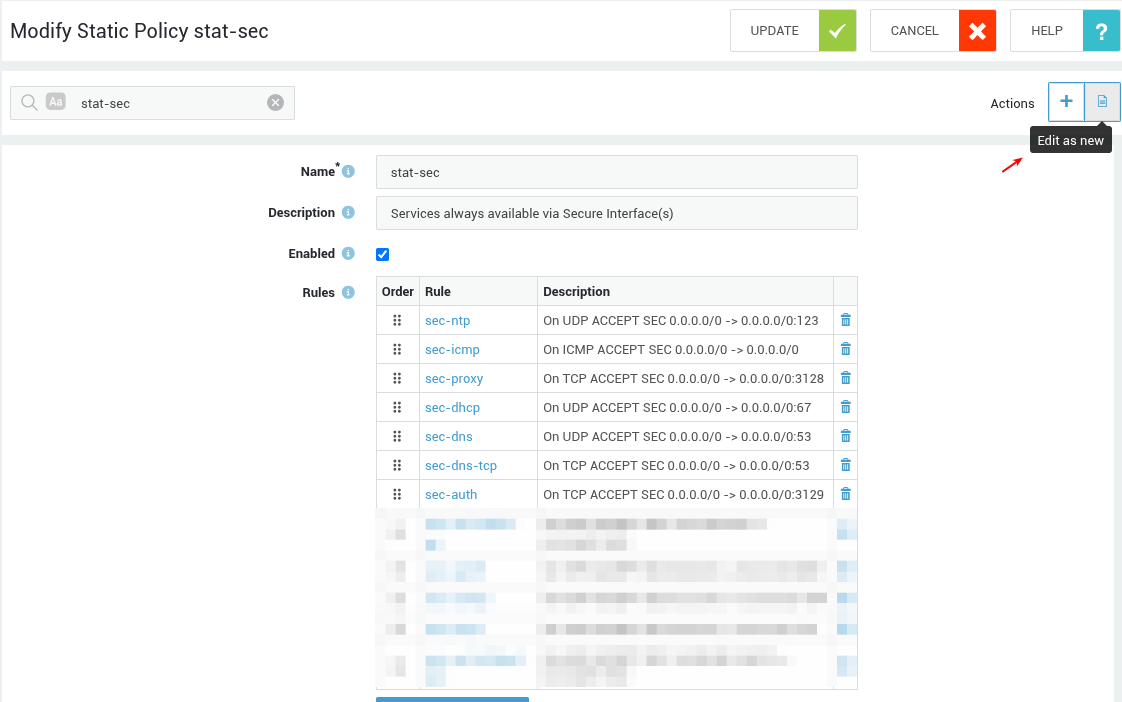
Secure LAN Services
This example outlines the procedure for adding a rule to a predefined, static policy (system level). The objective is to allow access from the secure LAN to a service running on AXS Guard (SMTP).
-
Log in to your AXS Guard appliance.
-
Navigate to Firewall > Policies > Static.
-
Enter
stat-secas a search string and press enter. -
Click on
stat-sec. -
Click on the Add Firewall Rule button.
-
Look for
sec-smtprule and click on it to add it to thestat-secpolicy. -
Update your configuration.
SMTP is now available for all users in the secure LAN.
DMZ Services
This example outlines the procedure for adding a rule to a predefined, static policy (system level). The objective is to enable access from the Internet to an HTTPS service running in the DMZ.
Important
Only use DMZ filter rules to allow traffic from the Internet to the DMZ.
-
Log in to your AXS Guard appliance.
-
Navigate to Firewall > Policies > Static.
-
Enter
dmzas a search string and press enter. -
Click on
stat-dmzf. -
Click on the Add Firewall Rule button.
-
Look for the
dmzf-swebrule and click on it to add it to thestat-dmzfpolicy. -
Update your configuration.
HTTPS services in the DMZ are now reachable from the Internet.
GeoIP Filtering
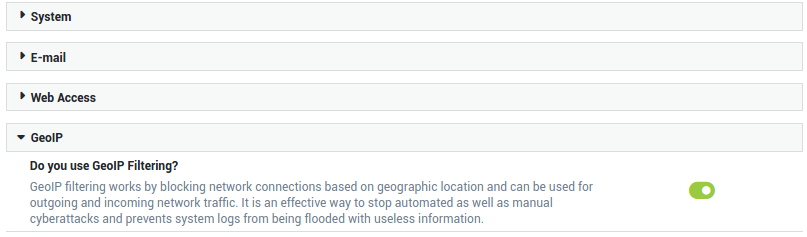
Feature Activation
Important
The GeoIP feature must be activated before use and requires a comfort or premium threat protection license.
- Log in to your AXS Guard appliance.
- Go to System > Feature Activation.
-
Enable GeoIP Filtering.
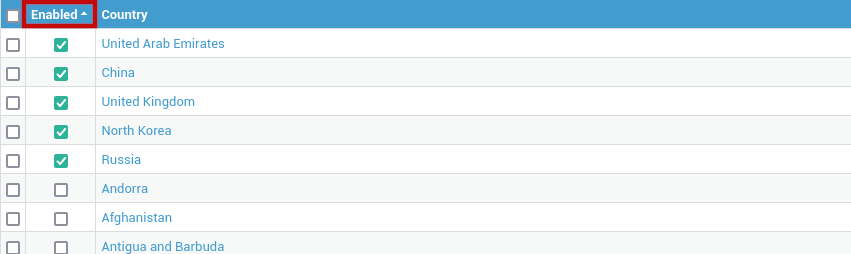
Global Configuration
-
Log in to your AXS Guard appliance.
-
Go to GeoIP > Filters.
-
Select the countries and regions to be blocked.
Important
- Filters that are enabled here are applied globally. This means that they are applied to the entire system, affecting all users.
- Whitelists allow you to override IP entries in GeoIP filters across the entire system.
- Use source and destination lists in firewall rules to override the global configuration. This enables users to access specific services and network resources.
- You can sort enabled GeoIP filters by clicking on the
Enabledheader.
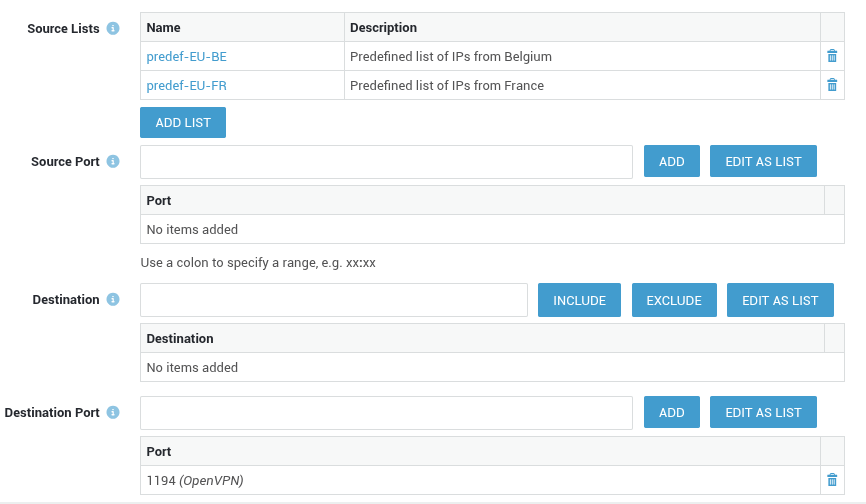
GeoIP Lists in the Firewall
GeoIP lists can be used as source and destination filters in firewall rules.
This enables administrators to create specific ACCEPT rules to override the global GeoIP configuration, giving organizations much finer control over access to particular AXS Guard services or specific network resources.
See the section on Custom Rules & Policies for steps to configure source and destination lists in firewall rules.
Configuring IP Lists
Block Lists
-
Go to Firewall > Block lists.
-
Click on the
+button to create a new list (or click on the name of an existing list and then on Edit as new). -
Configure the list options and settings as explained in the table below.
-
Update your configuration.

Parameter |
Description |
||||||
|---|---|---|---|---|---|---|---|
Name |
Enter a name for the block list. Predefined block lists have a |
||||||
Description |
Enter a description explaining the purpose of the block list (optional). |
||||||
Enabled |
Check to enable the block list. Uncheck to disable it. |
||||||
Type |
Select the appropriate type from the drop-down list:
|
||||||
Apply to incoming connections |
Applies to traffic originating from the specified IP address(es) towards the appliance. |
||||||
Apply to outgoing connections |
Applies to traffic leaving the appliance and destined for the specified IP address(es). |
||||||
Apply to forwarded connections |
Applies to traffic going through the appliance, i.e. from one network zone to another. |
||||||
Log traffic. |
Enable this option to log matching traffic under Firewall > Logs. When this option is enabled for a whitelist, matching traffic will be logged as |
||||||
IP/Domain List |
Add IP addresses, networks or domains that should be blocked (blacklist) or allowed (whitelist).
Valid values are:
If a subdomain is resolved by the AXS Guard appliance, the resulting IP address is also added to the rule. For example, axsguard.com will match:
|
Whitelists
To configure whitelists, follow the same steps as for block lists, but select whitelist as the type.
Firewall Tools
About
In large networks, the number of firewall rules can grow extensively. Use the firewall search tool to quickly locate specific rules.
Using Search Filters
-
Go to Firewall > Tools > Search.
-
Specify the filter properties as explained in the table below.
-
Click on Search.
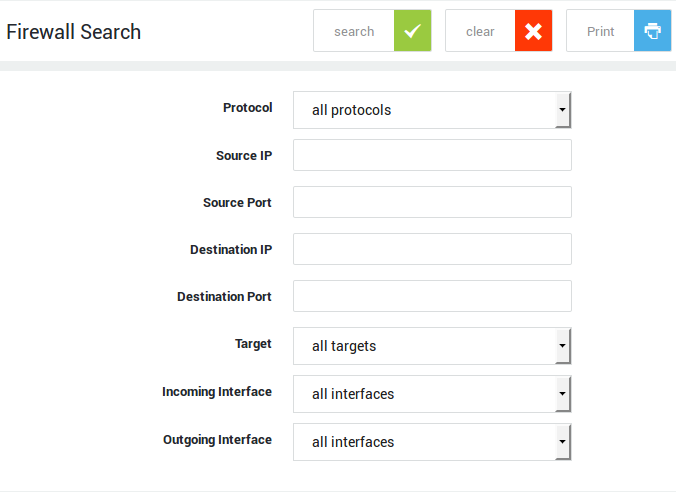
| Filter | Description |
|---|---|
Protocol |
The protocol to be matched by the query. |
Source IP |
The source IP to be matched by the query. Use the CIDR notation to specify an IP range. |
Source Port |
The source port to be matched by the query. |
Destination IP |
The destination IP to be matched by the query. Use the CIDR notation to specify an IP range. |
Destination Port |
The destination port to be matched by the query. |
Target |
Select the desired target from the drop-down list. |
Device IN |
The receiving device to be matched by the query. Select the appropriate device from the drop-down list. |
Device OUT |
The forwarding device to be matched by the query. Select the appropriate device from the drop-down list. |
Logging & Status
Firewall Log Example
Firewall logs record dropped or rejected packets. To prevent Denial of Service (DoS) attacks from overwhelming the system, AXS Guard implements a logging limit, meaning not every single dropped or rejected packet is recorded. Typical firewall log entries are shown below.
-
Log in to your AXS Guard appliance.
-
Go to Firewall > Logs.
-
Select the appropriate log date.
Example of a raw log
time     in     out    proto  len sip             spt   dip             dpt   flags                comment
00:00:02 eth4   eth1   TCP     64 195.211.11.19   3591  195.0.83.41     445   DF SYN                FORWARD DROP:
00:00:05 eth4          UDP     75 67.248.44.172   24874 194.78.97.254   51413                       INPUT DROP:
00:00:07 eth4   eth1   TCP     60 201.51.233.168  2593  195.0.83.91     445   DF SYN                FORWARD DROP:
00:00:11 eth4          TCP     60 91.183.93.188   58570 194.78.97.254   2525  DF SYN                INPUT DROP:
00:00:14 eth4   eth1   TCP     48 111.68.26.2     4710  195.0.83.123    445   DF SYN                FORWARD DROP:
00:00:17 eth0          UDP    116 10.32.64.150    17500 255.255.255.255 17500 DF                    INPUT DROP:
00:00:20 eth4   eth1   TCP     60 46.105.24.61    41373 195.0.83.11     80    DF SYN                FORWARD DROP:
00:00:23 eth4          TCP     52 186.108.65.41   61873 194.78.97.254   51413 DF SYN                INPUT DROP:
00:00:25 eth4   eth1   TCP     48 95.25.52.161    2957  195.0.83.105    445   DF SYN                FORWARD DROP:
Example of a parsed log
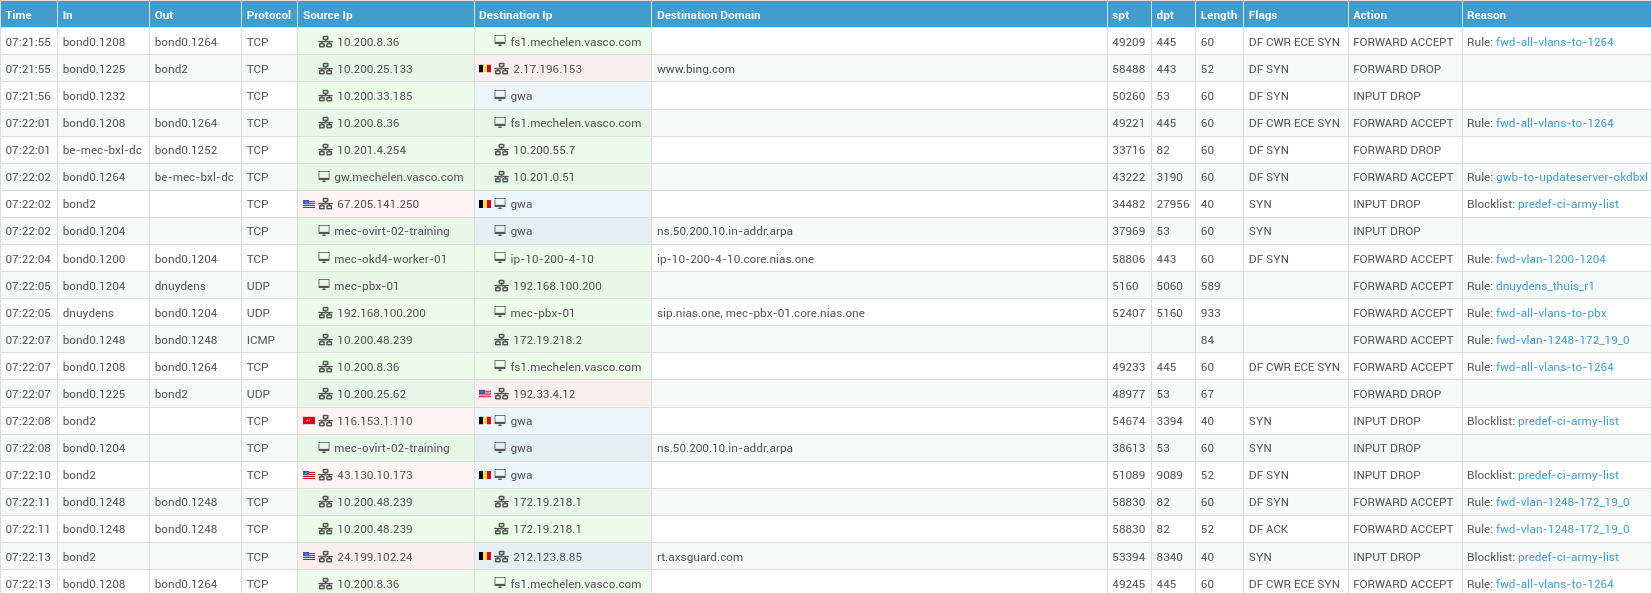
Important
Allowed traffic is not logged by default. To log allowed traffic, the log this rule target option must be enabled in the appropriate firewall rule. Administrators can also use the log only target for troubleshooting purposes.
Understanding Log Entries
| Field | Description |
|---|---|
time |
The time when the logged packet was dropped or rejected. |
in and out |
The interfaces on which a dropped or rejected packet was received and the interfaces via which a dropped or rejected packet was supposed to leave the AXS Guard network. |
protocol |
The protocol used by the dropped or rejected packet. |
Source IP address and Destination IP address |
The source and destination IP address of the dropped or rejected packet. If the source or destination IP address belongs to a locally configured LAN with DHCP enabled, the log will display hostnames instead of IP addresses. |
Destination Domain |
Shows the domain names associated with the IP addresses found in DNS responses. This makes it easier to identify traffic destinations that are being processed by the firewall. |
spt and dpt |
The source and destination port used by the dropped or rejected packet. |
flags |
The enabled flags of the dropped or rejected packet. For information about TCP and IP flags, see the appropriate online resources. |
length |
The size or length of the packet, measured in bytes. |
action |
The target action refers to the action that the firewall has taken when a network packet matched the conditions specified in a rule. The target action determines whether packets should be allowed, rejected, dropped or only logged. Actions are color-coded, allowing system administrators to quickly identify whether traffic was blocked or accepted.
Also see the table below for additional information on actions and reasons. |
reason |
Indicates why traffic was dropped or rejected and allows system administrators to easily pinpoint the matching rule or IP address list. Note that this requires the log this rule target option to be enabled in the firewall rule. Also see the table below for additional information on actions and reasons. |

| Actions & Reasons | Description |
|---|---|
INPUT DROP |
This message indicates that a packet was dropped in the INPUT chain of the firewall. |
INPUT REJECT |
This message indicates that a packet was rejected in the INPUT chain of the firewall and a notification was sent to the source of the packet. |
INPUT LOG |
This message indicates that a packet was logged in the INPUT chain of the firewall. |
FORWARD DROP |
This message indicates that a packet was dropped in the FORWARD chain of the firewall. |
FORWARD REJECT |
This message indicates that a packet was rejected in the FORWARD chain of the firewall and a notification was sent to the source of the packet. |
FORWARD LOG |
This message indicates that a packet was logged in the FORWARD chain of the firewall. |
FORWARD ACCEPT |
This message indicates that a packet was accepted in the FORWARD chain of the firewall. |
BLOCKLIST BYPASS |
This message indicates that logging has been enabled for a whitelist, and it signifies that the traffic has been successfully matched against this whitelist. |
BAD1: New not syn |
This messages indicates that a packet matched a rule in the _BAD_PKTS chain of the firewall, which checks for TCP packets with the NEW state and in which the SYN flag is not set. This match indicates a bad TCP connection, so the packet is dropped. |
BAD2: Unclean |
This message indicates that a packet matched a rule in the _BAD_PKTS chain of the firewall, which checks for unclean packets that seem malformed or unusual, i.e. bad packet headers. |
BAD3: DOS |
This message is an indication of an attempted denial of service (DoS) attack. See the section on Denial of Service checks. |
Network Security Logs
The network security logs compile information about traffic processed by the AXS Guard firewall, IPS, SecureDNS, GeoIP filtering, and application control system.
- Log in to your AXS Guard appliance.
- Go to System > Logs > Network Security.
-
Click on the desired log file to view its content.
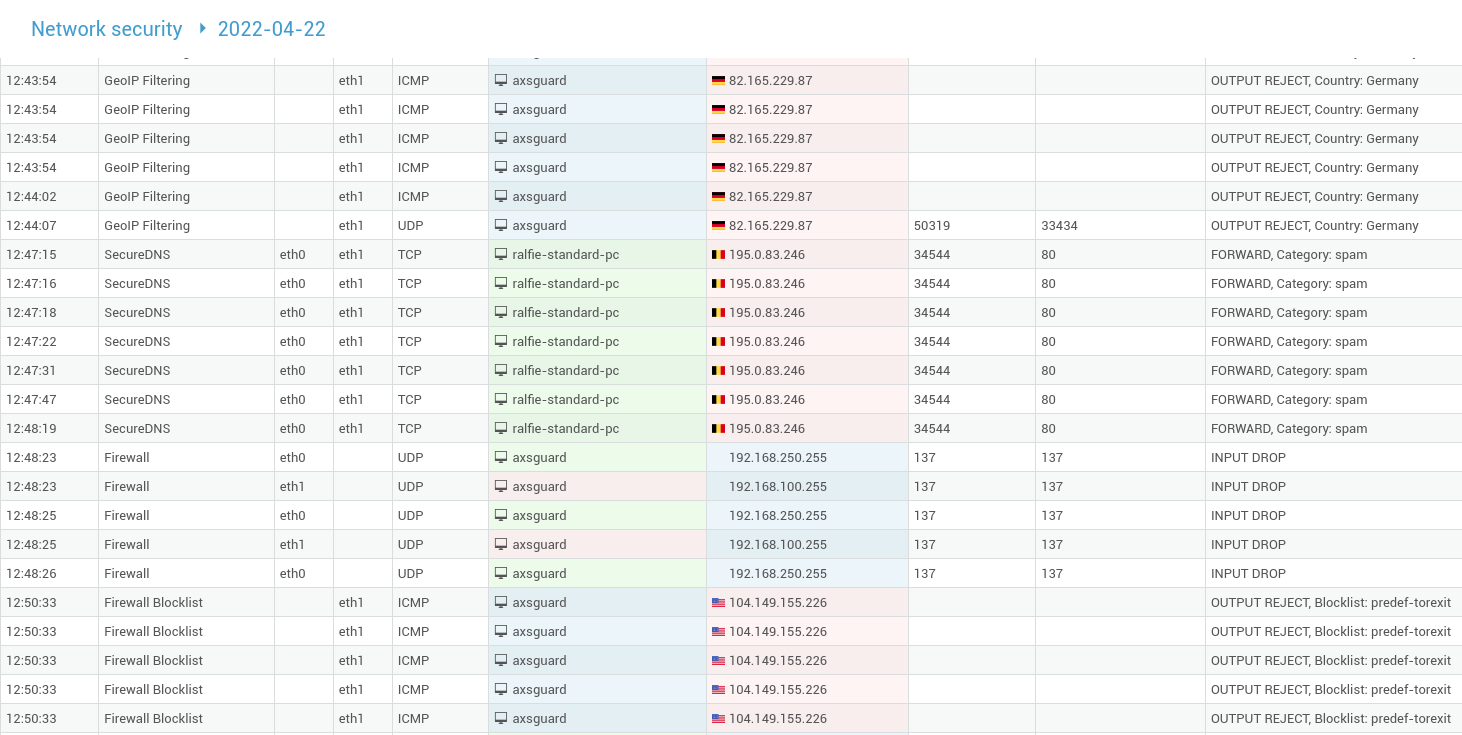
| Field | Description |
|---|---|
Time |
The time at which the log entry was created. |
Triggered by |
The feature that blocked the network traffic, e.g. Application Control, GeoIP filtering, etc. |
In |
The network device on the receiving end of the connection. |
Out |
The forwarding network device. |
Source IP |
The IP of the sending host. |
Source Port |
The source port used by the sending host. |
Destination IP |
The IP of the receiving host. |
Destination Port |
The destination port on the receiving host. |
Action |
The target action taken by the security feature in the
|
Reason |
Indicates the reason why traffic was blocked or accepted. In case GeoIP filtering is used, the name of the GeoIP filter will also be shown, e.g. |
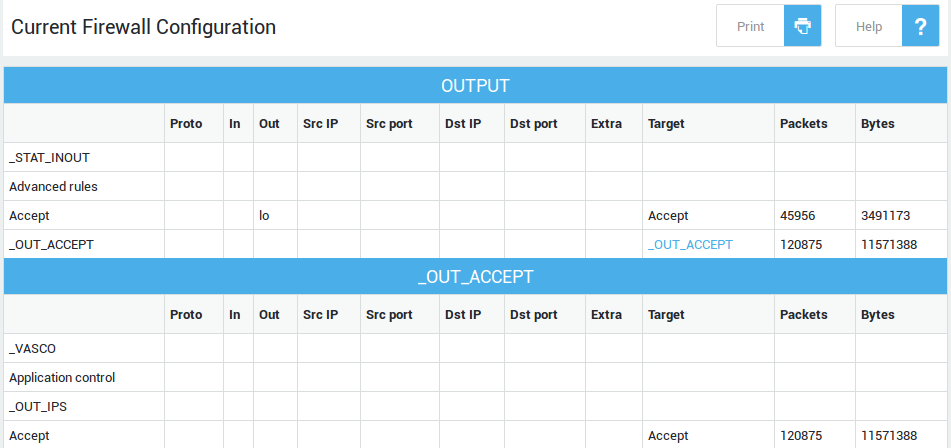
Firewall Status
The AXS Guard firewall status pages provide valuable information on active connections and current network traffic.
Connection Tracking
The firewall connection status page provides a centralized view of current network connections and their state. Sources and destinations are color-coded for quick identification.
-
Log in to your AXS Guard appliance.
-
Go to Firewall > Status > Connections.
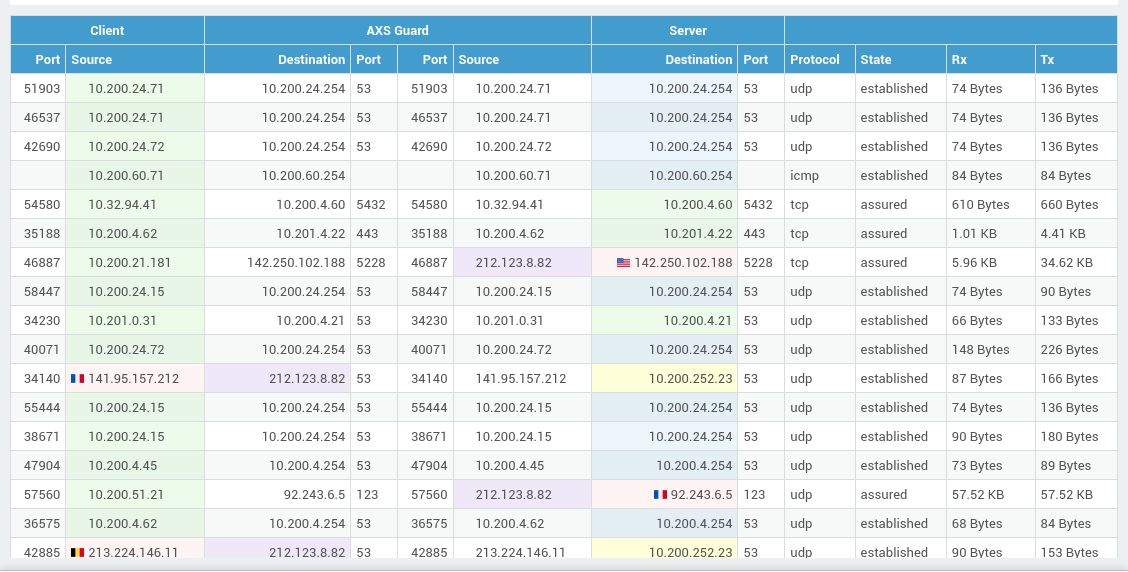
| Color | Description |
|---|---|
| Green | The peer is connected to a secure device. |
| Red | The peer is connected to an Internet device. |
| Yellow | The peer is connected to a DMZ device. |
| Blue | The peer is AXS Guard itself. |
| Purple | The host/port is translated (SNAT/DNAT/...). |
Filter Status
The filter status provides a table detailing the firewall checks applied to specific traffic flows (input, forward, and output).
| Filter | Description |
|---|---|
INPUT |
Shows the filter status of traffic coming to the AXS Guard appliance (INPUT Chain). |
FORWARD |
Shows the filter status of traffic which is being forwarded from one network zone to another (FORWARD Chain). |
OUTPUT |
Shows the filter status of traffic leaving the AXS Guard appliance (OUTPUT Chain). |
To view the status of a specific filter:
-
Log in to your AXS Guard appliance.
-
Navigate to Firewall > Status.
-
Click on the desired filter (Input, Forward or Output).
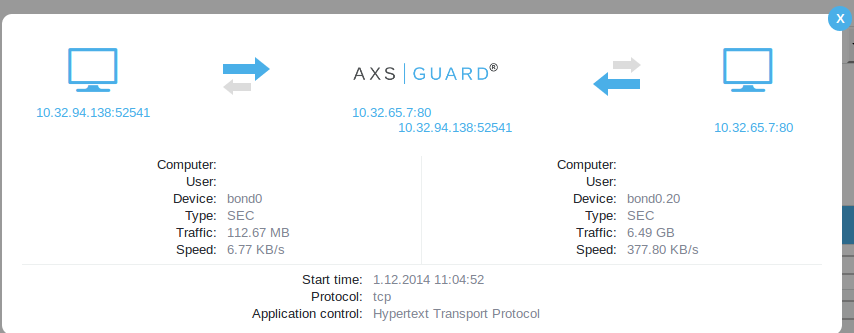
Network Flow Viewer
About
The network flow viewer allows you to monitor active connections and filter them by:
- Protocol
- Source IP address and port
- Destination IP address and port
- Network device
- Application control status (or monitored by Application Control)
Usage
- Log in to your AXS Guard appliance.
-
Go to Network > Tools.
-
Select Flow Viewer.

-
Click on an empty space in a row to view details about a connection.
Troubleshooting
My application isn't working, despite a firewall policy being in place.
This chart will help you troubleshoot any firewall problem:
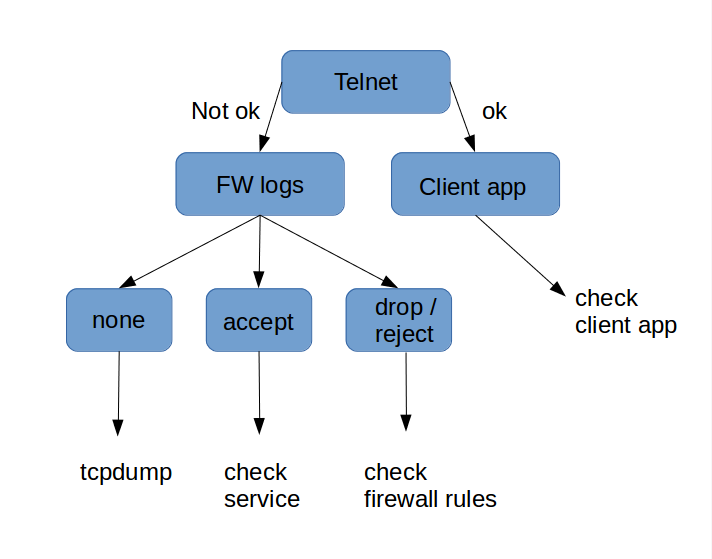
-
Telnet: Use the
telnetcommand to verify whether the problem is application-related or connection-related, for instancetelnet 192.168.1.50 25for SMTP. (Use:telnet+ IP address or FQDN + port number). See the appropriatetelnetdocumentation for more details. -
Client Application: If a
telnetconnection is successful, the issue likely lies within the application itself. Check the client's application settings, such as browser proxy configurations, and consult the application's documentation for further assistance. -
Firewall Logs: If you can't establish a
telnetconnection, check your firewall logs by going to Firewall > Logs. Then, click the relevant date and enter the appropriate search string. -
If you're troubleshooting an
acceptrule and traffic isn't flowing as expected, ensure theLog this rule targetoption is enabled for that rule. Accepted packets are not logged by default. If the logs confirm the traffic was accepted, the issue is not firewall or rule-related. Instead, investigate the AXS Guard or back-end service. Consult the relevant AXS Guard feature how-to guides and application logs, or the back-end server's documentation for further assistance. -
If legitimate traffic is being dropped or rejected, thoroughly examine the firewall rule hierarchy. The order of rules in a policy is crucial: an
allowrule will be ineffective if a preceding rule drops or rejects the same traffic. Also, verify all fields of the rule itself by navigating to Firewall > Rules > Towards / Through / DMZ Filter. -
If traffic is not logged, use the
tcpdumpcommand for advanced troubleshooting, as detailed in the AXS Guard CLI guide (e.g.,tcpdump -ni eth0). For comprehensive information about thetcpdumpcommand, consult its man pages and other online resources.
Bad 1 new not syn in firewall logs.
The firewall log entry Bad 1 new not syn means that a packet was dropped because it matched a rule in the firewall's _BAD_PKTS chain. This specific match indicates an invalid TCP connection setup (often due to asymmetric routing), as the TCP packet was in a New state but lacked the SYN flag.
BAD2: unclean in firewall logs.
This message indicates that a packet was dropped because it matched a rule in the _BAD_PKTS firewall chain. This chain identifies and discards malformed or unusual packets, often those with bad headers or checksums.
My secure LANs are unable to communicate with each other.
Inter-LAN communication between distinct secure network segments is not permitted by default by the AXS Guard firewall. Establishing connectivity requires the creation and assignment of adequate firewall rules and policies.
I cannot add or modify a rule in a policy.
Modifications are not permitted in certain predefined policies, unless specified otherwise in the Policy Naming Conventions.
Support
If you encounter a problem
If you encounter a problem with AXS Guard, follow the steps below:
-
Check the troubleshooting section of the feature-specific manual.
-
Check the knowledge base on this site for information about special configurations.
-
If no solution is available in any of the above sources, contact your AXS Guard vendor.
Contact Information
(+32) 15-504-400
support@axsguard.com