Mail Storage
Introduction
About this Document
This document serves as a reference for technical personnel and system administrators, detailing the concepts and configuration of AXS Guard email storage (POP, IMAP, Webmail).
Examples used in this Guide
All configuration examples in this guide are performed by an advanced administrator. Certain options are unavailable to full administrators or users with lower access privileges.
Due to ongoing software development and documentation updates, the screenshots in this guide may differ slightly from the current user interface.
E-mail Server Concepts
Introduction
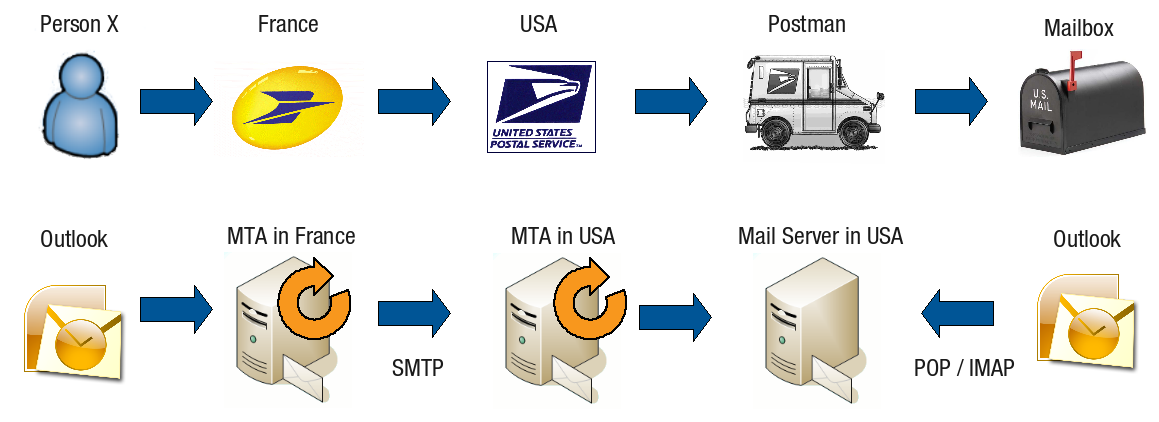
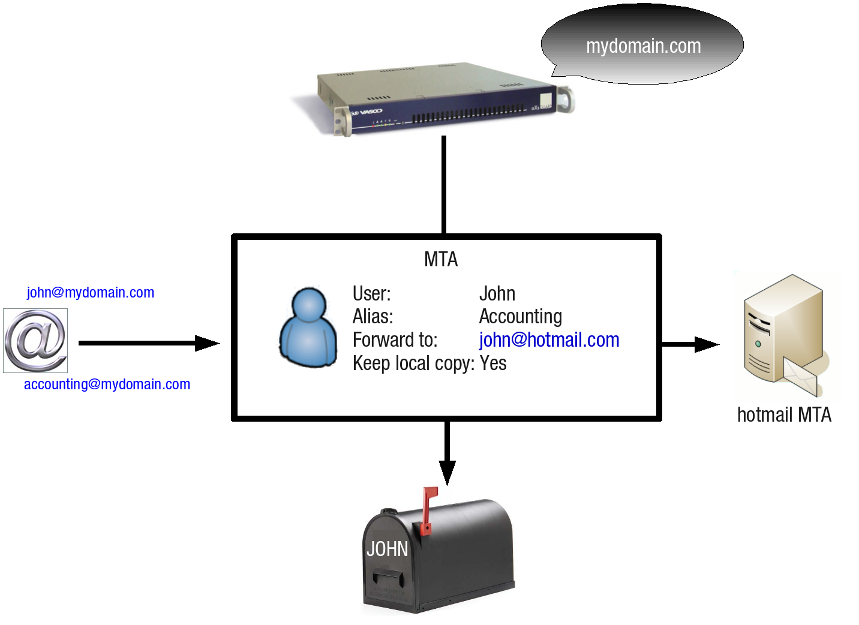
E-mails travel across the Internet between their source and destination via servers, in the same way that traditional paper mail travels the world via post offices (as illustrated below). On the Internet, the role of post offices or sorting offices is assumed by Mail Transfer Agents or MTAs.
The concept of email differs from traditional postal service in that a mail server stores emails for an email client, which then retrieves and delivers them. Traditional mail, in contrast, is typically delivered directly, rather than retrieved. Mail servers are sometimes referred to as Mail Delivery Agents, and mail clients as Mail User Agents (MUAs), such as Microsoft Outlook.
-
Similar to the infrastructure of traditional post offices, the MTA network links servers, such as the AXS Guard, across the world.
-
E-mails are sent directly from a sender MTA to the receiver MTA, based on the MX records which are looked up via a DNS request, unless configured otherwise on the sender MTA. For more information about DNS and MX records, see the AXS Guard Public DNS How To, which is available by clicking on the permanently available Documentation button in the Administrator tool.
-
The Mail Client is a program for viewing, replying, forwarding, sorting, creating and deleting e-mails. Common mail clients are Outlook, Outlook Express and Thunderbird.
See the AXS Guard MTA documentation for additional information.
E-mail Domains
A domain identifies company web sites, e-mail servers, but also other devices such as gateways and routers via a common name. For example, microsoft.com is the domain name of Microsoft’s web sites and update servers. A single web server can serve web sites for multiple domain names, but a single FQDN can only point to one machine. For example, Apple Computer has the following web sites: www.apple.com, www.info.apple.com and store.apple.com. Each of these sites could be hosted on different machines.
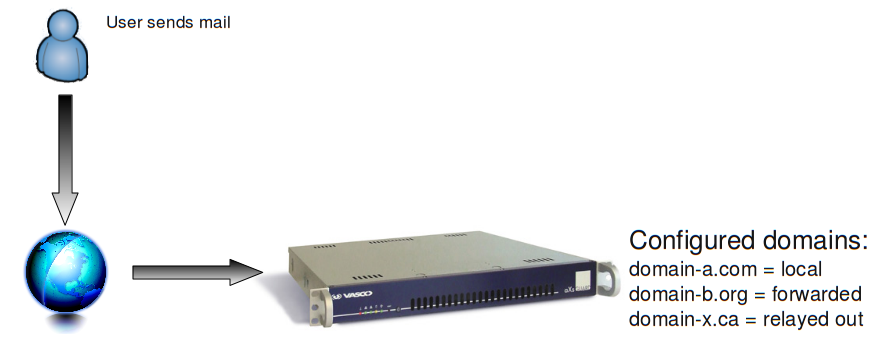
The AXS Guard MTA allows you to handle mail for one or multiple domains. All e-mails for a configured domain can either be handled and stored locally, forwarded to a specific computer or relayed out to a specific SMTP server. Users only have one physical mailbox, even if they are a member of multiple local domains on AXS Guard. All messages destined to a member of one of these domains are delivered to the same physical mailbox.
For detailed information about e-mail domains and their configuration, see the AXS Guard MTA documentation.
Message Components
The Envelope
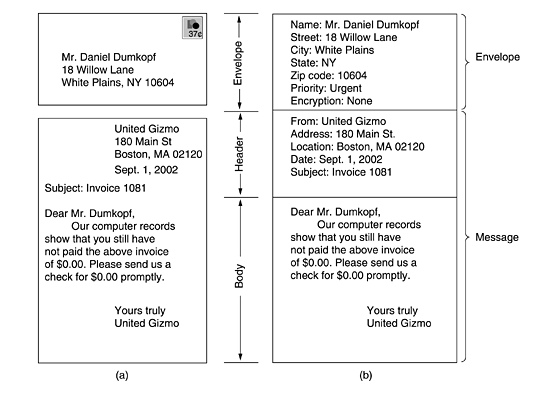
The envelope encapsulates the message. It contains all the information needed for transporting the message, such as the destination address, the message priority, etc. This information stands on its own and is distinct from the message itself. The Message Transport Agents (MTAs) use the envelope for routing, just as the post office does. A new envelope is created per recipient.
The Header and Body
The message inside the envelope consists of two parts: the header and the body. The header contains control information for the user agents. The body is intended for the human recipient. The body is the message itself, which can be formatted in plain text or HTML. The difference between paper mail (a) and e-mail (b) is illustrated below.
Each message has exactly one header, which has separate fields. Each field has a name and a value. RFC 5322 specifies the syntax to be used. The most important header fields are listed below:
| Field | Description |
|---|---|
From |
The e-mail address, and optionally the name of the sender. Forms the envelope with the |
To |
The e-mail address(es), and optionally name. Forms the envelope with the |
Subject |
A brief summary of the contents of the message. |
Date |
The local time and date when the message was written. |
BCC |
Blind Carbon Copy. The e-mail address(es) in this field are not visible to other addressees. |
CC |
Carbon copy. The e-mails address(es) in this field are visible to other addressees. |
Content-Type |
Information about how the message has to be displayed, usually a MIME type. |
In-Reply-To |
Message-ID of the message that this is a reply to. |
Received |
Tracking information generated by mail servers that have previously handled the message. |
References |
Message-ID of the message that this is a reply to, and the message-id of this message, etc. |
Reply-To |
E-mail address that should be used to reply to the sender. |
AXS Guard uses a special header to avoid e-mail loops when the auto-response option (e.g. vacation message) is enabled. See Auto-Response Settings for more information.
Supported Protocols
POP3
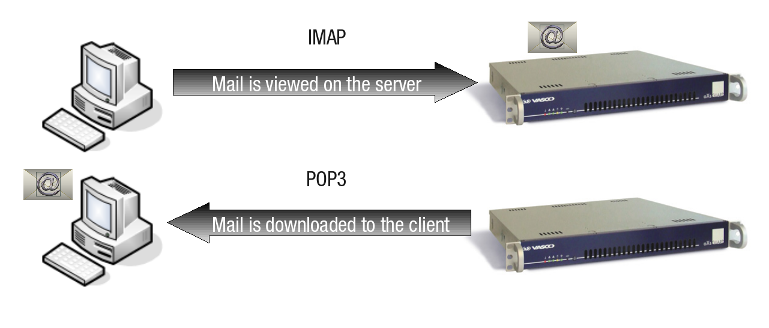
The Post Office Protocol (POP) is an application-layer Internet protocol used by local email clients to retrieve email from a remote server over a TCP/IP connection. Emails are typically downloaded from the server, unless the client is configured to leave a copy on the server. Earlier versions of POP (POP1 and POP2) are obsolete.
IMAP
The Internet Message Access Protocol (IMAP) is one of the two most prevalent Internet standard protocols for email retrieval, the other being the Post Office Protocol. Virtually all modern email clients and mail servers support both protocols for retrieving email messages from a server.
TLS
AXS Guard supports secure IMAP and POP, enabling secure email access from the Internet or the LAN. For detailed information about TLS, see the MTA documentation. Refer to the PKI documentation for an explanation of certificate usage.
E-mail Aliases
An e-mail alias is a forwarding mechanism which allows system administrators to create and link one or more alternate e-mail addresses to a single mailbox.
Some aliases are required, such as the
postmaster@domain.com e-mail address. This e-mail address is used to
report MTA problems. Other e-mail aliases are automatically created on AXS Guard, e.g. sysdeamon@domain.com, spam@domain.com, etc. The
postmaster e-mail alias is linked to the AXS Guard sysadmin user,
unless specified otherwise. More information about the AXS Guard
sysadmin user is available in the AXS Guard System Administration How
To, which is accessible via the Documentation button in the
Administrator Tool.
As of AXS Guard version 8.2.0, virtual domains have been implemented. A virtual domain is either a local or forwarded domain for which a directory service (LDAP) profile has been configured. This implementation directly affects the way e-mail aliases are handled by the AXS Guard mail server.
E-mail aliases have 2 functions:
-
They are used to find and apply the matching AXS Guard mail policy (applies to local and forwarded domains).
-
Messages sent to a user’s alias are stored in that user’s AXS Guard mailbox (applies to local domains only). The behavior of the AXS Guard mail server varies, depending on how an alias is added to an AXS Guard user profile.
Aliases can be added to a user profile as a name, e.g. alias or as an
e-mail address, e.g. alias@domain.com. In the first case, messages
sent to the alias will be delivered to all the user’s AXS Guard
mailboxes in non-virtual domains. In the second case, mail sent to
the alias will only be delivered to the associated mailbox.
In the following examples, we assume the following:
-
3 local mail domains have been configured on the AXS Guard appliance, i.e.
foo.com,bar.netandfoobar.org. -
An Directory Services (LDAP) profile has been configured for the
foorbar.orgdomain, which is a virtual domain.
Example 1
Given an AXS Guard user with a username user1 and an e-mail alias abuse.
The user will be able to receive e-mail sent to the following addresses: user1@foo.com, user1@bar.net, abuse@foo.com and abuse@bar.net.
Mail sent to user1@foobar.org and abuse@foobar.org will not be delivered.
Example 2
Given an AXS Guard user with a username user2 and an e-mail alias info@foo.com.
The user will be able to receive e-mail sent to the following addresses: user2@foo.com, user2@bar.net and info@foo.com.
Mail sent to user2@foobar.org, info@foobar.org and info@bar.net will not be delivered.
Example 3
Given an AXS Guard user with a username user3 and an e-mail alias info@foobar.org.
The user will be able to receive e-mail sent to the following addresses: user3@foo.com, user3@bar.net and info@foobar.org.
Mail sent to user3@foobar.org, info@foo.com and info@bar.net will not be delivered.
Example 4
Given an AXS Guard user with a username: user4@foobar.org and no e-mail alias.
The user will be able to receive e-mail sent to the following addresses: user4@foobar.org.
Mail sent to user4@foo.com and user4@bar.net will not be delivered.
Example 5
Given an AXS Guard user with a username user1 and an e-mail alias abuse.
The user will be able to receive e-mail sent to the following addresses: user1@foo.com, user1@bar.net, abuse@foo.com and abuse@bar.net.
Adding the e-mail alias abuse@bar.net to another user, e.g. user2, will generate a validation error, because abuse@bar.net was already added to user1.
E-mail Forwarding
Messages sent to a mailbox on the AXS Guard (i.e. a local mailbox) can be forwarded to one or more e-mail addresses. E-mail forwarding redirects e-mail going to one address and sends it to one or several other addresses. Vice versa, e-mails going to several different addresses can be converged via forwarding to end up in a single address mailbox.
If the e-mail address to which e-mails are forwarded is local, the message is forwarded to the user’s AXS Guard mailbox. If the address is not local, the AXS Guard forwards the message to the authoritative MTA, e.g. hotmail, gmail, etc.
The AXS Guard allows you to keep local copies of forwarded e-mails. The forwarding options can be configured by the user, if allowed by the AXS Guard system administrator (Under Users&Groups > General).
Important
E-mails are always checked by the AXS Guard mail content filtering system before they are forwarded.
Distribution Lists
A distribution list is an easy method to send an e-mail to multiple recipients through a single e-mail address, which is in fact an alias for member recipients. Mail sent to the alias is automatically delivered to the mailbox of each recipient who is included in the distribution list.
Important
You can only create distribution lists for your own (internal) network, not for forwarded domains. However, it is possible to use external e-mail addresses as recipients, e.g. hotmail or gmail addresses. The external addresses have to be added under E-mail > Filters > External Addresses, otherwise senders will receive an "undeliverable" message.
E-mail Quotas
A mail quotum is the amount of space reserved on a mail server to house a user’s e-mail messages. Quotas are necessary to preserve the AXS Guard’s storage capacity.
-
Soft quotas: The soft quota is a warning limit. Once it is reached, the AXS Guard automatically sends a notification to the user and the system administrator, requesting the user to remove and / or archive his / her messages. If no action is taken within 7 days after the notification, the system will treat the mailbox as if the hard quota has been exceeded. The frequency of notifications can be configured. Administrators can also verify the status of the quota, to see how much space is available in a user’s mailbox .
-
Hard quotas: Hard quotas determine the maximum allowed size of disk storage to be used for a user’s mailbox. As soon as it is exceeded, no new e-mails can be sent or received by the user. Messages first have to be deleted from the mailbox or archived by the user.
Important
- The POP3 protocol can be configured to leave a copy of e-mails on the server, in which case quotas become a factor, similar to IMAP.
- It is not possible to delete e-mail if the hard quota has been exceeded and the mail client is configured to move the e-mail to a trash folder on the mail server. To solve this problem, configure the client to delete messages permanently or use the Webmail feature.
Automated Responses
The auto-response function enables the AXS Guard to send an automatic response to e-mails received while a user is unavailable, e.g. when a user is on vacation. Senders are automatically notified that the addressee is unable to read his / her e-mails, allowing them to use an alternate e-mail address or another method of communication. The auto-response function can only be used for users in a local domain, i.e. a domain for which e-mail messages are stored locally (on the AXS Guard). It does not apply to forwarded domains.
The auto-response function can also be configured at the system level. If enabled, the system will automatically send an automated response on behalf of all users.
Example: Holiday season
Assuming your company employs 100 people and that you are closed for business every year between 12/23 and 2/2 for the holidays. You can have each employee configure his / her out of office message individually. This means 100 configurations on your appliance, with the risk of someone forgetting to do so. Doing this at the system level makes more sense in this case and only requires a single configuration at the system level by the system administrator.
Info
You can also configure an automatic response for distribution lists. When a user configures an auto-reply message and that user’s e-mail address is also included in a distribution list, no auto-reply will be sent on behalf of the user when a message is sent to the distribution e-mail address. This is expected behavior.
Automatic Deletion
It is possible to automatically delete incoming messages for a given user. This is very useful for old accounts that are no longer active and that are still receiving e-mail. You can combine this option with the auto-response functionality to provide senders with an alternate e-mail address or to let them know that the account is no longer monitored.
E-mail Server Configuration
Feature Activation
-
Log on to the AXS Guard appliance.
-
Navigate to System > Feature Activation.
-
Select the E-mail menu.
-
Enable the options as shown in the image below.

Adding E-mail Domains
Mail is only accepted and processed for registered domains.
-
Navigate to E-mail > Domains.
-
Click on the
+button (add new). -
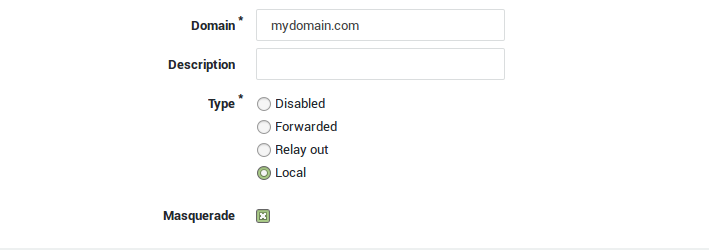
Enter a domain, e.g.
mydomain.com. -
Enter a description for the domain (optional).
-
Set the type to local.
-
Enable or disable masquerading for the domain.
-
Save your configuration.
| Parameter | Description |
|---|---|
| Domain | The domain for which e-mail should be handled by the AXS Guard MTA. |
| Disabled | Disables the domain, e.g. for maintenance. |
| Local | Select this option if e-mails are stored locally on the AXS Guard appliance. The e-mail server feature must be enabled under System > Feature Activation > E-mail. |
| Forwarded | Forwards e-mail traffic to the specified computer. The computer can be listed or unlisted. Listed means that the computer has been added to the AXS Guard computer list (under Computers). In case of an unlisted computer, enter the computer’s IP address or FQDN, e.g. computer.mydomain.com. |
| Forward port | The SMTP port of the computer to which e-mails are forwarded. The default SMTP port is 25. |
| Verify Recipient Address | If enabled, the recipient addresses are verified by initiating an SMTP connection to the server. If the server refuses delivery to the recipient, AXS Guard will too. If the server is unreachable, the delivery of the e-mail will be postponed. |
| Relay Out | Relays outgoing e-mail traffic to a non-listed computer. Enter the computer’s IP address or FQDN, port number (default is 25) and authentication credentials (if required). |
| Masquerade | See Masquerading for details. |
POP & IMAP Server Settings
-
Navigate to E-mail > POP3 & IMAP.
-
Configure the options as explained in the table below.
-
Update your configuration.
Parameter |
Description |
|---|---|
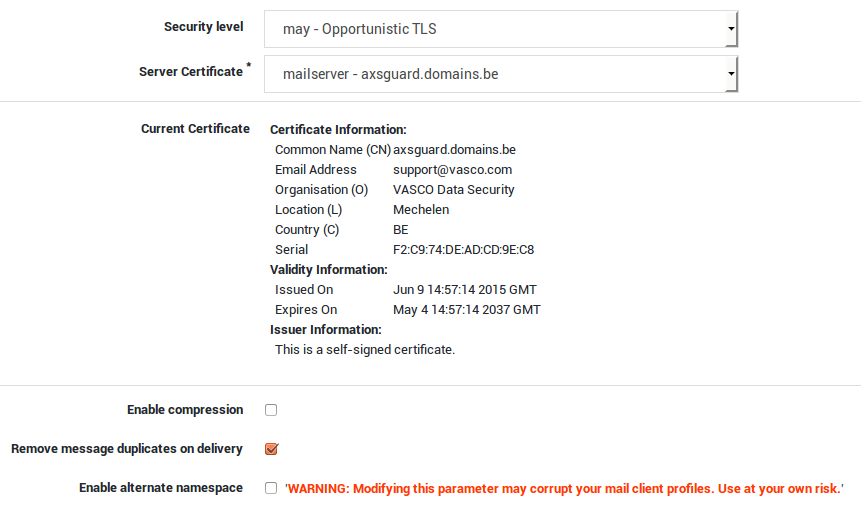
Security Level |
|
Server Certificate |
Select the server certificate to be used by the POP / IMAP server. Go to PKI > Certificates for an overview of certificates or to generate a new certificate. |
Enable compression |
The option is enabled by default and should be disabled for troubleshooting, e.g. when using a traffic analyzer such as tcpdump or Wireshark. |
Remove message duplicates on delivery |
The mail server has the possibility to detect message duplicates by checking the message ID of e-mails. E-mails with identical message IDs are deleted if the option is enabled. Per RFC, a message ID should be unique. |
Enable alternate namespace |
The namespace determines how the IMAP folder structure is presented on the client. If the option is unchecked, all folders are presented as subfolders of the inbox folder. If the option is checked, all folders are shown at the same level as the inbox folder. This parameter should be disabled if your are using the Konsec Workgroup connector. Do not modify this configuration if you are using the Konsec Workgroup connector as Outlook profiles will be corrupted without the possibility to recover. |
Enable storage of ephemeral data in memory |
To enhance performance on high I/O systems, enable in-memory database caching. This stores caching data in memory, bypassing disk I/O. Prior to enabling, please confirm your system has at least 2GB of free memory. |
Firewall Configuration
System-wide Policy
CAUTION
It is recommended to disable IMAP and POP services at the system level. Grant firewall access for these services only at the group or user level. Either use a VPN or TLS to access POP or IMAP services over the internet.
To assign system-wide IMAP and POP firewall policies (not recommended):
-
Log in to the AXS Guard appliance.
-
Go to Firewall > Policies > Static.
-
Add the POP and IMAP mail policies to the appropriate static policy.
-
Update your configuration.
Computer-level Policy
Important
Disable mail services at the computer level, unless a server requires sending automated emails over the Internet. Require user authentication whenever possible.
-
Go to Computers.
-
Select the desired computer from the list.
-
Select the firewall access control tab.
-
Add the appropriate POP and IMAP firewall policies.
-
Update your configuration.

| Button | Description |
|---|---|
Add Firewall Policy |
Select the desired firewall policy from the drop-down list. Go to Firewall > Policies > Dynamic for an overview of assignable firewall policies. |
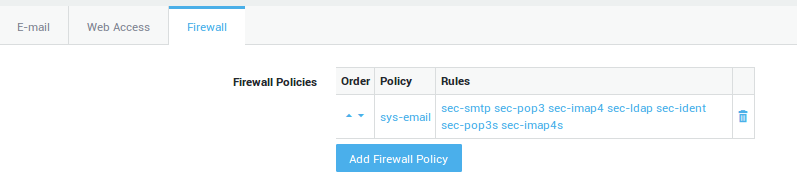
Group-level Policy
-
Go to Users & Groups > Groups.
-
Select the desired group.
-
Select the firewall tab.
-
Assign the
sys-emailfirewall policy to the group. -
Update your configuration.
| Parameters | Description |
|---|---|
Firewall Policies |
Select the firewall policy for the members of this group. Go to Firewall > Policies > Dynamic for an overview of defined firewall policies. |
VPN & RAS Policies |
Select specific firewall policies for group members who connect to the corporate network with a VPN client, such as a PPTP client. Go to Firewall > Policies > Dynamic for an overview of defined firewall policies. |
User-level Policy
-
Go to Users & Groups > Users.
-
Select the desired user from the list.
-
Select the firewall tab.
-
Select the appropriate firewall configuration from the drop-down list (make sure the user is assigned the
sys-emailpolicy). -
Update your configuration.

| Field | Description |
|---|---|
| Firewall Policy Mode | Select the desired firewall policy mode from the drop-down list. |
| Use group firewall policies: Uses the firewall policies as configured for the user’s group, under Users & Groups > Groups. If firewall policies are configured for the user’s computer (based on the user’s IP), they are applied as well, in combination with the system-wide policies. | |
| Add to group firewall policies: Uses the firewall policies as configured for the user’s group, under Users & Groups > Groups and the specific firewall policies defined here. Note that user-specific policies can either be more restrictive or more permissive than the user’s group firewall policies. The user-specific firewall policies are applied first. If firewall policies are configured for the user’s computer (based on the user’s IP), they are applied as well, in combination with the system-wide policies. | |
| Overrule group firewall policies: The user’s group firewall policies are overruled and do not apply. Only the user-specific firewall policies apply. If firewall policies are configured for the user’s computer (based on the user’s IP), they are applied as well, in combination with the system-wide policies. | |
| VPN - RAS Policy Mode | Select user-specific firewall policies for users who connect to the corporate network with a VPN client, such as a PPTP client. Go to Firewall > Policies > Dynamic for an overview of defined firewall policies. |
| User group VPN - RAS policies: Uses the VPN firewall policies as configured for the user’s group, under Users & Groups > Groups. If firewall policies are configured for the user’s computer (based on the IP address of the VPN client), they are applied as well, in combination with the system-wide policies. | |
| Add to group VPN - RAS policies: Uses the VPN firewall policies as configured for the user’s group, under Users & Groups > Groups and the specific firewall policies defined here. Note that user-specific policies can either be more restrictive or more permissive than the user’s group VPN firewall policies. The user-specific VPN firewall policies are applied first. If firewall policies are configured for the user’s computer (based on the IP address of the VPN client), they are applied as well, in combination with the system-wide policies. | |
| Overrule VPN - RAS policies: The user’s group VPN firewall policies are overruled and do not apply. Only the user-specific VPN firewall policies apply. If firewall policies are configured for the user’s computer (based on the IP address of the VPN client), they are applied as well, in combination with the system-wide policies. |
Adding Aliases
-
Navigate to Users & Groups > Users.
-
Select the appropriate user name.
-
Add the desired user alias(es).
-
Update the user profile.

Field |
Description |
|
|---|---|---|
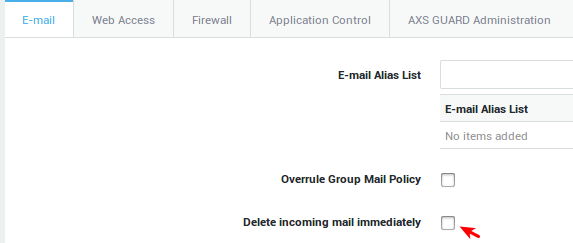
E-mail alias list |
An e-mail alias allows system administrators to link one or more alternate e-mail addresses to a single mailbox. Aliases can be added as a name, e.g. |
|
Overrule Group Mail Policy |
Check this option to overrule the user’s group policy. The group policy is configured under Users & Groups > Groups. Go to E-mail > Filters > Policies for an overview of defined e-mail policies on your system. |
|
Delete incoming mail immediately |
Check to delete incoming messages for the user. Use this option for inactive accounts to preserve disk space, e.g. when a user no longer works for your company. You can combine this option with the auto-response option to notify senders that the account is no longer in use. |
|
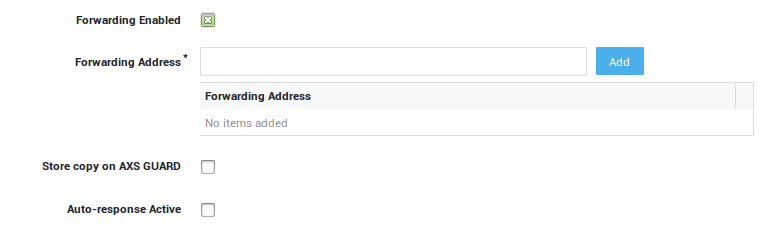
Forwarding Enabled |
Check this option to specify a forwarding address. |
|
Store copy on AXS GUARD |
Check to preserve a copy of forwarded e-mails on the appliance. |
|
Auto-response active |
Check to enable automated responses. |
|
Start: Enter a start date for the automated response in the DD/MM/YYYY HH:MM format. |
||
End : Enter an end date for the automated response in the DD/MM/YYYY HH:MM format. |
||
Notify sender: Select a frequency for automated responses. For example, |
||
Auto-response subject: The subject of the automated reply. |
||
Auto-response message: The body of the automated reply. For example, an out of office message. The following variables can be used in your message:
The substitutions for the |
||
Mailbox Quota Warning |
Once this limit is reached, the appliance automatically sends a warning to the user and the system administrator, requesting the user to remove or archive messages. |
|
Mailbox Quota Limit |
The maximum amount of disk space that may be used by the user’s mailbox. When exceeded, no new e-mails can be sent or received by the user. The user first needs to remove or archive excess messages. |
|
Allow access to Webmail |
Allow or deny access to the appliance’s webmail server.
|
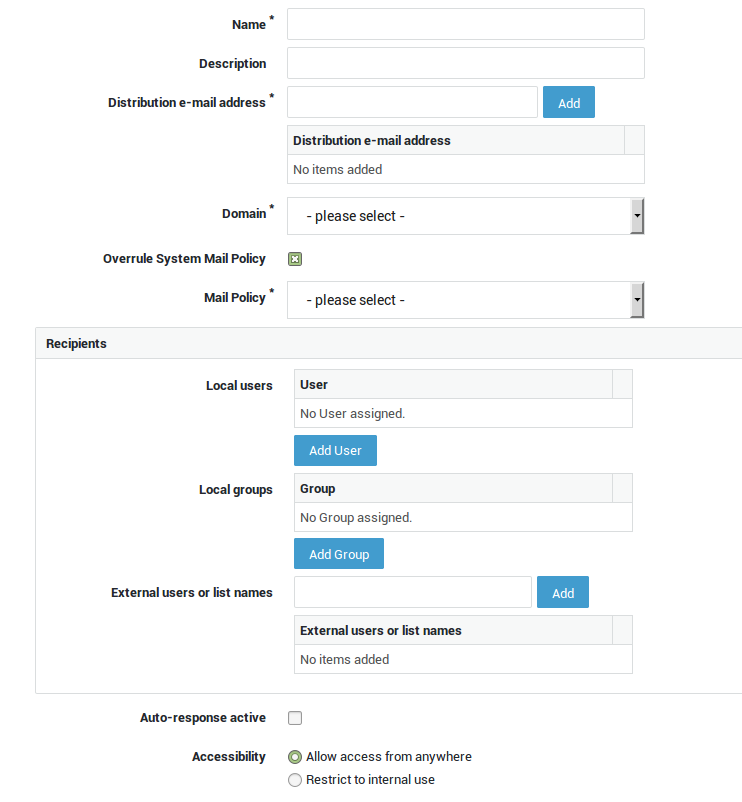
Creating Distribution Lists
-
Navigate to E-mail > Distribution List.
-
Click on Add new.
-
Enter the settings as explained in the table below.
-
Save your configuration.
Field |
Description |
|
|---|---|---|
Name |
A name for the distribution list. Invalid characters are not accepted. |
|
Description |
Provide a description for the distribution list (not required). |
|
Distribution e-mail address |
Enter the address without the domain name; rather than entering |
|
Domain |
Select the domain of the distribution address, e.g. |
|
Overrule System Mail Policy |
Check this option to overrule the system mail policy as configured under E-mail > General. Go to E-mail > Filters > Policies for an overview of available policies or to configure a new policy. |
|
Recipients |
|
|
Auto-response active |
Sends an automated response according to the configured settings. |
|
Accessibility |
Allow access from anywhere: Select this option to allow anybody to send messages to the distribution e-mail address. If enabled, messages coming from the Internet will be accepted and relayed. Restrict access to internal use: If selected, the broadcast mailbox will not accept messages originating from the Internet. Messaging will be restricted to users in your secure network. |
Auto-Response Settings
Auto-responses are automatically deactivated upon reaching their end date.
Avoiding E-mail Loops
Between AXS Guard MTAs
To avoid two or more AXS Guard users from generating auto-response messages to each other in a never-ending loop, an additional header field is automatically added to auto-response messages.
Between AXS Guard and 3rd party MTA
The same principle applies to auto-responses sent from the AXS Guard appliance to mailboxes of a 3rd party MTA. AXS Guard has an option so that only a single auto-response message is sent per external address. This prevents message looping. While the auto-response function is enabled, AXS Guard maintains a list of e-mail addresses to which an auto-response message has already been sent.
Important
The auto-response function only answers messages if a user has been contacted via his user name or alias(es). Distribution list addressees and BCC addressees do not receive automatic responses. This is to avoid unnecessary or indiscrete message traffic.
Priorities
Automatic responses are configurable at three hierarchical levels: user, distribution list, and system. In cases where multiple configurations exist, the system resolves conflicts by sending only the most specific response.
Example: Automatic responses at the user and system level
Assume that userX configured an automatic response and that an auto-response has also been activated at the system level. When a message is sent to userX, the appliance will only send one automatic response, i.e. the one that was configured by the user.
Auto-Response Access
Users cannot change their auto-response settings, unless authorized by an AXS Guard system administrator. Tool access is required at the user level. Navigate to Users & Groups > Preferences to allow users to update their auto-response configuration.

User-level Configuration
-
Navigate to Users & Groups > Users.
-
Click on the appropriate username.
-
Select the e-mail tab.
-
Activate the auto-response option.
-
Enter the required information as explained in the context-sensitive help.
-
Update your configuration.
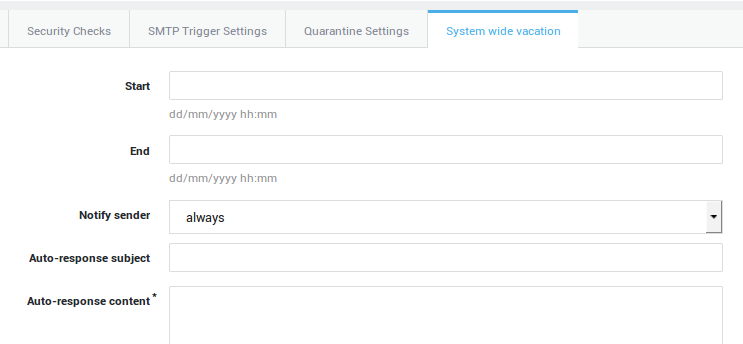
System-level Configuration
-
Navigate to E-mail > Server
-
Check auto-response active.
-
Select the auto response tab.
-
Enter the required information as explained the context-sensitive help.
-
Update your configuration.
Distribution Lists
-
Navigate to E-mail > Distribution Lists.
-
Select the list for which you want to configure an automated response.
-
Check auto-response active.
-
Enter the required information as explained the context-sensitive help.
-
Update your configuration.
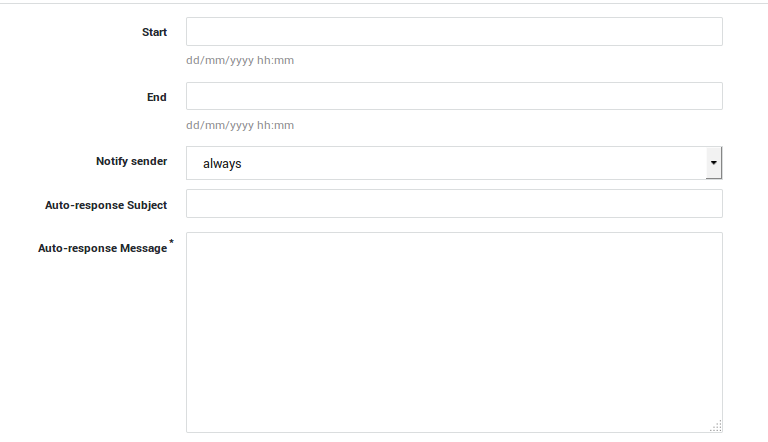
| Field | Description |
|---|---|
Auto-response Active |
Check to enable. Uncheck to disable. |
Start |
Enter the Start time in the |
End |
Enter the End time in the |
Notify sender |
Select the desired frequency. |
Auto-response Subject |
The subject of the auto-response message. |
Auto-response message |
The message you wish to convey. |
Auto-deleting E-mail
-
Navigate to Users & Groups > Users.
-
Select the account of which messages should be automatically deleted.
-
In the e-mail tab, select delete incoming mail immediately.
-
To notify senders, configure the auto-response functionality.
-
Update your configuration.
E-mail Forwarding Options
-
Navigate to Users & Groups > Users.
-
Select the appropriate user in the list.
-
Under the e-mail tab, select
Forwarding enabled. -
Enter the settings as explained in the table below.
-
Update your configuration.
| Field | Description |
|---|---|
Forwarding Enabled |
Check to enable forwarding. |
Forwarding Address |
Specify the e-mail address(es) to which your messages must be forwarded. |
Store copy on AXS Guard |
Check to keep a copy of the forwarded messages on the AXS Guard mail server. |
Quota Configuration
-
Navigate to Users & Groups.
-
Click on the appropriate username.
-
Enter the quota settings under the e-mail tab as explained in the table below.
-
Update the user profile.

| Field | Description |
|---|---|
Mailbox Quota Warning |
Enter the size of the soft quota. Once the specified limit is reached, the appliance automatically warns the user and the system administrator(s). The user will be requested to remove or archive messages to free up disk space on the appliance. If no action is taken by the user within 7 days following the warning, the appliance will act as if the hard quota has been exceeded. |
Mailbox Quota Limit |
Enter the size of the hard quota. Hard quotas determine the maximum size of disk storage that can be used by a user’s mailbox. As soon as this limit is exceeded, the user will no longer be able to send or receive messages until excess messages are deleted or archived. |
Quota Notifications
-
Navigate to E-mail > Notifications.
-
Click on the Quota Notifications Tab.
-
Select the desired options, as explained in the table below.
-
Update your configuration.
| Parameter | Description |
|---|---|
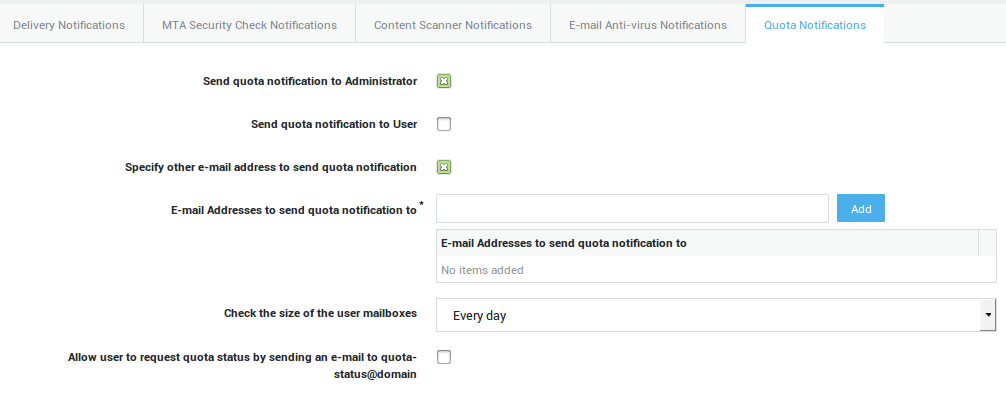
Send quota notification to Administrator |
Notifies the system administrator as specified under System > General about the storage that remains available for each mailbox (the soft and hard limits). |
Send quota notification to User |
Notifies the user about the remaining size of his / her mailbox (the soft and hard limits). |
Specify other e-mail address to sent quota notification |
Sends quota notifications to the specified e-mail address(es). |
Check the size of the user mailboxes |
Select the desired frequency from the drop-down list. |
Allow user to request quota status by sending an e-mail to |
Users can send an empty message to |
Info
Users can send an empty message to quota-status@<systemdomain> to receive a summary of their current quota. This only works if the message is sent from a secure or whitelisted network. quota-status is a reserved system name and cannot be modified. See the troubleshooting section for specifics.
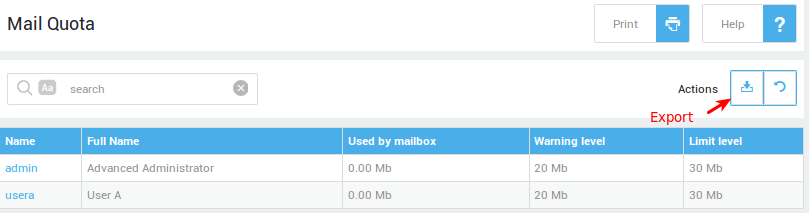
Exporting Mail Quota
-
Navigate to E-mail > Status > Mail Quota.
-
Click on the export button to export the data to a CSV file.
User Authentication Settings
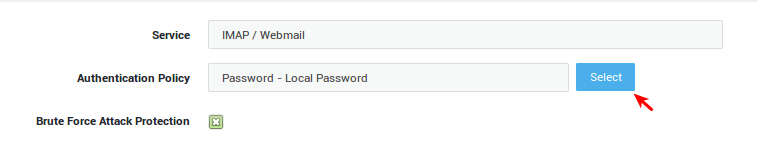
-
Navigate to Authentication > Services and select IMAP / Webmail.
-
Select the desired authentication policy.
-
Update your configuration.
Client Configuration
Introduction
Numerous POP3 and IMAP mail clients are available, though their configuration processes share notable similarities. While the specific user interfaces and menu options may differ, the core settings for server addresses, ports, and authentication remain consistent.
Frequently used mail clients include Microsoft Outlook, Mozilla Thunderbird, Apple Mail, and mobile applications like Outlook for iOS and Android.
Useful References
| Client | Description | Source |
|---|---|---|
| Mozilla Thunderbird | Manual account configuration. | Mozilla |
| Outlook for Windows | Email account settings in Outlook for Windows. | Microsoft |
| Apple Mail | Change settings in Mail on Mac. | Apple |
LDAP Address Book
Introduction
In this chapter, we explain how to configure and use the AXS Guard Address Book. The Address Book contains contact information, such as e-mail addresses, telephone numbers and other data. The information in the Address Book can be shared and is accessed by clients using the Lightweight Directory Access Protocol (LDAP).
The Lightweight Directory Access Protocol (LDAP) is an application protocol of the TCP/IP protocol suite and uses port 389. It allows the sharing of directory information. A directory is a database which is optimized for read operations, i.e. powerful search and browsing capabilities.
The structure of the Address Book and its use is similar to a phone book; a username leads to an e-mail address.
Server-side Configuration
Feature Activation
-
Log in to your AXS Guard appliance.
-
Navigate to System > Feature Activation.
-
Under E-mail, enable the AXS Guard Central Address Book option.
-
Update your configuration.
Address Book Options
-
Navigate to E-mail > Address Book > General.
-
Configure the Address Book options as explained in the table below.
-
Update your configuration.

| Field | Description |
|---|---|
Always add users to the Central Address Book? |
If enabled, AXS Guard users under Users & Groups > Users are automatically added to the central address book. |
AXS Guard user lookup type |
This option determines by which property address book entries are retrievable by a mail client. Possible lookup parameters are the username or the full name as entered in the AXS Guard user list. |
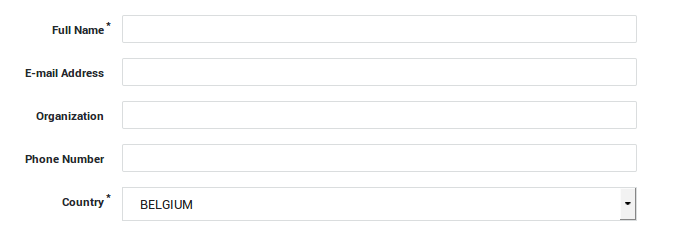
Adding Address Book Entries
-
Navigate to E-mail > Address Book > Addresses.
-
Click on Add New.
-
Enter the Address Book data and save your configuration.
| Field | Description |
|---|---|
Full Name |
Enter the full name of the contact to be added to the address book. |
E-mail Address |
Enter the contact’s e-mail address. |
Organization |
Enter the name of the contact’s organization. |
Phone Number |
Enter the contact’s phone number. |
Country |
Select the country of the contact from the drop-down list. |
Important
- Only basic administrators or above are authorized to add entries or modify the AXS Guard address book.
- You cannot add entries to the AXS Guard address book with e-mail clients, e.g. Microsoft Outlook.
Client Configuration
Important
- The user must be authenticated on the client, e.g. by means of the SSO Authentication Utility.
- The user should have the appropriate AXS Guard firewall rights assigned , e.g. the
sys-emailfirewall policy.
| Client | Description | Source |
|---|---|---|
| Apple | Configure access to an LDAP directory on Mac. | Apple |
| Outlook for Windows | Open and use the address book in Outlook. | Microsoft |
Webmail
Introduction
This chapter explains how to configure and access the AXS Guard Webmail server.
Unlike traditional email clients such as MS Outlook, which rely on dedicated software, Webmail allows users to access their email through a standard web browser.
The AXS Guard Webmail server secures connections by listening for incoming traffic on TCP port 443 via the Internet Interface, ensuring encrypted access to email from any location.
Mail Storage Options
The AXS Guard webmail server supports:
-
Local webmail (default configuration): AXS Guard stores the e-mails locally, in which case a backup to a network share is highly recommended.
-
Back-end webmail: e-mails are stored on a back-end server, e.g. an OWA server.
Server Configuration
Feature Activation
-
Log on to the AXS Guard appliance.
-
Navigate to System > Feature Activation.
-
Expand the E-mail menu and enable Webmail.
-
Update your configuration.

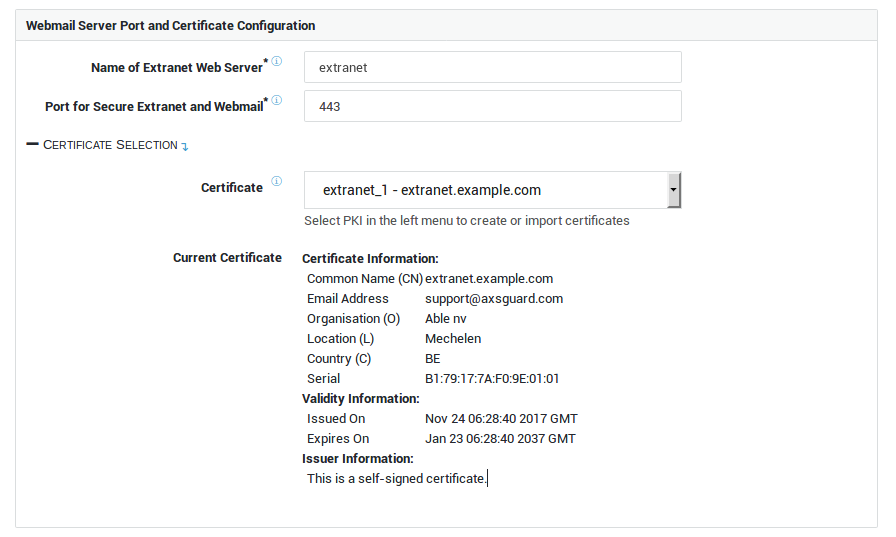
Server Certificate & Port
-
Go to Web Servers.
-
Enter the the desired port number and hostname.
-
Select the appropriate server certificate.
-
Update your configuration.
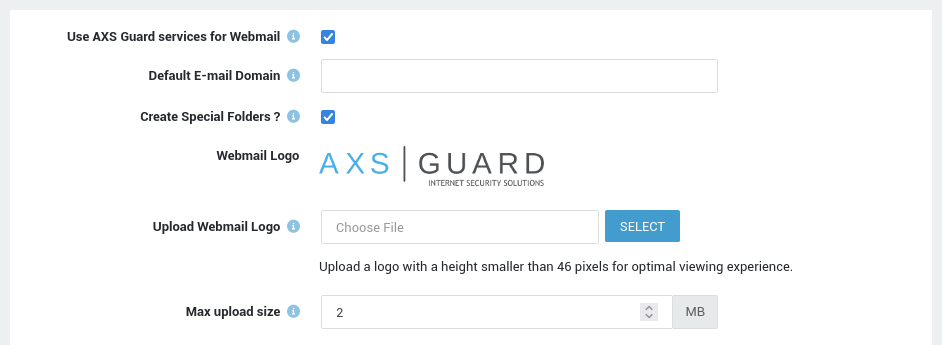
Webmail Settings
-
Navigate to E-mail > Webmail.
-
Enter the settings as explained in the table below.
-
Update your configuration.
| Field | Description |
|---|---|
Use AXS Guard services for Webmail |
Enable this option if your mail is stored on the AXS Guard appliance. Disable this option if your mail is stored on a dedicated mail server in your network. If the option is disabled, you will be required to configure the folder and service settings for Webmail. |
Default E-mail Domain |
Enter the name of your default e-mail domain. If left empty, the system domain will be used. |
Create Special Folders ? |
Check to automatically create special folders for users who log in. |
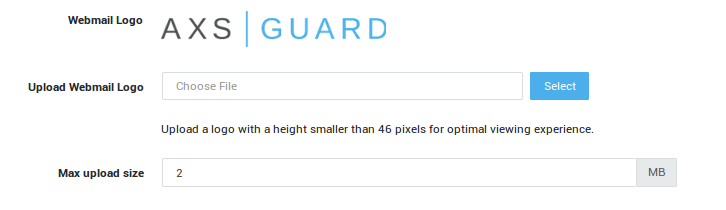
Webmail Logo |
Select the image to be used as your webmail portal’s logo. The following formats are supported: JPG, GIF or PNG. |
Max. upload size |
The maximum allowed size of attachments in outgoing messages. Make sure to also check the e-mail size limit under E-Mail > General. The specified size may not be exceeded by Webmail. |
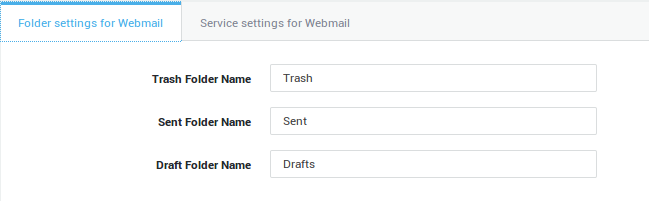
AXS Guard services for Webmail
The following options only appear if AXS Guard services for Webmail are disabled. See the context-sensitive help for additional information.
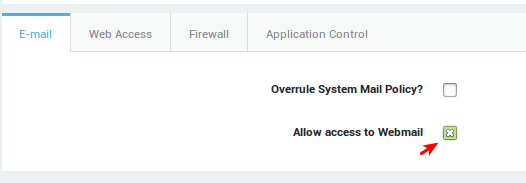
Group-level Access
-
Navigate to Users & Groups > Groups.
-
Select the group which needs Webmail access.
-
Enable Allow access to Webmail under the e-mail tab.
-
Update your configuration.
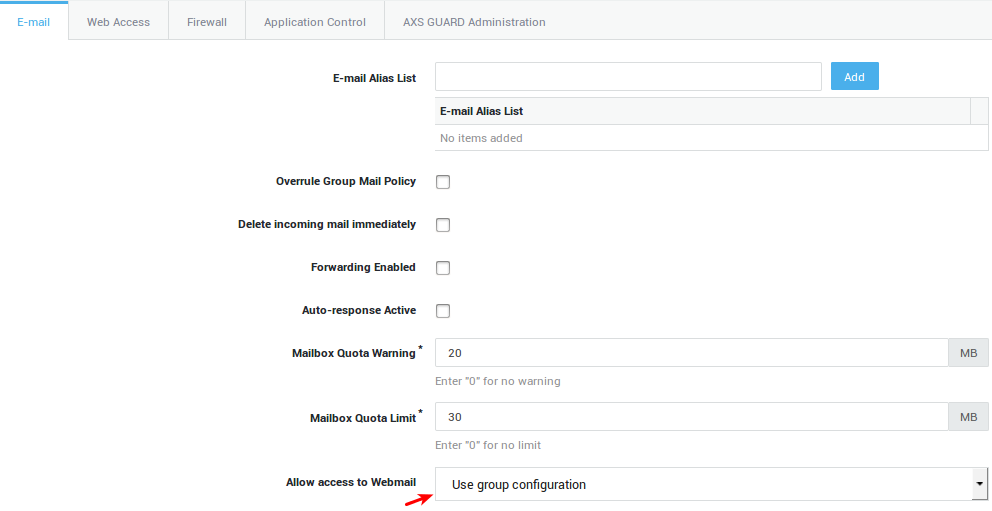
User-level Access
-
Navigate to Users & Groups > Users.
-
Select the user who needs access to webmail.
-
Select the policy for webmail access under the e-mail tab.
-
Update the user profile.
Field |
Description |
|
|---|---|---|
E-mail alias list |
An e-mail alias allows system administrators to link one or more alternate e-mail addresses to a single mailbox. Aliases can be added as a name, e.g. |
|
Overrule Group Mail Policy |
Check this option to overrule the user’s group policy. The group policy is configured under Users & Groups > Groups. Go to E-mail > Filters > Policies for an overview of defined e-mail policies on your system. |
|
Delete incoming mail immediately |
Check to delete incoming messages for the user. Use this option for inactive accounts to preserve disk space, e.g. when a user no longer works for your company. You can combine this option with the auto-response option to notify senders that the account is no longer in use. |
|
Forwarding Enabled |
Check this option to specify a forwarding address. |
|
Store copy on AXS GUARD |
Check to preserve a copy of forwarded e-mails on the appliance. |
|
Auto-response active |
Check to enable automated responses. |
|
Start: Enter a start date for the automated response in the DD/MM/YYYY HH:MM format. |
||
End : Enter an end date for the automated response in the DD/MM/YYYY HH:MM format. |
||
Notify sender: Select a frequency for automated responses. For example, |
||
Auto-response subject: The subject of the automated reply. |
||
Auto-response message: The body of the automated reply. For example, an out of office message. The following variables can be used in your message:
The substitutions for the |
||
Mailbox Quota Warning |
Once this limit is reached, the appliance automatically sends a warning to the user and the system administrator, requesting the user to remove or archive messages. |
|
Mailbox Quota Limit |
The maximum amount of disk space that may be used by the user’s mailbox. When exceeded, no new e-mails can be sent or received by the user. The user first needs to remove or archive excess messages. |
|
Allow access to Webmail |
Allow or deny access to the appliance’s webmail server.
|
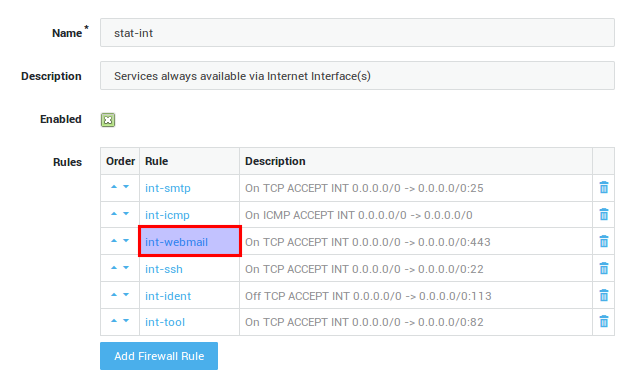
Firewall Configuration
-
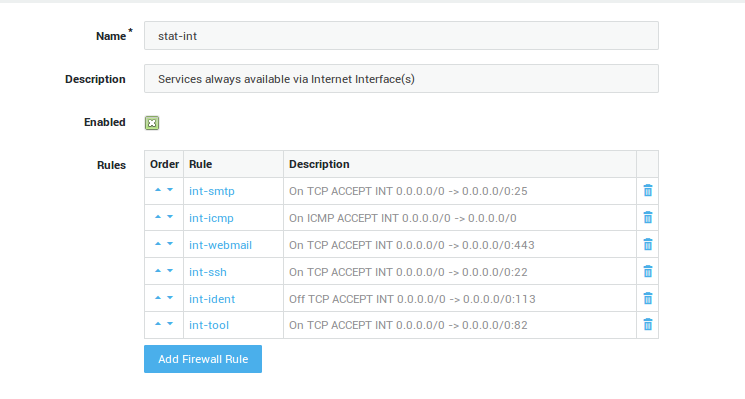
Navigate to Firewall > Policies > Static.
-
Verify if the int-webmail firewall rule is added to the stat-int policy.
Important
You can also enable Webmail access from the secure LAN or the DMZ. Access to port 443 should be allowed for each zone. More information is available in the AXS Guard Firewall How To, which can be accessed by clicking on the permanently available Documentation button in the Administrator Tool.
Webmail Logo Settings
-
Navigate to E-mail > Webmail
-
Upload the desired logo (JPG, GIF or PNG).
-
Update your configuration.
User Authentication
Using Webmail with an external IMAP service requires the Webmail service to be configured with the appropriate authentication policy:
-
Password if the user’s AXS Guard password is the same as on the back-end server.
-
DirectoryServices if the back-end is a MS Exchange server and users are synchronized from there.
In all cases, users must exist on AXS Guard to allow Webmail access.
-
Navigate to Authentication > Services and select IMAP / Webmail.
-
Select the desired authentication policy.
-
Update your configuration.
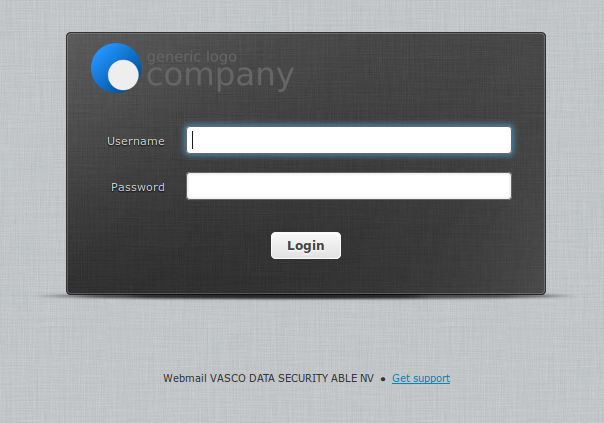
Accessing Webmail
-
Open an Internet browser.
-
In the URL field, enter
https://, followed by the FQDN or external IP address of the AXS Guard appliance, followed by a forward slash andwebmail, e.g.https://axsguard.mydomain.com/webmail -
Enter your webmail credentials.
-
Click on the Login button.
POP3, IMAP & Webmail Logs
Overview
The POP3, IMAP and webmail logs contain the access records of the AXS Guard mail server. These logs allow system administrators to check:
-
When a given user logged in or logged out.
-
When a given user removed e-mails. Internally, webmail uses the IMAP protocol. All activity is therefore logged in the IMAP logs.
Accessing POP3 & IMAP Logs
-
Log in to the AXS Guard appliance.
-
Navigate to E-mail > Logs > POP3/IMAP.
-
Click on the appropriate log date.

Accessing the Webmail Logs
-
Navigate to E-mail > Logs > Webmail.
-
Click on the appropriate log date.
Troubleshooting
My client cannot log on to the AXS GUARD POP3 server.
-
Make sure the user is authenticated on the client (SSO).
-
Verify the user name and password. Passwords are case sensitive.
-
Verify if the user has e-mail access (sys-email Firewall Policy).
-
Verify if the user has not been locked. (Authentication > Status > Blocked Users and Hosts).
My client cannot log on to the AXS GUARD IMAP server.
-
Make sure the user is authenticated on the client (SSO).
-
Verify the user name and password. Passwords are case sensitive.
-
Verify if the user has e-mail access (sys-email Firewall Policy).
-
Verify if the user has not been locked. (Authentication > Status > Blocked Users and Hosts).
-
Verify if the user exists .
I cannot access the Address Book.
-
Make sure the user is authenticated on the client (SSO).
-
Verify if the user has e-mail (LDAP) access (sys-email Firewall Policy).
-
Verify if the user has not been locked. (Authentication > Status > Blocked Users and Hosts).
I cannot modify the Address Book
Only Basic Administrators or above are authorized to modify the AXS Guard Address Book . You cannot modify the AXS Guard Address Book via the mail client, e.g. Outlook 2007.
-
Make sure the user is authorized to access the Webmail service.
-
Verify if the user has not been locked. (Authentication > Status > Blocked Users and Hosts).
-
Make sure Firewall access is granted to port 443 for the authorized network zone (Internet, Secure LAN or DMZ).
The users cannot change their auto-response settings.
Make sure the users are authorized to change their auto-response settings :
-
Log on to the AXS Guard as explained in the AXS Guard System Administration How To, which is accessible via the Documentation button.
-
Navigate to Users & Groups > Preferences.
-
Verify if the correct options are checked .
-
Click on Update when finished.
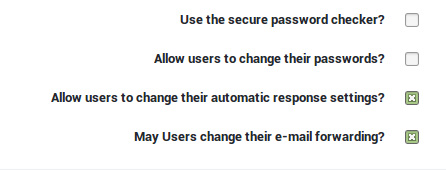
The user cannot change his / her e-mail forwarding settings.
Verify if the option is enabled.
Recipient address is rejected when sending a message to <quota-status@systemdomain>
The network from where the message is sent must be part of the AXS Guard secure network zone or an alias thereof. An alternative is to whitelist the sender’s IP address or network range.
Example: Unknown range
Assume that your AXS Guard’s secure device has the following IP address: 10.132.30.192/19
A client is connecting to the AXS Guard, but from a network range that is different from the AXS Guard’s secure range, e.g. 10.32.64.0/24. Since the sender’s range is unknown, any attempt to send a message to the SMTP server will result in an error:
554 5.7.1 <quota-status@systemdomain>: Recipient address rejected: Access denied (Net::SMTPFatalError)
Possible solutions:
-
NAT the 10.32.64.0 range to 10.132.30.0
-
Whitelist 10.32.64.0/24 under Email > Filters > Whitelist
-
Add the range as an IP alias in the secure device’s network configuration (beware of routing issues)
Support
If you encounter a problem
If you encounter a problem with AXS Guard, follow the steps below:
-
Check the troubleshooting section of the feature-specific manual.
-
Check the knowledge base on this site for information about special configurations.
-
If no solution is available in any of the above sources, contact your AXS Guard vendor.
Contact Information
(+32) 15-504-400
support@axsguard.com