OpenVPN
Introduction
About this Document
This guide is designed as a reference for technical personnel, system administrators, and network administrators. It begins with an explanation of the basic concepts of OpenVPN, followed by step-by-step instructions for configuring the OpenVPN server on the AXS Guard appliance. Finally, we demonstrate how to connect to the AXS Guard OpenVPN server using a freely available OpenVPN client in a Windows environment.
Examples used in this Guide
All setup and configuration examples in this guide are performed with advanced administrator privileges. Some options may be unavailable if you log in as a full administrator or a user with lower access rights.
Since software development and documentation are continuous processes, the screenshots in this guide may slightly differ from the current AXS Guard user interface.
About OpenVPN
What is OpenVPN?
OpenVPN is an open source virtual private network (VPN) program for creating point-to-point or server-to-multiclient encrypted tunnels between hosts. It is capable of establishing direct links between computers across networks which use network address translation (NAT) and firewalls.
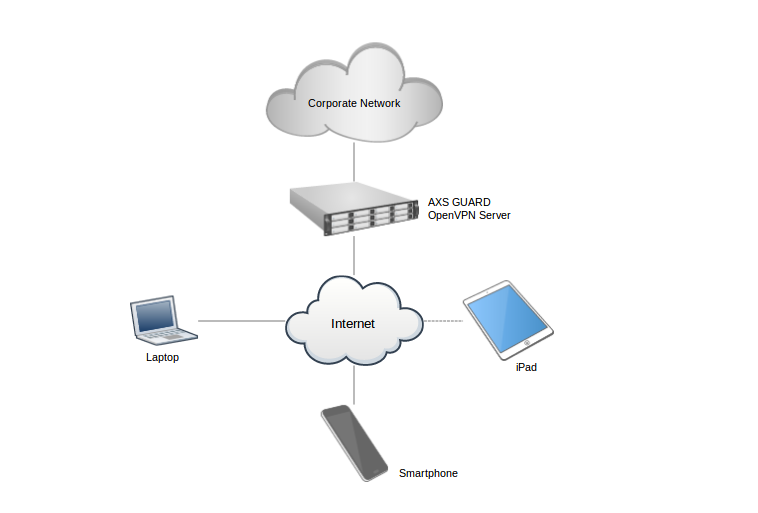
The AXS Guard OpenVPN server enables peer authentication using either client certificates or a combination of client certificates and username/password authentication, such as one-time passwords. In a multi-client server setup, the AXS Guard OpenVPN server issues an authentication certificate to each client through a Signature and Certificate Authority (PKI). OpenVPN heavily relies on OpenSSL for its cryptographic functions.
Data Encryption
OpenVPN uses OpenSSL to provide encryption for the data and the control channel. OpenSSL is an open source implementation of the SSL and TLS protocols. The core library (written in the C programming language) implements the basic cryptographic functions and provides various utility functions. Detailed information about the OpenSSL core library is outside the scope of this manual. For further details and specifications, please refer to the online resources available at: http://www.openssl.org/.
Authentication Methods
| Authentication Method | Description |
|---|---|
| Certificate-based authentication (PKI) | The client is authenticated through a client certificate process. The certificate is generated on the AXS Guard appliance and subsequently imported into the OpenVPN client. |
| Additional authentication | The client is authenticated through a client certificate (see above) combined with username/password authentication (e.g., one-time password, back-end authentication). This method requires additional configuration, as the appropriate authentication policy must be configured for the OpenVPN service. It also offers enhanced security, as physical access to the client device alone does not guarantee a connection to the OpenVPN server. |
Supported Protocols
OpenVPN can run over UDP or TCP. It multiplexes all communications over a single TCP/UDP port. It has the ability to work through most proxy servers and is effective at working through NAT and getting out through firewalls. The AXS Guard OpenVPN server can push certain network configuration settings to its clients. These include IP addresses, routing commands and a few other connection options.
UDP Port 1194 is the official IANA assigned port number for OpenVPN. Newer versions of the program now default to that port. The use of common network protocols (TCP and UDP) makes OpenVPN a desirable alternative to IPsec in situations where an ISP blocks specific VPN protocols.
Important
Using TCP port 443 is generally recommended for better firewall traversal. This is the system default configuration on AXS Guard.
Supported Clients
The AXS Guard appliance supports any open-source OpenVPN client, as well as the Community and Access Server editions from OpenVPN Technologies, which offer the following advantages:
- The client is freely available for Windows.
- The client is also available for portable devices, such as tablet computers and smartphones.
- You can deploy the OpenVPN Windows client and configuration files via Active Directory.
Deployment Options
OpenVPN offers flexible deployment options that cater to different organizational needs:
| Deployment Option | Description |
|---|---|
| OpenVPN Access Server | Uses the AXS Guard OpenVPN Access Server for secure, rapid remote access. Compatible with OpenVPN Connect client on Windows, Android, and iOS. Users can download and import configurations via the Cyber Resilience Portal or a custom URL, reducing administrative tasks related to credential distribution. |
| Manual Configuration | Provides manual export of OpenVPN configuration files for non-Access Server setups. Files contain certificates and settings for client connections. |
Server-Side Configuration
Overview
In this chapter, we explain how to configure the AXS Guard OpenVPN server. Topics covered in this chapter include:
-
How to enable the OpenVPN server feature
-
How to configure the AXS Guard OpenVPN server
-
How to create, assign and export an OpenVPN client configuration
-
How to configure user authentication for the OpenVPN service
-
How to configure user-level settings, such as firewall access rights
Server & Client Certificates
Server certificates are required for the OpenVPN AS and the OpenVPN server.
| Server Type | Requirements |
|---|---|
| OpenVPN Access Server (AS) | A valid certificate signed by a public Certificate Authority (CA) is required for the domain name associated with the public DNS record of the OpenVPN AS. The OpenVPN Connect app does not accept self-signed certificates or certificates signed by an untrusted CA by default. The certificate must be imported via PKI > Certificates on your AXS Guard appliance before you can assign it to the OpenVPN AS. Refer to the local access server section or the OpenVPN Access Server Knowledge Base (KB) article for further information. |
| OpenVPN Server | Use the AXS Guard built-in CA to issue client certificates and the OpenVPN server certificate. Important: AXS Guard automatically provisions client certificates for users when they connect to the OpenVPN Access Server (AS) using the OpenVPN Connect app. Manual certificate issuance is not required in that scenario. |
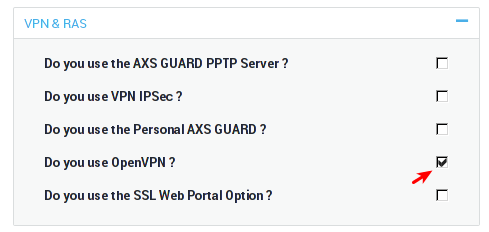
Feature Activation
-
Log in to the AXS Guard appliance.
-
Navigate to System > Feature Activation > VPN.
-
Enable OpenVPN and update your configuration.
Connection Settings
The connection settings are used by the OpenVPN server to listen for incoming client connections. The parameters listed in the table below are included in the client configuration file which is generated when you export an OpenVPN configuration pack. To configure the connection settings:
-
Navigate to VPN > OpenVPN > Server.
-
Enable the OpenVPN server.
-
Configure the connection settings as explained in the sections below.
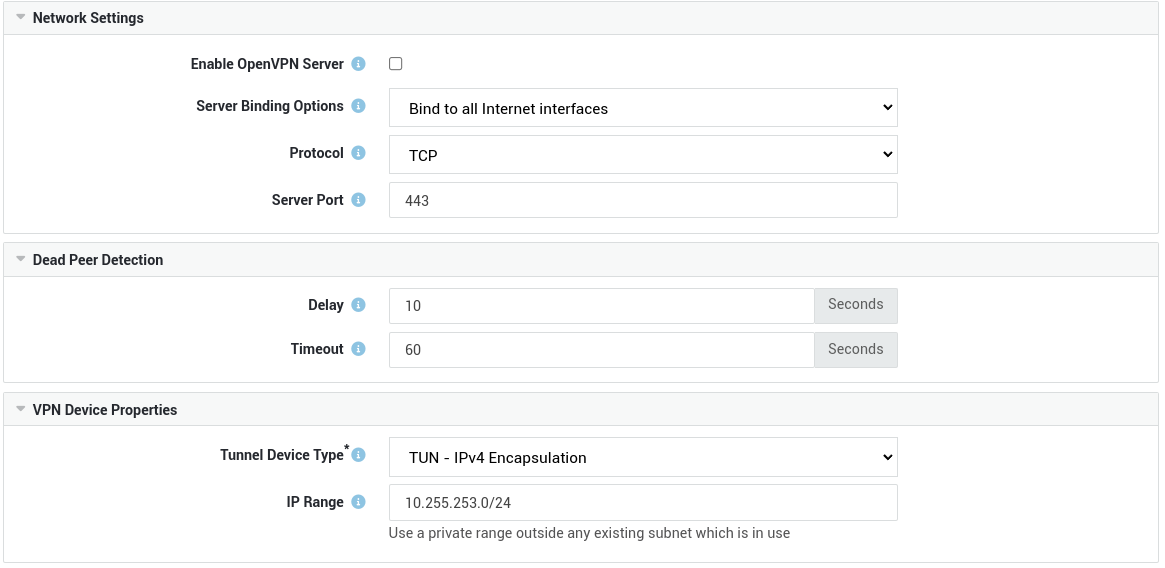
Network Settings
| Option | Description |
|---|---|
Enable OpenVPN Server |
Enables and starts the OpenVPN server. |
Server Binding Options |
Select the appropriate option. See the context-sensitive help on the AXS Guard appliance for additional information. OpenVPN will bind to all Internet interfaces by default, but it can also be configured to bind to a specific Internet interface or IP address. |
IP Address |
OpenVPN will bind to the specified IP address. This field is only visible if you set the option above to Bind to IP address . |
Protocol |
Select the protocol for OpenVPN connections. TCP is the system default as it can traverse proxies. Changing this option on an existing server configuration requires you to reconfigure your clients. |
Server Port |
Enter the OpenVPN server port. 443 is the system default port. Changing the port on an existing server configuration requires you to reconfigure your clients. Avoid port conflicts. If another service is using TCP port 443, for example the webmail or reverse proxy service, the OpenVPN server will fail to start. Change the OpenVPN port number in that case. |
Dead Peer Detection
| Option | Description |
|---|---|
Delay |
The number of seconds between keep-alive checks. 10 seconds is the system default. |
Timeout |
If the client does not reply to the OpenVPN server within the specified period, the connection will be reset. 60 seconds is the system default. |
VPN Device Properties
| Option | Description |
|---|---|
Tunnel Device Type |
Select the device type which will be used to set up OpenVPN connections. TUN is the system default option which is supported by most devices and operating systems. TUN is also required if you intend to use the OpenVPN Access Server. TAP is only needed if you want to transport non-IP based traffic or for bridging, e.g. if you want your LAN and VPN clients to be in the same broadcast domain. |
IP Range |
The range of IP addresses that is distributed to the OpenVPN clients. Use the CIDR notation, e.g. 10.255.253.0/24. Make sure the range is not used elsewhere in your network to avoid routing issues. |
Advanced Settings
Important
Clients using OpenVPN versions older than 2.4 will be unable to connect to the VPN server if DCO is enabled.
| Option | Description |
|---|---|
| Use (DCO) Data Channel Offload | Moves the data channel processing to a kernel module, reducing the overhead caused by context switching between the kernel and userspace. Enabling this option can significantly boost OpenVPN performance. Please note that offloading only works in TUN mode and requires all legacy options to be disabled. |
Security Settings
-
Navigate to VPN > OpenVPN > Server.
-
Select the Security Settings tab.
-
Configure the settings as explained in the sections below.
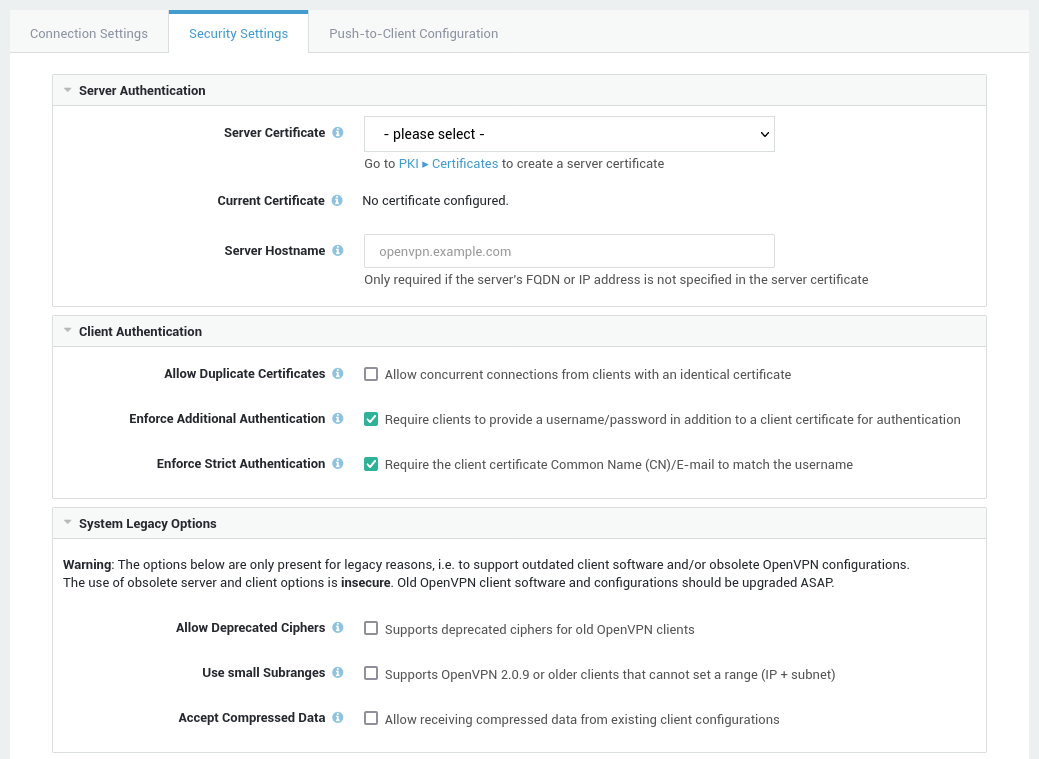
Server Authentication
| Option | Description |
|---|---|
Server Certificate |
Select the server certificate for the OpenVPN server. Go to PKI > Certificates to create or import a server certificate. If no hostname is specified in the server certificate, enter it in the Server Hostname field. |
Current Certificate |
Shows the certificate details of the selected server certificate. |
Server Hostname |
This field is optional. Enter the external FQDN or IP address of the OpenVPN server, e.g. my.server.net. The hostname will be written to the OpenVPN client configuration files used by the OpenVPN clients. Note that you only need to enter a hostname if you did not specify an FQDN or IP address in the server certificate. |
Client Authentication
| Option | Description |
|---|---|
Allow Duplicate Certificates |
Allows simultaneous OpenVPN connections from a single user if enabled. Enable this option if you have users which require OpenVPN access from different computers or devices which use the same client certificate. |
Enforce Additional Authentication |
If enabled, clients will be required to provide a username/password in addition to a client certificate for authentication. Go to Authentication > Services to configure the authentication policy of the OpenVPN server. Select DIGIPASS to enforce two-factor authentication. |
Enforce Strict Authentication |
If enabled, the server will verify if the CN or e-mail address in the client certificate matches the username provided during authentication. If they differ, the connection will be refused. Prevents sharing of client certificates. |
Enable WEB Authentication |
When enabled, the server initiates web authentication for supported clients and users. Clients must enable webauth support in their Single Sign-On properties, and users must be synchronized from a Directory Service that supports OpenID Connect web authentication. See our OpenVPN Entra ID configuration example. |
WEB Authentication Timeout |
Specify the web authentication timeout in seconds. The default is 120 seconds. |
WEB Application ID |
The identifier of the OpenVPN web application as registered with the OpenID Connect provider. See our OpenVPN Entra ID configuration example. |
WEB Application Secret |
The client secret of the OpenVPN web application as registered with the OpenID Connect provider. See our OpenVPN Entra ID configuration example. |
System Legacy Options
Important
The following options exist solely for legacy compatibility, to support outdated client software or obsolete OpenVPN configurations. These legacy options must be disabled for DCO (Data Channel Offload) to function. Additionally, using these outdated server and client options poses security risks. It is highly recommended to upgrade old OpenVPN client software and configurations as soon as possible.
| Option | Description |
|---|---|
Allow Deprecated Ciphers |
Enables deprecated ciphers to allow connections with old OpenVPN clients (v2.3 or older). It is strongly recommended to upgrade your OpenVPN clients instead of enabling this option. |
Cipher Algorithm |
Select the desired data encryption cipher for OpenVPN connections. AES is highly recommended and is the system default algorithm. The digits after AES represent the key size, which is expressed in bits. 128 bits is the system default key size. The higher the key size, the stronger the encryption. Changing this option on an existing server configuration requires you to reconfigure the clients. . |
Use small Subranges |
Enable to support outdated client software, i.e. for computers which are using OpenVPN 2.0.9 or older versions. OpenVPN 2.0.9 and older versions of the client software cannot configure a network range for OpenVPN TUN and TAP devices (IP + subnet). As a workaround, the server IP range is divided into small subranges; each client will be allocated a virtual /30 subnet, taking up 4 IP addresses per client, plus 4 additional IP addresses on the server side. It is recommended to upgrade the client software instead of using this option, as this may result in premature depletion of the configured IP address pool (IP range). |
Accept Compressed Data |
LZO compression is a data-compression algorithm that focuses on decompression speed. This option is deprecated and considered insecure. Allowing compression is not recommended, because a recent discovery revealed it is possible to collect information about an encrypted VPN tunnel's contents in very specific circumstances, if an attacker has the ability to capture the encrypted data packets while a certain type of data is transferred through the VPN tunnel. See the official OpenVPN documentation for additional information. System administrators should disable this option ASAP and distribute new OpenVPN configuration files. |
Push-to-Client Configuration
-
Navigate to VPN > OpenVPN > Server.
-
Select the Push-to-Client Configuration tab.
-
Configure the settings as explained in the tables below.
-
Update your configuration.
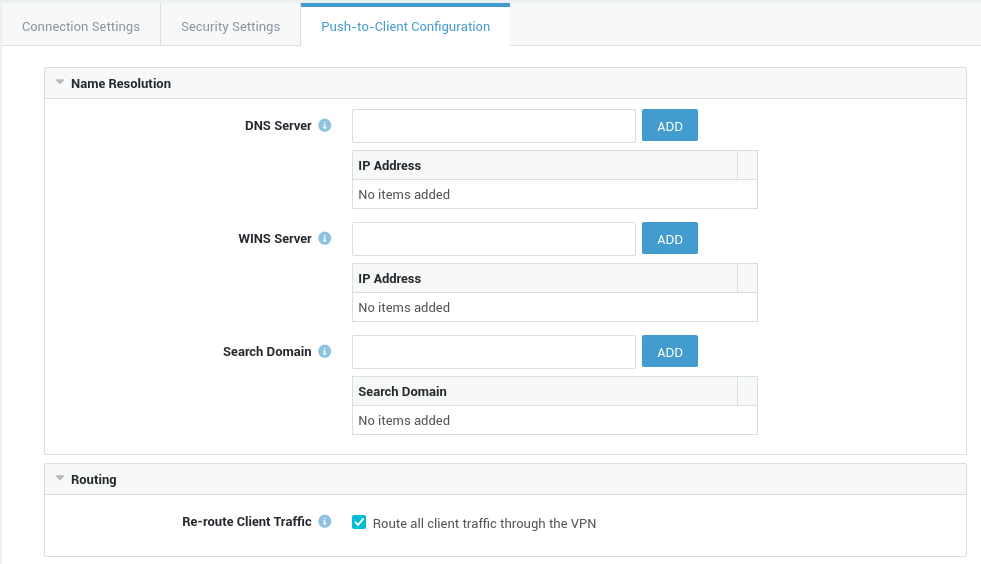
Name Resolution
| Option | Description |
|---|---|
DNS Server |
Add the primary domain name server address. Repeat to set secondary DNS server addresses. |
WINS Server |
Add the primary WINS server address (NetBIOS over TCP/IP Name Server). Repeat to set secondary WINS server addresses. |
Search Domain |
Enter a connection-specific DNS suffix, e.g. |
Block Outside DNS Servers |
This option allows system administrators to block all outbound DNS traffic (UDP and TCP on port 53) originating from network adapters other than the client's OpenVPN tunnel adapter, thereby preventing DNS leaks. This feature is supported on Windows clients only. |
Routing

| Option | Description |
|---|---|
Re-route Client Traffic |
If enabled, all client traffic, including Internet traffic, will be routed over the VPN connection. If you disable this option, you must add the internal networks that should be reachable by your OpenVPN clients. |
Network |
Add the internal network(s) you wish to make available to your OpenVPN clients. Use the CIDR notation, e.g. |
Gateway Network |
This feature allows system administrators to add networks that must be routed through the client’s existing default gateway. This is the opposite of the Network option above, where traffic is always routed via the OpenVPN tunnel. Add the network(s) that must be reachable via the client’s default gateway, using the CIDR notation, e.g. |
Inactivity Settings

| Option | Description |
|---|---|
Idle Timeout |
OpenVPN will terminate the connection after a period of inactivity. The length of the idle time is measured from the last incoming or outgoing tunnel packet. The default value is set to Dead Peer Detection and TLS control packets are not considered as activity, and are not counted as traffic, as they are only used internally and do not indicate actual user activity. |
Access Server Settings
-
Navigate to VPN > OpenVPN > Server.
-
Select the Access Server tab.
-
Configure the settings as explained in the following sections and update your configuration.

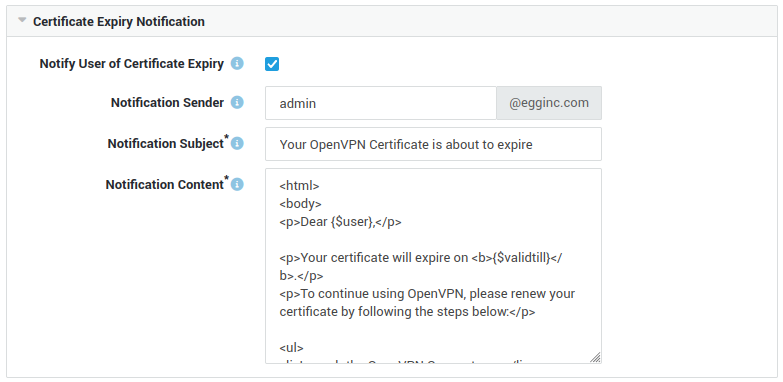
Certificate Expiry Notification
AXS Guard incorporates a feature that verifies the expiration dates of certificates assigned to OpenVPN users.
To ensure timely action, AXS Guard will proactively send email notifications to users when their certificate is about to expire.
This notification is composed of a default subject and default body. However, system administrators have the flexibility to modify the subject and body text of the email, allowing them to personalize the notification or override the default content as needed.
| Option | Description |
|---|---|
| Certificate Lifespan | The number of days for which issued OpenVPN client certificates remain valid. 365 days is the system default configuration. |
| Notify User of Certificate Expiry | Enable this option to send e-mail notifications to users regarding expiring certificates. Users will be notified 28 days before their certificate expires. The recipient e-mail address is determined based on the following priority: first, the system uses the first e-mail address in the user's e-mail alias list. If not available, the system defaults to the username appended with the mail domain (e.g., username@maildomain). Finally, if necessary, the username is combined with the system domain (e.g., username@systemdomain). |
| Notification Sender | The e-mail address from where notification mails will be sent. If no sender is defined, root will be used. The sender domain is the mail domain of the appliance. If no mail domain exists, the system domain will be used instead. |
| Notification Subject | The subject to be used in the notification. |
| Notification Content | The content to be used in the notification. Some template variables can be used, as explained in the list below. |
| Variable | Description |
|---|---|
{$user} |
Will be replaced with the user's full name or the username if no full name exists. |
{$username} |
Will be replaced with the user's AXS Guard username. |
{$fullname} |
Will be replaced with the user's full name. |
{$validtill} |
Will be replaced with the expiration date of the client certificate. |
{$license} |
Will be replaced with the license number of your AXS Guard appliance. |
Local Access Server
The local access server settings allow you to simplify the OpenVPN connection process for end-users.
For example, they can use https://openvpn.mycompany.com instead of the 0000-000XXXXX.appliances.axsguard.cloud URL provided by AXS Guard. This makes connecting to the company network through OpenVPN easier and more user-friendly.
Requirements
- The AXS Guard appliance must be reachable over the internet via TCP port 443.
- A public DNS record must resolve to the appliance's public IP address.
- A valid certificate signed by a public Certificate Authority (CA) is required for the domain name associated with the DNS record. The OpenVPN Connect client does not accept self-signed certificates or certificates signed by an untrusted CA.
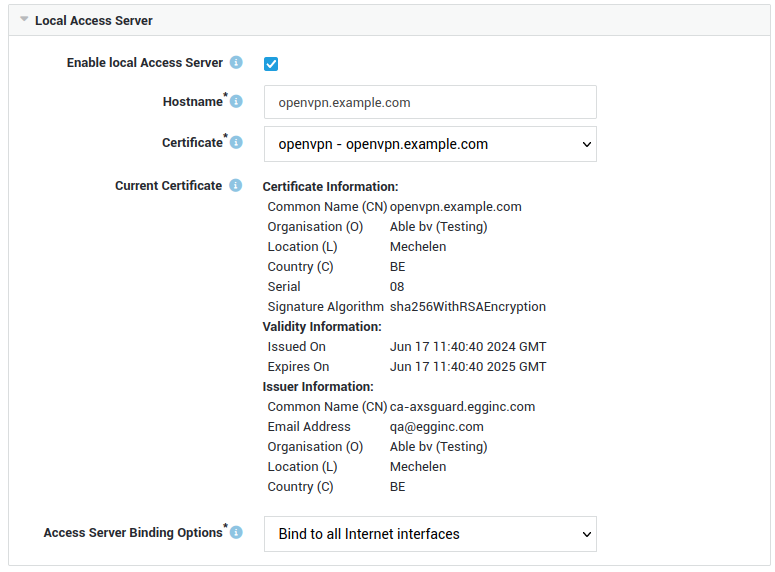
Hostname
Hostname as used by the clients to connect to the OpenVPN Access server.
It must match the name as configured in your public DNS record(s) as well as the CN (or one of the Subject Alternative Names) in the server certificate.
Certificate Configuration
Select the server certificate for the OpenVPN Access Server. Go to PKI > Certificates to import a server certificate.
It is required that the OpenVPN Access server certificate be issued by a public Certification Authority (CA). The OpenVPN Connect client does not accept self-signed certificates or certificates signed by an untrusted CA.
Certificate Details
Shows the certificate details of the configured server certificate.
Binding Options
Select the appropriate OpenVPN Access Server binding option:
| Configuration | Behavior |
|---|---|
| Bind to all Internet interfaces | The OpenVPN Access server will listen on all Internet interfaces for incoming traffic. This is the system default configuration. |
| Bind to a specific Internet interface | The OpenVPN Access server will only listen on the specified Internet interface. |
| Bind to IP address | The OpenVPN Access server will only listen on the specified IP address. |
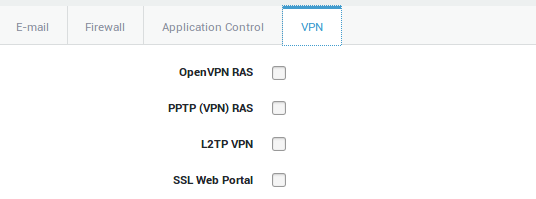
Granting Access to OpenVPN
Group-level Access
-
Navigate to Users & Groups > Groups
-
Select the appropriate group
-
Select the VPN tab
-
Check the appropriate VPN option
-
Click on update to save your settings
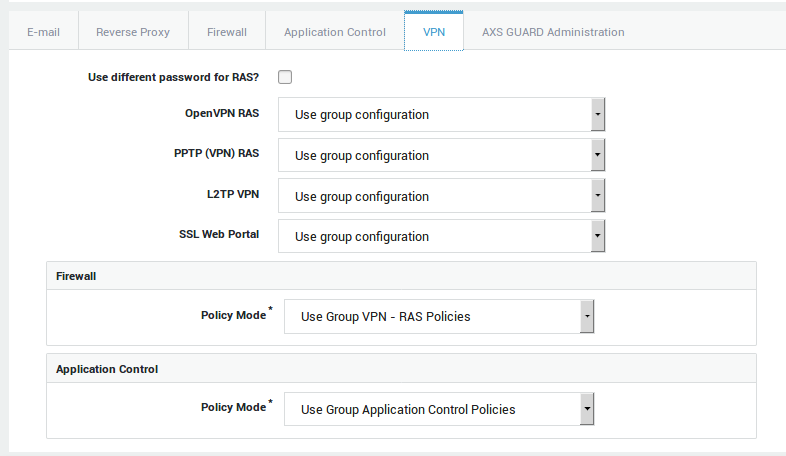
User-level Access
-
Navigate to Users & Groups > Users.
-
Select the appropriate user by clicking on the username.
-
Click on the VPN tab.
-
If access to the VPN service is already allowed in the user’s group, select use group configuration. If not, set the option to on to overrule the group configuration.
-
Update your configuration.
OpenVPN Firewall and Application Control Settings
System-Wide Firewall Policies
System-wide firewall policies affect all users on the AXS Guard network. Connected OpenVPN users are considered a part of the secure network. It is crucial to restrict the system-wide firewall rights as much as possible.
The default system-wide firewall policies (stat-sec and stat-z-fix)
provide appropriate security for OpenVPN access. However, you can
overrule these default policies simply by creating separate, custom
policies. The custom policies must then be added to the AXS Guard group
or user profile in order to be applied after authentication.
A list of default firewall rules is available in the AXS Guard Firewall How To, which can be accessed via the Documentation button in the Administrator Tool. You can also click on a firewall rule or policy to view its configuration.
User and Group Firewall Policies.
Able highly recommends the use of a strong client-side firewall and the
creation of dedicated firewall policies for access to network resources
that are available through the VPN connection. A predefined firewall
policy, fwd-access-lan, is available for convenience. This policy
allows any type of traffic towards the AXS Guard secure LAN when a VPN
connection is established.
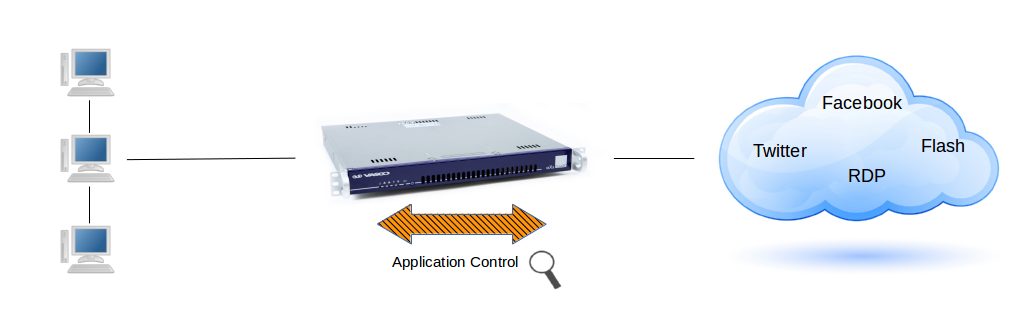
About Application Control
The application control system monitors the application layer (layer 7 of the OSI model) of the network. This is also known to as Deep Packet Inspection (DPI), a form of computer network packet filtering that examines the data part of a packet as it passes the AXS Guard, searching for defined criteria, such as protocols or websites, to decide whether the packet may pass or needs to be blocked. The AXS Guard also collects and reports statistical information about all layer 7 traffic.
The application control system allows application-layer detection of protocols, regardless of the port being used. This means that it is possible to both detect known protocols on non-standard ports, e.g. http traffic on ports other than 80, and also the opposite, e.g. detect Skype traffic on port 80. The system will also detect and block access to certain file types, such as multimedia files (if enabled).
Group-level Configuration
-
Navigate to Users & Groups > Groups.
-
Click on the appropriate group name.
-
Select the VPN tab to specify the VPN firewall and application control policies.
-
Update your configuration.
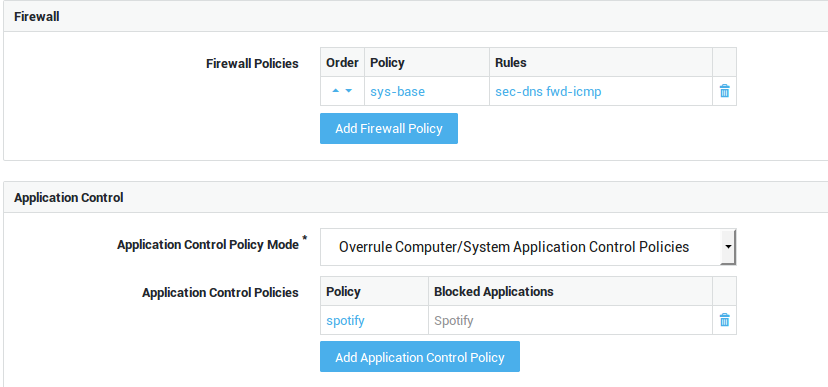
Option |
Description |
|---|---|
Add Firewall Policy |
Select specific firewall policies for group members who connect to the corporate network with a VPN client, such as a PPTP client. Go to Firewall > Policies > Dynamic for an overview of defined firewall policies. |
| Option | Description |
|---|---|
Use computer/system application control policies |
Enforce the system-wide policies, assigned under Application Control > General and the computer-level policies, if any. |
Add to computer/system application control policies |
Assign specific policies to this group, in addition to the system-wide policies configured under Application Control > General and computer-level policies, if any. |
Overrule computer/system application control policies |
Do not enforce the system-wide policies and computer-level policies, but only the specified policies. The specific policies will be enforced when a member of the group successfully authenticates. |
User-level Configuration
-
Navigate to Users & Groups > Users.
-
Click on the appropriate username.
-
Select the VPN tab and select the appropriate firewall and application control policy modes as explained below.
-
Update your configuration.
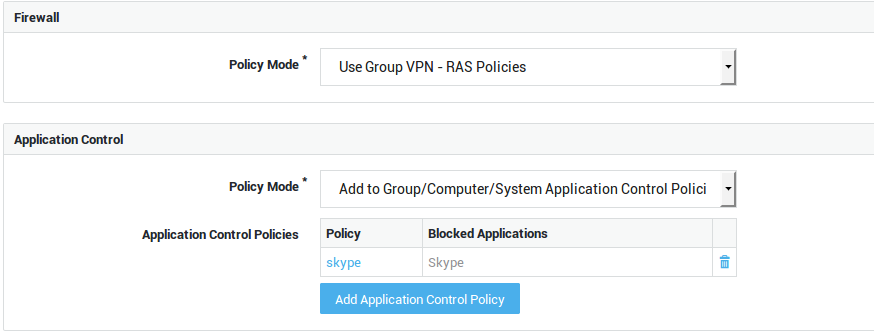
| Option | Description |
|---|---|
Use Group Firewall Policies |
Select this option if you wish to apply the same firewall policies for VPN use as defined in the user’s group. |
Add to Group Firewall Policies |
Select this option to add specific policies for VPN use, in addition to the user’s group firewall policies. |
Overrule Groups Firewall Policies |
Select this option to overrule the group firewall configuration and specify unique policies for the user. |
| Option | Description |
|---|---|
Use group application control policies |
Only enforce the policies as configured for the user’s group. |
Add to group application control policies |
Enforce the policies as configured for the user’s group and the policies that are specified in the user profile. |
Overrule group application control policies |
Only policies configured at the user, computer and system levels are enforced. Group policies are not enforced. |
Overrule Group / Computer / System Application Control Policies |
Only the application control policies configured at the user level are enforced. |
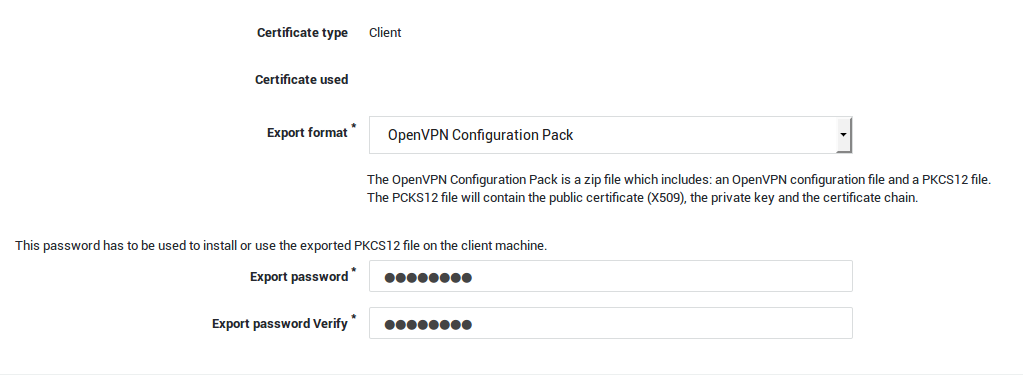
Exporting OpenVPN Configuration Files
OpenVPN client configuration files should be generated using the AXS Guard CA through PKI > Certificates. Refer to the PKI guide for detailed instructions on creating and exporting certificates.
Important
- Manually generating and exporting OpenVPN configuration files is only necessary for non-Access Server setups.
- You can easily block a user's OpenVPN access by revoking their client certificate.
- Go to PKI > Certificates.
-
Locate the certificate to be exported and click on the export icon.

-
Select the appropriate export format for your client, enter an export password and click on the export button.
Downloading OpenVPN Configuration Files
Users can also download their OpenVPN configuration via the Cyber Resilience Portal or a custom URL. In order to do this, users need a supported OpenVPN client and a valid set of credentials - like a username and a password - and of course the address (URL) of the OpenVPN Access Server.
Requirements:
- The AXS Guard OpenVPN server must be correctly configured and running.
- The Tunnel Device Type must be set to
TUN - IPv4 Encapsulation(TAP is not supported). -
The AXS Guard appliance must be reachable via a custom URL or the Cyber Resilience Portal. The latter can be tested by logging in to the Cyber Resilience Portal portal. Under Adaptive Security > Infrastructure, find your appliance's license and click the corresponding login button.

OpenVPN Access Server URL:
| Access Type | URL |
|---|---|
| Standard connection URL | https://0000-000XXXXX.appliances.axsguard.cloud/ (Replace 0000-000XXXXX with the license number of your AXS Guard appliance.) |
| HA cluster connection URL (master node) | https://m-0000-000XXXXX.appliances.axsguard.cloud/ |
| Custom URL | https://vpn.mycompany.com (see our knowledge base for instructions) |
Supported OpenVPN Clients:
| OS | Client |
|---|---|
| Windows | OpenVPN Connect |
| Android | |
| Linux | OpenVPN 3 Linux |
| macOS | OpenVPN Connect v3 (OpenVPN Connect v2 is not supported) |
| iOS | OpenVPN Connect v3 |
User Authentication
Setting the OpenVPN Server Policy
Clients are authenticated by their client certificate. However, additional authentication methods are available for increased security, e.g. DIGIPASS authentication.
In this section, we explain how to configure additional authentication methods for OpenVPN users. For detailed information about authentication methods and policies, see the AXS Guard authentication manual.
The instructions in this section are only relevant if additional authentication is enforced in the OpenVPN server configuration.
-
Navigate to Authentication > Services.
-
Click on OpenVPN.
-
Choose the appropriate Authentication Policy by clicking on the Select button, e.g. DIGIPASS if you want users to authenticate with a one-time password.
-
Update your configuration.
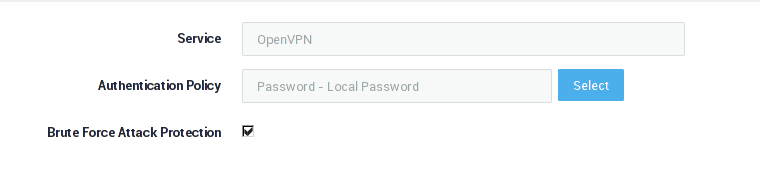
| Field | Description |
|---|---|
Service |
The AXS Guard service to be configured. This field cannot be edited. |
Authentication Policy |
The authentication policy determines how users must authenticate to access the service. Go to Authentication > Advanced > Policy for an overview of policies configured on your system. |
Brute Force Attack Protection |
Enable to protect the selected service against brute force attacks as configured under Authentication > General. |
AXS Guard Service |
Supported Authentication Policies |
|---|---|
OpenVPN |
|
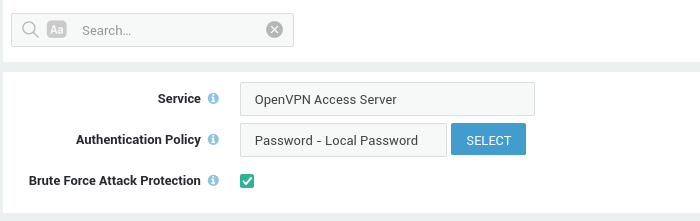
Setting the OpenVPN Access Server Policy
Configure the authentication policy for users who download their OpenVPN configuration via the Cyber Resilience Portal or a custom URL, using their OpenVPN Connect Client.
-
Navigate to Authentication > Services.
-
Click on OpenVPN Access Server.
-
Choose the appropriate Authentication Policy by clicking on the Select button.
Microsoft Entra ID
The AXS Guard OpenVPN Access Server leverages OpenID Connect, an industry-standard protocol that builds upon OAuth 2.0, allowing for user authentication and authorization with external identity providers. See the knowledge base section for detailed configuration instructions.
Client-Side Configuration
Deploying with Active Directory
About
The documentation to install and deploy the OpenVPN Technologies client is available on the official website: http://openvpn.net. The main reason you want to use this client, is because it can be deployed via Active Directory, which is particularly useful in large network environments.
The OpenVPN Connect client (MSI) must be deployed via GPOs using a generic server locked profile.
Copying the Server and Client Files to Their Appropriate Directories
The AXS Guard OpenVPN configuration file, which contains the client
certificate and configuration, must be copied to the appropriate
directory on the client, typically C:\Program Files\OpenVPN\config\
This process can be automated with an Active Directory logon script.
Refer to your Active Directory documentation for information about
creating logon scripts. Check the OpenVPN online
reference
for more information.
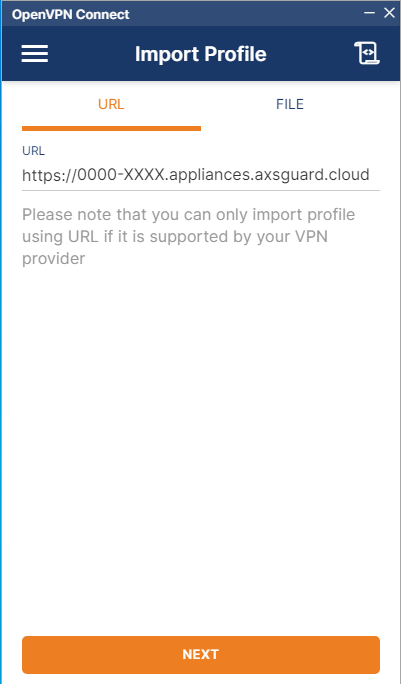
OpenVPN Connect Example
- Download and install the OpenVPN Connect app.
- Launch the OpenVPN Connect app.
-
Enter the OpenVPN Connect URL, for example:
- Standard URL:
https://0000-00012345.appliances.axsguard.cloud/(Replace0000-00012345with the license number of your AXS Guard appliance). - Custom URL:
https://openvpn.mycompany.com.
Important - OpenVPN Access in High Availability (HA) Configurations
In High Availability (HA) configurations, URLs with the
m-ands-prefixes automatically redirect to the active master and slave nodes. The master node handles the primary OpenVPN connections, while the slave node is ready to take over if a failover occurs.For example,
https://m-0000-00012345.appliances.axsguard.cloudalways points to the running master appliance. In the event of a master failure, the running slave appliance will be promoted to master, ensuring continuous availability. The OpenVPN service on the new master will automatically take over and maintain VPN access without requiring changes to the user’s connection settings.This seamless redirection ensures uninterrupted VPN connectivity even during appliance failover.
- Standard URL:
-
Click on the Next button.
- Enter your user credentials for the OpenVPN Access Server.
- Click on Import to download your OpenVPN configuration.
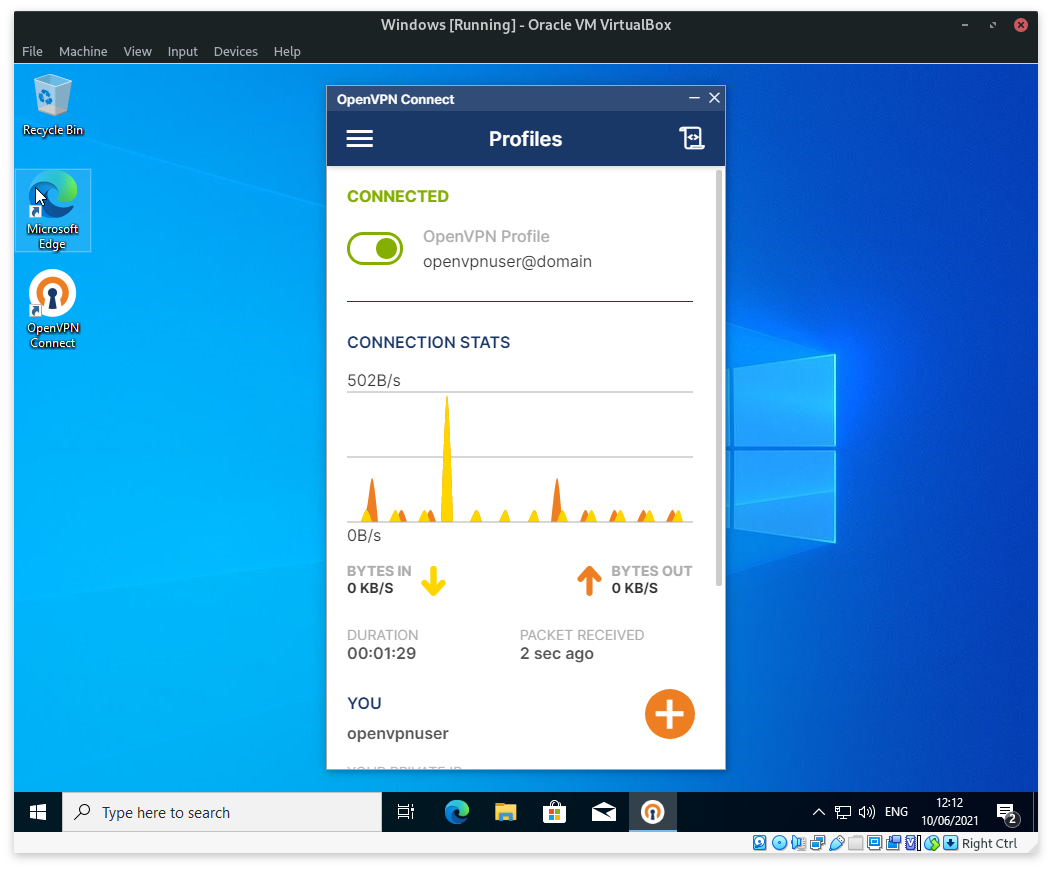
- Click on the slider button to connect to the OpenVPN server (to initiate a VPN connection).
-
Enter your OpenVPN server password when prompted.
Manual Installation and Configuration in Windows
Prerequisites
You need the following to successfully install, configure and run your OpenVPN client in Windows:
-
A working server configuration.
-
A valid client certificate.
-
The free OpenVPN client, which can be downloaded from https://openvpn.net/vpn-client/
-
A Windows workstation with Internet access
-
Windows Administrator privileges (required to install and run the OpenVPN software)
Installing the OpenVPN Client
-
Log in to Windows as an administrator.
-
Download the OpenVPN client software.
-
Start the installer and follow the on-screen instructions.
Extract the OpenVPN Configuration Files
-
Log on to Windows (administrator privileges are required).
-
Save the OpenVPN configuration pack to the location of your choice.
-
Right click on the file and select Extract All as shown below.

Testing the OpenVPN Connection
-
Open the folder where your extracted the OpenVPN configuration pack.
-
Right-click on the OpenVPN configuration file and select Start OpenVPN on this config file (administrator privileges are required).

-
Enter the credentials and certificate password as requested on screen.
-
Minimize the window when your connection is up.
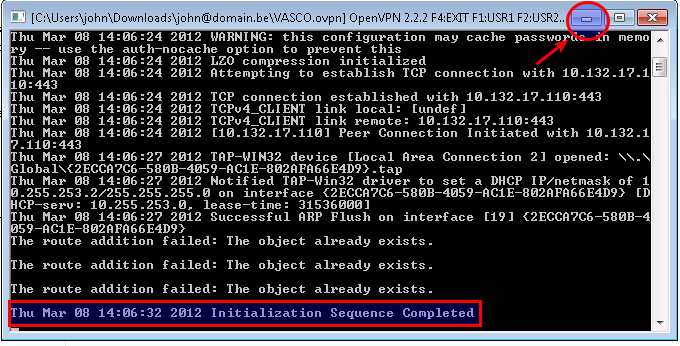
Close the window to stop the OpenVPN connection.
OpenVPN Status & Logs
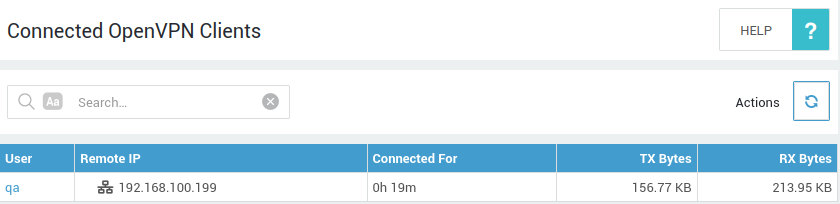
Checking the Status
-
Log in to the AXS Guard appliance.
-
Navigate to VPN > OpenVPN > Status.
Accessing the OpenVPN Logs
-
Log in to the AXS Guard appliance.
-
Navigate to VPN > OpenVPN > Logs.
-
Select the desired log type (server or config).
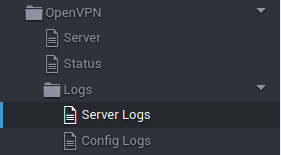
-
Click on the desired date to view the log entries.
| Type | Description |
|---|---|
| Server Logs | The OpenVPN server logs contain detailed information about VPN server events, such as client connection details, encryption and authentication. They allow you to analyze and troubleshoot client connectivity. |
| Config Logs | The config logs contain useful information about OpenVPN client connect events. See the context-sensitive help on your AXS Guard appliance for additional information. |
Troubleshooting
The OpenVPN service fails to start
If another service on your appliance is already using port 443, the service will not start. In that case, you must change the port number.
AXS Guard services that also use port 443:
-
The Reverse Proxy server (HTTPS & RDG)
-
The Webmail server
Contact Able Support if you need to change your Webmail service port.
The connection to the OpenVPN server is successful, but I cannot connect to the corporate LAN
Windows requires administrator privileges to execute some functions in the OpenVPN software, such as adding network routes. Run the OpenVPN client as an administrator.
The OpenVPN client indicates that the route addition failed using CreateIpForwardEntry
Run the VPN client as an administrator.
The OpenVPN client indicates that the user cannot write to the log folder
Run the VPN client as an administrator.
Authenticating without providing a certificate password.
Important
This is possible, but not recommended. The certificate passphrase protects your certificate when it’s copied from one location to another. It also prevents abuse in case it is intercepted or stolen by a third party and provides authentication if no other authentication method has been configured for the OpenVPN service.
This operation requires you to use the command line. Note that the openssl binary, which is needed to remove the certificate password, is not included with the OpenVPN client, so this method only works on a Linux machine or on a Windows machine where the cygnus or openssl package is installed. If a user insists on removing the password of the pkcs12 client certificate, use the following command:
openssl pkcs12 -in <name of .p12> -nodes -out file.pem
Put this file in C:\Program Files\OpenVPN\config. Then modify the ovpn
config file as follows:
-
Remove:
pkcs12 <name of cert> -
And add:
Delete the current OpenVPN client configuration and export the original OpenVPN client configuration again on the client.
I'm seeing comp-lzo warnings in the logs.
Compression must be configured the same on the client and the server side. If there is a mismatch, the server and client log files will show the following messages:
WARNING: 'comp-lzo' is present in local config but missing in remote config, local='comp-lzo'
Bad compression stub decompression header byte: 102
Bad LZO decompression header byte: 69
IP packet with unknown IP version=15 seen
Allowing compression is not recommended, because a recent discovery revealed it is possible to collect information about an encrypted VPN tunnel's contents in very specific circumstances, if an attacker has the ability to capture the encrypted data packets while a certain type of data is transferred through the VPN tunnel.
System administrators should disable this option ASAP and distribute new OpenVPN configuration files.
No common cipher between server and client.
When deprecated ciphers are disabled (recommended) and an old OpenVPN client connects to the AXS Guard OpenVPN server, using an old client configuration, the server logs will contain one of the following entries:
PUSH: No common cipher between server and client. Server data-ciphers: 'AES-256-GCM:AES-128-GCM:AES-128-CBC', client supports cipher 'AES-256-CBC'
PUSH: No common cipher between server and client. Server data-ciphers: 'AES-256-GCM:AES-128-GCM', client supports cipher 'AES-128-CBC'
PUSH: No common cipher between server and client. Server data-ciphers: 'AES-256-GCM:AES-128-GCM', client supports cipher 'BF-CBC'
- Upgrade your OpenVPN clients to the latest version.
- Disable deprecated ciphers ASAP.
- Distribute new OpenVPN configuration files to your clients.
Support
If you encounter a problem
If you encounter a problem with AXS Guard, follow the steps below:
-
Check the troubleshooting section of the feature-specific manual.
-
Check the knowledge base on this site for information about special configurations.
-
If no solution is available in any of the above sources, contact your AXS Guard vendor.
Contact Information
(+32) 15-504-400
support@axsguard.com