PAX Configuration Guide
About this Document
This document is intended for technical personnel, system administrators and network administrators. It explains how to install and configure a Personal AXS Guard VPN unit.
Examples used in this Guide
All setups and configuration examples in this guide are executed as an advanced administrator. Some options are not available if you log in as a full administrator or a user with lower access privileges.
As software development and documentation are ongoing processes, the screenshots shown in this guide may slightly deviate from the current user interface.
Environmental Safety
PAX units may contain substances which are hazardous for human health and the environment. To reduce the risk of any hazardous substances being released into the environment and to reduce the depletion of natural resources, we encourage you to use appropriate recycling systems.
Such systems reuse or recycle most end-of-life materials in a safe way. The crossed-bin symbol invites you to use such systems. Further information on collection, reuse and recycling is available from your local or regional refuse administration center.
Hardware Specifications
AG1192 Road Warrior
| Feature | Specification |
|---|---|
| CPU | QCA9331, 400MHz |
| Memory | DDRII 64MB |
| Storage | 16MB Nor Flash |
| Wireless Frequency | 2.4GHz |
| Transmission rate | 150Mbps |
| Protocol | 802.11 b/g/n |
| Power input | 5V/1A, USB Power Supply |
| Power consumption | <1W |
| Dimension, Weight | 82 X 24 X 11mm, 10g |
AG1497 Home Office
Important - Product Discontinued
This product has been discontinued, but technical support is still available.
Technical Specifications
Hardware Features |
|
|---|---|
Interfaces |
|
Buttons |
|
External Power Supply |
12VDC / 1.5A |
Dimensions |
9.6 x 6.4 x 1.3 in. (243 x 160.6 x 32.5mm) |
Antenna |
3 external detachable dual band antennas (RP-SMA) |
Wireless Features
Wireless Features |
|
|---|---|
Wireless Standards |
IEEE 802.11a, IEEE 802.11b, IEEE 802.11g, IEEE 802.11n |
Frequency |
2.4GHz & 5GHz |
Signal Rate |
|
EIRP |
<20dBm |
Reception Sensitivity |
|
Guest Network |
|
Operating Environment
| Feature | Specification |
|---|---|
| Operating Temperature | 0°C - 40°C (32°F - 104°F) |
| Storage Temperature | -40°C - 70°C (-40°F - 158°F) |
| Operating Humidity | 10% ~ 90% non-condensing |
| Storage Humidity | 5% ~ 90% non-condensing |
AG1694 Small Office
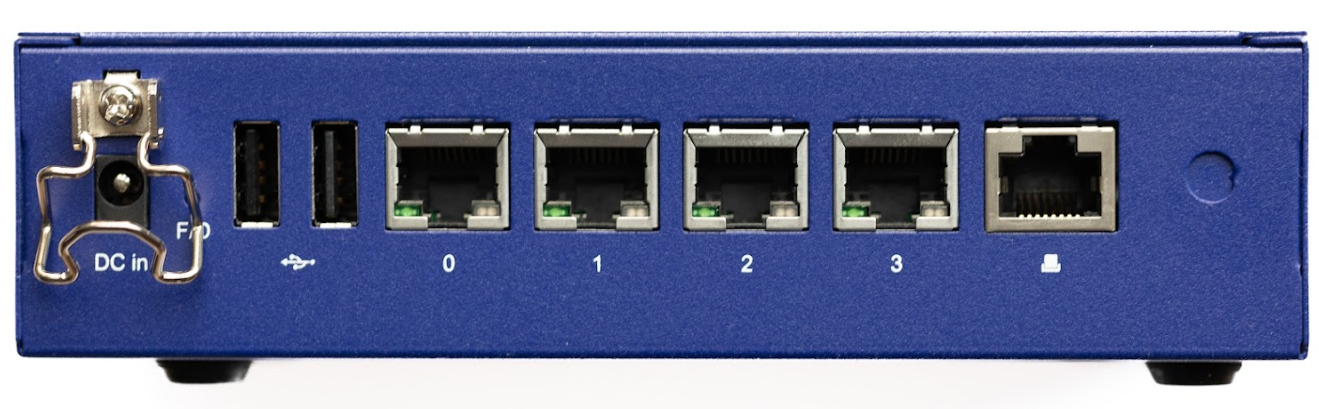
| Network Port | Use |
|---|---|
| 0 | LAN |
| 1 | Not in use |
| 2 | WAN - Internet |
| 3 | Not in use |
 |
Console |
Hardware Features |
|
|---|---|
Model Name |
PAX Small Office |
CPU |
Intel Atom C2358 |
PCH |
N/A |
Memory |
DDR3/L SODIMM 1333MHz Memory (1 Slot) |
Ethernet |
Ports GbE Ethernet 4 Ports |
Bypass Segment(s) |
N/A |
USB Interface |
USB2.0 x2 |
Console |
RJ-45 Console x1 |
Power Supply Unit (PSU) |
24W Adapter |
Dimensions |
165(W)×105(D)×43(H)mm |
Weight |
0.6kg |
Operating Environment |
Temperature: 0 - 40℃ |
Humidity Tolerance |
20 - 90% RH(No Condensation) |
Certifications |
FCC CE UL |
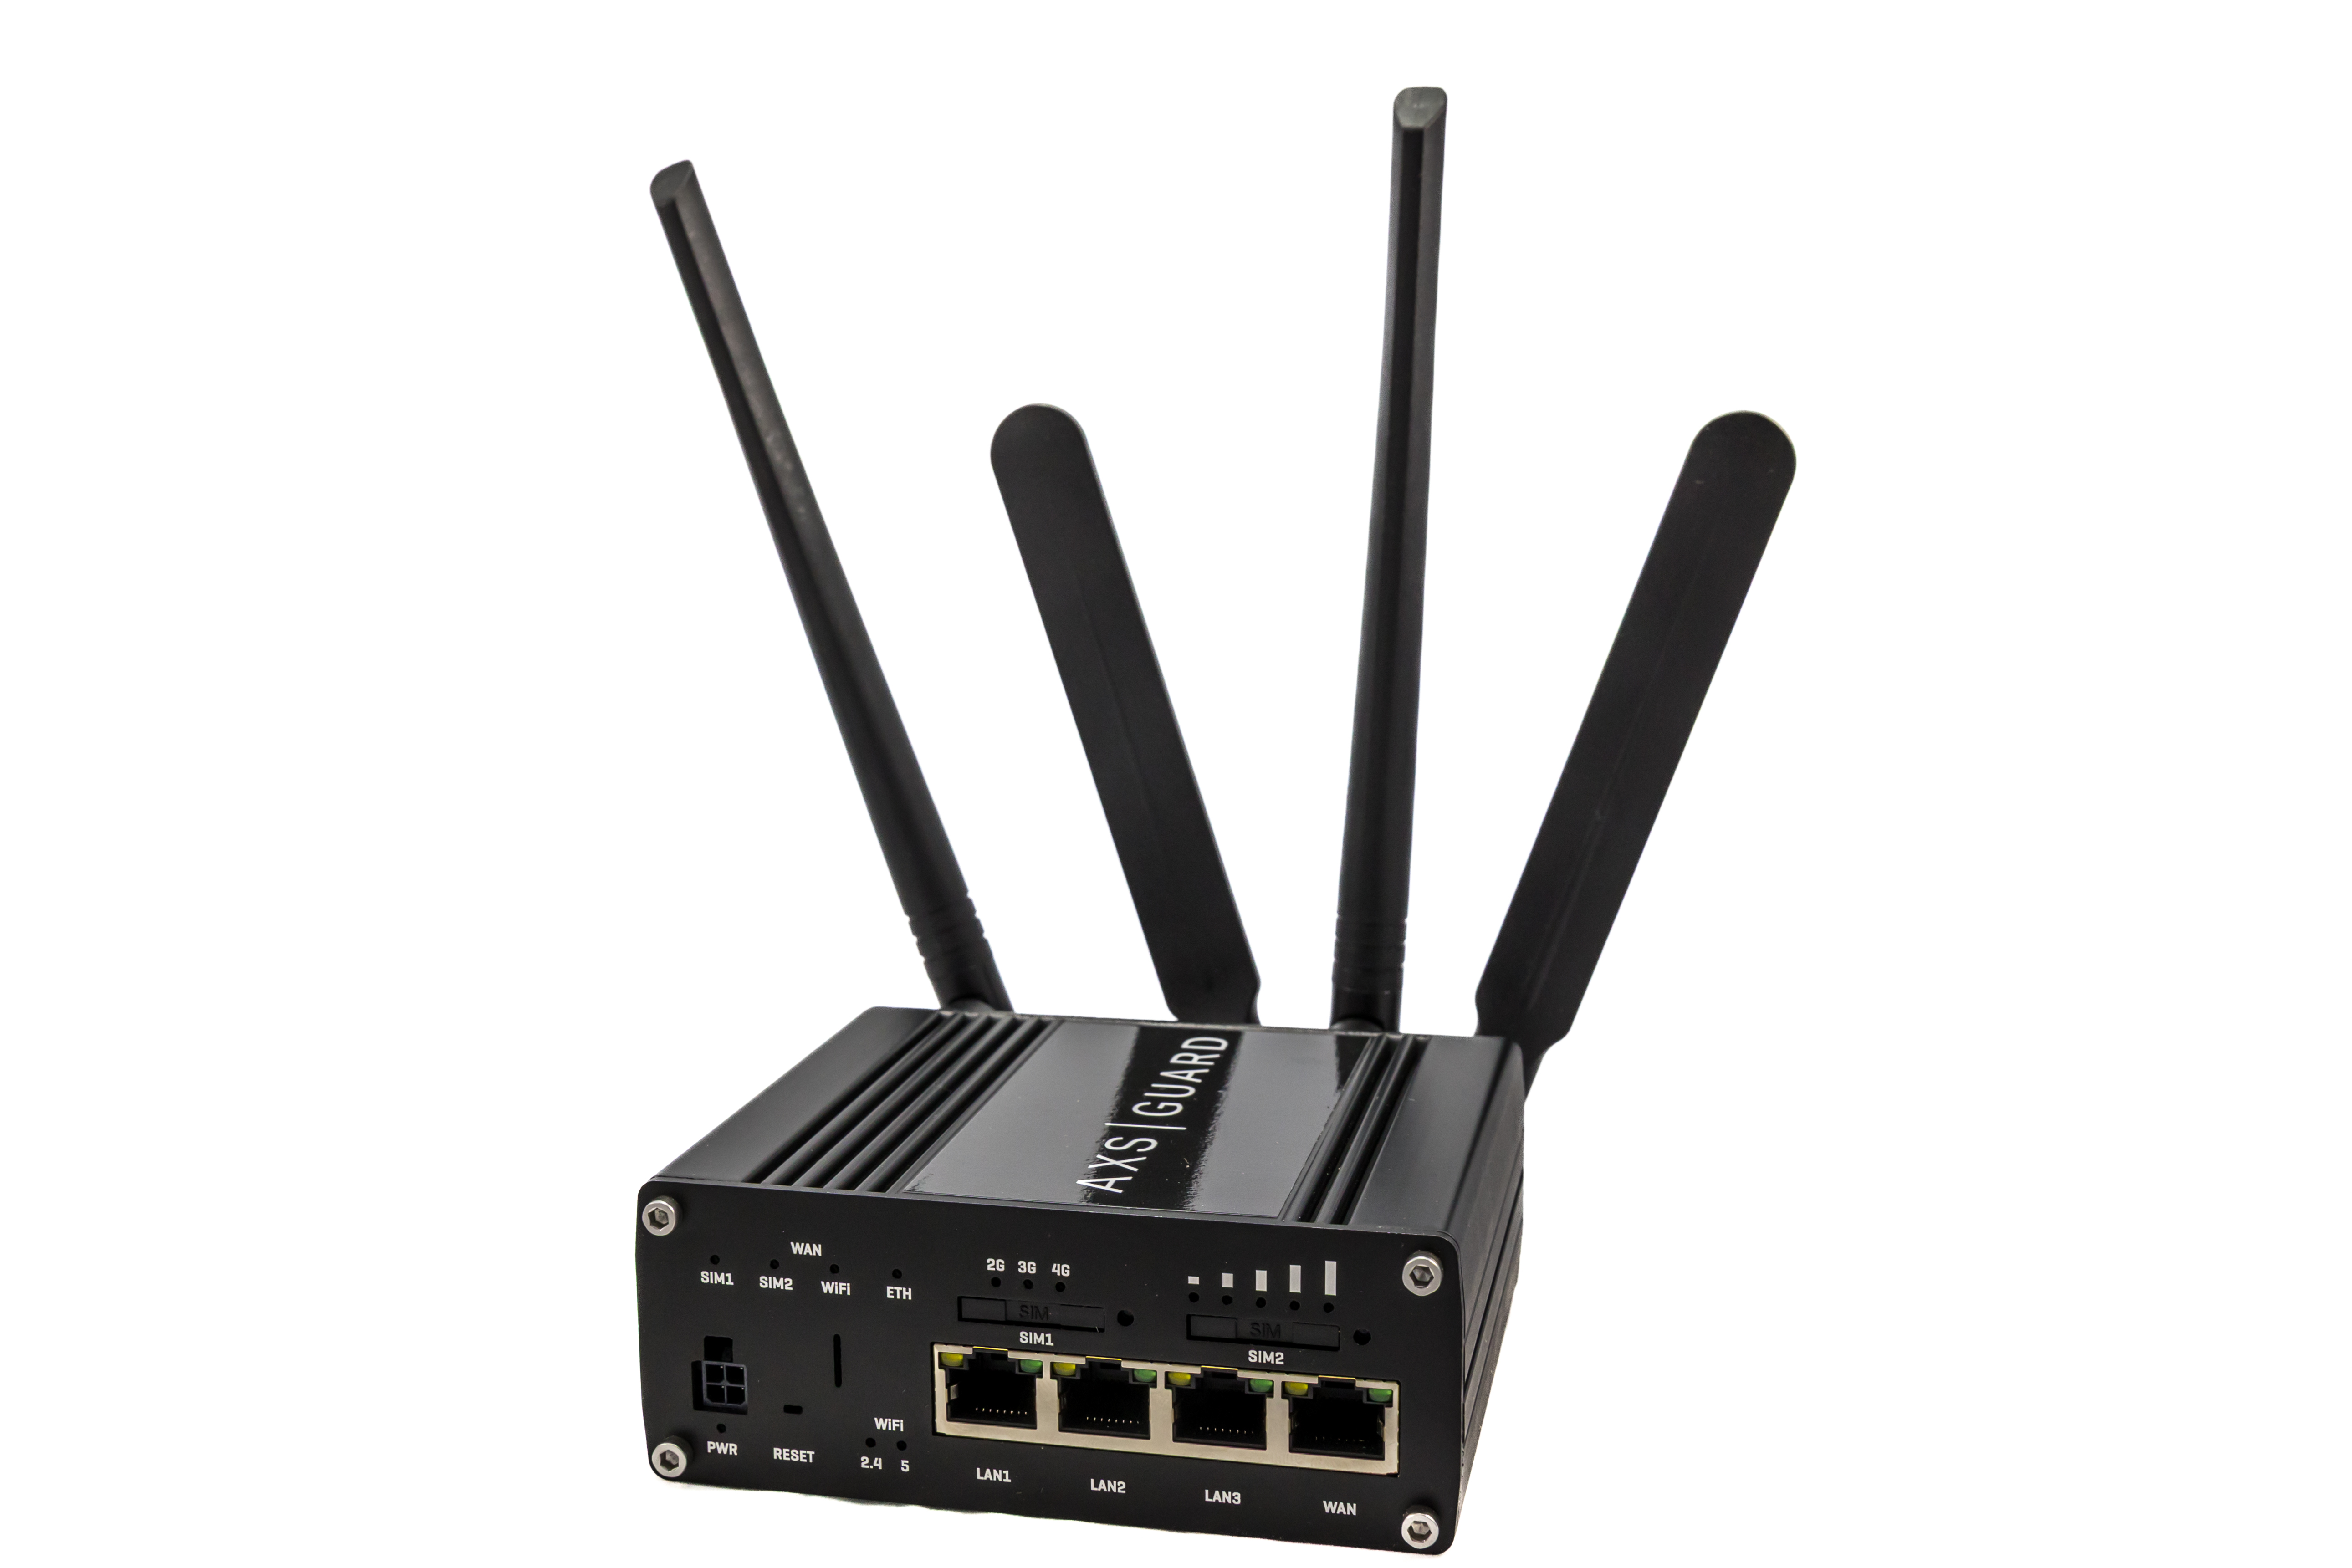
AGi200 PAX Industrial
Hardware Specifications |
|
|---|---|
Model Name |
PAX Industrial |
CPU |
MediaTek, Dual-core, 880 MHz, MIPS1004Kc |
Memory |
256 MB, DDR3 |
Storage |
16 MB serial NOR flash, 256 MB serial NAND flash |
Cooling |
Fanless design, passive cooling |
Interfaces |
|
Wi-Fi |
802.11b/g/n/ac Wave 2 (Wi-Fi 5) with data transmission rates up to 867 Mbps (Dual Band, MU-MIMO) |
Mobile |
|
Power |
|
Dimensions |
115 x 44.2 x 95.1 mm |
Weight |
460 g |
Mounting Options |
DIN rail included |
Operating Environment |
|
Safety Standards |
|
Monitoring |
PAX Core OS |
Features and Concepts
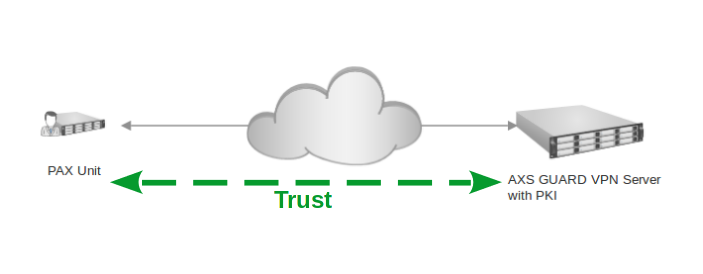
Central Management and PKI
PAX units rely on digital certificates for identification and encryption purposes. In terms of certificate types, there are client (PAX) and server (AXS Guard) certificates. Only PAX units with a valid client certificate are allowed to connect to the corporate network.
System administrators must use the AXS Guard’s built-in PKI to sign, manage and distribute valid PAX certificates; certificates signed by a commercial CA are not recommended.
Why we advise against using a commercial CA
When private services, such as VPN access, are provided, it is recommended to use a private Certificate Authority (CA), such as the built-in CA.
Unlike public CAs that issue certificates to anyone, the built-in CA ensures that only a select group of people (or PAX devices) have access. Therefore, access to the PAX server needs to be secured with certificates issued by the built-in Certificate Authority.
Using a commercial CA can also be very inconvenient, especially when managing a large number of clients. If a commercial CA is used for the server certificate, you will be locked into using the same commercial CA to sign the client certificates. Switching certificate vendors would then require reconfiguring all PAX units.
In addition to client certificates, the AXS Guard appliance also centrally manages the following PAX settings:
-
The administrator and user passwords required to log in to the web-based administrator tool of PAX units.
-
PAX network settings, such as IP addresses, routes, NAT rules and DNS servers.
-
PAX DHCP server settings.
-
Wireless network settings, in case users are connecting to the PAX unit from a PC equipped with a wireless network device.
-
Firewall policies which govern traffic through the VPN tunnel, as well as traffic towards the Internet.
-
Application control policies.
Firewall Scenarios
There are two possible firewall scenarios:
-
The VPN connection is established: the HQ AXS Guard VPN appliance pushes firewall policies to the PAX unit of the user. These policies govern network traffic from the PAX unit’s LAN towards the Internet as well as traffic going to the corporate network. System default firewall policies only accept ICMP traffic and connections to the AXS Guard support center. Additional policies have to be added manually. See the firewall guide for additional information.
-
The VPN connection is down: By default, PAX units are configured to block incoming connections. In this state, PAX units behave like classic home network routers. All traffic towards the Internet is allowed, traffic coming from the Internet is dropped, except ICMP traffic and remote support connections.
Important
Restrict corporate network access to what is specifically needed by PAX clients. This improves security in case a client is hijacked or compromised, e.g. if infected with a trojan virus.
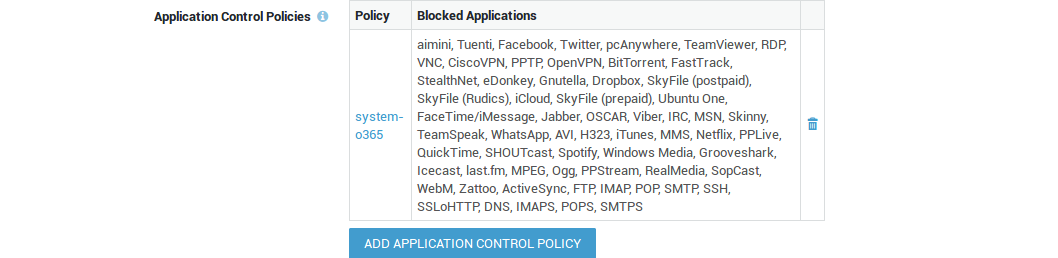
Application Control
Application control refers to the process of managing and controlling network traffic related to the execution of certain software programs and access to applications on the Internet. This can include allowing certain applications and protocols to be used while blocking others, e.g. Facebook, Twitter, etc.
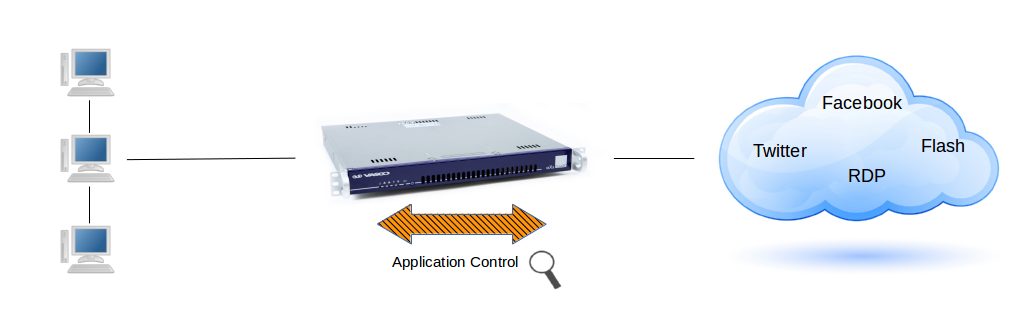
Important
System administrators should unblock protocols and applications which must be accessible via the VPN tunnel, e.g. social media. The following protocols are allowed by the factory default application control policy: HTTP, HTTPS and DNS. All other traffic is blocked by default.
PAX clients which are configured to access the Internet via the AXS Guard proxy server are subject to the web access application control policy. Go to Web Access > Proxy Server to configure the application policy for the proxy server.
DNS Scenarios
The Domain Name System (DNS) translates human-readable hostnames, e.g. www.example.com to machine-readable IP addresses, e.g. 93.184.216.34.
Depending on whether the PAX VPN tunnel is up or down, the following DNS scenarios apply:
| Bypass AXS Guard DNS | VPN Status | Behavior |
|---|---|---|
| Off | Up | The PAX unit uses AXS Guard to resolve hostnames. This is the system default configuration, which also allows you to use AXS Guard's DNS security (server-side configuration). |
| Off | Down | The PAX unit uses the DNS servers of the ISP or manually configured DNS servers (client-side configuration). |
| On | Up | The PAX unit uses the DNS servers as configured on AXS Guard (server-side configuration). |
| On | Down | The PAX unit will use the DNS servers as configured on the client side. |
DHCP
The Dynamic Host Configuration Protocol (DHCP) is an application protocol that enables a PAX unit to dynamically assign IP addresses to computers and other devices in its network.
DHCP simplifies network administration because software automatically keeps track of IP addresses so that administrators don’t have to. Many Internet Service Providers (ISPs) use DHCP to assign IP addresses to their clients.
VLANs
Personal AXS Guard supports VLANs or Virtual Local Area Networks. They offer several advantages for network management and security, including:
- Segmentation: VLANs allow for the segmentation of a network into multiple smaller logical networks, improving network performance by reducing broadcast traffic and enhancing security by isolating devices within each VLAN.
- Scalability: VLANs facilitate network scalability by enabling the creation of new logical networks without the need for additional physical hardware.
- Security: VLANs improve network security by limiting access to specific resources and reducing the risk of unauthorized access and data breaches.
- Cost Savings: By using VLANs, organizations can consolidate network infrastructure, reducing the need for costly physical hardware and simplifying network management.
- Simplified Network Management: VLANs simplify network management by allowing administrators to configure and manage networks from a single point of control, reducing the need for complex and time-consuming configuration changes.
NAT-Traversal
UPnP and NAT-PMP
UPnP (Universal Plug’n'Play) enables programs running on a host to automatically configure port forwarding on the PAX. UPnP basically allows a program to open ports that are necessary for its operation, without any warning or intervention from the system administrator. For this reason, there is a security risk associated with enabling UPnP on the PAX. Technically, a worm or malware could use this function to compromise your LAN’s security.
It is therefore recommended to manually configure port forwarding whenever possible and disable UPnP. However, in some cases dynamic port forwarding may be required if manual port forwarding becomes impractical.
NAT-PMP is a protocol similar to UPnP supported by a number of Windows and Linux applications.
DNAT and Port Forwarding
Destination network address translation (DNAT) is a technique for transparently changing the destination IP address of an en route packet and performing the inverse function for any replies. DNAT is commonly used to publish a service located in a private network on a publicly accessible IP address. This use of DNAT is also called port forwarding.
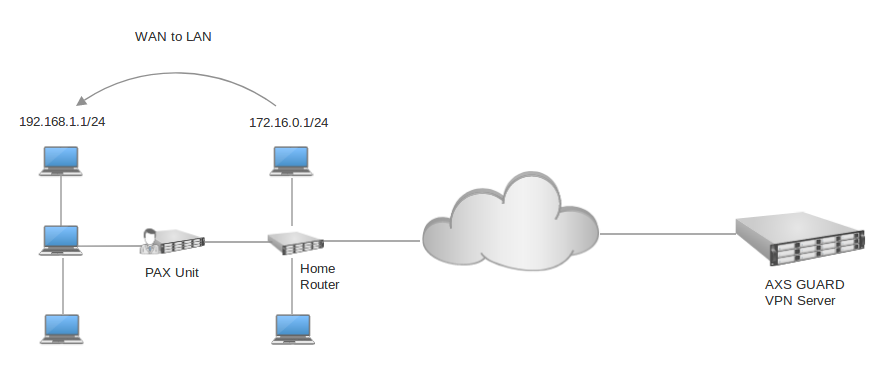
WAN to LAN
This option may be enabled if the WAN interface of the PAX unit is connected to one of the main router’s LAN ports, a.k.a. cascading.
In this case, the WAN interface of the PAX unit will be assigned an IP address in a private range by the main router. By default, computers that are connected to the LAN of the main router will not be able to communicate with computers in the LAN of the PAX unit and vice versa because they are part of separate networks.
Enable this option to allow such communications. If enabled, you must add the LAN network(s) of the main router to allow communications between the separate LAN segments.
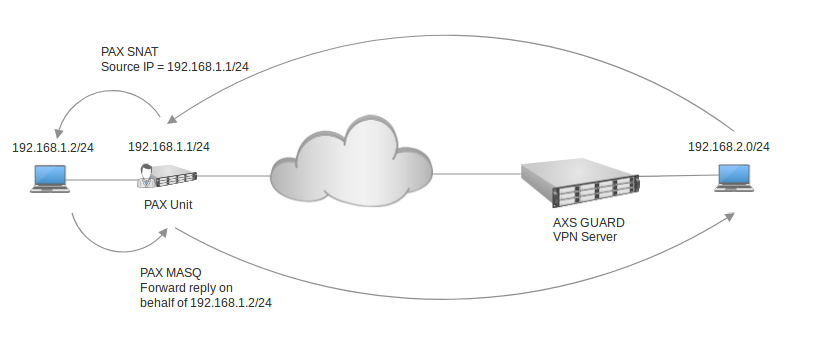
SNAT and Masquerading
Source Network Address Translation (SNAT) is a NAT type used to change the source IP address of packets.
Masquerading is a NAT type which is used to change a packet’s source IP address. For all new connections, the source IP address is looked up, based on the outgoing interface of the packet, and subsequently altered (masqueraded). Reply packets are automatically "demasqueraded" and returned to the original source IP addresses.
VPN Failover
In computing, failover is the capability to switch over automatically to a redundant or secondary computer server, system, or a network upon the failure or abnormal termination of the primary server, system, or network. Failover occurs automatically and is generally a seamless process.
If you have a site with 2 AXS Guard appliances in a high availability (HA) configuration or a single AXS Guard appliance equipped with multiple Internet devices (Internet Redundancy system), you can configure PAX units to automatically try alternate IP addresses in case the primary VPN connection is failing.
Failover can also be applied at the protocol level; PAX units support UDP and TCP. The default behavior is set to auto, which means that a UDP connection will be attempted first. If it fails, the PAX unit will automatically try to establish a TCP connection. If alternate IP addresses have been configured and the VPN protocol type is set to auto, the PAX unit will try to establish a VPN connection in the following order:
-
IP address 1 on UDP
-
IP address 1 on TCP
-
IP address 2 on UDP
-
IP address 2 on TCP
-
IP address X on UDP
-
IP address X on TCP
This provides the flexibility to use UDP on one VPN server and TCP on another. However, PAX units will take longer to recover from a failing VPN connection; if the UDP connection towards the first server fails, units will first try to establish a TCP connection with the same server, before they switch to the second server.
If a connection is made to the second server, UDP will be attempted first. In case a specific VPN protocol is selected, the failover occurs without delay, as only the selected protocol is used.
Example: Maintenance of master system in HA cluster
Assume that you have a HA cluster and that the master system is down for maintenance. If configured, the PAX unit will automatically try to establish a VPN connection with the slave system, which is listening on a different IP address.
Example: Selecting UDP as the VPN protocol
Assume you have configured the PAX unit to use UDP only. The PAX unit will connect to the first IP address using UDP. If the connection fails, it will immediately switch to the second IP address, without attempting to establish a TCP connection with the first IP address.
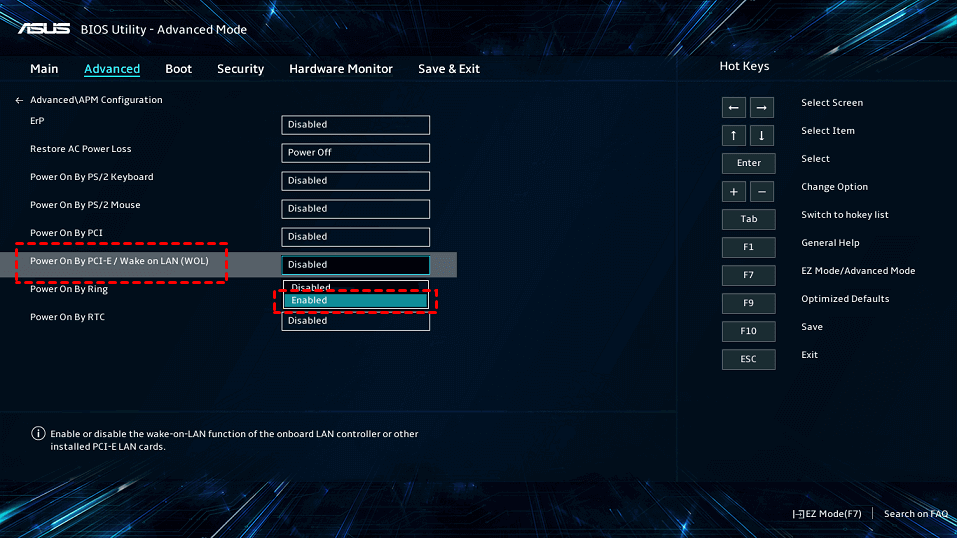
Wake-on-LAN
Wake-on-LAN, commonly abbreviated as WOL, is an application which allows a dormant PC connected to a PAX unit to be activated and used remotely. Its functionality is dependent on:
-
The Wake-on-LAN functionality being present and enabled on the PC.
-
Your network infrastructure being able to support and allow the transmission of wake-up packets (for example over network switches and firewalls).
Please consult your PC and network hardware documentation for further guidance on these dependencies.
Wireless Access Point
The following encryption types are supported on Personal AXS Guard:
-
WPA2 Enterprise CCMP Encryption
-
WPA2 PSK CCMP Encryption
-
WPA/WPA2 Enterprise AES Encryption
-
WPA/WPA2 PSK AES Encryption
-
WPA/WPA2 Enterprise TKIP+AES Encryption
-
WPA/WPA2 PSK TKIP+AES Encryption
-
WEP 128 bit Encryption
Info
The encryption types are listed from strongest to weakest, in descending order.
Supported VPN Protocols
Auto Detection
The client-side Auto Detection feature simplifies the process of configuring the VPN protocol on the PAX unit. By selecting the Auto option, users can rely on the unit to automatically detect the appropriate VPN protocol type. This eliminates the need for manual configuration and ensures that the VPN connection is established using the correct protocol.
UDP
PAX units rely on the OpenVPN protocol and use UDP Port 1194 to establish VPN connections with the AXS Guard VPN server. UDP is very suitable for stable Internet connections.
UDP port 1194 is the port number that is officially assigned by the IANA for OpenVPN. It is a fast protocol, but offers no error control mechanisms and guaranteed delivery, unlike TCP.
TCP
TCP is the preferred option if a PAX unit is located in a remote area and is likely to have an Internet connection of a quality inferior to modern standards. The TCP protocol offers error correction mechanisms and is therefore more reliable and suitable than UDP for unstable Internet connections, but it also produces more overhead.
Bypassing Firewall Restrictions
The OpenVPN protocol is an ideal candidate for connecting out of restrictive corporate networks. PAX units sitting behind a firewall which is beyond the control of a system administrator can be configured to bypass UDP restrictions. This is achieved by using a tunnel which turns UDP traffic into encrypted TCP traffic using a raw socket (port 443).

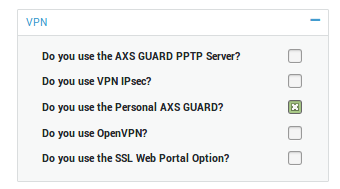
User Authentication
System administrators have the possibility to enforce user authentication for PAX VPN connections.
Note that this option is currently only supported by the PAX Road Warrior and is intended to protect the device against theft or loss. Extra authentication also protects your corporate network against unauthorized access in case of loss or theft.
Lost or stolen road warrior units should be disabled ASAP on the AXS Guard appliance and have their certificates revoked.
The following user authentication methods are supported:
- AXS Guard username and password
- LDAP back-end authentication
- RADIUS authentication
- 2FA: DIGIPASS or OATH
System Administration
PAX units are administered via a secure web-based administration tool (HTTPS).
Administrator User Levels
There are two user levels; the admin and the user level.
- The admin level is required to configure system-critical settings, such as certificates and IP address(es) of AXS Guard VPN server(s) on the Internet.
- The user level is limited to stopping and starting the VPN connection, initiating a remote support connection and rebooting the PAX unit.
Remote Support
Users can initiate a remote support connection by logging in to the web interface of the PAX unit. By clicking on the support button, a secure connection is established with the AXS Guard support center, which enables our support engineers to remotely access the PAX unit for troubleshooting. As an alternative, we can configure any PAX unit so that it has a permanent secured connection to our service center.
Context-sensitive Help
Help is always available on the AXS Guard appliance if you get stuck.

Server-Side Configuration
Introduction
In this chapter, we explain how to configure the AXS Guard VPN server, so that PAX units can automatically download their configuration and establish a connection with corporate HQ.
The configuration steps must be executed in the provided order. Note that the AXS Guard CA must be initialized to configure the PAX server.
Feature Activation
To access the PAX menu, the PAX feature must be activated on your AXS Guard appliance.
-
Log in to the AXS Guard appliance.
-
Navigate to System > Feature Activation
-
Expand the VPN tree.
-
Enable the Personal AXS Guard feature and update your configuration.
Server and Client Certificates
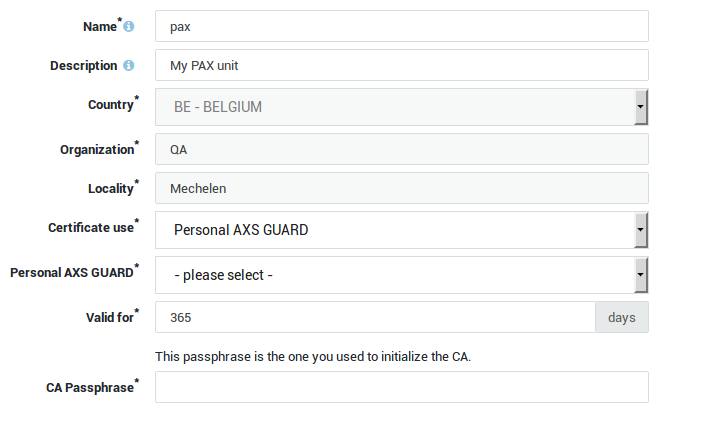
Use the AXS Guard built-in CA to issue PAX client and server certificates. See the AXS Guard PKI manual for a detailed explanation of the PKI feature. Go to PKI > Certificates to issue client and server certificates.
Important
Certificates issued by commercial CAs are not recommended, as explained in Central Management and PKI.
Connection Settings
- Log in to the AXS Guard appliance as an administrator.
- Go to VPN > PAX > Server.
- Configure the VPN server as explained below.

Network Settings
Option |
Description |
|---|---|
Enable PAX Server |
Enables and starts the PAX server. |
Server Binding Options |
Select the appropriate server binding option. See the context-sensitive help on the appliance for additional information. The PAX server will bind to all Internet interfaces by default, but it can also be configured to bind to a specific Internet interface or IP address. |
Protocol |
PAX units rely on the OpenVPN protocol and use UDP Port 1194 by default to establish VPN connections with the AXS Guard VPN server. TCP is also supported. |
Support HTTPS Firewall Passthrough |
Allows PAX units to connect to TCP port 443 as a fallback mechanism when sitting behind a firewall which is beyond your control and where UDP traffic on port 1194 is blocked. In case TCP is selected, the |
Dead Peer Detection
Option |
Description |
|---|---|
Delay |
The number of seconds between keep-alive checks. 10 seconds is the system default. |
Timeout |
If the client does not reply to the PAX server within the specified period, the connection will be reset. 60 seconds is the system default. |
VPN Device Properties
Option |
Description |
|---|---|
IP Range |
The range of IP addresses that is distributed to the PAX clients. Use the CIDR notation, e.g. 10.255.254.0/24. Make sure the range is not used elsewhere in your network to avoid routing issues. |
Allow same LAN subnets |
If enabled, PAX units can be configured with the same Remote LAN IP / Subnet. During the configuration of such units, an additional subnet needs to be specified. |
Server Authentication
-
Select the server authentication tab.
-
Configure the certificate as explained in the table below.
Option |
Description |
|---|---|
Server Certificate |
Select the server certificate for the PAX server. Go to PKI > Certificates to create or import a server certificate. |
Current Certificate |
Shows the certificate details of the selected server certificate. |
Adding PAX Clients
-
Go to VPN > PAX > Clients.
-
Click on Add New and enter the settings as explained below.
-
Save your configuration.
Important
- Go to PKI > Certificates to generate a client certificate before your add a PAX client.
- Certain configuration tabs will only appear if the corresponding option has been enabled.
General Settings
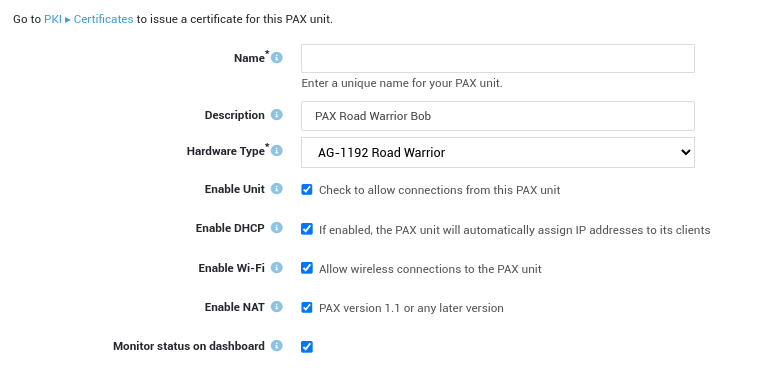
Option |
Description |
|---|---|
Name |
Enter a unique name for the PAX unit. The name will appear in the PAX client overview. |
Description |
Enter a description for the unit, e.g. the name of the owner or the location of the PAX unit. Descriptions are optional, but useful if you have a lot of clients to manage. Even though this is an optional field, we recommend using a sensible name to facilitate the configuration and management of your PAX units. The description will also appear in the PAX client overview. |
Hardware Type |
Select the hardware type of the PAX unit. 4 types are available:
Each type has its own hardware specifications. |
Enable Unit |
Check to allow incoming connections from the PAX unit. Uncheck to prevent the unit from connecting to and accessing your network. |
Enable DHCP |
Check this option to enable the DHCP server on the PAX unit. If enabled, the PAX will automatically assign IP addresses to its clients in the specified range. |
Enable Wi-Fi |
Check this option to allow wireless connections to the PAX unit. |
Enable NAT |
Check this option to configure NAT rules for the PAX unit, e.g. to forward traffic to certain ports or IP addresses of computers connected to the LAN of the PAX unit. This option is disabled by default. |
Monitor status on dashboard |
Select this option to allow system administrators to monitor the PAX unit via the system administration dashboard. |
PAX Administration
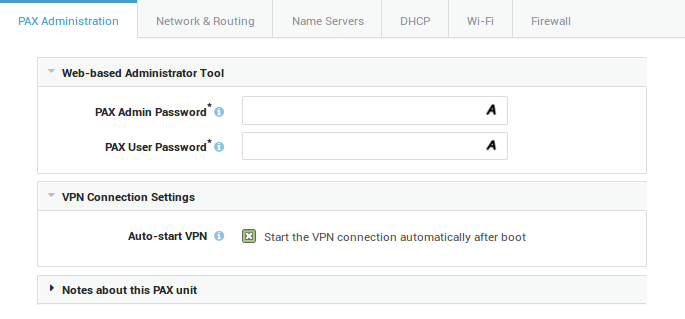
Option |
Description |
|---|---|
PAX Admin Password |
This password is required to access the web-based administrator tool of the PAX unit to configure essential settings, such as the client certificate, the certificate passphrase and the IP address or FQDN of the corporate AXS GUARD appliance. |
PAX User Password |
Enter a password for user access to the web-based administrator tool of the PAX unit. Access will be limited to (re)connecting or disconnecting the VPN. |
Auto-start VPN |
This option is enabled by default. If checked, the VPN connection is established automatically when powering on the PAX unit. If unchecked, the VPN needs to be started manually by logging in to administrator tool of the PAX unit. |
Require User Authentication |
This option is disabled by default. If enabled, the PAX unit will restrict VPN connectivity to the users listed in the next field. We highly recommend to enable this option to protect your network against unauthorized access in case a PAX Road Warrior unit is lost or stolen. Lost or stolen units should be disabled ASAP and have their certificates revoked. Go to Authentication > Services to configure the authentication policy of the PAX server. |
Restrict to Users |
List of users who are authorized to establish a VPN connection after successful authentication. If no specific user is selected, all users listed under Users & Groups > Users will be allowed to establish a VPN connection, which is the system default configuration. |
Notes |
Use this field to enter important notes and general information about the PAX unit. This is an optional field. |
Network & Routing Options

Option |
Description |
|---|---|
Remote LAN IP/Netmask |
Enter the LAN IP and subnet mask of the PAX unit. Use the CIDR notation, e.g. 192.0.2.1/24. Use this IP address to log in to the web-based administrator tool of the PAX unit. |
Translate Remote LAN |
Translate the remote LAN to a different IP subnet. Enable this option if you want to use the same subnet for multiple PAX units, for example:
In the example above, clients in the LAN of the PAX unit all have an IP address in the 192.168.1.0/24 range. When connecting from HQ to machines in the LAN of the PAX unit, you must replace |
HQ Subnet |
Subnet to which the LAN of the unit is translated. Use this subnet to connect to the LAN of the unit from HQ. |
WAN to LAN |
Enable this option if the WAN interface of the PAX unit is connected to one of the main router’s LAN ports, a.k.a. cascading. In this case, the WAN interface of the PAX unit will be assigned an IP address in a private range by the main router. By default, computers that are connected to the LAN of the main router will not be able to communicate with computers in the LAN of the PAX unit and vice versa because they are part of separate networks. Enable this option to allow such communications. If enabled, you must add the LAN network(s) of the main router to allow communications between the separate LAN segments. Use the CIDR notation to add a network, e.g. 192.0.2.0/24. |
Source Network |
This field is only available if you enabled the WAN to LAN option. Add WAN networks that are allowed to connect to the LAN of the PAX unit. Use the CIDR notation, e.g. 192.0.2.0/24 |
Route all Client Traffic through VPN |
If enabled, all client traffic, including Internet traffic, will be routed over the VPN connection. If you disable this option, you will need to add the corporate networks that should be reachable by the clients in the LAN of the PAX. |
Only reroute traffic towards the following Networks |
Add the corporate network(s) that should be available through the VPN connection. Use the CIDR notation, e.g. 192.0.2.0/24 This option is disabled by default. |
VLAN Configuration
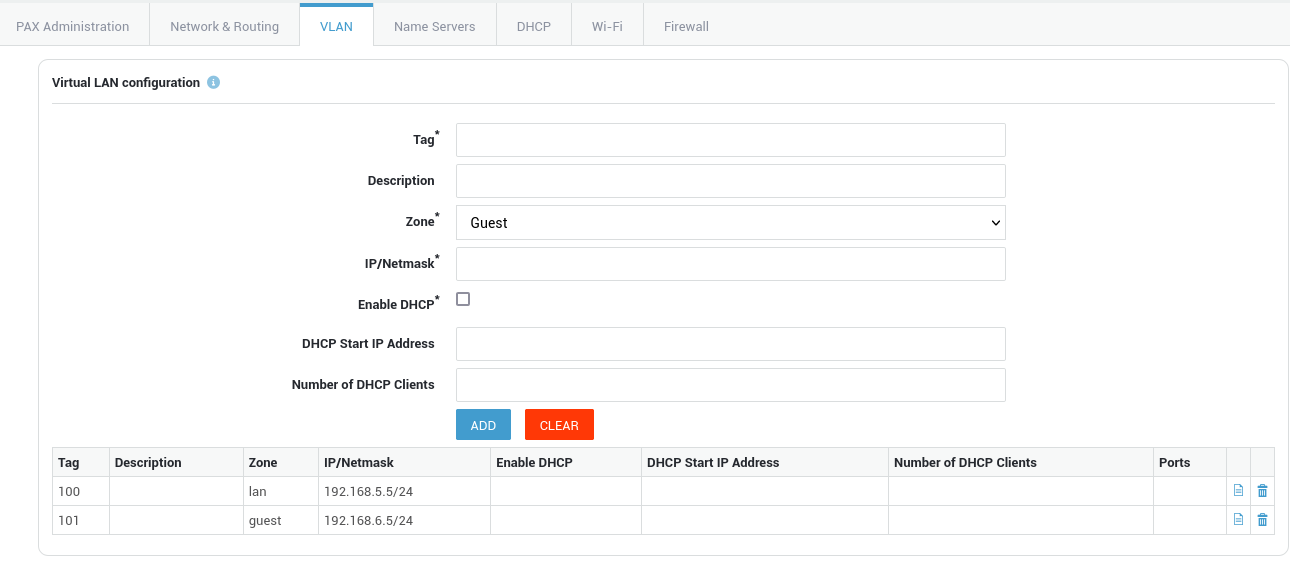
| Option | Description |
|---|---|
| Tag | The VLAN identifier, also known as a VLAN ID or VLAN tag, is a 12-bit identifier that is added to an Ethernet frame header to indicate which virtual local area network (VLAN) the frame belongs to. Specify a number between 10 and 65536.It's important to note that the range of VLAN IDs that are allowed can vary depending on the specific networking equipment and configuration being used. Some switches may have further VLAN ID restrictions, so it's always a good idea to consult the documentation for your specific networking equipment to determine the range of VLAN IDs that are supported. |
| Description | Provide an optional description for the VLAN, e.g. Guest network. |
| Zone | Select the zone the VLAN will operate in: LAN or Guest. The default LAN zone has VPN and WAN access, whereas access of the Guest zone is limited to WAN only. |
| IP/Netmask | Use the CIDR notation to specify a network address for a VLAN, e.g. 192.0.2.1/24. |
| Enable DHCP | Allows the PAX unit to act as a DHCP server for the configured VLAN. |
| DHCP Start IP Address | The first IP address of the DHCP address range to be assigned to DHCP clients in the VLAN. |
| Number of DHCP Clients | The number of hosts to be allowed in the specified DHCP address range. |
| Ports | The physical ports with which the VLAN device is associated. |
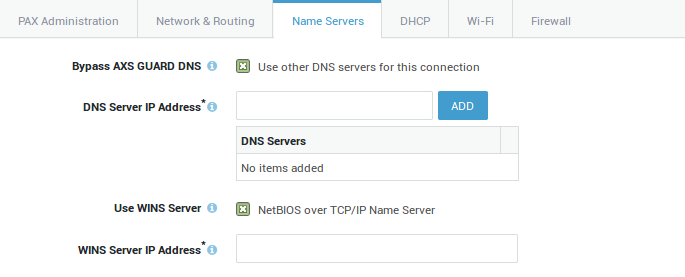
Name Servers
Option |
Description |
|---|---|
Bypass AXS GUARD DNS |
Leave this option unchecked to use the AXS GUARD appliance as the primary DNS server for VPN connections. Enable to use other DNS servers, e.g. a Microsoft DNS server in the corporate network. This option is disabled by default. Also see the section about DNS scenarios. |
DNS Server IP Address |
Enter the IP address of the DNS server to be used for the VPN connection. Multiple DNS servers can be added. |
Use WINS Server |
Enable to enter the IP address of the WINS server in the corporate network. WINS (Windows Internet Name Server) is Microsoft’s implementation of the NetBIOS Name Service(NBNS), a name server and service for NetBIOS computer names. This option is disabled by default. |
WINS Server IP Address |
Enter the IP address of the WINS server in your corporate network. |
Important
When the VPN connection is down, PAX clients will fall back to their own DNS configuration, e.g. the DNS server of the ISP.
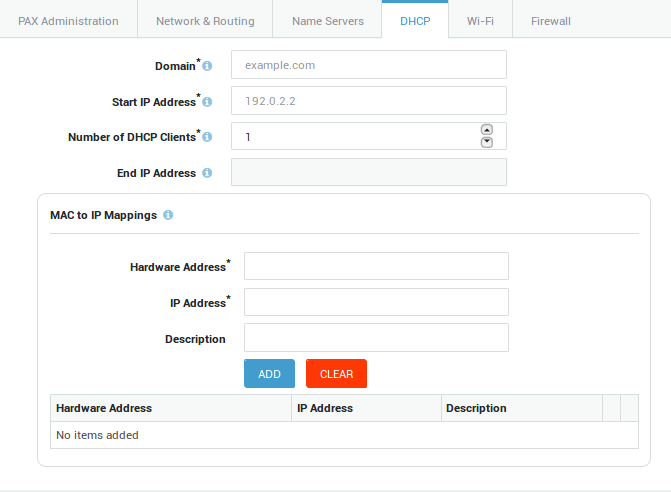
DHCP Options
Option |
Description |
|---|---|
Domain |
Enter the domain suffix of the corporate network, e.g. example.com. This suffix is automatically appended to unqualified hostnames in DNS queries. For example, a DNS query for myhost will return the IP of myhost.example.com. |
Start IP Address |
Enter the first IP address of the DHCP address pool to be assigned to PAX clients, e.g. 192.0.2.2. |
Number of DHCP Clients |
Enter or select the number of IP addresses to be made available in the DHCP address pool. |
End IP Address |
Shows the last IP address of the DHCP address pool based on your selection. |
MAC to IP Mappings |
Forces the DHCP server of the PAX to assign a specific IP address of the DHCP address pool to a specific PAX client. This provides extra security, as VPN access will be restricted to the specified client(s), rather than allowed to all PAX clients with a valid IP.
|
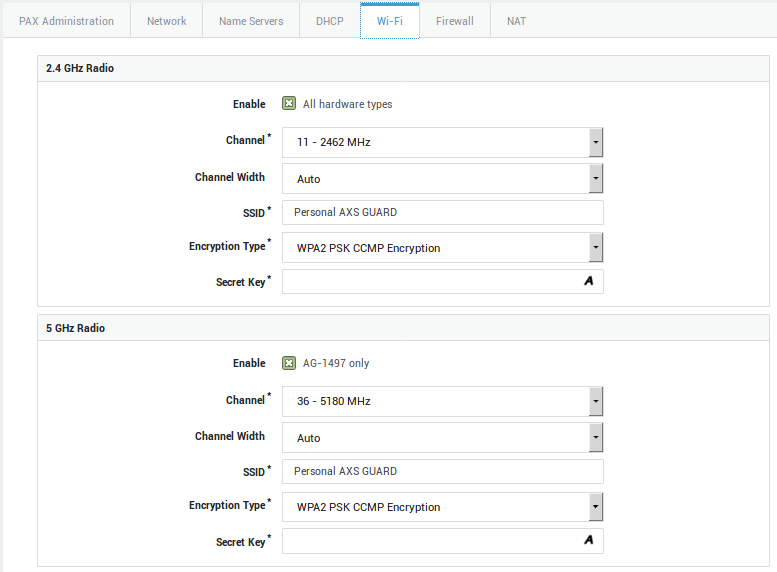
Wi-Fi Options
Option |
Description |
|---|---|
Enable |
Check to enable Wi-Fi. Note that hardware restrictions apply. |
Channel |
Wireless networks based on the 802.11b and 802.11g standards transmit their signal in a narrow radio frequency range of 2.4 GHz. The 2.4 GHz Wi-Fi signal range is divided into a number of smaller bands or "channels," similar to television channels. Select the desired Wi-Fi channel (1-13). The same channel should be configured on the client. Be advised that depending on your country or region, the use of some channels may be restricted. In the US, channels 1-11 are allowed, whereas in most of European countries, channels 1-13 can be used. In Spain however, only channels 10 and 11 are allowed. Wireless networks based on the 802.11a standards operate on a different 5 GHz band. The band is also divided into channels, but is much more restricted and regulated. Select the desired Wi-Fi channel (36, 40, 44, 48, 149, 153, 157, 161 or 165), in accordance with FCC and local regulations. |
Channel Width |
Select the channel width to be used by the wireless radio controller. Normally, a width of 20MHz is used, as specified in the 802.11abg standards. The wireless-n specification however, allows to bond neighboring channels into a larger band, increasing the maximum data rate. In order to achieve 150 Mbps and more, a channel width of 40 MHz is required. Use the auto select option to automatically choose the maximum available bandwidth. Busy wireless networks or overcapacity of the radio band may prevent channel bonding from being used at all. |
SSID |
The SSID (Service Set Identifier) is the name of the wireless network to be broadcasted by the PAX unit. All wireless devices attempting to communicate with the PAX must use this SSID. Windows clients equipped with a wireless network interface usually detect this SSID automatically. |
Encryption Type |
The encryption to be used for the wireless communication between the clients and the PAX unit. The list starts with the strongest variant and ends with the weakest variant (WEP). WPA2 Enterprise CCMP Encryption is the system default. Supported Types:
|
Secret Key |
The secret passphrase to be be entered on the client(s) to connect to the wireless network. The passphrase is hidden by default when entered. Click on A to view the password as you type. If you selected WEP encryption, a secret key of at least 26 characters is recommended. |
Firewall Policies
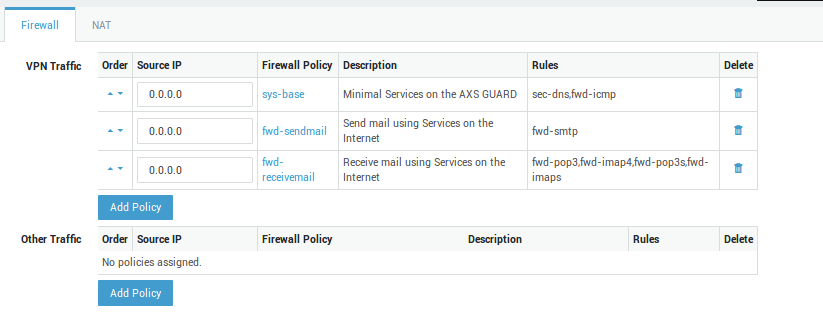
Option |
Description |
|---|---|
VPN Traffic |
Firewall policies which govern access to corporate and other networks which are accessible through the VPN. Go to Firewall > Policies for an overview of available policies or to add new policies. If application control is enabled on your system, make sure to allow access to protocols and applications needed by your VPN users. The system policy blocks all traffic by default, including SSL traffic. |
Other Traffic |
Firewall policies which apply outside the VPN connection, i.e. access to the Internet or other networks which are not accessible through the VPN. This option is not available if all client traffic is routed through the VPN (See the Route all Client Traffic through VPN option under the Network tab. Go to Firewall > Policies for an overview of available policies or to add new policies. |
Important
Only the following firewall policies can be selected for the PAX unit:
- Outside Tunnel Firewall Policies: only
fwd-dynamicpolicies (i.e. dynamic policies containing rules of the type through AXS Guard are valid. These policies define access to services on the Internet when the VPN tunnel is down. - Tunnel Firewall Policies: only
fwd-dynamicandsec-dynamicpolicies can be selected. Thefwd-policies define access through the corporate AXS Guard appliance towards its secure LAN, its DMZ zone and optionally the Internet. Thesec-dynamicpolicies allow access to services running on the corporate AXS Guard appliance. Firewall rights can be restricted to a specific IP address or range. Use the CIDR notation to specify a range, e.g.10.0.0.0/24. Additionally, an IP address can be assigned to a specific client in the secure LAN of the PAX unit, based on its MAC address and the DHCP options configured for the PAX unit. - Any dynamic firewall policy not mentioned above is not suitable to configure a PAX unit.
- Incoming and outgoing network devices specified in the
fwd-dynamicpolicies do not apply to PAX units.
Network Address Translation
Automated NAT
- Enable Auto NAT-T.
- Select the desired NAT type.
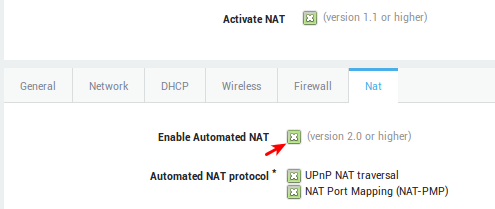
NAT Type |
Description |
|---|---|
Enable Automated NAT (PAX version 2.0 or later) |
Allows you to select the automated NAT protocols if checked. |
UPnP NAT Traversal |
(Universal Plug’n’Play) enables programs running on a host to automatically configure port forwarding on the PAX. UPnP basically allows a program to open ports that are necessary for its operation, without any warning or intervention from the system administrator. For this reason, there is a security risk associated with enabling UPnP on the PAX. Technically, a worm or malware could use this function to compromise your LAN’s security. It is therefore recommended to manually configure port forwarding whenever possible and disable UPnP. However, in some cases dynamic port forwarding may be required if manual port forwarding becomes impractical. |
NAT Port Mapping (NAT-PMP) |
NAT-PMP is a protocol similar to UPnP and is supported by a vast number of Windows and Linux applications. |
DNAT and Port Forwarding
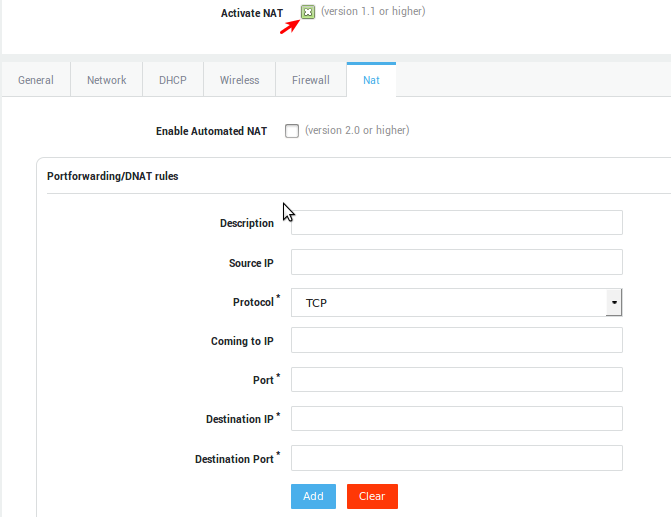
Parameter |
Description |
|---|---|
Description |
A description for the new NAT rule, e.g. mail. |
Source IP |
The Source IP or subnet to be matched. Use the CIDR notation to specify a subnet. If left empty, the rule applies to any source IP. |
Protocol |
The protocol to be matched. Select the appropriate protocol from the drop-down list (TCP or UDP). |
Coming to IP |
The destination IP to be matched. Leave this field empty if you have a public IP address that is dynamically assigned by your ISP. |
Port |
Enter the port number to be matched, e.g. 25 (for SMTP traffic). |
Destination IP |
The IP address of the host to which matching traffic must be forwarded. Only one IP address may be entered, e.g. |
Destination Port |
Traffic will be forwarded to the specified port. |
Control Buttons |
|
SNAT and Masquerading
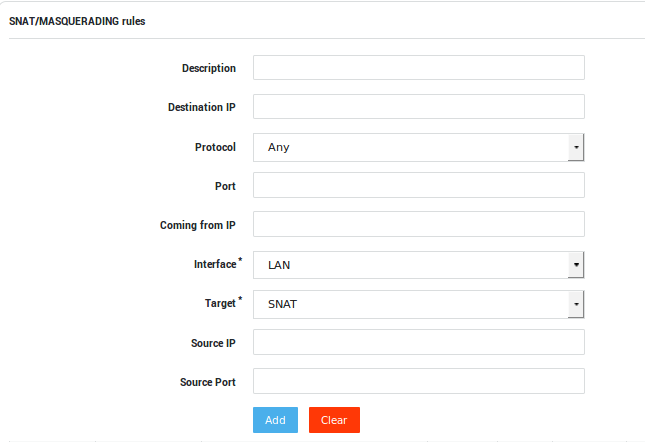
Parameter |
Description |
|---|---|
Description |
A description for the new NAT rule, e.g. ssh. |
Destination IP |
SNAT will be performed for any packet that matches this destination IP or network. Use the CIDR notation to specify a network, e.g. 192.168.0.1/24. If left empty, SNAT will be performed for all outgoing traffic. |
Protocol |
The protocol to be matched. Select the appropriate protocol from the drop-down list (TCP, UDP or Any). |
Port |
The port of the destination device / network that must be matched. |
Coming from IP |
SNAT will only be applied if network packets contain the specified source address, e.g. |
Interface |
LAN / WAN. The network device that handles the traffic to be SNATed or Masqueraded. |
Target |
Select the appropriate action for matching traffic, i.e. SNAT or Masquerade. |
Source IP |
The source IP in the packets will be replaced with the source IP specified here. |
Source Port |
The source port in the packets will be replaced with the source port specified here. |
Control Buttons |
|
Application Control
Important
The steps below are only required if the application control feature is enabled on your AXS Guard appliance.
System administrators should unblock protocols and applications which must be accessible via the VPN tunnel, e.g. social media. The following protocols are allowed by the factory default application control policy: HTTP, HTTPS and DNS. All other traffic is blocked by default.
PAX clients which are configured to access the Internet via the AXS Guard proxy server are subject to the web access application control policy. Go to Web Access > Proxy Server to configure the application policy for the proxy server.
-
Go to Application Control > General
-
Add the desired application control policies.
-
Update your configuration.
Authentication Policy
The authentication policy determines how users must authenticate to establish a VPN connection (PAX Road Warrior only).
-
Go to Authentication > Services.
-
Select the Personal AXS Guard service.
-
Select the desired authentication policy, e.g. DIGIPASS.
-
Update your configuration.

Client-Side Configuration
Before you Start
Important — Reset Button
Some PAX models are equipped with a reset button. This reset button is protected by a seal and must not be pressed. Removing or breaking the seal will immediately void the product warranty. Pressing the reset button will cause irreparable damage to the software.
Factory Default Configuration
| Parameter | Factory Defaults |
|---|---|
PAX LAN IP Address |
192.168.1.1 |
Netmask |
255.255.255.0 |
DHCP Server |
Enabled |
Hostname |
|
Admin login |
Use lowercase only
|
User login |
Use lowercase only
|
URL |
|
Account Types
| Account | Description |
|---|---|
|
Provides administrative access without any restrictions. |
|
Allows users to reboot the PAX unit, use the Wake-on-LAN feature and establish a VPN connection. |
Password Guidelines
Important
- Protect your PAX unit with complex passwords to prevent users from rebooting or controlling any settings on the unit.
- Factory default passwords are overwritten as soon as a PAX unit downloads its configuration from the AXS Guard VPN server.
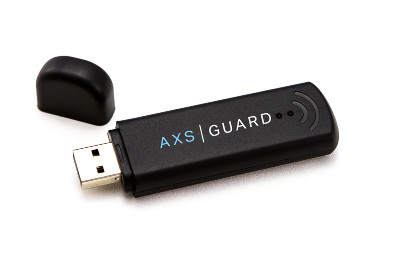
Mobile Internet
Compatibility
3G and 4G connectivity are supported differently across PAX variants:
| Product Variant | Mobile Internet | Supported Network Technologies | Notes |
|---|---|---|---|
| AG1497 Home Office (discontinued) | 4G LTE, 3G UMTS, GPRS/EDGE | Requires separate USB dongle; must be installed manually. | |
| AG1694 Small Office | 4G LTE, 3G UMTS, GPRS/EDGE | Requires separate USB dongle; must be installed manually. | |
| AGi200 PAX Industrial | 4G LTE, 3G UMTS, GPRS/EDGE | 3G & 4G interfaces are integrated into the unit. | |
| AG1192 Road Warrior | Not supported | N/A |
USB Dongle Installation
-
Ensure the PAX unit is powered off.
-
Remove the cover from the 4G modem.
-
Insert your SIM card into the 4G modem and reattach the cover.
-
Connect the modem directly to a USB port of the PAX unit or use a USB extension cable.
-
Power on the PAX unit and wait until it is fully booted.
-
Log in to the PAX unit to configure your mobile Internet connection.
PAX Login
Important
- Verify the proxy server settings of your Internet browser before you start. The PAX administrator tool may not be accessible if a proxy server is configured.
- After the PAX unit is fully configured and the VPN connection is established, it will become accessible through the Cyber Resilience Portal, enabling you to conveniently manage and monitor the unit as if you were directly connected to it. Please note that you must be running PAX version 4.2.0-0 or newer to use this feature.
-
Configure your client’s network interface so that it automatically receives an IP address from the PAX unit (DHCP).
-
Once your client has been assigned an IP address, verify if you can ping the PAX unit. Open a command prompt and run the following command:
ping 192.168.1.1 -
Start your favorite Internet browser and go to:
https://192.168.1.1. -
Accept the self-signed certificate.
-
Log in with the factory default credentials.
Internet & VPN
- Log in to the PAX unit.
- Select
Settingsto configure your Internet and VPN connection.
Info
3G & 4G options will only appear if the PAX unit supports mobile Internet.
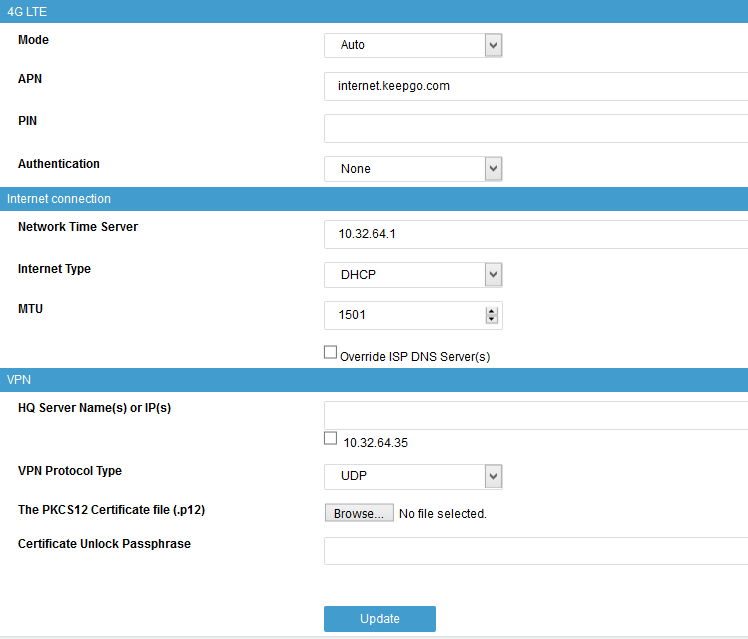
3G & 4G Settings
| Parameter | Description |
|---|---|
Mode |
Select the mode which matches your service subscription. |
APN |
Enter the Access Point Name provided by your operator, e.g. |
PIN |
The Personal Identification Number is a four-digit code to enable your SIM card once you have inserted it into your modem and is required to access your operator’s mobile network. |
Authentication |
Select the authentication protocol which matches your service subscription. |
Internet Connection
| Parameter | Description |
|---|---|
Network Time Server |
The IP address or FQDN of an Internet Time Server. |
Internet Type |
Select the appropriate method to connect to the Internet. See the information provided by your ISP. |
MTU |
The size in bytes of the largest protocol data unit that can be transmitted over the network. The system default is 1500. A table of commonly used MTUs is available online. |
Override ISP DNS Servers |
Check this option to bypass your ISP’s DNS servers. |
VPN Configuration
| Parameter | Description |
|---|---|
HQ Server Name or IP |
You can specify more than one FQDN or IP address, e.g. if the client needs a VPN connection to several sites or in a failover configuration. |
VPN Protocol Type |
|
Certificate Unlock Passphrase |
The passphrase you configured on AXS Guard to export the VPN client certificate. |
The PKCS12 Certificate file |
Upload the |
The VPN tunnel will start automatically after importing your PAX client certificate. Rebooting is allowed, but not required. The PAX unit will automatically check whether a valid client certificate is present.
Modem Status LED
| Status | Color/State | Meaning |
|---|---|---|
| Connected (Fast) | Dark Blue | 3G connection is active |
| Connected (Faster) | Cyan | 4G connection is active |
| Connected (Basic) | Green | GPRS connection is active |
| Not Connected | Blinking | Device has no connection |
Using Wake-on-LAN
The Wake-on-LAN feature is accessible to the user and admin accounts.
-
Log in to the PAX unit.
-
Select LAN in the left pane.
-
Enter the appropriate Wake-on-LAN settings and press the
Wake Upbutton.

| Parameter | Description |
|---|---|
MAC Address |
The MAC address of the PC that must be able to receive magic WOL packets. |
Password (HEX) |
A four or six byte HEX password to be appended to the magic WOL packet. The NIC wakes the system only if the MAC address and password are correct. This is an optional field. |
The Wake Up button is also available in the DHCP menu. When clicked, a WOL packet will be sent to the MAC address associated with the DHCP lease.
Rebooting your PAX Unit
-
Log in to the PAX unit.
-
Click on Reboot Now.
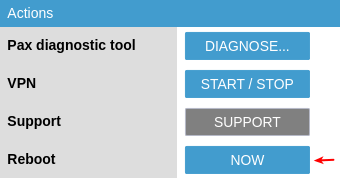
Important
- The reboot procedure takes about 60 seconds to complete.
- After starting up or rebooting a PAX unit, wait until the power LED stops flashing.
- The DMZ LED on the front panel indicates that the booting process is still ongoing. Wait until this LED is no longer illuminated before proceeding.
Diagnostics and Statistics
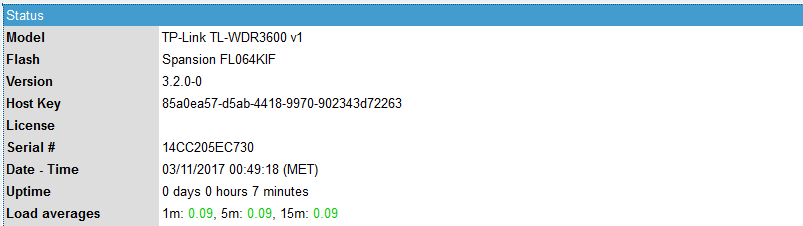
Checking the System Status
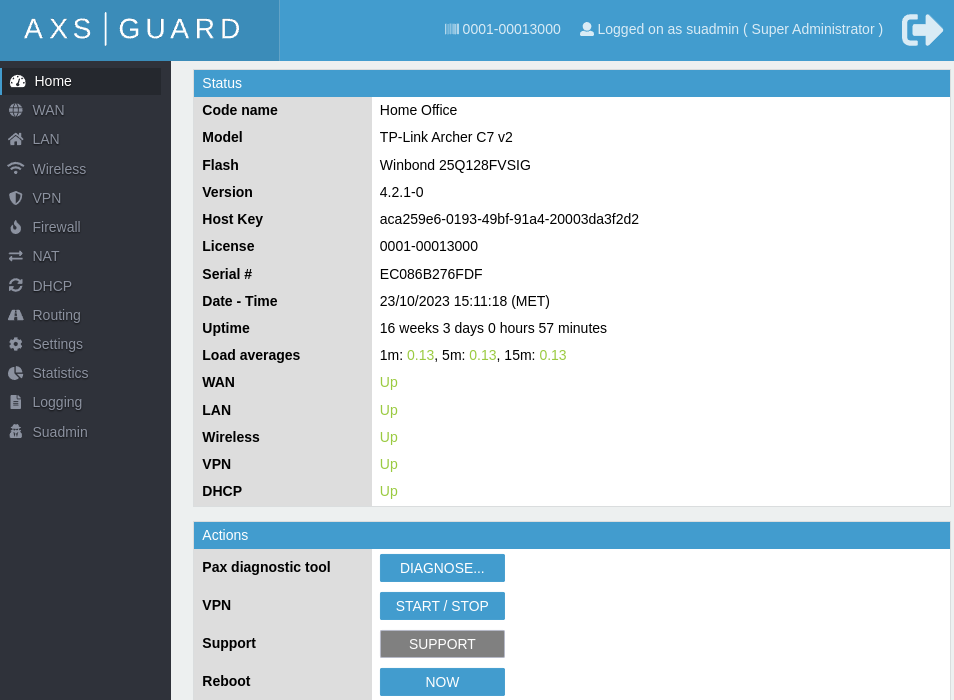
You can conveniently monitor the status of any deployed PAX unit through multiple methods, including remote access via the AXS Guard VPN server, the Cyber Resilience Portal, or by logging in directly to the PAX unit on your local network.
The status screen provides information about the VPN and Internet connection, the assigned IP address, transmitted and received bytes, license information, etc. This information is self-explanatory.
On AXS Guard
-
Log in to the AXS Guard appliance.
-
Navigate to VPN > PAX > Status.

On the PAX Unit
- Log in to the PAX unit.
-
Click on the appropriate menu on the left to view the relevant status information, e.g. DHCP information.
Cyber Resilience Portal
- Log in to the Cyber Resilience Portal.
- Go to Adaptive Security > Infrastructure and enter the license number of your AXS Guard appliance, e.g.
0000-00012345. -
Click on the license number.
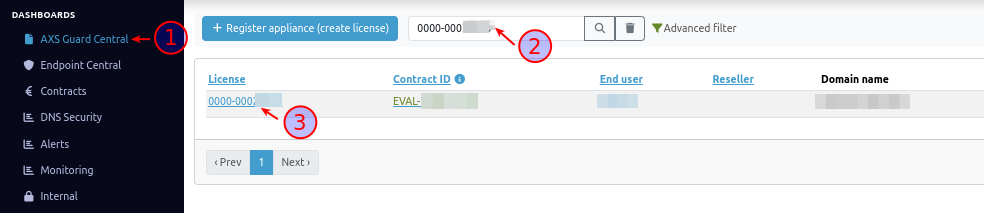
-
Select the Personal AXS Guard tab.
-
To access the PAX unit you'd like to log into, click on the corresponding license ID, e.g.
0001-00012345.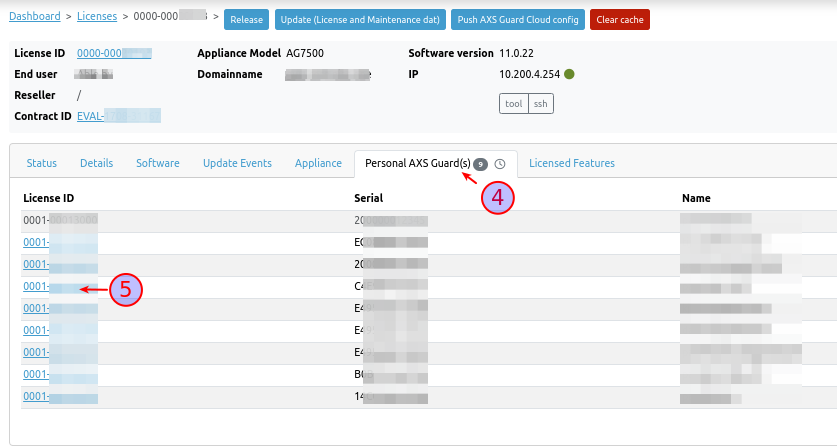
-
Please take note that this login feature necessitates PAX software version
4.2.0-0or a more recent release. Click on the login button.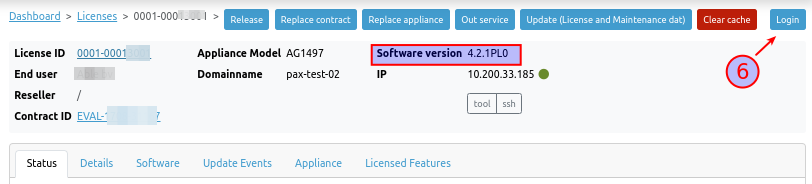
-
The login page of the PAX unit will open in a new browser tab. Log in with the credentials that you configured on the server side.
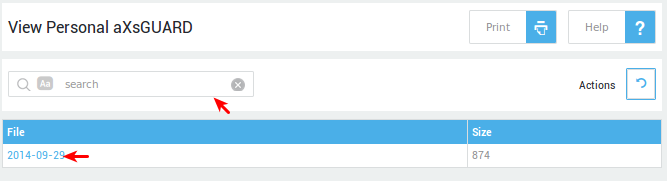
PAX Logs
PAX logs are available on AXS Guard as well as the PAX unit. There are two types of logging on AXS Guard; server and client logging.
On AXS Guard
-
Log in to your AXS Guard appliance.
-
Navigate to VPN > PAX > Logs.
-
Select the appropriate logs (server or client logs).
-
Click on the appropriate log date to view the corresponding log file.
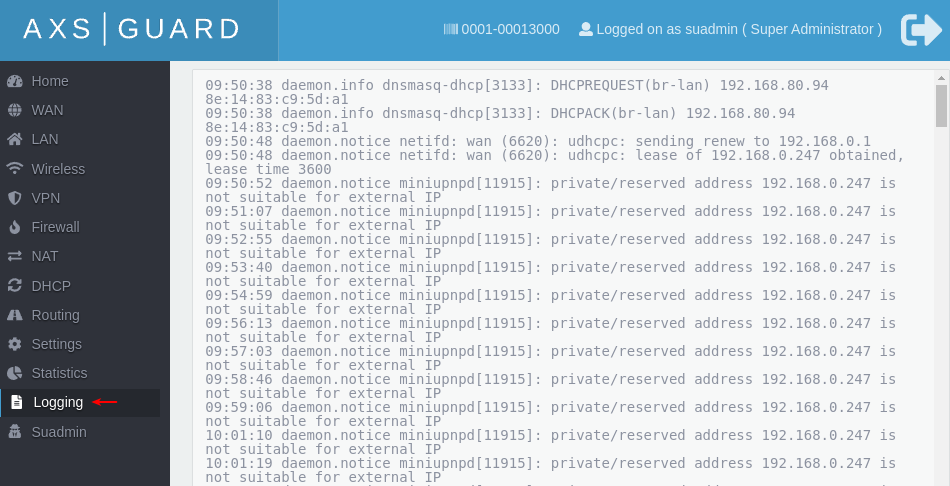
On the PAX Unit
Important
PAX units frequently rotate their logs due to limited system resources (only 16 KB of memory is available). Logs are limited to about 160 lines.
-
Log in to the PAX unit.
-
Click on Logging to view the logs.
Network Statistics
Network stats can be viewed per network device. This allows you to detect and examine unusual traffic peaks or to gather statistical information for any purpose you see fit.
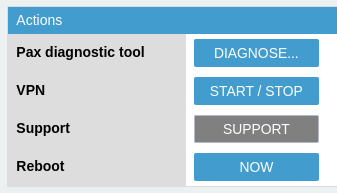
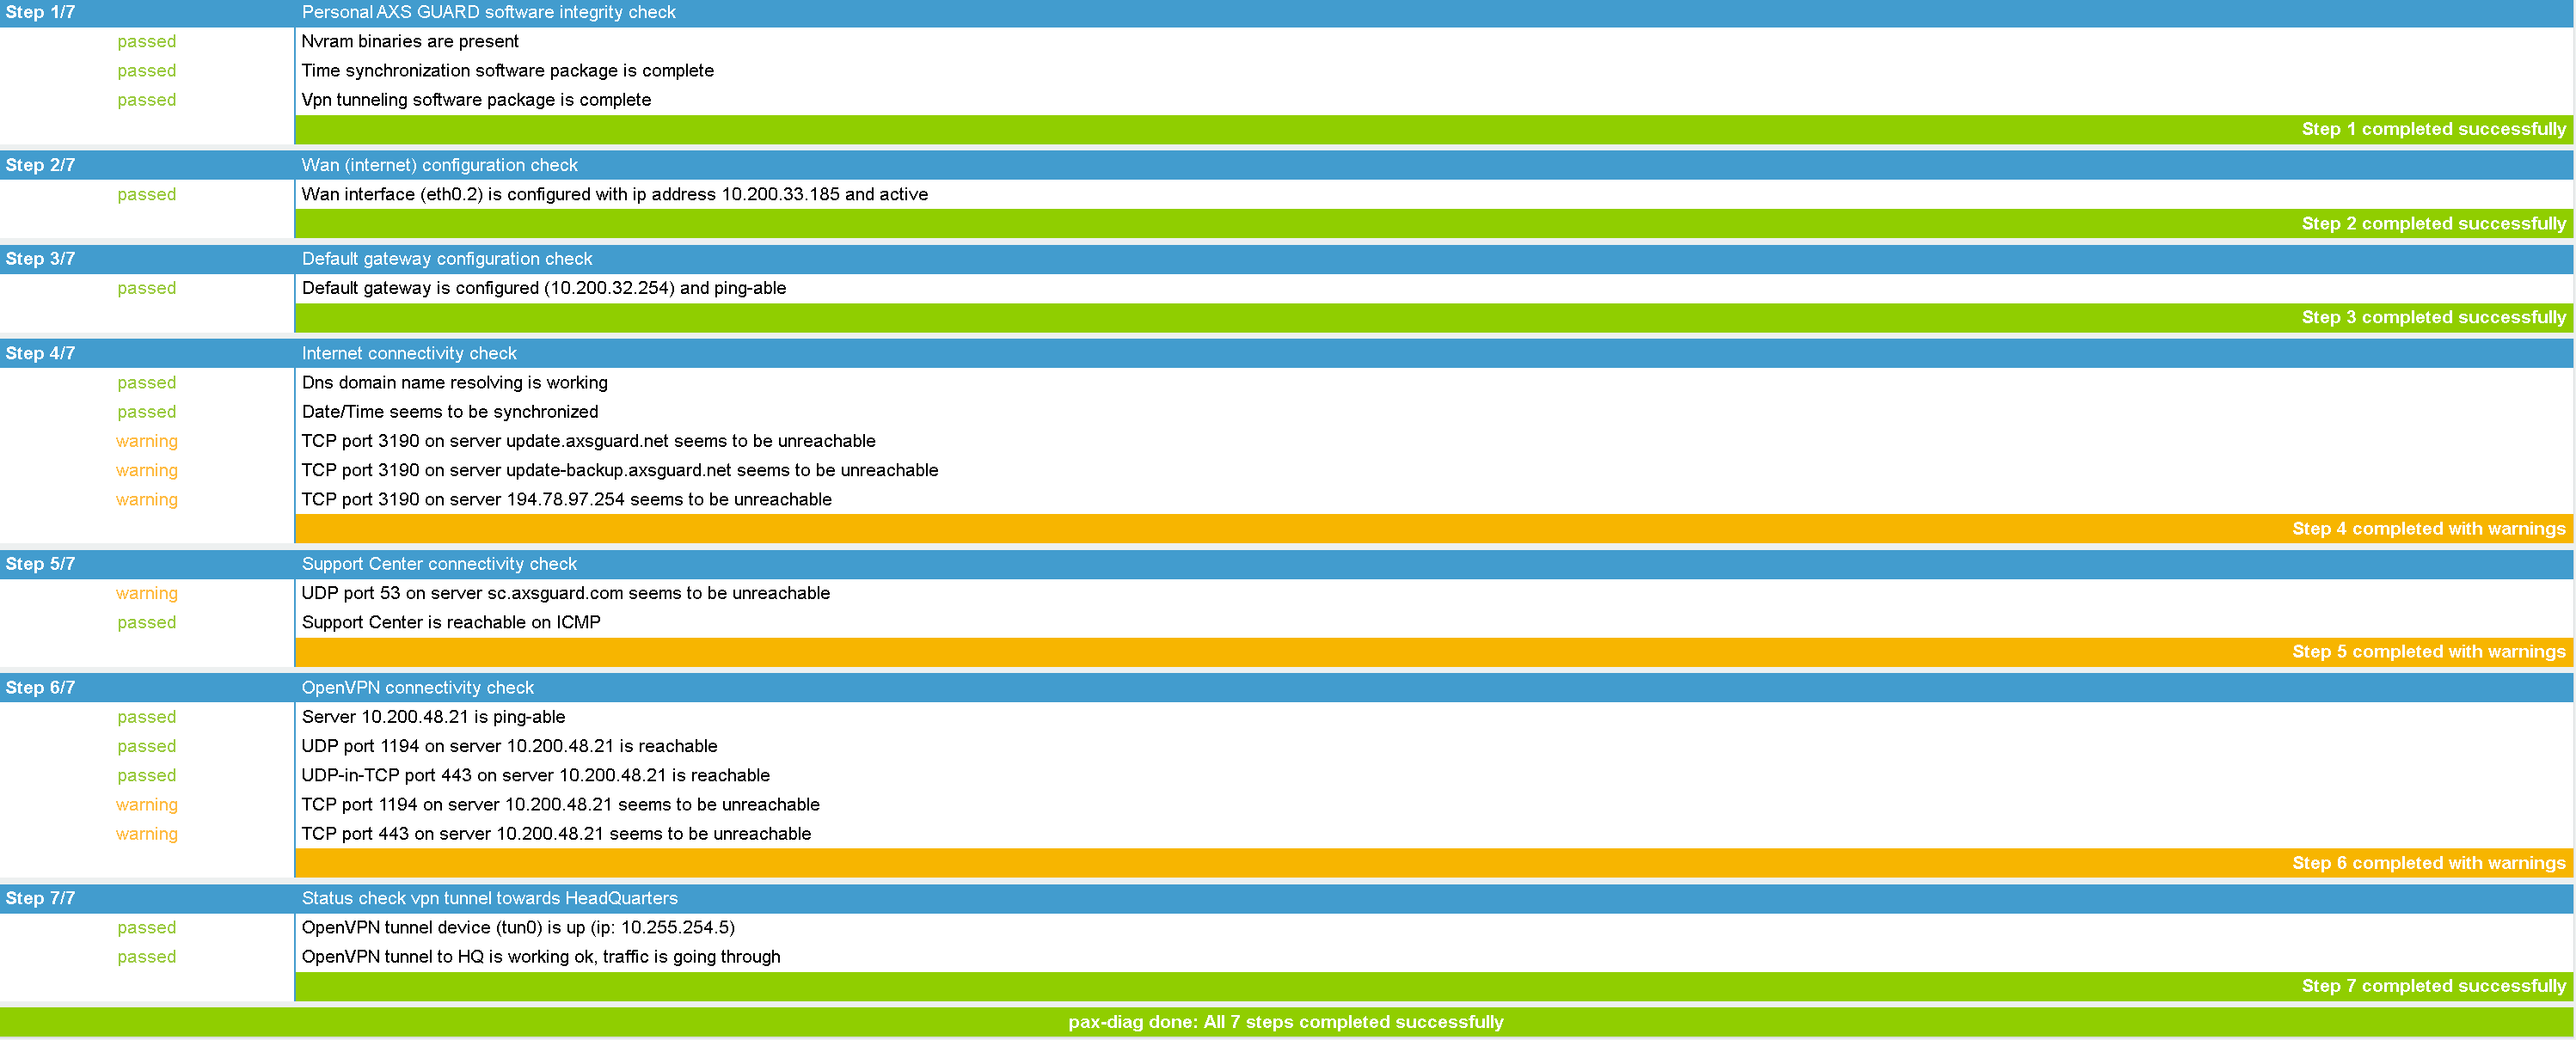
Running Diagnostics
-
Log in to the PAX unit.
-
Click on Diagnose.
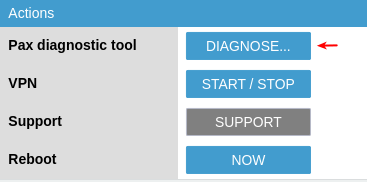
The PAX diagnostic tool helps system administrators to identify problems and detect network issues more easily:
Initiating Remote Support
-
Log in to the PAX unit.
-
Click on Support to initiate a support connection.
Troubleshooting
The PAX unit cannot establish a VPN connection with the corporate AXS Guard VPN server.
- Ensure that traffic towards port 1194 is allowed on the Internet interface of the corporate AXS Guard server for the selected VPN protocol (TCP or UDP). This is required to initialize the SSL tunnel.
- Ensure that you have selected the correct VPN protocol on the PAX unit. For example: if the AXS Guard VPN server has been configured to only accept UDP connections on port 1194, either UDP or Auto must be configured on the PAX unit.
- Ensure that the correct client certificate has been installed on the PAX unit. (Especially if you have several sites to which the PAX unit can connect). Client certificates are derived from server certificates; trying to establish a connection with the wrong certificate is impossible.
- Verify if the installed PAX certificate isn’t expired.
- Verify if you exported the right type of certificate (PKCS12).
- Verify the IP address or the FQDN of the AXS Guard VPN server you are trying to connect to.
I cannot connect to the PAX web-based configuration tool.
- Verify the proxy server settings of your Internet browser. If a proxy server is configured, you may not be able to access the PAX administrator tool. Clear the settings and try again.
- Verify whether your client PC is in the same network range as the PAX unit. The PAX unit downloads its settings from the corporate AXS Guard VPN server. Once the PAX unit has successfully established a VPN connection, its LAN IP address and other configuration settings are automatically updated. This problem is most likely to occur if you changed the default LAN settings of the PAX unit on AXS Guard.
I cannot connect to the corporate LAN, even though the VPN connection is established.
- Ensure that the correct routing entries have been added.
- Verify your firewall settings.
- Ensure application control is disabled or allows appropriate traffic.
I cannot connect to the Internet after establishing a VPN connection.
If all traffic is routed via the VPN, verify if the correct routes and firewall policies have been added to allow Internet traffic.
The VPN Tunnel disconnects and reconnects frequently.
- Check the load averages on the PAX unit.
- Run diagnostics and reboot the unit.
- If the issue persists after rebooting, contact your PAX vendor.
Support
If you encounter a problem
If you encounter a problem with AXS Guard, follow the steps below:
-
Check the troubleshooting section of the feature-specific manual.
-
Check the knowledge base on this site for information about special configurations.
-
If no solution is available in any of the above sources, contact your AXS Guard vendor.
Contact Information
(+32) 15-504-400
support@axsguard.com