Authentication Manual
Introduction
About this Document
The AXS Guard Authentication How To guide serves as a reference source for system administrators who are familiar with Authentication. Explanations of the various concepts such as AXS Guard Authentication Methods, Restrictions, Rules and Policies are provided. Once we have explained the concepts, we provide instructions on how to configure the relevant Authentication settings.
Examples used in this Guide
All setups and configuration examples in this guide are executed as an advanced administrator. Some options are not available if you log in as a full administrator or a user with lower access privileges.
As software development and documentation are ongoing processes, the screenshots shown in this guide may slightly deviate from the current user interface.
Authentication Methods
Overview
In this section we explain the general concepts underpinning the AXS Guard authentication service. Topics covered in this section include:
-
Authentication methods: the way users provide credentials to access a service and how these credentials are processed by the AXS Guard appliance.
-
One-factor authentication vs. two-factor authentication, a.k.a. 2FA.
-
OATH authentication, which is an open standard for 2FA and strong authentication leveraging smartphones. It allow users to log in using a freely available Google or Microsoft authenticator app. Note that OATH hardware tokens are also available on the market, but not yet supported.
-
DIGIPASS authentication, which is a proprietary standard focussing primarily on hardware tokens. DIGIPASS is a trademark of OneSpan.
-
Local vs. back-end authentication: credentials can be checked locally on the AXS Guard appliance or by a back-end server connected to its network.
What is an Authentication Method?
On the client side, an Authentication Method is the way users log on to gain access to a service provided by the AXS Guard or a server in its network, e.g. providing a user name and an One-Time Password (OTP) to access information on the corporate Intranet server.
On the server side, it is the entire process used by the AXS Guard to verify the authenticity of provided credentials, including actions taken against potentially malicious authentication attempts.
The following Authentication Methods are supported by the AXS Guard:
-
One-factor authentication
-
Two-factor authentication
-
Local authentication
-
Back-end authentication
One-Factor Authentication vs. Two-Factor Authentication
One-Factor Authentication: Static Passwords
The most commonly used Authentication Method is the username / static password combination. Only one factor comes into play, which is something the user knows, i.e. the username and static password combination.
One-Factor Authentication is inherently less secure than Two-Factor Authentication, because complex passwords are hard to remember and many users tend to write them down somewhere near their workstation. Static Passwords are also prone to social hacking, a technique to persuade users to release personal information, such as passwords.
Static Passwords can easily be stolen and used by a third party to impersonate the actual user or access the user’s personal data.
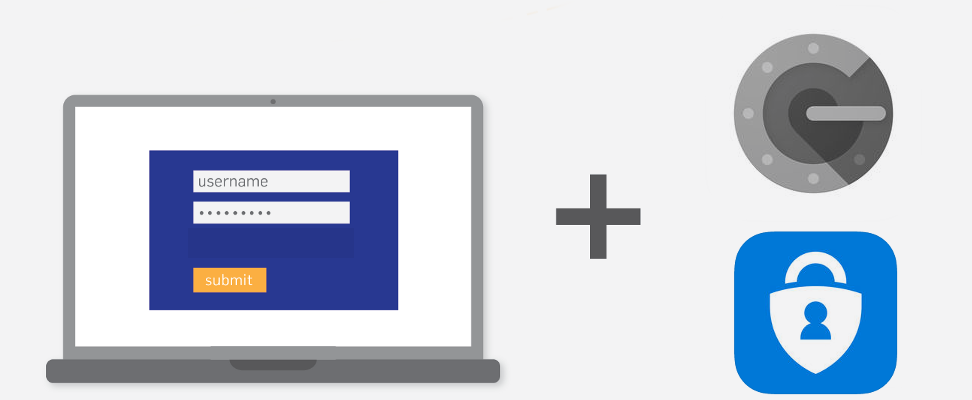
Two-Factor Authentication: OATH, DIGIPASS & Cronto
Two-factor authentication or 2FA eliminates the vulnerabilities associated with one-factor authentication. It is a strong authentication method which requires:
-
Something the user knows, e.g. a password or a DIGIPASS PIN, which must be entered before a one-time password can be generated by the device.
-
Something the user has, such as a DIGIPASS token, an OATH secret which can be used with a Google or Microsoft authenticator app or a dedicated Cronto app provided by an ASP.
Administrators have the possibility to configure or create policies where OATH authentication is enforced in combination with other authentication methods, such as a password or LDAP authentication.
This means that in case of loss or theft, the token by itself cannot be used for authentication, because only the user knows the associated password; the one-time password by itself is useless.
Two-factor authentication can also be implemented with one-button hardware DIGIPASS tokens.
How one-time passwords are generated
OATH and DIGIPASS tokens use the time and a pre-shared secret to calculate one-time passwords. This is also the case on the server side; AXS Guard uses the time and pre-shared secrets to verify submitted passwords. It is therefore important to synchronize both the server and clients with an NTP server. AXS Guard is synchronized with an NTP server by default.
One-time passwords provide more security than classic passwords, because their validity is limited in time by design. The technology also offers protection against password replay attacks, a network attack in which a valid data transmission is maliciously or fraudulently repeated.
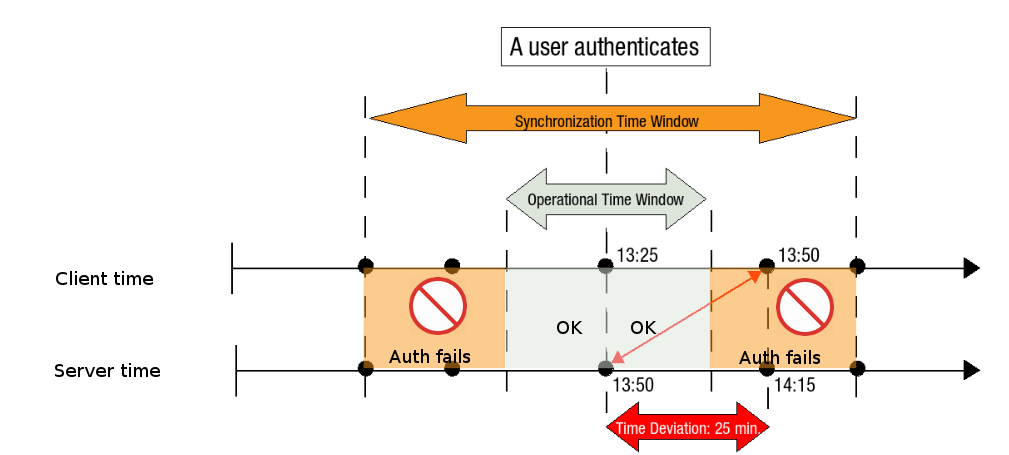
Why a correct system time is important
Time deviations, a.k.a. clock skew, between clients and the AXS Guard appliance can occur. Large time deviations will inevitably result in authentication errors.
To resolve this issue both OATH and DIGIPASS tokens make use of various parameters to compensate for errors linked to time deviations, for example a time window.
A time window is the period during which a generated one-time password is accepted as valid by the AXS Guard authentication server.
Important
As illustrated below, authentication will fail outside the operational time window. To avoid complications, it is recommended to synchronize clients with an NTP server. AXS Guard uses an NTP server by default.
How one-time passwords are verified
The AXS Guard authentication server verifies submitted one-time passwords based on the following parameters:
-
The current time. This is why a correct system time is critical on the client as well as the AXS Guard appliance.
-
A pre-shared secret. This is the same secret that is configured on the client.
-
A cryptographic algorithm which generates one-time passwords.

OATH Tokens
OATH is an open reference architecture for implementing strong authentication, produced by an industry-wide collaboration of security vendors for the universal adoption of strong authentication.
Both Google and Microsoft, among others, provide authenticators based on the OATH standard. Most implementations of OATH leverage smartphones and apps for generation of the one-time passwords.
For enhanced security and compatibility, our system exclusively supports TOTP tokens. This standardized approach ensures seamless integration with a wide range of authenticator apps and devices.
Google Authenticator, Microsoft Authenticator, and any other TOTP-compatible authenticator apps or hardware tokens are supported. You can download Google and Microsoft Authenticator from the Android and iOS app stores at no cost.
DIGIPASS Tokens
About
A DIGIPASS token is a device which provides one-time passwords to an end user. DIGIPASS is a trademark of OneSpan.
Instances
A DIGIPASS token can provide one or multiple applications for which data needs to be stored and updated each time it is being used. This data consists of DIGIPASS application characteristics, operational parameters (such as time/event variables, PIN) and private data.
To use this data for authentication or signature purposes, DIGIPASS instances, holding a working copy of the DIGIPASS application data, are created.
Under normal circumstances, a single instance is created per DIGIPASS application. This instance can be shared among different users.
Instances are managed automatically by AXS Guard and are created when a DIGIPASS token is assigned to a user.
An instance is composed of the DIGIPASS serial number, the instance ID
and the DIGIPASS application number, i.e.
<serial number>—<instance number>—<application number>.
Server PIN
A server PIN can be used together with a one-time password generated by a DIGIPASS token as part of the authentication process.
The server PIN is a digit-based secret which must be typed in by the user into the password field, followed by the one-time password. Authentication will only succeed if the correct combination is entered. As such, the server PIN provides an extra layer of security.
A detailed list all server PINs is included with your order. The server PIN of DIGIPASS tokens can be modified on the AXS Guard appliance.
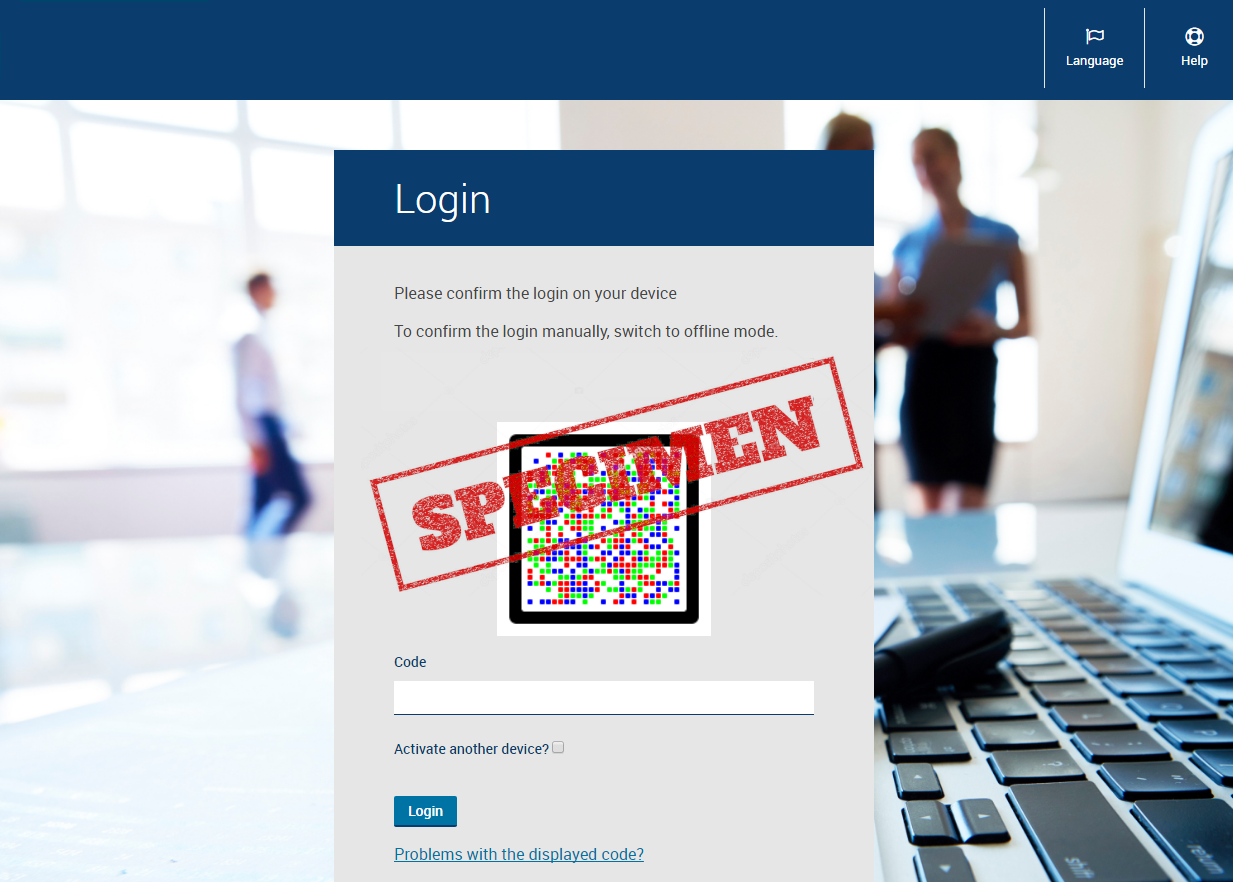
Cronto Mobile App for Web Applications
The Cronto Mobile App leverages the widespread adoption of smartphones and provides an easy-to-use, portable transaction authentication solution for web applications.
The user experience is straightforward: users simply have to point their mobile phone camera at the screen, and all transaction details appear on the phone ready for verification.
The Cronto App is customized to for each deployment to meet the client’s branding and other requirements and is delivered to end users via application stores. Contact sales@axsguard.com for additional information.
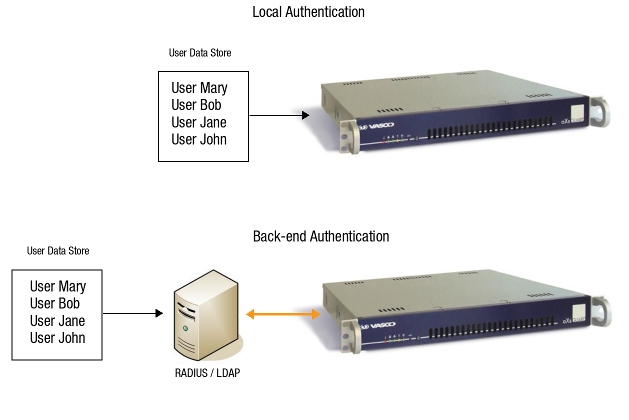
Local Authentication vs. Back-end Authentication
Local Authentication
With local authentication, the user information is stored locally on the AXS Guard. This means that when users authenticate, their credentials are checked against the information in the data store of the AXS Guard.
Two local Authentication Methods are supported by the AXS Guard:
- One-factor Authentication, i.e. a user name and a static password.
- Two-factor Authentication, i.e. DIGIPASS or OATH Authentication.
These methods can be combined through Authentication Policies.
Back-end Authentication
With back-end authentication, the AXS Guard does not use its own user data store to authenticate users. Instead, the user data store of an authentication back-end server is queried to authenticate users.
The AXS Guard supports two back-end protocols, i.e. LDAP and RADIUS. The supported Authentication Methods depend on the back-end server type.
Supported Authentication Protocols
An authentication protocol is a standard for transmitting authentication data between hosts in a network, e.g. the RADIUS protocol. Protocols are used for communication with an authentication back-end server.
An authentication protocol determines:
-
The type of error checking to be used;
-
The data compression and / or encryption method, if any;
-
How the sending device indicates that it has finished sending a message;
-
How the receiving device indicates that it has received a message
LDAP
The Lightweight Directory Access Protocol (LDAP) is an application protocol for querying and modifying Directory Services running over TCP/IP.
AXS Guard can be synchronized with a Directory Server, such as Active Directory, Novell eDirectory or a POSIX-based server. As a result, users can authenticate with the AXS Guard using their Directory Server credentials, e.g. their Active Directory user name and password.
The use and configuration of AXS Guard Directory Services are fully explained in the AXS Guard Directory Services How To guide, which can be accessed by clicking on the permanently available Documentation button in the Administrator Tool.
Important
- Synchronized users cannot authenticate locally with AXS Guard. They must use their back-end server credentials.
- When using Directory Services, ensure that you have at least one AXS Guard administrator who can authenticate locally. A local administrator account is required to log on to the AXS Guard if the LDAP back-end server fails.
| Format | Description and Examples | When to use |
|---|---|---|
User account name |
Also known as the logon name, e.g. |
This format must be used for authentication when the AXS Guard system domain matches the domain of the directory server of which the user is also a member or if the AXS Guard appliance is not synchronized with a directory server. |
User Principal Name (UPN) |
The UPN format is used to specify an Internet-style name, such as |
This format must be used for authentication when the AXS Guard system domain does not match the domain of the directory server of which the user is a member. |
Important
The UPN format cannot be used to authenticate for PPTP and AXS Guard services for which Kerberos authentication has been enforced.
Microsoft Entra ID
Microsoft Entra ID Integration provides seamless synchronization of users and groups, enabling businesses to efficiently manage access and identity. With this integration, you can authenticate and authorize users through their Microsoft Entra ID credentials. See the Directory Services documentation on this site for configuration instructions.
Kerberos
Concept and Advantages
Kerberos is a secure method for authenticating service requests in a computer network.
Info
For in-depth information about the Kerberos protocol, see the appropriate online resources .
Advantages
-
Users are asked to enter a password only once per work session and can transparently access all their authorized AXS Guard services without having to re-enter their password for the duration of the session. This is also known as Single Sign-On.
-
When requested, the application servers in the network must also prove their authenticity to the client. This characteristic is known as mutual authentication.
-
Kerberos encrypts all messages (tickets and authenticators) passing between the various participants during the authentication process.
-
When users change their password, it is changed for all supported AXS Guard services at once.
General Requirements
-
The AXS Guard must contain the user information, otherwise authentication will fail; the KDC back-end server must either be synchronized with the AXS Guard (this option is only supported if the back-end is a MS Active Directory server) or the users must be created manually.
-
Kerberos has strict time requirements, which means that the clocks of all involved hosts must be synchronized within configured limits. The validity of tickets is limited and if clocks aren’t synchronized with the Kerberos server clock, authentications will fail. It is therefore recommended to synchronize all involved hosts with a time server, e.g. ntp.vasco.com.
-
Ensure that you have a common encryption type for the KDC, the Kerberos keytab file(s), the Kerberos service principal name and the Kerberos client.
-
You internal DNS server must be correctly configured for Kerberos to work. A and PTR records are required for the KDC and the AXS Guard.
Username Restrictions
Internet-style login names, e.g. username@domain, are currently not
supported for Kerberos-enabled AXS Guard services.
DNS Requirements
Clients should always be able to correctly resolve the name of the AXS Guard appliance, otherwise Kerberos authentication will fail. Adding the correct forward and reverse entries (A and PTR record) to your DNS repository is therefore crucial. This is your AD server in most cases.
-
The AD and AXS Guard domain are identical, e.g. mydomain.local, in which case you need to verify the AXS Guard hostname in the Kerberos configuration before generating your keytab files.
-
The AD and AXS Guard domain are different, e.g. mydomain.local and mydomain.com, in which case the AXS Guard hostname and realm must verified before generating or uploading your keytab files.
Supported Back-ends and Services
-
Windows 2003 and 2008
-
The MIT Implementation on various Unix flavors
-
The Heimdal implementation
AXS Guard Services
Kerberos authentication can be used for the following AXS Guard services:
-
Web Access (unlinked authentication only)
-
Mail: POP and IMAP
-
SMTP (mail relay)
Important
- Kerberos authentication cannot be used to log in to the AXS Guard administrator tool.
- Only unlinked authentication is supported when using Kerberos.
Supported Encryption and Hashing
Kerberos often needs to encrypt and decrypt the messages (tickets and authenticators) passing between the various participants. For clients, application and authentication servers to properly interoperate, they must have at least one encryption type in common.
Windows 2000 (also supported in Windows 7 and Server 2008)
- RC4_HMAC_MD5
Windows Server 2008, Windows Vista and later
-
AES128_HMAC_SHA1
-
AES256_HMAC_SHA1
Info
DES encryption is still supported, but not recommended and must be enabled separately on the active directory server (see http://support.microsoft.com/kb/977321).
A Windows 2008 server uses the following encryption types by default:
-
AES256-CTS-HMAC-SHA1-96
-
AES128-CTS-HMAC-SHA1-96
-
RC4-HMAC
-
ARCFOUR-HMAC
For more information, see: http://support.microsoft.com/kb/977321/en-us
AXS Guard
-
DES-CBC-CRC
-
DES-CBC-MD4
-
DES-CBC-MD5
-
DES3-CBC-SHA1
-
DES3-HMAC-SHA1
-
DES3-CBC-SHA1-KD
-
DES-HMAC-SHA1
-
AES256-CTS-HMAC-SHA1-96
-
AES256-CTS
-
AES128-CTS-HMAC-SHA1-96
-
AES128-CTS
-
ARCFOUR-HMAC
-
RC4-HMAC
-
ARCFOUR-HMAC-MD5
-
ARCFOUR-HMAC-EXP
-
RC4-HMAC-EXP
-
ARCFOUR-HMAC-MD5-EXP
Kerberos Components
Realm
The term realm indicates an authentication domain. It establishes the boundaries within which an authentication server has the authority to authenticate a user, a host or a service. In case of an Active Directory setup, the realm is the same as the AD domain.
Principal
A principal is the name used to refer to the entries in the authentication server database. A principal is associated with each user, host or service of a given realm. The following syntax is used for entries that refer to AXS Guard services:
Service/axsguard_fqdn@REALM
Where:
-
Serviceis the name of the service, for example SMTP, HTTP, etc. -
axsguard_fqdnis the FQDN, in lower cases, of the machine providing the requested service(s). This FQDN must be resolvable by all Kerberos clients for authentication to work. -
REALMis the authentication domain.
Your DNS server must have a PTR record for axsguard_fqdn.
The following is a valid example of a principal that refers to a
service: HTTP/axsguard.yourdomain.com@YOURDOMAIN.COM
Ticket Granting Ticket
or a TGT is a small, encrypted identification file with a limited validity period. Tickets are issued by the authentication server and are encrypted using the secret key of the service they are intended for.
Key Distribution Center (KDC)
KDC AS TGS TGT Key Distribution Center Ticket Granting Server Authentication Server Ticket Granting Ticket
The authentication server in a Kerberos environment is called a Key Distribution Center or KDC. It resides entirely on a single physical server, but can be logically divided into three parts: the database, the Authentication Server (AS) and the Ticket Granting Server (TGS)
Database
The database is the container for entries associated with users and services. We refer to an entry by using the principal (i.e. the name of the entry). Information in entries includes, but is not limited to:
-
The maximum validity of tickets
-
The attributes or flags characterizing the behavior of tickets
-
The password expiration date
Authentication Server
The Authentication Server (AS) is the part of the KDC that replies to initial authentication requests from the clients. If a user is not yet authenticated, (s)he must enter his/her password. Once the user is authenticated, the AS issues a special ticket known as the Ticket Granting Ticket (TGT)
Ticket-Granting Server
The TGT is submitted to the a ticket-granting server or TGS. The TGS may be physically the same server as the AS, but it’s now performing a different service. The TGS returns the ticket that can be sent to the application server for the requested service.
Keytab Files
All Kerberos server machines need a keytab file to authenticate with the KDC. Each service requires its own keytab file, which contains the following:
-
one or several principals
-
encryption and hashing keys
Info
- You don’t have to create a separate keytab file for every AXS Guard service. You can create a single keytab file for all services and upload it.
- You don’t have to upload a keytab for every service, only for the service(s) that require kerberos authentication. If you only need kerberos authentication for the AXS Guard proxy, you only need to upload an HTTP keytab file.
Automatic vs. Custom Configuration
Keytab files can be configured manually (custom configuration) or automatically. Automatic Keytab file generation is the easiest and recommended solution.
Automatic Configuration Requirements:
-
The KDC must be a Microsoft AD server
-
Directory Services must be enabled and correctly configured on the AXS Guard
-
The AXS Guard must contain a PTR record for the KDC (AD server)
-
An AD account with privileges to create computers and accounts is required
Once the Directory Services module is configured, you will be able to manage your keytab files (they will appear automatically when generated). Services that already have a keytab file, will have their principals listed and provide a button to remove the associated keytab file.
When to use Custom Configuration:
-
This method is required when the KDC is not a Microsoft AD server, but can be used with a Microsoft AD server as well.
-
To be used by administrators who want full control and are already familiar with Kerberos
When using a custom configuration, the administrator is fully responsible for creating and uploading the correct keytab files to the AXS Guard. The keytab files can be created on any supported KDC back-end.
Important
AXS Guard will only use the provided keytab files; if you accidentally forget to upload a mail Keytab file, it will not be possible to use Kerberos authentication for IMAP or POP.
For every supported service, the required principal will be listed. Uploaded keytab files must at least contain this principal. After uploading a keytab file, the principal(s) will be listed on the AXS Guard Kerberos configuration page.
Authentication Flow
AXS Guard never communicates directly with the Key Distribution Center; the service tickets are submitted to the services via the client that wants to access them.
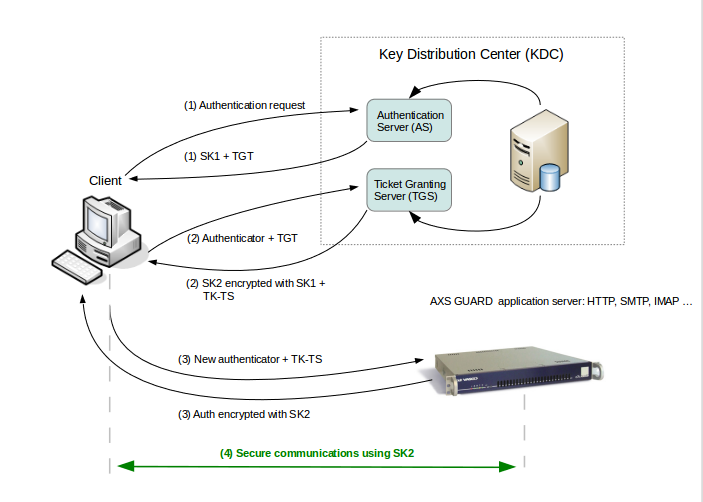
-
Authentication exchange: The client asks the authentication server (AS) for a ticket to the ticket-granting server (TGS). The authentication server looks up the client in its database, then generates a session key (SK1) for use between the client and the TGS. Kerberos encrypts SK1 using the client’s secret key. The authentication server also uses the TGS’s secret key (known only to the authentication server and the TGS) to create and send the user a ticket-granting ticket (TGT).
-
Ticket-granting service exchange: The client decrypts the message and recovers the session key (SK1), then uses it to create an authenticator containing the user’s name, IP address and a time stamp. The client sends this authenticator, along with the TGT, to the TGS, requesting access to the target server. The TGS decrypts the TGT, then uses the SK1 inside the TGT to decrypt the authenticator. It verifies information in the authenticator, the ticket, the client’s network address and the time stamp. If everything matches, the request is accepted. The TGS then creates a new session key (SK2) for the client and target server to use, encrypts it using SK1 and sends it to the client. The TGS also sends a new ticket containing the client’s name, network address, a time stamp and an expiration time for the ticket — all encrypted with the target server’s secret key — and the name of the server.
-
Client/server exchange: The client decrypts the message and gets the SK2. Finally ready to approach the target server, the client creates a new authenticator encrypted with SK2. The client sends the session ticket (already encrypted with the target server’s secret key) and the encrypted authenticator. Because the authenticator contains plaintext encrypted with SK2, it proves that the client knows the key. The encrypted time stamp prevents an eavesdropper from recording both the ticket and authenticator and replaying them later. The target server decrypts and checks the ticket, authenticator, client address and time stamp. For applications that require two-way authentication, the target server returns a message consisting of the time stamp plus 1, encrypted with SK2. This proves to the client that the server actually knew its own secret key and thus could decrypt the ticket and the authenticator.
-
Secure communications: The target server knows that the client is who he claims to be, and the two now share an encryption key for secure communications. Because only the client and target server share this key, they can assume that a recent message encrypted in that key originated with the other party.
RADIUS
Concepts
The Remote Authentication Dial-In User Service (RADIUS) is a widely deployed protocol enabling centralized authentication, authorization, and accounting for network access. RADIUS authentication and authorization are defined per RFC 2865, while accounting is defined per RFC 2866.
The support of Authentication, Authorization and Accounting is referred to as the AAA (pronounced as triple A) process. Each process is briefly explained in the following paragraphs.
Authentication
A user authenticates (e.g. provides a user name and a password) via an application or appliance to access a particular network resource or service. RADIUS does not transmit passwords in clear-text between the application or appliance and the RADIUS server (not even with the PAP protocol). Instead, a shared secret or PKI is used to secure the password transmission.
The application or appliance sends a RADIUS Access Request message to the RADIUS server, requesting access authorization.
The RADIUS server checks the provided credentials using authentication schemes like PAP or CHAP and then returns one of three responses: a "Nay" (Access Reject), a "Challenge" (Access Challenge) or a "Yea" (Access Accept).
-
Access Reject: The user is unconditionally denied access, e.g. the user provided an unknown user name or an incorrect password.
-
Access Challenge: The RADIUS server requests additional information from the user, such as a secondary password.
-
Access Accept: The user is authenticated.
Authorization
The RADIUS authorization process is used to decide if a user, a program or a device is allowed to have access to certain data, a certain functionality or a service.
Once a user is authenticated, the RADIUS server often checks if he or she is authorized to use the requested network service, e.g. a given user may be authorized to use a company’s Intranet web server, but not its VPN service. Depending on the network setup, the authorization may given by the RADIUS server or another server in the network, such as an Active Directory server.
Accounting
RADIUS accounting is used to send accounting information to the RADIUS accounting server, such as successful and failed login attempts.
If network access is granted to the user, the application or appliance sends a RADIUS Accounting Start request to the RADIUS server. Accounting records typically contain the user’s identification, network address, point of attachment, a unique session identifier and the duration of the session.
Supported Integration Methods
The AXS Guard can be integrated in your network as a RADIUS Authentication Server, a RADIUS Client or a combination of both.
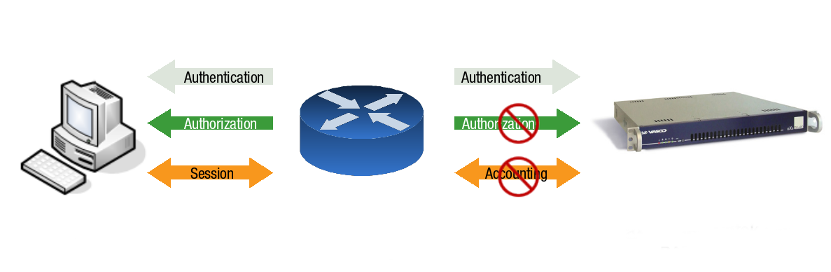
Important
- The AXS Guard RADIUS Server only handles authentication. It does not handle RADIUS authorization and accounting.
- A RADIUS accounting request should not be confused with authentication logging. RADIUS accounting requests are not supported by the AXS Guard RADIUS server, but authentication logging is available.
EAP
EAP-TLS, defined in RFC 2716, is an IETF open standard, and is well-supported among wireless vendors. It offers a good deal of security, since TLS is considered the successor of the SSL standard. It uses PKI to secure communications with the AXS Guard RADIUS authentication server.
About PAP and CHAP
AXS Guard only supports PAP authentication (Password Authentication Protocol, as defined per RFC 1334. CHAP (Challenge-Handshake Authentication Protocol ) is currently not supported.
-
PAP: After a link is established, the password and the user id are sent to the authentication server.
-
CHAP: The password is not sent. Instead, a challenge is sent by the server to the client. The client uses this challenge and the password to form a response which is sent back to the server.
OATH Token Management
Limits & Limitations
OATH TOTP Support
Only OATH TOTP authenticators are supported. Other types (e.g., OCRA, HOTP) authenticators are not supported. Software (e.g., Google and Microsoft Authenticator) and hardware tokens (e.g., YubiKey) are both supported.
Licensing & Availability
- The number of available OATH tokens is tied to your system license. Only one token can be assigned per user.
- If your system does not support OATH tokens or if you require additional tokens, you must upgrade your system license.
- To view the number of OATH tokens included in your license, navigate to: System > License > Authenticators > OATH.

Generating OATH Tokens
These steps only apply to software tokens, such as the Google and Microsoft Authenticator apps.
- Log in to your AXS Guard appliance.
- Navigate to Authentication > Authenticators > OATH > Tokens.
-
Click on the
+button in the upper right corner of the page.
-
Select Generate new software tokens.
-
Specify the number of software tokens to generate.
-
Click on the
Updatebutton to generate the token(s). Generated tokens will appear in the OATH token overview: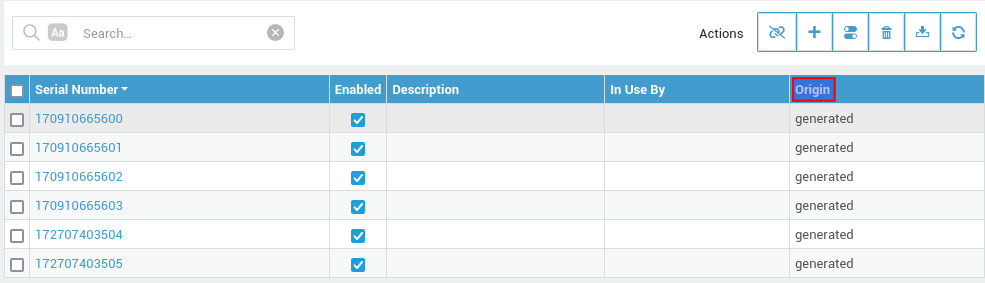
| Origin | Description | Token Type |
|---|---|---|
generated |
The tokens were generated by a system administrator. | Software only. |
imported |
The TOTP secrets were manually imported by a system administrator. | Software & Hardware. |
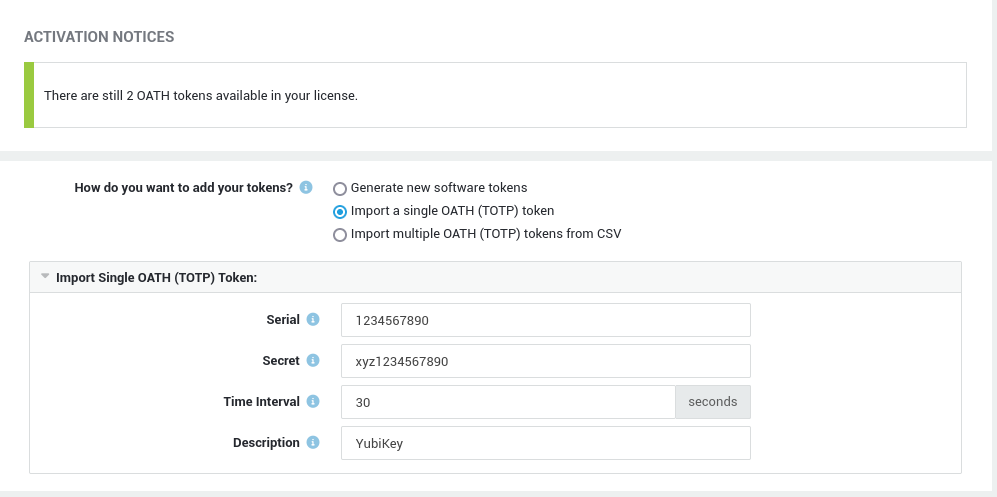
Importing OATH Tokens
Hardware Tokens
- Log in to your AXS Guard appliance.
- Navigate to Authentication > Authenticators > OATH > Tokens.
-
Click on the
+button in the upper right corner of the page. -
Select one of the following:
- Import a single OATH (TOTP) token
- Import multiple OATH (TOTP) tokens from CSV
-
Enter the required information.
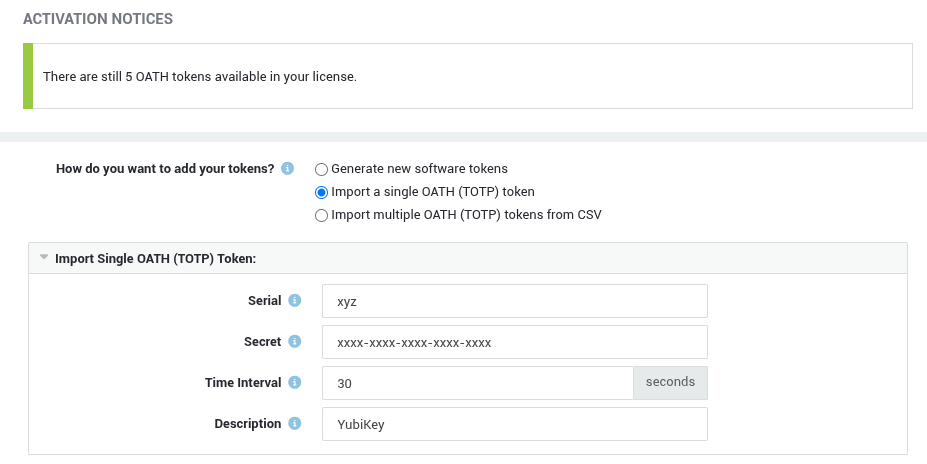
-
Click on the
Updatebutton to complete the import. Imported tokens will appear in the OATH token overview: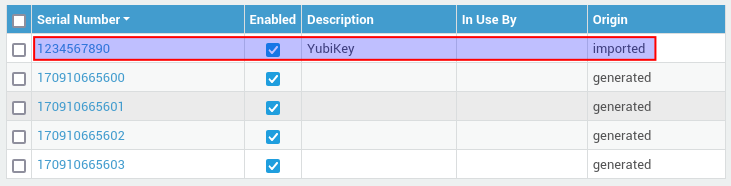
| Origin | Description | Token Type |
|---|---|---|
generated |
The tokens were generated by a system administrator. | Software only. |
imported |
The TOTP secrets were manually imported by a system administrator. | Software & Hardware. |
Software Tokens
See Hardware Tokens.
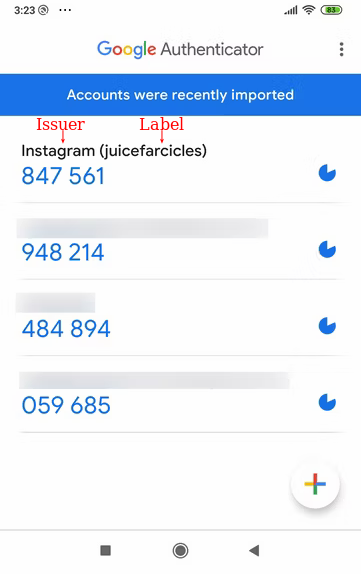
Identifying Accounts
Both Google and Microsoft Authenticator apps are designed to manage multi-factor authentication (MFA) or two-factor authentication (2FA) for various online accounts.
Identifying the accounts within these apps is typically straightforward, as each entry is labeled with the service it's for (e.g., Google, Microsoft, Amazon, Facebook) and a username, domain or email address.
This information is added automatically after users scan a QR code to set up their authenticator. On AXS Guard, administrators can configure a specific label and issuer, allowing users to quickly find the correct one-time password (OTP) needed for verification.
OATH URI Label
The purpose of this label is to provide a user-friendly identifier within authenticator applications. This can be a domain, such as example.com, or another label, such as VPN. If no label is specified, the issuer value is used.
- Log in to your AXS Guard appliance.
- Go to Authentication > Authenticators > OATH > General.
- Configure the OATH URI label and issuer, then save your configuration.

OATH URI Issuer
The issuer identifies the provider or service associated with the account. It's displayed in supported OATH authenticator apps like Microsoft Authenticator or Google Authenticator. If no issuer value is specified, the system's hostname and domain name will be used by default (e.g., axsguard.example.com). To configure the issuer, follow the same instructions provided for setting the OATH URI label.
OATH Notifications
Administrators can customize the enrollment notifications that are sent to users when an OATH token is assigned, for example to tailor the messaging to their organization’s branding and onboarding requirements.
- Log in to your AXS Guard appliance.
- Go to Authentication > Authenticators > OATH > General.
- Customize the message template and save your configuration.
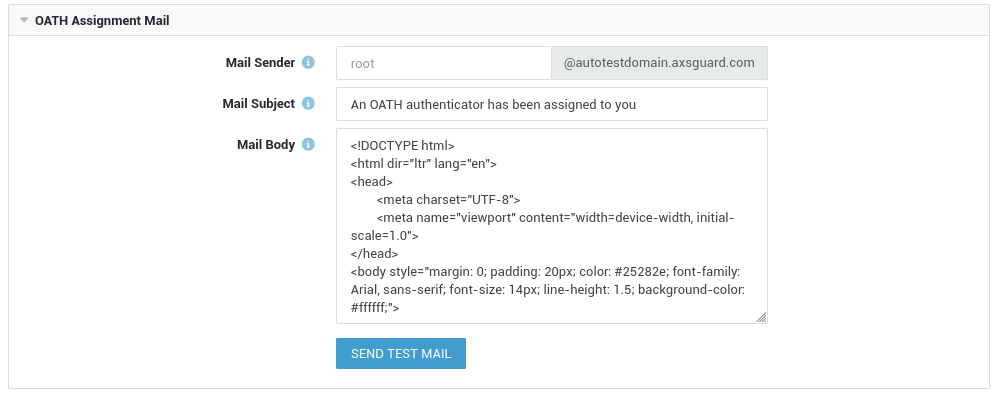
Customization Options
The following message template elements can be customized:
- Mail Sender: Specify the
fromaddress for the email. - Mail Subject: Define a clear, branded subject line.
- Mail Body: Use full HTML formatting to create a professional, branded onboarding experience that includes clear instructions for your users.
Configuration Testing
To ensure a seamless rollout and prevent delivery issues, the system provides a Send Test Mail button. We strongly recommend using this button after configuring your template to:
- Validate the configuration: Verify that your SMTP settings and sender details are correct.
- Preview rendering: Confirm that your HTML template renders correctly across various email clients before sending it to your users.
Assigning OATH Tokens
OATH tokens are essential for implementing Multi-Factor Authentication (MFA). They generate unique time-based codes that, when combined with a password, provide a more secure login process. To enforce MFA, OATH tokens must be assigned to users. The procedure for assigning OATH tokens varies slightly depending on whether you're using software tokens like Microsoft or Google Authenticator apps or hardware OATH tokens.
With mobile authenticator apps like Microsoft Authenticator or Google Authenticator, users will receive a QR code via email. They can then scan this QR code using their app's camera, which automatically sets up the token.
Unlike mobile authenticator apps, hardware OATH tokens cannot be set up using QR codes or secret codes sent via email. Administrators must provide the required configuration details through other means, such as in-person distribution or secure messaging.
Software Tokens
-
Go to Users & Groups > Users.
-
Select a user.
-
Select the Authenticators tab.
-
Assign an OATH Token by clicking on the Assign button.

-
Select the desired token (imported or generated).

-
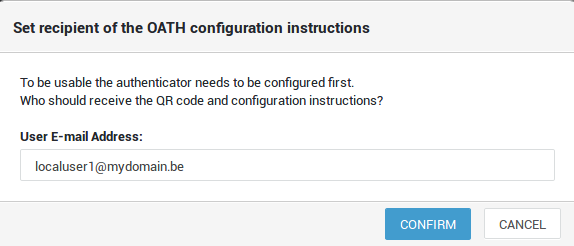
Generated tokens: Enter or verify the user's email address, then click confirm to send the instructions for setting up their Microsoft or Google Authenticator app.
-
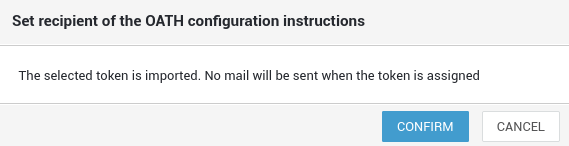
Imported tokens: Provide the required token configuration details to the user, e.g. via secure messaging.
-
Generated Tokens
- An email with configuration instructions is automatically sent to the user when a generated token is assigned. This is not the case with imported tokens.
-
If users change their OATH app or device, they may need to re-enter their TOTP secret. Administrators can therefore resend the secret to users.

-
Only one OATH token can be assigned per user.
Hardware Tokens
-
Go to Users & Groups > Users.
-
Select a user.
-
Select the Authenticators tab.
-
Assign an OATH Token by clicking on the Assign button.
-
Make sure to select an
importedtoken.
-
Confirm the assignment of the token.
-
Provide the required configuration details to the user, e.g. via secure messaging.
Important
Only one OATH token can be assigned per user.
Reassigning Tokens
-
Go to Users & Groups > Users.
-
Select the appropriate user.
-
Select the Authenticators tab.
-
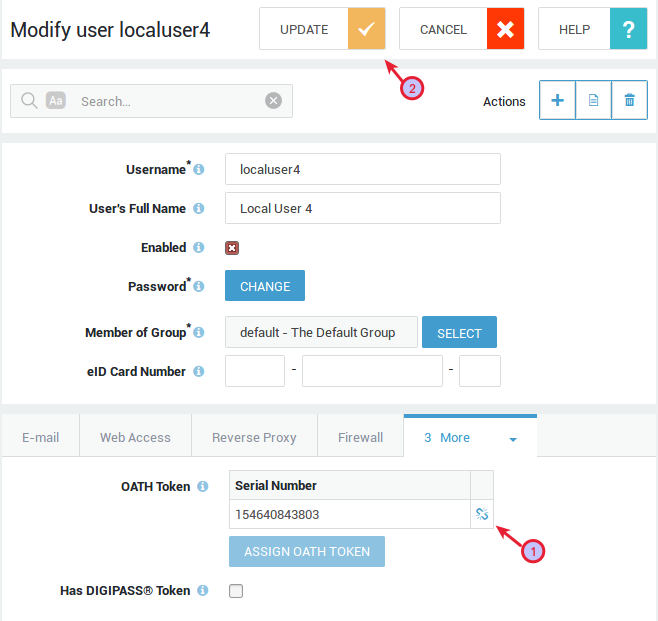
Unassign the OATH token (1) and update (2).
-
Reassign the token to another user.
Disabling OATH Tokens
Tokens can be disabled to protect your network and AXS Guard services against unauthorized access in case the token of a user is lost or stolen. To disable an OATH token:
-
Go to Authentication > Authenticators > OATH > Tokens.
-
Uncheck the
Enabledflag next to the token’s serial number.
Tip
Another option is to unassign the token via the user’s AXS Guard profile.
Deleting OATH Tokens
Please note that only unassigned tokens can be deleted. Follow this procedure to delete OATH tokens:
- Log in to your AXS Guard appliance.
- Navigate to Authentication > Authenticators > OATH > Tokens.
-
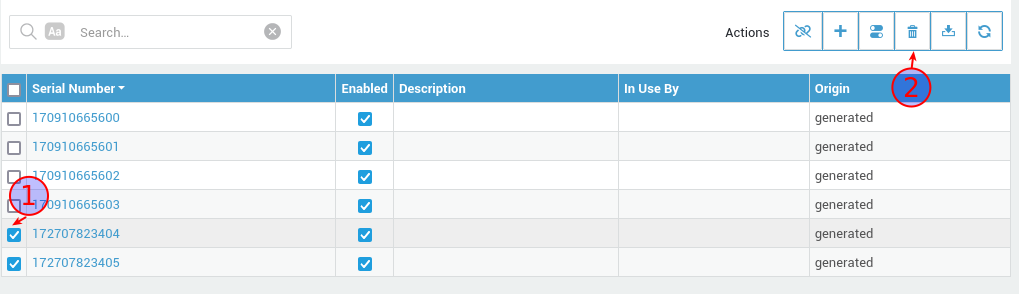
Select the tokens you wish to delete (1) and click the delete (2) button. Confirm to delete.
Client-side Configuration
Software Tokens
When a generated token is assigned, an email containing configuration instructions is automatically sent to the user. This email includes a QR code for easy setup. If email is unavailable or inaccessible, alternative delivery methods for the QR code can be arranged. Users can configure their authenticator by scanning the provided QR code or by manually entering the account details into their Google or Microsoft Authenticator app.
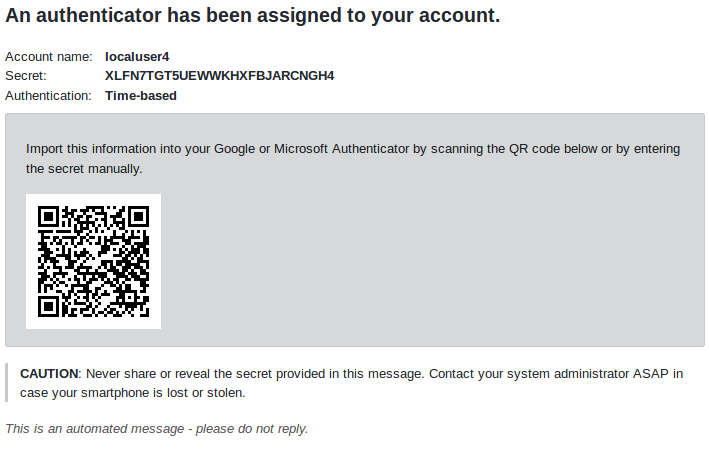
Manual Configuration
-
Enter the account name, e.g.
user@example.com. -
Enter the provided secret.
-
Select time-based authentication.
Tip
Detailed configuration instructions for Google and Microsoft Authenticators are available in the knowledge base section of this site.
Hardware Tokens
Unlike mobile authenticator apps, hardware OATH tokens cannot be set up using QR codes or secret codes sent via email. Administrators must provide the required configuration details through other means, such as in-person distribution or secure messaging.
Authentication Policy
To enforce OATH authentication for a given service, the authentication policy must be configured accordingly. Go to Authentication > Services to select the authentication policy for a service.

OATH Runtime Information
Runtime information, helpful for troubleshooting and setting up tokens, can be accessed in two places:
- Via the user page, by clicking on the OATH token's serial number.
-
Via the OATH Token overview page. Both locations also display the QR code linked to the token.
- Log in to your AXS Guard appliance.
- Go to Authentication > Authenticators > OATH > Tokens.
- Click on the serial number of an OATH token to view its runtime information.
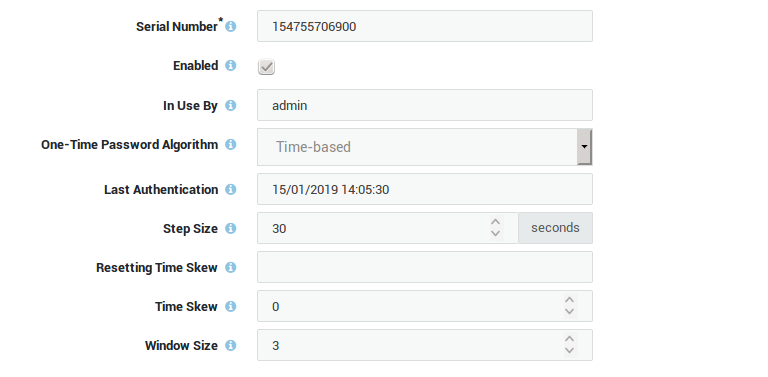
| Field | Description |
|---|---|
Serial Number |
Each token has a unique serial number. For software tokens this is generated automatically and cannot be modified. |
Enabled |
Tokens are enabled by default, but can be disabled in case a user’s smartphone has been lost or stolen. Go to Authentication > Authenticators > OATH to unassign or disable tokens. |
Description |
A description specifying the token's type, brand, or distribution date. System administrators can choose any description. |
Origin |
Indicates whether the token was generated or imported. |
In Use By |
The account to which the token has been assigned. Go to Users & Groups > Users to assign a token to a user. |
Secret |
The secret is a crucial component of the TOTP authentication process, providing a secure and efficient way to verify a user's identity. When users enter a code generated by their authenticator, AXS Guard performs the same calculation using the stored secret and the current time. If the calculated code matches the one entered by the user, the authentication is successful. The secret can be used in lieu of the QR code to manually configure the token of the user. |
One-Time Password Algorithm |
OATH tokens can be used to implement two-step verification for AXS GUARD services using the Time-based One-time Password Algorithm (TOTP as defined in RFC 6238). For authentications to succeed, the system time must be correctly configured on the server side and the clients. It is therefore recommended to synchronize clients with a time server. The AXS Guard appliance uses a time server by default, which is configured under Network > General. |
Last Authentication |
This field shows the user’s most recent login. |
Authentication Errors |
Shows the number of authentication errors. Depending on the order of authentication methods in the selected policy, this counter may increase even after a successful login, e.g.: If you select or configure policies where authentication methods are combined, such as "OATH or Password", and the user chooses to enter a local password instead of a one-time password, the system will validate the one-time password before the local password because it appears first in the policy (OATH). This event will be registered as an authentication failure in the logs and will be counted as an authentication error, even though valid credentials (a username and password) were submitted by the user. Once the one-time password has been validated, the system will check if the input is a valid local password because this method appears second in the authentication policy. This event will be registered as a successful login in the logs. |
Step Size |
The time-step size has an impact on both security and usability. A larger time-step size means a larger validity window for an OTP to be accepted by the AXS Guard appliance. However, there are implications for using a larger time-step size. A larger time-step size exposes a larger window to attack; when an OTP is generated and exposed to a third party before it is consumed, the third party can consume the OTP within the time-step window. It is highly recommended to use a default time-step size of 30 seconds, which is the ideal balance between security and usability. |
Resetting Time Skew |
The AXS Guard authentication service can compensate for an excessive time skew. When reset, it requires the user to repeatedly try to log in. After a sequence of three successful logins, the AXS Guard authentication service will learn the client’s time skew and will subsequently compensate for it. |
Time Skew |
The vast majority of issues related to TOTP two-step verification are a direct result of the server and the authenticator having different ideas of what the current time is, a.k.a. time skew. Some amount of time skew is tolerated, but significant differences will usually result in an authentication failure and access being denied. Administrators can therefore manually configure the OATH token time skew. |
Window Size |
By default, three one-time passwords are valid at any one time. This accounts for generated, but unused passwords and failed login attempts. In order to decrease the likelihood of problems linked to time synchronization, this window can be increased from its default size of 3. The window size must be a value between 1 and 21. |
QR Code |
A TOTP QR code encapsulates essential information required for authenticator app setup. This includes a secret key for code generation, the issuer and URI label for identification, the cryptographic algorithm and digit count for code format, and the time interval for code updates. When scanned, authenticator apps extract this data to accurately configure the token. |

DIGIPASS Management
Overview
In this section, we explain the AXS Guard DIGIPASS management system. Topics covered in this section include:
-
Setting the Derivation Key used to encrypt or decrypt DIGIPASS database data.
-
Importing DIGIPASS on the AXS Guard.
-
Deleting DIGIPASS from the AXS Guard.
-
How to assign / unassign a DIGIPASS to / from a user.
-
The DP 810 Registration Process
-
How to assign / unassign a DIGIPASS 810 for eID.
-
How to test, reset and unlock a DIGIPASS.
-
How to consult DIGIPASS runtime information.
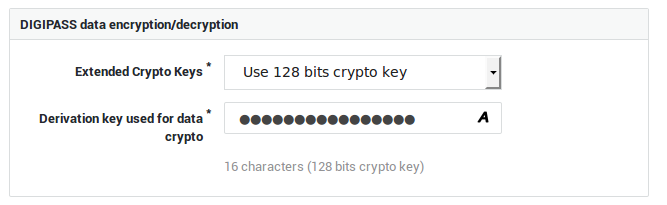
Setting the Derivation Key
The derivation key is a string which consists of 16 ASCII characters used to encrypt or decrypt the AXS Guard DIGIPASS database. It provides physical security, in that access to the AXS Guard hard drive(s) alone is not sufficient to read DIGIPASS data. The derivation key must be entered by an AXS Guard user with full administrative privileges or above before any DIGIPASS blob data can be imported. A derivation key can only be changed by a full system administrator or above. Derivation Key
-
Log in to the AXS Guard appliance.
-
Go to Authentication > Able DIGIPASS > General.
-
Enter the Derivation Key in the Derivation Key used for data crypto field.
-
Save your settings.
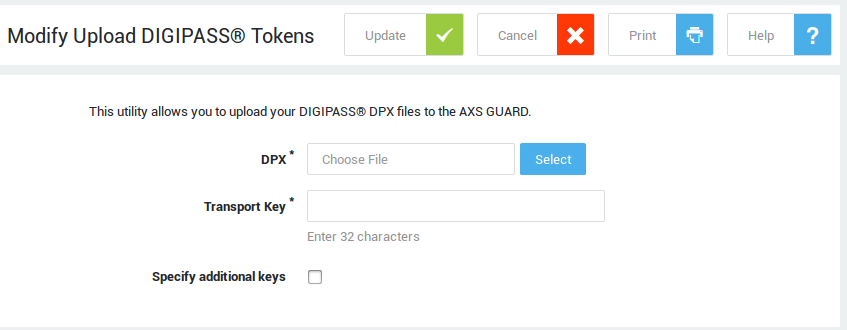
Importing DPX Files
Before DIGIPASS authentication can be implemented, a valid derivation key must be entered and a DIGIPASS DPX file imported on the AXS Guard appliance. The DPX file contains vital DIGIPASS records, such as the serial numbers of the tokens, the model numbers and important runtime information.
Every DPX file is encrypted with a transport key to insure its integrity (to protect the DPX file an DIGIPASS tokens against loss or theft). A transport key consists of 32 characters and is provided by Able. It can be extended with an operator and administrator key for additional security.
Info
- You can import (reuse) DIGIPASS tokens that were purchased with another Able product, provided you have a valid license.
- Currently, response-only tokens are the only ones which are supported by the AXS Guard appliance.
-
Log on to the AXS Guard.
-
Navigate to Authentication > DIGIPASS > Upload.
-
Click on the Browse button to locate your DPX file.
-
Enter the transport key provided by Able to decrypt the DPX file. If Able provided additional keys, check specify additional keys to enter the operator and administrator keys.
-
Click on Update to finish.
| Parameter | Description |
|---|---|
DPX |
Click on |
Transport Key |
Every DPX file is encrypted with a transport key to insure its integrity (to protect the DPX file against loss or theft). The transport key consists of 32 characters and is provided by Able. It can be extended with an operator and administrator key for additional security. |
Specify additional keys |
Check to enter the operator and administrator keys. |
Operator key (key 1) |
Enter the operator key, which must be 16 characters long. |
Administrator key (key 2) |
Enter the administrator key, which must be 16 characters long. |
Assigning DIGIPASS Tokens
Before a user can authenticate with a DIGIPASS token, you must assign one to his / her user account. It is possible to assign multiple DIGIPASS tokens to a user. The user can then use any of the assigned DIGIPASS tokens to authenticate against the AXS Guard.
-
Navigate to Users & Groups > Users.
-
Click on the desired user account.
-
Check the Has Able DIGIPASS option.
-
Click on the Add DIGIPASS button.
-
Select a DIGIPASS serial number from the list.
-
Update the user account.

Info
- Follow the same procedure to assign additional DIGIPASS tokens, except for DIGIPASS 810 readers.
- Use a search filter to easily find tokens in the list.
DIGIPASS 810 for eID Registration and Assignment
Requirements
The following items are required before users can authenticate with their DIGIPASS 810 for eID:
-
Users with a DIGIPASS 810 for eID require user level tool access to self-register.
-
If High Security Mode is selected, every user must enter his / her eID card number.
-
Because of the above, the AXS Guard Tool Authentication Policy must be set to
PasswordOrDigipass. If you have a mix of Directory Services and local users, the Policy must be set toPasswordOrDirectoryServicesOrDigipass, unless all users already have a DIGIPASS. -
Only basic administrators and above can register on behalf of users who don’t have access to the AXS Guard tool.
eID Security Modes
The eID security mode determines how users must register their eID card reader (DP 810).
-
Log on to the AXS Guard as a Full Administrator or above.
-
Navigate to Authentication > Able DIGIPASS > eID > General.
-
Select the desired security mode from the drop-down list.
-
Update your configuration.

| Mode | Description |
|---|---|
Low Security |
In Low Security Mode, users are not required to enter their eID card number when registering their eID reader. |
High Security |
System default. Users will be required to enter their eID card number when registering their eID reader. The submitted eID number is checked against the eID number entered by the system administrator. In case of a discrepancy, eID registration will fail. |
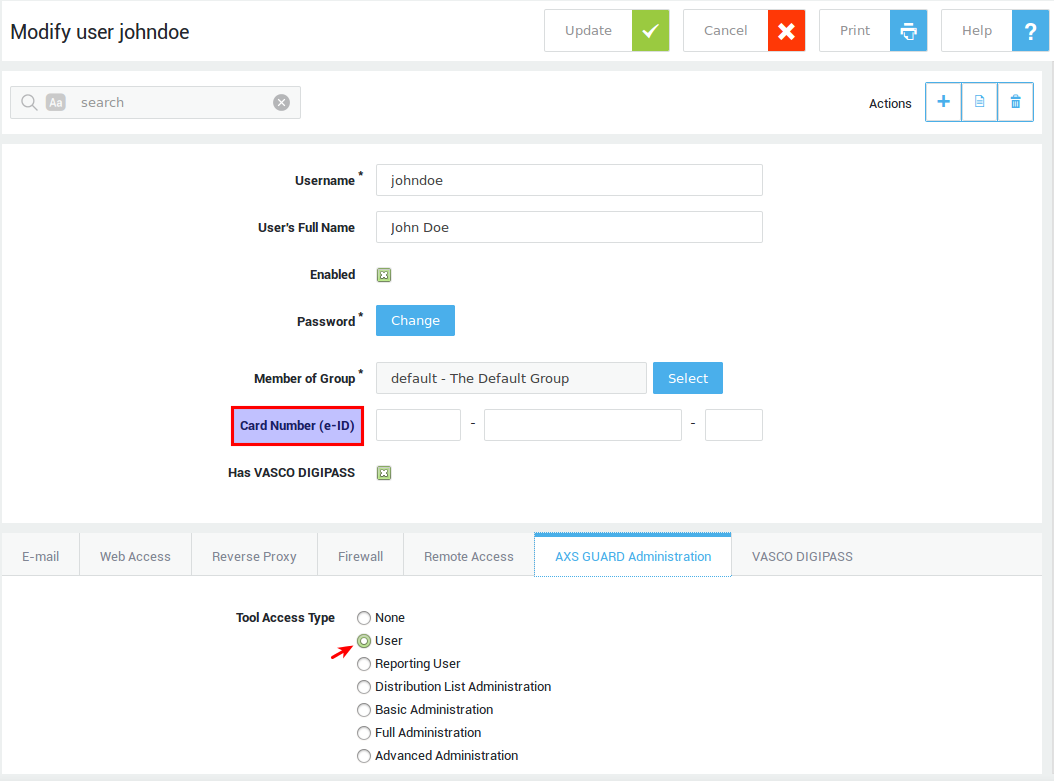
User-specific eID Settings
-
Log on to the AXS Guard appliance as a basic administrator or above.
-
Navigate to Users & Groups > Users.
-
Select the user who needs access to the AXS Guard tool to register his / her eID.
-
Enter the user’s eID number in the Card Number field.
-
Select the AXS Guard Administration tab.
-
Set the Tool Access Type to User.
-
Update your configuration.
Self-Registration URL
Users can register via the following URL: https://<axsguard>:82/registration (system default). To change this URL:
-
Log on to the AXS Guard as a system administrator.
-
Navigate to System > Administrator Tool.
-
Update your settings.
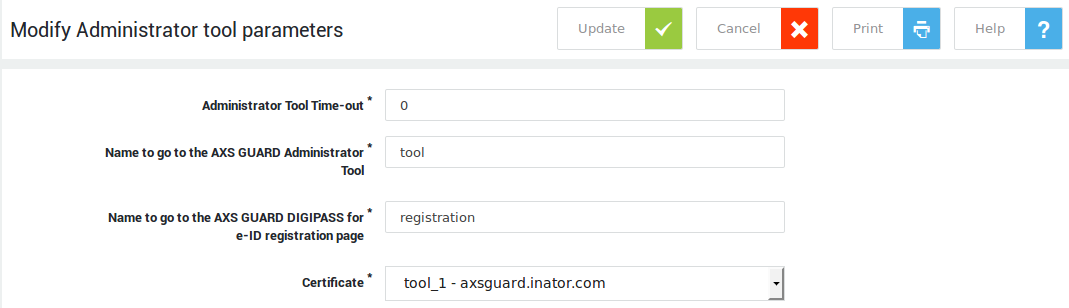
| Field | Description |
|---|---|
Administrator Tool Time-Out |
Enter the time in minutes for the period of inactivity after which the AXS Guard Administrator Tool is automatically disconnected. The system default is 15 minutes. This is an extra security precaution in case an administrator forgets to log off. Setting the value to 0 disables the time-out. |
Name to go to the AXS Guard Administrator Tool |
The name specified in this field automatically resolves to the AXS Guard Administrator Tool if the AXS Guard is configured as your browser’s proxy server (see the AXS Guard System Administration How To). The system default is |
Name to go to the AXS Guard DIGIPASS for e-ID registration page |
This is the name of the page users can go to in order to register their DIGIPASS for eID reader. For example, if you enter |
Certificate |
The certificate that is used to identify your appliance. Go to PKI > Certificates to configure the AXS Guard CA and create certificates. See the PKI How To for more information. |
Self-Registration Procedure
-
Log on to the AXS Guard as a user (tool access is required).
-
Navigate to Authentication > DIGIPASS > eID > Registration.
-
Enter your eID number. This step is skipped in Low Security Mode.
-
Enter the serial number of the DP 810 reader.
-
Insert your eID card into the DP 810 reader and select Register.
-
Enter your eID PIN number when prompted.
-
Enter the result in the Registration Code field. The result is case-insensitive.
-
Click on Register.
Info
- Users can also register via the following URL:
https://<axsguard>:82/registration. This is a shortcut for Authentication > VASCO DIGIPASS > eID > Registration as mentioned in step 2. - Users can also re-register via this screen.
- Basic administrators or above can also register on behalf of users who don’t have access to the AXS Guard tool.
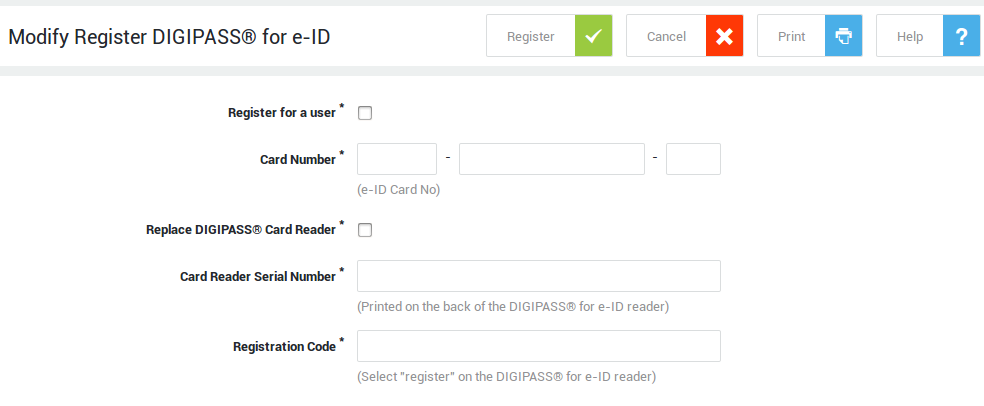
| Field / Option | Description |
|---|---|
Register for a user |
Basic administrators or above can register a DIGIPASS eID reader on behalf of another user, in case (s)he does not have user access to the AXS Guard administration tool. The user needs to supply his/her ID information to the system administrator, preferably over a secure communication channel, who will then enter it on the user’s behalf. |
Username |
Select the name of the user on whose behalf you are registering. |
Card Number |
Enter the number of the user’s eID card. This must only be provided if the High Security mode is selected under eID > General. The number is compared to the number as specified in the user’s AXS Guard profile. |
Replace DIGIPASS reader |
Select this option is you are replacing the user’s eID reader. The old and new serial numbers must be provided. |
Old Card Reader Serial Number |
The serial number of the card reader to be replaced. This is required to remove the link between the old reader and the user, so that the old reader can no longer be used. |
Card Reader Serial Number |
The serial number printed on the back of the card reader. |
DIGIPASS Challenge |
The response returned by the DIGIPASS token in case challenge/response authentication is required. |
Registration Code |
To use the eID card reader, the Application Service Provider (ASP) must link the user’s eID card to the card reader. Only then the user will be able to use his/her card reader to authenticate with the ASP. To get a registration code, start the registration procedure on the eID card reader and enter the registration code in this field. The registration code is checked against the DIGIPASS information associated with the card reader’s serial number. |
Registering on behalf of a User
See self-registration procedure. Select "register for a user".
User Re-registration
Users must re-register in the following cases:
-
The user receives a new DIGIPASS for eID reader, e.g. in case the previous one has been lost, stolen or the battery is depleted. The new eID reader has a different serial number, which means a new DIGIPASS Instance must be created.
-
The user receives a new electronic ID card. The new electronic ID has a different serial number and must be registered by a system administrator and the user of the electronic ID.
In case a new reader is issued
-
The user must follow the same steps as explained in the self-registration procedure, but must also
-
check the Replace DIGIPASS Reader option.
-
provide the serial number of the previous eID reader.
-
In case a new electronic ID is issued
-
An AXS Guard administrator must register the card number of the new electronic ID in the user settings.
-
After the administrator has registered the new ID, the user must re-register.
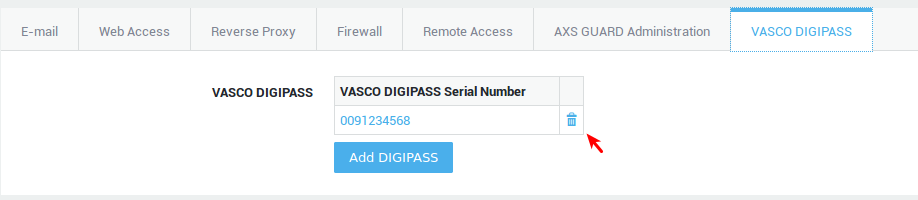
Unassigning a DIGIPASS Token
You should unassign a DIGIPASS token in the following cases:
-
the user left your organization and no longer needs access to your network resources.
-
the DIGIPASS token is defective and you want to delete it from the system.
-
the wrong DIGIPASS token was accidentally assigned.
-
Navigate to Users & Groups > Users.
-
Click on the appropriate user account.
-
Click on the trash icon next to the serial number of the DIGIPASS (for eID) to be unassigned.
-
Click on Update to finish.
Disabling a DIGIPASS Token
A DIGIPASS can be manually disabled in case it has been reported lost or stolen.
-
Navigate to Authentication > DIGIPASS > Tokens.
-
Click on the serial number of the DIGIPASS to be locked.
-
Uncheck the Enabled option.
-
Click on Update.

Deleting a DIGIPASS Token
Delete a DIGIPASS in case:
-
it is no longer functional
-
its battery is depleted
-
the DIGIPASS token is lost by the user.
Info
Assigned DIGIPASS tokens must be unassigned before they can be deleted.
To delete a DIGIPASS token:
-
Navigate to Authentication > DIGIPASS > Tokens.
-
Check the DIGIPASS token to be removed.
-
Click on Delete.
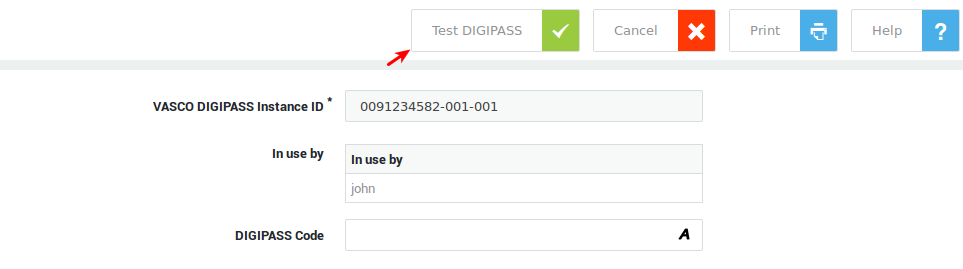
Testing a DIGIPASS Token
You can test a DIGIPASS token before assigning it to a user or to troubleshoot the device.
-
Navigate to Authentication > DIGIPASS > Tokens.
-
Click on the appropriate DIGIPASS serial number.
-
Click on the appropriate instance.
-
Click on the Test OTP button.
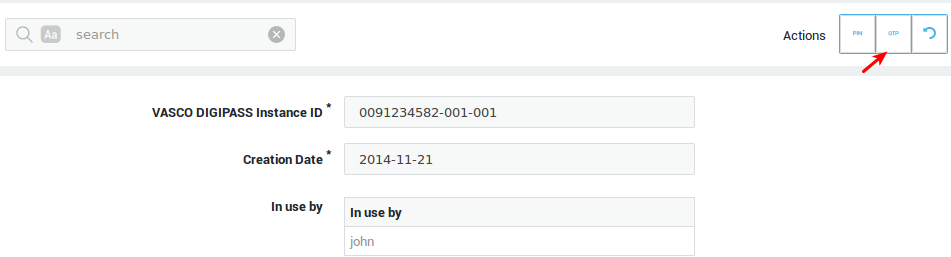
-
Generate an OTP on your DIGIPASS token.
-
Enter the OTP in the DIGIPASS Code field.
-
Click on the "Test DIGIPASS" button.
Info
If the test fails, try resetting the DIGIPASS token.
| Parameter | Description |
|---|---|
Able DIGIPASS Instance ID |
A unique combination that identifies a DIGIPASS instance. |
Creation Date |
The time that the DIGIPASS instance was created on the AXS Guard appliance. |
In use by |
The user to which the DIGIPASS instance is assigned. |
DIGIPASS Information |
DIGIPASS runtime information, including the type, model number and other properties. |
DIGIPASS Code |
The code generated by the DIGIPASS token to be tested. |
Radmom number on DIGIPASS |
A numeric code that appears on a locked DIGIPASS token. Enter this code here to unlock the token. |
Resetting a DIGIPASS Token
A DIGIPASS needs to be reset when the Operational Time Window has been exceeded, i.e. the DIGIPASS token needs to be resynchronized with the AXS Guard appliance.
-
Navigate to Authentication > DIGIPASS > Tokens.
-
Click on the appropriate DIGIPASS serial number.
-
Click on the appropriate instance.
-
Click on the reset button. You will receive a message that the DIGIPASS has been reset.

Info
Test the DIGIPASS token after it has been reset.
Client-side Unlocking of a DIGIPASS Token
For security, a DIGIPASS token is automatically locked after a user repeatedly enters the wrong DIGIPASS PIN. Once a DIGIPASS is locked, a lock code will appear on its LCD. An AXS Guard administrator must then unlock the token. To unlock the token, the user must submit the lock code, which is needed by the administrator to unlock the DIGIPASS token on the AXS Guard appliance.
-
Navigate to Authentication > DIGIPASS > Tokens.
-
Click on the serial number of the locked token.
-
Click on the appropriate instance.
-
Enter the lock code displayed on the DIGIPASS token in the Random number on DIGIPASS field.

-
Press the Generate Unlock Code button in the top right corner.
-
Have the user enter the unlock code on his / her DIGIPASS token.

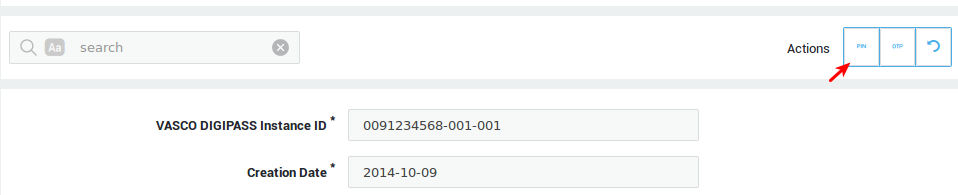
Changing the DIGIPASS Server PIN
Whether or not a Server PIN is supported depends on the DIGIPASS type. The required length of the Server PIN is listed in the DIGIPASS information screen.
-
Navigate to Authentication > DIGIPASS > Tokens.
-
Click on the DIGIPASS serial number.
-
Click on the appropriate instance. The DIGIPASS Runtime information indicates whether or not a Server PIN is supported and to whom the DIGIPASS token is assigned.
-
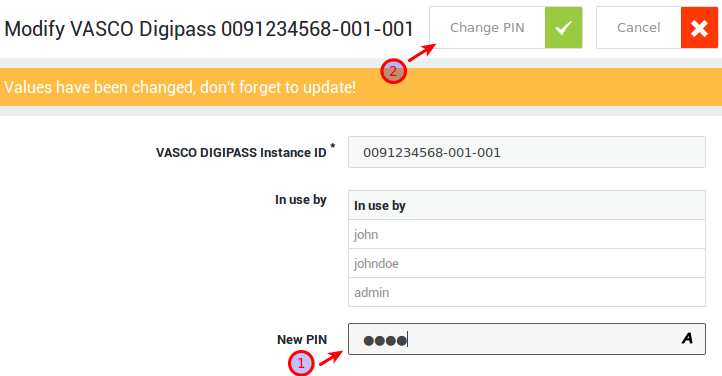
Click on the Change PIN button in the top right corner.
-
Enter the new Server PIN.
-
Click on Change PIN.
Info
- Users can also change their server PIN when they authenticate for a service by entering the following combination:
Password+currentPIN+OTP+newPIN+newPIN - This method doesn’t work for PPTP.
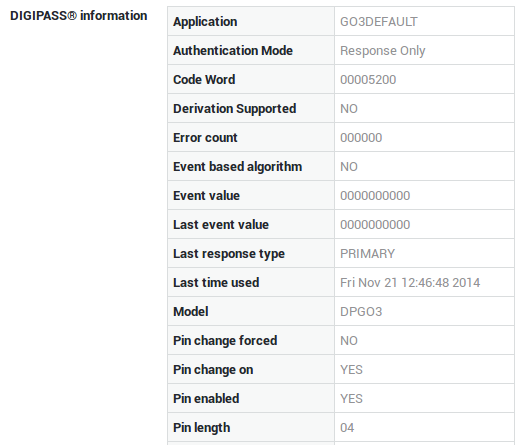
Viewing DIGIPASS Runtime Information
DIGIPASS runtime information varies depending on the type of DIGIPASS hardware and provides useful information about its supported properties and features.
You can access the runtime information of free and assigned DIGIPASS tokens. The runtime information of assigned DIGIPASS tokens is more detailed, e.g. event values are shown.
| Field | Description |
|---|---|
Model |
The DIGIPASS Model number. |
Last Time Used |
Displays the date and time of the most recent authentication. |
PIN Supported |
Indicates whether or not the DIGIPASS token supports a Server PIN. |
PIN Length |
The Server PIN length supported by the DIGIPASS token. |
Use Count |
The number of times the DIGIPASS token has been used. |
Sync Windows |
Appears if the DIGIPASS token has been reset. |
-
Navigate to Authentication > DIGIPASS > Tokens.
-
Click on a DIGIPASS serial number which is in use.
-
Click on the appropriate DIGIPASS Instance.
-
Navigate to Authentication > DIGIPASS > Tokens.
-
Click on a DIGIPASS serial number which is not in use.
VACMAN Controller Configuration
The VACMAN Controller is the server-side software of the DIGIPASS. Its main function is to verify submitted OTPs, i.e. when a client authenticates, the VACMAN controller checks various parameters before it accepts or rejects a one-time password. This is also referred to as the dynamic authentication service.
In addition to this dynamic authentication service, the VACMAN Controller offers eSignature validation, DIGIPASS management, emulation and activation services. Many parameters exist and can be fine-tuned to change the the VACMAN Controller’s default behavior. For additional information, see the VACMAN Library Product Guide or visit http://www.vasco.com
To configure the general settings of the VACMAN Controller:
-
Navigate to Authentication > DIGIPASS > General.
-
Adjust the settings as desired.
-
Click on Update when finished.
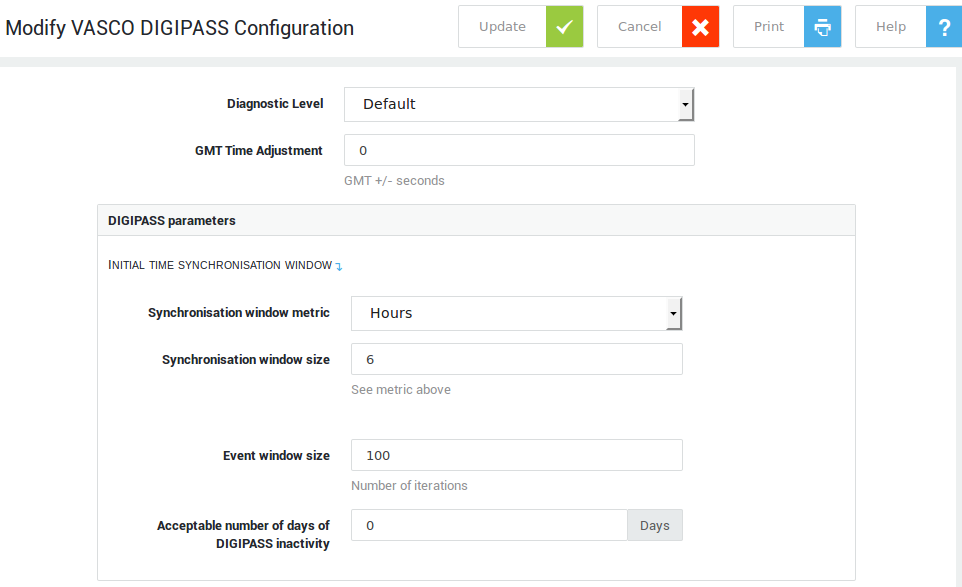
| Field / Option | Description |
|---|---|
Diagnostic Level |
Level of diagnostic details included in messages generated by the VACMAN Controller Library. This level can only be adjusted by Able personnel. |
GMT Time Adjustment |
Adjusts the system’s GMT time with the amount specified (seconds). Ideally, this value should always be 0 and never be adjusted. However, if the the system’s time is inaccurate, you have the option to manually change this value, which must be between -86400 and 86400 seconds. |
Synchronization Window Metric |
The metric in which the initial synchronization window size is expressed. Possible values are hours (default), minutes, or discrete. The discrete value is intended for DIGIPASS for Mobile Clients. It offers a mechanism to support the daylight saving time (DST) adjustment in the VACMAN Controller Library. |
Synchronization Window Size |
The Synchronization Window is used to calculate of the Initial Time Synchronization Window, which is used during the initial verification process of a DIGIPASS response value. The VACMAN controller uses this parameter to calculate the initial clock skew between the client DIGIPASS and the VACMAN’s Controller GMT Time. The size of the Initial Time Synchronization Window is linked to the configured maximum value of the Synchronization Window and the configured Identification/Signature Time Windows. Only values between 1 and 512 are allowed. |
Event Window Size |
The Event Window Size, expressed in a number of iterations. Acceptable values range from |
Acceptable number of days of DIGIPASS inactivity |
Maximum allowed number of days of DIGIPASS client inactivity. After this period, a user’s DIGIPASS will be locked and will have to be reset. The default value is 0, which means there is no maximum period of inactivity. The maximum value that can be specified is 1024 days. |
Enable Dynamic Identification Time Window |
If enabled, the window size automatically increases with time if a user does not use his/her DIGIPASS. The more frequently a DIGIPASS is used, the smaller this window can be made, allowing even smaller (meaning more secure) values than those assigned to a static window. |
Number of successive identification errors before locking |
The amount of allowed failed authentications. When this number is exceeded, the DIGIPASS will be locked on the server side. Acceptable values range from 0 to 255 identification errors, 0 meaning that server-side locking is disabled. |
Challenge generated by AXS Guard? |
Check if the challenge is to be generated by the AXS Guard. Uncheck to use and external challenge. |
Allow a challenge to be reused? |
Check to reuse (recycle) previous challenges. Uncheck to disable the reuse of challenges. |
Require challenge at validation? |
The challenge is generated by VACMAN Controller Library and is required to validate the DIGIPASS response. |
Signature Time Window |
The clock skew tolerance (or allowed time drift) between a DIGIPASS client and the signature server. This window is adjusted to the last known drift per token. The maximum acceptable drift correction is 1 second per 6 hours. The time step is determined by the internal programming options of the DIGIPASS. The minimum value is 2, the maximum value 500. 24 is the system default value. |
Enable Dynamic Signature Time Window |
The Signature Time Window size can be set dynamically or can be a static value (system default). During periods of account inactivity, the window size increases with time. If a DIGIPASS are frequently used, this window can be made smaller, which is more secure. |
Number of successive identification errors before locking |
When this number is exceeded, the DIGIPASS is locked on the server side. Acceptable values range from |
Signature presented/validated online (ordered and in real-time) |
Check this option when the signature is generated in real-time and the different steps are presented chronologically to the user. |
Amount of signatures allowed per time step |
With a time-based signature in online mode, you can set the amount of signatures that can be accepted per DIGIPASS time step. You can allow only one or multiple signatures per time step. In the latter case, successive signatures validated during the same time step must be different from each other. |
Extended Crypto Keys |
Extended crypto key to use as additional input for creating the crypto keys to encrypt or decrypt DIGIPASS database data. |
Derivation key used for data encryption |
The derivation key is a string consisting of 16 (8 bit) ASCII characters. It represents a 128 bits crypto key. This option is preferred when HSM is not used. |
Cronto App Management
Strong Authentication with Push Notifications
Push Notification Authentication enables user authentication by sending a push notification directly to the user’s smartphone, alerting them that an authentication attempt is taking place.
Users can use their mobile devices as the second required factor for secure two-factor authentication; there is no need for tokens or additional devices.
When users log in, they will automatically receive an authentication request based on their username. Users can view the authentication details and approve or deny access, via a simple press of a button.
To use this feature, you need the mobile application, which can be personalized and branded according to the customer’s requirements, a DIGIPASS server license, the AXS Guard Enterprise bundle and of course a web application to be secured.
Contact sales@axsguard.com for more information.
Importing DPX Files
Before Cronto authentication can be implemented, a DPX file must be uploaded to the AXS Guard appliance. Also see Importing DPX Files.
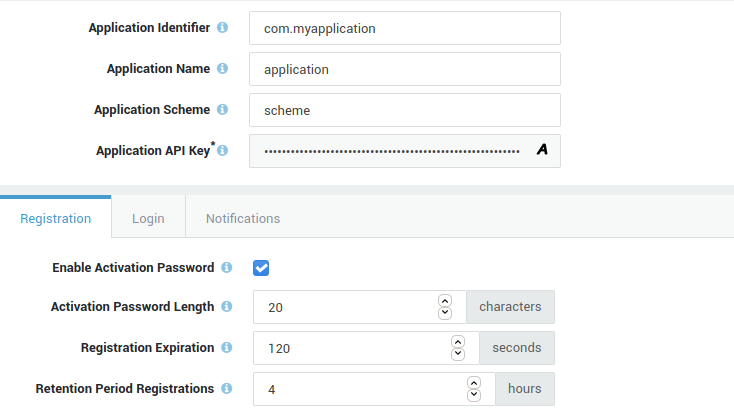
App Service Configuration
To configure the options and parameters for the App server:
-
Log in to the AXS Guard appliance.
-
Go to Authenticators > App > Server.
-
Complete the required fields and save your configuration.
Important
See the context-sensitive help for additional information or contact sales@axsguard.com.
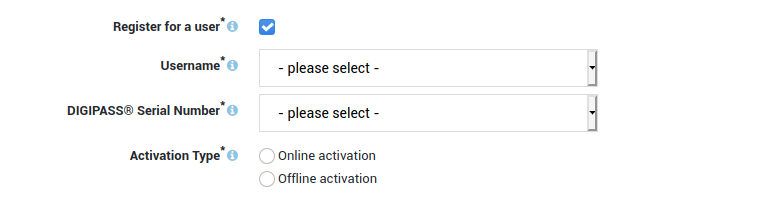
App Registration
Users can register their app via the following URL: https://<axsguard>:82/registration, which is the system default configuration. System administrators can also register on behalf of users. Note that users require access to the AXS Guard web-based administration tool to self-register.
The app registration procedures are basically identical to the eID registration procedures.
Authentication Policy Configuration
Overview
In this chapter, we explain how authentication policies are built and how they can be assigned to AXS Guard services to support various authentication methods, such as DIGIPASS authentication. Topics covered in this chapter include:
-
Authentication Restrictions, which determine who can / cannot authenticate.
-
Authentication Rules, which define the Authentication Methods and / or applicable Restrictions to be enforced.
-
Authentication Policies, which are a combination of Authentication Rules and / or Restrictions.
-
How Authentication Policies are assigned to AXS Guard services, such as the Reverse Proxy, VPN services, etc.
Authentication Restrictions
Authentication Restrictions determine who can or cannot authenticate. Through Restrictions, authentication can either be:
-
Denied to specific users, groups or networks.
-
Allowed to specific users, groups or networks.
Important
- Currently, Network-Based Restrictions can only be assigned to the following services: the Administrator Tool, Firewall and Web Access, the Reverse Proxy, IMAP and POP.
- Do not create a separate Restriction per user or group; Instead, add users or groups to a single Restriction.
Authentication Restriction Properties
-
Can be added at the Rule Level or the Policy Level.
-
Restrictions are optional. You can create Authentication Rules and Policies without Restrictions.
-
If no Authentication Restrictions are defined, all authenticating users are subject to the enforced Authentication Policy.
-
Any authentication attempt which doesn’t match existing Restriction(s) fails. Restrictions are always checked first.
-
Are only active if included in an Authentication Policy, either directly or via an Authentication rule and if the Policy is assigned to a service.
| Level | Applies to: |
|---|---|
Rule-Level |
A single Authentication Rule. |
Policy-Level |
Every Authentication Rule included in an Authentication Policy. |
Example: Rule-Level vs. Policy-Level Authentication Restrictions
Assume you have a Policy with 2 Rules (A and B) and you allow access for user X in the Policy. User X is denied in Rule A. Rule B does not contain any Restrictions. This means that user X can authenticate by using the Authentication Method(s) defined in Rule B.
On the other hand, if you have a Policy with 2 Rules (A and B) and you deny access to user X in the Policy, authentication is always denied to user X, even if user X is explicitly allowed access by one of the included Rules.
Predefined Authentication Restrictions
For convenience, a set of predefined Authentication Restrictions are available on the AXS Guard. They can be added to any new or existing Authentication Policy or Authentication Rule, except predefined factory Rules and Policies.
Predefined Authentication Restrictions cannot be modified or deleted.
-
Log on to the AXS Guard appliance.
-
Navigate to Authentication > Advanced > Restrictions.

Creating Authentication Restrictions
- Navigate to Authentication > Advanced > Restrictions.
-
Click on the Add New button.
-
Enter the settings as explained below.
-
Click on Save when finished.
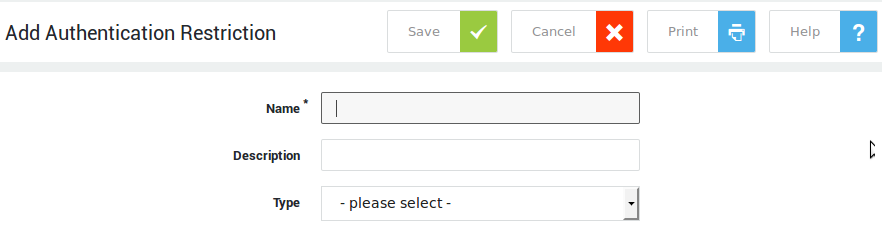
| Field | Description |
|---|---|
Name |
Enter a name for the restriction. An error message appears if an invalid name is entered. |
Description |
Enter a description for the restriction (optional field). |
Type |
Select the restriction type as explained in the table below. |
Invert |
Check this option to negate the configured restriction. |
| Type | Invert is off (default) | Invert is on |
|---|---|---|
User-based |
Deny specified user(s). |
Allow specified user(s) only. |
Group-based |
Deny specified group(s). |
Allow specified group(s) only. |
IP or Network-based |
Deny specified IP(s) or Network(s). Use the CIDR notation to specify a network, e.g. |
Allow specified IP(s) or Network(s) only. Use the CIDR notation to specify a network, e.g. |
Domain-based |
Deny authentications from the specified LDAP domains. |
Restrict access to the specified LDAP domains. |
Access Level-based |
Deny the specified administrator level and below. |
Restrict access to the specified level and above. |
GeoIP-based |
Deny authentications originating from the specified countries. |
Restrict access to the specified countries. |
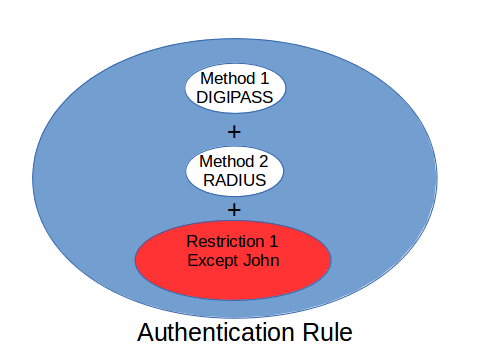
Authentication Rules
Authentication rules are the backbone of authentication policies. Rules are composed of authorized authentication methods and, optionally, restrictions. Rules have the following properties:
-
Rules can contain one or several authorized authentication methods.
-
Users cannot choose between authentication methods defined in a rule; all methods are enforced when a user authenticates.
-
Rules may contain one or more restrictions.
-
A rule is only applied if it is added to an authentication policy, which in turn must be assigned to an AXS Guard service.
-
If both methods and restrictions are specified, they are both enforced (logical AND). Only matching authentication will be allowed.
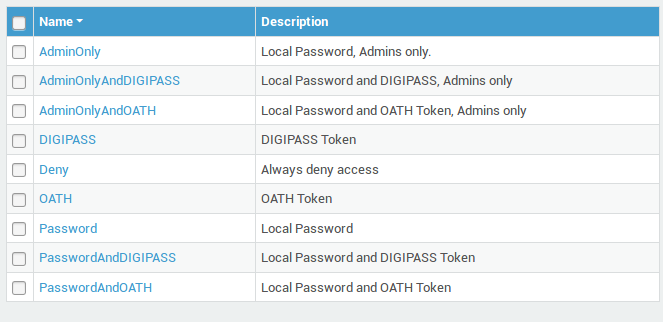
Predefined Authentication Rules
For convenience, predefined Authentication Rules are available on the AXS Guard. They can be added to any new or existing Authentication Policy, except to factory predefined Policies.
-
Log on to the AXS Guard
-
Navigate to Authentication > Advanced > Rule.
-
Click on a rule name to view its configuration details.
Important
Predefined authentication rules cannot be modified or deleted.
| Rule | Description |
|---|---|
AdminOnly |
Only Basic Administrators or above are authorized to use their local password for authentication. |
Allow |
Always allow access. Only for testing. Do not use on a production platform! |
Deny |
Always deny access. |
OATH |
Enforce authentication with OATH tokens, such as the Microsoft or Google authenticator apps. |
DIGIPASS |
Enforce DIGIPASS Authentication |
DIGIPASSAndAdminOnly |
Enforce DIGIPASS Authentication for all users. Only Administrators are allowed to use their local password for authentication. |
DIGIPASSAndDirectoryService |
Enforce DIGIPASS Authentication AND LDAP back-end authentication. |
DIGIPASSAndPassword |
Enforce DIGIPASS AND local password for authentication. |
DIGIPASSAndRadius-* |
Enforce DIGIPASS AND RADIUS back-end authentication. |
DirectoryService |
Enforce LDAP back-end authentication. |
Password |
Enforce local password authentication. |
Radius-* |
Enforce RADIUS back-end authentication. |
Important
When combining RADIUS, Directory Service or local passwords with DIGIPASS authentication, the password must be entered before the OTP. The password and the OTP must be entered as a single string in the authentication form presented to the user.
Creating Authentication Rules
-
Navigate to Authentication > Advanced > Rule.
-
Click on the Add New button.
-
Enter the settings as explained below.
-
Click on Save to finish.
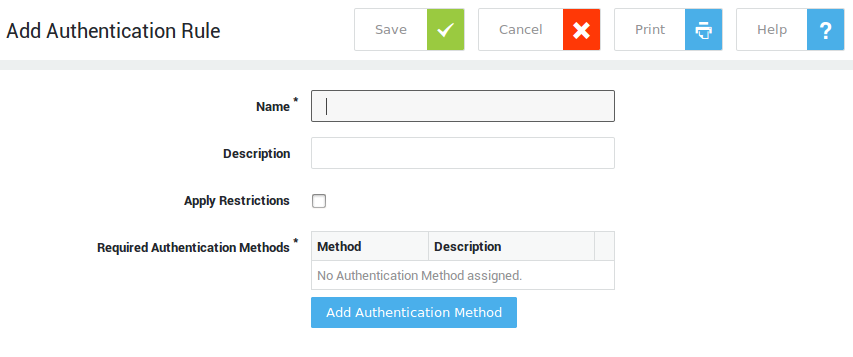
| Option | Description |
|---|---|
Name |
Provide a name for the authentication rule. An error message will appear if an invalid name is entered. |
Description |
Add a description for the authentication rule (optional field). |
Apply Restrictions (Optional) |
Check this option to add an authentication restriction. |
Add Authentication Restrictions |
Click on this button to select the desired restriction. |
Add Authentication Method (Required) |
Click on this button to select the desired authentication method(s), e.g. DIGIPASS authentication. |
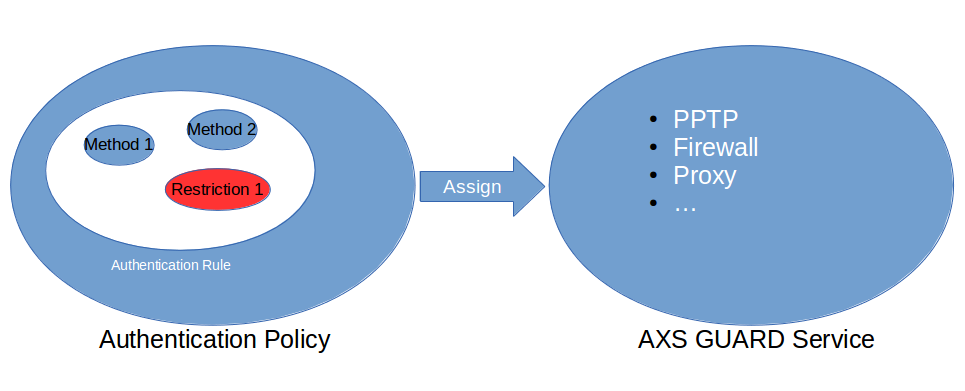
Authentication Policies
Authentication policy
Authentication Policies are a combination of:
-
One or multiple authentication rules (required).
-
One or multiple authentication restrictions (optional).
Authentication policies ensure that authentication rules are processed logically. If an authentication policy contains multiple rules, the users can choose between the various methods defined in the rules.
Important
- All authentication attempts which do not match the authentication rule(s) included in a policy are blocked.
- Administrators should verbally inform their users about allowed authentication method(s), as not all application interfaces provide a selection or help menu indicating which authentication methods are supported.
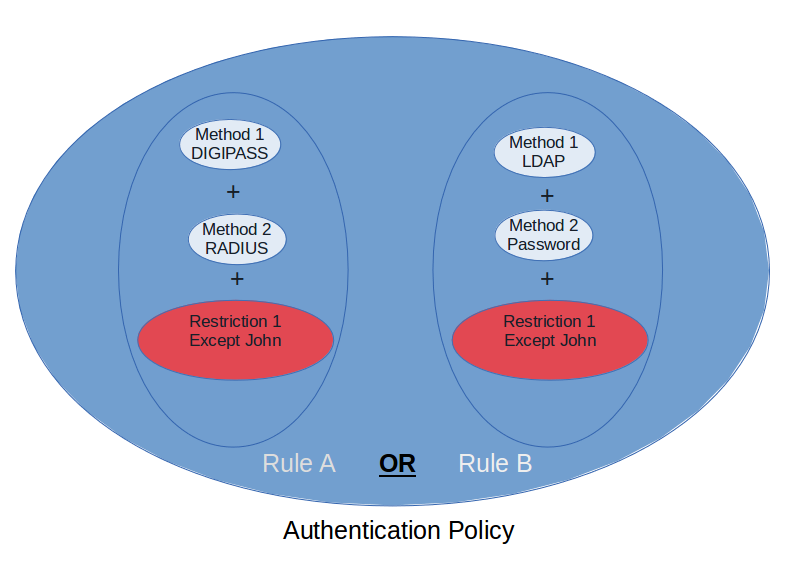
Authentication Policy Properties
-
You cannot enforce authentication rules and restrictions without adding them to an authentication policy.
-
An authentication policy should include at least one authentication rule.
-
An authentication policy may contain one or more authentication restrictions.
-
Authentication restrictions, if present, are always processed first.
-
If no authentication restrictions exist, the authentication policy is enforced for all users.
-
Authentication policies must be assigned to an AXS Guard service to be enforced.
Predefined Authentication Policies
For convenience, predefined authentication policies are available on the AXS Guard appliance. They can be added to any of the AXS Guard services.
-
Log on to the AXS Guard.
-
Navigate to Authentication > Advanced > Policy.
-
Click on a policy name to view its configuration details.
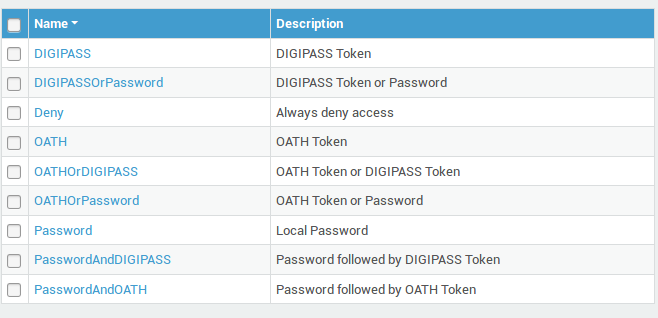
Important
Predefined authentication policies cannot be modified or deleted.
| Policy Name | Description applicable to Users | Description applicable to Administrators |
|---|---|---|
Deny |
Always deny access |
Always deny access |
OATH |
Enforce OATH authentication only. |
N/A |
OATHorDIGIPASS |
Enforce OATH or DIGIPASS authentication. Use this policy to migrate authentication methods. |
N/A |
OATHorPassword |
Users can log in with an OATH token or a local password |
N/A |
DIGIPASS |
Enforce DIGIPASS Authentication only. |
N/A |
DIGIPASSAndDirectoryService |
DIGIPASS + LDAP Authentication. |
are also allowed to use DIGIPASS and Static Password. |
DIGIPASSAndPassword |
DIGIPASS + Local Password. |
N/A |
DIGIPASSAndRadius-* |
DIGIPASS + RADIUS Password |
N/A |
DIGIPASSOrDirectoryService |
DIGIPASS or LDAP Password |
are also allowed to use Static Password. |
DIGIPASSOrPassword |
DIGIPASS or Local Password |
N/A |
DIGIPASSOrRadius-* |
DIGIPASS or RADIUS Password |
N/A |
DirectoryService |
LDAP Password Only |
are also allowed to use Static Password. |
Password |
Local Password Only |
N/A |
Radius-* |
RADIUS Password Only |
N/A |
Important
-
*is the RADIUS Server ID -
When combining RADIUS, Directory Service or local passwords with DIGIPASS authentication, the password must be entered before the OTP. The password and the OTP must be entered as a single string in the authentication form presented to the user.
Creating Authentication Policies
-
Navigate to Authentication > Advanced > Policy.
-
Click on the Add New button.
-
Enter the settings as explained below.
-
Click on Save when finished.
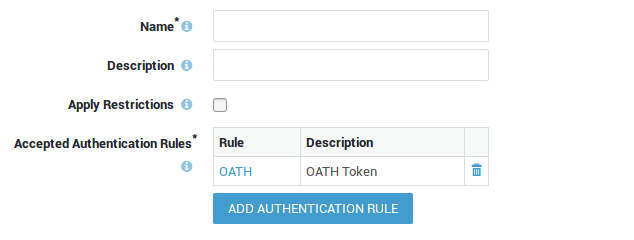
| Field | Description |
|---|---|
Name |
Provide a name for the new authentication policy. |
Description |
Add a description for the authentication policy (optional field). |
Add Authentication Rule |
Click on this button and select the appropriate authentication rule(s). |
Apply Restrictions |
Check this option to add authentication restrictions. |
Add Authentication Restrictions |
Click on this button and select the desired authentication restriction(s). |
How to Configure User Authentication for a Service
Assigning Authentication Policies
AXS Guard services include, but are not limited to, the reverse proxy, web access or a VPN server. For information about the individual services, see the relevant AXS Guard manuals, accessible via the Documentation button in the administrator tool.
An authentication policy must be assigned to an AXS Guard service before:
-
Any authentication method(s) defined in authentication rule(s) can be enforced.
-
Authentication restriction(s), if any, can be applied.
Important
Administrators should inform their users about allowed authentication method(s), as not all application interfaces provide a selection or help menu indicating which authentication method is supported.
-
Log on to the AXS Guard
-
Navigate to Authentication > Services.
-
Select the appropriate service.
-
Click on the Select button to assign an authentication policy.
-
Click on Update to finish.
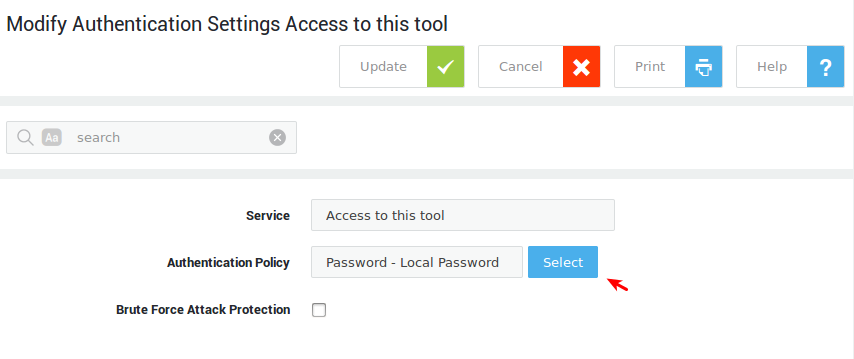
Service |
Description |
|---|---|
Access to this Tool |
The system administrator tool is a user-friendly, intuitive interface to configure the appliance and its modules. See the System Administration How To for additional information. |
Reverse Proxy |
The reverse proxy services the requests of Internet clients by forwarding these requests to the appropriate servers in the LAN, while providing access control, auditing and content monitoring. Only local authentication is supported by FTP back-end servers. For more information, see the Reverse Proxy How To, which is accessible via the Documentation button in the Administrator Tool. |
IPsec (XAUTH) |
A VPN solution that allows users to remotely access corporate network resources using an IPsec client. See the IPsec XAUTH How To for additional information. |
PPTP VPN |
A VPN solution that allows users to remotely access corporate network resources using an PPTP client. See the PPTP How To for additional information. |
SSL Web Portal |
The SSL Web Portal is a browser-based VPN solution. It allows users to remotely access corporate network resources over SSL (HTTPS). See the SSL Web Portal How To for additional information. |
OpenVPN |
A VPN solution that allows users to remotely access corporate network resources using an OpenVPN client. See the OpenVPN How To for additional information. |
RADIUS Service |
The appliance can be used as a RADIUS Authentication Server, in which case the appropriate RADIUS client policy is applied (based on the IP address of the RADIUS client). |
RADIUS Clients |
A service entry is automatically added for each RADIUS client, including Personal AXS GUARD (PAX) units. In case enterprise-level wireless security has been configured for such a unit, system administrators can select which authentication policy should be enforced. See the Personal AXS GUARD how to for additional information. |
Firewall / Web Access |
|
IMAP |
The Internet Message Access Protocol (commonly known as IMAP) is an application layer Internet protocol operating on port 143, which allows a local client to access e-mail on a remote server. See the E-mail Storage How To for additional information. |
POP |
The Post Office Protocol (POP) is a protocol which enables users to download messages from a server to their local computer. See the E-mail Storage How To for additional information. |
Supported Authentication Policies per Service
AXS Guard Service |
Authentication Policy |
|---|---|
PPTP / SSTP / L2TP |
|
AXS Guard Service |
Authentication Policy |
|---|---|
OpenVPN |
|
AXS Guard Service |
Authentication Policy |
|---|---|
Reverse Proxy HTTP |
|
Reverse Proxy RDG |
|
AXS Guard Service (Cloud) |
Authentication Policy |
|---|---|
Remote Workspace |
|
Authentication Server Configuration
Kerberos Configuration
Configuration Overview
-
Ensure that you AXS Guard, KDC and Kerberos clients are properly synced with a time server, as Kerberos has strict time constraints.
-
Make sure there is a user record for every Kerberos user on the AXS Guard. Users can be created manually or imported from an LDAP back-end, such as an AD server. See the Directory Services How To for information and configuration details.
-
A correct DNS setup is crucial for Kerberos. Incorrectly setting up your DNS repository will result in authentication failures. Add forward and reverse DNS records for the KDC and the AXS Guard appliance to your DNS repository.
-
Generate or import your keytab files.
-
Unlink Firewall and Web Access authentication if you are planning to enforce Kerberos authentication for Web Access. You must also specifically allow Kerberos authentication for Web Access.
Client-side Configuration:
No special configuration is required, except in the case of Web Access or in case you are planning to enforce Kerberos authentication for specific client software, such as a mail client, in which case you will need to enable and configure GSSAPI. See the documentation of your client software if necessary.
Creating User Accounts
A user record must exist on the AXS Guard for each user who wants to use Kerberos authentication. User records can be created manually (under Users & Groups > Users) or imported from your Directory Server (LDAP). The use and configuration of LDAP is explained in the AXS Guard Directory Services How To guide, available via the Documentation button in the Administrator Tool.
DNS and Principal Configuration
A correct DNS setup is crucial for Kerberos; clients must be able to correctly resolve the KDC as well as the AXS Guard hosts and IPs. This means that forward (A) and reverse (PTR) records must be added to your DNS repository for each of the following:
-
The Kerberos Key Distribution Center (KDC)
-
The AXS Guard appliance. Make sure you use the same FQDN in your keytab files.
** Example 1: AXS Guard and AD in same domain**
Assume the following:
-
Default AXS Guard hostname =
axsguard -
AXS Guard domain =
mydomain.com -
Kerberos realm =
mydomain.com
axsguard.mydomain.com must be resolvable by all Kerberos clients.
Clients must also be able to perform a reverse lookup for
axsguard.mydomain.com.
Example of HTTP Principal:
HTTP/axsguard.mydomain.com@MYDOMAIN.COM
Example 2: AXS Guard and AD in different domains
Assume the following:
-
AXS Guard hostname =
axsguard-hq -
AXS Guard domain =
mydomain.com -
Kerberos realm =
mydomain.local
Option1:
-
This is the easiest and recommended solution. Simply add an A and PTR record for
axsguard-hq.mydomain.localto your DNS repository (most likely your AD server). -
Example of HTTP Principal:
HTTP/axsguard-hq.mydomain.local@MYDOMAIN.LOCAL
Option2:
-
Make sure
axsguard-hq.mydomain.comresolves correctly on all Kerberos clients. Clients must also be able to perform a reverse lookup foraxsguard-hq.mydomain.com. -
Example of HTTP Principal:
HTTP/axsguard-hq.mydomain.com@MYDOMAIN.LOCAL
Important
Use a client in your network to verify your DNS records.
-
Go to Authentication > Kerberos and enable Kerberos
-
Change the AXS Guard hostname if necessary.
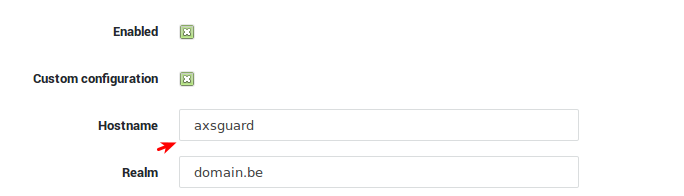
-
Add A and PTR records for the KDC and the AXS Guard to your DNS repository. In most cases, this will be your AD server. Consult the documentation of your DNS server if necessary.
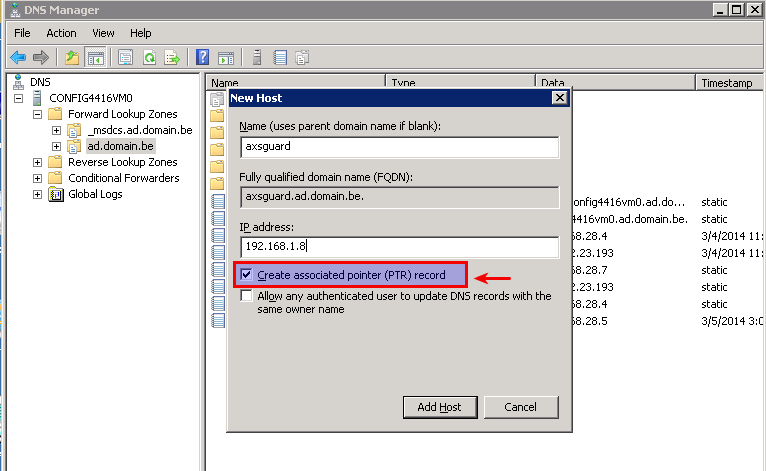
| Option | Description |
|---|---|
Enabled |
Check to enable Kerberos authentication. |
Custom configuration |
Check to manually upload the required keytab files for more flexibility. Uncheck to use the automated configuration. The automated configuration only works with Active Directory back-ends. Configuration examples are available in the AXS Guard authentication manual. |
Hostname |
The unqualified hostname of the AXS Guard as known by your AD server. |
Realm |
The term realm indicates an authentication domain. It establishes the boundaries within which an authentication server has the authority to authenticate a user, a host or a service. In case of an Active Directory setup, the realm is the same as the AD domain. |
HTTP keytab file |
The keytab file to be used for web access authentication. |
Mail keytab file |
The keytab file to be used for POP and/or IMAP authentication. |
SMTP keytab file |
The keytab file to be used for SMTP authentication. |
Generating Keytab Files
Automated Keytab File Generation
Important
- Automated Keytab File Generation is recommended, but not possible if your KDC is not a Windows server.
- When using automated keytab file generation for a configuration where your AD and AXS Guard domains are the same, principals will be created without the domain suffix and will appear as follows:
SERVICE/axsguard@MYDOMAIN.COM. Kerberos clients will automatically append the domain suffix in their service requests, e.g.SERVICE/axsguard.mydomain.com@MYDOMAIN.COM
The following example is based on a setup with a Microsoft KDC. We assume that the IP address of the back-end is 192.23.132.193, that the KDC server also your DNS server and that the default AXS Guard hostname is used.
-
Log in to the AXS Guard as explained in the System Administration guide.
-
Configure the AXS Guard Directory Services module, as explained in the Directory Services guide.
-
Go to Network > DNS > Forwarding and add an entry to forward reverse DNS requests to the IP address(es) specified in your AXS Guard Directory Services configuration.
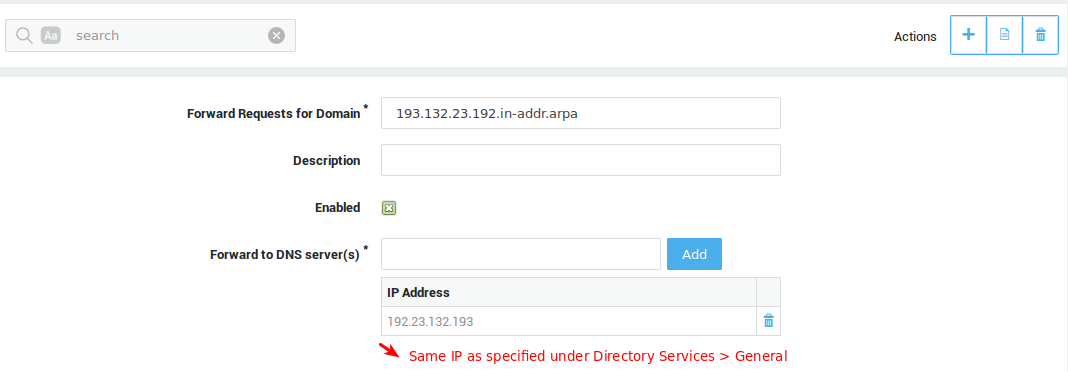
-
Go to Authentication > Kerberos and enable Kerberos.
-
Enter the same credentials as supplied in your Directory Services configuration.
-
Generate the appropriate keytab file(s).
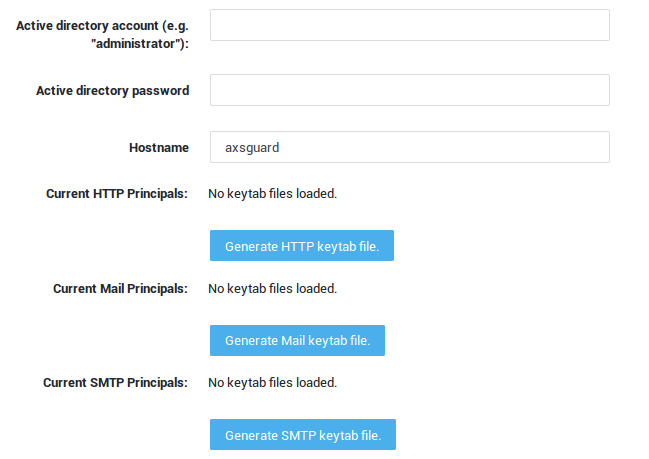
Uploading Custom Keytab Files
Important
Only use this method if your KDC isn’t a Microsoft Server or if you are familiar with Kerberos. Keytab files can be created with any KDC (Key Distribution Center), e.g. an Active Directory or MIT Kerberos server, and then uploaded to AXS Guard.
-
Generate the Keytab files on your Kerberos (AD) server.
-
Log on to the AXS Guard as explained in the System Administration guide.
-
Go to Authentication > Kerberos > General, enable Kerberos and select "Custom Configuration".
-
Verify the AXS Guard hostname and the Kerberos realm. Update if necessary.
-
Import the Keytab files generated on your Kerberos (AD) server.
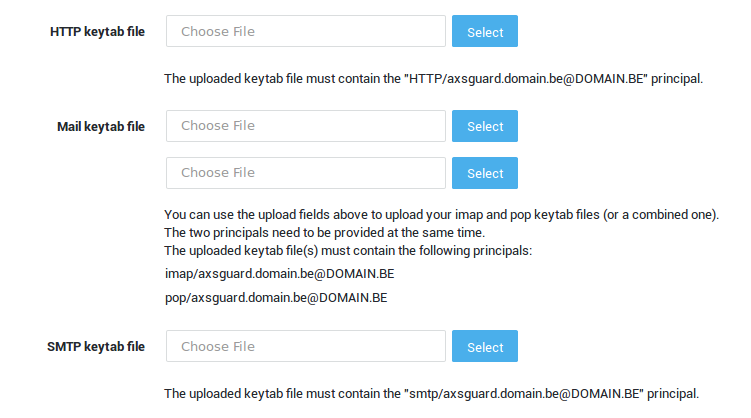
Important
- You don’t have to create a separate keytab file for every AXS Guard service. You can create a single keytab file for all services and upload it.
- You don’t have to upload a keytab for every service, only for the service(s) that require kerberos authentication. If you only need kerberos authentication for the AXS Guard proxy, you only need to upload an HTTP keytab file.
- You can upload several keytab files for e-mail. The keytab files will be merged and then checked for the required principals or
- You can upload a single keytab file which contains both principals for e-mail.
Creating a keytab file in Windows Server 2003
ktpass -princ HTTP/[axsguard-FQDN]@[REALM] -mapuser [USERNAME] -pass [PASSWORD] -ptype KRB5_NT_PRINCIPAL -out [OUTPUT-FILENAME].keytab
Creating a keytab file in Windows Server 2008
ktpass -princ HTTP/[axsguard-FQDN]@[REALM] -mapuser [USERNAME] -pass [PASSWORD] -ptype KRB5_NT_PRINCIPAL -crypto All -out [OUTPUT-FILENAME].keytab
Imported Keytab Files.
Once your keytab files have been successfully imported, the principals will appear on screen, as shown below.
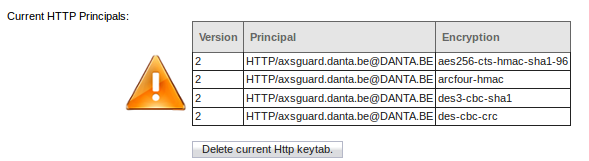
Important
Mind the principal version number. If the imported version differs from the version generated on your Kerberos back-end, authentication will fail.
Web Access Specific Configuration
If you are planning to enforce Kerberos authentication for web access, you must:
-
Unlink firewall and web access authentication under Authentication > General.
-
Add A and PTR records to your DNS server for the KDC and the AXS Guard.
-
Verify the system time on the KDC and the AXS Guard. The use of NTP is recommended.
-
Sync your AD users as explained in the Directory Services How To.
-
Forward reverse DNS lookups for the KDC.
-
Configure user web access privileges.
-
Generate the keytab file for web access.
-
Allow Kerberos authentication for web access as shown below.
-
Adjust the proxy settings on the clients.
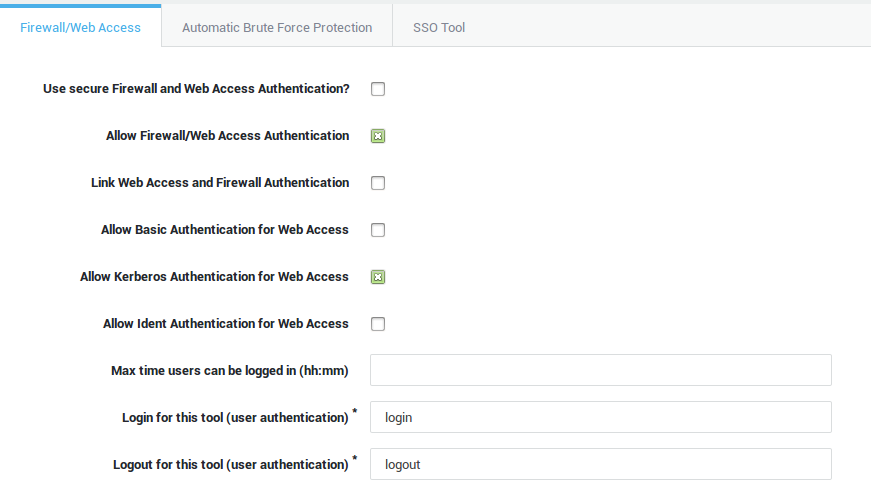
Client-Side Configuration
No special configuration is required for Windows clients that joined your AD domain, except if you are planning to use Kerberos authentication for web access. In that case, browsers should be configured to use the AXS Guard as their proxy server.
Using Kerberos for Web Access
Important items to remember
- Enter the proxy server name and not the IP address when you configure the browser proxy settings of a Kerberos client.
- The proxy server name must be resolvable by the client (added to the AXS Guard computer list).
- Make sure Web Access and Firewall authentication are unlinked (under Authentication > General).
- Make sure that Kerberos authentication is enabled for Web Access (under Authentication > General).
Other things to verify:
-
Make sure to enable Kerberos (GSSAPI) in your client software, e.g. your mail client. Check our knowledge base for the correct procedures or refer to your software’s documentation if necessary.
-
Install and configure a Kerberos client if necessary, e.g.
kiniton Linux clients. -
Check the system time on the client. It must be accurate for Kerberos to work. It is recommended to synchronize your clients with a time server.
-
Make sure the client can correctly resolve the KDC as well as the AXS Guard. A and PTR records are required for the KDC as well as the AXS Guard.
-
Verify if the user accounts exist on the AXS Guard.
-
Make sure there is a valid keytab file for every service that is required by the clients.
-
Make sure there are no duplicate SPNs.
Info
See the troubleshooting section for assistance.
RADIUS Setups and Configuration
RADIUS Server Setup
In this setup, the AXS Guard does not act as a gateway, but is located in a segment of a corporate LAN, as shown in the image below. The gateway and the AXS Guard use a pre-shared secret to protect the password communications over the RADIUS protocol. The AXS Guard RADIUS service is started automatically when a RADIUS client is added to its Computer list.
The authentication flow is as follows:
-
Users authenticate with the corporate gateway, which is accessed via a public IP address.
-
The corporate gateway (RADIUS client) relays the user credentials to the AXS Guard RADIUS server, e.g. a DIGIPASS OTP. A pre-shared secret is used to encrypt the transmission of user credentials.
-
The AXS Guard RADIUS server handles the authentication process and verifies the submitted DIGIPASS OTP.
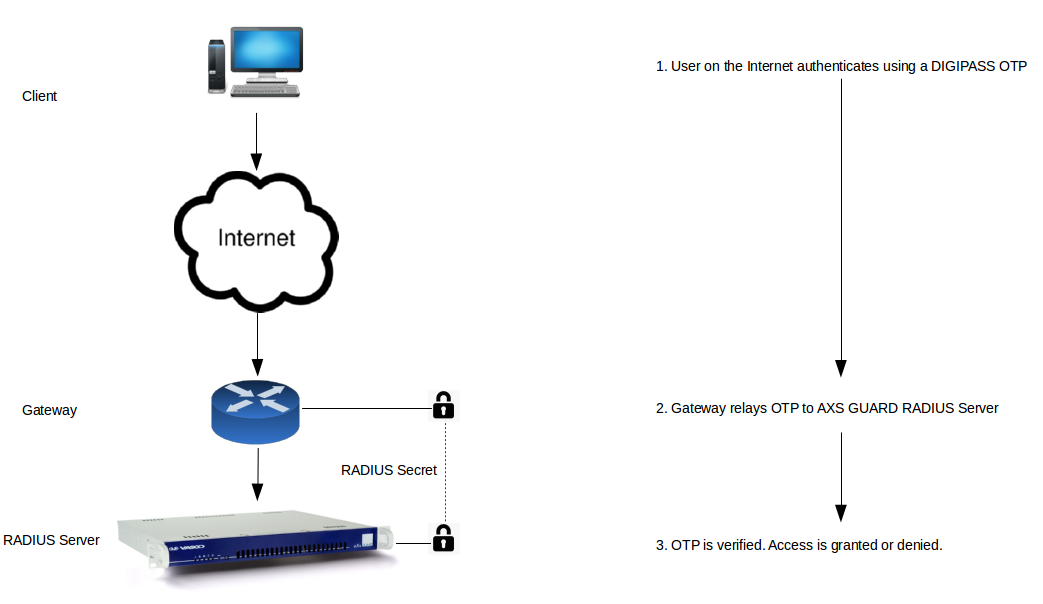
Example: AXS Guard as a RADIUS Back-End
-
A user on the Internet connects to his / her corporate VPN using an Internet browser, e.g.
https://corporatevpn.somedomain.com. The corporate gateway is running a third party VPN solution. The user is required to enter his / her credentials to access the corporate network. -
When the credentials are submitted to the corporate gateway, it relays the credentials, e.g. a user name and an OTP, to the AXS Guard RADIUS authentication server. The transmission of the user credentials between the gateway and the AXS Guard RADIUS server is encrypted (pre-shared secret).
-
If the credentials are valid, (meaning the user exists on the AXS Guard, is assigned a Able DIGIPASS and has entered a valid OTP), the authentication is validated. A positive response is sent to the gateway. The gateway then gives the OK to the user to proceed to the authorized resources in the corporate network.
RADIUS Server Configuration
Important
- The users on the gateway must also exist on the AXS Guard appliance under Users & Groups > Users, otherwise authentication will fail.
- A sec-radius firewall rule is automatically added for each RADIUS client in the secure LAN. For RADIUS clients in the DMZ and on the Internet, administrators need to manually add the appropriate firewall rules.
- Only PAP authentication is supported.
Server Configuration
-
Log on to the AXS Guard.
-
Go to Computers.
-
Click on Add New.
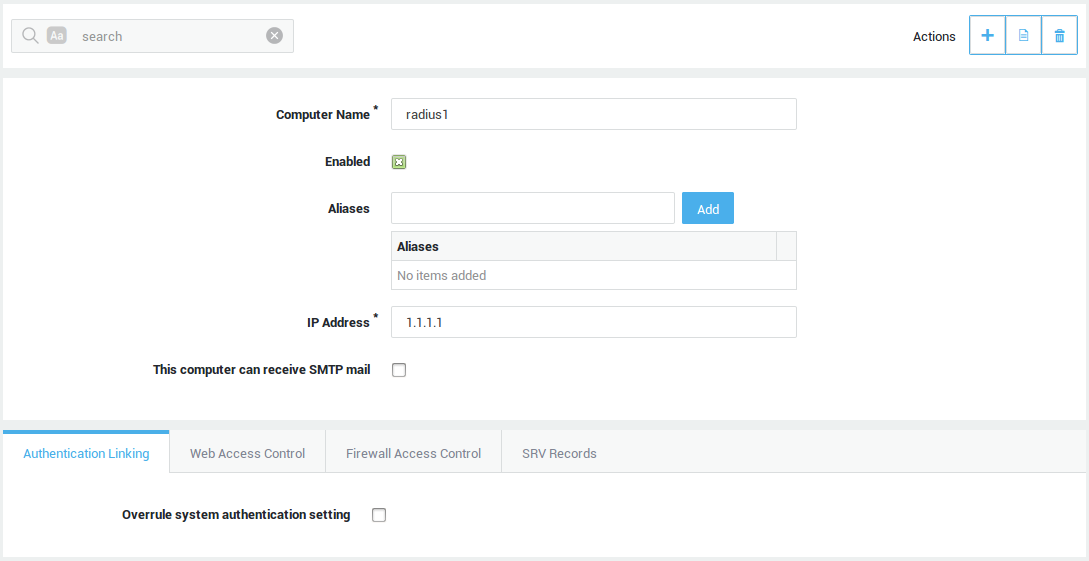
-
Navigate to Authentication > RADIUS > General
-
Check Enable RADIUS EAP Support.
-
Select the appropriate server certificate (generated under PKI > Certificates)

| Option | Description |
|---|---|
Enable Radius EAP support |
EAP-TLS, defined in RFC 2716, is an IETF open standard, and is well-supported among wireless vendors. It offers a good deal of security, since TLS is considered the successor of the SSL standard. It uses PKI to secure communications with the AXS Guard RADIUS authentication server. |
Server Certificate |
The server certificate used to secure and authenticate communications with the AXS Guard RADIUS server. For an overview of certificates on your system, go to PKI > Certificates. |
Client Configuration
-
Navigate to Authentication > RADIUS > Clients.
-
Click on Add New.
-
Enter the settings as explained below.
-
Click on Save.
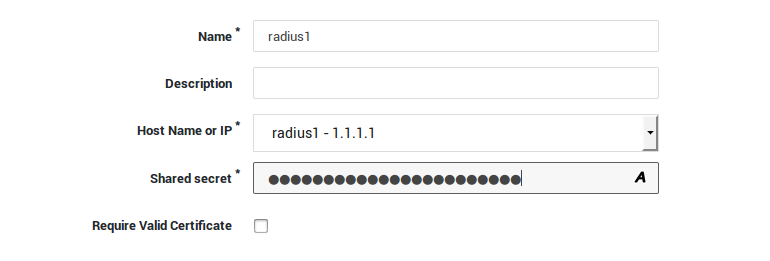
Important
- To create a new RADIUS client based on an existing one, select an existing RADIUS client in the list and click on Edit as New.
- Each new RADIUS client is added to the list under Authentication > Services.
| Rule | Description |
|---|---|
Name |
Provide a name (ID) for the new client. An error message appears if an invalid name is entered. |
Description |
Add a description for the client (optional field). |
Host name or IP |
Select the appropriate RADIUS client from the drop-down list. The client must exist in the AXS Guard Computer list. |
Shared Secret |
Enter the shared secret that is used on the RADIUS client machine. Click on A to view the secret as you type. |
Require Valid Certificate |
If enabled, the client will only be allowed to connect if it has a valid certificate. The certificate must be signed by the same CA that issued the certificate of the RADIUS server and EAP must be enabled under Authentication > RADIUS > General. |
RADIUS Client Setup
In this configuration example, the AXS Guard appliance is used as a corporate gateway. An Identikey appliance is used as the RADIUS back-end. With the Identikey appliance, you can benefit from advanced authentication and DIGIPASS management features, such as the automatic roll-out of DIGIPASS tokens.
-
Users authenticate with the AXS Guard, which is accessible via a public IP address.
-
The AXS Guard relays submitted credentials to a RADIUS back-end server in its network, assuming the role of a RADIUS client. A pre-shared secret is used to secure traffic between the AXS Guard appliance and the RADIUS back-end server.
-
The RADIUS back-end handles the authentication after which it sends its response to the AXS Guard appliance.
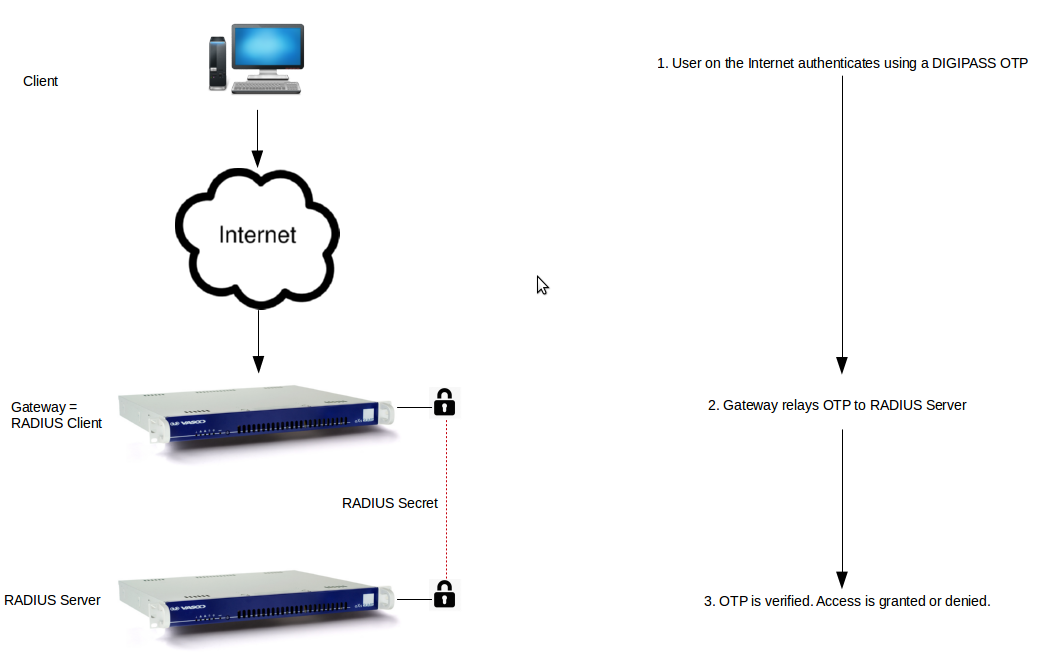
-
A user connects to the AXS Guard PPTP server.
-
The PPTP credentials are relayed to a RADIUS back-end server the LAN. Traffic between the AXS Guard appliance and the RADIUS back-end server is encrypted with a pre-shared secret.
-
If the credentials are accepted by the RADIUS back-end server, the AXS Guard appliance will grant access to the PPTP client.
RADIUS Client Configuration
Important
The users on the RADIUS back-end must also exist on the AXS Guard under Users & Groups > Users; otherwise authentication will fail.
-
Log on to the AXS Guard appliance.
-
Navigate to Authentication > RADIUS > Back-end Servers.
-
Click on Add New. A screen as shown below appears.
-
Enter the settings as explained below.
-
Click on Save.
-
Assign the appropriate RADIUS policy to the AXS Guard service.
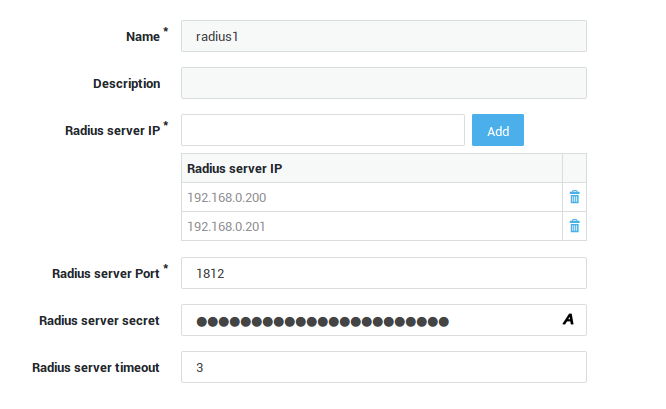
Info
To create a new RADIUS back-end server entry based on an existing one, navigate to Authentication > RADIUS > Back-end Servers, select a server in the list and click on Edit as New.
| Field | Description |
|---|---|
Name |
Enter a name for the RADIUS server. An error message will appear in case an invalid name is entered. |
Description |
Add a description for the server (optional field). |
RADIUS Server IP |
Enter the IP address of the RADIUS back-end server. If the RADIUS back-end is mirrored, you can also enter the IP address of the mirror. Note that the first IP address in the list must be the one of the primary RADIUS server, not the back-up. |
RADIUS Server Port |
Enter the port number of the RADIUS back-end server. The default RADIUS port is 1812. |
RADIUS Server Secret |
Enter the shared secret configured on the RADIUS back-end server. Click on *A* to show the secret as you type. |
Timeout |
If this time limit is exceeded, the RADIUS communication will be terminated, e.g. if the server is unreachable. The system default timeout is 3 seconds. Use a value between 1 and 60. |
RADIUS Mixed Setup
In this setup, we use the AXS Guard appliance as a corporate gateway and combine its RADIUS server and client functions. In the following example, we use an Identikey Authentication appliance as the RADIUS back-end server.
Important
The users on the RADIUS back-end must also exist on the AXS Guard under Users & Groups > Users; otherwise authentication will fail.
-
A user authenticates to access a custom application in the DMZ.
-
The custom application on the server in the DMZ relays submitted user credentials to the AXS Guard appliance. At this stage, the AXS Guard is acting as a RADIUS server. The server in the DMZ and the AXS Guard appliance use a pre-shared secret to secure their communications.
-
In turn, the AXS Guard appliance relays the submitted credentials to a RADIUS back-end server in its network (in this example an Identikey Authentication appliance). At this stage, the AXS Guard appliance is acting as a RADIUS client. A pre-shared secret is used to secure network traffic between the AXS Guard appliance and the RADIUS back-end server.
-
The RADIUS back-end (Identikey Authentication server) handles the authentication; the credentials are either accepted or rejected.
-
The RADIUS back-end sends its response to the AXS Guard appliance.
-
In turn, the AXS Guard appliance relays the response to the DMZ application server. If authentication is successful, the user is granted access to the application on the server in the DMZ.
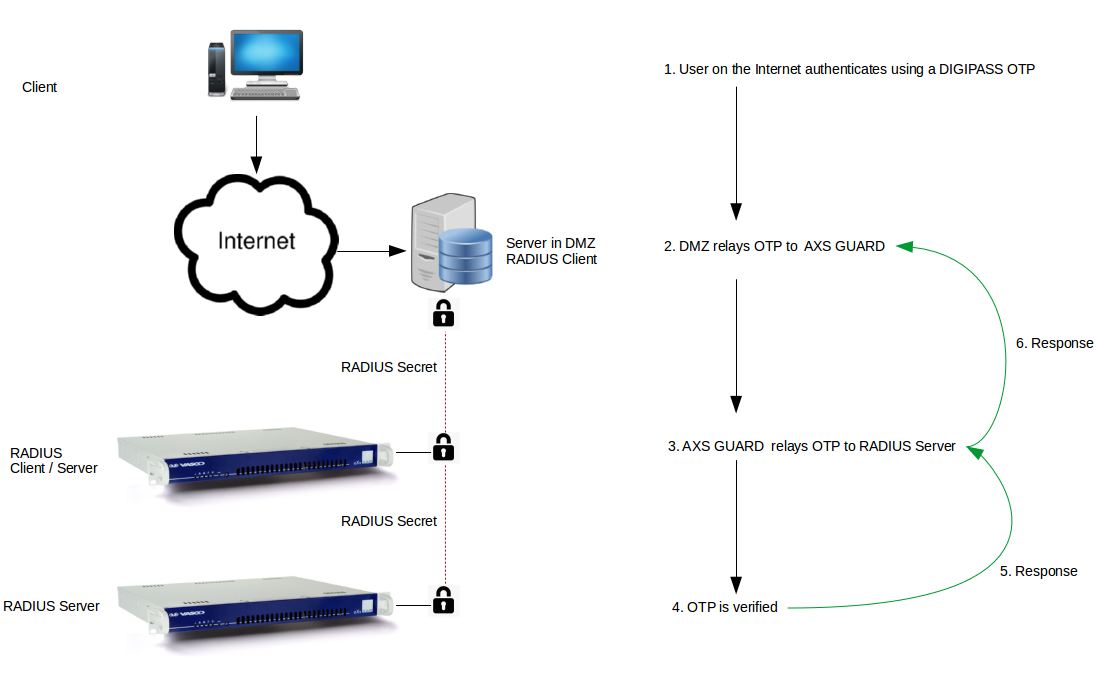
RADIUS Mixed Configuration
- Server configuration: see RADIUS Server Setup
- Client configuration: see RADIUS Client Setup
Important
A sec-radius firewall rule is automatically added for each RADIUS client in the secure LAN. For RADIUS clients in the DMZ and on the Internet, administrators need to manually add the appropriate firewall rules.
Firewall and Web Access Authentication
Overview
Firewall and Web Access are AXS Guard services to which an authentication policy can be assigned. Users get certain firewall and web access rights based on their profile settings. In this chapter we explain:
-
Firewall and Web Access Rights.
-
How authentication for Firewall and Web Access can be linked or unlinked.
-
Supported protocols and configurations, e.g. Ident, Kerberos and single sign-on.
-
Common and exceptional authentication scenarios.
-
Firewall and Web Access configuration settings.
Info
See the Web Access guide for specifics and configuration examples.
About Firewall and Web Access Rights
Firewall Rights
Firewall rights determine the type of network traffic users may or may not generate in a network based on their AXS Guard user profile, e.g. access to mail services on TCP port 25. For details about the AXS Guard Firewall, see the AXS Guard Firewall How To guide, which is accessible via the permanently on-screen Documentation button in the Administrator Tool.
Web Access Rights
Web Access Rights determine the type of Web pages users may or may not visit, based on their AXS Guard user profile. For instance, the type of allowed Web Sites can be restricted to work-related pages during working hours. For details about AXS Guard Web Access, see the AXS Guard Web Access How To guide, which is accessible via the permanently on-screen Documentation button in the Administrator Tool.
Even though Firewall and Web Access are two separate AXS Guard services, it is possible to link authentication for both. This depends on your network configuration (topology).
Supported Configurations and Protocols
Linked Authentication
Linked authentication is the default AXS Guard configuration and combines authentication for Firewall and Web Access rights. With linked authentication, users are mapped to the computer’s IP address on which they authenticate, making the user and IP address a unique pair. Based on this unique pair, the defined AXS Guard user and group Firewall and Web Access rights are assigned, as shown in the image below.
Each user / IP address pair must be unique: two or more users cannot authenticate with the AXS Guard on the same computer (IP). If users authenticate with a Terminal Server, linked authentication is impossible, since all users originate from one IP address (the Terminal Server’s IP). In that case, unlinked authentication must be used.
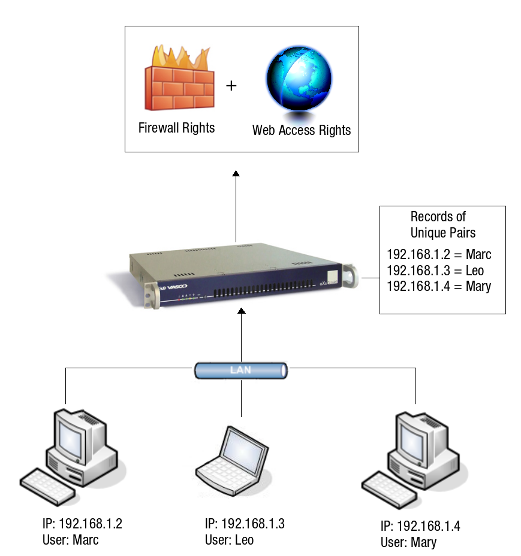
Implementing Linked Authentication with the SSO Utility
A utility to easily implement Linked Authentication can be downloaded directly from the Cyber Resilience Portal. This Single Sign-On (SSO) authentication utility is designed to securely and transparently authenticate users with AXS Guard from a client PC in the LAN. After successful authentication, the user’s Firewall and Web Access rights are automatically applied.
Download the SSO tool:
-
Log in to the Cyber Resilience Portal.
-
Navigate to the Download Center.
-
Select the appropriate installer for your OS.
-
Install and configure the tool as explained in the AXS Guard Single Sign-On manual.
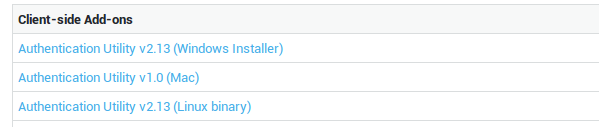
Installation Modes
There are two installation modes: the Workgroup mode and the Domain mode.
SSO in Domain Mode
In Domain Mode, the user does not authenticate with the AXS Guard, but with a Domain Server. AXS Guard Firewall and Web access rights are granted based on the Windows Domain (AD) credentials of the user. The user is automatically authenticated with the AXS Guard after successfully logging on to the Domain.
In Domain Mode, all AXS Guard settings under Authentication > Services > Firewall / Web Access are irrelevant (except for the Windows Domain in your network), since authentication is handled by the Domain server.
SSO in Workgroup Mode
The SSO authentication utility can also be installed if users in your network do not authenticate with a Domain Server. This is referred to as Workgroup Mode. The user’s AXS Guard user name / password combination is stored locally in a profile, which can be automatically activated after logging on to the PC. Once the SSO profile is activated, the user automatically is granted his / her Web Access and Firewall rights.
Info
For details about the SSO utility, the possible installation modes, the supported Authentication Methods and the configuration, see the AXS Guard Single Sign-On Utility How To, which can be accessed by clicking on the permanently on-screen Documentation button in the AXS Guard Administrator Tool.
Unlinked Authentication
Unlinked authentication is not the default AXS Guard configuration. Unlinked means that Firewall and Web Access authentication are kept separate. Unlinked authentication must only be used if:
-
users in your network authenticate with a Terminal Server.
-
you have a special NAT setup, which causes all users in the network to use the same source IP address.
In other words, the user / IP address pairs are not unique, contrary to Linked Authentication. As a consequence, it is impossible to detect the origin of all communication protocols at the user level, which is necessary for effective Firewall protection. Linking Web Access and Firewall Authentication without unique user / IP pairs would be insecure.
Unlinked authentication only allows Web Access authentication via a browser session. The user authentication data is transferred via the user’s browser session parameters. The AXS Guard checks whether the session is authenticated. Firewall authentication is not allowed.
Info
Unlinked Authentication can be configured as the system-wide default if you have a network where some users authenticate with a Terminal Server while others don’t, or if you have a Terminal Server supporting Virtual IP addresses.
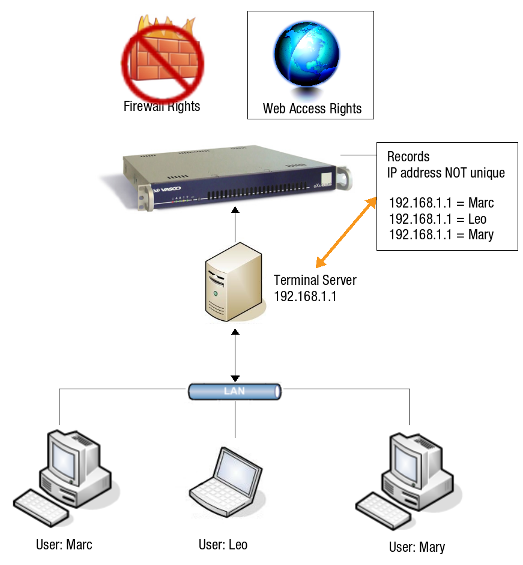
Basic Authentication
This option is only available with unlinked authentication. Users will be invited to authenticate via a browser popup when they attempt to access the Internet. Configured computer ACLs don’t apply in this case. Web access is only authorized after authentication, including access to sites configured in system-wide ACLs (under System > Web Access > General). After authenticating, the user’s group and / or user level ACLs are applied. If no user or group ACLs exist, the system-wide ACLs are applied. Basic authentication can be configured at the following levels:
-
The computer level, i.e. for a given system in your network. Users who attempt to connect to the Internet from that system (IP) will be invited to log in via a basic authentication popup.
-
The system level, i.e. a system-wide configuration that applies to all computers and users. Any user who attempts to access the Internet will be invited to log in via a basic authentication popup.
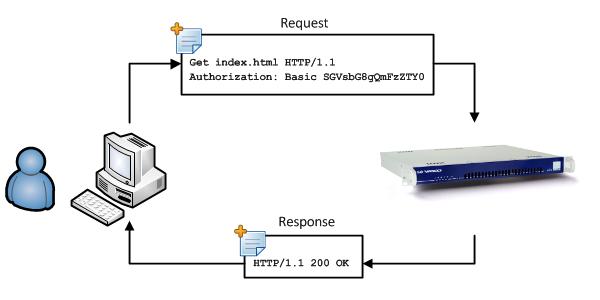
Ident Authentication
The Ident Protocol, defined per RFC 1413, is an Internet protocol that helps identify the user of a particular TCP connection. This simplifies management in that you do not have to match IP addresses to computers to regulate web traffic.
Using Ident for user authentication has several benefits over the SSL (SSO) or proxy login methods, primarily that the user does not need to enter username and password credentials for Web Access. Instead, an Ident server running on the citrix client system will automatically provide the Windows username to the AXS Guard proxy server.
Info
- Linked Authentication must be disabled for Ident to work.
- An Ident server must be running on your terminal server.
- The AXS Guard proxy server waits no longer than 2 seconds for the ident server’s response. If no answer is received within 2 seconds, the user’s computer level web access rights are applied.
One disadvantage of the Ident protocol is that it is relatively easy for a user who has broken or intentionally compromised his / her computer to spoof a user with potentially more access rights.
Another disadvantage is that if the AXS Guard proxy server cannot contact an Ident daemon, the processing of web requests can be delayed for a long time (up to several minutes). This is normally not a problem if you follow these two recommendations:
-
Allow port 113 through all internal software firewalls. Don’t treat the Windows Firewall as nothing more than a simple "all on" or "all off" capability; you may need to explicitly allow port 113 even though the firewall is "on". Consult the documentation of your OS for information on how to configure the firewall.
-
Allow port 113 through all internal network infrastructure devices (hubs, routers, etc.). Some network infrastructure devices allow all traffic indiscriminately by default , but others block "uncommon" types of traffic, such as traffic related to port 113.
To configure Ident authentication:
-
Log on to the AXS Guard.
-
Navigate to Computers.
-
Select the computer on which the ident process is running, e.g. a citrix server in your network.
-
Select Overrule system authentication setting.
-
Uncheck Link Web Access and Firewall authentication.
-
Check Allow Ident Authentication for Web Access.
-
Save your configuration.
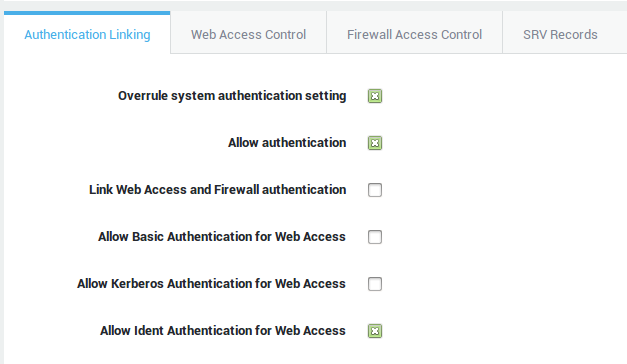
Info
- For a system-wide configuration, go to Authentication > General, uncheck Link Web Access and Firewall authentication and check Allow Ident Authentication for Web Access.
- For additional information see the Web Access How To, which can be accessed via the Documentation button in the Administrator Tool.
Kerberos Authentication
See Kerberos and Web Access Specific Configuration.
Automated Logout
The authentication server provides the ability to log users out after a specified time of inactivity.
Firewall and Web Access Authentication Scenarios
Common Scenario
This scenario is the most common in corporate networks. Linked Authentication is implemented using the SSO Utility in a Windows Domain. The following conditions must be met:
-
A Windows Domain must be available in your network.
-
If a Terminal Server is present, it should support Virtual IP addresses, e.g. a Citrix Presentation Server 4.0. The Citrix Presentation Server 4.0 in the Advanced and Enterprise editions includes a feature known as Virtual IP addressing. Virtual IP addresses are intended for applications which do not allow multiple connections originating from a single IP address.
-
The SSO Utility must be installed in Domain Mode on the network clients.
-
The Windows Domain must be added on AXS Guard.
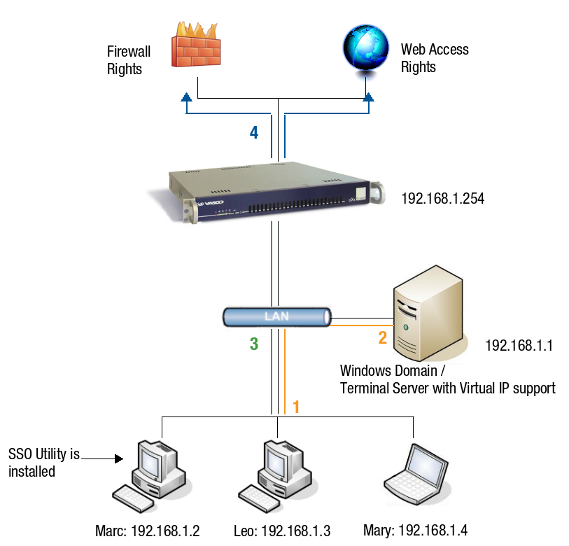
-
A user logs on to the Windows Domain with his / her Domain credentials.
-
The SSO Utility receives a positive response from the Domain Server if the authentication is successful.
-
In turn, the SSO Utility informs the AXS Guard of the received response.
-
The AXS Guard activates the user’s Firewall and Web Access rights.
Exceptional Scenarios
The scenarios explained further are less frequent in corporate networks.
SSO Utility is installed in Workgroup Mode
-
There is no Windows Domain in the network or a Windows environment is not used, e.g a Linux environment.
-
The SSO Utility must be installed in Workgroup Mode on the clients.
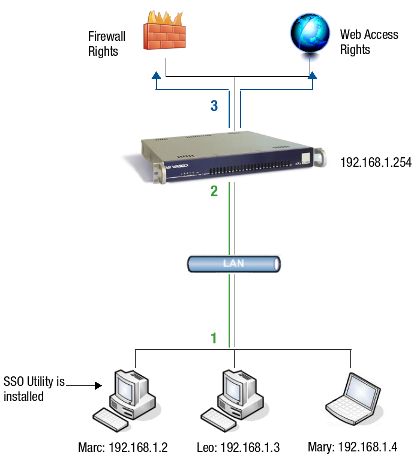
-
The user enters his / her AXS Guard credentials (Static Password or DIGIPASS OTP) when prompted by the SSO Utility.
-
The AXS Guard validates the authentication if the submitted credentials are correct.
-
The AXS Guard activates the user’s Firewall and Web Access rights.
SSO Utility is not installed (Guest Login Page)
Linked Authentication can be implemented without installing the SSO Utility. Users can authenticate for Firewall and Web Access via the AXS Guard’s login page. This is a useful feature for guests who temporarily need to access the Internet while visiting your company. By default, guests don’t have the necessary permissions to download and install the SSO Utility on their laptop. The following conditions must be met:
-
The SSO Utility is not installed on the clients.
-
The client’s browser must be properly configured to use the AXS Guard as its proxy server. For details, refer to your browser’s documentation and the AXS Guard Web Access How To, which is accessible via the Documentation button in the Administrator Tool.
-
The HTTP accelerating Proxy Feature must be activated on the AXS Guard. Feature Activation is explained in the AXS Guard System Administration How To.
-
Pop-up blockers on the client must be disabled.
The login page is accessed via a special URL and can also be customized (see the AXS Guard Web Access How To for more information).
To authenticate via the AXS Guard guest login page:
-
Start your Internet browser.
-
Type login in the URL field. The AXS Guard login page will appear.

-
Enter your credentials, e.g. your user name and DIGIPASS OTP.
-
If the credentials are valid, a small pop-up window indicating that you are authenticated will appear, which means the user’s firewall and web access rights are active.
To log off, close the browser or click on the logout button. A user can also log out by entering logout in the browser’s URL field..
Info
- If the user tries to access a non-HTTPS page, (s)he will be redirected to the AXS Guard guest login page.
- Sometimes users will still be able to access certain websites after they log out, because their content is cached by the browser.
Terminal Server with no Virtual IP Support
Unlinked authentication must only be used if users in your network are authenticating with a terminal server without Virtual IP Address support or are connected to networks with a specific NAT configuration, causing all clients in the network to use the same source IP. There are two methods to implement Unlinked Authentication:
Recommended Method:
-
Log on to the AXS Guard.
-
Navigate to Authentication > General.
-
Check Link Web Access and Firewall Authentication and save your configuration.
-
Go to Computers and add the Terminal Server to the Computer List.
-
Check Overrule System Authentication in the Authentication Linking Tab.
-
Check Allow Authentication.
-
Uncheck Link Web Access and Firewall authentication and save your configuration.

Alternate Method (System-wide configuration)
-
Log on to the AXS Guard.
-
Navigate to Authentication > General.
-
Uncheck Link Firewall and Web Access Authentication.
-
Click on Update to save your settings
Important
- The system-wide configuration above is not practical if you have a network combining both setups. In other words, the system-wide setting also applies to users who are not authenticating via a Terminal Server. Only use this option if all users in the network authenticate via a Terminal Server.
- Computer and System Access Control Lists (ACLs) are not available for Terminal Servers without Virtual IP support. User Authentication is required in this case.
Firewall and Web Access Authentication Settings
-
Log on to the AXS Guard.
-
Navigate to Authentication > General.
-
Configure the authentication settings as explained below.
-
Save your configuration.
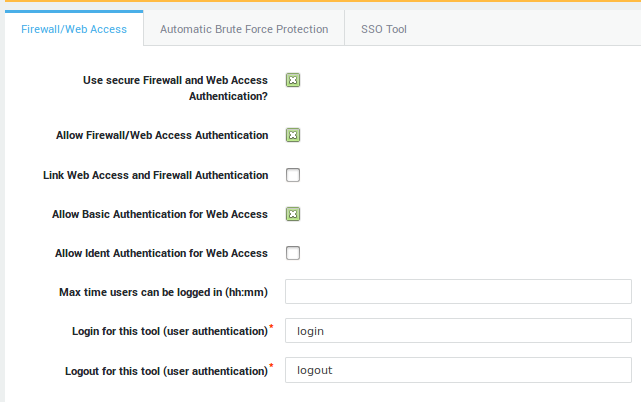
Info
The Web Access Authentication page can be customized. You can upload your company logo and custom messages, such as instructions, warnings and disclaimers. See the AXS Guard Web Access How for configuration instructions.
| Field | Description |
|---|---|
Use secure Firewall and Web Access Authentication? |
If checked, HTTPS is used instead of plaintext HTTP to transmit user credentials from the client to the AXS Guard when using the guest login page. |
Allow Firewall and Web Access Authentication |
Check to enables system-wide firewall and web access authentication. |
Link Web Access and Firewall Authentication |
If checked, Firewall and Web Access authentication are linked (recommended setup). If unchecked, Firewall and Web Access authentication are unlinked. With linked authentication, users are mapped to the computer’s IP address from which they authenticate, making the user and IP address a unique pair. Based on this unique pair, AXS Guard firewall and web access rights are applied. |
Allow Basic Authentication for Web Access |
This option is only available with unlinked authentication. Users will be invited to authenticate via a browser popup when they attempt to access the Internet. Configured computer ACLs don’t apply in this case. Web access is only authorized after authentication, including access to sites configured in system-wide ACLs (under System > Web Access > General). After authenticating, the user’s group and / or user level ACLs are applied. If no user or group ACLs exist, the system-wide ACLs are applied. |
Allow Kerberos Authentication for Web Access |
This option only works with unlinked authentication. Kerberos is a secure method for authenticating service requests in a computer network. |
Allow Ident Authentication for Web Access |
Using Ident for user authentication has several benefits over the SSL (SSO) or proxy login methods, primarily that the user does not need to enter username and password credentials for Web Access. Instead, an Ident server running on the citrix client system will automatically provide the Windows username to the AXS Guard proxy server. |
Max time users can be logged in (hh:mm) |
The appliance will automatically log users out after the specified period of inactivity, e.g. |
Login for this tool |
The string to enter in the browser’s URL field to authenticate when using the guest login page. The browsers of your users need to be configured so that they use the AXS Guard as their proxy server. Refer to your browser’s documentation if necessary. login is the system default. |
Logout for this tool |
The string to enter in the browser’s URL field to log out of the guest login page. The browsers of your users need to be configured so that they use the AXS Guard as their proxy server. Refer to your browser’s documentation if necessary. logout is the system default. |
Brute Force Attack Protection
What is a Brute Force Attack?
A Brute Force (BF) attack is an attack method that relies on one’s ability to guess passwords to illegally access a target system. Most typically, the attacker uses software that tries a vast number of username / password combinations until the target system is accessed or the intrusion attempt is detected and blocked. AXS Guard automatically blocks BF attempts by blocking users or hosts that systematically fail to authenticate for its services.
Brute Force Protection Levels
The AXS Guard automatically blocks BF attempts at the following levels:
-
The user level: consecutive failed logins from the same user are blocked, regardless of the source IP from which a suspected attack originates. Anonymizers are herewith rendered ineffective.
-
The host level: consecutive failed logins from the same source IP are blocked, regardless of the account that is used to launch a suspected attack.
As soon as a BF attack is detected and a user account is locked, the AXS Guard administrator is notified via e-mail. Only a single e-mail is sent per blocked user and only an administrator can unlock the user’s account. Note that the configured BF settings apply to all services, e.g. VPN, Web Access, Webmail, etc. You cannot configure BF settings per service.
Automated Purging of Blocked Users and Hosts
A time window is created for each blocked user or host. During this time window, it will be impossible for the user or host to authenticate. When the time window is exceeded, blocked users and hosts are automatically purged. This simplifies maintenance and improves performance.
Security Considerations
-
Never allow access to the Administrator Tool from the Internet or your DMZ. If you need to manage the AXS Guard remotely, use a VPN connection.
-
Use DIGIPASS authentication where possible, as this is the most secure method.
Automatic Brute Force Protection Settings
-
Navigate to Authentication > General.
-
Select the Automatic Brute Force Protection Tab.
-
Configure the settings as explained below.
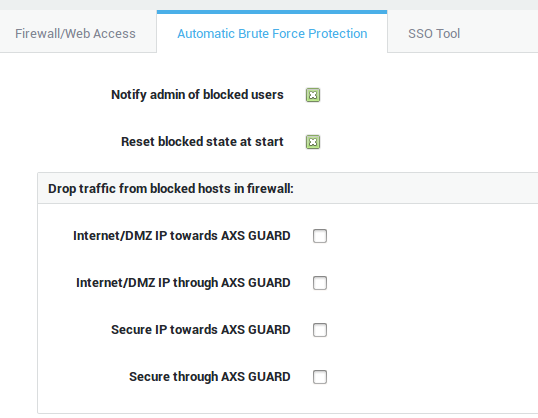
Field |
Description |
|---|---|
Notify admin of blocked users |
If the option is checked, an e-mail is sent to the system administrator when a user or a source IP is blocked. Blocked users and hosts are listed under Authentication > Status > Blocked Users & Hosts. |
Reset blocked state at start |
If enabled, any user or system administrator that accidentally locked her / himself out will be removed from the blocked users list after a system reboot. |
Drop traffic from blocked hosts in firewall |
If a BF attempt is detected, the selected traffic will be blocked at the firewall level. For information about firewall rules and zones, see the Firewall How To, which can be downloaded by clicking on the Documentation button in the administrator tool. |
Blocking options |
|
Host Whitelist |
Authentication requests coming from the specified IP address(es) are never blocked. Use the CIDR notation to specify IP ranges. |
Whitelist users |
Whitelisted hosts are not blocked at the firewall level. Users attempting to log in from a whitelisted host are blocked if they match one of the criteria specified below. |
Never block the following users |
Bypasses the configured rules for the listed user(s). |
Allowed Authentications per host |
The number of allowed authentication requests coming from a given host within a specific time frame. If the number of allowed authentication requests is exceeded, the requests are blocked. You can add multiple rules. If multiple rules are configured, the rule which first matches a potential attack pattern applies. |
Allowed Authentications per user |
The number of allowed authentication requests originating from a given user within a specific time frame. If the number of allowed authentication requests is exceeded, the requests are blocked. You can add multiple rules. If multiple rules are configured, the rule which first matches a potential attack pattern applies. |
Important
- The AXS Guard firewall automatically drops traffic on its DMZ and Internet interfaces that originates from blocked hosts. Matching hosts in the secure LAN are never blocked at the firewall level, but only at the authentication level.
- The firewall automatically resets its blocked hosts table every 15 minutes (4 times per hour). Therefore, blocked hosts may have to wait longer than the period specified in the Allowed Authentication Rates per host rule before they can reattempt to authenticate.
Enabling Brute Force Protection for a Service
-
Go to Authentication > Services.
-
Select the desired service from the list.
-
Enable Brute Force Protection and save your configuration.
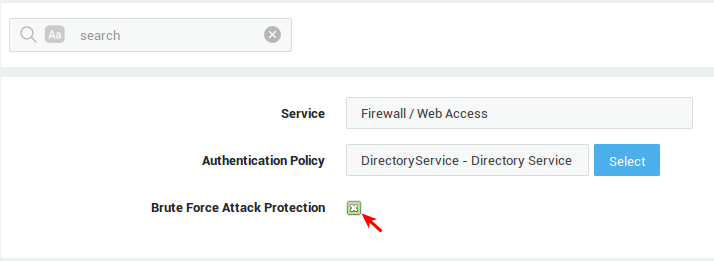
| Field | Description |
|---|---|
Service |
The AXS Guard service to be configured. This field cannot be edited. |
Authentication Policy |
The authentication policy determines how users must authenticate to access the service. Go to Authentication > Advanced > Policy for an overview of policies configured on your system. |
Brute Force Attack Protection |
Enable to protect the selected service against brute force attacks as configured under Authentication > General. |
Use Case Examples
Example 1: Configuration of two authentications per hour at the host level
Assuming that you configured a rule that allows hosts to authenticate twice per hour:
If authentication fails at 10:02 AM and at 10:03 AM, the host is blocked and should be unblocked by 11:03 AM. However, the host is also blocked at the firewall level. This means that connections will be refused until the firewall automatically purges its blocked hosts table, which is every 15 minutes. Therefore, any matching host will have to wait until 11:15 AM before it is allowed to send new authentication requests.
Example 2: Whitelist users
Assume that your block rules only allow 3 authentication attempts. Host 1.1.1.1 is whitelisted with the "whitelist users" option enabled. This means that users authenticating from 1.1.1.1 can try indefinitely. If authenticating from another machine, e.g. 1.1.1.2, the users will be blocked after 3 failed attempts.
Configuration Examples
Setting a New User’s Local Password
Purpose
In this example we explain how to configure the local password for a new AXS Guard user.
-
Log on to the AXS Guard appliance.
-
Navigate to Users&Groups > Users and click on Add New.
-
Enter the Username.
-
Enter the new password in the Password field.
-
Confirm the newly entered password in the Verify Password field.
-
Click on Save.
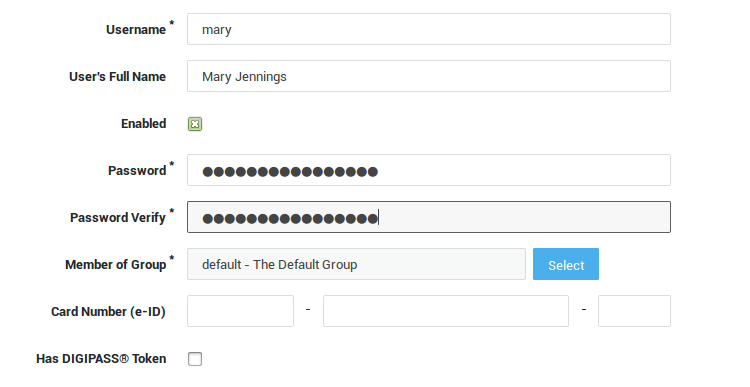
Modifying a User’s Local Password
Purpose
The purpose is to modify the local password of an existing AXS Guard user.
-
Log on to the AXS Guard.
-
Navigate to Users&Groups > Users and click on the user of whom you want to change the local password.
-
Click on the Change button.
-
Enter the new password as requested on-screen.
-
Click on Update.
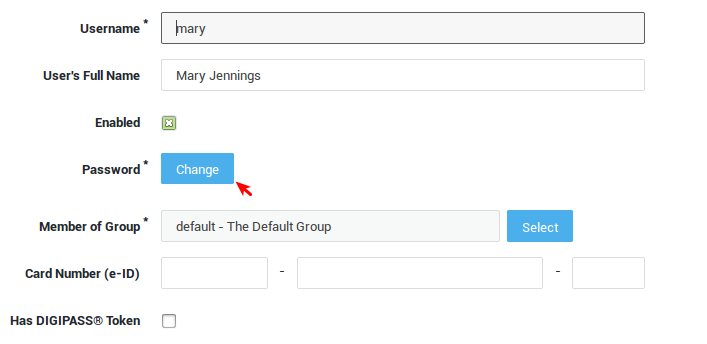
Disabling Authentication for a User
Purpose
The purpose is to disable a user account. This prevents the user from authenticating for any AXS Guard service, while preserving all his / her user data, e.g. e-mails.
-
Log in to the AXS Guard.
-
Navigate to Users&Groups > Users.
-
Select the user whose access should be blocked.
-
Uncheck Enabled, as shown below.
-
Click on Update.
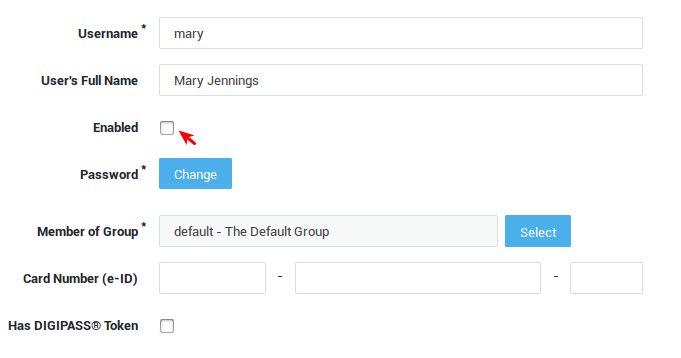
LDAP-based Back-end Authentication with Access Level Restriction
Purpose
This configuration enforces LDAP-based back-end authentication for all users, except for AXS Guard Basic Administrators or above, who are allowed to authenticate with a local password to access the Administrator Tool. In other words, an Access Level Restriction is enforced.
The Directory Services Module needs to be activated and correctly configured. Refer to the AXS Guard Directory Services How To for details.
Important
A local administrator and password is needed to log on to the AXS Guard in case the LDAP back-end authentication server fails. Ensure that you have at least one local System Administrator.
-
Log on to the AXS Guard Administrator Tool as explained in the System Administration How To, which is accessible via the Documentation button in the Administrator Tool.
-
Navigate to Authentication > Services.
-
Click on Access to this Tool in the list.
-
Click on Select.
-
Choose the DirectoryService password Policy
-
Update your settings.
Allow Local Authentication with Directory Services Enabled
Purpose
This configuration enforces Local Authentication for users who are registered on the AXS Guard, but not on the Directory Server. Users who are synchronized with the Directory Server can only use their Directory Services password to authenticate.
The AXS Guard Directory Services Module needs to be activated and correctly configured. Refer to the Directory Services How To for more details.
Important
Synchronized users cannot authenticate locally with the AXS Guard and have to user their back-end server credentials. Ensure that you have at least one administrator who can log on locally. A local administrator and password is required to log on to the AXS Guard in case the LDAP back-end authentication server fails.
-
Create a new Authentication Policy
-
Add the Password Authentication Rule (Local Password) to the Policy.
-
Add the DirectoryService Authentication Rule to the Policy.
-
Assign the new Authentication Policy to the appropriate service.
Combining Local Password and DIGIPASS Authentication for PPTP
Purpose
This configuration enforces two-factor authentication for the AXS Guard PPTP service with a one-button DIGIPASS. The one-button DIGIPASS does not support client PINs. The first factor consists of a static password which needs to be entered as a single string together with the OTP when authenticating, e.g. mystaticpassword123456. Combining static password with DIGIPASS authentication provides more security to your VPN service and prevents potential unauthorized access in case a user’s DIGIPASS is lost or stolen.
The PPTP service must be activated and correctly configured. See the AXS Guard PPTP How To for details.
-
Log on to the AXS Guard as explained in the System Administration How To, which is accessible via the Documentation button in the Administrator Tool.
-
Navigate to Authentication > Services.
-
Click on PPTP.
-
Click on Select.
-
Select the DIGIPASSAndPassword Policy.
-
Click on Update.
Reverse Proxy with DIGIPASS Authentication
Purpose
This configuration enforces DIGIPASS Authentication for users who wish to access a public Web Server protected by the AXS Guard Reverse Proxy Application Firewall. Assume you have a Web Server containing sensitive information and the information should only be available to users who are assigned a DIGIPASS. DIGIPASS Authentication provides stronger information access control.
The Reverse Proxy Service should be activated and correctly configured. See the AXS Guard Reverse Proxy How To for details.
-
Log on to the AXS Guard as explained in the System Administration How To, which is accessible via the Documentation button in the Administrator Tool.
-
Navigate to Authentication > Services.
-
Click on Reverse Proxy.
-
Click on Select.
-
Select the DIGIPASS Policy.
-
Click on Update.
Reverse Proxy with DIGIPASS Authentication and Network-based Restriction
Purpose
Allow authentication from a certain public IP range. Assume you have a Web server containing sensitive information and the information should only be available to users who are assigned a DIGIPASS and authenticating from a certain network. DIGIPASS Authentication provides stronger information access control. The (inverted) Network-based Authentication Restriction provides increased security as authentication is only allowed from a specific network.
-
Create a new Authentication Restriction.
-
Set the type to IP or Network Based.
-
Check the Invert flag. This means that authentication is only allowed from the defined network.
-
Enter the Source Network using the CIDR notation, e.g. 192.0.2.0/24.
-
Click on Update to save your settings.
-
Create a new Authentication Policy.
-
Add the DIGIPASS Authentication Rule to this policy.
-
Add the Authentication Restriction created in step 1.
-
Assign the new Authentication Policy to the Reverse Proxy Service.
Reverse Proxy with DIGIPASS Authentication and Group-based Restriction
Purpose
Restrict authentication to certain AXS Guard group(s).
-
Create a new Authentication Restriction.
-
Set the type to Group based.
-
Check the Invert flag. This means that only the defined group(s) is / are authorized to authenticate.
-
Select the desired AXS Guard group(s).
-
Click on Update.
-
Create a new Authentication Policy.
-
Add the DIGIPASS Authentication Rule to this policy.
-
Add the Authentication Restriction created in step 1.
-
Assign the new Authentication Policy to the Reverse Proxy Service.
Reverse Proxy with DIGIPASS Authentication and User-based Restriction
Purpose
Restrict authentication to certain AXS Guard user(s). Users who are not listed in the Restriction cannot authenticate to access the service.
-
Create a new Authentication Restriction.
-
Set the type to User based.
-
Check the Invert flag. This means that only the defined user(s) are allowed to authenticate.
-
Select the desired AXS Guard users.
-
Click on Update.
-
Create a new Authentication Policy.
-
Add the DIGIPASS Authentication Rule to this policy.
-
Add the Authentication Restriction created in step 1.
-
Assign the new Authentication Policy to the Reverse Proxy Service.
Reverse Proxy with DIGIPASS Authentication with User and Group Restriction
Purpose
-
Restrict authentication to a certain AXS Guard group
-
A specific member of that group cannot use his / her DIGIPASS, only his / her local password.
Configuration:
-
Create a new Authentication Restriction
-
Set the type to Group based.
-
Check the Invert flag. This means that only the members of the selected group(s) are allowed to authenticate.
-
Select the desired AXS Guard group(s).
-
Save your settings.
-
Create another Authentication Restriction.
-
Set the type to User based.
-
Select the member who is not allowed to authenticate with a DIGIPASS.
-
Save your settings.
-
Create another Authentication Restriction.
-
Select the Authentication Restriction you just created.
-
Click on Edit as New.
-
Provide a unique name for the Restriction
-
Check the Invert flag.
-
Save your settings
-
Create a new Authentication Rule.
-
Add the DIGIPASS Authentication Method.
-
Add the Group based Restriction created above.
-
Add the User-based Restriction which is not inverted. This prevents the specified user from authenticating.
-
Create another Authentication Rule.
-
Add the Local Password Authentication Method.
-
Add the inverted user-based Restriction created above. This allows authentication only for the specified user.
-
Create a new Authentication Policy and add both Authentication Rules to this policy.
-
Assign the new Authentication Policy to the Reverse Proxy Service.
Result
All members of the specified group(s) have to authenticate with a DIGIPASS, except one member, who must use his / her Local Password. Members of other groups cannot authenticate.
Reverse Proxy with RADIUS Back-end Authentication
Purpose
This configuration enforces RADIUS back-end server Authentication . A static password must be used to access a Web Server in the Secure Network Zone of the AXS Guard.
The AXS Guard relays the entered credentials to a RADIUS back-end server in its network.
DIGIPASS Authentication can be enforced the same way if an aXsGUARD Identifier is present in your network. This way, you can benefit from the advanced DIGIPASS features and management available on the aXsGUARD Identifier over the RADIUS protocol.
The users on the RADIUS back-end must also exist on the AXS Guard, otherwise authentication fails.
-
Log on to the AXS Guard as explained in the System Administration How To, which is accessible via the Documentation button in the Administrator Tool.
-
Enter the RADIUS server information.
-
Navigate to Authentication > Services.
-
Select Reverse Proxy.
-
Assign the Radius-* Authentication Policy to the Reverse Proxy service.
-
Update your settings.
Info
To enforce DIGIPASS Authentication over RADIUS, assign the DIGIPASSAndRadius-* Authentication Policy instead. * stands for the name given to the RADIUS server.
Denying Authentication to a Group with User Exception
Purpose
This configuration enforces DIGIPASS Authentication for all AXS Guard users regardless of their group membership and denies authentication to a specific group, except one member of this group.
-
Create a new Authentication Restriction.
-
Set the type to Group Based.
-
Select the AXS Guard group which is not allowed to authenticate, e.g. group_x.
-
Save your settings.
-
Create a second Authentication Restriction.
-
Set the type to User Based.
-
Check the Invert flag. This means that only the selected user is authorized to authenticate.
-
Select the specific AXS Guard user, e.g. user Mary who is a member of group_x.
-
Save your settings.
-
\(A\) Create a new Authentication Rule.
-
Add the DIGIPASS Authentication Method.
-
Add the Group-Based Restriction created above.
-
Save your settings.
-
\(B\) Create a second Authentication Rule.
-
Add the DIGIPASS Authentication Method.
-
Add the Inverted Restriction created above.
-
Save your settings.
-
Create a new Authentication Policy and add both Authentication Rules to this policy.
-
Assign the new Authentication Policy to the desired service.
Result
\(A\) All users may authenticate with a DIGIPASS, except the members of the specified group (group_x). (B) Only user Mary, who is a member of group_x, is allowed to authenticate with her DIGIPASS.
Manual DIGIPASS Rollout via a User-based Restriction
Purpose
This configuration enforces DIGIPASS authentication for a service, while allowing a grace period during which users can authenticate with their static password. Once a user successfully authenticates with his / her DIGIPASS, an AXS Guard administrator can add a user-based Authentication Restriction to the DIGIPASS Authentication Policy. As a result, the specified user must use his / her DIGIPASS during the next authentication.
-
Create 2 new Authentication Rules.
-
The first Rule should include the Local Password Authentication Method.
-
The second Rule should include the DIGIPASS Authentication Method.
-
Create a new Authentication Policy. Add both Rules created above to it and assign the new Policy to the desired service).
-
When the first user successfully authenticates with his / her DIGIPASS, add a user-based Restriction to the Rule which enforces Local Password Authentication.
-
Set the type to User Based.
-
Add the AXS Guard User(s) who successfully authenticated with a DIGIPASS.
-
Update the Restriction.
Other users should be added progressively to the Authentication Restriction (as soon as they have successfully authenticated with their DIGIPASS). Do not create a separate Restriction per user. Instead, add each user to the existing Restriction.
Info
The same procedure can be used to implement group-based and network-based grace periods.
Gateway Application with DIGIPASS RADIUS Authentication
Purpose
This configuration enforces DIGIPASS Authentication over the RADIUS protocol on the AXS Guard. This setup integrates the AXS Guard into your existing network infrastructure behind a corporate gateway. The AXS Guard has an IP address in the private range. The gateway must be configured as an AXS Guard client and must be added to the Computer list.
Important
- The users on the gateway must also exist on the AXS Guard, otherwise authentication will fail.
- Grant the necessary Firewall Access, so the RADIUS client (gateway) can connect to the AXS Guard RADIUS server (If the Firewall and IPS Module has been purchased).
- Only PAP authentication is supported.
Configuration:
-
Ensure that the corporate gateway is correctly configured to use the AXS Guard as a RADIUS server. Consult your gateway’s documentation if necessary.
-
Configure the AXS Guard RADIUS server.
-
Navigate to Authentication > Services and select the AXS Guard RADIUS Service.
-
Assign the DIGIPASS Authentication Policy to the service.
-
Update your settings.
Kerberos for Web Access with Windows 2008 Server (Automatic Configuration)
Overview
In this section we explain how to set up Kerberos authentication for Web Access using automatic keytab file generation (proxy with automatic keytab files) where the AXS Guard domain is the same as the Kerberos realm (back-end domain) and where the Kerberos back-end is also your DNS server. Following is a list of machines involved in the setup:
-
Kerberos back-end: Windows 2008 Enterprise Server (Standard Active Directory Domain Controller / domain =
ad.domain.be/ FQDN =config4416vm0.ad.domain.be/ IP = 192.168.28.4/22) -
A Windows 7 client in the Windows 2008 domain (domain =
ad.domain.be, IP = 192.168.28.8/22) -
AXS Guard with Web Access (proxy) and Directory Services features enabled (domain =
ad.domain.be/ FQDN =axsguard.ad.domain.be/ IP = 192.168.28.7/22)
DNS Configuration
-
Log in to your Windows 2008 server with an administrator account.
-
Click on start > all programs > administrative tools > DNS.
-
Expand "Forward Lookup Zones" and select your domain (
ad.domain.bein this example). -
Add the following records:
-
A and PTR record for your KDC
config4416vm0.ad.domain.be> 192.168.28.4 -
A and PTR record for
axsguard.ad.domain.be> 192.168.28.7
-
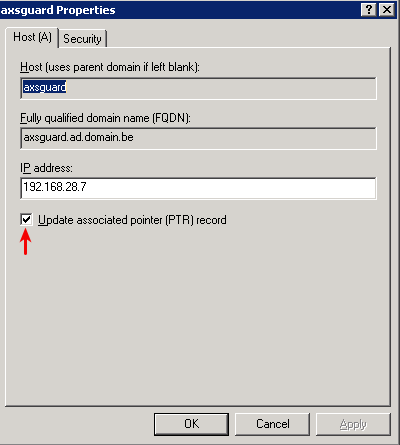
Verifying the System Time
Kerberos has strict time requirements. If the time is off on any of the machines involved in the authentication process, authentication will fail. It is recommended to synchronize all your hosts with a time server, e.g. ntp.vasco.com.
AXS Guard
Navigate to Network > General to verify the time settings.
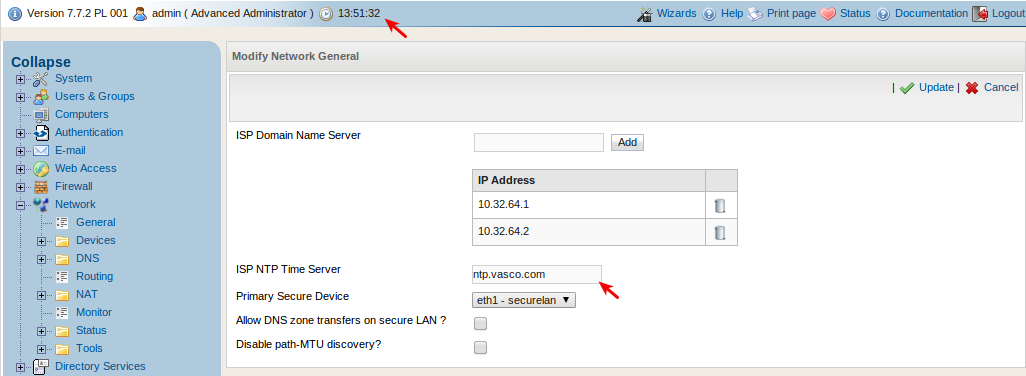
Windows 2008 Server
Log in to your server with an administrator account and check if the system time is accurate. Adjust it if necessary.
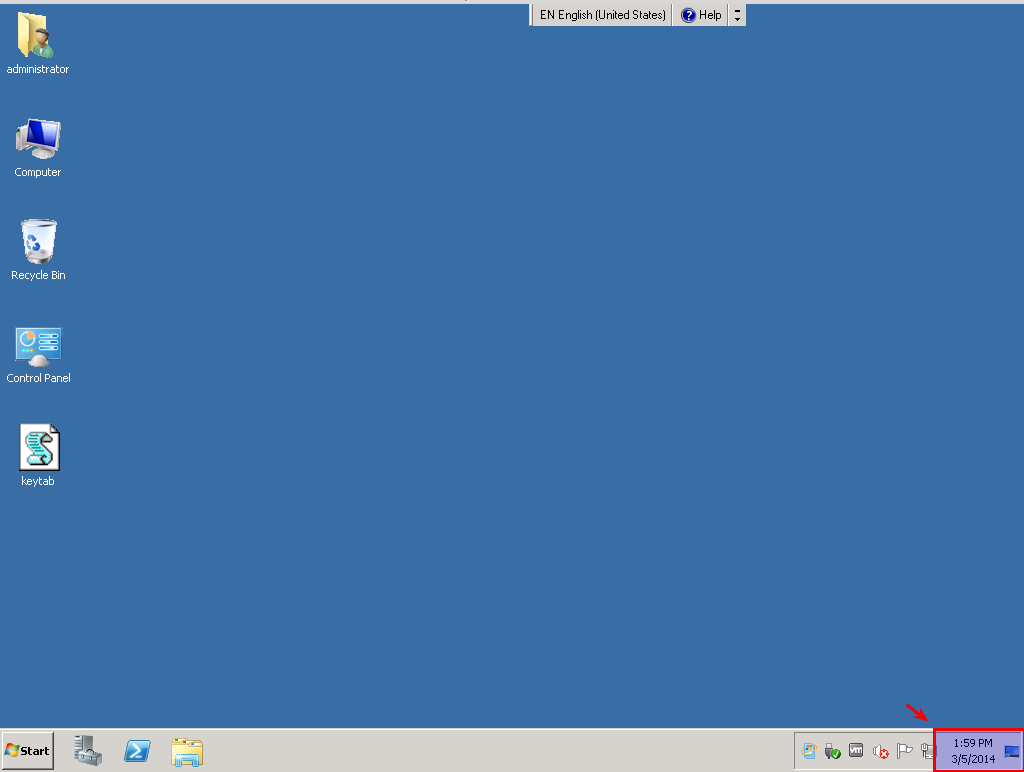
-
Log in to your PDC Server and open the command prompt.
-
Stop the W32Time service:
C:\>net stop w32time -
Configure the external time sources, type:
C:\> w32tm /config /syncfromflags:manual /manualpeerlist:”0.pool.ntp.org, 1.pool.ntp.org, 2.pool.ntp.org” -
Make your PDC a reliable time source for the clients. Type:
C:\>w32tm /config /reliable:yes -
Start the w32time service:
C:\>net start w32time -
The windows time service should begin synchronizing the time. You can check the external NTP servers in the time configuration by typing:
C:\>w32tm /query /configuration -
Check the Event Viewer for any errors.
Windows 7 Kerberos Client
Follow the same steps as provided for Windows 2008. To repair the Windows Time Service, proceed as follows:
-
Open a command prompt and run the following commands
-
net stop w32time -
w32tm /unregister(ignore the error message) -
w32tm /unregister -
w32tm /register -
net start w32time
Syncing AD Users
You need to make sure that user accounts are created on the AXS Guard for every user who will authenticate via Kerberos.
-
Log in to your AXS Guard appliance.
-
Go to Directory Services > General and configure as shown below.
-
Next, go to Users & Groups > Users to verify whether the users have been correctly synchronized.
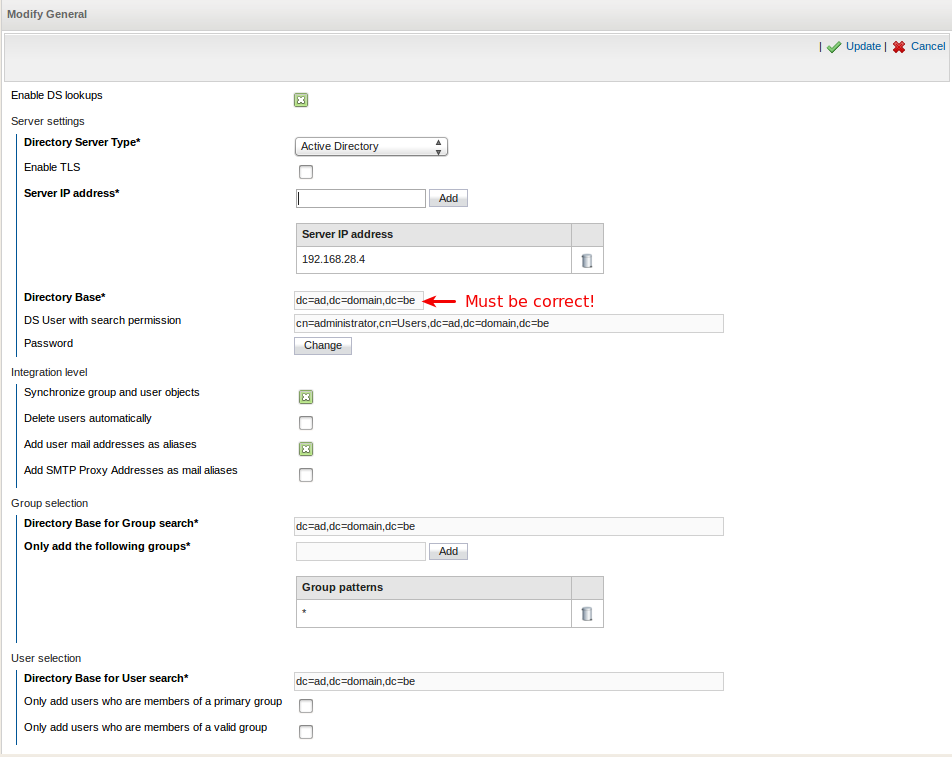
Info
See the Directory Services How To for configuration instructions.
DNS Forwarding
Make sure to forward reverse lookups for the KDC:
-
Go to Network > DNS > Forwarding
-
Add a PTR record for the KDC (in this example
4.28.168.192.in-addr.arpa>192.168.28.4) -
Update your configuration
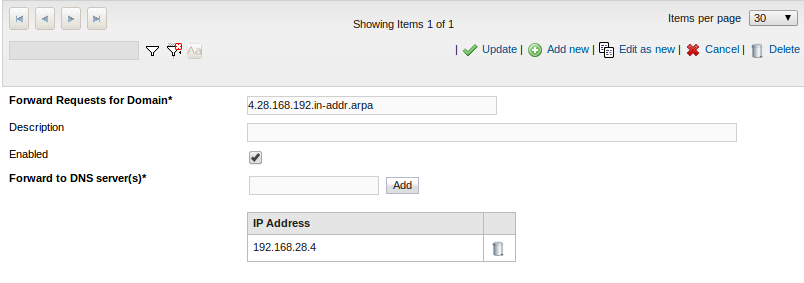
Configuring User Web Access Privileges
Ensure that users have the appropriate Web Access rights. Rights can be configured at the group or user level.
Group Level Configuration
-
Go to Users & Groups > Groups
-
Select the appropriate group. In this example we use the default domain_users group:

User Level Configuration
-
Go to Users & Groups > Groups
-
Select the appropriate user
-
Configure the desired Web Access Policy for the user. In this example we allow the user unrestricted access to any site.
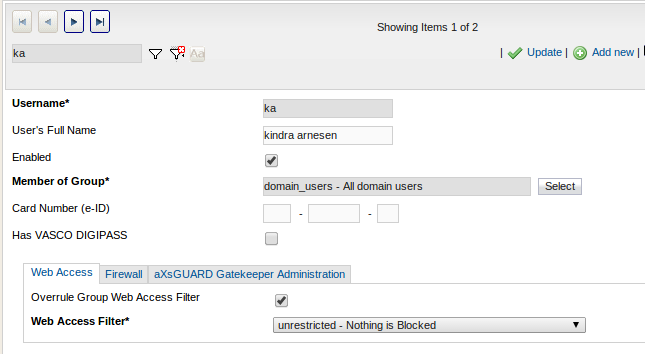
Generating a Keytab File for Web Access
-
Go to Authentication > Kerberos > General.
-
Enable Kerberos.
-
Enter the AD credentials of a user who can create computers and accounts on the KDC.
-
Verify the hostname of the AXS Guard and update it if necessary (default =
axsguard). -
Generate the keytab file(s) for the required service(s).
-
Update your configuration.
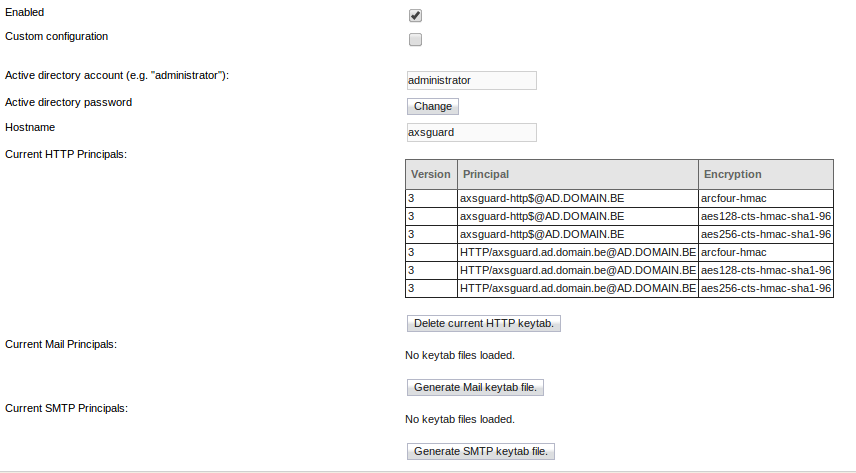
Web Access Authentication Settings
-
Unlink firewall and web access authentication.
-
Allow Kerberos authentication for web access as shown below.
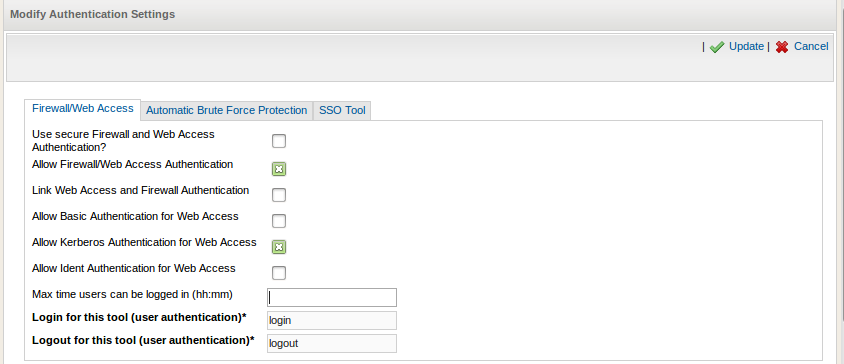
Client Proxy Settings
Configure the Internet browser on the client, so that it uses the AXS Guard as its proxy server. In this example, we use a Windows 7 client with Firefox. For other operating systems and browsers, see the appropriate documentation or online resources.
Important
Do not use the proxy server’s IP address, but its FQDN, e.g. axsguard.ad.domain.be, otherwise authentication will fail.
-
Log on to Windows 7
-
Start Firefox
-
Go to Firefox > Options > Options
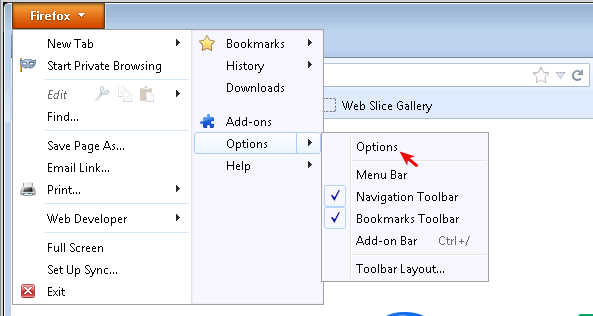
-
Click on Advanced and select the "Network" tab.
-
Click on "Settings" (configure how Firefox connects to the Internet)
-
Select "Manual proxy configuration"
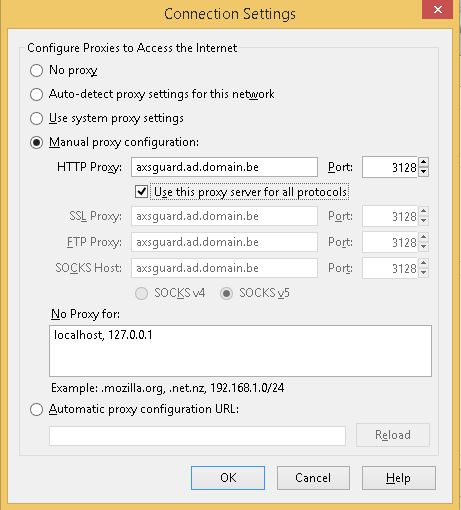
-
Enter the FQDN and port of the proxy server, i.e.
axsguard.ad.domain.beport 3128 -
Check "Use this proxy server for all protocols"
-
Click on OK to save your settings
-
Restart Firefox and go to a website.
Kerberos for Web Access with Windows 2008 Server (Custom Configuration)
Overview
In this section we explain how to manually set up Kerberos authentication for Web Access (proxy with custom keytab files) where the AXS Guard domain is different from the Kerberos back-end domain and where the Kerberos back-end is also your DNS server. Following is a list of machines involved in the setup:
-
Kerberos back-end: Windows 2008 Enterprise Server (Standard Active Directory Domain Controller / domain =
ad.domain.be/ FQDN =config4416vm0.ad.domain.be/ IP = 192.168.28.4/22) -
A Windows 7 client in the Windows 2008 domain (domain =
ad.domain.be, IP = 192.168.28.8/22) -
AXS Guard with Web Access (proxy) and Directory Services features enabled (domain =
mydomain.com/ FQDN =axsguard.mydomain.com/ IP = 192.168.28.7/22)
DNS Configuration
-
Log in to your Windows 2008 server with an administrator account.
-
Click on start > all programs > administrative tools > DNS.
-
Expand "Forward Lookup Zones" and select your domain (
ad.domain.bein this example). -
Add the following records:
-
A and PTR record for your KDC
config4416vm0.ad.domain.be> 192.168.28.4 -
A and PTR record for
axsguard.ad.domain.be> 192.168.28.7
-
Verifying the System Time
Kerberos has strict time requirements. If the time is off on any of the machines involved in the authentication process, authentication will fail. It is recommended to synchronize all your hosts with a time server, e.g. ntp.vasco.com.
AXS Guard
Navigate to Network > General to verify the time settings.
Windows 2008 Server
Log in to your server with an administrator account and check if the system time is accurate. Adjust it if necessary.
-
Log in to your PDC Server and open the command prompt.
-
Stop the W32Time service:
C:\>net stop w32time -
Configure the external time sources, type:
C:\> w32tm /config /syncfromflags:manual /manualpeerlist:”0.pool.ntp.org, 1.pool.ntp.org, 2.pool.ntp.org” -
Make your PDC a reliable time source for the clients. Type:
C:\>w32tm /config /reliable:yes -
Start the w32time service:
C:\>net start w32time -
The windows time service should begin synchronizing the time. You can check the external NTP servers in the time configuration by typing:
C:\>w32tm /query /configuration -
Check the Event Viewer for any errors.
Windows 7 Kerberos Client
Follow the same steps as provided for Windows 2008. To repair the Windows Time Service, proceed as follows:
-
Open a command prompt and run the following commands
-
net stop w32time -
w32tm /unregister(ignore the error message) -
w32tm /unregister -
w32tm /register -
net start w32time
Generating a Keytab File for Web Access
A keytab file for web access (HTTP) must be generated on the Windows 2008 server. You must then import this file on the AXS Guard.
-
Log in to your Windows 2008 server with an administrator account.
-
Open a command prompt
-
Run the following command:
ktpass -princ HTTP/axsguard.ad.domain.be@AD.DOMAIN.BE -mapuser ad\administrator -pass administrator_password -ptype KRB5_NT_PRINCIPAL -crypto All -out webaccess.keytab
You should see output similar to this:
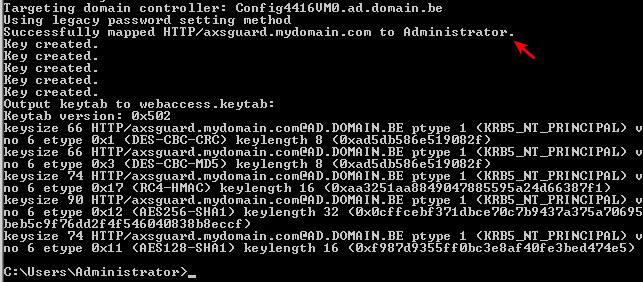
Save the keytab file to a secure location, so that you can access it later. The keytab file must be imported on the AXS Guard.
Syncing AD Users
You need to make sure that user accounts are created on the AXS Guard for every user who will authenticate via Kerberos. See the Directory Services How To for configuration instructions.
-
Log in to your AXS Guard appliance.
-
Go to Directory Services > General and configure as shown below.
-
Next, go to Users & Groups > Users to verify whether the users have been correctly synchronized.
Configuring User Web Access Privileges
Ensure that users have the appropriate Web Access rights. Rights can be configured at the group or user level.
Group Level Configuration
-
Go to Users & Groups > Groups
-
Select the appropriate group. In this example we use the default domain_users group:
User Level Configuration
-
Go to Users & Groups > Groups
-
Select the appropriate user
-
Configure the desired Web Access Policy for the user. In this example we allow the user unrestricted access to any site.
Importing Keytab Files and Kerberos Settings
Import the keytab file created on your Windows 2008 server.
-
Go to Authentication > Kerberos > General
-
Enable Kerberos and select "Custom Configuration"
-
Verify the hostname and realm. Adjust them if necessary. They must match the FQDN that you used to generate your keytab file; i.e.
axsguard.ad.domain.be -
Click on "Choose File" and locate the keytab file that you created earlier.
-
Update your configuration.
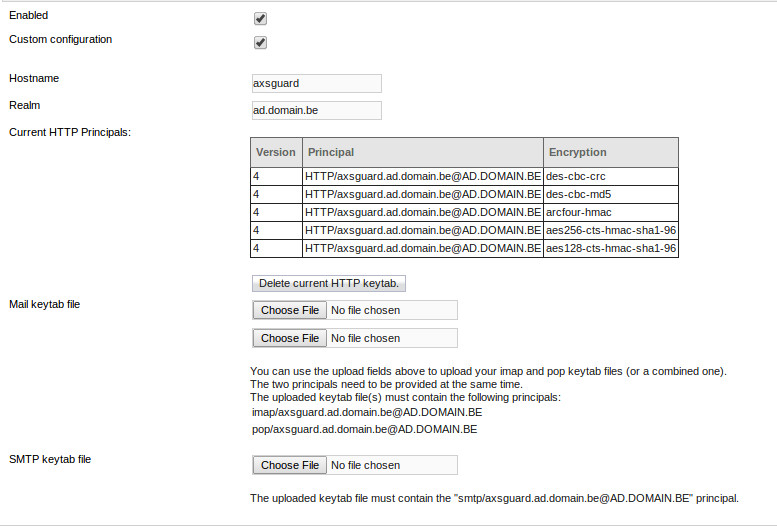
Web Access Authentication Settings
-
Unlink firewall and web access authentication .
-
Allow Kerberos authentication for web access as shown below.
Client Proxy Settings
Configure the Internet browser on the client, so that it uses the AXS Guard as its proxy server. In this example, we use a Windows 7 client with Firefox. For other operating systems and browsers, see the appropriate documentation or online resources.
Do not use the proxy server’s IP address, but its FQDN, e.g.
axsguard.ad.domain.be, otherwise authentication will fail.
-
Log on to Windows 7
-
Start Firefox
-
Go to Firefox > Options > Options
-
Click on Advanced and select the "Network" tab.
-
Click on "Settings" (configure how Firefox connects to the Internet)
-
Select "Manual proxy configuration"
-
Enter the FQDN and port of the proxy server, i.e.
axsguard.ad.domain.beport 3128 -
Check "Use this proxy server for all protocols"
-
Click on OK to save your settings
-
Restart Firefox and go to a website.
Reporting
About
The reporting feature allows system administrators to better monitor various types of network and system activity. The aim is threat detection and protection in the context of the General Data Protection Regulation (GDPR). Administrators will be able to generate various types of reports covering a given period.
The authentication and authorization report is an easy way to detect suspicious login activity. If such activity is detected, administrators can intervene immediately by blocking the IP address associated with this activity. Reports may also contain usernames linked to internal system processes, e.g. cyrus. This is expected behavior. System processes should never indicate a login failure. If a login failure is, however, detected, administrators should check the full event logs.
Authentication and Authorization Reports
-
Go to Reports > Threats.
-
Click the more link under "Authentication and Authorization Report".
-
Select the appropriate report, e.g. "Login Activity".
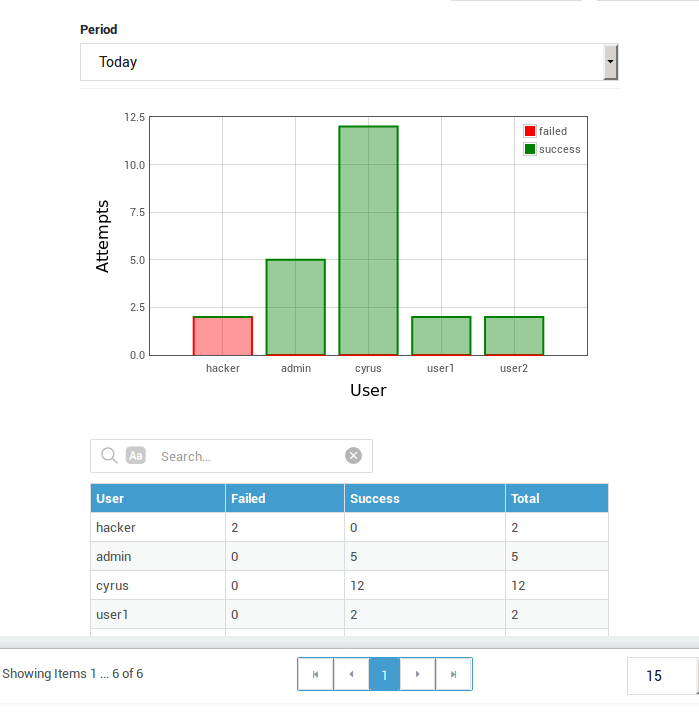
Status and Logging
Overview
Topics covered in this chapter include:
-
The Authentication Status Menu, which provides information about authenticated and blocked users. You can also disconnect (log out) users and hosts via this menu.
-
eID User Registration Logs
-
The Authentication Logs.
Authentication Status
To view authenticated users and hosts:
-
Log on to the AXS Guard.
-
Navigate to Authentication > Status > Authenticated Users.
-
Select a service to display its logs or to log out a user / host.

| Service | Description |
|---|---|
Firewall, VPN and RAS |
Allows you to view or disconnect users who are authenticated with the AXS Guard Firewall, PPTP, L2TP or IPsec server and who are authenticated via a PAX. |
Reverse Proxy |
Allows you to view or disconnect users who are connected to the AXS Guard Reverse Proxy server. |
| Field | Description |
|---|---|
Client IP |
The source IP of an authenticated user. |
User |
The user name as listed under Users&Groups > Users. |
Source |
The application used to authenticate with the AXS Guard, e.g. the SSO Tool. |
Public IP |
The Public IP of an Authenticated user (If authenticated from the Internet). |
Login Time |
When a user authenticated. |
Logout |
Use this function to log out an authenticated user. |
Blocked Users and Hosts
To view users who have been blocked by the AXS Guard Brute Force Protection feature.
-
Log on to the AXS Guard.
-
Navigate to Authentication > Status > Blocked Users&Hosts.
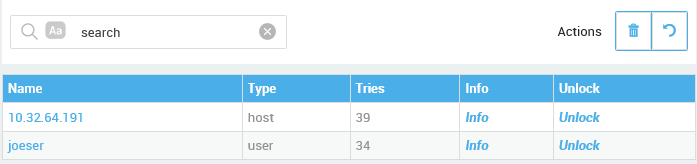
| Field | Description |
|---|---|
Name |
The name of the blocked host(s) or user(s). |
Type |
Two types exist: user and host. Indicates whether a host or a user was blocked. |
Tries |
The number of failed authentication attempts. |
Info |
When clicked, provides more details about the blocked user(s) or host(s). |
Unlock |
Click to unlock the user or host. You can also use the unlock button in the Blocked Users & Hosts screen. |
Reset Database |
Only use this function when you need to unlock all listed users and hosts (rather than unlocking them individually with the unlock function) or when you modify authentication settings which affect all users and hosts. |
Refresh |
Refreshes displayed information when clicked. |
Info
- Locked accounts are automatically unlocked after 48 hours if they haven’t been used during that period. This simplifies maintenance.
- Administrators are notified by e-mail as soon as a user account is locked.
- The unlocking of users and hosts is logged under System > Logs > Admin Tool.
eID Registration Logs
The eID User Registration logs allow you to verify if a user succesfully registered or re-registered his / her DP 810 for eID. To access the eID registration logs:
-
Log on to the AXS Guard.
-
Navigate to System > Logs > Admin Tool.
-
Select the appropriate log in the presented list.

Authentication Logs
Authentication logs are parsed records of current and past authentication events on the AXS Guard. Unparsed logging is available for advanced administrators.
Authentication Logs are not kept indefinitely. The AXS Guard periodically purges its logs to preserve disk space.
Authentication Events Summary
To view a summary of authentication events:
-
Log on to the AXS Guard.
-
Navigate to Authentication > Logs > Summary.
-
Click on a log file to view parsed log information.

| Field | Description |
|---|---|
Time |
When the user authenticated. |
Service |
The service for which the user authenticated, e.g. Firewall, Web Access, VPN, etc. |
User |
The username of the authenticated user. |
Action |
Shows the authentication history in chronological order (Login / Logout / Fail). |
Policy |
Show the applicable Authentication Policy. |
Rule |
Displays the Rule(s) used in the Authentication Policy. |
Restriction |
Displays applicable Authentication Restrictions, if any. |
IP |
Displays the IP address of the authenticating client. |
Source |
Shows which application has been used to authenticate, e.g. the SSO Utility or an Internet browser. |
Public IP |
Shows the public IP address that was used to authenticate from the Internet. |
Total Time |
The total time of authenticated sessions in the |
Authentication Event Details
This type of logging is for advanced AXS Guard administrators only.
-
Log on to the AXS Guard.
-
Navigate to Authentication > Logs > Detailed.
-
Click on a log file to view its details.
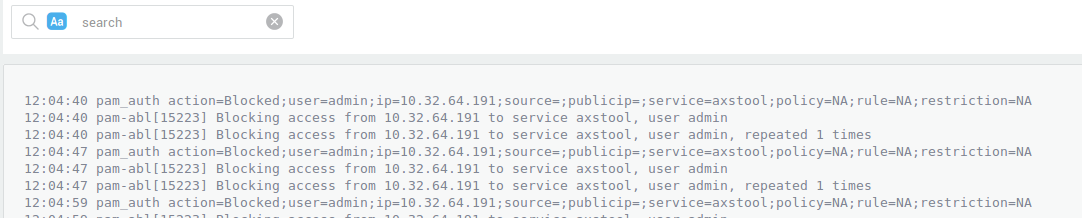
Troubleshooting
Failure to authenticate with RADIUS Back-End Server.
-
Verify the RADIUS shared secret for typos.
-
Make sure the user(s) also exists locally on the AXS Guard; otherwise RADIUS back-end authentication fails.
-
Verify the settings on the RADIUS back-end server if necessary. Consult the your RADIUS server’s documentation.
How do I start the RADIUS Service on the AXS Guard?
The RADIUS Service is started automatically when a RADIUS client is added to the AXS Guard. The RADIUS Service cannot be started without adding a RADIUS client. This is a security precaution to prevent unnecessary services from running.
I cannot add a RADIUS Client on the AXS Guard.
Ensure that the client has been added to the AXS Guard Computer list.
I accidentally locked myself out of the Administrator Tool.
Use the sysadmin account to create a new Administrator as explained in the AXS Guard System Administration How To.
I have configured a RADIUS client, but authentication fails.
This is only applicable if the AXS Guard Firewall and IPS module have been purchased. Ensure that the correct Firewall Rules are active, so the client can connect to the AXS Guard RADIUS server . The predefined RADIUS Firewall rules are labeled dmz-radius, int-radius and sec-radius. See the AXS Guard Firewall How To for information about Firewall Rules. A sec-radius Firewall Rule is automatically created when a RADIUS client is added in the secure LAN of the AXS Guard. For RADIUS clients in the DMZ or on the Internet, administrators need to manually configure the AXS Guard Firewall.
I cannot authenticate for PPTP with my Directory Server (Active Directory) Password.
Check if the user exists in Active Directory. If the user already exists, check if the user account is locked. If the user is not present or the user account is locked in Active Directory, the connection fails.
I have created individual Restrictions per user / group and cannot authenticate.
If you create individual Restrictions per user or per group and add them to a Rule or Policy, authentication will fail. Restrictions are “ANDed”, which means they should ALL match the authentication attempt. Create a single Restriction for each type (user or group) and add the individual users / groups to the Restriction.
Kerberos doesn’t work at all.
Kerberos has strict time constraints. Verify if all hosts (the KDC, AXS Guard and clients) are correctly synchronized with a time server. If the time is off, authentication will fail.
Problems can also occur if you generated keytab files on the AXS Guard and then uploaded your own, custom keytab files. As a result, duplicate principal entries (SPNs) will be created on the AD server and clients will try to authenticate using NTLM instead of Kerberos.
Verify your DNS settings and records. A and PTR records must exist for the KDC and the AXS Guard. Make sure that all Kerberos clients can resolve the IP addresses and names of the KDC and AXS Guard. Consult the documentation of your DNS server if necessary.
Activation Errors when generating keytab files.
This happens when you generate keytab files automatically after importing your own, manually generated keytab files. As a result, duplicate principal entries (SPNs) will be created on the AD server, which leads to errors.
Only one SPN should be set for each service. Multiple SPNs can cause clients to connect to the wrong system or the ticket may be encrypted with the wrong key.
To check if duplicate entries exist, run the following command on your AD server:
setspn -X
If duplicates are found, you will see something like this:
    Checking domain DC=ad,DC=domain,DC=be
    Processing entry 0
    HTTP/axsguard.ad.domain.be is registered on these
    accounts:
    CN=Jon Do,CN=Users,DC=ad,DC=domain,DC=be
    CN=axsguard,CN=Users,DC=ad,DC=domain,DC=be

    found 1 group of duplicate SPNs.
-
Open a command prompt on your AD server.
-
Run adsiedit.msc
-
Connect.
-
Look for the users returned by the
setspn -Xcommand (see above). -
Remove them.
-
Regenerate your keytab files.
Useful links:
Kerberos authentication is not working on a specific client.
-
Make sure that the application is correctly configured to use Kerberos (GSSAPI) authentication. Check the documentation of your application if necessary.
-
Check the system time on the client. It must be accurate for Kerberos to work. It is recommended to synchronize your clients with a time server.
-
Make sure the client can correctly resolve the KDC as well as the AXS Guard. A and PTR records are required for the KDC as well as the AXS Guard.
-
Verify if the user account exists on the AXS Guard.
-
Make sure there is a valid keytab file for the requested service and that there are no duplicate SPNs (see above).
Web Access specific settings.
-
Linked authentication must be disabled.
-
Kerberos must be specifically allowed for Web Access.
-
Use the FQDN of the AXS Guard in the client’s browser proxy settings and not its IP address, otherwise Kerberos authentication will fail. An example of a correct proxy configuration would be:
axsguard.mydomain.com:3128
Using the IP address will result in errors and entries in the authentication logs similar to the ones shown below.

-
Go to Directory Services > General.
-
Verify if the directory base is correct.
-
Log on to your DNS server and verify if all DNS records are present. Restart your DNS server to avoid DNS caching issues.
-
If your DNS server is correctly configured and you still cannot export the HTTP principal, restart the AXS Guard DNS cache service.
Support
If you encounter a problem
If you encounter a problem with AXS Guard, follow the steps below:
-
Check the troubleshooting section of the feature-specific manual.
-
Check the knowledge base on this site for information about special configurations.
-
If no solution is available in any of the above sources, contact your AXS Guard vendor.
Contact Information
(+32) 15-504-400
support@axsguard.com