High Availability
Introduction
About this Document
The aim of this guide is to provide the essential steps to get a new High Availability (HA) cluster up and running as quickly as possible and to provide general maintenance guidance. This document is intended for technical personnel, system administrators and network administrators.
Examples used in this Guide
All setups and configuration examples in this guide are executed as an advanced administrator. Some options are not available if you log in as a full administrator or a user with lower access privileges.
As software development and documentation are ongoing processes, the screenshots shown in this guide may slightly deviate from the current user interface.
High Availability Concepts
Overview
In this chapter, we explain the aim of a High Availability (HA) system and some important terminology associated with this technology.
Topics covered in this section include:
-
HA Prerequisites
-
What is High Availability?
-
The Heartbeat process
-
Virtual IP Addresses and Failover
-
Important terminology
Prerequisites
You cannot enable the HA Feature without a valid Able license. With a licensed appliance, configurations for all purchased options are possible for a user with full administration rights. The licensing process is explained in the AXS Guard System Administration How To and the Getting Started guide, which are accessible by clicking on the permanently available Documentation button in the Administrator Tool.
Licensing HA appliances
The same steps apply as explained in the System Administration and Getting Started Guides. However, HA is a special case which requires you to import a separate license file on each AXS Guard appliance in the HA cluster (An HA cluster typically consists of a Master and a Slave appliance). You can only enable the HA Feature on an appliance with the correct license. To upgrade your existing installation (e.g. a single AXS Guard) to an HA cluster, your appliance has to be replaced by 2 or more HA capable machines. Contact your reseller for information.
To correctly import a Able license file on your HA appliance, you have to:
-
Follow the Licensing steps as explained in the System Administration How To and acquire a Able license file for the Master.
-
Import the license.dat file on the Master.
-
Follow the same steps to import a license on the Slave. Use the Contract ID of the Master to register the Slave and obtain a separate license file.
What is High Availability?
High-Availability clusters (also known as failover clusters) are implemented primarily for the purpose of improving the availability of services that the cluster provides. They operate by having redundant nodes, which are then used to provide services when system components fail.
The most common size for an HA cluster is two nodes, a Master and a Slave, which is the minimum requirement to provide redundancy. HA cluster implementations attempt to use redundancy of cluster components to eliminate single points of failure.

The Heartbeat Process
Heartbeat is a daemon (process) that checks which peers in the HA cluster are online or offline. The Heartbeat communications are transmitted over ethernet or over a serial connection (RS-232). The serial cable is included with your delivery.
Virtual IP Addresses
A virtual IP address (VIP or VIPA) is an IP address that is not connected to a specific computer or network interface card (NIC) on a computer.
Packets that are sent to the VIP address, are automatically redirected to the appropriate physical network interface. Virtual IPs are used for connection redundancy or failover; a VIP address remains available if a computer or a NIC fails, because an alternative computer or NIC automatically assigns itself the VIP address and replies to incoming connections.
Virtual IPs can be assigned in the following AXS Guard network zones:
-
The Secure LAN
-
The DMZ
-
The Internet (WAN)
For details about the AXS Guard network zones, see the System Administration How To, which can be accessed via the Documentation button in the Administrator Tool.
Example: HA configuration with 2 SMTP servers
In the simple case of an AXS Guard HA configuration with 2 SMTP servers, a single virtual IP address is assigned to the virtual IP address "pool." The virtual IP address is assigned to the first SMTP server (HA Master), which handles the mail traffic that is explicitly routed to it. The second SMTP server, the HA Slave, assumes the virtual IP address and handles SMTP traffic only if the Master fails.
Important Terminology
Several important terms refer to key components and states within an AXS Guard HA cluster. Administrators should become familiar with the following states and definitions:
| State | Definition |
|---|---|
| Configured Master | The AXS Guard appliance which is assigned the master IP address in the HA => General page. The hostname of a master system always contains the word master, e.g. axsguard-master.example.com. The hostname of a configured master system is permanently visible in the top-right corner of the AXS Guard dashboard. You can also verify the current status of the node by navigating to High Availability => Status. |
| Configured Slave | The AXS Guard appliance which is assigned the slave IP address in the HA => General page. The hostname of a slave system always contains the word slave, e.g. axsguard-slave.example.com. The hostname of a configured slave system is permanently visible in the top-right corner of the AXS Guard dashboard. You can also verify the current status of the node by navigating to High Availability => Status. |
| Running Master | The system which is currently assuming the role of the master node and which is assigned the virtual IP address. The running master system provides all services to the outside world and is the one where the replicated volume is mounted. You can verify the current status of the node by navigating to High Availability => Status. |
| Running Slave | The system which is currently standing by. When the running master fails, the running slave system can swiftly take over the services that are normally provided by the master, a.k.a. a failover. You can verify the current status of the node by navigating to High Availability => Status. |
| DRBD Primary | A DRBD device in the primary role can be used unrestrictedly for read and write operations. It may be used for creating and mounting file systems, raw or direct I/O to the block device, etc. |
| DRBD Secondary | A DRBD device in the secondary role receives all updates from the peer node’s device, but otherwise disallows access completely. It can not be used by applications, neither for read nor write operations. The reason for disallowing even read-only access to the device is the necessity to maintain data coherency, which would be impossible if it were made accessible in any way. |
Important
In a normal scenario, the Configured Master will also be the Running Master and the Configured Slave will be the Running Slave.
However, if a failover occurs or is manually triggered by a system administrator, then the states of the Configured Master and the Configured Slave will change as follows:
- The Configured Master becomes the Running Slave.
- The Configured Slave is now the Running Master.
This is important to keep in mind when upgrading or updating your HA cluster.
High Availability Configuration
Before you Start
In this chapter we explain how to set up an AXS Guard HA cluster from scratch. This is the most common setup in the field, but other setups are possible.
Before configuring HA, certain prerequisites must be completed to ensure reliable operation. This includes system validation and setup steps that require intervention by Able support. Please contact Able to complete these steps prior to initiating the HA configuration.
Important
- Before configuring High Availability (HA), intervention by Able is required.
- Make sure to read our HA checklist to speed up the installation process.
- Disable automated version and revision updates on the master and the slave unit; manual intervention is required to upgrade your HA cluster.
- Keep the installation and system administration guides in reach, as they explain the correct procedures to create administrator accounts, upgrade a system and how to obtain a valid license for your AXS Guard appliances.
Licensing your HA Cluster
You must acquire a valid Able license before you can start configuring and using your HA cluster. The same Contract ID may be used to register the appliances of the HA cluster, but a separate license file has to be uploaded to each appliance, starting with the Master.
-
Start the new Master System and log on as the sysadmin user.
-
Create a new Advanced Administrator account and use it to log on to the Master.
-
Navigate to System > Feature Activation and enable the High Availability option.
-
Acquire a license.dat file.
-
Save this file to the desired location and upload it to the Master.
-
Repeat the same registration steps for the Slave. A new license.dat file is required for the Slave, but you can use the Master’s Contract ID to register the Slave.

Feature Activation
-
Log in to your AXS Guard appliance.
-
Go to System > Feature Activation.
-
Enable the High Availability option.

Error message during feature activation
If you get the following message: The system is not yet prepared for use in a High Availability (HA) cluster, contact our support department.
Before configuring HA, certain prerequisites must be completed to ensure reliable operation. This includes system validation and setup steps that require intervention by Able support.
Setting up the Master Unit
Setup Sequence
Important
It is crucial to configure the HA Master before the Slave.
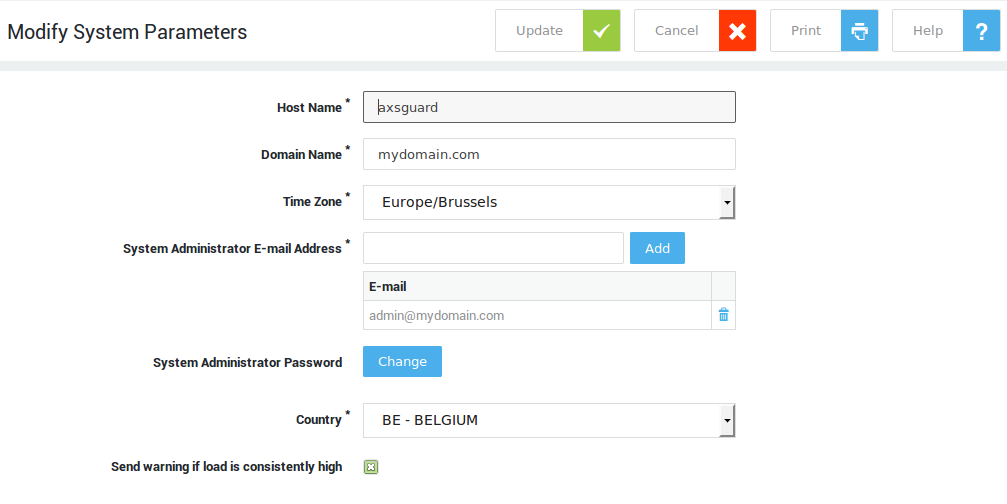
Viewing & Changing the Hostname of a Node
Important
The hostname and the domain name must be identical on all appliances in the HA cluster.
-
Log on to the AXS Guard as explained in the System Administration Guide or the Installation Guide.
-
Navigate to System > General. The screen below is displayed.
-
Configure the fields as explained in the System Administration Guide or the Installation Guide.
-
Click on Update to finish.
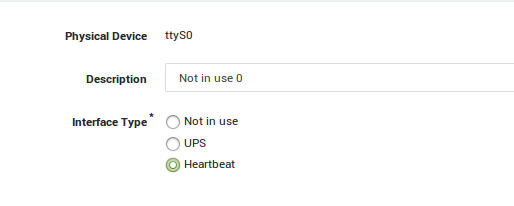
PSTN Device Configuration
You need to set your PSTN device to Heartbeat.
-
Navigate to Network > Devices > PSTN.
-
Click on pstn0.
-
Set the type to Heartbeat.
-
Update your configuration.
Master General Settings
Important
- The Master’s secure LAN IP must be one of the addresses specified for the Master’s Primary Secure Device, typically
eth0(Configured under Network > General). - If a device other than the standard
eth0device is selected, you must adjust the Primary Secure Device setting under Network > General. - If you change the IP address of a secure device which handles the HA connection under Network > Devices > Eth, you must also change the addresses under High Availability > General and High Availability > Virtual IP Addresses, otherwise severe problems will occur after a reboot .
-
Navigate to High Availability > General.
-
Check the High Availability Active option.
-
Enter the secure LAN IP of the Master.
-
Enter the secure LAN IP of the Slave. This IP address must be the same as one of the addresses specified for the Slave’s Primary Secure Device .
-
Leave the other options unchecked.
-
When finished, proceed to the Heartbeat Tab.
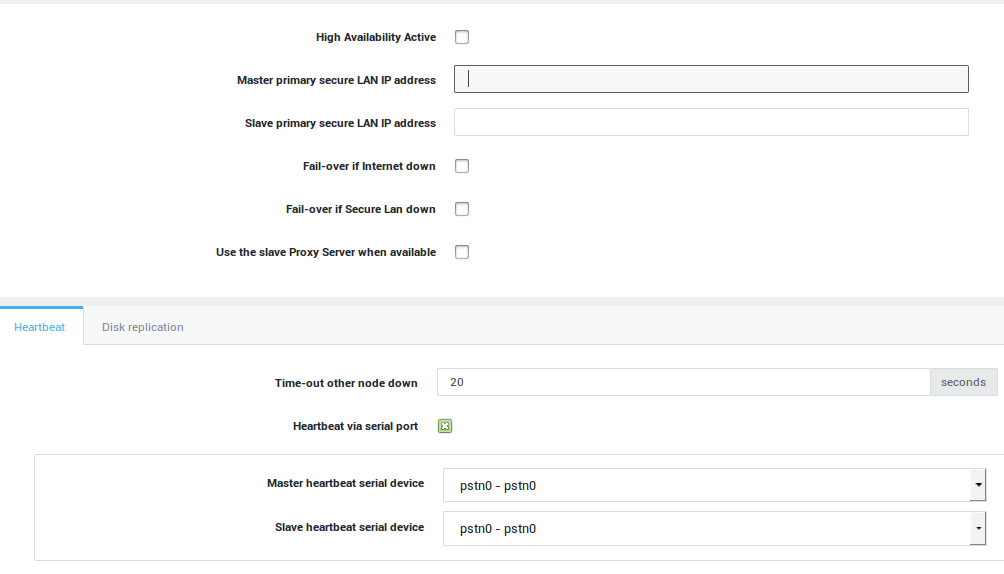
| Option | Description |
|---|---|
High Availability Active |
Check to enable HA. The option should be enabled on the master first, then on the slave. A system reboot is required. Ensure that the master is completely up and running before rebooting the slave. |
Master primary secure LAN IP address |
Enter the secure LAN IP address of the master system. The IP must be in the same range as the master’s primary secure device (Configured under Network > General) |
Fail-over if Internet Down |
If checked, the slave system will take over if all Internet devices on the master are down and if the Connectivity Check option is enabled for the Internet devices in question. |
Time Internet must be down for fail-over |
The Internet links are monitored on the master and the slave system. Specify the time in minutes during which the Internet link(s) on the master system is/are allowed to be down or unavailable before the slave system takes over the Internet services otherwise delivered by the master system. |
Fail-over if Secure LAN down |
If checked, the slave system will take over if all secure devices on the master are down and if the Connectivity Check option is enabled for the secure devices in question. Don’t use master or slave IP addresses for network connectivity checks . |
Time Secure Lan must be down for fail-over |
The Secure LAN links are monitored on the master and the slave system. Specify the time in minutes during which the Secure LAN link(s) on the master system is/are allowed to be down or unavailable before the slave system takes over the Secure LAN services otherwise delivered by the master system. |
Use the Slave Proxy when available |
Check this option if you want the slave system to handle all Web Access (proxy server) requests. This reduces the workload of the master system and optimizes performance. |
Master Heartbeat Settings
-
Leave the Time-out other node down setting to the system default setting (20 seconds).
-
Ensure the heartbeat via serial port option is enabled.
-
Ensure that the serial cable is connected to the 1st port on the Master and set the Master heartbeat serial device to
pstn0-pstn0. -
Set the Slave heartbeat serial device to
pstn0-pstn0. -
When finished, proceed to the Disk Replication Tab.
| Option | Description |
|---|---|
Time-out other node down |
Beyond this time the other HA node is considered down. 20 seconds is the system default. |
Heartbeat via serial port |
Enable this option to allow Heartbeat communications between the Master and Slave units over a serial link (RS-232). If disabled, this communication occurs over the LAN devices, which is less efficient and causes problems in case of network congestion or a primary secure device failure. This option is highly recommended. |
Master heartbeat serial device |
The serial device used for Heartbeat communications on the Master unit. The Master PSTN device type must be set to Heartbeat (See Network > Devices > PSTN). |
Slave heartbeat serial device |
The serial device used for Heartbeat communications on the Slave unit. The Slave PSTN device type must be set to Heartbeat (See Network > Devices > PSTN). |
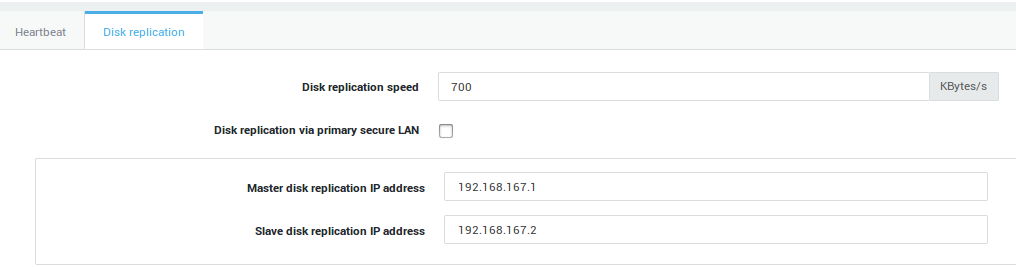
Master Disk Replication Settings
-
Set the Disk replication speed to a speed supported by the network devices. The entered value is expressed in Kilobytes per second.
-
Leave the replication via primary secure LAN option disabled.
-
Enter the Master Disk replication IP address. This must be an IP address in the same range of another Master secure LAN device which can access the Slave, e.g. eth1.
-
Enter the Slave Disk replication IP address. This must be an IP address in the same range of another Slave secure LAN device which can access the Master, e.g. eth1.
-
Click on Update and proceed to the Virtual IP Address settings.
| Option | Description |
|---|---|
Disk replication speed |
Set the disk replication speed (expressed in Kilobits per second). Set a speed supported by the network devices. |
Disk Replication via primary secure LAN |
Check this option to transmit hard drive replication data over the primary secure LAN devices (not recommended). This option is disabled by default. It is highly recommended to use dedicated network devices for this, due to the large amount of data which is being transferred during replication. |
Master Disk Replication Address |
This option is only available if the option above is disabled. Enter the Master Disk replication IP address. This IP address must be in the same range as a secure LAN device on the Master unit through which the Slave unit is accessible, e.g. |
Slave Disk Replication Address |
This option is only available if the Disk Replication via primary secure LAN option is disabled. Enter the Slave Disk replication IP address. This IP address must be in the same range as a secure LAN device on the Slave unit through which the Master unit is accessible, e.g. |
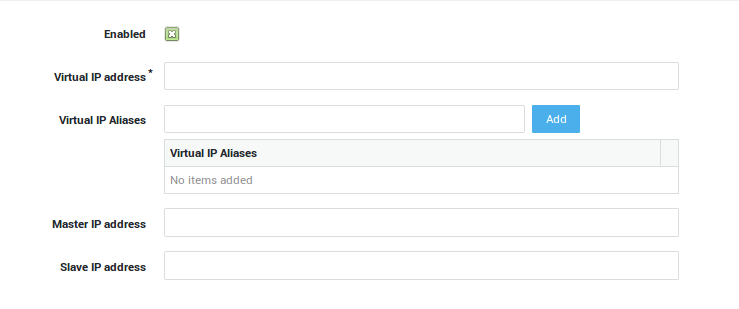
Master Virtual IP Settings
-
Navigate to High Availability > Virtual IP Addresses.
-
Click on Add New.
-
Check the Enabled option.
-
Enter a Virtual IP in the same range as the Master’s and the Slave’s secure LAN.
-
Enter the IP Address of the Master unit.
-
Enter the IP Address of the Slave unit.
-
Click on Update.
-
Navigate to System > Tools > Actions and Reboot the Master.
Important
- A Virtual IP address must be unique; you may not create additional entries for the same VIP.
- You may only assign one VIP per AXS Guard network device (one-to-one correlation). You may add as many Virtual IP Alias(es) per VIP as needed.
| Option | Description |
|---|---|
Enabled |
Enables the Virtual IP address. A system reboot is required. Reboot the Master first and wait until it is completely up an running before enabling this option on the Slave unit. |
Virtual IP address |
Enter a Virtual IP in the same range as the secure LAN device which connects the Master and the Slave units. |
Virtual IP Aliases |
Add one or more Aliases for the Virtual IP. |
Master IP address |
Enter the IP Address of the Master unit. |
Slave IP address |
Enter the IP Address of the Slave unit. |
Setting up the Slave Unit
Follow the same procedures as used for the master unit.
Important
Only reboot the Slave unit when the Master unit is completely up and running.
HA Status and Logs
Overview
In this chapter we explain how to verify the status of your AXS Guard HA cluster and consult its logs, once you have completed all the configuration steps on the Master and the Slave.
Unsynced Items
Some configuration items are not synced between the master and the slave unit. A warning is displayed in the AXS Guard configuration tool for unsynced items.
Verifying the Status
-
Log on to the AXS Guard Master / Slave, as explained in the System Administration guide.
-
Navigate to High Availability > Status. A screen as shown below will appear. HA errors are listed on this screen.

Info
You can also use the Virtual IP address to log in to the HA Master. If the Slave has taken over, e.g. during maintenance of the Master, the Slave’s information is shown instead.
Accessing the Logs
-
Navigate to High Availability > Logs.
-
Select either:
-
Heartbeat and DRBD to view logging of Heartbeat and Synchronization events.
-
Failover to view information about Master / Slave alternation.
-
HA Services
Overview
In this chapter we explain how we can divide tasks between the Master and the Slave. By default, the Slave only replicates the Master and has a standby function, in case the Master fails.
It is possible to configure the HA cluster so that certain services only run on the active Master, on the Slave or on both systems simultaneously. The latter option provides redundancy, while the former spreads the processing load over the appliances in the HA cluster.
Adding & Modifying HA Services
-
Log on to the AXS Guard Master, as explained in the System Administration Guide.
-
Navigate to High Availability > Services.
-
Click on Add to configure new settings or select an existing configuration to modify.
-
Select the desired settings as explained in the table below.

| Option | Setting |
|---|---|
Service Name |
Select the desired service from the drop-down list. |
Start |
Choose to start the selected service either on the active Master, on the Slave or on both systems. |
List of available Services
-
IPsec
-
OpenVPN
-
L2TP
-
PPTP
-
SSL VPN
-
SSL Web Portal
HA Tools
Overview
In this chapter we explain the use of the AXS Guard HA tools. You should only use these tools if a “split-brain” situation occurs.
What is a Split-Brain?
A split-brain is a situation in which the data on the Slave and on the Master is different and cannot be reconciled. Envision the following scenario:
-
The HA cluster is in sync
-
Turn off the Slave
-
Leave the Master running
-
When the Slave has shut down completely, turn off the Master
-
Turn the Slave back on and let it run for a while
-
Turn the Master back on
What happens in this scenario is that the data from the Slave is stale when it boots, but it has no way of detecting this.
It boots and sees that the data on its disk is consistent and usable, so it uses it. When the Master boots up, it detects that its data is also consistent and usable, but different from the Slave.
The cluster can only choose which data to use; it cannot merge it. If it cannot decide, it will refuse to damage either dataset, since data integrity is the first priority.
In this split-brain situation, the cluster will usually continue its services, but it cannot perform a failover. The longer the situation persists, the larger the chance becomes that both datasets cannot be merged at all, resulting in unrecoverable data loss.
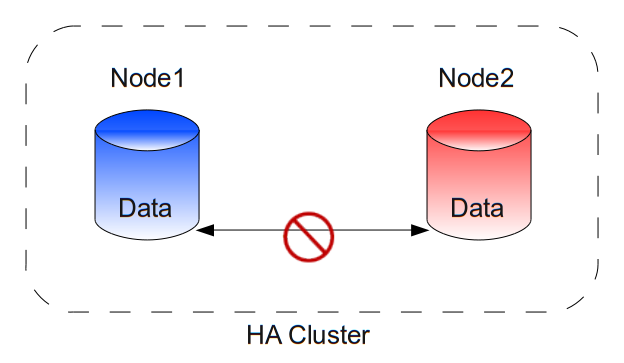
If an e-mail arrives when only the first node is running, it will not be present on the disk of the second node when it boots.
If an e-mail arrives after the second node has taken over the services, we have one e-mail in each dataset and no way to merge them. One e-mail will be lost.
Important
Contact your reseller as soon as possible in case of a problem.
Using the HA Tools
-
Log on to the AXS Guard Master / Slave, as explained in the System Administration Guide.
-
Navigate to High Availability > Tools.
-
Start the appropriate tool as explained in the table below.

| Button | Description |
|---|---|
Make myself the running master |
The other appliance will assume the slave function if it is currently running as master. |
Make myself the running slave |
The other appliance will assume the master function if it is currently running as slave. It will also become the DRBD primary. |
High Availability Maintenance
Overview
In this chapter, we explain the principles behind a High Availability cluster. Understanding these principles will help you to use your cluster correctly and minimize downtime while ensuring maximum availability and reliability.
System Priorities
The AXS Guard High Availability solution has two main priorities. The priorities are listed by order of importance:
-
Data Integrity
-
Service Integrity
Conservation of your data has the highest priority. Keeping the services up and running has a lower priority. Services are only interrupted in case of problems or if the first priority (i.e. data integrity) requires maintenance. At all times, the cluster attempts to deliver the best possible service.
Correct Reboot Procedures
To allow the second node to take over from the first node, the second node requires a copy of the very latest data generated by the first node.
Therefore, the cluster keeps a copy of its most current data on each node. To enable the HA cluster to keep this data synchronized, you must follow strict procedures when rebooting the HA nodes.
Failure to follow the correct procedure will result in irrevocable loss of data and cause a disruption of services.
Example Scenarios
Rebooting the Second Node without Service Interruptions
-
The HA cluster is in sync
-
Reboot the second node
-
The second node will synchronize with the first node
-
The cluster is in sync
This procedure is highly recommended. The second node will disconnect from the cluster, reboot and reconnect. It will then start a resync process with the first node and update its data until the cluster is in sync again. This is a normal working scenario. There will be no interruption of services.
Rebooting the First Node with some Service Interruptions
-
The cluster is in sync
-
Reboot the first node
-
The second node will take over
-
The first node reboots
-
The first node synchronizes with the second node
-
The cluster is in sync
When you reboot the first node (which is at that time running the services), the second node takes over from the first node and continues to provide its services. The first node reboots, rejoins the HA cluster and resynchronizes with the second node until its data is up-to-date again. This is also a normal scenario. With a default configuration, the first node will take over the services again.
In this scenario, there are two service interruptions, the first one occurs when the second node takes over and the second one (if configured) occurs when the first node takes over the services from the second node.
Split-Brain Situation
Important
Contact your reseller as soon as possible in case of a problem.
Keeping your HA Cluster Healthy
First of all, do not shut down or reboot your HA nodes unless you really
have to. Turning off the power also increases the risk of damaging the
data on your disks. If you wish to reboot a node because it seems to
have become unstable, use the Administrator Tool (web interface) or as a
last resort, use the Ctrl-Alt-Del combination on the console. You
should only shut down a node if it fails to respond on the console.
Important
Never reboot a node unless the other node is up and synchronized. Never reboot your system if it is out of sync. You will get messages on the console and via the web interface when the system is synchronizing.
Procedures to follow in case of a Split-Brain
Overview
In case a split-brain situation occurs, contact Able support immediately.
Your cluster might seem to function normally, but it will not perform a failover if something goes wrong. There is no protection against disk failures. The longer you delay you call or e-mail to Able support, the higher the risk of losing data. To solve the split-brain situation, our intervention is required. Do not reboot the nodes, as it will only make matters worse.
Failover
When the active node detects problems with its currently active services, it will attempt to fail over to the other node. A few common reasons for a take-over are an Internet failure, a quitting LAN interface or if there are any problems writing to the disk. First the active cluster will shut down the current resources and then the other node will start the services. Please keep in mind that this may take a while, especially when your system already has a high load.
If you think it’s taking too long, please use the Administrator Tool (web interface) to monitor what the cluster is doing. Do NOT REBOOT, unless you are absolutely sure something is wrong. When in doubt, contact Able support .
Info
A failover event takes up a lot of system resources. All services are started and the system load will increase. Your system should be tailored to handle this extra load. If you notice that a failover routinely takes too long, please consider upgrading your AXS Guard hardware.
Summary: General Recommendations
Do not reboot unless you are sure that it will not hurt the HA cluster. A reboot in the hopes to quickly restore services could damage your data and keep the system off line for an extended period.
If you invest in a High-Availability system, make sure acquire hardware powerful enough to handle the demanding system load of an HA cluster. The cluster will not function well if it is overloaded, just like any other server.
A High-Availability system is not a replacement for good system administration practices. Make sure to frequently back up your configuration and user data on the AXS Guard. The daily backup feature is easy to use and well documented (see the AXS Guard System Administration How To for more information. This guide is accessible by clicking on the permanently available Documentation button in the Administrator Tool).
Upgrade and Update Procedures
Preparing your HA Upgrade
Important
- Before upgrading your HA cluster, we recommended that you back up all AXS Guard configuration and user data. The procedures to back up and restore your AXS Guard data are explained in the AXS Guard System Administration How To, which can be accessed by clicking on the permanently available Documentation button in the web-based administrator tool of your appliance.
- It is highly recommended to reboot the configured slave unit prior to upgrading.
- Do not skip any of the steps provided in the following sections, otherwise the upgrade may fail or cause a split-brain situation.
- Disable automated version and revision updates, as manual intervention is always required when updating or upgrading your HA cluster.
- Revision upgrades require two consecutive reboots per node. Version upgrades, e.g. from version 10.X.X to 11.X.X, require three consecutive reboots per node.
Upgrade Testing Recommendations
It takes time to update an HA cluster. Do not rush the process. Conduct this activity during non-peak or off-peak hours as you are not permitted to make any changes to your cluster or nodes while the upgrade is in progress.
It is critical to fully upgrade and thoroughly test one node before upgrading another (1 business day to upgrade and test both nodes is recommended), for example:
Assume you decide to upgrade the configured slave unit first. You then trigger a failover so that it becomes the running master. After 10 minutes of observation and testing the upgrade, you decide that everything is OK and you start upgrading the configured master unit.
After an hour you start observing some service failures. In this case, it will be a lot more difficult to downgrade, since all nodes have already been upgraded.
In that respect, first upgrading the master node is the best option, as it will allow you to conduct thorough and lengthier tests. Upgrading the configured slave unit later will have no impact on the production environment.
Update Scenarios
Assuming a default cluster state where the configured master is also the running master and the configured slave is also the running slave, there are 3 possible update scenarios:
- You can update the configured master unit first (recommended).
- You can update the configured slave unit first.
- You can shut down the configured slave unit and then update the configured master unit.
There are things to consider for each scenario, which are explained in the following sections.
Updating the Master Unit First
Follow this procedure if you want to to fall back on the slave unit in case of an upgrade failure. This is also the recommended procedure.
Things to consider
Since all AXS Guard services are running on the running master unit, you will be able to test everything after the update, but be aware that this procedure also has an immediate impact on the production environment.
In case of a problem or failure, log in to the running slave unit and trigger a failover (navigate to System > Tools and select Make myself running master).
Procedure
- Check if the update package is available on the master and the slave unit.
- Reboot the running slave unit & wait until the HA cluster is fully in sync.
- Update the running master unit. The system will reboot itself after the update.
- Wait until the system is fully up and running, then test and verify your configuration.
If everything went as expected:
- Update the running slave unit.
- Reboot the running slave unit.
- Make the slave unit the 'running master' by triggering a failover (navigate to System > Tools and select
Make myself running master). - Test and verify your configuration.
- Trigger a failover again to change the configuration back to its original state.
If something went wrong:
- Make the configured slave unit the running master by using the 'make myself the running master' button or by shutting down the configured master unit. (if needed, also reboot the configured slave unit).
- Test and verify your configuration
- Contact Able support.
Updating the Slave Unit First
This update procedure allows you to fall back on the configured master unit in case of a failure on the slave unit. Follow this procedure if you are experiencing performance issues on the slave unit.
Things to consider
In this scenario, the master unit is not at all impacted and tests can be performed on the configured slave unit.
The disadvantage is that you won't be able to test much on the slave unit, as most services are running on the running master.
As a workaround, you can trigger a failover on the configured slave unit, so that it temporarily becomes the running master, allowing you to perform your tests.
In case of a problem or failure on the configured slave unit, simply reboot the unit or power it off. This will change the state on the configured master, which will again assume its role as running master.
Procedure
- Check if the update package is available on the master and the slave unit.
- Update the configured slave.
- Reboot the configured slave unit & wait until the HA cluster is fully in sync.
- Trigger a failover on the configured slave unit by logging in to its web-based administration tool, then navigate to System > Tools and select
Make myself running master. - Test and verify your system configuration.
If everything went as expected:
- Update the configured master unit.
- Reboot the configured master unit, which will take over services from the configured slave unit.
- Test and verify your system configuration.
If something went wrong:
- Reboot the configured slave unit or power it off.
- Test your configuration.
- Contact Able support.
Shutting down the Slave Unit to upgrade the Master Unit
Follow this procedure if you want to fall back on the configured slave unit ASAP in case of a critical failure and if your wish to reduce downtime. This procedure speeds up the failover process, which can take a lot of time when all HA nodes are powered on.
Things to consider
When upgrading the master unit, it will reboot to start the update process. The following happens when upgrading a master unit while a slave unit is still available (default scenario):
- The configured master unit will stop all services and waits for the slave unit to take over operations.
- The configured slave unit takes over all services normally provided by the master unit.
- The configured master unit upgrades itself.
- The configured master then reboots, using the new software version.
- The configured slave unit stops all its services.
- The upgraded master unit takes over all services from the slave unit and resumes operations.
A disadvantage of following the regular upgrade procedure, i.e. with a running slave unit, is that a failover will occur twice. In some instances, these failovers can take a lot of time.
To avoid these failovers and gain time, you can shut down the running slave unit.
- Pro: The upgrade process on the running master unit will be considerably faster.
- Con: All services will be offline for the duration of the upgrade process, while this is not the case with a running slave unit (services will only be briefly offline, i.e. while the failover is occurring).
Procedures
- Check if the update package is available on the master and the slave unit.
- Shut down the running slave unit & wait until the system is completely shut down.
- Update the running master unit. The system will reboot itself after installing the updates.
- Test and verify your configuration.
If everything went as expected:
- Turn on the slave unit.
- Update the running slave unit. The unit will automatically reboot after it is updated.
- Trigger a failover on the running slave unit (navigate to System > Tools and select
Make myself running master). - Test and verify your configuration.
- Trigger a failover again to change the configuration back to its original state.
If something went wrong:
There are several recovery options if you encounter difficulties:
Option A
Warning
Please consider that data and configuration settings may already have changed. It is therefore possible that certain services will no longer be able to start or function correctly. In case of any doubt please contact Able support.
- Power on the configured slave unit.
- Wait until the configured slave is up & running.
- Trigger a failover by using the 'make myself running master' button.
Option B
Warning
Please consider that data and configuration settings may already have changed. It is therefore possible that certain services will no longer be able to start or function correctly. In case of any doubt please contact Able support.
- Power on the configured slave unit.
- Wait until the configured slave unit is up & running.
- Power off the configured master unit.
Option C
Warning
The configured slave unit will automatically assume the running master role. This method will always work. However, you might inadvertently introduce a split-brain situation and a small amount of data loss might occur. In case of any doubt please contact Able support.
- Shut down or power off the configured master unit.
- Wait until the configured master is completely shut down or powered off.
- Power on the configured slave unit.
Support
If you encounter a problem
If you encounter a problem with AXS Guard, follow the steps below:
-
Check the troubleshooting section of the feature-specific manual.
-
Check the knowledge base on this site for information about special configurations.
-
If no solution is available in any of the above sources, contact your AXS Guard vendor.
Contact Information
(+32) 15-504-400
support@axsguard.com