AXS Guard Remote Workspace
About Remote Workspace
AXS Guard Remote Workplace is a very simple and straightforward secure solution to take over your desktop from a remote location through a modern browser like Chrome, Firefox, Safari and Edge.
AXS Guard Remote Workspace configuration and management is limited to:
- Defining the remote workstations and applications
- Defining which AXS Guard users have access to the defined applications and workstations
Optionally, but recommended, is the use of strong authentication. The authentication policies are defined and enforced via AXS Guard.
This document is aimed for the AXS Guard administrator and outlines the architecture and configuration.
Recommendations for optimal performance
For best performance and user experience, the following conditions should be met:
- A low-latency Internet connection of 25 Mbps or more on AXS Guard (upload bandwidth).
- Between 1 and 2 Mbps extra upload bandwidth per user.
- RDP or Terminal Server, version 2016 or newer (older versions also work, but are known to have an impact on performance and user experience).
Architecture and user experience
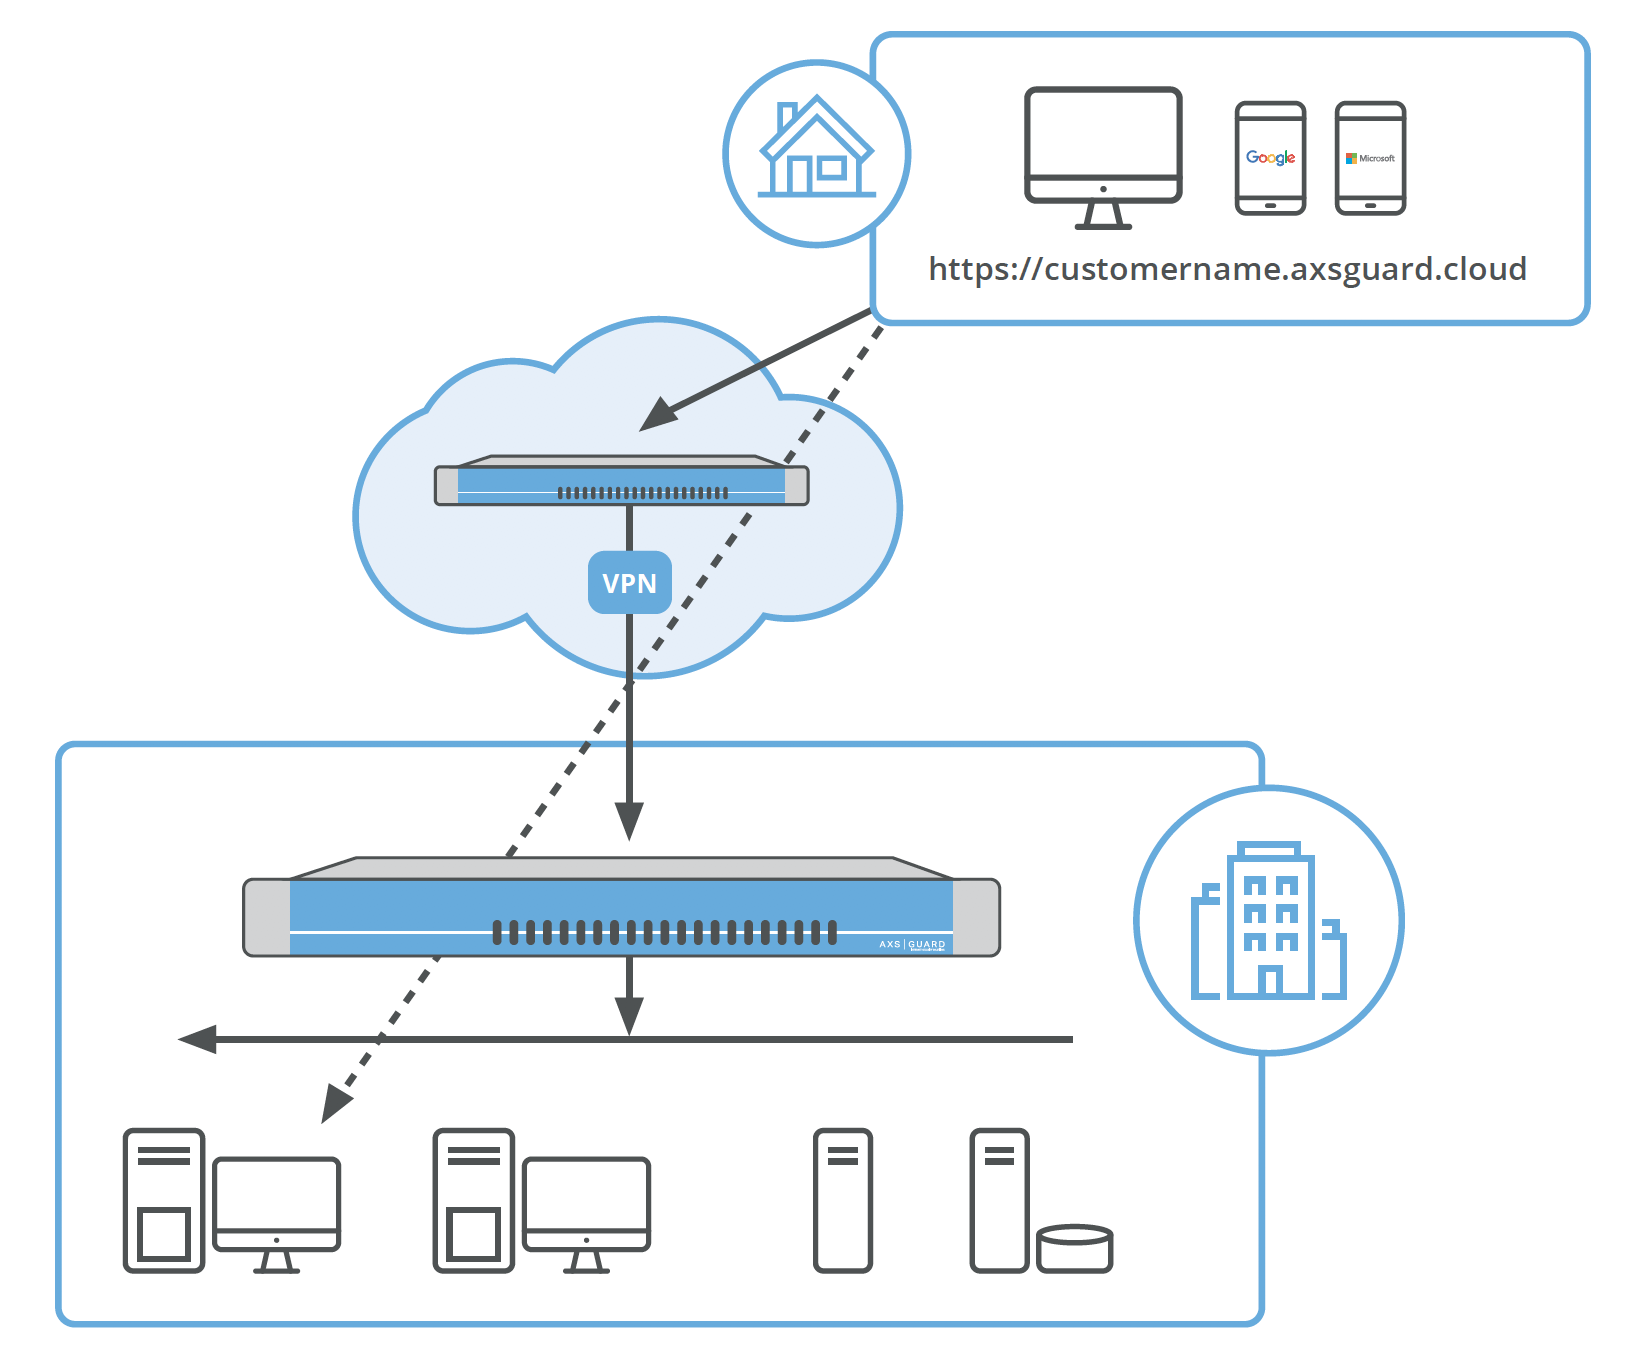
The user can use any modern browser (Chrome, Firefox, Safari or Edge) to browse towards a special secured url (HTTPS) that is configured as part of the initial setup. Typically this is https://
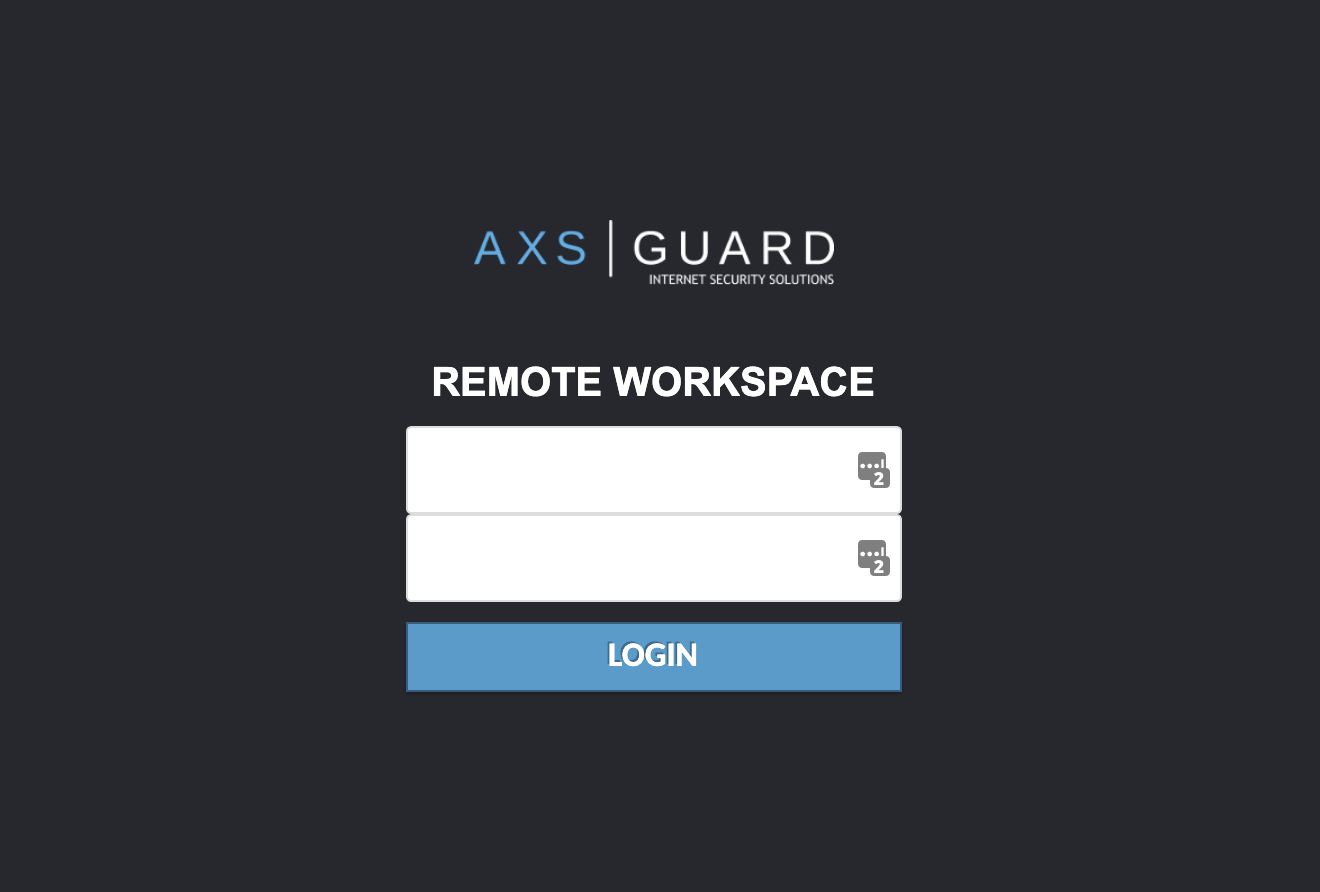
The user is prompted to authenticate after which an overview appears of the defined “connections”. Connections are either remote workstations or remote applications.
Once you have successfully logged in, you will be taken to either the AXS Guard Remote Workplace home screen, where all available connections are listed, or directly to a connection, if you only have access to one connection.
The home screen will contain a list of all connections to which you have access, along with thumbnails of any recently used or active connections. If you have access to a large number of connections and wish to quickly locate a specific connection, you can also enter search terms within the "Filter" field to filter the list of connections by name.
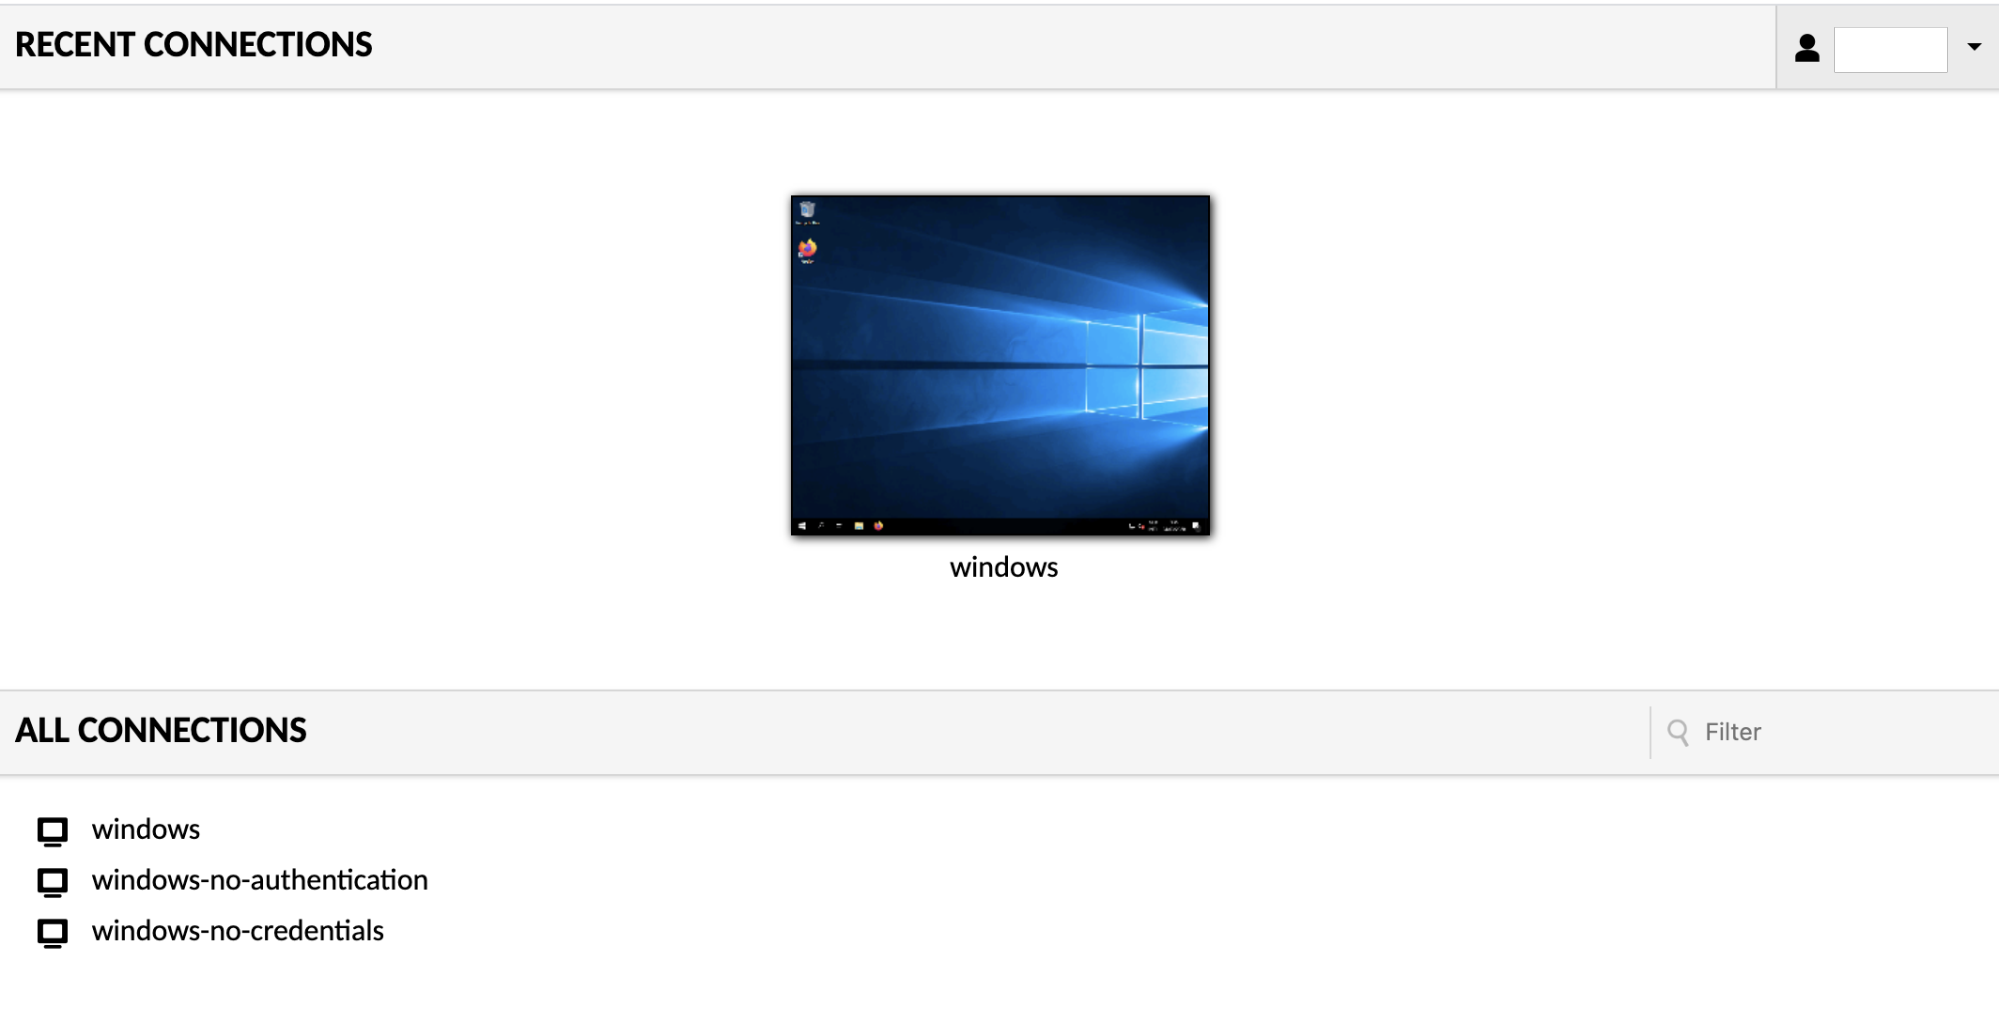
Clicking on any connection will open that connection within the current window or tab, but multiple connections can be used simultaneously. You can easily navigate back to the home screen without disconnecting by using your browsers back button or the "Home" button in the AXS Guard Remote Workspace menu. Each connection you use will remain active until explicitly disconnected, or until you navigate away from AXS Guard Remote Workspace entirely. Active connections can be seen as thumbnails updating in real-time on the home screen
User menu
With the exception of the client screen discussed below, AXS Guard Remote Workspace screens contain a menu in the upper-right corner called the "user menu". This menu displays your username and contains several options which depend on your user's level of access:
Home
Navigates back to the home screen, if you are not already there. If you only have access to one connection, this will be replaced with a link to that connection.
Settings
Navigates to the settings interface, which provides access to user preferences such as display language. If you have access to administrative functions, those are found within the settings interface, as well, and are discussed in more detail in Chapter 16, Administration.
Logout
Logs out of AXS Guard Remote Workspace completely, closing all current connections and ending the AXS Guard Remote Workspace session.
Client screen
Once you open a connection, you will see a real-time view of the remote display. You can interact with this display just as you would your normal desktop. Your mouse and keyboard will function as if they were connected directly to the remote machine.
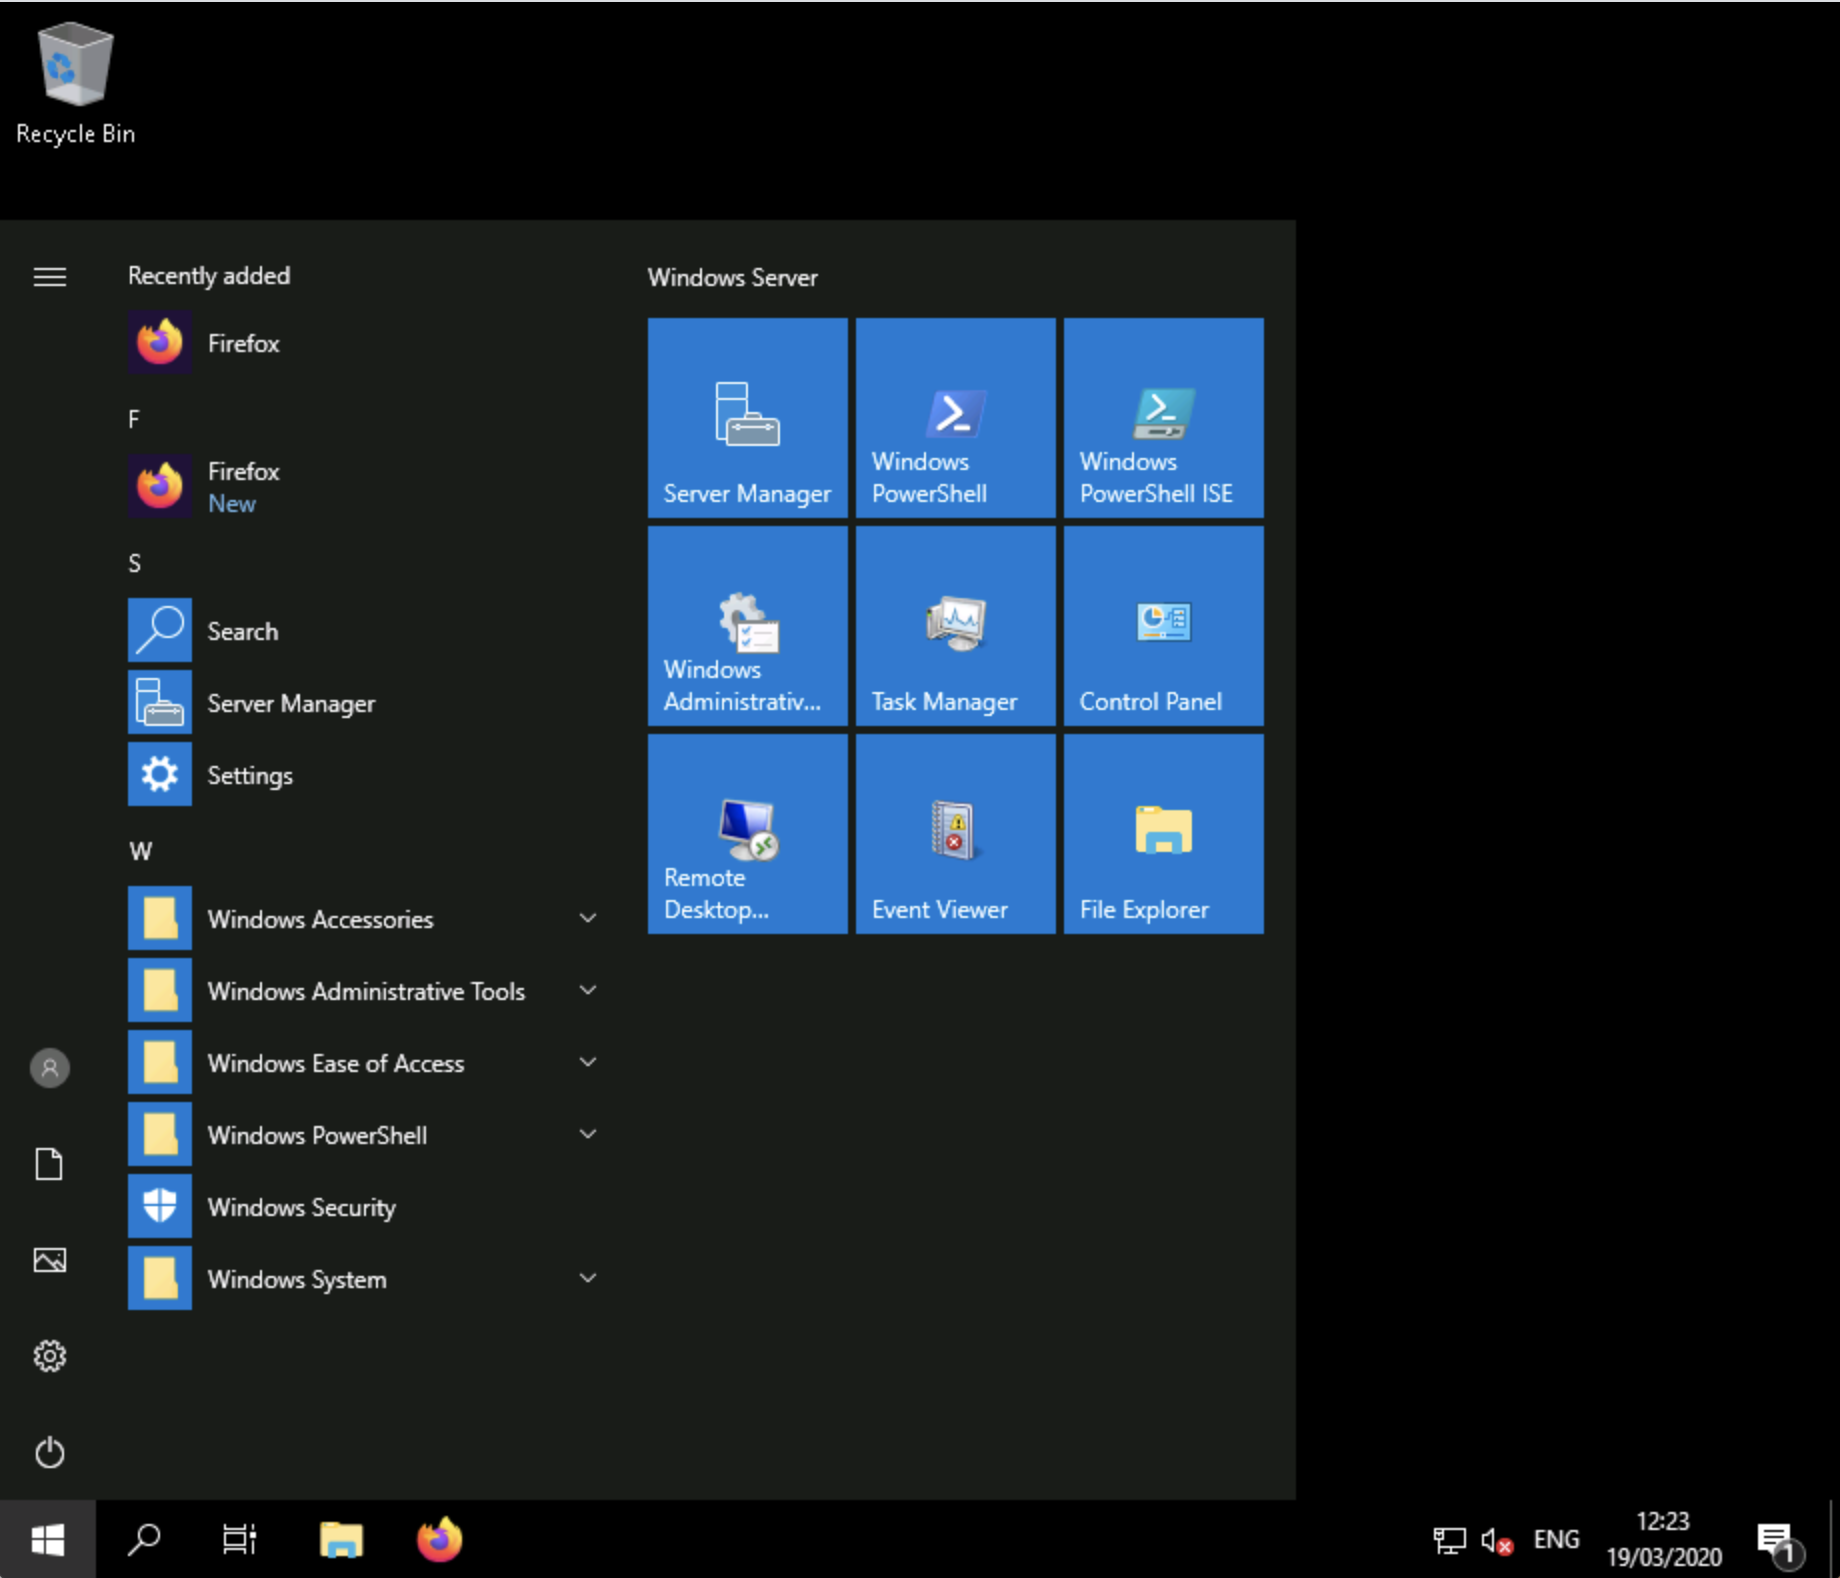
The remote display will take up the entire browser window, with no buttons or menus to disturb the view. With the intent of providing a seamless experience, options specific to remote desktop are hidden within the AXS Guard Remote Workspace menu, which can be opened as needed.
The AXS Guard Remote Workspace menu
The AXS Guard Remote Workspace menu is a sidebar which is hidden until explicitly shown. On a desktop or other device which has a hardware keyboard, you can show this menu by pressing Ctrl+Alt+Shift. If you are using a mobile or touchscreen device that lacks a keyboard, you can also show the menu by swiping right from the left edge of the screen. To hide the menu, you press Ctrl+Alt+Shift again or swipe left across the screen.
The AXS Guard Remote Workspace menu provides options for:
- Navigating back to the home screen
- Sharing the current connection
- Reading from (and writing to) the clipboard of the remote desktop
- Uploading and downloading files
- Selecting alternative methods of typing or controlling the mouse, particularly for use on mobile or touchscreen devices
- Zooming in and out of the remote display
- Disconnecting from the current connection entirely
Sharing the connection
If the AXS Guard Remote Workspace server is configured to allow connection sharing, and you have been granted permission to share the current connection, an additional "Share" menu will appear next to your username in the AXS Guard Remote Workspace menu. Clicking on this menu opens a list of options for sharing the current connection.

Clicking any of the options within the "Share" menu will immediately generate a unique share link which can be distributed to anyone, even to users which do not otherwise have accounts within the same AXS Guard Remote Workspace system.
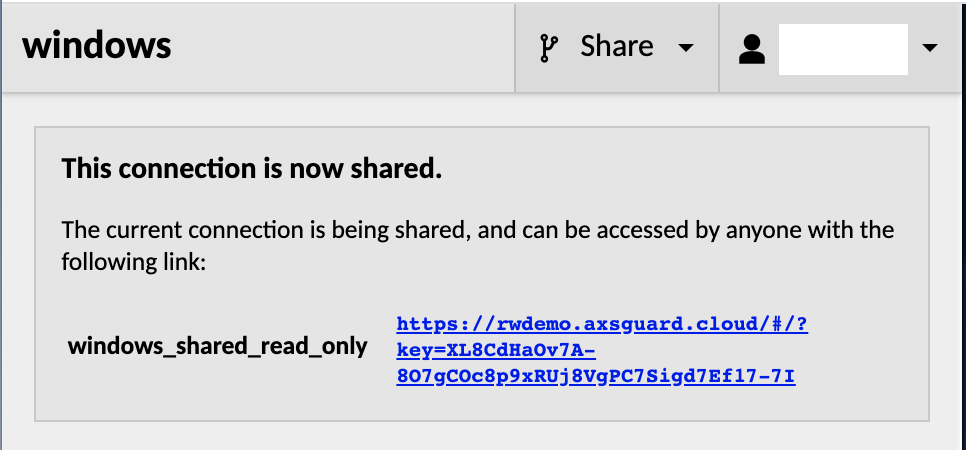
When the link is visited, that user will be given temporary access to your connection, restricted according to the sharing option chosen. This access, and the validity of the link overall, lasts only until you disconnect. Once the connection is closed, the link ceases to be valid, and any users sharing the connection with you will be disconnected.
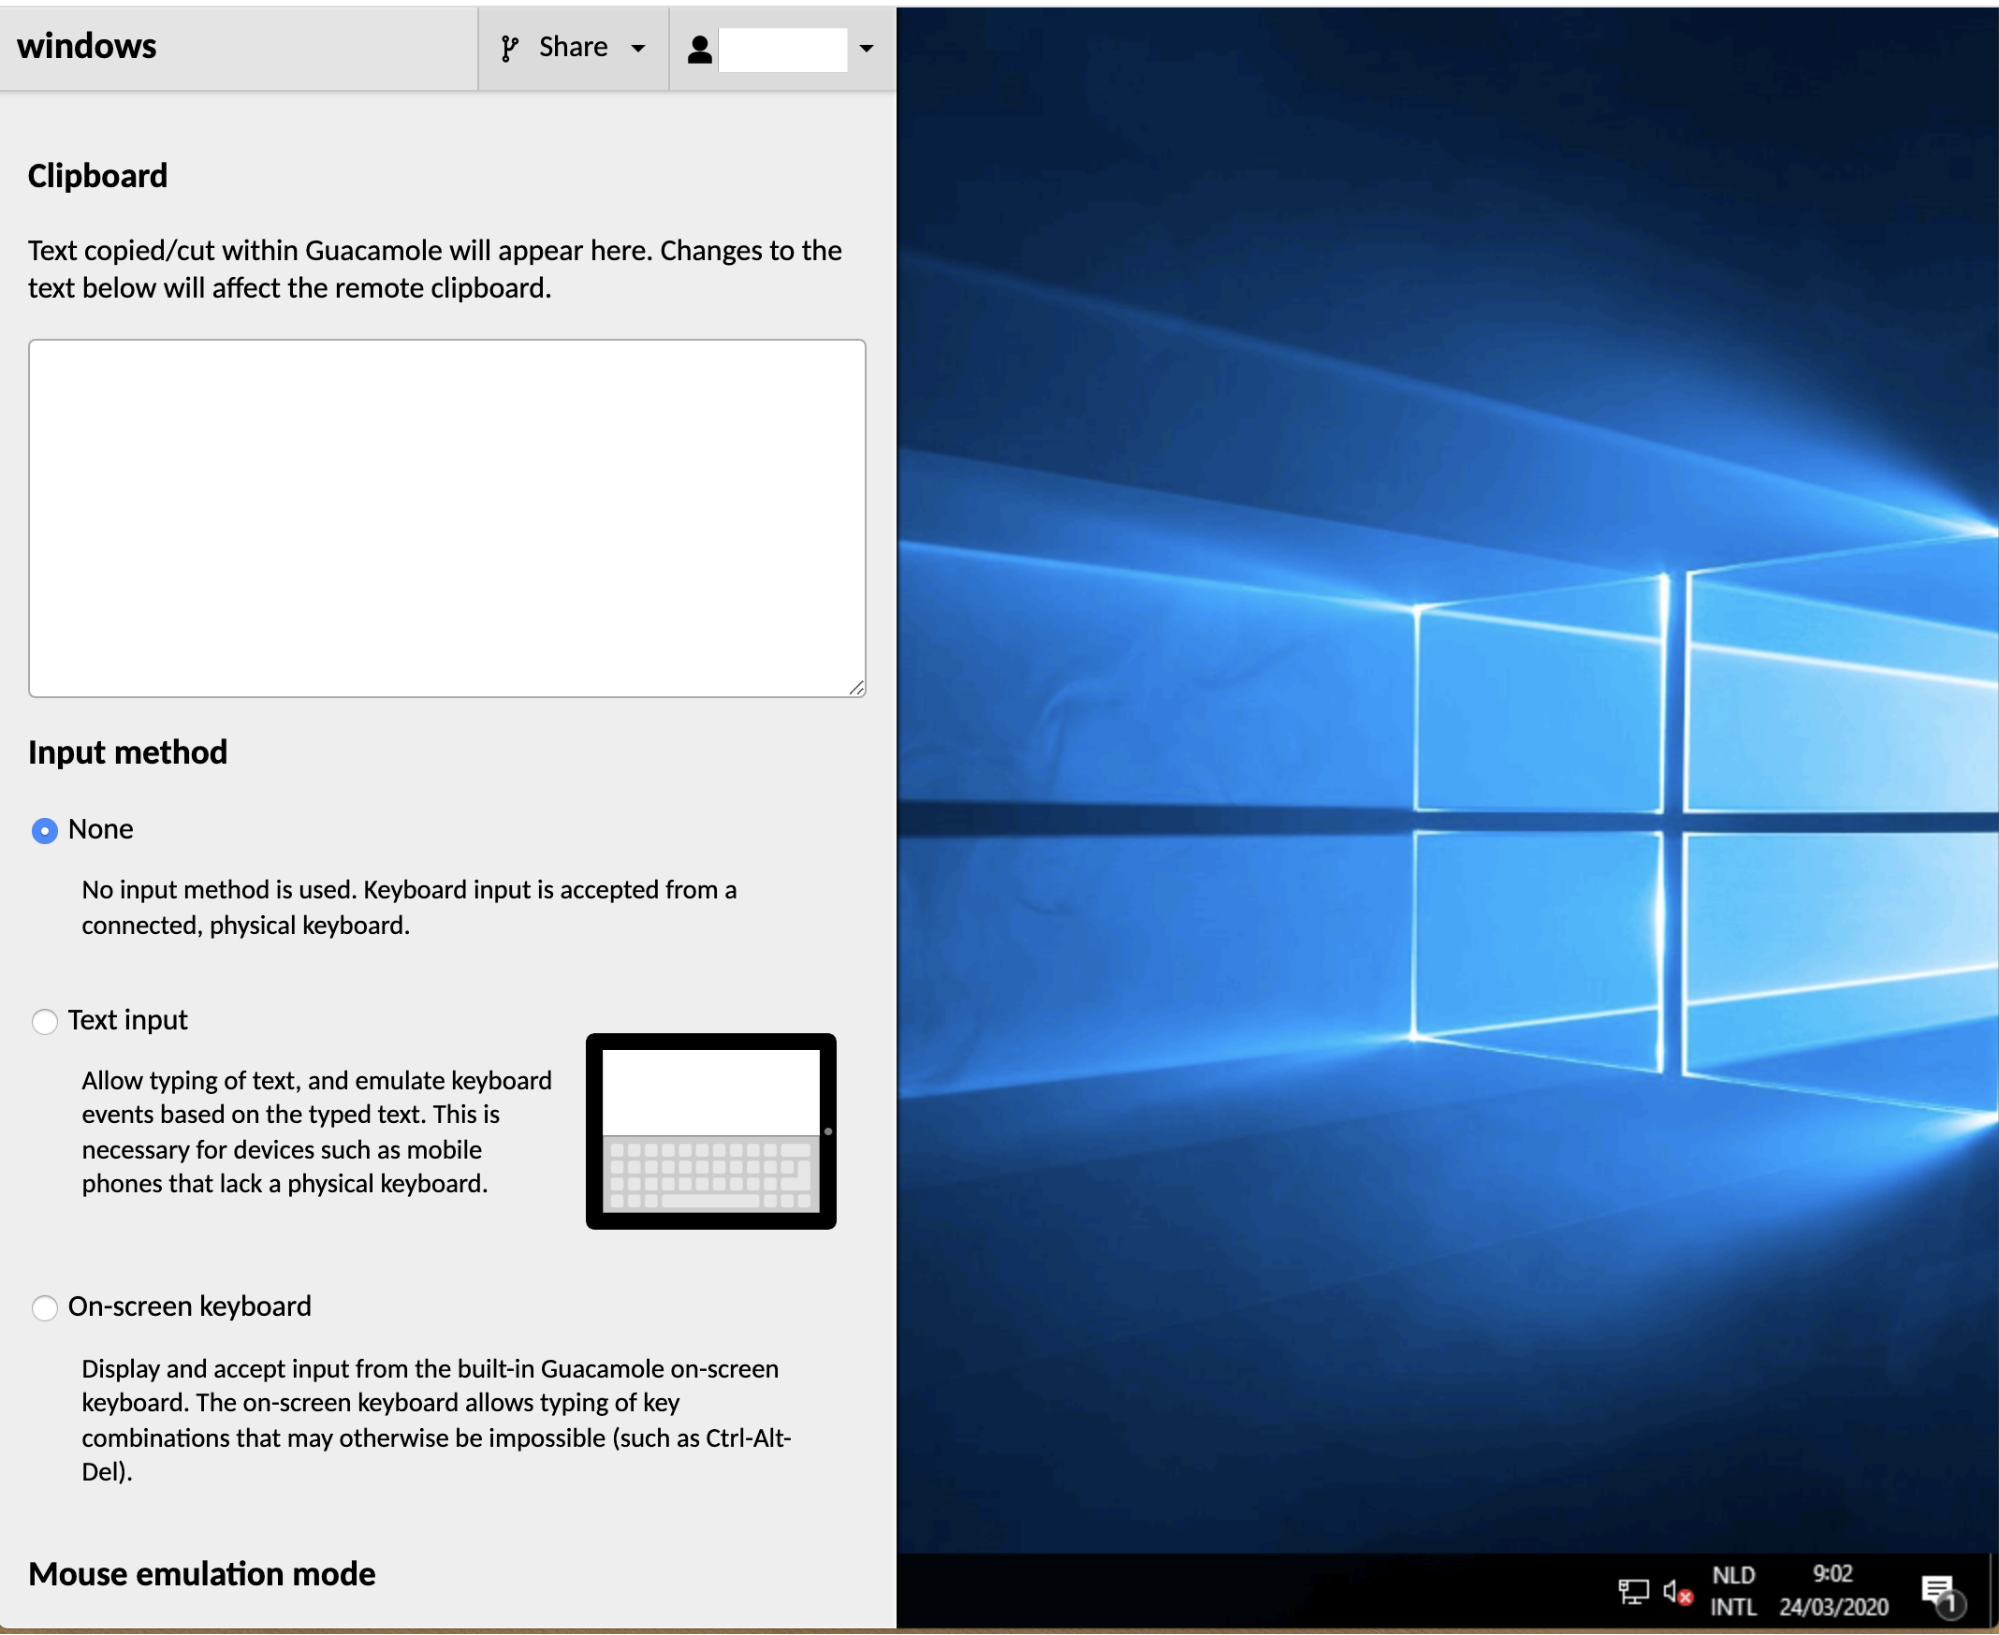
Copying & pasting text
At the top of the AXS Guard Remote Workspace menu is a text area labeled "clipboard" along with some basic instructions:
Text copied/cut within AXS Guard Remote Workspace will appear here. Changes to the text below will affect the remote clipboard.
The text area functions as an interface between the remote clipboard and the local clipboard. Text from the local clipboard can be pasted into the text area, causing that text to be sent to the clipboard of the remote desktop. Similarly, if you copy or cut text within the remote desktop, you will see that text within the text area, and can manually copy it into the local clipboard if desired.
Disconnecting and navigation
When you are done using the current connection, or you wish to navigate elsewhere temporarily, options to do so are within the user menu inside the AXS Guard Remote Workspace menu:
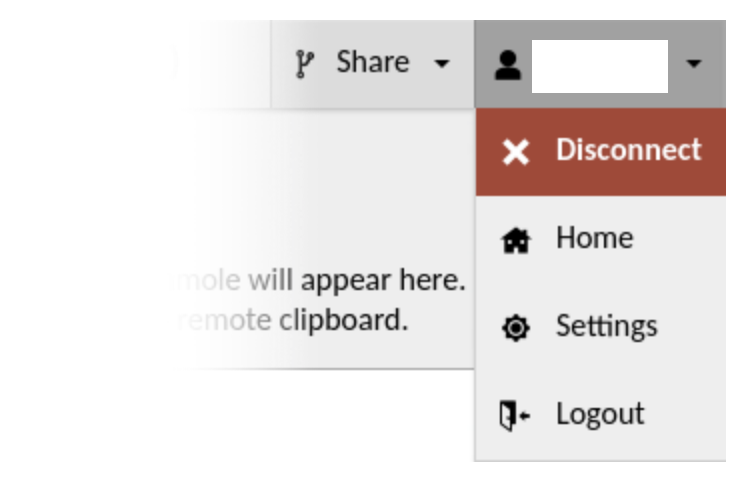
The user menu within the AXS Guard Remote Workspace menu.
The user menu within the AXS Guard Remote Workspace menu provides an additional "Disconnect" option that allows you to explicitly close the current connection only. Clicking "Logout" will also implicitly disconnect all active connections, including the current connection.
Navigating back to the home screen or to the settings screen will not disconnect you: your connection will continue running in the background while you change settings or initiate another connection, and you can resume any active connection by clicking on it within the home screen.
On-screen keyboard
Certain key combinations are impossible to press within a web application like AXS Guard Remote Workspace because they are reserved by the operating system (Ctrl+Alt+Del or Alt+Tab, for example) or by the web browser. If you press one of these reserved combinations, the effect will be observed locally, not remotely, and the remote desktop will receive only some of the keys.
AXS Guard Remote Workspace provides its own, built-in on-screen keyboard which allows keys to be sent to the remote desktop without affecting the local system. If the device you're using does not have certain keys which the remote desktop depends on, such as the arrow keys or Ctrl, you can use the on-screen keyboard for this, too. You can show the on-screen keyboard by selecting the "On-screen keyboard" option from the menu.
Clicking (or tapping) the buttons of the on-screen keyboard has the same effect as pressing the same buttons on a real keyboard, except that the operating system and browser will not intercept these keypresses; they will only be sent to the remote desktop.
Scaling the display
AXS Guard Remote Workspace will default to shrinking or expanding the remote display to fit the browser window exactly, but this is not necessarily ideal. If the remote display is much larger than your local display, the screen may be impossible to see or interact with. This is especially true for mobile phones, whose screens need to be small enough to fit in the average hand.
You can scale the display on touch devices by using the familiar pinch gesture. Place two fingers on the screen and bring them closer together to zoom out or further apart to zoom in.
If your device lacks a touch screen, you can also control the zoom level through the menu. The controls for zooming in and out are located at the bottom of the menu. The current zoom level is displayed between two "-" and "+" buttons which control the zoom level in 10% increments.
Mobile & touch devices
AXS Guard Remote Workspace is designed to work equally well across all HTML5 browsers, including those of mobile devices. It will automatically handle input from a touch screen or a traditional mouse (or both, if you happen to have such a gifted computer), and provides alternative input methods for devices which lack a physical keyboard.
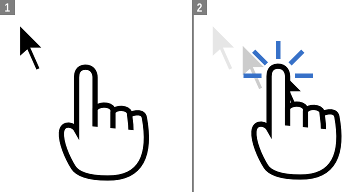
Mouse emulation
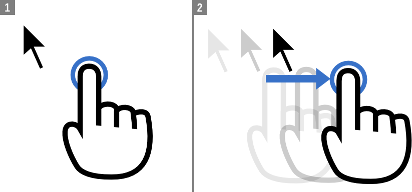
In the case that your device has a touchscreen and lacks a mouse, AXS Guard Remote Workspace will emulate a mouse for the sake of interacting with remote desktops that expect mouse input. By default, AXS Guard Remote Workspace uses "absolute" mouse emulation. This means that the mouse pointer is positioned at the location of each tap on the screen.
In both absolute and relative modes, you can click-and-drag by tapping the screen and then quickly placing your finger back down. This gesture only causes the mouse button to press down, but does not release it again until you lift your finger back up.
Absolute mode (touchscreen)
Absolute mouse emulation is the default as it tends to be what people expect when using a touch device to interact with applications designed for mouse input.
Each tap on the screen is translated into a left-click at that position. Right-clicking is accomplished through pressing and holding your finger on the screen. If parts of the remote display are off-screen, you can drag your finger around the screen to pan the off-screen parts back into view.
Although absolute mouse emulation works generally well, a finger makes for a very inaccurate pointing device. To address this, AXS Guard Remote Workspace also provides "relative" mouse emulation. Relative mouse emulation provides a way to deal with the need for accurate pointer control, when a true pointer device is not present.
Relative mode (touchpad)
AXS Guard Remote Workspace's relative mouse emulation behaves similarly to the touchpad present on most modern laptops. You drag your finger across the display to move the mouse pointer, and tap the display to left-click. The pointer moves relative to the motion of your finger. Right-clicking is accomplished with a two-finger tap, and middle-clicking with a three-finger tap. The mouse scroll wheel can be operated by dragging two fingers up or down.
Because the relative mouse emulation reserves so many gestures for the different mouse buttons and actions, common touch gestures like panning and pinch-to-zoom will not work while relative mouse emulation is enabled. Instead, the screen will automatically pan to keep the mouse pointer in view, and you can zoom through the buttons in the menu.
Typing without a physical keyboard
Many mobile devices lack a physical keyboard entirely, and instead provide their own on-screen keyboards. As these are not true keyboards per se and do not produce key presses, AXS Guard Remote Workspace's text input mode is required for typing on these platforms.
"Text input" allows input of keystrokes based on the input of text. Choosing "Text input" tells AXS Guard Remote Workspace to infer keystrokes by tracking text entered, rather than relying on actual key presses. AXS Guard Remote Workspace will instead determine the combination of keypresses necessary to produce the same pattern of input, including deletions.
If you wish to type via an IME (input method editor), such as those required for Chinese, Japanese, or Korean, text input mode is required for this as well. Such IMEs function through the explicit insertion of text and do not send traditional key presses. Using text input mode within AXS Guard Remote Workspace thus allows you to use a locally-installed IME, without requiring the IME to be installed on the remote desktop.
User preferences
User preferences can be changed within the settings screen. These preferences are stored locally within the browser, so if you use multiple computers to access AXS Guard Remote Workspace, you can have different settings for each location. The settings screen allows users to change the language of the AXS Guard Remote Workspace interface, to change the default input method used by AXS Guard Remote Workspace connections, and to change the default mouse emulation mode for if a touch device is used. If you have sufficient permissions, you may also change your password, or administer the system.
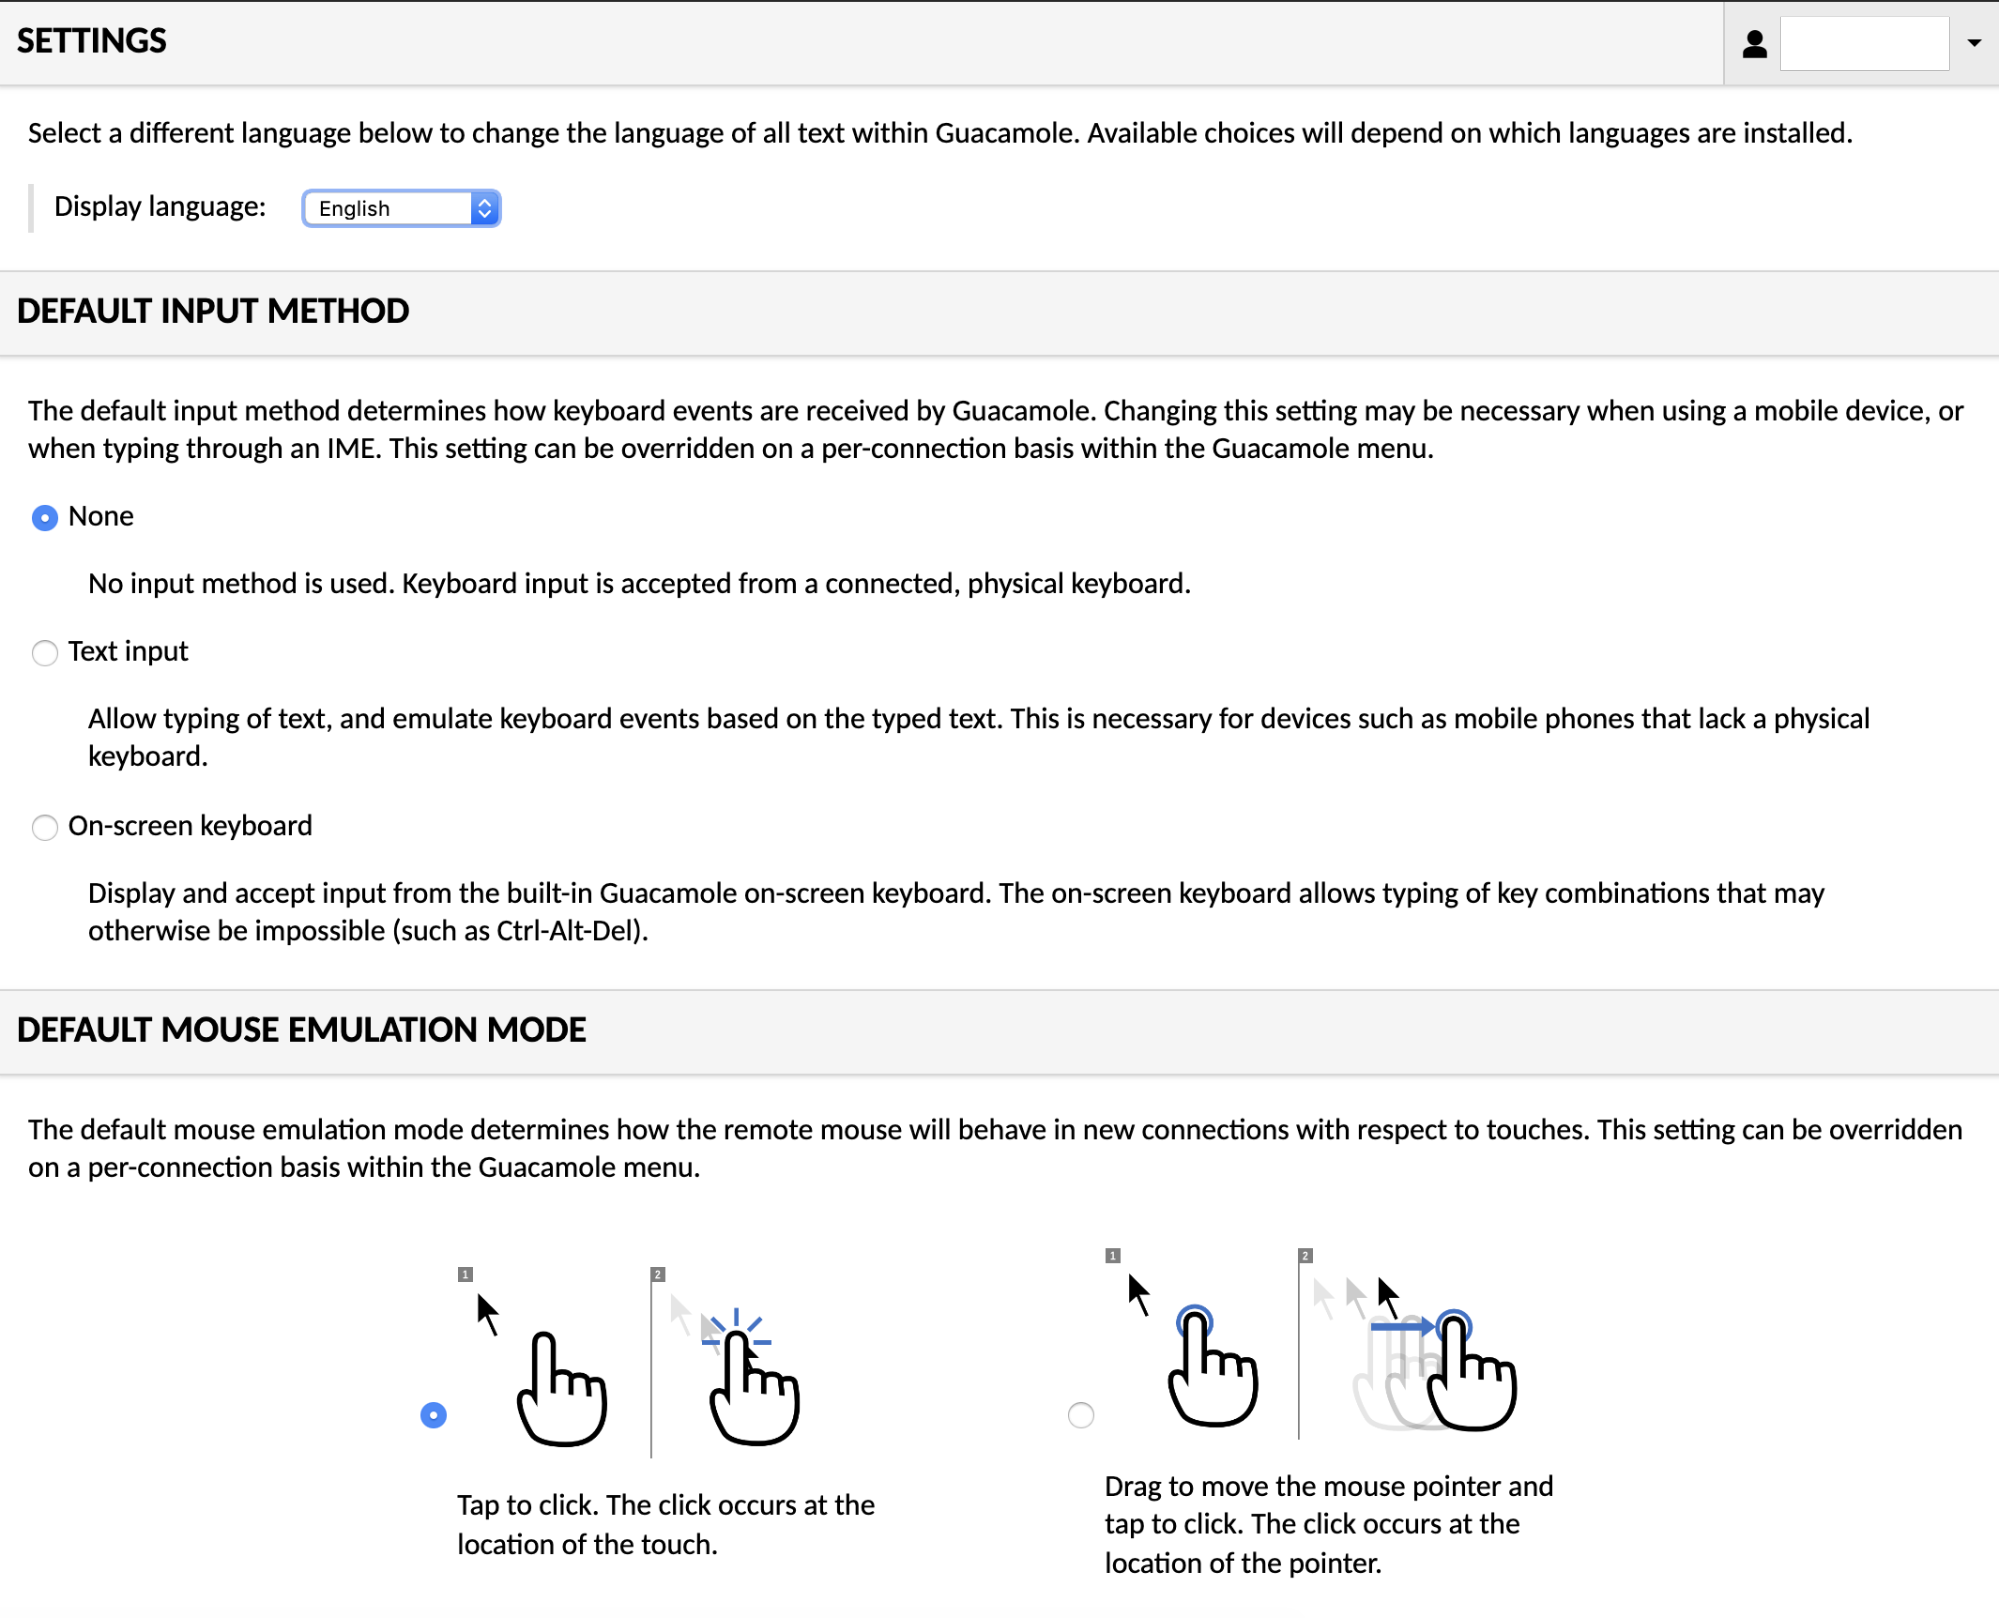
AXS Guard Remote Workspace preferences screen.
Display language
The AXS Guard Remote Workspace interface is currently available in English, Dutch, French, German, Italian, and Russian. By default, AXS Guard Remote Workspace will attempt to determine the appropriate display language by checking the language preferences of the browser in use. If this fails, or the browser is using a language not yet available within AXS Guard Remote Workspace, English will be used as a fallback.
If you wish to override the current display language, you can do so by selecting a different language within the "Display language" field. The change will take effect immediately.
Default input settings
AXS Guard Remote Workspace provides multiple keyboard input methods and multiple mouse emulation modes. Many of these settings are specifically useful for touch devices, while others are aimed mainly at traditional desktop use. By default, AXS Guard Remote Workspace will use the keyboard and mouse modes most commonly preferred by users, but you can change these defaults if they do not fit your tastes or your current device.
The choices available mirror those within the AXS Guard Remote Workspace menu discussed earlier in this chapter, and changing these settings will affect the default values selected within the AXS Guard Remote Workspace menu of future connections.
Important notes
AXS Guard Remote Workspace is integrated with your main AXS Guard and it is important to understand how the integration works and how the different sets of parameters interact. There are the following sets:
- Connections: the parameters related to the connection towards the different computers and applications. All these parameters are managed through the AXS Guard Remote Workplace GUI and do not interact with the AXS Guard parameters.
- Users: The usernames defined in AXS Guard Remote Workspace need to match 100% (case sensitive) with the usernames of AXS Guard. The password in AXS Guard Remote Workplace needs to remain empty (= not specified) and users should not be able to change/set their own passwords. Authentication is managed 100% by Authentication Policies on AXS Guard and usually include OATH or DIGIPASS one-time-passwords for security reasons.
- The applicable AXS Guard Authentication Policy is defined and mutually agreed on during the setup of AXS Guard Workplace.
- The AXS Guard Remote Workplace Group concept is separated from AXS Guard and is used to manage more efficiently the AXS Guard Remote Workplace Connections and Users, independent from the AXS Guard Users.
The most often used connection type towards a computer is RDP (Remote Desktop protocol). The connection parameters that fits best most use cases are:
-
Authentication
-
Security mode: either
-
NLA (Network Level Authentication) or
-
RDP Encryption
-
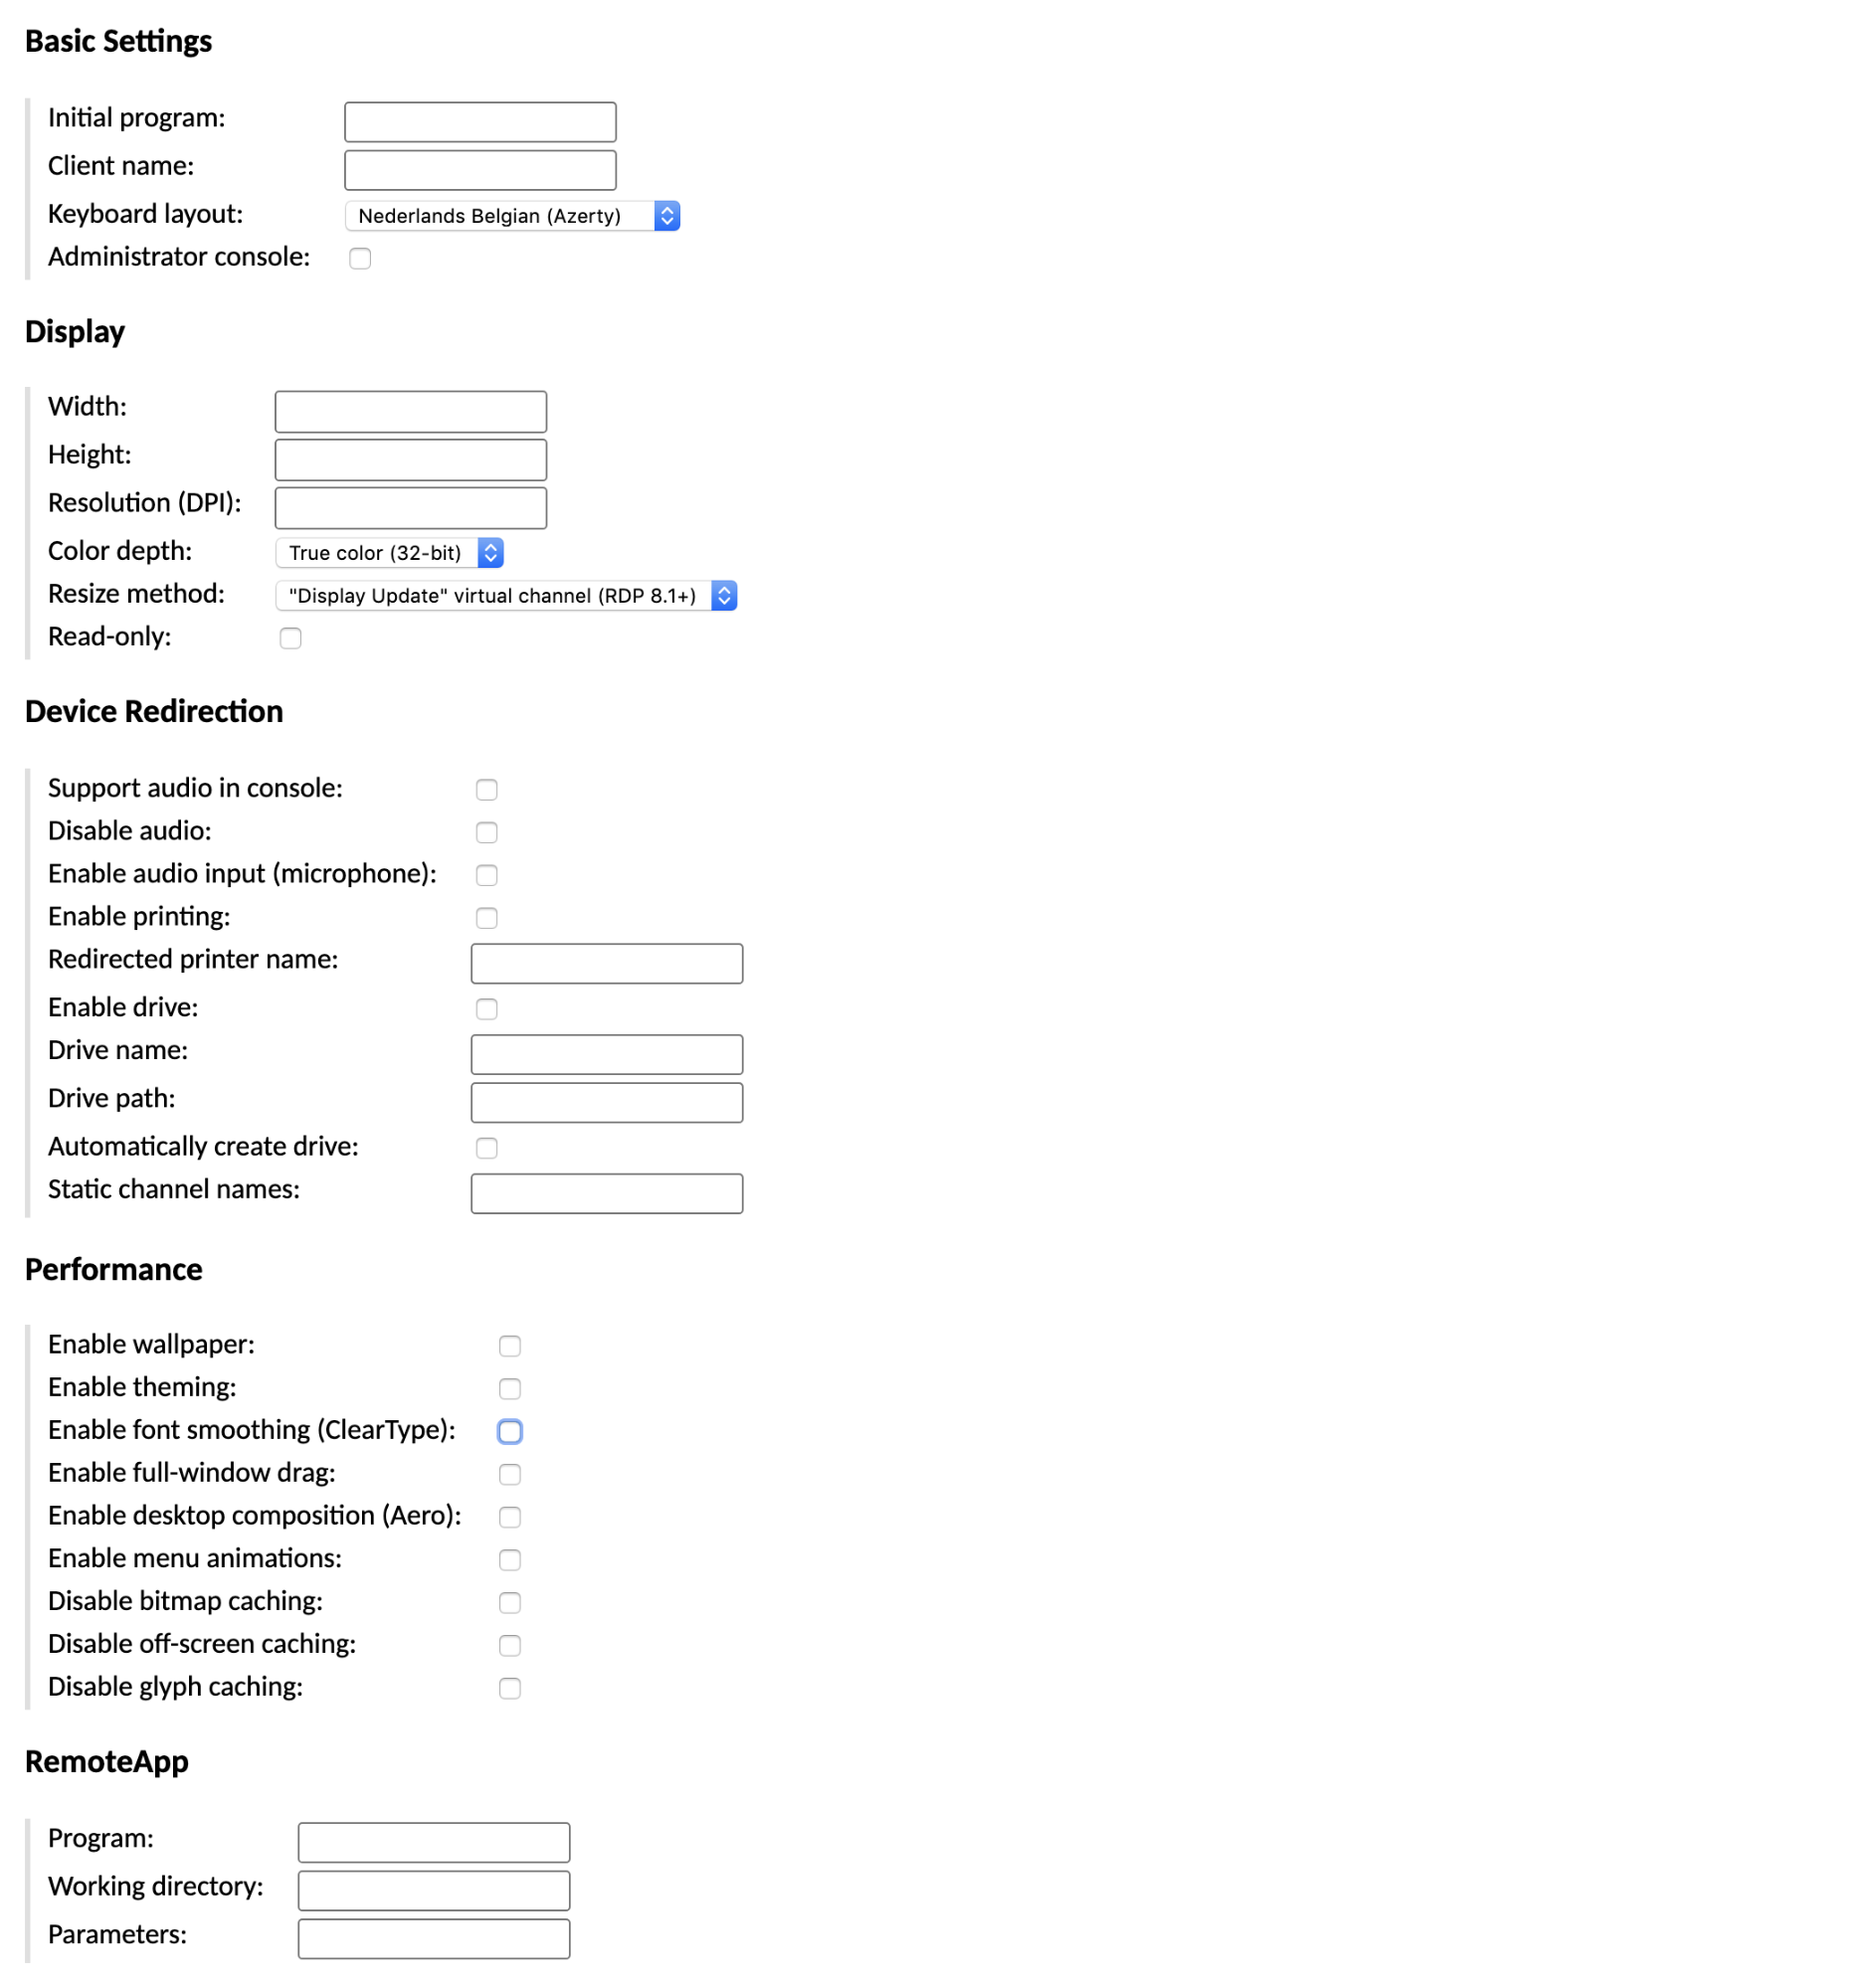
Basic Settings
-
Keyboard layout: Netherlands Belgian (Azerty)
-
Display
-
Color depth: True color (32-bit)
-
Resize method:
-
Newer RDP computers: Display Update virtual channel (RDP 8.1+)
- Old RDP computers: Reconnect
Administration
Users, user groups, connections, and active sessions can be administered from within the web interface. If you are logged in as a user with sufficient privileges, you will see management sections listed within the settings screen:

Sections within the AXS Guard Remote Workspace settings screen.
Clicking any of these options will take you to a corresponding management section where you can perform administrative tasks.
Managing sessions
Clicking "Active Sessions" navigates to the session management screen. The session management screen displays all active sessions and allows system administrators to kill them as needed.
When any user accesses a particular remote desktop connection, a unique session is created and will appear in the list of active sessions in the session management screen. Each active session is displayed in a sortable table, showing the corresponding user's username, how long the session has been active, the IP address of the machine from which the user is connecting, and the name of the connection being used.
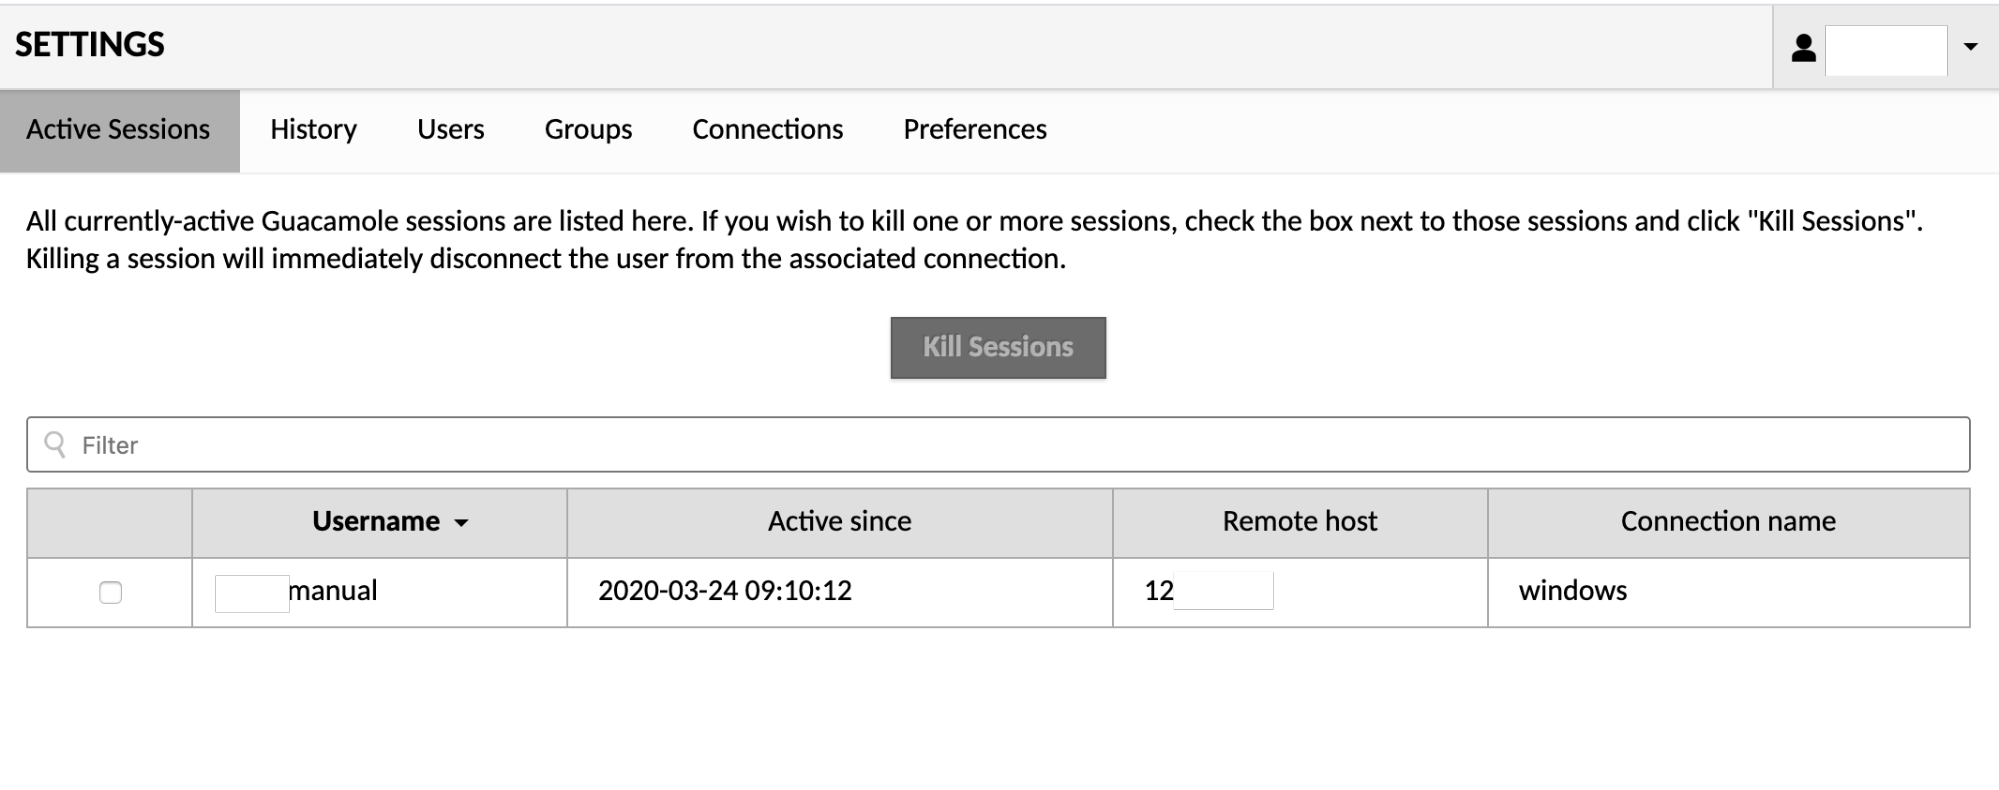
To kill one or more sessions, select the sessions by clicking their checkboxes. Once all desired sessions have been selected, clicking "Kill Sessions" will immediately disconnect those users from the associated connection.
Filtering and sorting
The table can be resorted by clicking on the column headers. Clicking any column will resort the table by the values within that column, while clicking a column which is already sorted will toggle between ascending and descending order.
The content of the table can be limited through search terms specified in the "Filter" field. Entering search terms will limit the table to only sessions containing those terms. For example, to list only connections by the user "guacadmin" which have been active since March, 2015, you would enter: "guacadmin 2015-03". Beware that if a search term needs to contain spaces, it must be enclosed in double quotes to avoid being interpreted as multiple terms.

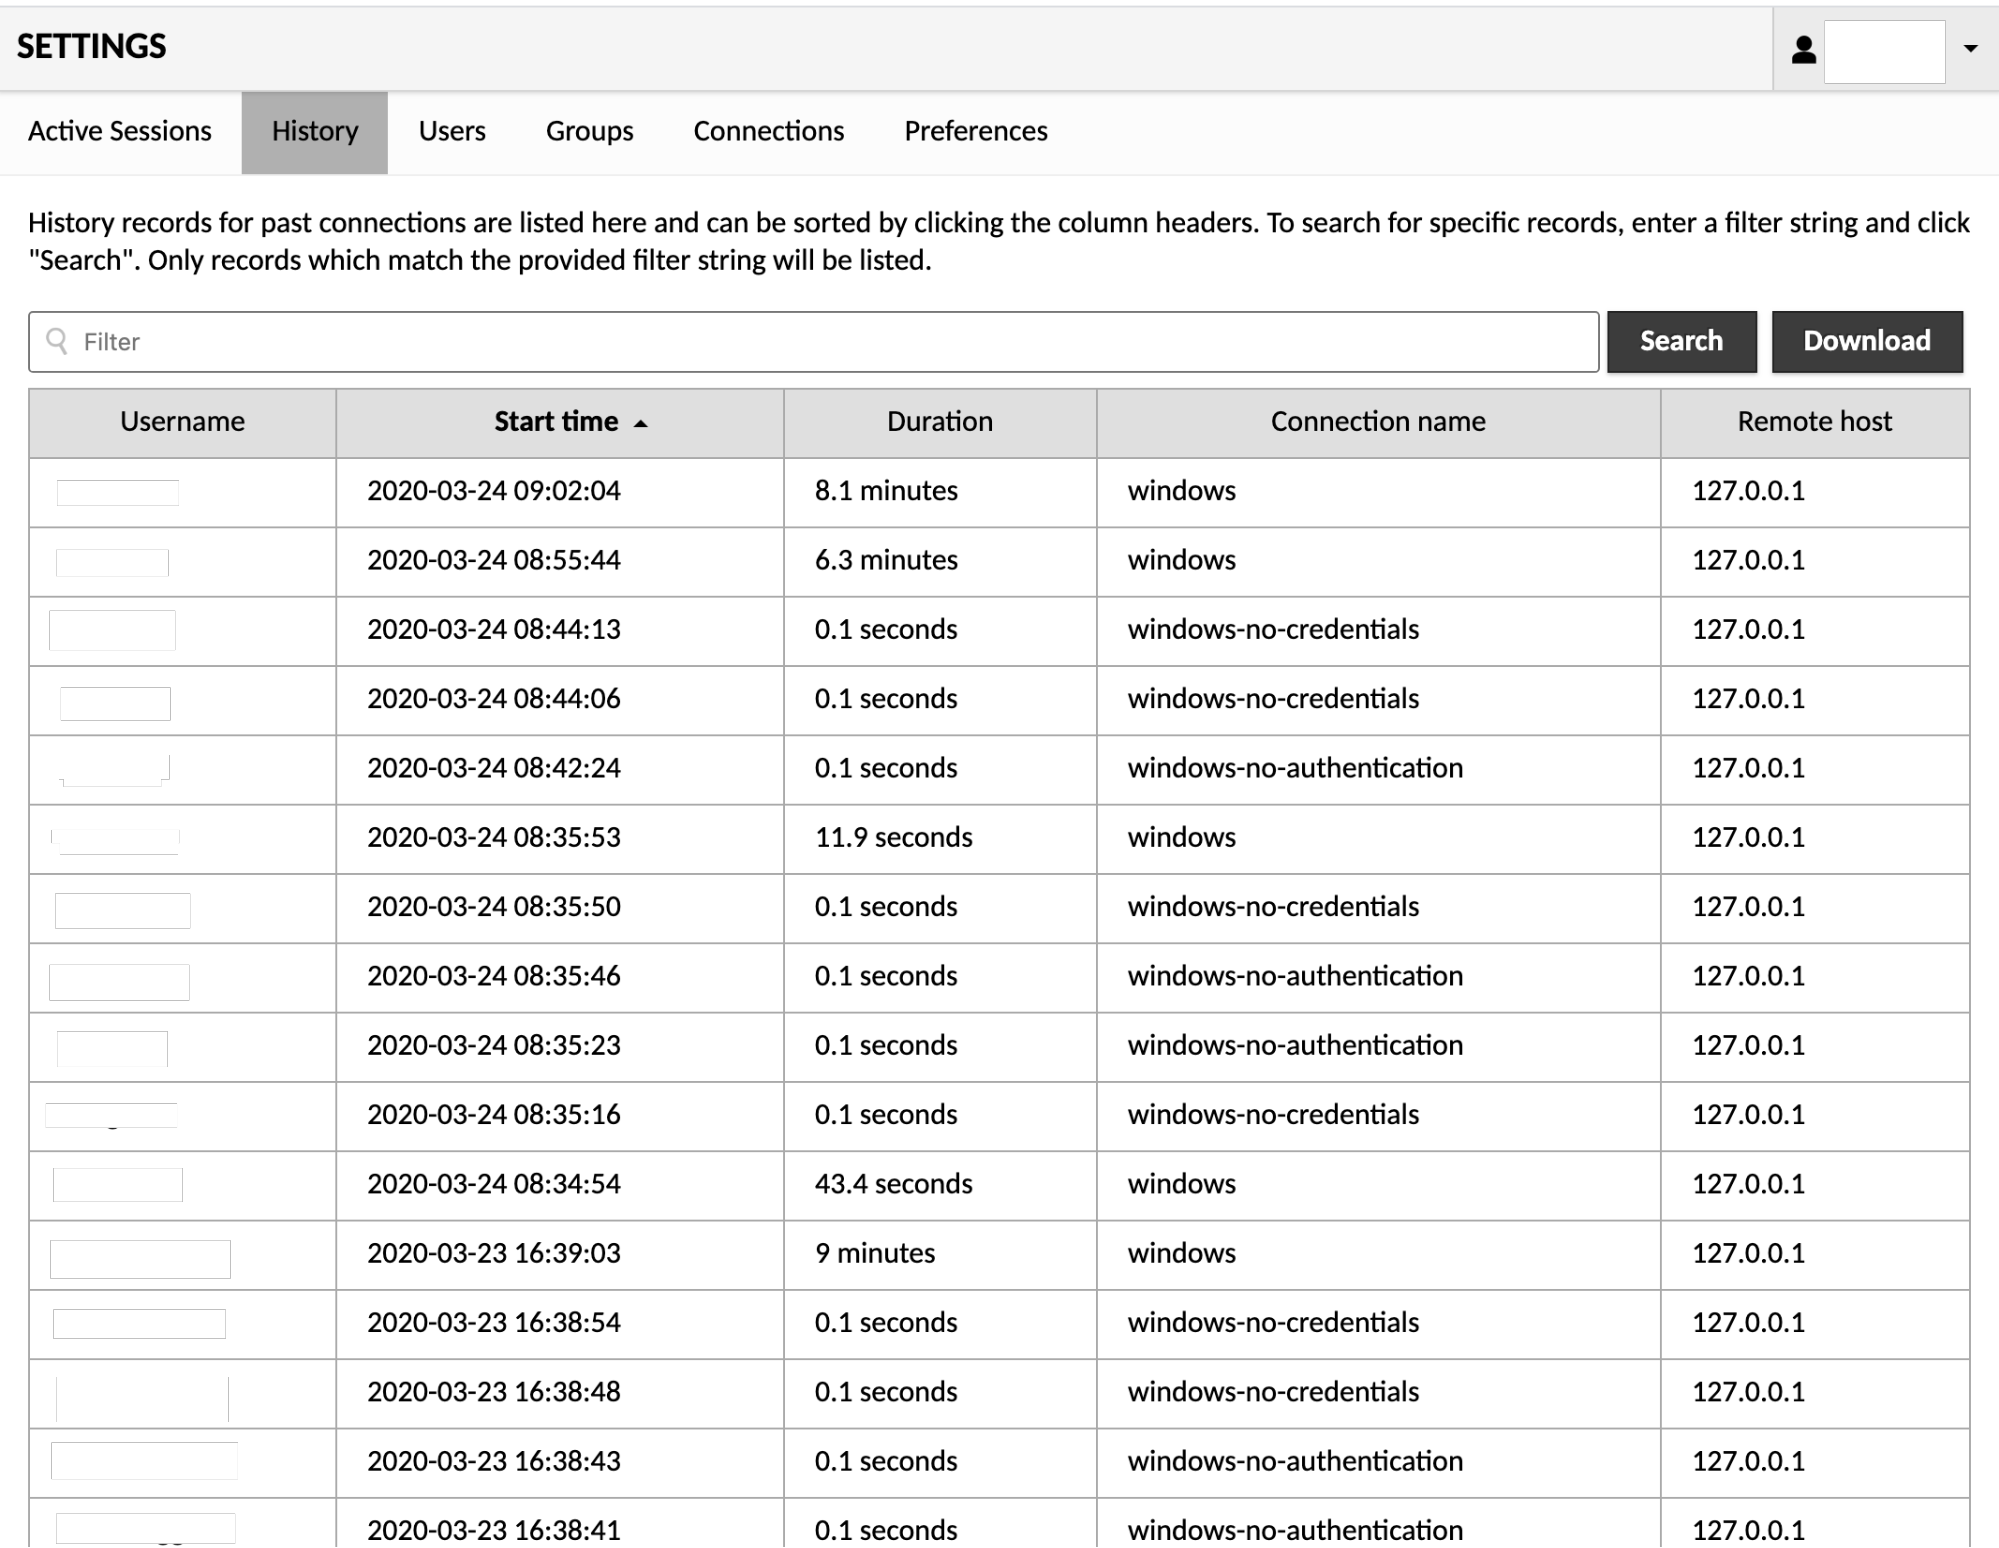
Connection history
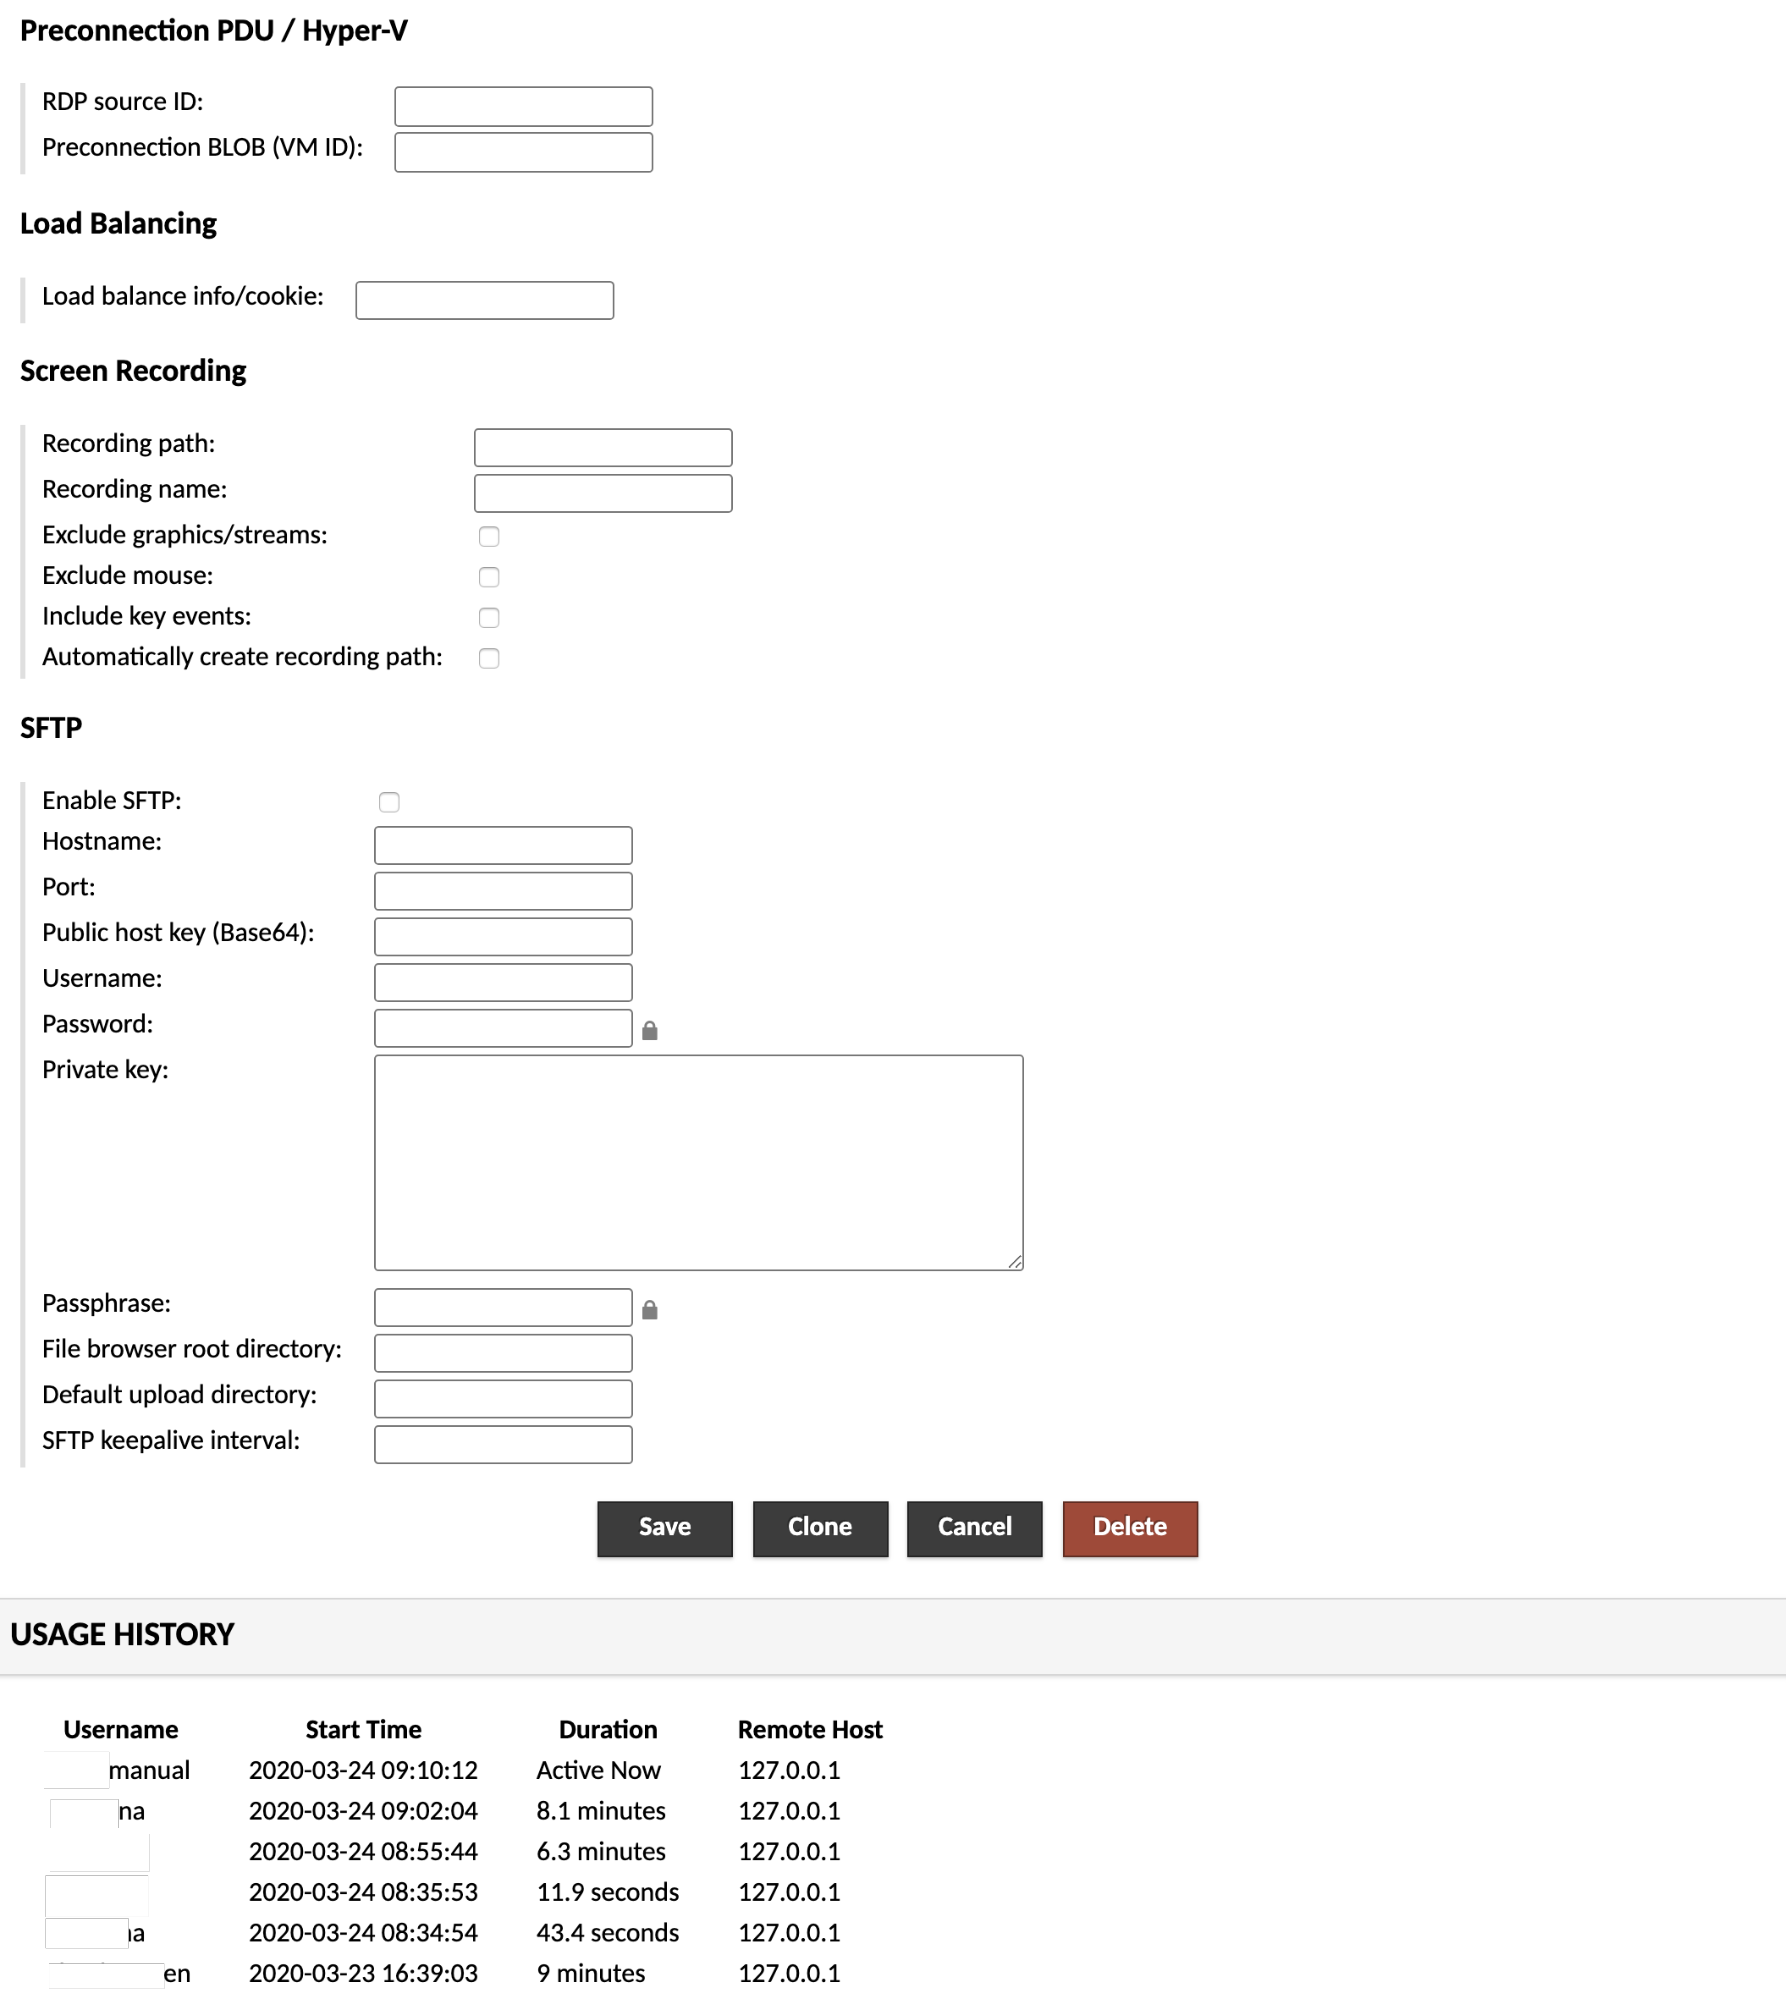
Clicking "History" navigates to the connection history screen. The connection history screen displays a table of the most recent connections, including the user that used that connection, the time the connection began, and how long the connection was used.
Filtering and sorting
Initially, the connection history table will display only the most recent history records. You can page through these records to see how and when AXS Guard Remote Workspace has been used.
Just as with the table of active sessions described earlier, the table of history records can be resorted by clicking on the column headers or filtered by entering search terms within the "Filter" field.
The same filtering format applies - a search term containing spaces must be enclosed in double quotes to avoid being interpreted as multiple terms, and only history records which contain each term will be included in the history table. Unlike the table of active sessions, however, the filter will only take effect once you click the "Search" button. This is due to the nature of the connection history, as the number of records may be quite extensive.
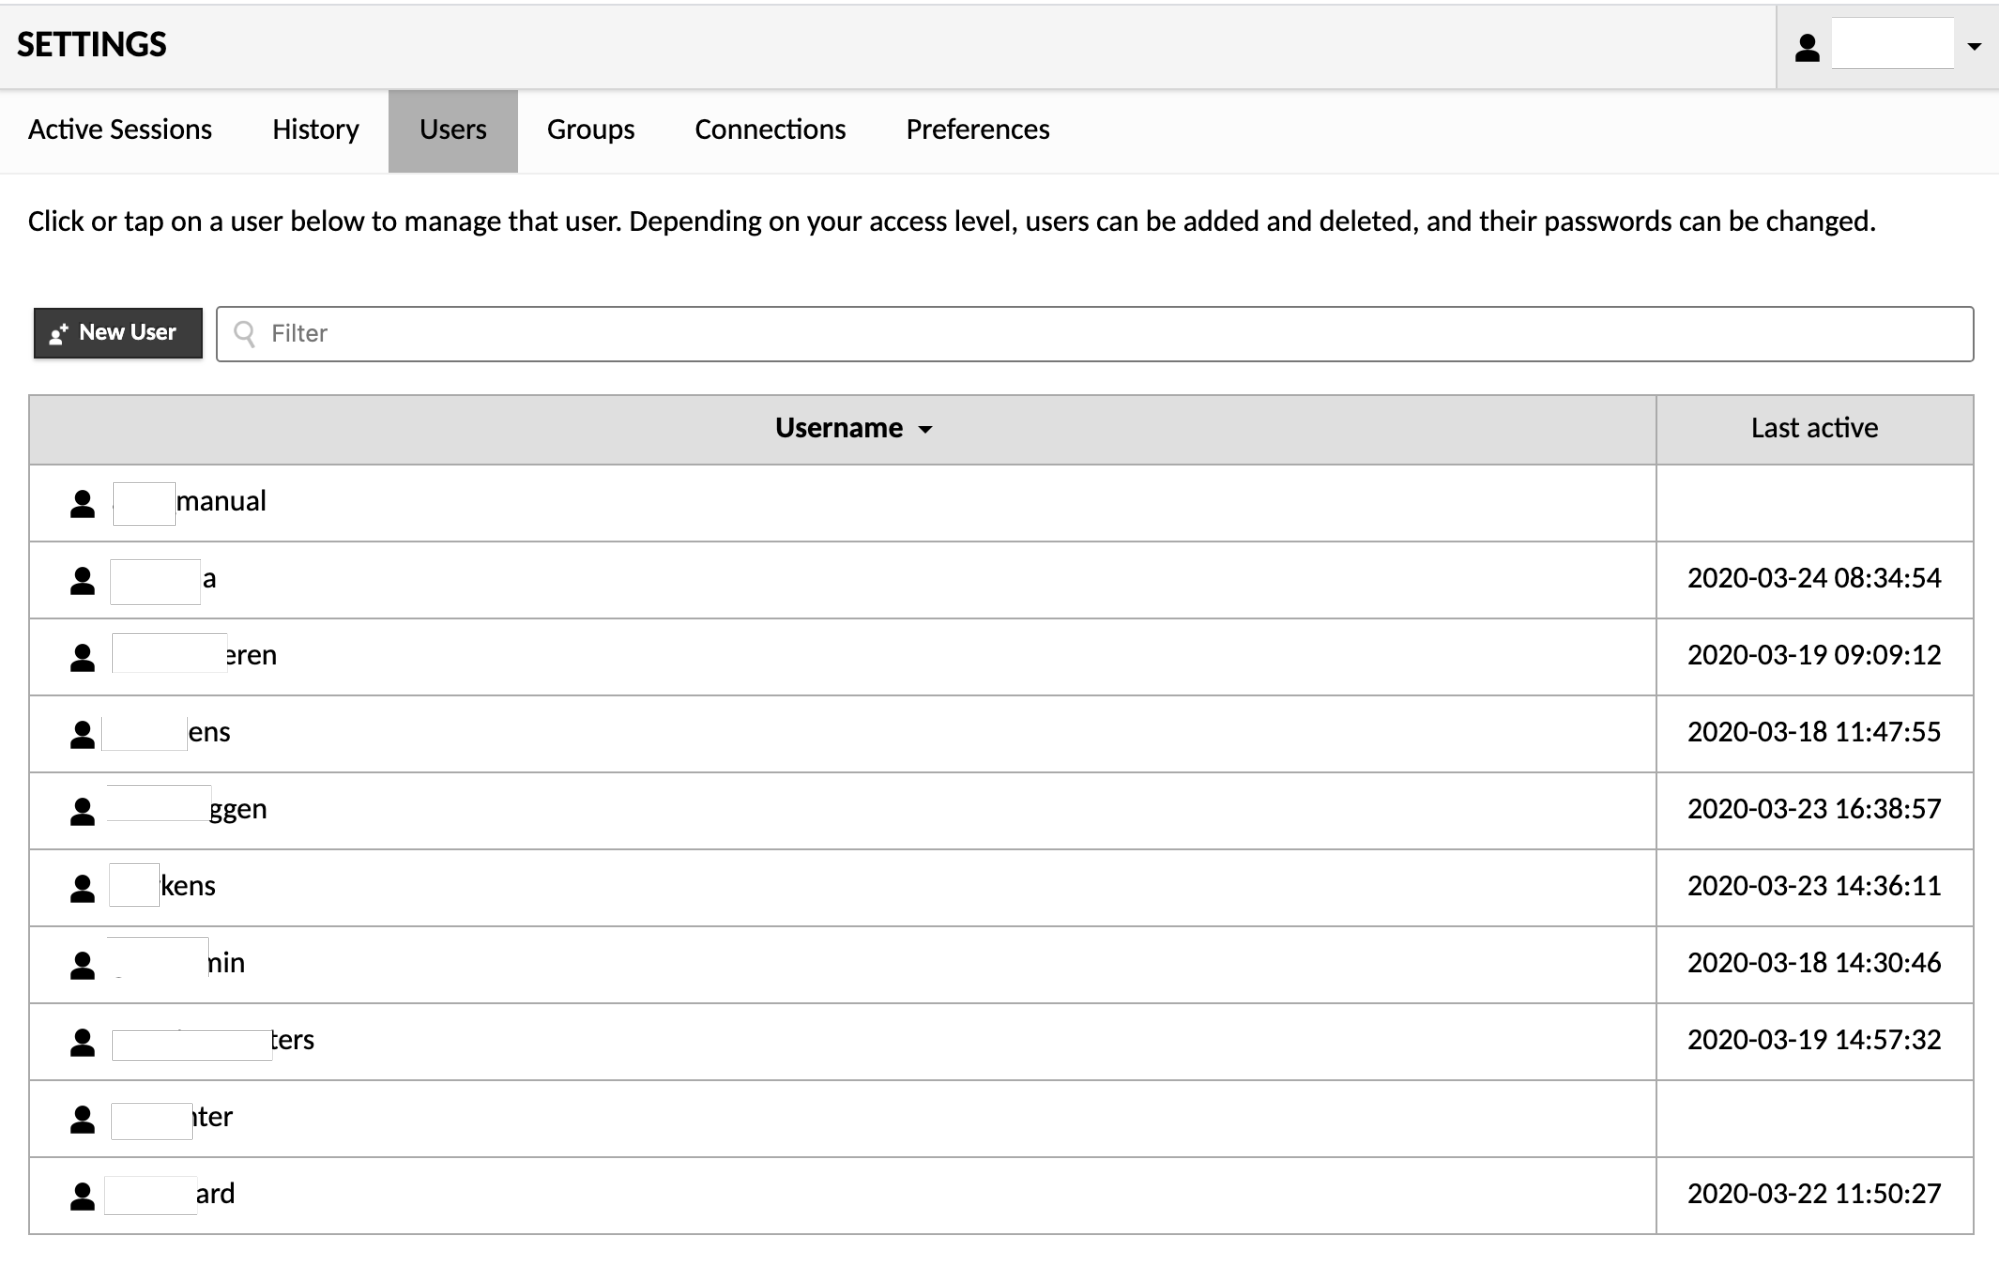
User & Group management
Clicking "Users" within the list of settings sections will take you to the user management screen. Here you can add new users, edit the properties and privileges of existing users, and view the times that each user last logged in. If you have a large number of users, you can also enter search terms within the "Filter" field to filter the list of users by username.
To add a new user, click the "New User" button. This will take you to a screen where you will be allowed to enter the details of the new user, such as the password and username. Note that, unless you specify otherwise, the new user will have no access to any existing connections, nor any administrative privileges, and you will need to manually set the user's password before they will be able to log in.
To edit a user, just click on the user you wish to edit. You will be taken to a screen which allows you to change the user's password, expire their password (such that it must be changed at next login), add or remove administrative permissions, and add or remove read access to specific connections, sharing profiles, or groups. If you are managing a large number of connections or groups and wish to reduce the size of the list displayed, you can do so by specifying search terms within the "Filter" field. Groups will be filtered by name and connections will be filtered by name or protocol.
If you have delete permission on the user, you will also see a "Delete" button. Clicking this button will permanently delete the user. Alternatively, if you only wish to temporarily disable the account, checking "Login disabled" will achieve the same effect while not removing the user entirely. If they attempt to log in, the attempt will be rejected as if their account did not exist at all.
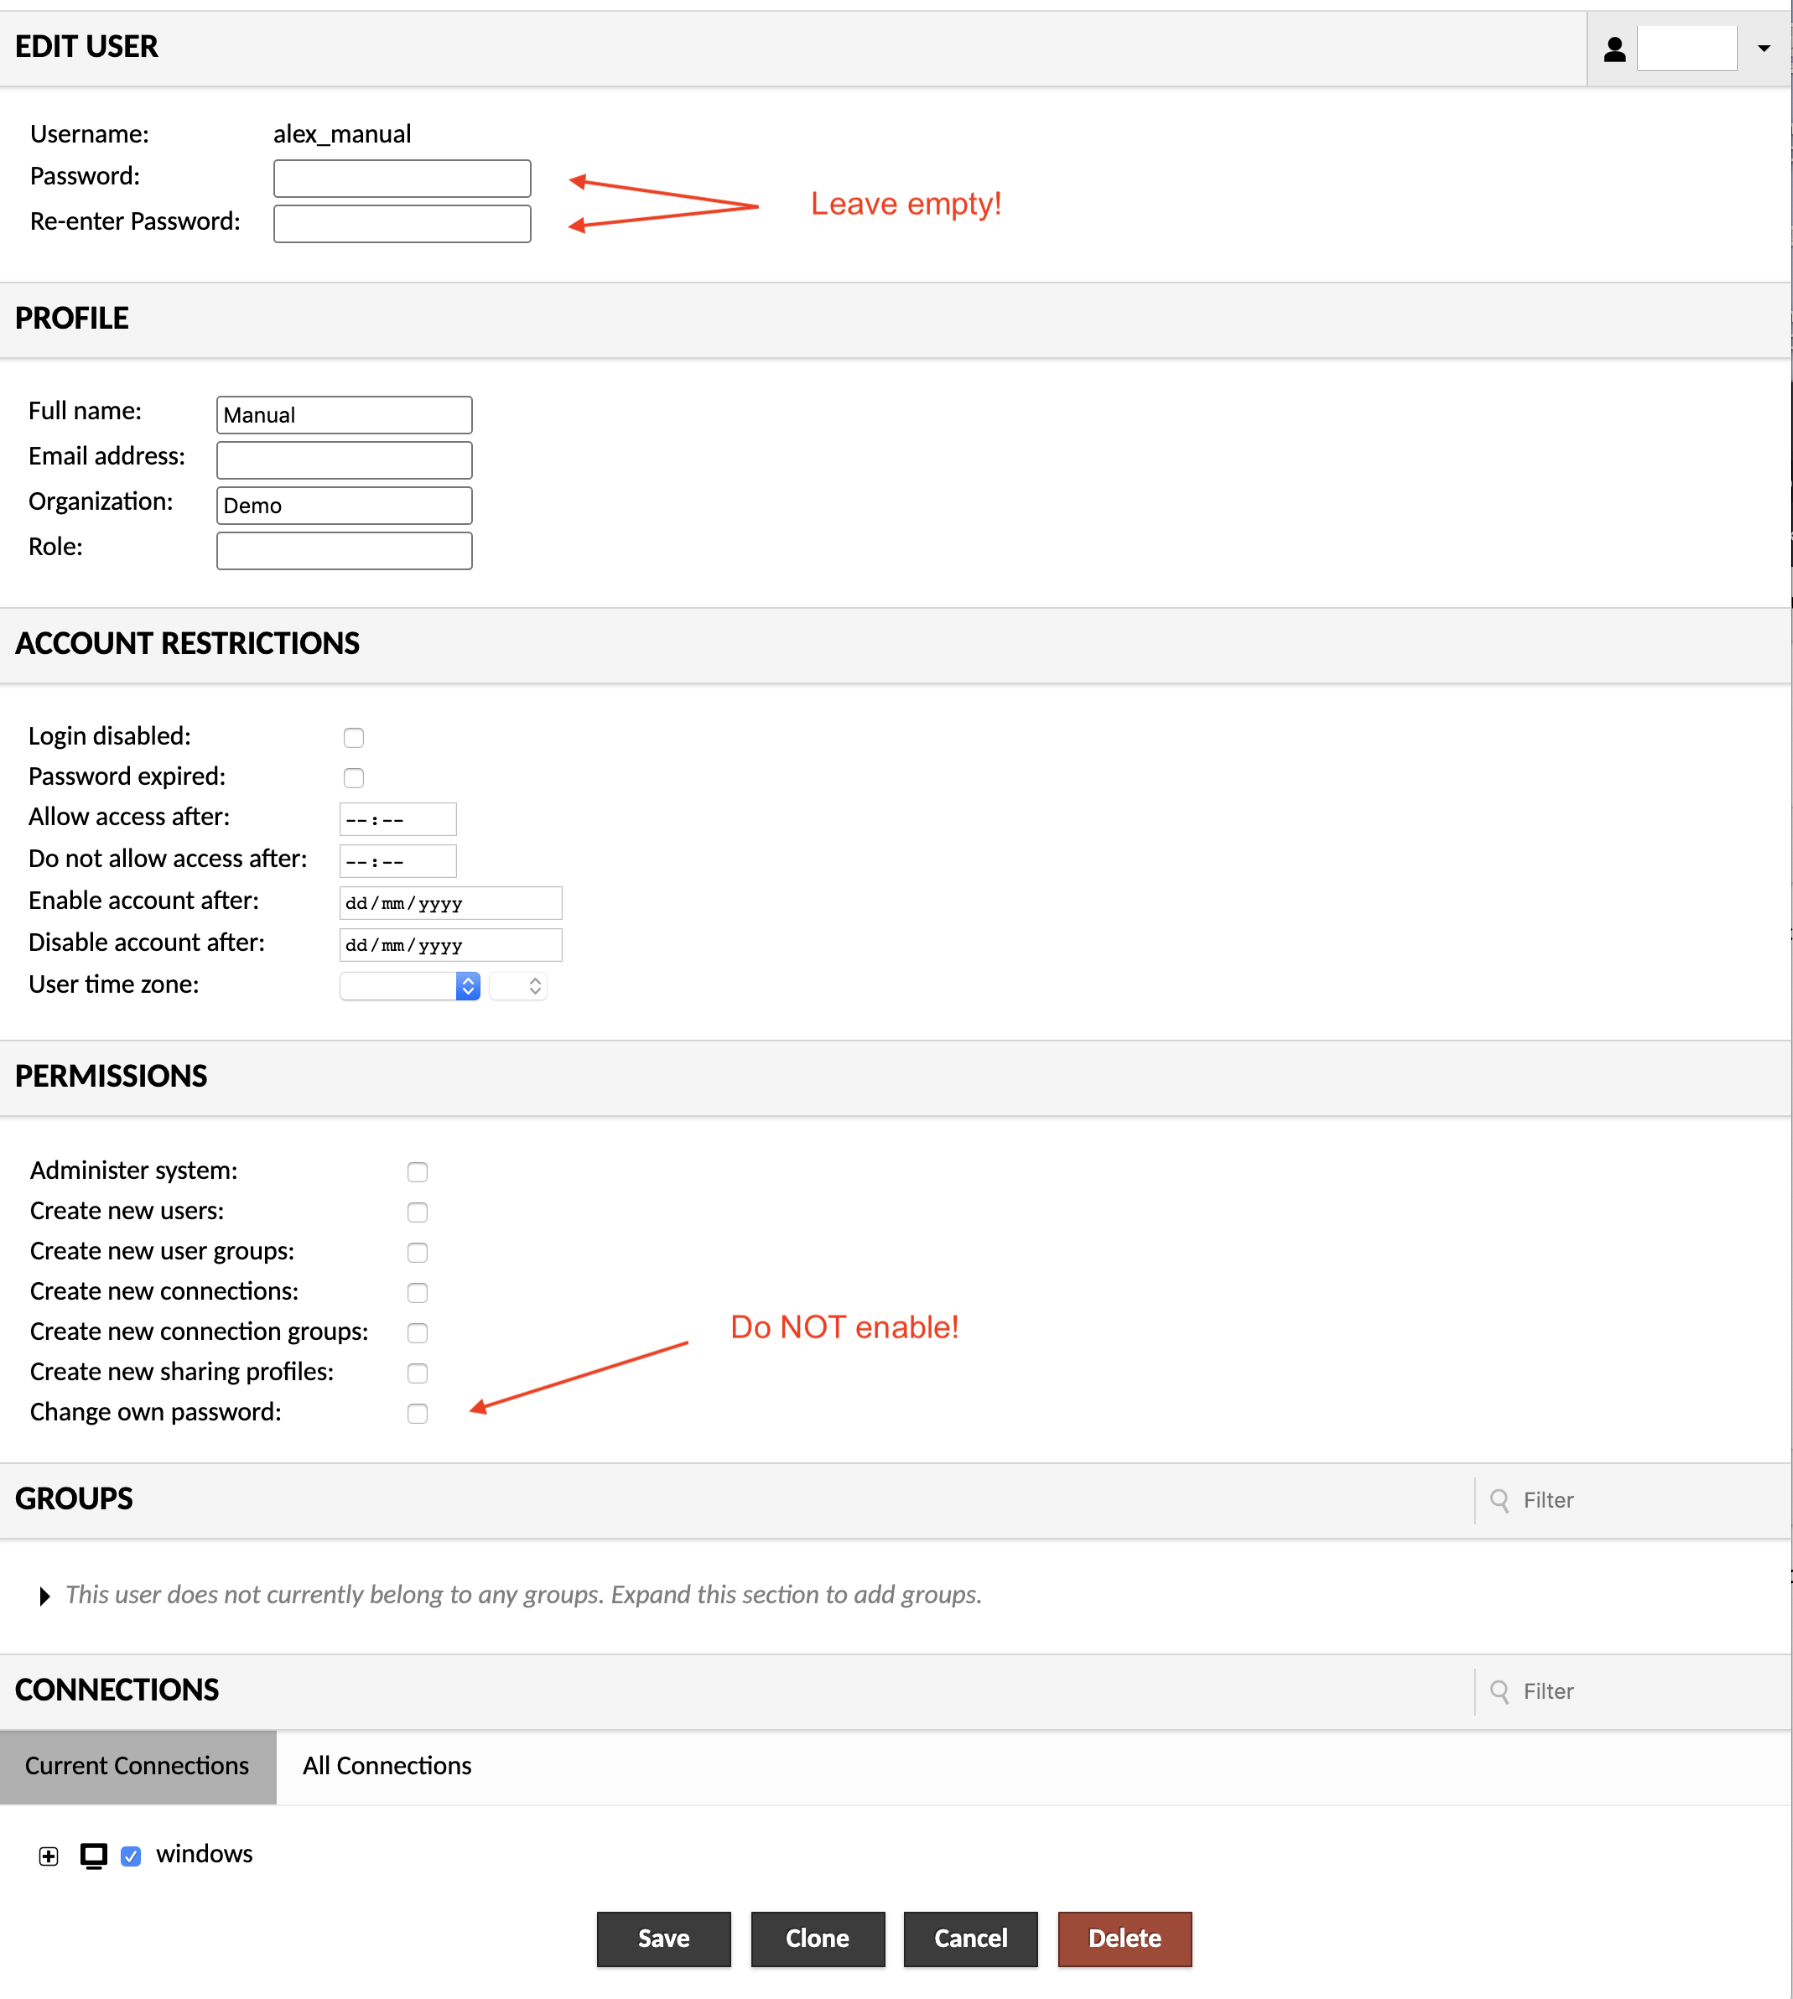
Important notes:
- Leave the password fields empty. The authentication is is verified on your AXS Guard. Defining passwords in these fields will install a local password without applying the Authentication Policy from AXS Guard.
- Do not activate: Change own password. This option allows the user to change / create a local password without applying the Authentication Policy from AXS Guard.
Group membership
When editing a user, the groups that user is a member of may be modified within the "Groups" section. By default, only groups that the user is already a member of will be displayed. If you have permission to modify the user's membership within a group, an "X" icon will be available next to that group's name. Clicking the "X" will remove the user from that group, taking effect after the user is saved.
To add users to a group, the arrow next to the list of groups must be clicked to expand the section and reveal all available groups. Available groups may then be checked/unchecked to modify the user's membership within those groups:
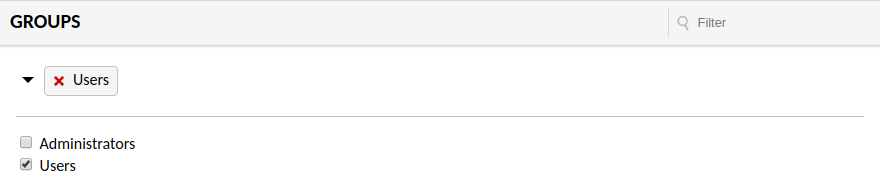
If you have a large number of available groups, you can also enter search terms within the "Filter" field to filter the list of groups by name.
Group management
Clicking "Groups" within the list of settings sections will take you to the user group management screen. Here you can add new groups and edit the properties and privileges of existing groups. If you have a large number of user groups, you can also enter search terms within the "Filter" field to filter the list of groups by name:
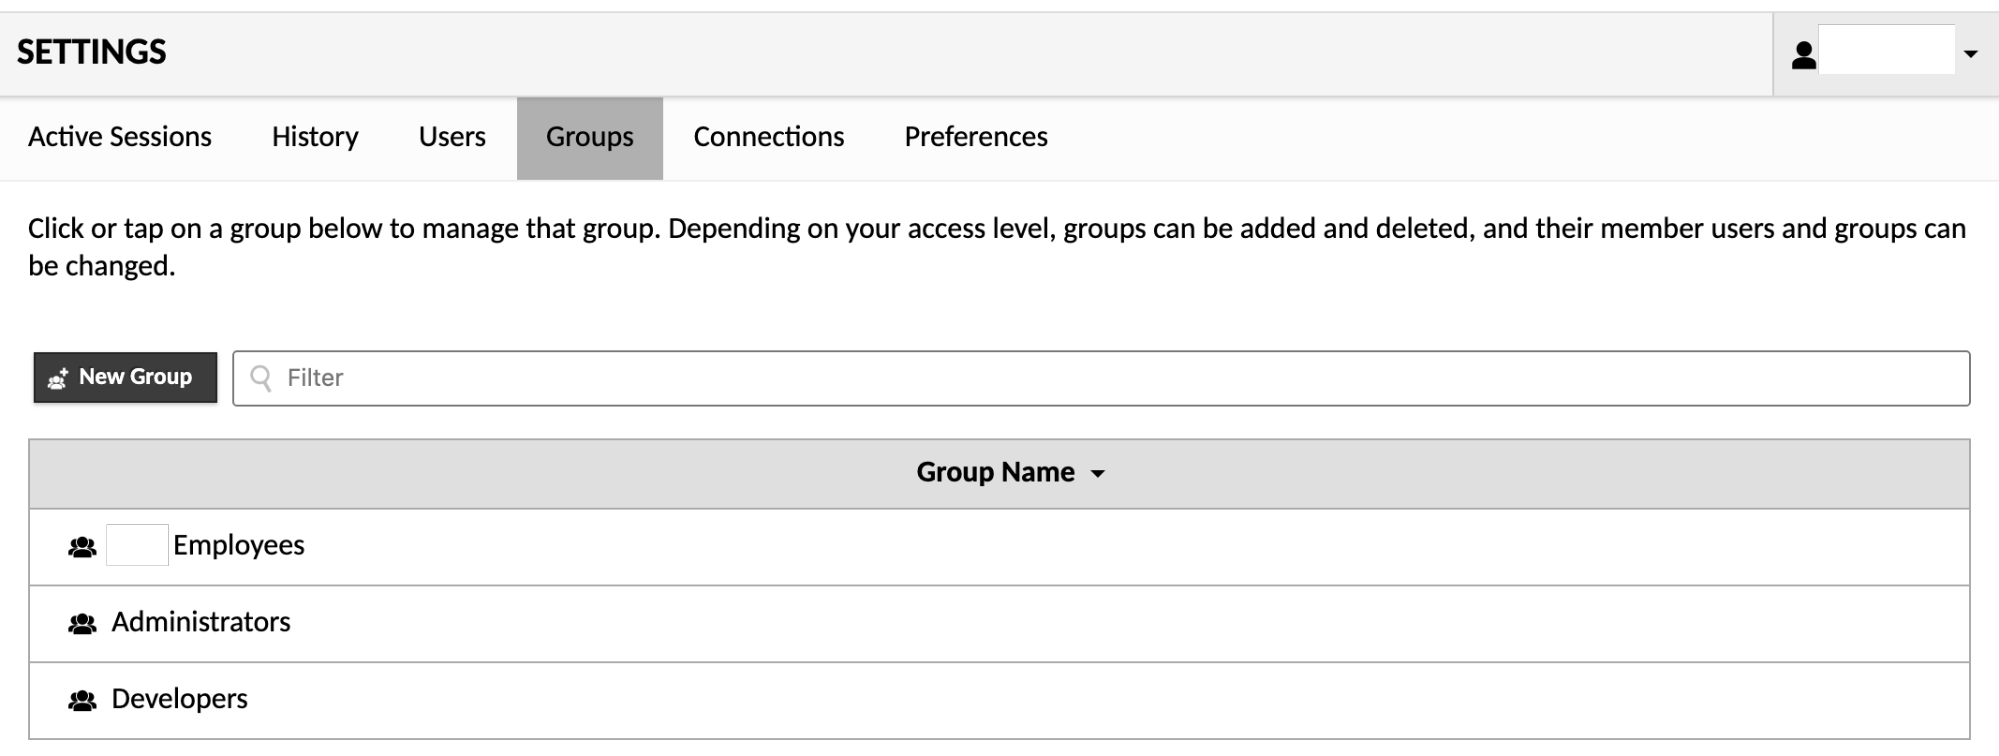
To add a new group, click the "New Group" button. This will take you to a screen where you will be allowed to enter the details of the new group, including membership and any permissions that members of the group should have.
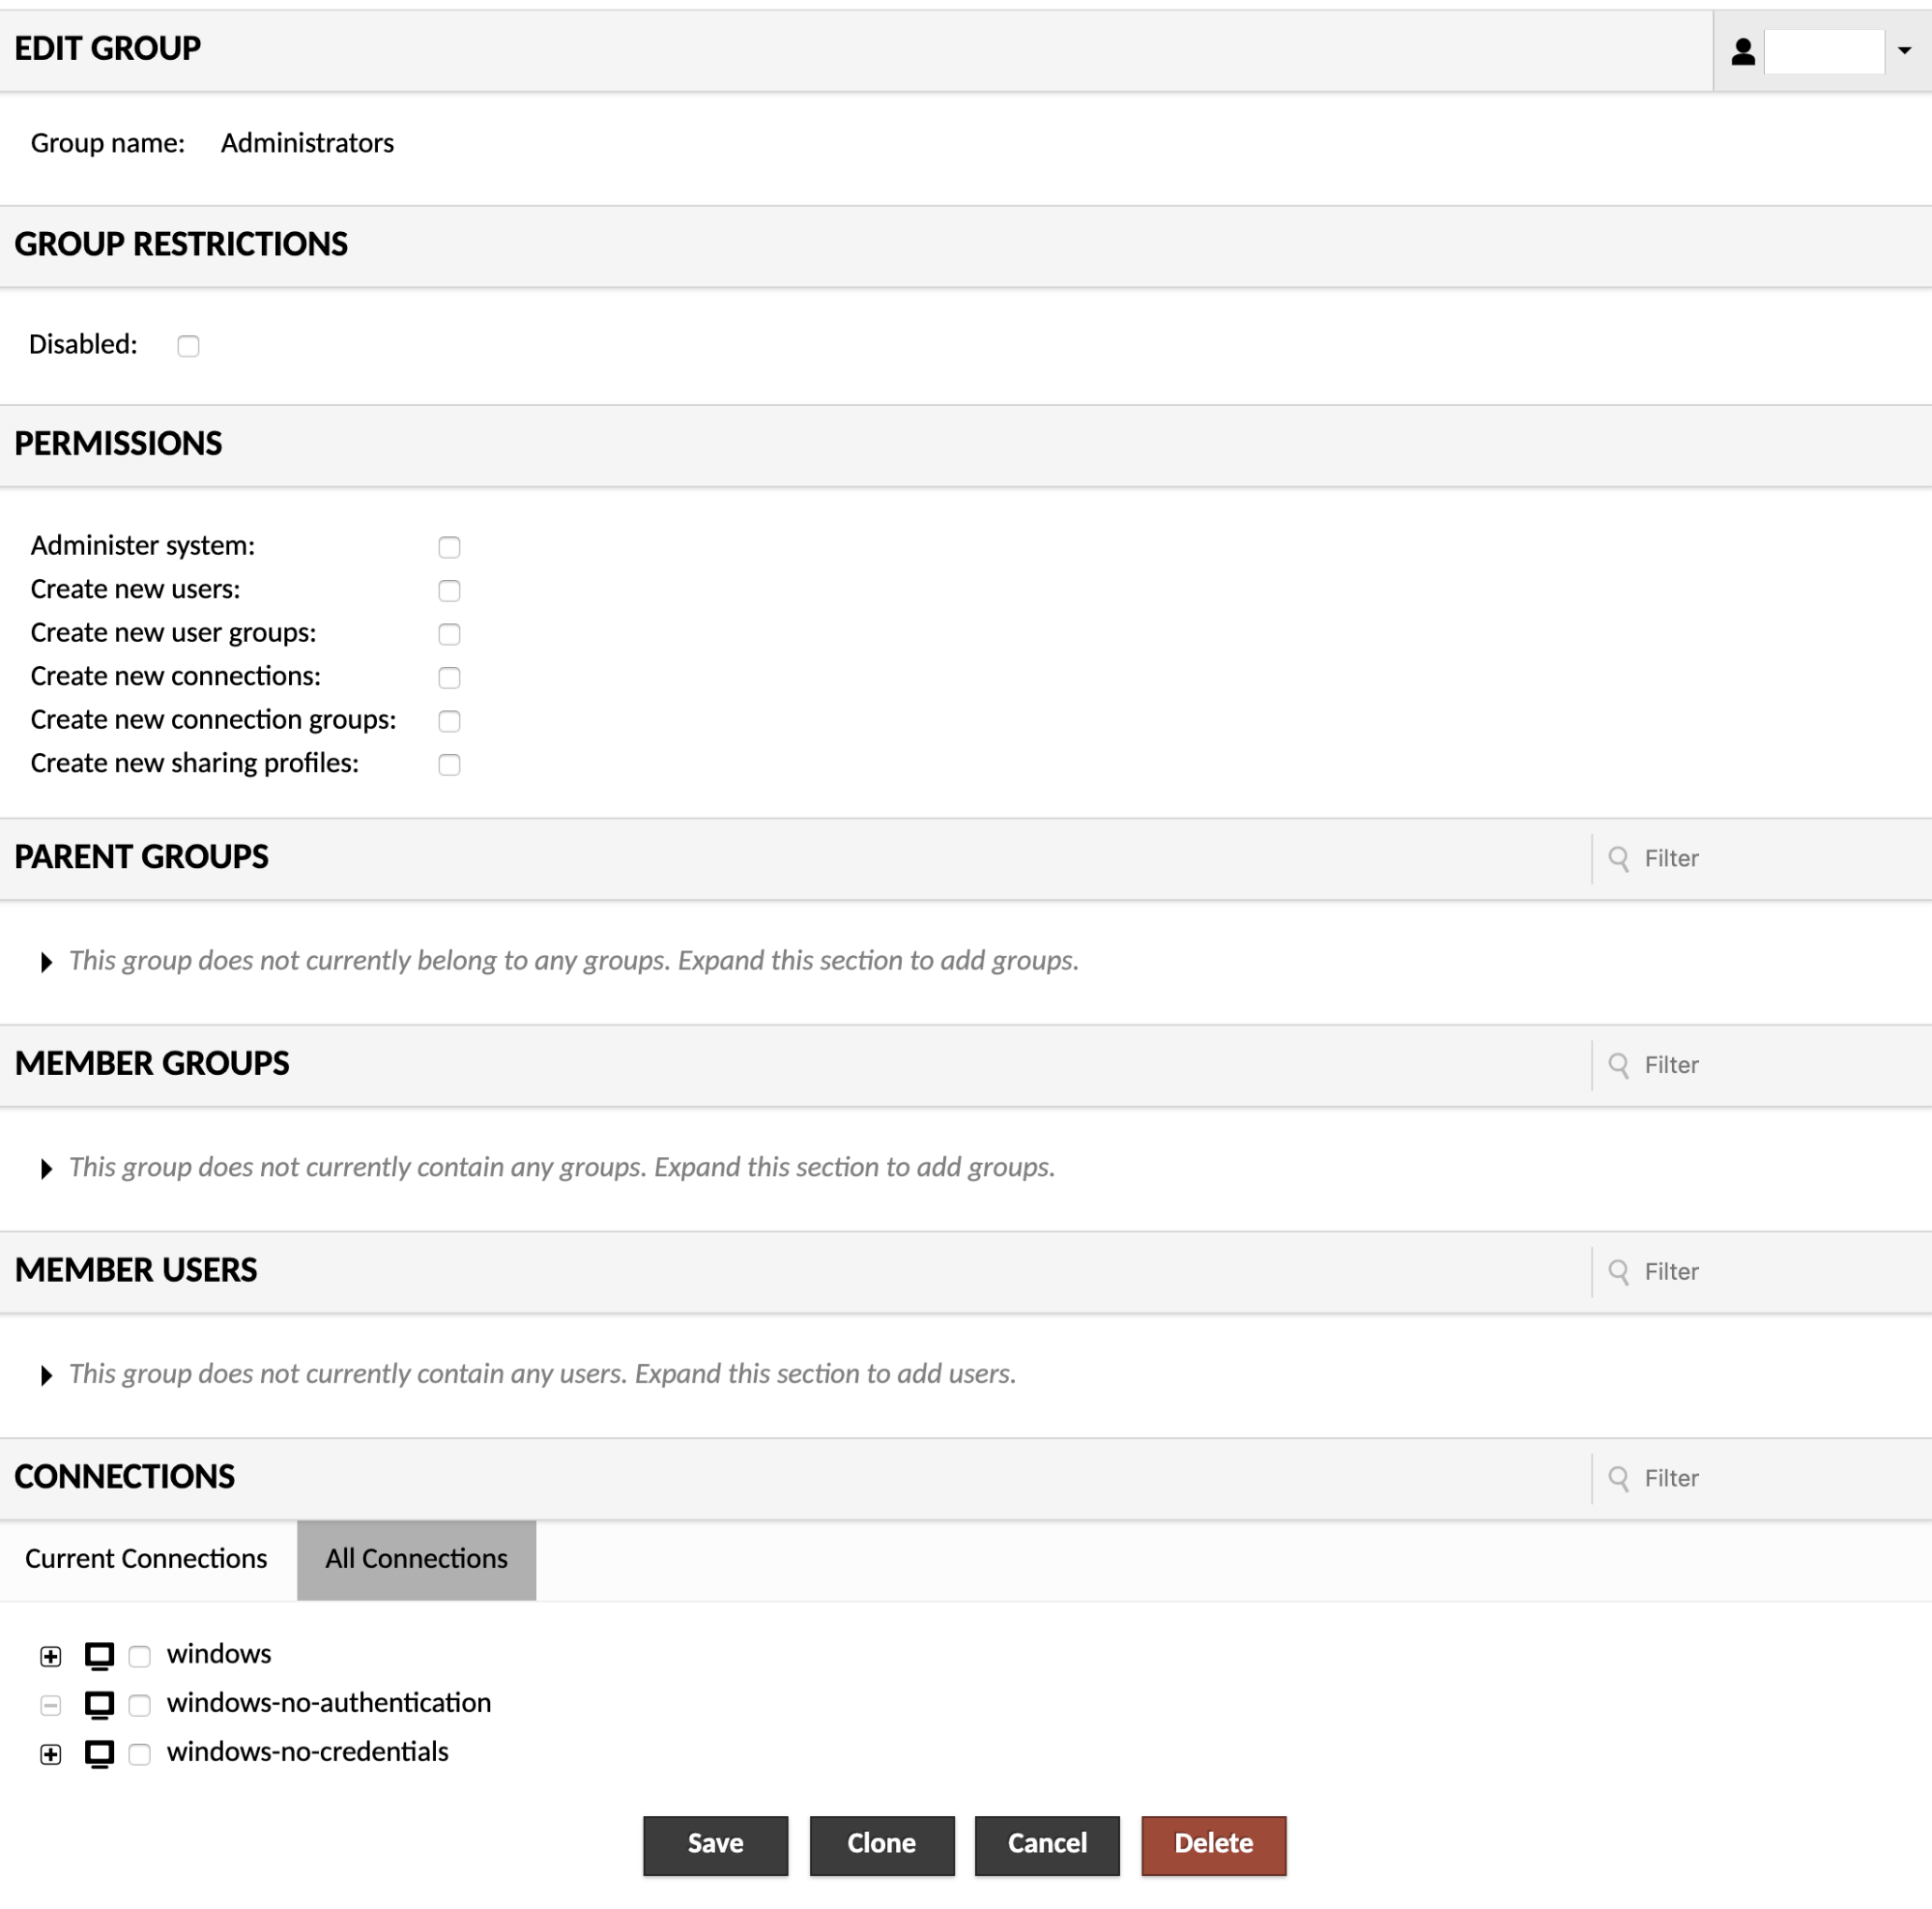
To edit a group, just click on the group you wish to edit. You will be taken to a screen which allows you to modify membership, add or remove administrative permissions, and add or remove read access to specific connections, sharing profiles, or connection groups. If you are managing a large number of connections or groups and wish to reduce the size of the list displayed, you can do so by specifying search terms within the "Filter" field. Connection groups will be filtered by name and connections will be filtered by name or protocol.
If you have delete permission on the group, you will also see a "Delete" button. Clicking this button will permanently delete the group. Alternatively, if you only wish to temporarily disable the effects of membership in the group, checking "Disabled" will achieve the same effect while not removing the group entirely.
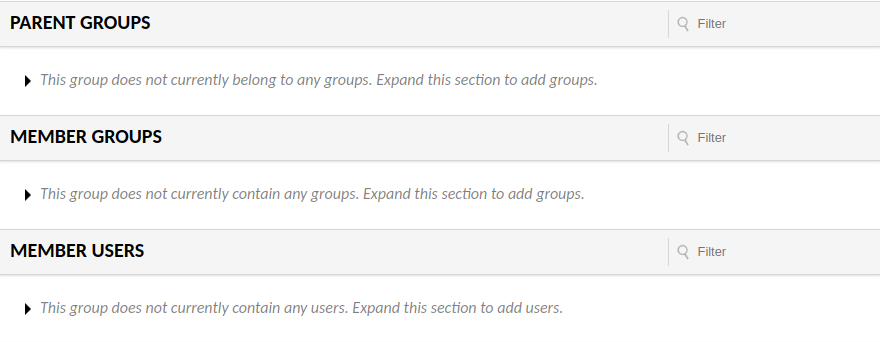
Parent groups
Managing the group membership of groups is more complex than that of users, as groups may contain both users and groups, with permissions from parent groups possibly being inherited. Parent groups, member groups, and member users, can all be managed identically to the group memberships of users, with a corresponding section dedicated to each within the user group editor:
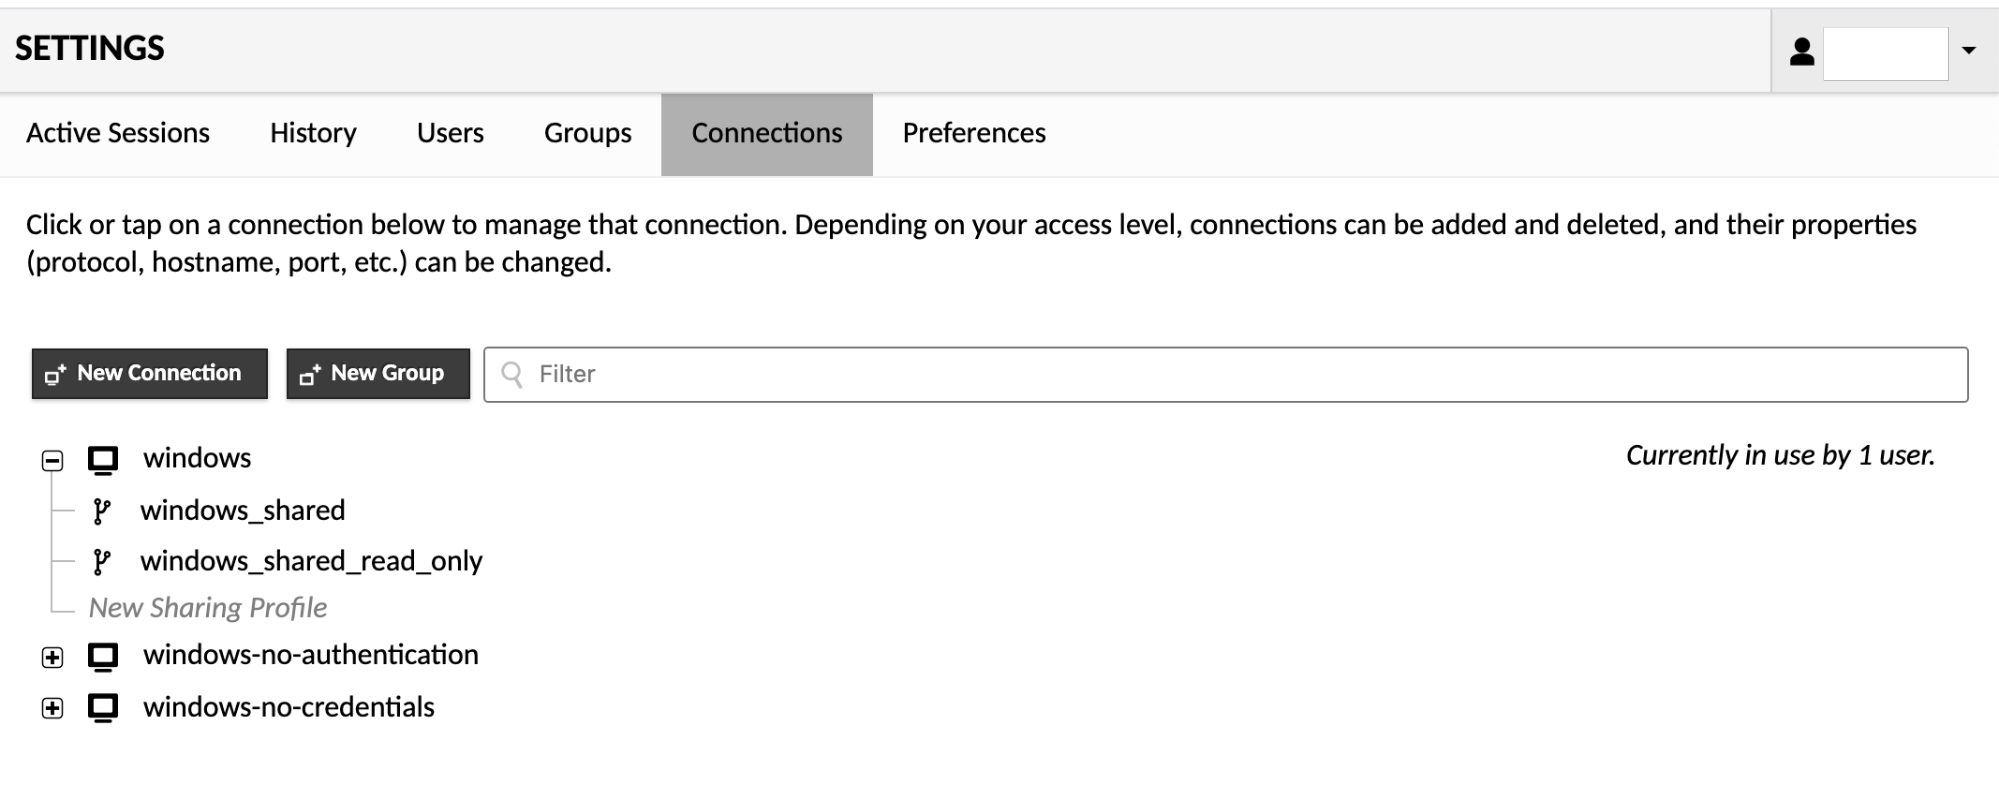
Connections and connection groups
Clicking "Connections" within the list of settings sections will take you to the connection management screen. The connection management screen allows administrators to create and edit connections, sharing profiles, and connection groups. If you have a large number of connections, you can also enter search terms within the "Filter" field to filter the list of connections by name or protocol.
To add a new connection or connection group, click the "New Connection" or "New Group" button, or the "New Connection" or "New Group" placeholders which appear when you expand an existing connection group. These options will take you to a screen where you will be allowed to enter the details of the new object, such as its location, parameters, and name. This name should be descriptive, but must also be unique with respect to other objects in the same location.
Once you click "Save", the new object will be added, but will initially only be usable by administrators and your current user. To grant another user access to the new connection or connection group, you must edit that user or a user group that the user is a member of, checking the box corresponding to the connection or connection group you created.
Editing connections, sharing profiles, and connection groups works identically to editing a user. Click on the object you wish to edit, and you will be taken to screen which allows you to edit it. The screen will display all properties of the object, including its usage history, if applicable.
If you have delete permission on the object, you will also see a "Delete" button. Clicking this button will permanently delete the object being edited.
Each protocol supported by AXS Guard Remote Workspace has its own set of configuration parameters. These parameters typically describe the hostname and port of the remote desktop server, the credentials to use when connecting, if any, and the size and color depth of the display. If the protocol supports file transfer, options for enabling that functionality will be provided as well.
VNC
The VNC protocol is the simplest and first protocol supported by AXS Guard Remote Workspace. Although generally not as fast as RDP, many VNC servers are adequate, and VNC over AXS Guard Remote Workspace tends to be faster than VNC by itself due to decreased bandwidth usage.
Network parameters
With the exception of reverse-mode VNC connections, VNC works by making outbound network connections to a particular host which runs one or more VNC servers. Each VNC server is associated with a display number, from which the appropriate port number is derived.
| Parameter | Description |
|---|---|
| hostname | The hostname or IP address of the VNC server AXS Guard Remote Workspace should connect to. |
| port | The port the VNC server is listening on, usually 5900 or 5900 + display number. For example, if your VNC server is serving display number 1 (sometimes written as :1), your port number here would be 5901. |
| autoretry | The number of times to retry connecting before giving up and returning an error. In the case of a reverse connection, this is the number of times the connection process is allowed to time out. |
Authentication
The VNC standard defines only password based authentication. Other authentication mechanisms exist, but are non-standard or proprietary. AXS Guard Remote Workspace supports only the password method.
| Parameter | Description |
|---|---|
| password | The password to use when attempting authentication, if any. This parameter is optional. |
Display settings
VNC servers do not allow the client to request particular display sizes, so you are at the mercy of your VNC server with respect to display width and height. However, to reduce bandwidth usage, you may request that the VNC server reduce its color depth. AXS Guard Remote Workspace will automatically detect 256-color images, but this can be guaranteed for absolutely all graphics sent over the connection by forcing the color depth to 8-bit. Color depth is otherwise dictated by the VNC server.
If you are noticing problems with your VNC display, such as the lack of a mouse cursor, the presence of multiple mouse cursors, or strange colors (such as blue colors appearing more like orange or red), these are typically the result of bugs or limitations within the VNC server, and additional parameters are available to work around such issues.
| Parameter | Description |
|---|---|
| color-depth | The color depth to request, in bits-per-pixel. This parameter is optional. If specified, this must be either 8, 16, 24, or 32. Regardless of what value is chosen here, if a particular update uses less than 256 colors, AXS Guard Remote Workspace will always send that update as a 256-color PNG. |
| swap-red-blue | If the colors of your display appear wrong (blues appear orange or red, etc.), it may be that your VNC server is sending image data incorrectly, and the red and blue components of each color are swapped. If this is the case, set this parameter to "true" to work around the problem. This parameter is optional. |
| cursor | If set to "remote", the mouse pointer will be rendered remotely, and the local position of the mouse pointer will be indicated by a small dot. A remote mouse cursor will feel slower than a local cursor, but may be necessary if the VNC server does not support sending the cursor image to the client. |
| encodings | A space-delimited list of VNC encodings to use. The format of this parameter is dictated by libvncclient and thus doesn't really follow the form of other AXS Guard Remote Workspace parameters. This parameter is optional, and libguac-client-vnc will use any supported encoding by default. Beware that this parameter is intended to be replaced with individual, encoding-specific parameters in a future release. |
| read-only | Whether this connection should be read-only. If set to "true", no input will be accepted on the connection at all. Users will only see the desktop and whatever other users using that same desktop are doing. This parameter is optional. |
File transfer (via SFTP)
VNC does not normally support file transfer, but AXS Guard Remote Workspace can provide file transfer over SFTP even when the remote desktop is otherwise being accessed through VNC and not SSH. If SFTP is enabled on a AXS Guard Remote Workspace VNC connection, users will be able to upload and download files
| Parameter | Description |
|---|---|
| enable-sftp | Whether file transfer should be enabled. If set to "true", the user will be allowed to upload or download files from the specified server using SFTP. If omitted, SFTP will be disabled. |
| sftp-hostname | The hostname or IP address of the server hosting SFTP. This parameter is optional. If omitted, the hostname of the VNC server specified with the hostname parameter will be used. |
| sftp-port | The port the SSH server providing SFTP is listening on, usually 22. This parameter is optional. If omitted, the standard port of 22 will be used. |
| sftp-host-key | The known hosts entry for the SFTP server. This parameter is optional, and, if not provided, no verification of SFTP host identity will be done. If the parameter is provided the identity of the server will be checked against the data. The format of this parameter should be that of a single entry from an OpenSSH known_hosts file.For more information, please see SSH Host Verification |
| sftp-username | The username to authenticate as when connecting to the specified SSH server for SFTP. This parameter is required. |
| sftp-password | The password to use when authenticating with the specified SSH server for SFTP. |
| sftp-private-key | The entire contents of the private key to use for public key authentication. If this parameter is not specified, public key authentication will not be used. The private key must be in OpenSSH format, as would be generated by the OpenSSH ssh-keygen utility. |
| sftp-passphrase | The passphrase to use to decrypt the private key for use in public key authentication. This parameter is not needed if the private key does not require a passphrase. |
| sftp-directory | The directory to upload files to if they are simply dragged and dropped, and thus otherwise lack a specific upload location. This parameter is optional. If omitted, the default upload location of the SSH server providing SFTP will be used. |
| sftp-root-directory | The directory to expose to connected users via AXS Guard Remote Workspace's file browser. If omitted, the root directory will be used by default. |
| sftp-server-alive-interval | The interval in seconds at which to send keepalive packets to the SSH server for the SFTP connection. This parameter is optional. If omitted, the default of 0 will be used, disabling sending keepalive packets. The minimum value is 2. |
VNC Repeaters
There exist VNC repeaters, such as UltraVNC Repeater, which act as intermediaries or proxies, providing a single logical VNC connection which is then routed to another VNC server elsewhere. Additional parameters are required to select which VNC host behind the repeater will receive the connection.
| Parameter | Description |
|---|---|
| dest-host | The destination host to request when connecting to a VNC proxy such as UltraVNC Repeater. This is only necessary if the VNC proxy in use requires the connecting user to specify which VNC server to connect to. If the VNC proxy automatically connects to a specific server, this parameter is not necessary. |
| dest-port | The destination port to request when connecting to a VNC proxy such as UltraVNC Repeater. This is only necessary if the VNC proxy in use requires the connecting user to specify which VNC server to connect to. If the VNC proxy automatically connects to a specific server, this parameter is not necessary. |
Reverse VNC connections
AXS Guard Remote Workspace supports "reverse" VNC connections, where the VNC client listens for an incoming connection from the VNC server. When reverse VNC connections are used, the VNC client and server switch network roles, but otherwise function as they normally would. The VNC server still provides the remote display, and the VNC client still provides all keyboard and mouse input.
| Parameter | Description |
|---|---|
| reverse-connect | Whether reverse connection should be used. If set to "true", instead of connecting to a server at a given hostname and port, guacd will listen on the given port for inbound connections from a VNC server. |
| listen-timeout | If reverse connection is in use, the maximum amount of time to wait for an inbound connection from a VNC server, in milliseconds. If blank, the default value is 5000 (five seconds). |
RDP
The RDP protocol is more complicated than VNC and is the second protocol supported by AXS Guard Remote Workspace. RDP tends to be faster than VNC due to the use of caching, which AXS Guard Remote Workspace does take advantage of.
Network parameters
RDP connections require a hostname or IP address defining the destination machine. The RDP port is defined to be 3389, and will be this value in most cases. You only need to specify the RDP port if you are not using port 3389.
| Parameter | Description |
|---|---|
| hostname | The hostname or IP address of the RDP server AXS Guard Remote Workspace should connect to. |
| port | The port the RDP server is listening on, usually 3389. This parameter is optional. If this is not specified, the default of 3389 will be used. |
Authentication and security
RDP provides authentication through the use of a username, password, and optional domain. All RDP connections are encrypted.
Most RDP servers will provide a graphical login if the username, password, and domain parameters are omitted. One notable exception to this is Network Level Authentication, or NLA, which performs all authentication outside of a desktop session, and thus in the absence of a graphical interface.
Auto login
Remote Workspace login credentials can also be passed on to the RDP session via magic strings. This means the user will only have to log in once; the RDP session will inherit the user’s Remote Workspace credentials.
Note that this requires the Remote Workspace authentication policy to be set to Directory Services. The username and password connection parameters must also contain the following magic strings: ${GUAC_USERNAME} and ${GUAC_PASSWORD}.
Important
If your server requires NLA, you must provide a username and password. Leveraging AXS Guard Remote Workspace's parameter tokens and LDAP support to integrate with Active Directory and automatically pass through credentials is a common configuration.
| Parameter | Description |
|---|---|
| username | The username to use to authenticate, if any. This parameter is optional. |
| password | The password to use when attempting authentication, if any. This parameter is optional. |
| domain | The domain to use when attempting authentication, if any. This parameter is optional. |
| security | The security mode to use for the RDP connection. This mode dictates how data will be encrypted and what type of authentication will be performed, if any. By default, a security mode is selected based on a negotiation process which determines what both the client and the server support. Possible values are:
|
| ignore-cert | If set to "true", the certificate returned by the server will be ignored, even if that certificate cannot be validated. This is useful if you universally trust the server and your connection to the server, and you know that the server's certificate cannot be validated (for example, if it is self-signed). |
| disable-auth | If set to "true", authentication will be disabled. Note that this refers to authentication that takes place while connecting. Any authentication enforced by the server over the remote desktop session (such as a login dialog) will still take place. By default, authentication is enabled and only used when requested by the server. If you are using NLA, authentication must be enabled by definition. |
2FA
To implement 2FA, use NLA in combination with the following settings.
Set the username to ${GUAC_USERNAME} and leave the password field open in the RDP connection settings.
Change the ‘Radius Client remote-workspace’ authentication service to ‘OATH’, DIGIPASS or OATHorDIGIPASS (select whichever is appropriate).
The Remote Workspace login page will now prompt users for their username and a one-time password generated by their OATH or DIGIPASS token when they start a session or if the session is auto-started.
Subsequently, Remote Workspace will request users to provide their AD password as a second factor before access is granted.

Session settings
RDP sessions will typically involve the full desktop environment of a normal user. Alternatively, you can manually specify a program to use instead of the RDP server's default shell, or connect to the administrative console.
Although AXS Guard Remote Workspace is independent of keyboard layout, RDP is not. This is because AXS Guard Remote Workspace represents keys based on what they do ("press the Enter key"), while RDP uses identifiers based on the key's location ("press the rightmost key in the second row"). To translate between an AXS Guard Remote Workspace key event and an RDP key event, AXS Guard Remote Workspace must know ahead of time the keyboard layout of the RDP server.
By default, the US English qwerty keyboard will be used. If this does not match the keyboard layout of your RDP server, keys will not be properly translated, and you will need to explicitly choose a different layout in your connection settings.
| Parameter | Description |
|---|---|
| client-name | When connecting to the RDP server, AXS Guard Remote Workspace will normally provide its own hostname as the name of the client. If this parameter is specified, AXS Guard Remote Workspace will use its value instead. On Windows RDP servers, this value is exposed within the session as the CLIENTNAME environment variable. |
| console | If set to "true", you will be connected to the console (admin) session of the RDP server. |
| initial-program | The full path to the program to run immediately upon connecting. This parameter is optional. |
| server-layout | The server-side keyboard layout. This is the layout of the RDP server and has nothing to do with the keyboard layout in use on the client. The AXS Guard Remote Workspace client is independent of keyboard layout. The RDP protocol, however, is not independent of keyboard layout, and AXS Guard Remote Workspace needs to know the keyboard layout of the server in order to send the proper keys when a user is typing. Possible values are:
|
| timezone | The timezone that the client should send to the server for configuring the local time display of that server. The format of the timezone is in the standard IANA key zone format, which is the format used in UNIX/Linux. This will be converted by RDP into the correct format for Windows. The timezone is detected and will be passed to the server during the handshake phase of the connection, and may used by protocols, like RDP, that support it. This parameter can be used to override the value detected and passed during the handshake, or can be used in situations where guacd does not support passing the timezone parameter during the handshake phase (guacd versions prior to 1.1.0). Support for forwarding the client timezone varies by RDP server implementation. For example, with Windows, support for forwarding timezones is only present in Windows Server with Remote Desktop Services (RDS, formerly known as Terminal Services) installed. Windows Server installations in admin mode, along with Windows workstation versions, do not allow the timezone to be forwarded. Other server implementations, for example, xrdp, may not implement this feature at all. Consult the documentation for the RDP server to determine whether or not this feature is supported. |
Display settings
AXS Guard Remote Workspace will automatically choose an appropriate display size for RDP connections based on the size of the browser window and the DPI of the device. The size of the display can be forced by specifying explicit width or height values.
To reduce bandwidth usage, you may also request that the server reduce its color depth. AXS Guard Remote Workspace will automatically detect 256-color images, but this can be guaranteed for absolutely all graphics sent over the connection by forcing the color depth to 8-bit. Color depth is otherwise dictated by the RDP server.
| Parameter | Description |
|---|---|
| color-depth | The color depth to request, in bits-per-pixel. This parameter is optional. If specified, this must be either 8, 16, or 24. Regardless of what value is chosen here, if a particular update uses less than 256 colors, AXS Guard Remote Workspace will always send that update as a 256-color PNG. |
| width | The width of the display to request, in pixels. This parameter is optional. If this value is not specified, the width of the connecting client display will be used instead. |
| height | The height of the display to request, in pixels. This parameter is optional. If this value is not specified, the height of the connecting client display will be used instead. |
| dpi | The desired effective resolution of the client display, in DPI. This parameter is optional. If this value is not specified, the resolution and size of the client display will be used together to determine, heuristically, an appropriate resolution for the RDP session. |
| resize-method | The method to use to update the RDP server when the width or height of the client display changes. This parameter is optional. If this value is not specified, no action will be taken when the client display changes size. Normally, the display size of an RDP session is constant and can only be changed when initially connecting. As of RDP 8.1, the "Display Update" channel can be used to request that the server change the display size. For older RDP servers, the only option is to disconnect and reconnect with the new size. Possible values are:
|
Device redirection
Device redirection refers to the use of non-display devices over RDP. AXS Guard Remote Workspace's RDP support currently allows redirection of audio, printing, and disk access, some of which require additional configuration in order to function properly.
Audio redirection will be enabled by default. If AXS Guard Remote Workspace was correctly installed, and audio redirection is supported by your RDP server, sound should play within remote connections without manual intervention.
Printing allows users to print arbitrary documents directly to PDF. When documents are printed to the redirected printer, the user will receive a PDF of that document within their web browser.
AXS Guard Remote Workspace provides support for file transfer over RDP by emulating a virtual disk drive. This drive will persist on the AXS Guard Remote Workspace server, confined within the drive path specified. If drive redirection is enabled on a AXS Guard Remote Workspace SSH connection, users will be able to upload and download files.
| Parameter | Description |
|---|---|
| disable-audio | Audio is enabled by default in both the client and in libguac-client-rdp. If you are concerned about bandwidth usage, or sound is causing problems, you can explicitly disable sound by setting this parameter to "true". |
| enable-audio-input | If set to "true", audio input support (microphone) will be enabled, leveraging the standard "AUDIO_INPUT" channel of RDP. By default, audio input support within RDP is disabled. |
| enable-printing | Printing is disabled by default, but with printing enabled, RDP users can print to a virtual printer that sends a PDF containing the document printed to the AXS Guard Remote Workspace client. Enable printing by setting this parameter to "true". |
| printer-name | The name of the redirected printer device that is passed through to the RDP session. This is the name that the user will see in, for example, the Devices and Printers control panel. If printer redirection is not enabled, this option has no effect. |
| enable-drive | File transfer is disabled by default, but with file transfer enabled, RDP users can transfer files to and from a virtual drive which persists on the AXS Guard Remote Workspace server. Enable file transfer support by setting this parameter to "true". Files will be stored in the directory specified by the "drive-path" parameter, which is required if file transfer is enabled. |
| drive-name | The name of the filesystem used when passed through to the RDP session. This is the name that users will see in their Computer/My Computer area along with client name (for example, "AXS Guard Remote Workspace on AXS Guard Remote Workspace RDP"), and is also the name of the share when accessing the special \\tsclient network location. If file transfer is not enabled, this parameter is ignored. |
| drive-path | The directory on the AXS Guard Remote Workspace server in which transferred files should be stored. This directory must be accessible by guacd and both readable and writable by the user that runs guacd. This parameter does not refer to a directory on the RDP server. If file transfer is not enabled, this parameter is ignored. |
| create-drive-path | If set to "true", and file transfer is enabled, the directory specified by the drive-path parameter will automatically be created if it does not yet exist. Only the final directory in the path will be created - if other directories earlier in the path do not exist, automatic creation will fail, and an error will be logged. By default, the directory specified by the drive-path parameter will not automatically be created, and attempts to transfer files to a non-existent directory will be logged as errors. If file transfer is not enabled, this parameter is ignored. |
| console-audio | If set to "true", audio will be explicitly enabled in the console (admin) session of the RDP server. Setting this option to "true" only makes sense if the console parameter is also set to "true". |
| static-channels | A comma-separated list of static channel names to open and expose as pipes. If you wish to communicate between an application running on the remote desktop and JavaScript, this is the best way to do it. AXS Guard Remote Workspace will open an outbound pipe with the name of the static channel. If JavaScript needs to communicate back in the other direction, it should respond by opening another pipe with the same name. AXS Guard Remote Workspace allows any number of static channels to be opened, but protocol restrictions of RDP limit the size of each channel name to 7 characters. |
Preconnection PDU (Hyper-V)
Some RDP servers host multiple logical RDP connections behind a single server listening on a single TCP port. To select between these logical connections, an RDP client must send the "preconnection PDU" - a message which contains values that uniquely identify the destination, referred to as the "RDP source". This mechanism is defined by the "Session Selection Extension" for the RDP protocol, and is implemented by Microsoft's Hyper-V hypervisor.
If you are using Hyper-V, you will need to specify the ID of the destination virtual machine within the preconnection-blob parameter. This value can be determined using PowerShell:
    PS C:\\> Get-VM VirtualMachineName | Select-Object Id
    Id
    \--
    ed272546-87bd-4db9-acba-e36e1a9ca20a
    PS C:\\>
The preconnection PDU is intentionally generic. While its primary use is as a means for selecting virtual machines behind Hyper-V, other RDP servers may use it as well. It is up to the RDP server itself to determine whether the preconnection ID, BLOB, or both will be used, and what their values mean.
If you do intend to use Hyper-V, beware that its built-in RDP server uses slightly different parameters for both authentication and the port number, and AXS Guard Remote Workspace's defaults will not work. In most cases, you will need to do the following when connecting to Hyper-V:
- Set "port" to "2179", as this is the default port used by Hyper-V. The standard RDP port is 3389, and AXS Guard Remote Workspace will use port 3389 unless a different value is specified.
- Specify both "username" and "password" appropriately, and set "security" to "nla" or "any". Hyper-V requires Network Level Authentication from connecting clients. AXS Guard Remote Workspace's default is to use standard RDP encryption without Network Level Authentication, which Hyper-V does not support.
- If necessary, set "ignore-cert" to "true". Hyper-V may use a self-signed certificate.
| Parameter | Description |
|---|---|
| preconnection-id | The numeric ID of the RDP source. This is a non-negative integer value dictating which of potentially several logical RDP connections should be used. This parameter is optional, and is only required if the RDP server is documented as requiring it. If using Hyper-V, this should be left blank. |
| preconnection-blob | An arbitrary string which identifies the RDP source - one of potentially several logical RDP connections hosted by the same RDP server. This parameter is optional, and is only required if the RDP server is documented as requiring it, such as Hyper-V. In all cases, the meaning of this parameter is opaque to the RDP protocol itself and is dictated by the RDP server. For Hyper-V, this will be the ID of the destination virtual machine. |
Remote desktop gateway
Microsoft's remote desktop server provides an additional gateway service which allows external connections to be forwarded to internal RDP servers which are otherwise not accessible. If you will be using AXS Guard Remote Workspace to connect through such a gateway, you will need to provide additional parameters describing the connection to that gateway, as well as any required credentials.
| Parameter | Description |
|---|---|
| gateway-hostname | The hostname of the remote desktop gateway that should be used as an intermediary for the remote desktop connection. If omitted, a gateway will not be used. |
| gateway-port | The port of the remote desktop gateway that should be used as an intermediary for the remote desktop connection. By default, this will be "443". |
| gateway-username | The username of the user authenticating with the remote desktop gateway, if a gateway is being used. This is not necessarily the same as the user actually using the remote desktop connection. |
| gateway-password | The password to provide when authenticating with the remote desktop gateway, if a gateway is being used. |
| gateway-domain | The domain of the user authenticating with the remote desktop gateway, if a gateway is being used. This is not necessarily the same domain as the user actually using the remote desktop connection. |
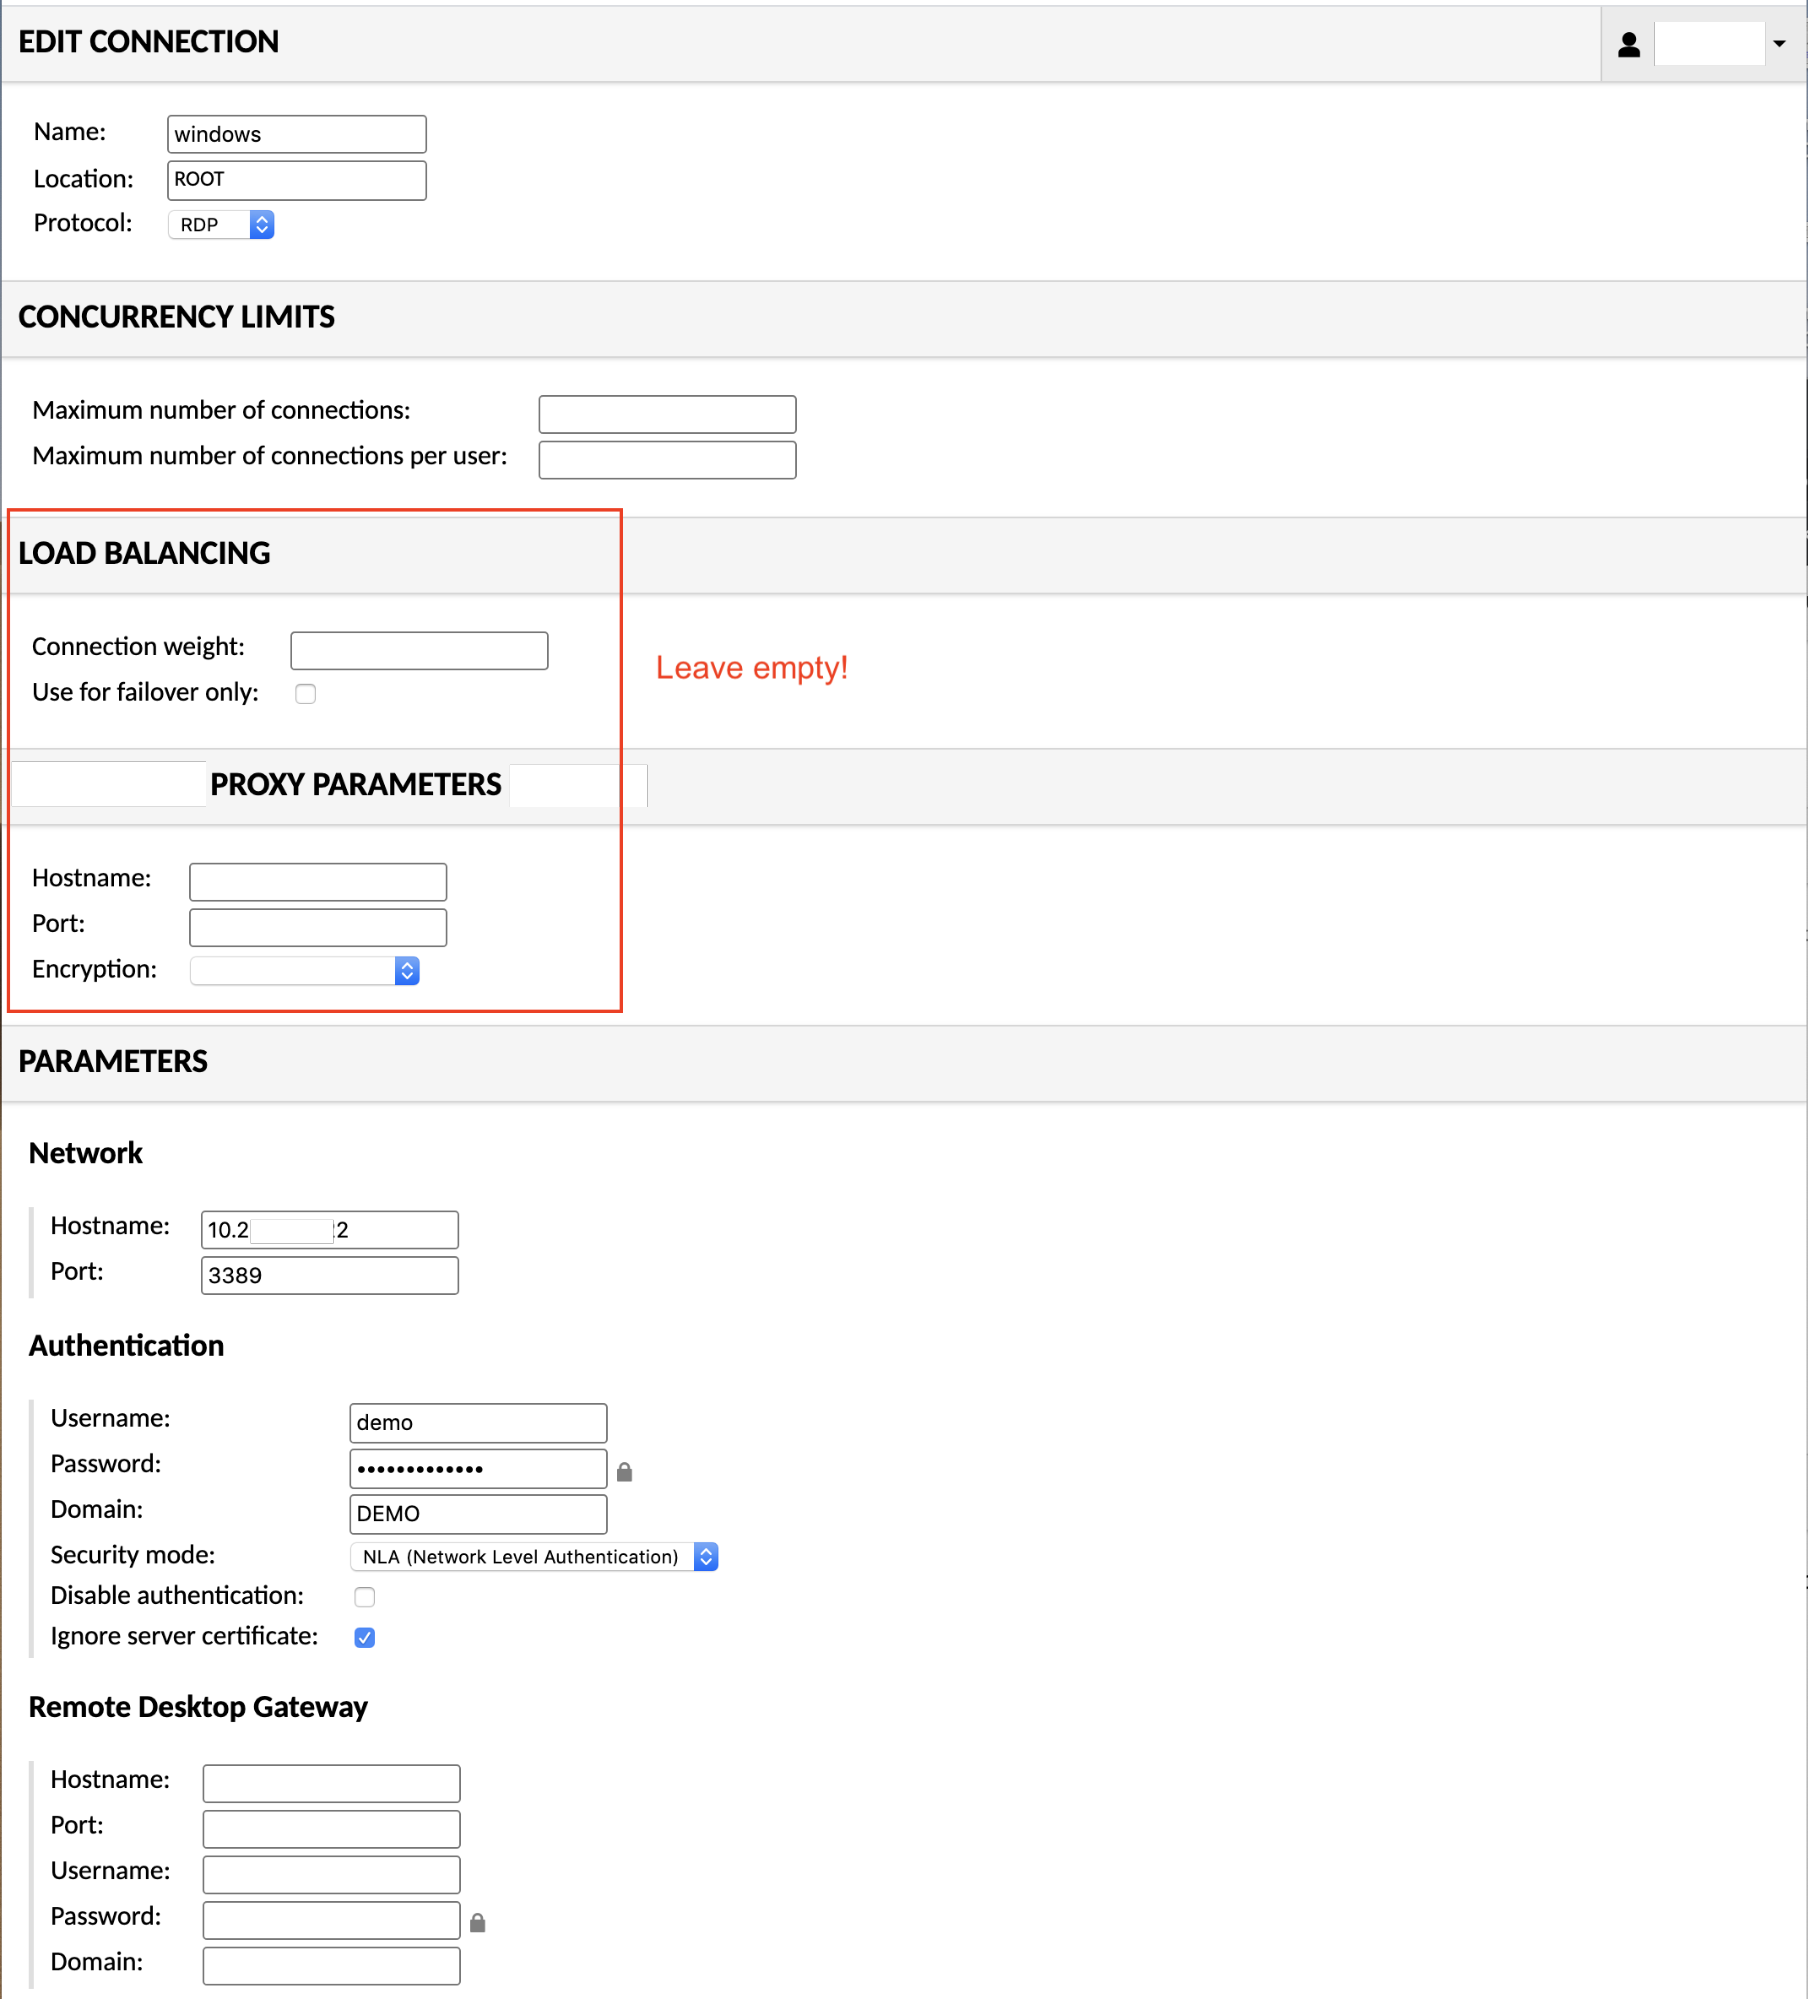
Load balancing and RDP connection brokers
If your remote desktop servers are behind a load balancer, sometimes referred to as a "connection broker" or "TS session broker", that balancer may require additional information during the connection process to determine how the incoming connection should be routed. RDP does not dictate the format of this information; it is specific to the balancer in use.
If you are using a load balancer and are unsure whether such information is required, you will need to check the documentation for your balancer. If your balancer provides .rdp files for convenience, look through the contents of those files for a string field called "loadbalanceinfo", as that field is where the required information/cookie would be specified.
| Parameter | Description |
|---|---|
| load-balance-info | The load balancing information or cookie which should be provided to the connection broker. If no connection broker is being used, this should be left blank. |
Performance flags
RDP provides several flags which control the availability of features that decrease performance and increase bandwidth for the sake of aesthetics, such as wallpaper, window theming, menu effects, and smooth fonts. These features are all disabled by default within AXS Guard Remote Workspace such that bandwidth usage is minimized, but you can manually re-enable them on a per-connection basis if desired.
| Parameter | Description |
|---|---|
| enable-wallpaper | If set to "true", enables rendering of the desktop wallpaper. By default, wallpaper will be disabled, such that unnecessary bandwidth need not be spent redrawing the desktop. |
| enable-theming | If set to "true", enables use of theming of windows and controls. By default, theming within RDP sessions is disabled. |
| enable-font-smoothing | If set to "true", text will be rendered with smooth edges. Text over RDP is rendered with rough edges by default, as this reduces the number of colors used by text, and thus reduces the bandwidth required for the connection. |
| enable-full-window-drag | If set to "true", the contents of windows will be displayed as windows are moved. By default, the RDP server will only draw the window border while windows are being dragged. |
| enable-desktop-composition | If set to "true", graphical effects such as transparent windows and shadows will be allowed. By default, such effects, if available, are disabled. |
| enable-menu-animations | If set to "true", menu open and close animations will be allowed. Menu animations are disabled by default. |
| disable-bitmap-caching | In certain situations, particularly with RDP server implementations with known bugs, it is necessary to disable RDP's built-in bitmap caching functionality. This parameter allows that to be controlled in a AXS Guard Remote Workspace session. If set to "true" the RDP bitmap cache will not be used. |
| disable-offscreen-caching | RDP normally maintains caches of regions of the screen that are current not visible in the client in order to accelerate retrieval of those regions when they come into view. This parameter, when set to "true," will disable caching of those regions. This is usually only useful when dealing with known bugs in RDP server implementations and should remain enabled in most circumstances. |
| disable-glyph-caching | In addition to screen regions, RDP maintains caches of frequently used symbols or fonts, collectively known as "glyphs." As with bitmap and offscreen caching, certain RDP implementations can cause performance issues when glyph-caching is enabled. Setting this option to true will disable glyph-caching for RDP sessions. It is strongly recommended to disable glyph-caching for pre-2016 Windows server editions and old Windows desktop versions, such as Windows 7. |
RemoteApp
Recent versions of Windows provide a feature called RemoteApp which allows individual applications to be used over RDP, without providing access to the full desktop environment. If your RDP server has this feature enabled and configured, you can configure AXS Guard Remote Workspace connections to use those individual applications.
RemoteApps lower the amount of computer resources you need on your server and are recommended when available.
| Parameter | Description |
|---|---|
| remote-app | Specifies the RemoteApp to start on the remote desktop. If supported by your remote desktop server, this application, and only this application, will be visible to the user. Windows requires a special notation for the names of remote applications. The names of remote applications must be prefixed with two vertical bars. For example, if you have created a remote application on your server for notepad.exe and have assigned it the name "notepad", you would set this parameter to: ||notepad. |
| remote-app-dir | The working directory, if any, for the remote application. This parameter has no effect if RemoteApp is not in use. |
| remote-app-args | The command-line arguments, if any, for the remote application. This parameter has no effect if RemoteApp is not in use. |
SSH
Unlike VNC or RDP, SSH is a text protocol. Its implementation in AXS Guard Remote Workspace is actually a combination of a terminal emulator and SSH client, because the SSH protocol isn't inherently graphical. AXS Guard Remote Workspace's SSH support emulates a terminal on the server side, and draws the screen of this terminal remotely on the client.
SSH Host Verification
By default, AXS Guard Remote Workspace does not do any verification of host identity before establishing SSH connections. While this may be safe for private and trusted networks, it is not ideal for large networks with unknown/untrusted systems, or for SSH connections that traverse the Internet. The potential exists for Man-in-the-Middle (MitM) attacks when connecting to these hosts.
AXS Guard Remote Workspace includes two methods for verifying SSH (and SFTP) server identity that can be used to make sure that the host you are connecting to is a host that you know and trust. The first method is by reading a file in AXS Guard Remote Workspace_HOME called ssh_known_hosts. This file should be in the format of a standard OpenSSH known_hosts file. If the file is not present, no verification is done. If the file is present, it is read in at connection time and remote host identities are verified against the keys present in the file.
The second method for verifying host identity is by passing a connection parameter that contains an OpenSSH known hosts entry for that specific host. The host-key parameter is used for SSH connections, while the SFTP connections associated with RDP and VNC use the sftp-host-key parameter. If these parameters are not present on their respective connections no host identity verification is performed. If the parameter is present then the identity of the remote host is verified against the identity provided in the parameter before a connection is established.
Network parameters
SSH connections require a hostname or IP address defining the destination machine. SSH is standardized to use port 22 and this will be the proper value in most cases. You only need to specify the SSH port if you are not using the standard port.
| Parameter | Description |
|---|---|
| hostname | The hostname or IP address of the SSH server AXS Guard Remote Workspace should connect to. |
| port | The port the SSH server is listening on, usually 22. This parameter is optional. If this is not specified, the default of 22 will be used. |
| host-key | The known hosts entry for the SSH server. This parameter is optional, and, if not provided, no verification of host identity will be done. If the parameter is provided the identity of the server will be checked against the data. The format of this parameter is that of a single entry from an OpenSSH known_hosts file. For more information, please see SSH Host Verification. |
| server-alive-interval | By default the SSH client does not send keepalive requests to the server. This parameter allows you to configure the the interval in seconds at which the client connection sends keepalive packets to the server. The default is 0, which disables sending the packets. The minimum value is 2. |
Authentication
SSH provides authentication through passwords and public key authentication, and also supports the NONE method.
SSH NONE authentication is seen occasionally in appliances and items like network or SAN fabric switches. Generally for this authentication method you need only provide a username.
For AXS Guard Remote Workspace to use public key authentication, it must have access to your private key and, if applicable, its passphrase. If the private key requires a passphrase, but no passphrase is provided, you will be prompted for the passphrase upon connecting.
If no private key is provided, AXS Guard Remote Workspace will attempt to authenticate using a password, reading that password from the connection parameters, if provided, or by prompting the user directly.
| Parameter | Description |
|---|---|
| username | The username to use to authenticate, if any. This parameter is optional. If not specified, you will be prompted for the username upon connecting. |
| password | The password to use when attempting authentication, if any. This parameter is optional. If not specified, you will be prompted for your password upon connecting. |
| private-key | The entire contents of the private key to use for public key authentication. If this parameter is not specified, public key authentication will not be used. The private key must be in OpenSSH format, as would be generated by the OpenSSH ssh-keygen utility. |
| passphrase | The passphrase to use to decrypt the private key for use in public key authentication. This parameter is not needed if the private key does not require a passphrase. If the private key requires a passphrase, but this parameter is not provided, the user will be prompted for the passphrase upon connecting. |
Display settings
AXS Guard Remote Workspace's SSH support provides a display, but not in the same sense as a remote desktop protocol like VNC or RDP. The display is a terminal emulator, and thus provides options for configuring the font used and its size. In this case, the chosen font must be installed on the server, as it is the server that will handle rendering of characters to the terminal display, not the client.
| Parameter | Description |
|---|---|
| color-scheme | The color scheme to use for the terminal emulator used by SSH connections. It consists of a semicolon-separated series of name-value pairs. Each name-value pair is separated by a colon and assigns a value to a color in the terminal emulator palette. For example, to use blue text on white background by default, and change the red color to a purple shade, you would specify:
|
| font-name | The name of the font to use. This parameter is optional. If not specified, the default of "monospace" will be used instead. |
| font-size | The size of the font to use, in points. This parameter is optional. If not specified, the default of 12 will be used instead. |
| scrollback | The maximum number of rows to allow within the terminal scrollback buffer. This parameter is optional. If not specified, the scrollback buffer will be limited to a maximum of 1000 rows. |
Running a command (instead of a shell)
By default, SSH sessions will start an interactive shell. The shell which will be used is determined by the SSH server, normally by reading the user's default shell previously set with chsh or within /etc/passwd. If you wish to override this and instead run a specific command, you can do so by specifying that command in the configuration of the AXS Guard Remote Workspace SSH connection.
| Parameter | Description |
|---|---|
| command | The command to execute over the SSH session, if any. This parameter is optional. If not specified, the SSH session will use the user's default shell. |
Internationalization & Locale settings
The language of the session is normally set by the SSH server. If the SSH server allows the relevant environment variable to be set, the language can be overridden on a per-connection basis.
| Parameter | Description |
|---|---|
| locale | The specific locale to request for the SSH session. This parameter is optional and may be any value accepted by the LANG environment variable of the SSH server. If not specified, the SSH server's default locale will be used. As this parameter is sent to the SSH server using the LANG environment variable, the parameter will only have an effect if the SSH server allows the LANG environment variable to be set by SSH clients. |
| timezone | This parameter allows you to control the timezone that is sent to the server over the SSH connection, which will change the way local time is displayed on the server. The mechanism used to do this over SSH connections is by setting the TZ variable on the SSH connection to the timezone specified by this parameter. This means that the SSH server must allow the TZ variable to be set/overriden - many SSH server implementations have this disabled by default. To get this to work, you may need to modify the configuration of the SSH server and explicitly allow for TZ to be set/overriden. The available values of this parameter are standard IANA key zone format timezones, and the value will be sent directly to the server in this format. |
Controlling terminal behavior
In most cases, the default behavior for a terminal works without modification. However, when connecting to certain systems, particularly operating systems other than Linux, the terminal behavior may need to be tweaked to allow it to operate properly. The settings in this section control that behavior.
| Parameter | Description |
|---|---|
| backspace | This parameter controls the ASCII code that the backspace key sends to the remote system. Under most circumstances this should not need to be adjusted; however, if, when pressing the backspace key, you see control characters (often either ^? or ^H) instead of seeing the text erased, you may need to adjust this parameter. By default the terminal sends ASCII code 127 (Delete) if this option is not set. |
| terminal-type | This parameter sets the terminal emulator type string that is passed to the SSH server. This parameter is optional. If not specified, "linux" is used as the terminal emulator type by default. |
Telnet
Telnet is a text protocol and provides similar functionality to SSH. By nature, it is not encrypted, and does not provide support for file transfer. As far as graphics are concerned, AXS Guard Remote Workspace's telnet support works in the same manner as SSH: it emulates a terminal on the server side which renders to the AXS Guard Remote Workspace client's display.
Network parameters
Telnet connections require a hostname or IP address defining the destination machine. Telnet is standardized to use port 23 and this will be the proper value in most cases. You only need to specify the telnet port if you are not using the standard port.
| Parameter | Description |
|---|---|
| hostname | The hostname or IP address of the telnet server AXS Guard Remote Workspace should connect to. |
| port | The port the telnet server is listening on, usually 23. This parameter is optional. If this is not specified, the default of 23 will be used. |
Authentication
Telnet does not actually provide any standard means of authentication. Authentication over telnet depends entirely on the login process running on the server and is interactive. To cope with this, AXS Guard Remote Workspace provides non-standard mechanisms for automatically passing the username and entering password. Whether these mechanisms work depends on specific login process used by your telnet server.
The de-facto method for passing the username automatically via telnet is to submit it via the USER environment variable, sent using the NEW-ENVIRON option. This is the mechanism used by most telnet clients, typically via the -l command-line option.
Passwords cannot typically be sent automatically - at least not as reliably as the username. There is no PASSWORD environment variable (this would actually be a horrible idea) nor any similar mechanism for passing the password to the telnet login process, and most telnet clients provide no built-in support for automatically entering the password. The best that can be done is to heuristically detect the password prompt, and type the password on behalf of the user when the prompt appears. The prescribed method for doing this with a traditional command-line telnet is to use a utility like expect. AXS Guard Remote Workspace provides similar functionality by searching for the password prompt with a regular expression.
If AXS Guard Remote Workspace receives a line of text which matches the regular expression, the password is automatically sent. If no such line is ever received, the password is not sent, and the user must type the password manually. Pressing any key during this process cancels the heuristic password prompt detection.
If the password prompt is not being detected properly, you can try using your own regular expression by specifying it within the password-regex parameter. The regular expression must be written in the POSIX ERE dialect (the dialect typically used by egrep).
| Parameter | Description |
|---|---|
| username | The username to use to authenticate, if any. This parameter is optional. If not specified, or not supported by the telnet server, the login process on the telnet server will prompt you for your credentials. For this to work, your telnet server must support the NEW-ENVIRON option, and the telnet login process must pay attention to the USER environment variable. Most telnet servers satisfy this criteria. |
| password | The password to use when attempting authentication, if any. This parameter is optional. If specified, your password will be typed on your behalf when the password prompt is detected. |
| username-regex | The regular expression to use when waiting for the username prompt. This parameter is optional. If not specified, a reasonable default built into AXS Guard Remote Workspace will be used. The regular expression must be written in the POSIX ERE dialect (the dialect typically used by egrep). |
| password-regex | The regular expression to use when waiting for the password prompt. This parameter is optional. If not specified, a reasonable default built into AXS Guard Remote Workspace will be used. The regular expression must be written in the POSIX ERE dialect (the dialect typically used by egrep). |
| login-success-regex | The regular expression to use when detecting that the login attempt has succeeded. This parameter is optional. If specified, the terminal display will not be shown to the user until text matching this regular expression has been received from the telnet server. The regular expression must be written in the POSIX ERE dialect (the dialect typically used by egrep). |
| login-failure-regex | The regular expression to use when detecting that the login attempt has failed. This parameter is optional. If specified, the connection will be closed with an explicit login failure error if text matching this regular expression has been received from the telnet server. The regular expression must be written in the POSIX ERE dialect (the dialect typically used by egrep). |
Display settings
AXS Guard Remote Workspace's telnet support provides a display, but not in the same sense as a remote desktop protocol like VNC or RDP. The display is a terminal emulator, and thus provides options for configuring the font used and its size. In this case, the chosen font must be installed on the server, as it is the server that will handle rendering of characters to the terminal display, not the client.
| Parameter | Description |
|---|---|
| color-scheme | The color scheme to use for the terminal emulator used by telnet connections. It consists of a semicolon-separated series of name-value pairs. Each name-value pair is separated by a colon and assigns a value to a color in the terminal emulator palette. For example, to use blue text on white background by default, and change the red color to a purple shade, you would specify:
|
| font-name | The name of the font to use. This parameter is optional. If not specified, the default of "monospace" will be used instead. |
| font-size | The size of the font to use, in points. This parameter is optional. If not specified, the default of 12 will be used instead. |
| scrollback | The maximum number of rows to allow within the terminal scrollback buffer. This parameter is optional. If not specified, the scrollback buffer will be limited to a maximum of 1000 rows. |
Controlling terminal behavior
In most cases, the default behavior for a terminal works without modification. However, when connecting to certain systems, particularly operating systems other than Linux, the terminal behavior may need to be tweaked to allow it to operate properly. The settings in this section control that behavior.
| Parameter | Description |
|---|---|
| backspace | This parameter controls the ASCII code that the backspace key sends to the remote system. Under most circumstances this should not need to be adjusted; however, if, when pressing the backspace key, you see control characters (often either ^? or ^H) instead of seeing the text erased, you may need to adjust this parameter. By default the terminal sends ASCII code 127 (Delete) if this option is not set. |
| terminal-type | This parameter sets the terminal emulator type string that is passed to the telnet server. This parameter is optional. If not specified, "linux" is used as the terminal emulator type by default. |
Connection organization and load balancing
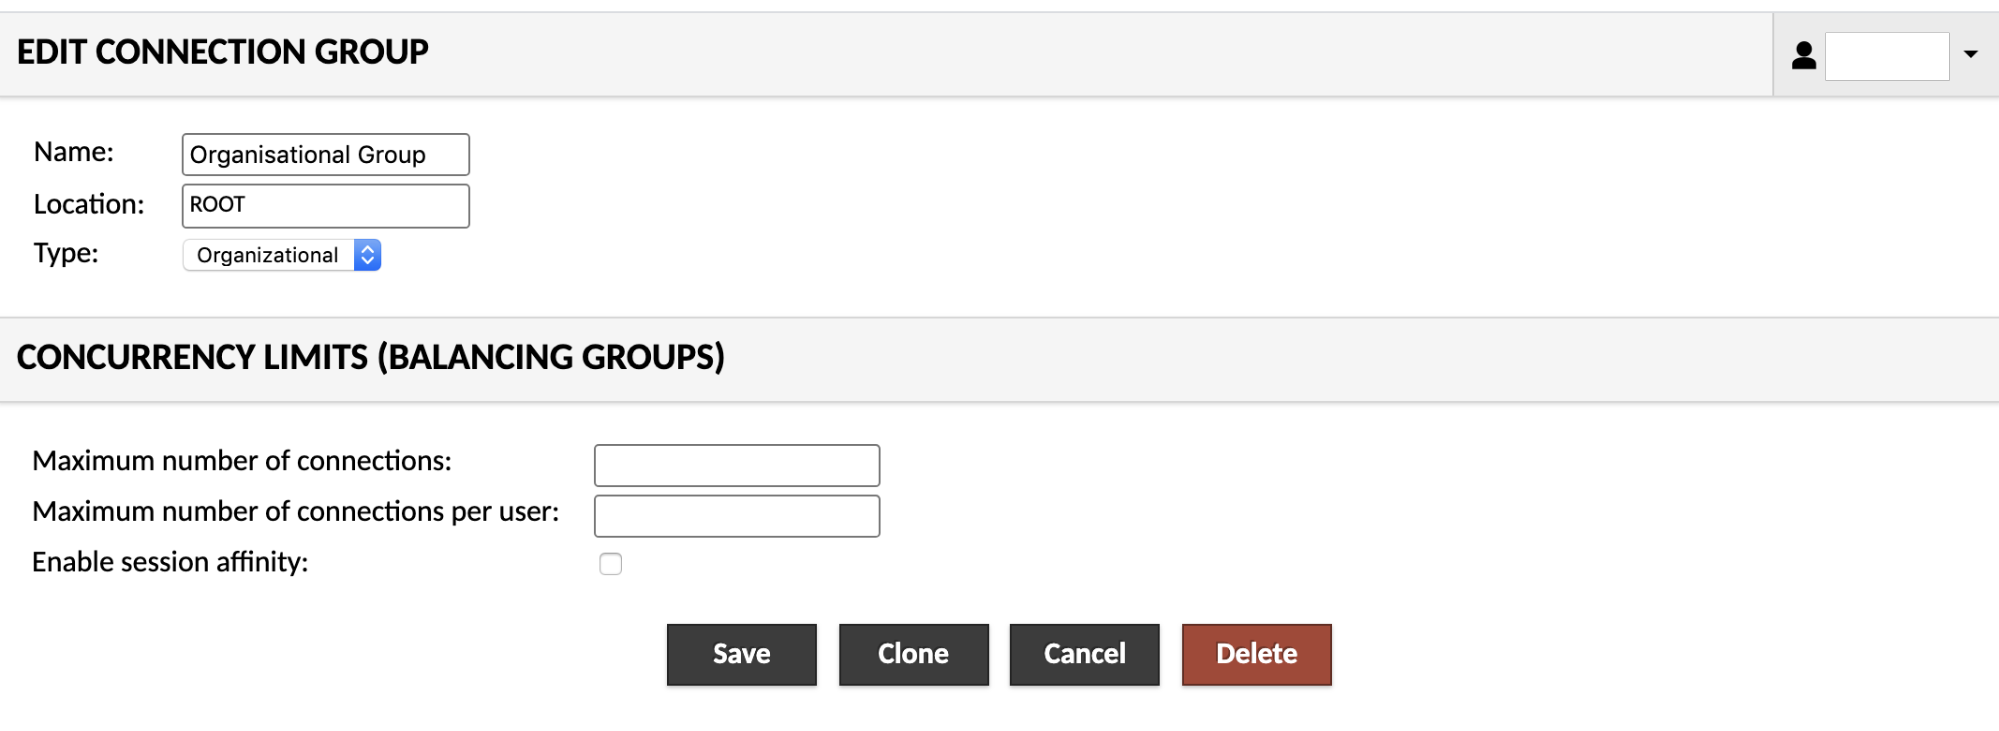
Connection groups can be either "organizational" or "balancing". Each group can contain any number of other connections or groups, but the semantics of the group change depending on the type.
An organizational group behaves exactly as a folder or directory in a file system. It simply contains connections and other groups, but provides no other behavior. Clicking on an organizational group within a connection list will expand the group, revealing its contents.
A balancing group behaves as a connection. It dynamically balances load across the connections it contains, choosing the connection with the fewest number of active users. Unlike organizational groups, clicking on a balancing group causes a new connection to be opened. The actual underlying connection used depends on which connection has the least load at the time the group was clicked, and whether session affinity is enabled on that group.
Enabling session affinity for a balancing group ensures that users are consistently routed to the same underlying connections until they log out of AXS Guard Remote Workspace. The load balancing behavior of the balancing group will apply only for the first time a particular user connects to the group. If your users may lose their desktop state if they are routed to a different underlying connection, this option should be enabled.
Connection sharing
The ability to share a connection is governed through the use of "sharing profiles". If a sharing profile is created for a connection, users with access to both that connection and that sharing profile will be able to share the connection with other users by generating connection sharing links, even if those users do not otherwise have user accounts within AXS Guard Remote Workspace.
The name of the sharing profile will be presented an option within the share menu for any users with access, while the level of access granted to users of generated share links will be dictated by the parameters specified for the sharing profile.
Unlike connections and groups, there is no "New Sharing Profile" button. Sharing profiles are created through clicking the "New Sharing Profile" placeholders which appear when connections are expanded. Just as expanding a connection group reveals the connections or groups therein, expanding a connection reveals the sharing profiles associated with that connection. This holds true with both the list of connections in the connection management screen and the list of connections in the user editor.
Creating or editing a sharing profile is virtually identical to creating or editing a connection, with the exception that not all connection parameters are available:
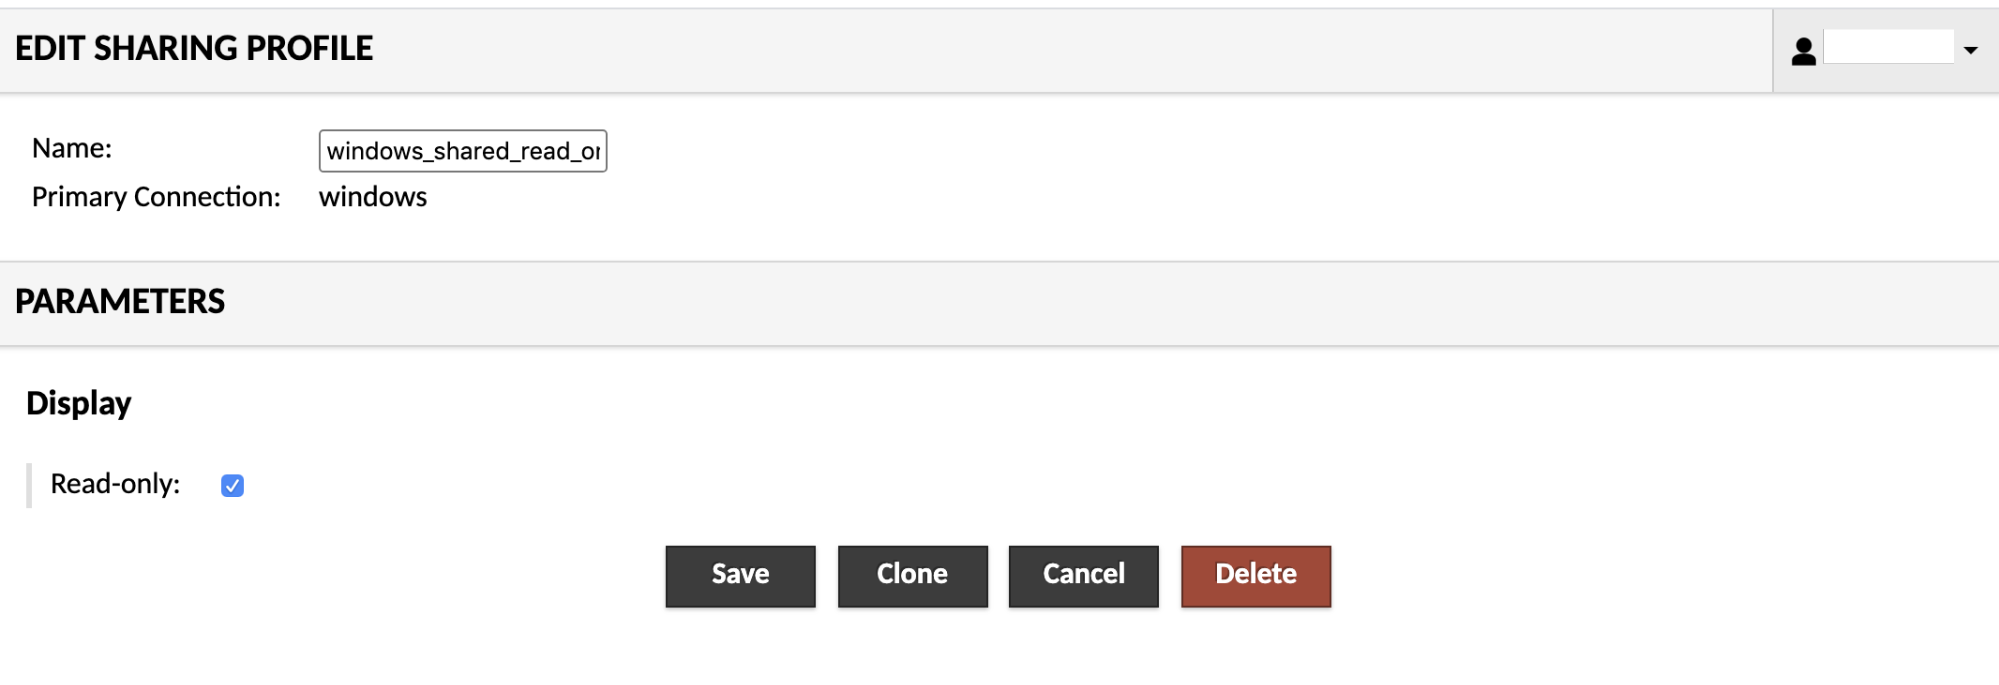
Support
If you encounter a problem
If you encounter a problem with AXS Guard, follow the steps below:
-
Check the troubleshooting section of the feature-specific manual.
-
Check the knowledge base on this site for information about special configurations.
-
If no solution is available in any of the above sources, contact your AXS Guard vendor.
Contact Information
(+32) 15-504-400
support@axsguard.com