CLI Guide
Introduction
About this Document
The AXS Guard CLI guide serves as a reference source for technical personnel and system administrators. It explains how to use the AXS Guard console tool for advanced troubleshooting.
Examples used in this Guide
All setups and configuration examples in this guide are executed as an advanced administrator. Some options are not available if you log in as a full administrator or a user with lower access privileges.
As software development and documentation are ongoing processes, the screenshots shown in this guide may slightly deviate from the current user interface.
Local Access to the Console
About
The console tool is a text-based command line interface (CLI) to edit and display critical AXS Guard configuration parameters via menus. It also allows you to execute commands for advanced troubleshooting, such as network traffic analysis.
There are 2 ways to access the AXS Guard console tool:
| Method | Description |
|---|---|
Local Access |
Connect a keyboard and monitor directly to the AXS Guard appliance. Access privileges to the console tool are required. |
Remote Access |
The user connects to the AXS Guard console from a remote PC with an SSH client. Access privileges to the console tool and a key pair are both required. |
Connecting a Keyboard and Screen
You can access the console tool locally by connecting a keyboard and
monitor to the rear connectors of the AXS Guard appliance (shown below).
Only users with console tool access privileges can log in to the console
tool. Another option is to log in with the sysadmin account, which has access to the
console tool by default.

Info
- USB keyboards are not supported.
- QWERTY (US) is the default keyboard layout.
Providing Access to the Console
Important
- This is not required for the
sysadminaccount, which has access by default. - The console tool is only accessible to users with basic administrator privileges or above.
-
Log in to the AXS Guard appliance.
-
Navigate to Users & Groups > Users.
-
Click on the user name of the administrator who needs access to the AXS Guard console tool.
-
Click on the AXS Guard Administration Tab.
-
Check the Console Tool Access option.
-
Copy the public RSA or DSA key of the user into the public key field (only required for remote access).
-
Update your configuration.
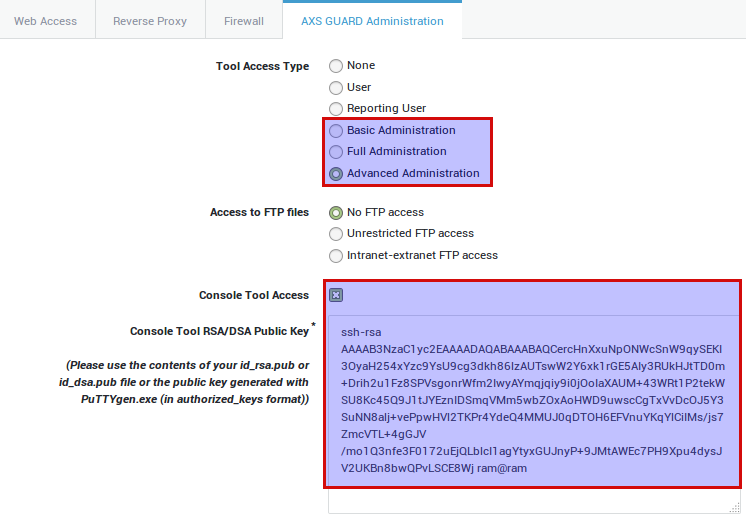
Parameter |
Description |
|---|---|
Console Tool Access |
Check to enable access to the console tool. |
Console Tool RSA/DSA Public Key |
Copy and paste the user’s public key, generated with |
Logging in to the Console Tool
-
Press Alt + F2 to log in to the AXS Guard console tool.
-
Log in with the
sysadminaccount or a user with console tool access.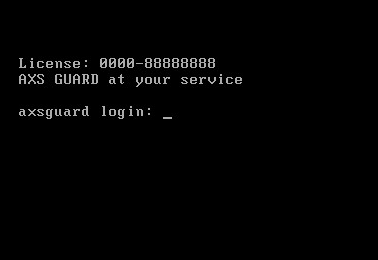
Info
See the AXS Guard Getting Started and System Administration guides for additional information about the sysadmin account.
Remote Access to the Console
Prerequisites
The following is required to log in to the console tool from a remote host:
-
A user with console tool access privileges.
-
A valid DSA or RSA key pair, generated with PuTTY or
ssh-keygen. -
A host with an SSH client, e.g. PuTTY.
Windows
PuTTY Key Generator
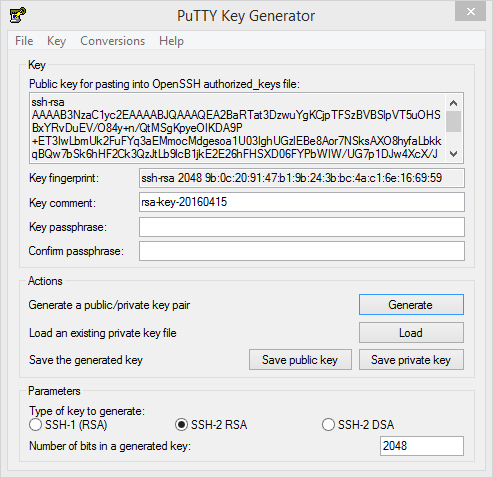
PuTTYgen is a free RSA and DSA key pair generator, manager and converter for use with the Windows PuTTY client. Use PuTTYgen to generate the required key pairs to access the AXS Guard console tool.
About Key Pairs
A key pair is a set of digital keys; a public key, which needs to be copied to the AXS Guard, and a private key, which needs to be securely stored on the client workstation or another portable medium, such as a portable USB drive. The private key must be secured and not be accessible to anyone but the intended user. A public key is identified by its key fingerprint.
About Key Fingerprints
A key fingerprint is a string of numbers and characters or ASCII art that uniquely identifies a public key.
The key fingerprint is shown when connecting to the AXS Guard console tool for the first time. It is up to the user to inspect, verify and accept (or deny) the key on the client side. This verification is an extra step towards security and exists to prevent man-in-the-middle (MITM) attacks.
Generating a Key Pair with PuTTYgen
-
Start the PuTTYgen application.
-
Select the type of key to generate, e.g. SSH-2 RSA. This is the default type.
-
Generate your key pair.
-
Log in to the AXS Guard appliance and copy / paste the public key into the appropriate user profile with console tool access privileges.
-
Store your private key in a secure location, preferably in a private (encrypted) folder.
Important
- It is highly recommended to protect your private key with a strong password. The private key must not be accessible to anyone but the intended user. A password protects your private key against theft or accidental loss.
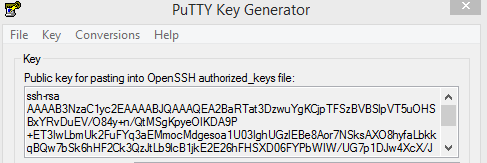
- PuTTYgen automatically adds extra information to the public key when it is saved to a file. Do no copy the contents of the file to the AXS Guard profile of the user with console tool access privileges or the SSH connection will fail. Copy and paste the public key instead.
Logging in to the Console with PuTTY
PuTTY is a free and open-source SSH (Secure Shell) and Telnet client, developed for Windows platforms.
-
Start the PuTTY application.
-
Go to Window > Translation and change the remote character set to
iso-8859-5. -
Go to Connection > Data and enter the AXS Guard user name in the auto-login username field. This is the user with console tool access privileges. Use the correct cases, as usernames are case-sensitive.
-
Navigate to Connection > SSH > Auth and add the user’s private key to the authentication parameters.
-
Go to Session and enter the LAN IP address of the AXS Guard, e.g.
192.168.250.254. Press enter to connect.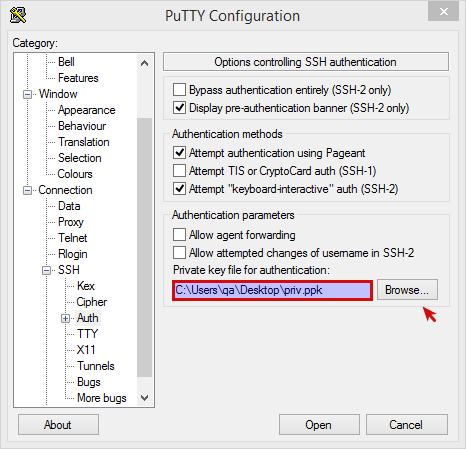
Info
- Save your session so you don’t have to reconfigure the PuTTY client the next time you log in.
- If your private key is password-protected (recommended), you will be prompted to enter it before connecting to the AXS Guard console tool.
Unix-like Operating Systems
Generating a Key Pair with ssh-keygen
It is highly recommended to protect your private key with a password. The private key must not be accessible to anyone but the intended user.
ssh-keygen is a Linux command
to generate, manage and convert RSA and DSA authentication keys. It
supports the creation of keys for the SSH protocol versions 1 and 2.
To generate a key pair with
ssh-keygen:
-
Start a console.
-
Type
ssh-keygenwithout any arguments and press enter. -
Follow the on-screen instructions.
-
Copy and paste the contents of the public key file into the AXS Guard profile of the user with console tool access privileges.
    $ ssh-keygen
    Generating public/private rsa key pair.
    Enter file in which to save the key (/home/user/.ssh/id_rsa): /home/user/.ssh/axsguard
    Enter passphrase (empty for no passphrase): *********************
    Enter same passphrase again: *********************
    Your identification has been saved in /home/user/.ssh/axsguard.
    Your public key has been saved in /home/user/.ssh/axsguard.pub.
    The key fingerprint is:
    20:cb:b6:a6:c5:81:73:ac:6f:b9:f2:f8:d8:9b:d2:01 user@user
    The key's randomart image is:
    +--[ RSA 2048]----+
    |                 |
    |                 |
    |    . .          |
    |  E+ o .         |
    |  o.B   S        |
    |   *.o           |
    |  ..=o           |
    |  oO+.           |
    |  +*Oo           |
    +-----------------+
Logging in to the Console with SSH
SSH stands for Secure Shell. ssh is
a free program which allows remote users to securely log in to another
computer.
To log in to the AXS Guard console tool with
ssh:
-
Start a Linux console.
-
Specify the private key with the
-iparameter, e.g.:ssh -i /home/yourhomedir/.ssh/axsguard admin@192.168.250.254
Info
- If your private key is password-protected (recommended), you will be prompted to enter it before connecting to the console tool.
- Replace
yourhomedirwith the appropriate path. - Replace
adminwith the appropriate user. - Replace
192.168.250.254with the LAN IP address of your AXS Guard appliance.
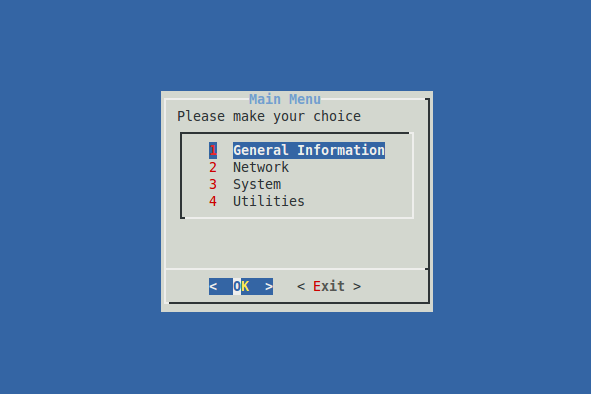
Console Tool Menus
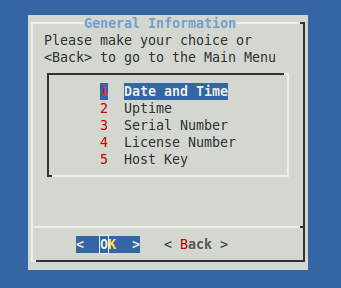
General Information
Menu Item |
Description |
|---|---|
Date and Time |
Shows the current system date and time in the |
Uptime |
Shows the system’s uptime and current load average.
|
Serial Number |
Shows the serial number of your appliance. It contains the same information as shown under System > Status > System Info in the system’s web-based configuration tool. Note that virtual appliances do not have a serial number. |
License Number |
The software license number of your appliance. |
Host Key |
The host key of your appliance. The host key is linked to your software license. |
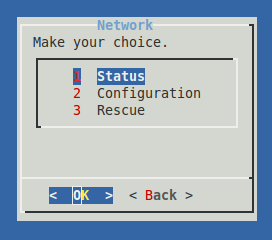
Network
Submenu |
Description |
|---|---|
Status |
Shows the runtime information of the selected network interface. |
Configuration |
Select this option to configure the network devices of the appliance. Use the CIDR notation to assign IP addresses, e.g. |
Rescue |
Select to open TCP ports 22 and 82 of the primary secure LAN device of the appliance in case these ports were accidentally closed. The primary secure LAN device is used by:
|
System
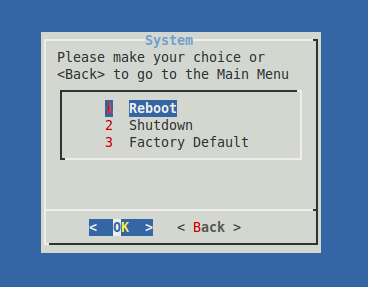
Submenu |
Description |
|---|---|
Reboot |
Select to reboot the appliance, e.g. in case you cannot reboot the appliance via the web-based administrator tool. |
Shutdown |
Select to shut down the appliance, e.g. in case you cannot shut it down via the web-based administrator tool. |
Factory Default |
Select to restore the appliance to its factory default settings. |
Back up your system!
Resetting the appliance to its factory default settings will:
- Reset the
sysadminpassword to the system default value. - Delete all configured users, groups, computers and other system configuration settings.
- Delete all user data, such as e-mails.
- Delete the latest IPS rule sets and virus definitions.
- Clear out the customer information.
- Delete the license and change the configuration key. See the section about relicensing.
Utilities
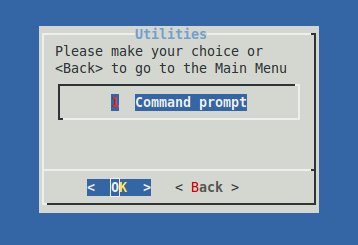
Select this menu to access the shell of the AXS Guard appliance. The shell allows you to execute commands to troubleshoot problems. A list of available commands is provided at the end of this document.
Useful Console Commands
Getting Help
Info
For assistance with a particular command, go to http://linux.die.net/man/
Current Kernel Version
The uname -r command shows the current AXS Guard kernel version.
This information is useful if you intend to deploy AXS Guard in a virtual environment.
4.14-axs-virtual
The w command
w displays information about the users that are currently logged on to
the appliance and their processes. The header shows the current time,
how long the system has been running, how many users are currently
logged on and the system load averages for the past 1, 5, and 15
minutes.
The uptime command
uptime tells you how long the appliance has been running.
13:14:32 up 2:07, 0 users, load average: 0.73, 1.12, 1.10
The ip Command
The ip command must not be used to change any IP settings. Use the Administrator Tool or the Interfaces menu instead.
ip addr list
Displays the information of all available AXS Guard network interfaces.
ip addr list eth0
Displays the information of a specific AXS Guard network interface, e.g.
eth0
-
link/ether: The MAC address of the specified network interface, e.g. 00:0C:29:38:24:16. -
inet: The IP address and subnet mask (CIDR notation) of the specified network interface, e.g. 192.168.208.254/24. -
brd: The Broadcast IP address of the subnet to which the interface is connected, e.g. 192.168.208.255.
The ifconfig Command
Important
- The ifconfig command must not be used to change any IP settings. Use the Administrator Tool or the Interfaces menu instead.
- Aliases are not shown with ifconfig. Use the ip command to display alias information.
ifconfig
If no arguments are provided, ifconfig displays the status of all active network interfaces, physical and virtual (VLANs).
ifconfig eth0
Displays the information of the eth0 device. If eth1 is provided as
an argument, only the information for the eth1 device is displayed,
etc.
-
Hwaddr: The MAC address of the specified network interface, e.g. 00:0C:29:38:24:16
-
inet addr: The IP address of the specified network interface, e.g. 192.168.208.254.
-
Bcast: The Broadcast IP address of the subnet to which the interface is attached, e.g. 192.168.208.255.
-
Mask: The Subnet Mask or network segment in which the interface operates, e.g. 255.255.255.0
[zed@isdead ~]$ ifconfig
eth0      Link encap:Ethernet  HWaddr 00:08:54:56:2E:BB
          inet addr:10.32.64.162  Bcast:10.32.64.255  Mask:255.255.255.0
          inet6 addr: fe80::208:54ff:fe56:2ebb/64 Scope:Link
          UP BROADCAST RUNNING MULTICAST  MTU:1500  Metric:1
          RX packets:2246368 errors:0 dropped:172 overruns:0 frame:0
          TX packets:1271927 errors:0 dropped:0 overruns:0 carrier:0
          collisions:0 txqueuelen:1000
          RX bytes:2670287774 (2546.5 Mb)  TX bytes:114690905 (109.3 Mb)
          Interrupt:16 Base address:0xcc00

lo        Link encap:Local Loopback
          inet addr:127.0.0.1  Mask:255.0.0.0
          inet6 addr: ::1/128 Scope:Host
          UP LOOPBACK RUNNING  MTU:16436  Metric:1
          RX packets:144 errors:0 dropped:0 overruns:0 frame:0
          TX packets:144 errors:0 dropped:0 overruns:0 carrier:0
          collisions:0 txqueuelen:0
          RX bytes:8640 (8.4 Kb)  TX bytes:8640 (8.4 Kb)
The ping command
ping -b
pings a broadcast address to check which hosts are alive (up), e.g.
ping -b 192.168.1.255
ping -c
pings the number of times specified, e.g. ping -c 3 192.168.250.254
ping -I
pings from a specific network device, e.g.
ping -I 192.168.250.254 www.google.com
Packet Tracing with traceroute
traceroute -i
Specifies the interface through which traceroute should send packets,
e.g. traceroute -i eth1 www.google.com.
traceroute -m
Specifies the maximum number of hops (max time-to-live value) traceroute
will probe, e.g. traceroute -m 15 www.google.com. The default is 30.
Packet Tracing with tracepath
tracepath -n
Only shows the IP addresses, e.g. tracepath -n www.vasco.com
tracepath -b
Shows the hostnames and corresponding IP addresses, e.g.
tracepath -b www.vasco.com
Monitoring Bandwidth Usage with iftop
iftop -i
Specifies the interface for which network traffic information is to be
displayed, e.g. iftop -i eth0
iftop -F
Displays the network traffic from and to the specified IP address , e.g.
iftop -i eth0 -F 192.168.250.254
iftop -n
Do not perform host name lookups, e.g.
iftop -i eth0 -n -F 192.168.250.254
iftop -B
Displays bandwidth rates in bytes per second rather than bits per
second, e.g. iftop -i eth0 -n -B -F 192.168.250.254
iftop -P
Displays the ports (IP / Port pairs), e.g.
iftop -i eth0 -n -B -P -F 192.168.250.254
Using grep to search through Files
grep -i
Toggles case insensitive pattern search, e.g.
grep -i 'drop' 2008-09-29
grep -r
Toggles recursion. Search all files recursively within a specified
directory, e.g. grep -ir 'drop' /log/fw
grep -v
Excludes the specified string from the search, e.g.
grep -iv 'drop' /log/fw/2008-09-29
Examples
This example demonstrates how to search for network traffic which was:
-
dropped by the Firewall
-
logged on June 11th 2009 between 10:15 AM and 10:20 AM (10:20 AM is not included in the result)
grep -i 'drop' /log/fw/ | grep '10:1'
This example demonstrates how to search for network traffic in the proxy logs that is related to the access of a specific website (www.google.com).
grep -ir 'www.google.com' /log/proxy
This example demonstrates how to search for network traffic which was:
-
dropped by the Firewall
-
logged on June 11th 2009 between 10:15 AM and 10:20 AM (10:20 is excluded from the result) and
-
not originating from source IP 172.16.77.1
grep -i 'drop' /log/fw/2009-06-11 | grep -v '172.16.77.1' | grep '10:1'
Viewing Log Entries with tail
tail file
file is the path to the file, including the file name, e.g.
tail /log/fw/fileX
tail -f
Displays data as it is appended to the file in real-time, e.g.
tail -f /log/fw/fileX
Analyzing Network Traffic with tcpdump
Command Options
tcpdump -i
Specifies the network interface to capture traffic from, e.g.
tcpdump -i eth0
tcpdump -n
Does not resolve IP addresses to host names. Only displays IP addresses,
e.g. tcpdump -ni eth0
tcpdump -v
Produces verbose output, such as TTL, ICMP header checksum, etc., e.g.
tcpdump -v -ni eth0
tcpdump -c
Specifies the number of packets to capture, e.g.
tcpdump -vvv -c10 -ni eth0
tcpdump -s
Specifies the length (in bytes) of each packet to be captured, rather
than the default of 68, e.g. tcpdump -vvv -c10 -ni eth0 -s0 Setting
the value to 0 means that tcpdump automatically uses the required
length.
tcpdump -w
Writes the raw packets to a file rather than parsing them and displaying
them on the screen, e.g. tcpdump -vvv -c10 -ni eth0 -s0 -w mydumpfile.
This option is used to analyze the packets with a protocol analyzer,
such as Wireshark.
-
More verbose output is provided for each additional
v, e.g.tcpdump -vvv -ni eth0 -
Consult the online
tcpdumpman page for additional information.
Matching Network Traffic
The output of the tcpdump command can be matched with the following:
-
A specific destination or source host, e.g.
dst host 192.168.250.254 -
A specific destination or source port, e.g.
dst port 80 -
A specific network protocol, e.g.
udp port 53 -
Matches can be combined using the
and,or¬operands.
Examples
tcpdump -ni eth0 host 192.168.250.254
Captures network packets on the eth0 network interface that match with IP address 192.168.250.254.
tcpdump -ni eth0 port 22
Captures network packets on the eth0 network interface and displays all network traffic related to port 22 (SSH).
tcpdump -ni eth0 icmp
Captures network packets on the eth0 network interface and displays all ICMP network traffic.
tcpdump -ni eth0 host 192.168.250.254 and port 25
Captures network packets on the eth0 network interface that match with IP address 192.168.250.254. Only network traffic related to port 25 (SMTP) is captured.
tcpdump -ni eth0 host 192.168.250.254 and not port 22
Captures network packets on the eth0 network interface that match with IP address 192.168.250.254. All traffic is displayed, except traffic related to port 22 (excluded).
tcpdump -ni eth0 host 192.168.250.254 and not port 22 -s0
Performs the same operation as explained in the previous example, but in
addition tcpdump automatically captures the required packet length,
since the -s0 parameter is added.
tcpdump -ni eth0 host 192.168.250.254 and not port 22 -s0 -w mycapfile
Performs the same operation as explained in the previous example, but in addition the command output is written to a file, allowing further analysis with a protocol analyzer, such as Wireshark.
Press CTRL + C to exit tcpdump
Telnet
telnet -4 host.domain.com
Forces IPv4 address resolution.
telnet -6 host.domain.com
Forces IPv6 address resolution.
Netcat
Common uses include:
-
simple TCP proxies
-
network daemon testing
-
SOCKS or HTTP ProxyCommand for ssh
nc -l 2389
Starts server mode on the specified port and listens for incoming connections.
nc somehost.com 2389
Starts client mode and tries to connect to the specified host on the specified port
Dig
dig google.com
Queries the DNS server(s) as configured on your system and returns any
record that matches google.com.
dig mx google.com @1.1.1.1
Specifically queries the DNS server with IP 1.1.1.1 for the MX record of the Google domain.
Nslookup
nslookup www.vasco.com
Server:         10.32.64.1
Address:        10.32.64.1#53

Non-authoritative answer:
Name:   www.vasco.com
Address: 62.58.227.146
nslookup followed by a domain name will display the A Record (IP Address) of that domain.
nslookup -query=mx google.com
Server:         10.32.64.1
Address:        10.32.64.1#53

Non-authoritative answer:
google.com      mail exchanger = 50 alt4.aspmx.l.google.com.
google.com      mail exchanger = 20 alt1.aspmx.l.google.com.
google.com      mail exchanger = 40 alt3.aspmx.l.google.com.
google.com      mail exchanger = 30 alt2.aspmx.l.google.com.
google.com      mail exchanger = 10 aspmx.l.google.com.
Looks up the MX record for the specified domain name and lists the mail exchange servers for that domain.
Mtr
mtr is a network diagnotic tool that combines the functionalities of the traceroute and the ping commands.
mtr www.axsguard.com
iperf
iperf is a command that enables system administrators to measure the network bandwidth and check the quality of a network link.
iperf -c 1.1.1.1
Client connecting to IP 1.1.1.1 on TCP port 5001 (iperf default)
Troubleshooting
The AXS GUARD ConsoleTool option is not available
-
You can only enable Console Tool access for a user if you are logged on to the AXS Guard Administrator Tool as an advanced administrator. More information about AXS Guard user levels is available in the AXS Guard System Administration How To, which can be accessed by clicking on the permanently available Documentation button in the Administration Tool.
-
Ensure that you have selected Basic Administration or above for the given user.
The user cannot log on to the AXS GUARD Console Tool
-
Verify if the Public Key has been copied correctly. The smallest error will prevent the user from logging on.
-
Verify if the user is allowed to access the console.
-
Verify whether the user login option is enabled in the user’s AXS Guard profile.
-
Verify if the credentials are entered correctly. Check your keyboard layout. US QWERTY is the default keyboard layout.
Console Tool rendering issues
Change the value of the TERM variable to an appropriate value for your
terminal program. The $TERM shell value in Ubuntu and PuTTY defaults
to xterm for a console login. The TERM variable stores the name of
an entry in the terminfo database that helps the OS determine how to
display information in your terminal. Changing the TERM value to vte
for terminals that use the GTK console input widget resolves the issue.
Alternatively, you can use the xterm program to log in to the console;
no extra configuration is required.
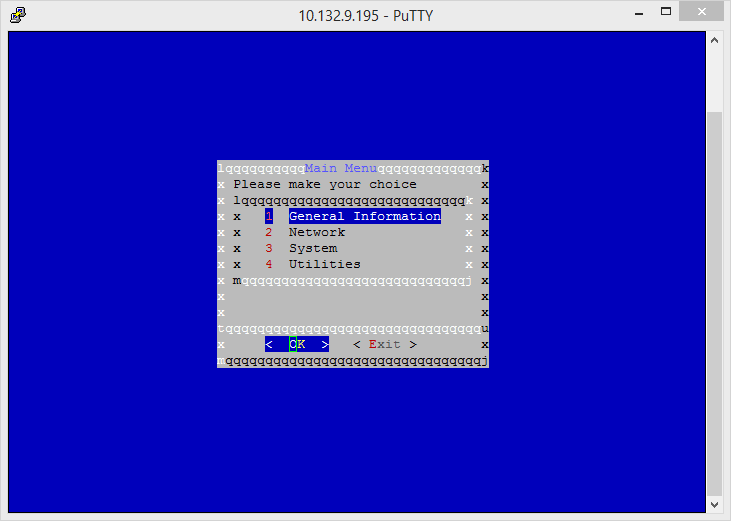
Issue with Console Tool menu borders
PuTTY uses utf-8 encoding by default, which is not yet supported by
the AXS Guard console tool. Change the character set in PuTTY to
iso-8859-5 to solve this issue (window > translation).
Support
If you encounter a problem
If you encounter a problem with AXS Guard, follow the steps below:
-
Check the troubleshooting section of the feature-specific manual.
-
Check the knowledge base on this site for information about special configurations.
-
If no solution is available in any of the above sources, contact your AXS Guard vendor.
Contact Information
(+32) 15-504-400
support@axsguard.com
List of available commands
arp (8)
manipulate the system ARP cache
arpd (8)
userspace arp daemon.
base64 (1)
base64 encode/decode data and print to standard output
basename (1)
strip directory and suffix from filenames
bash (1)
GNU Bourne Again SHell
bashbug (1)
report a bug in bash
c_rehash (1)
Create symbolic links to files named by the hash values
cat (1)
concatenate files and print on the standard output
chage (1)
change user password expiry information
chcon (1)
change file security context
chfn (1)
change real user name and information
chgpasswd (8)
update group passwords in batch mode
chgrp (1)
change group ownership
chmod (1)
change file mode bits
chown (1)
change file owner and group
chpasswd (8)
update passwords in batch mode
chsh (1)
change login shell
chvt (1)
change foreground virtual terminal
cksum (1)
checksum and count the bytes in a file
clear (1)
clear the terminal screen
comm (1)
compare two sorted files line by line
compress (1)
compress and expand data
cp (1)
copy files and directories
csplit (1)
split a file into sections determined by context lines
ctstat (8)
unified linux network statistics
cut (1)
remove sections from each line of files
date (1)
print or set the system date and time
dd (1)
convert and copy a file
deallocvt (1)
deallocate unused virtual consoles
df (1)
report file system disk space usage
dig (1)
DNS lookup utility
dir (1)
list directory contents
dircolors (1)
color setup for ls
dirname (1)
strip last component from file name
dnsdomainname (1)
show the system’s DNS domain name
domainname (1)
show or set the system’s NIS/YP domain name
du (1)
estimate file space usage
dumpkeys (1)
dump keyboard translation tables
echo (1)
display a line of text
egrep (1)
print lines matching a pattern
env (1)
run a program in a modified environment
expand (1)
convert tabs to spaces
expiry (1)
check and enforce password expiration policy
expr (1)
evaluate expressions
factor (1)
factor numbers
faillog (8)
display faillog records or set login failure limits
false (1)
do nothing, unsuccessfully
fgconsole (1)
print the number of the active VT.
fgrep (1)
print lines matching a pattern
fmt (1)
simple optimal text formatter
fold (1)
wrap each input line to fit in specified width
free (1)
Display amount of free and used memory in the system
gawk (1)
pattern scanning and processing language
getkeycodes (8)
print kernel scancode::to::keycode mapping table
gpasswd (1)
administer /etc/group and /etc/gshadow
grep (1)
print lines matching a pattern
groupadd (8)
create a new group
groupdel (8)
delete a group
groupmems (8)
administer members of a user’s primary group
groupmod (8)
modify a group definition on the system
groups (1)
display current group names
grpck (8)
verify integrity of group files
grpconv (8)
convert to and from shadow passwords and groups
grpunconv (8)
convert to and from shadow passwords and groups
gunzip (1)
compress or expand files
gzexe (1)
compress executable files in place
gzip (1)
compress or expand files
head (1)
output the first part of files
host (1)
DNS lookup utility
hostid (1)
print the numeric identifier for the current host
hostname (1)
show or set the system’s host name
id (1)
print real and effective user and group IDs
ifconfig (8)
configure a network interface
iftop (8)
display bandwidth usage on an interface by host
igawk (1)
gawk with include files
install (1)
copy files and set attributes
ip (8)
show / manipulate routing, devices, policy routing and tunnels
iperf (1)
perform network throughput tests
join (1)
join lines of two files on a common field
kbd_mode (1)
report or set the keyboard mode
kbdrate (8)
reset the keyboard repeat rate and delay time
kill (1)
send a signal to a process
lastlog (8)
reports the most recent login of all users or of a given user
less (1)
opposite of more
lessecho (1)
expand metacharacters
lesskey (1)
specify key bindings for less
link (1)
call the link function to create a link to a file
ln (1)
make links between files
lnstat (8)
unified linux network statistics
loadkeys (1)
load keyboard translation tables
loadunimap (8)
load the kernel unicode::to::font mapping table
login (1)
begin session on the system
logname (1)
print user’s login name
logoutd (8)
enforce login time restrictions
ls (1)
list directory contents
lspci (8)
list all PCI devices
mapscrn (8)
load screen output mapping table
md5sum (1)
compute and check MD5 message digest
mkdir (1)
make directories
mkfifo (1)
make FIFOs (named pipes)
mkhomedir_helper (8)
Helper binary that creates home directories
mknod (1)
make block or character special files
mktemp (1)
create a temporary file or directory
mtr (8)
a network diagnostic tool
mv (1)
move (rename) files
nameif (8)
name network interfaces based on MAC addresses
netcat (1)
GNU Netcat Manual
netstat (8)
Print network connections, routing tables, interface statistics, masquerade connections, and m…
newgidmap (1)
set the gid mapping of a user namespace
newgrp (1)
log in to a new group
newuidmap (1)
set the uid mapping of a user namespace
newusers (8)
update and create new users in batch
nice (1)
run a program with modified scheduling priority
nisdomainname (1)
show or set system’s NIS/YP domain name
nl (1)
number lines of files
nm (1)
list symbols from object files
nohup (1)
run a command immune to hangups, with output to a non::tty
nproc (1)
print the number of processing units available
nslookup (1)
query Internet name servers interactively
nstat (8)
network statistics tools.
numfmt (1)
Convert numbers from/to human::readable strings
objdump (1)
display information from object files.
od (1)
dump files in octal and other formats
openssl (1)
OpenSSL command line tool
openvt (1)
start a program on a new virtual terminal (VT).
pam_tally (8)
The login counter (tallying) module
pam_tally2 (8)
The login counter (tallying) module
pam_timestamp_check (8)
Check to see if the default timestamp is valid
passwd (1)
compute password hashes
paste (1)
merge lines of files
pathchk (1)
check whether file names are valid or portable
pgrep (1)
look up or signal processes based on name and other attributes
pinky (1)
lightweight finger
pkill (1)
look up or signal processes based on name and other attributes
plipconfig (8)
fine tune PLIP device parameters
pmap (1)
report memory map of a process
pr (1)
convert text files for printing
printenv (1)
print all or part of environment
printf (1)
format and print data
ps (1)
report a snapshot of the current processes.
psfaddtable (1)
add a Unicode character table to a console font
psfgettable (1)
extract the embedded Unicode character table from a console font
psfstriptable (1)
remove the embedded Unicode character table from a console font
psfxtable (1)
handle Unicode character tables for console fonts
ptx (1)
produce a permuted index of file contents
pwck (8)
verify integrity of password files
pwconv (8)
convert to and from shadow passwords and groups
pwd (1)
print name of current/working directory
pwdx (1)
report current working directory of a process
pwunconv (8)
convert to and from shadow passwords and groups
rarp (8)
manipulate the system RARP table
readelf (1)
Displays information about ELF files.
readlink (1)
print resolved symbolic links or canonical file names
realpath (1)
print the resolved path
reset (1)
terminal initialization
resizecons (8)
change kernel idea of the console size
rm (1)
remove files or directories
rmdir (1)
remove empty directories
route (8)
show / manipulate the IP routing table
routef (8)
flush routes
routel (8)
list routes with pretty output format
rtacct (8)
network statistics tools.
rtmon (8)
listens to and monitors RTnetlink
rtstat (8)
unified linux network statistics
runcon (1)
run command with specified security context
scp (1)
secure copy (remote file copy program)
sed (1)
stream editor for filtering and transforming text
seq (1)
print a sequence of numbers
setfont (8)
load EGA/VGA console screen font
setkeycodes (8)
load kernel scancode::to::keycode mapping table entries
setleds (1)
set the keyboard leds
setmetamode (1)
define the keyboard meta key handling
setpci (8)
configure PCI devices
setvtrgb (8)
set the virtual terminal RGB colors
sftp (1)
secure file transfer program
sg (1)
execute command as different group ID
sha1sum (1)
compute and check SHA1 message digest
sha224sum (1)
compute and check SHA224 message digest
sha256sum (1)
compute and check SHA256 message digest
sha384sum (1)
compute and check SHA384 message digest
sha512sum (1)
compute and check SHA512 message digest
showconsolefont (8)
Show the current EGA/VGA console screen font
showkey (1)
examine the codes sent by the keyboard
shred (1)
overwrite a file to hide its contents, and optionally delete it
shuf (1)
generate random permutations
size (1)
list section sizes and total size.
slabtop (1)
display kernel slab cache information in real time
slattach (8)
attach a network interface to a serial line
sleep (1)
delay for a specified amount of time
slogin (1)
OpenSSH SSH client (remote login program)
sort (1)
sort lines of text files
split (1)
split a file into pieces
ss (8)
another utility to investigate sockets
ssh (1)
OpenSSH SSH client (remote login program)
ssh::add (1)
adds private key identities to the authentication agent
ssh::agent (1)
authentication agent
ssh::keygen (1)
authentication key generation, management and conversion
ssh::keyscan (1)
gather ssh public keys
sshd (8)
OpenSSH SSH daemon
stat (1)
display file or file system status
stdbuf (1)
Run COMMAND, with modified buffering operations for its standard streams.
strings (1)
print the strings of printable characters in files.
stty (1)
change and print terminal line settings
su (1)
change user ID or become superuser
sum (1)
checksum and count the blocks in a file
sync (1)
Synchronize cached writes to persistent storage
sysctl (8)
configure kernel parameters at runtime
tabs (1)
set tabs on a terminal
tac (1)
concatenate and print files in reverse
tail (1)
output the last part of files
tc (8)
show / manipulate traffic control settings
tcpdump (1)
dump traffic on a network
tee (1)
read from standard input and write to standard output and files
telnet (1)
User interface to TELNET
test (1)
check file types and compare values
tftp (1)
TFTP client
timeout (1)
run a command with a time limit
tload (1)
graphic representation of system load average
top (1)
display Linux processes
touch (1)
change file timestamps
tput (1)
initialize a terminal or query terminfo database
tr (1)
translate or delete characters
traceroute (8)
print the route packets trace to network host
true (1)
do nothing, successfully
truncate (1)
shrink or extend the size of a file to the specified size
tset (1)
terminal initialization
tsort (1)
perform topological sort
tty (1)
print the file name of the terminal connected to standard input
uname (1)
print system information
unexpand (1)
convert spaces to tabs
unicode_start (1)
put keyboard and console in unicode mode
unicode_stop (1)
revert keyboard and console from unicode mode
uniq (1)
report or omit repeated lines
unix_chkpwd (8)
Helper binary that verifies the password of the current user
unix_update (8)
Helper binary that updates the password of a given user
unlink (1)
call the unlink function to remove the specified file
update::pciids (8)
download new version of the PCI ID list
uptime (1)
Tell how long the system has been running.
useradd (8)
create a new user or update default new user information
userdel (8)
delete a user account and related files
usermod (8)
modify a user account
users (1)
print the user names of users currently logged in to the current host
vdir (1)
list directory contents
vigr (8)
edit the password, group, shadow::password or shadow::group file
vipw (8)
edit the password, group, shadow::password or shadow::group file
vmstat (8)
Report virtual memory statistics
w (1)
Show who is logged on and what they are doing.
watch (1)
execute a program periodically, showing output fullscreen
wc (1)
print newline, word, and byte counts for each file
who (1)
show who is logged on
whoami (1)
print effective userid
yes (1)
output a string repeatedly until killed
ypdomainname (1)
show or set the system’s NIS/YP domain name
zcat (1)
compress or expand files
zcmp (1)
compare compressed files
zdiff (1)
compare compressed files
zforce (1)
force a .gz extension on all gzip files
zgrep (1)
search possibly compressed files for a regular expression
zless (1)
file perusal filter for crt viewing of compressed text
zmore (1)
file perusal filter for crt viewing of compressed text
znew (1)
recompress .Z files to .gz files