Getting Started
About this Document
In this guide, we explain how to set up an AXS Guard appliance with factory default settings. This document is intended for technical personnel, system administrators and network administrators.
If the appliance you intend to configure will be used exclusively as an authentication server in your Local Area Network, please refer to the AXS Guard authentication manual on this site.
Examples used in this Guide
All configuration examples in this guide assume you are logged in as an advanced administrator. Some options are not available if you log in as a full administrator or a user with lower access privileges.
As software development and documentation are ongoing processes, the screenshots shown in this guide may slightly deviate from the latest AXS Guard user interface.
Zero Trust Security Model
About
AXS Guard uses a zero trust approach to cybersecurity. This means that system administrators must validate every stage of digital interactions; nothing is allowed by default.
Zero trust favors least access policies and relies on strong authentication, as well as threat prevention and detection at various network layers in order to govern user access to network resources.

Internet Access
Internet access is denied by default.
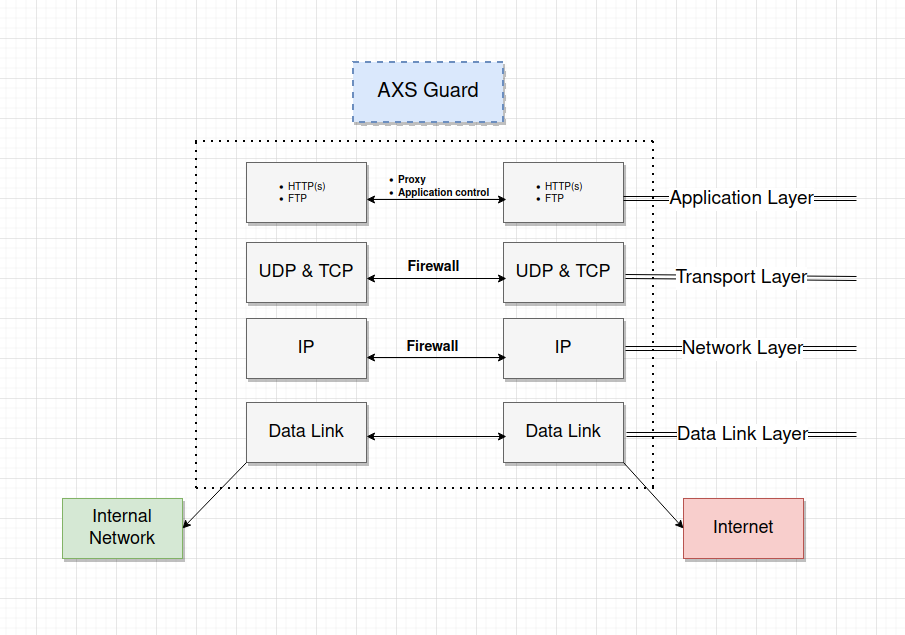
After the initial configuration, the following AXS Guard features must be properly configured in order to allow secure access to the Internet:
- Proxy server: allows users to safely browse the Internet.
- Application control: blocks unwanted protocols and applications.
- Firewall: governs traffic between networks and must be configured appropriately to provide safe access to the Internet for devices which don't use the AXS Guard proxy server.
The availability of features on your appliance depends on your license. See the product manuals section on this site for step-by-step configuration instructions of specific security features.
User Authentication
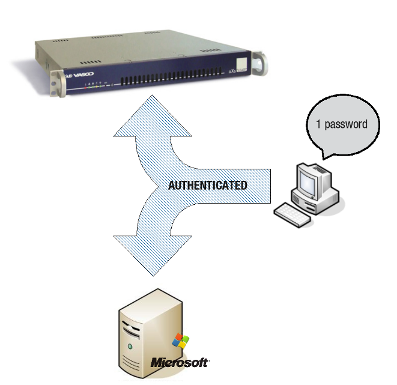
All access, with only a few minor exceptions, must be authenticated for optimal security.
We highly recommend the use of strong authentication, brute-force attack protection and GeoIP filtering for services which are externally accessible, such as the Reverse Proxy and VPN services.
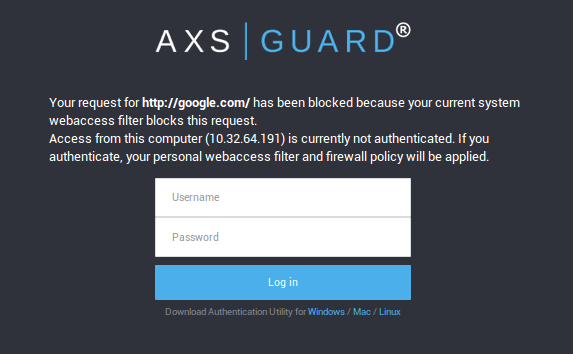
For access to internal services and resources, we recommend the use of the AXS Guard Single Sign-On utility, which is designed to securely and transparently authenticate users against AXS Guard. Users with mobile devices can use a web browser and navigate to the guest login page to get authenticated:
AXS Guard Security Concepts
Introduction
To help you define your organization’s security needs, we briefly explain the AXS Guard policy-based system and the various levels at which policies can be applied.
Security Policies
AXS Guard is based on a zero trust security model. This means nothing is allowed by default, except the bare minimum to configure the appliance.
Authentication and other features such as firewall, e-mail and web access privileges are managed through security policies. Security policies consist of rules which govern the rights of users connected to your network, for example, whether a user must use a one-time password for authentication or is allowed to visit a given website. There are 4 types of policies:
-
System-wide policies are authentication-independent and apply to all users, computers and other devices connected to the appliance. These policies must be as restrictive as possible to avoid possible abuses on your network.
-
Computer policies are authentication-independent and are associated with a given IP address in your network, e.g. to allow a server to connect to the Internet to perform automatic updates. Computer policies should be used sparingly and only in cases where user authentication is not possible.
-
Group policies are authentication-dependent and affect all members of a group, e.g. whether or not the members of a given group are allowed to connect to Facebook.
-
User policies are authentication-dependent and affect a single user, e.g. to override a group, computer or system-wide policy.

Important
- System-wide policies apply to all devices that are physically connected to your network. This can include untrusted devices owned by guests and visitors. This is why, ideally, nothing should ever be allowed at the system level.
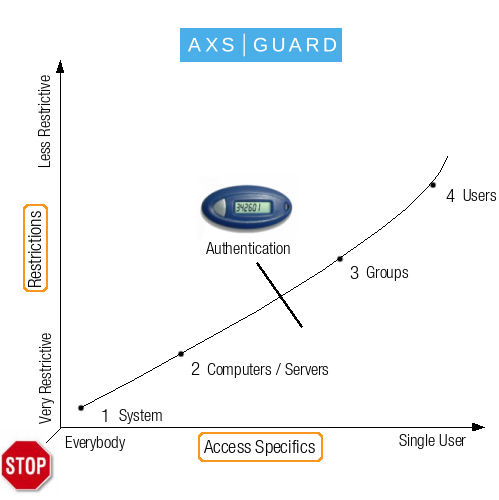
- Able recommends the implementation of strong user authentication. The illustration below shows the optimal implementation, with the levels (system, computer, groups and users) varying in terms of broadness of application (e.g. from everybody to a specific user) and restrictive powers (from very restrictive to less restrictive).
- Restrictions should be high for a large number of users, but can be reduced on an individiual basis, depending on the access requirements of a particular user.
User Policies
A user is a person who:
-
Exists on the AXS Guard appliance under
Users & Groups => Users. -
Has certain access rights based on configured security policies.
-
Has an AXS Guard mailbox (if the e-mail server feature is enabled).
Users must exist on AXS Guard and be a member of a group to be granted firewall and web access rights after authentication and only adopt access rights as defined in their specific group. These rights can be overruled and customized at the user level.
Group Policies
A group is a set of users who share common properties and access rights, e.g. HR, accounting, etc. AXS Guard groups are created under Users & Groups => Groups.
Users automatically adopt the access rights configured for their group, unless overruled at the user level.
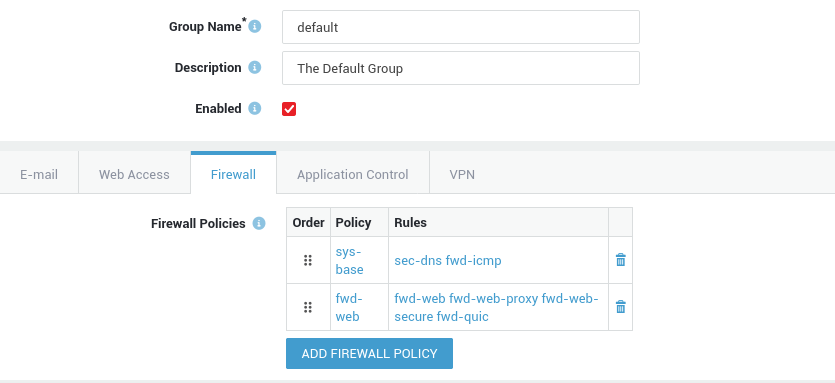
The AXS Guard appliance has a default group. The following policies apply to the default group, depending on the features that are enabled on your AXS Guard appliance:
-
Web access rights: the default group is assigned the web access filter
predef-no-porn, which allows access to all Internet sites, except pornographic sites. -
E-mail rights: the default group is assigned the default e-mail policy, which allows users to send and receive e-mails, except those with potentially dangerous executable attachments or messages identified as spam. If the AXS Guard spam detection system identifies a message with a sufficiently high spam-rate, the message is deleted. If not, the message is only labeled as spam, but still delivered.
-
Firewall rights: the default group is assigned the
sys-basefirewall policy, which allows access to AXS Guard DNS and proxy services.
Computer Policies
Computer entries should only be created for machines with a static IP address which require specific access, e.g. RADIUS clients or Windows machines which need access to Microsoft servers to perform automated updates.
-
Without user authentication, anyone who has physical access to a computer in your network can potentially (ab)use your public IP address or other services in your network. Authentication is therefore strongly advised.
-
User and group-specific policies are only applied after successful authentication; system or computer policies require no authentication and should only be used where authentication is not possible or impractical.
-
Computers from which users authenticate do not need to be defined on AXS Guard.
-
Registering a computer on AXS Guard allow policies to be assigned to that computer. An unauthenticated user on a registered computer is assigned computer-level web access and firewall policies, based on that computer’s IP address.
-
If you are using the AXS Guard appliance as a gateway, firewall and web access policies should be configured to allow servers to access specific services in another network, for instance access to Microsoft updates on the Internet.
-
If you are using the AXS Guard appliance exclusively for authentication, a record needs to exist for every computer in your network that needs access to the AXS Guard RADIUS server.
The AXS Guard system-wide policy is automatically enforced for non-registered computers. For more information on computer registration, RADIUS and authentication, see the AXS Guard System Administration guide and the AXS Guard Authentication guide in the product manuals section of this site.
System-wide Policies
Any user:
- whose device or computer is physically connected to the network
- who does not exist on AXS Guard
- whose device or computer is not registered on AXS Guard
automatically falls under the system-wide policy. This is why system administrators must always enforce the strictest security policies at the system level (zero trust).
Additional Information & Documentation
For more information on policy assignment and the configuration of AXS Guard security features, see:
- the AXS Guard System Administration guide
- the AXS Guard Authentication guide
- the AXS Guard Web Access guide
- the AXS Guard Firewall guide
- the AXS Guard Application Control guide
- the other feature-specific guides in the product manuals section
These documents can also be accessed by clicking on the Documentation button in the appliance’s web-based administrator tool.
Connecting AXS Guard to your Network
Overview
In this section we provide step-by-step instructions to connect the AXS Guard appliance to your network. Read the safety and environmental information before connecting the appliance and check that all the package contents are present.
The contents of the package are listed on a separate sheet that is supplied along with the AXS Guard appliance. Ensure that you have all the information required prior to installation.
Safety and Environmental Information
Electrical Safety
The mains plug is used as disconnect device and it shall remain readily operable during intended use. Powering off or disconnecting the power cord while the appliance is booting or in operation may result in system damage.
-
Use the proper power cord to connect your appliance.
-
Only use a power cord which is certified in compliance with safety regulations.
-
Only use a power cord which is compliant with the AC voltage requirements in your region.
-
Before turning on the power, plug the power cord(s) into a socket which is properly grounded.
-
Before disconnecting the power supply, turn off the system.
-
Use the exact type of network cable recommended.
-
To conform to certification restrictions, only use a network cable with maximum length of 3.0 meters.
Environmental Safety
Components containing perchlorate!
This product contains (a) battery(ies), a printed circuit board (pcb) and a LCD display that may require special handling at end-of-life.
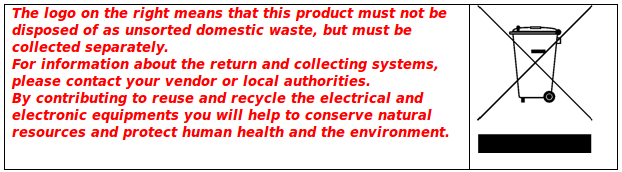
Protect the environment
Producing the AXS Guard appliance involves the extraction and use of natural resources. The product may contain substances which are hazardous for human health and the environment.
To reduce the risk of any hazardous substances being released into the environment and to reduce the depletion of natural resources, we encourage you to use appropriate recycling systems.
Such systems reuse or recycle most end-of-life materials in a safe way. The crossed-bin symbol invites you to use such systems. Further information on collection, reuse and recycling is available from your local or regional refuse administration center.
Personal Safety
- Avoid back injuries. Keep your back straight and bend your knees when lifting the appliance.
- Do not lift or carry the appliance by its chassis handles. These handles should only be used to slide the AXS Guard in and out of the chassis rails.
- Do not drop the appliance.
Powering on AXS Guard
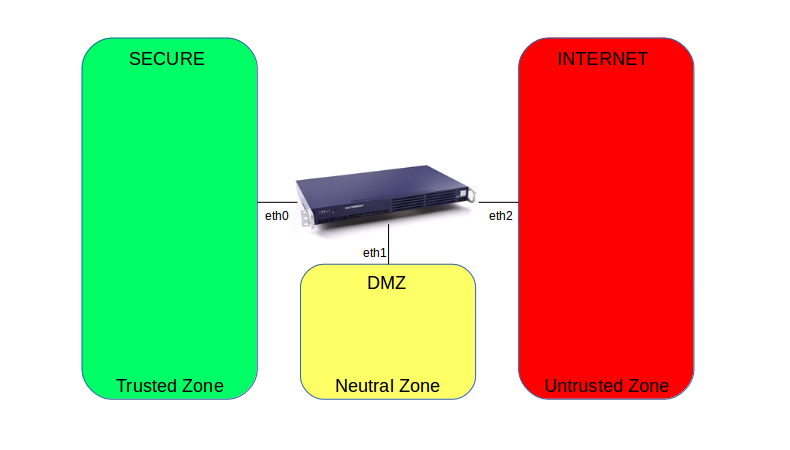
Connect the interface labeled as ETH0 to your network switch. This is the default secure network interface of the appliance. Example stickers are shown below; check the stickers on your AXS Guard appliance to identify the correct network port.
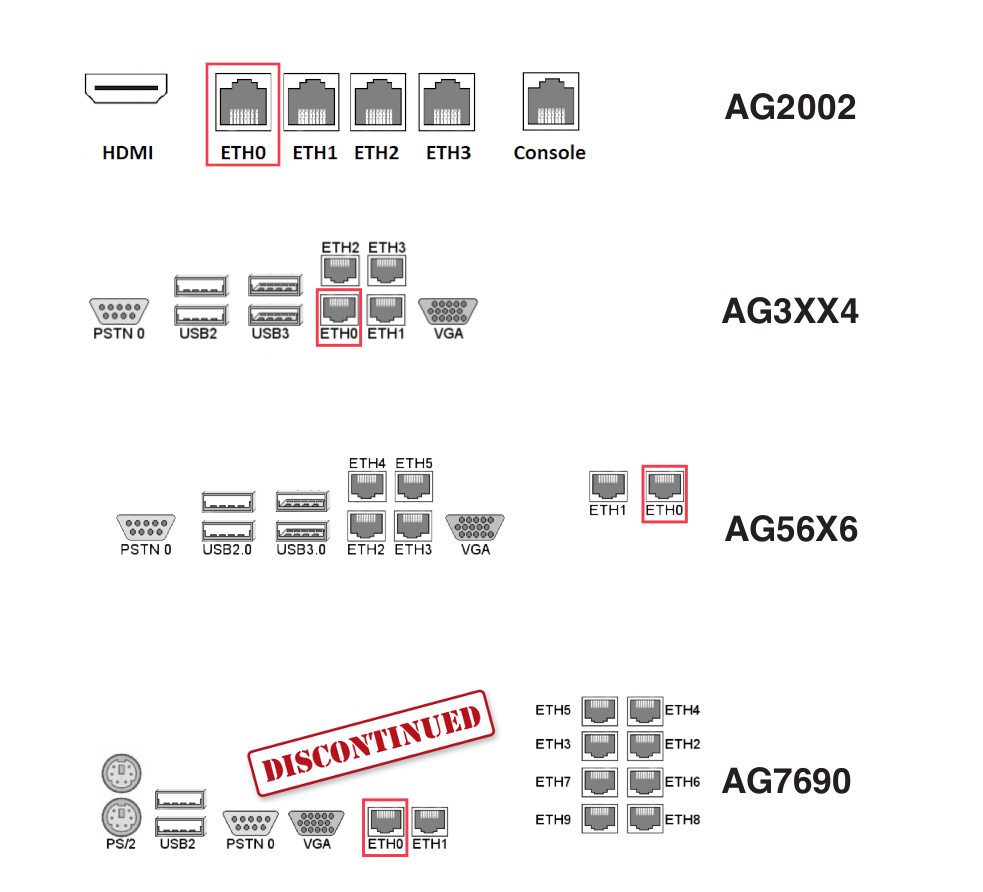
Info
The AG-7690 model is no longer available and has been replaced by the AG-9198 model.

-
Connect the AXS Guard appliance to a power socket. The AG-7XXX models are equipped with two power supplies, needing a separate power cable each. Make sure to connect the power cables to separate power circuits, e.g. the main power circuit and a UPS unit. The second power supply provides redundancy in case the primary power circuit fails.
-
Power on your AXS Guard appliance by pressing the power switch once. A power LED will illuminate.
-
A green LED next to the network port where the network cable is plugged in indicates a correct network connection. If the LED is off, verify that the network cable is undamaged and securely connected to the ETH0 port.
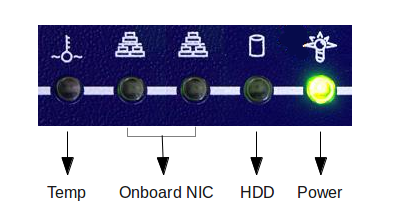
| LED | Description |
|---|---|
 |
System is overheating and critical if illuminated or blinking. |
 |
Indicates the connection status of the onboard NICs. If illuminated, the NIC(s) is/are correctly connected to your network. |
 |
Indicates HDD activity. If this LED remains illuminated and you are unable to log in to the AXS Guard appliance, a system error has probably occurred. Log in to the console and reboot the appliance if necessary. |
 |
Indicates that the appliance is powered on. |
Virtual AXS Guard
AXS Guard offers the convenience of a virtual appliance deployment option. Alongside its hardware counterpart, the virtual appliance version of AXS Guard provides organizations with flexibility in choosing the most suitable deployment method for their specific needs.
To delve into the details and gain a comprehensive understanding of the virtual appliances, see the dedicated documentation in the product manuals section.

Before you Begin
Pre-installation Checklist
Collecting the following information before you start will help to speed up your installation:
-
an unused IP address in your network
-
the Default Gateway setting in your network
-
DNS Server IP address(es) for your network
-
DNS Suffix(es) (optional)
-
the Contract Number (e.g.,
AXGK-1234-56789orEVAL-1234-56789for product evaluation), as found in your AXS Guard order confirmation. -
an appropriate network cable, with a maximum length of 3.0 meters
Important information for HA configurations
Please review our checklist for high availability (HA) and refer to the installation guide.
Factory Default Network Settings
Installation requires temporarily isolating a client workstation from the network and linking it to the AXS Guard appliance.
This involves changing a client workstation IP address to an address within the factory default IP address range of the AXS Guard appliance.
During first-time configuration, you will be invited to change the default IP address to match your network configuration. The client’s previous network settings can then be restored.
| Network Parameter | Factory Default Configuration |
|---|---|
| IP address/Netmask | 192.168.250.254/24 |
| Web-based configuration tool URL | https://192.168.250.254:82 |
| Network Hostname | axsguard |
| Domain Name | domain.be |
| DHCP Server | disabled |
Workstation TCP/IP Settings
A workstation must be temporarily configured so you can log in to the web-based configuration tool of your AXS Guard appliance.
- Configure your workstation with an IP address in the same range as
the factory default range of the appliance, i.e.
192.168.250.254/24. - Once the network settings are configured and applied, open a Windows
command prompt or Linux terminal and run the following command:
ping 192.168.250.254
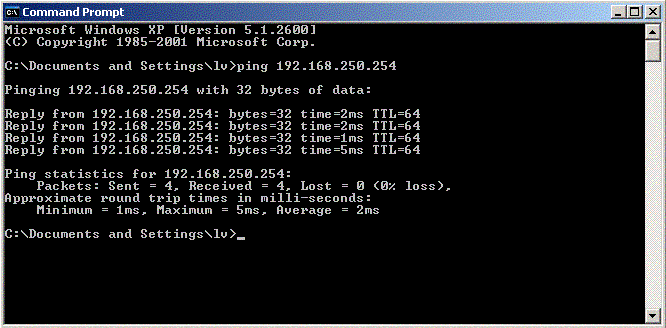
If a reply is received, log in to your appliance to start the first-time configuration wizard.
If a Request Timed Out or Destination Host Unreachable response is
received, please check the following:
-
Check that the workstation’s TCP/IP settings have been correctly entered.
-
Check that the network cable is in good working condition and correctly plugged into the AXS Guard eth0 device.
Once the workstation is correctly configured, the AXS Guard administrator tool can be accessed through a web browser on the workstation.
Supported Browsers
| Browser | Version |
|---|---|
| Google Chrome | Current versions only |
| Microsoft Edge | Current versions only |
| Mozilla Firefox | Current versions only |
| Safari | Current versions only |
| Opera | Current versions only |
Factory Default Credentials
Important
| username | password |
|---|---|
sysadmin |
sysadmin |
-
Changing the factory default sysadmin password is critical for security. It should be changed ASAP to prevent non-authorized users from accessing the AXS Guard administrator tool. Make sure to use a strong password. Include a combination of uppercase and lowercase letters, numbers, and special characters in your password, e.g.
!, @, #, $, %, ^, &, *. This increases its complexity and makes it harder to guess. -
Enable two-factor authentication whenever possible. It adds an extra layer of security to your accounts by requiring a second verification step.
Configuration Wizards
About
The configuration wizards walk you through essential configuration steps needed to get your appliance up and running. Note that each wizard must be completed before the next one becomes available.
Tool Login
-
Start your favorite Internet browser.
-
Enter the factory default URL for the administrator tool, i.e. https://192.168.250.254:82
-
Accept the self-signed certificate to continue.
-
Enter the factory default username and password to log in.

Starting the Wizards
Important
-
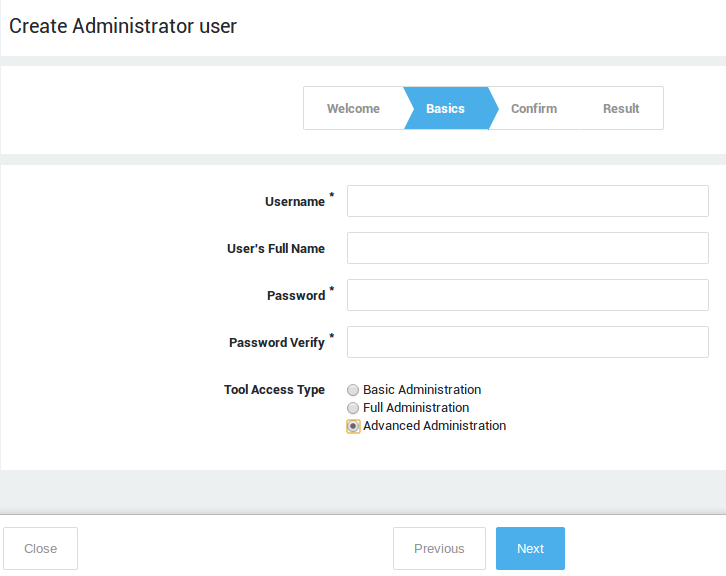
If you are logging in for the first time, the wizard to create an administrative account will start automatically. Otherwise, click on the Wizards button located in the top pane to start it manually.

-
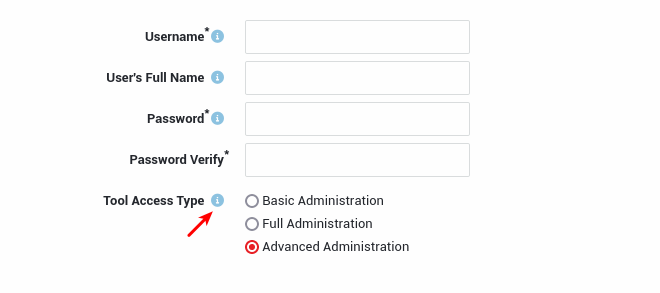
Fields marked with an asterisk
*are required, other fields are optional. -
Configuration options are explained in the various help pages available throughout the AXS Guard configuration tool. These pages can be accessed by clicking on the
Helpbutton.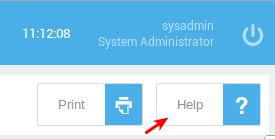
-
You can also click on the information icon next to a text field or option for assistance.
-
Some wizards and features shown in this guide may not be available on your system. The availability of features is tied to your system license. Upgrade it if necessary.
- It is necessary to reboot your appliance after completing the setup wizards and before proceeding to the post-installation configuration.
- Log in to your AXS Guard appliance. Accept the self-signed certificate.
-
Follow the on-screen instructions. Click on the Wizards button located in the top pane if the first wizard doesn't start automatically.
-
Create an administrator with advanced administrative privileges. Advanced access privileges provide access to all licensed system components and options. Make sure to use a complex and secure password.
-
Start the setup wizard to configure your domain, Time Zone, SMTP, DNS, NTP and other basic network settings. Replace the factory default
sysadminpassword with a complex, secure password.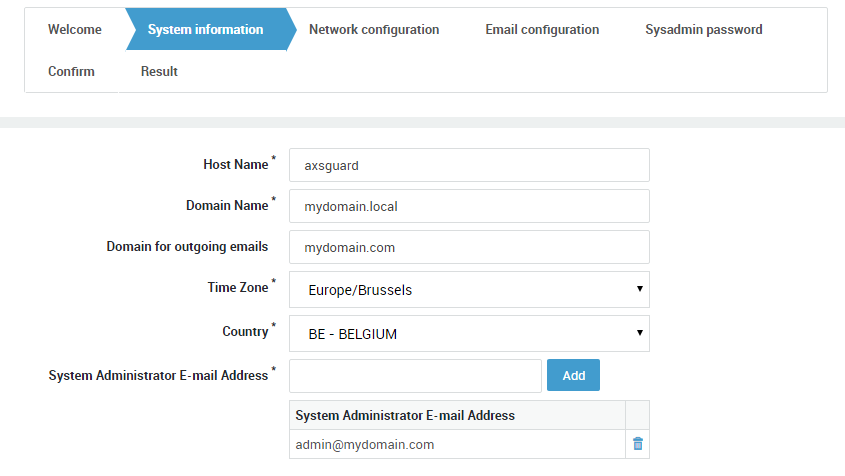
-
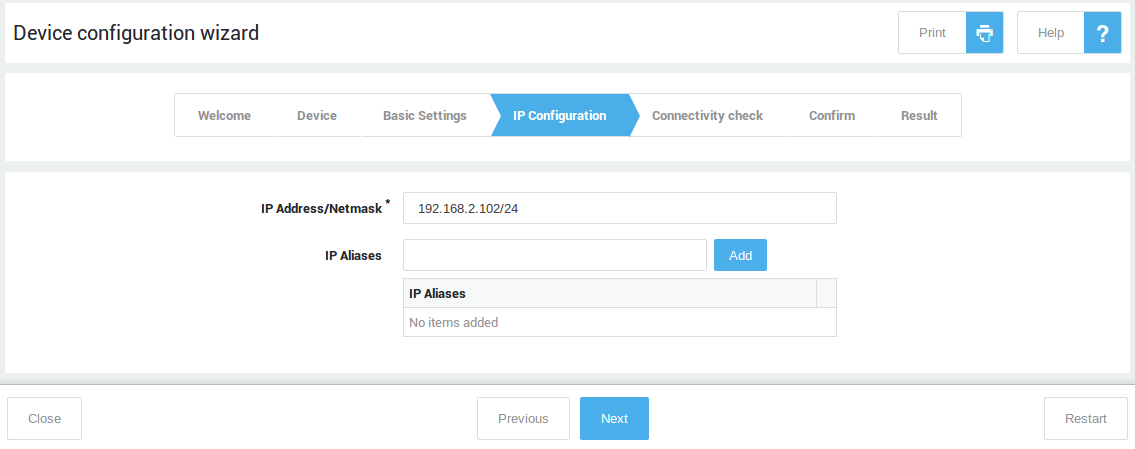
Start and complete the network device wizard for every zone in your network, i.e. secure LAN, DMZ & Internet.
-
Start and complete the customer wizard.
-
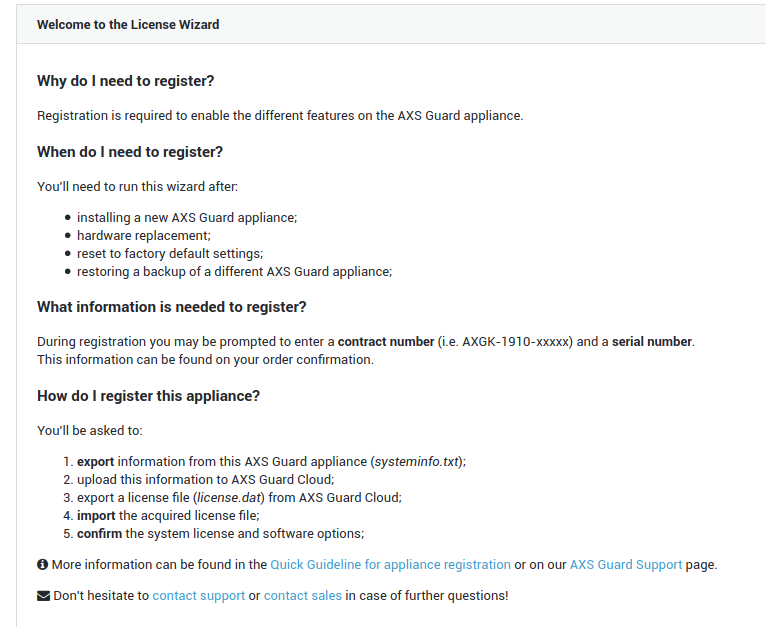
Start and complete the license wizard. Activate your system license and software options.
-
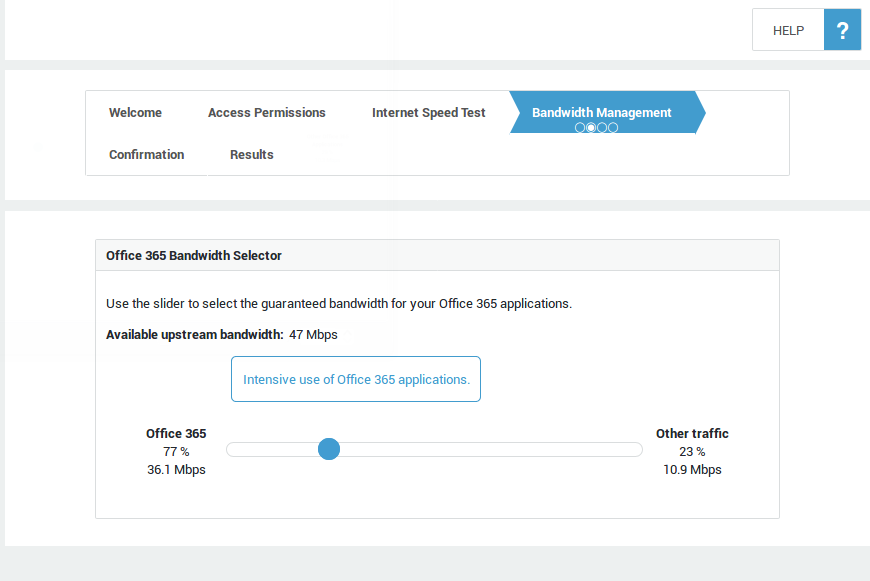
Start the Office 365 FAST Lane wizard to automatically optimize the upstream bandwidth and security for your Office 365 applications and services (an appropriate license and Azure tenant access are required). Skip this step if you don't use Office 365.
-
Start the group wizard if you need to create custom groups. If no additional groups are created, all users will automatically be assigned to the system
defaultgroup. Note that groups can also be added automatically via LDAP synchronization.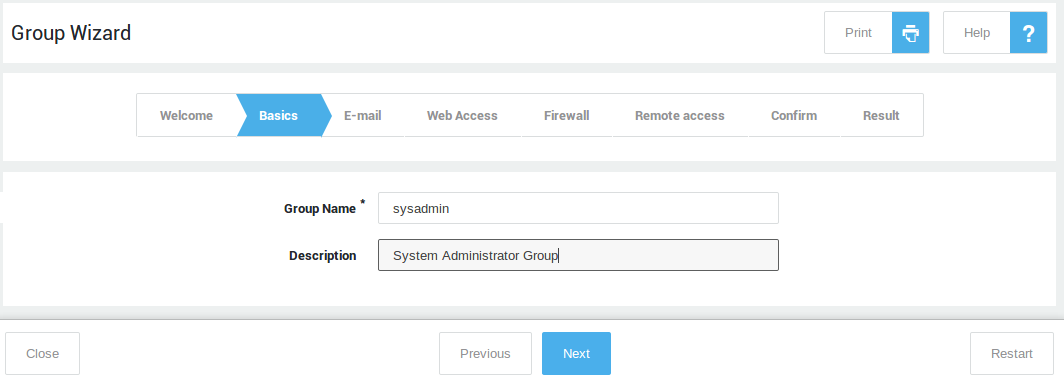
-
Start the user wizard if you need to create users manually. Add each user to the desired group created in the previous step. If no group is selected, new users will be added to the system
defaultgroup. Note that users can also be added automatically via LDAP synchronization. Reboot your appliance after completing the wizards.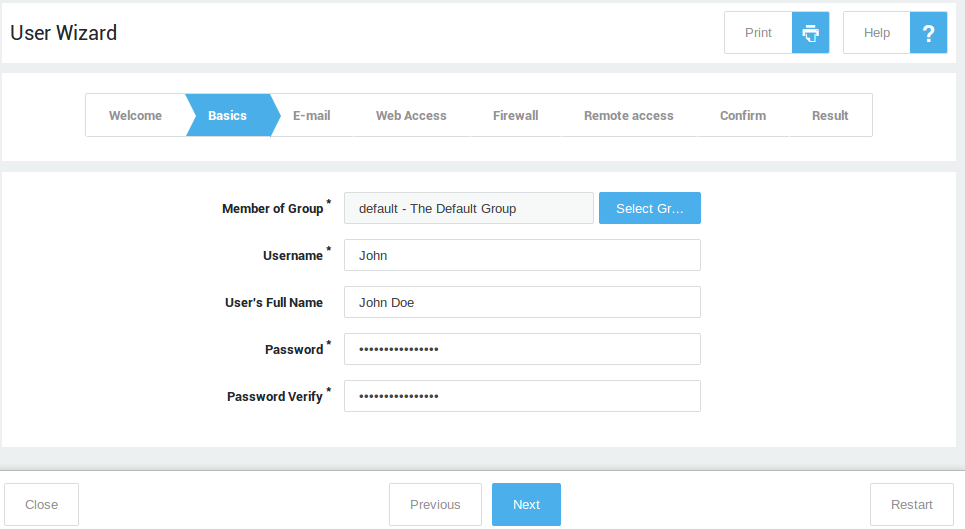
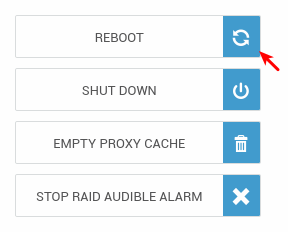
Rebooting your Appliance
Go to System => Tools => Actions and reboot your AXS Guard appliance to apply your basic system configuration and network settings, initiate your domain and the AXS Guard antivirus engine. This is required before proceeding with the post-installation configuration.
Post-Installation Configuration
Internet Connection Test
Run the AXS Guard Internet speed test to verify your Internet connection.
- Navigate to Network > Tools > Internet speed test.
- Click on the
Start Speed Testbutton. - Select the desired mode.
-
Press the
Start Speed Testbutton again to run the test.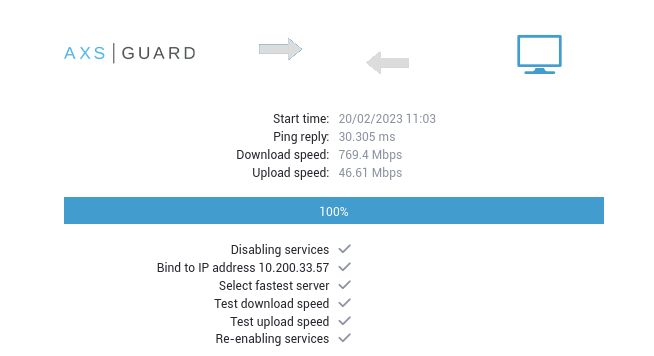
Tips
- If the test fails, run the network device wizard again to verify the configuration of your Internet device(s).
- You can also verify the status of your Internet connection(s) via Network > Status > Internet.
- You can also execute a
pingtest via Network > Tools > Ping.
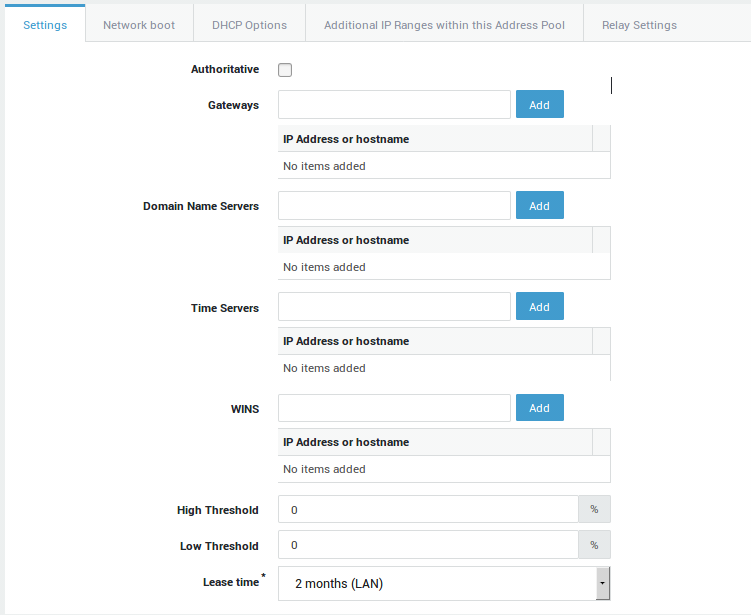
DHCP Settings
DHCP is not enabled by default on AXS Guard. It offers many advantages over manual IP address configuration and is especially important in a DNS security context. Advantages include:
- Automatic management of IP addresses, including the prevention of issues related to duplicate IP addresses.
- Allows system administrators to set lease times and configure static DHCP leases, which are useful for managing servers, printers and IoT devices in your network.
- Allows system administrators to configure additional DHCP options, such as gateways, preferred DNS servers, NTP servers, WPAD and other advanced options.
- Definition of IP address pools & easy network segmentation.
To use DHCP, you must first enable the feature under System => Feature Activation.

Next, navigate to Network => DHCP => Address Pools to add a DHCP pool. See the DHCP section in the system administration guide on this site for additional information and step-by-step configuration instructions.
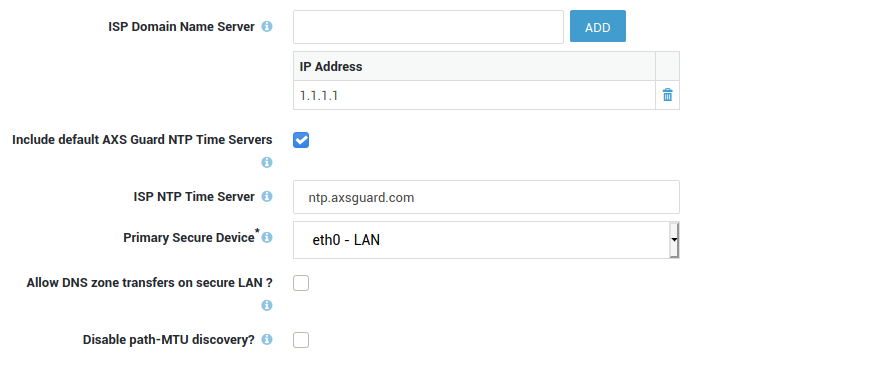
NTP Settings
The Network Time Protocol or NTP is a networking protocol for clock synchronization between computer systems.
A correct system time is critical for time-sensitive processes such as log generation, event reporting, scheduled tasks, 2FA and Kerberos authentication.
With an imprecise time, your connected devices and systems may run into different kinds of errors and you also may encounter various troubleshooting burdens.
AXS Guard NTP servers provide redundancy, which means clients and other devices connected to your network will always be able to get the correct time.
Navigate to Network => General to configure NTP.
Open DNS Resolvers vs DNS Security
Open DNS resolvers, such as 1.1.1.1 and the DNS servers of certain ISPs, are DNS servers which are publicly available; they can be used by anyone connected to the Internet.
While practical, this inherent lack of security allows ill-intentioned 3rd parties to propagate payloads related to ransomware and other malicious software across networks all over the world.
Research by industry leaders indicates that more than 91% of malware relies on DNS in one way or another. Despite this, many organizations don’t monitor DNS traffic, leaving them vulnerable to attacks.
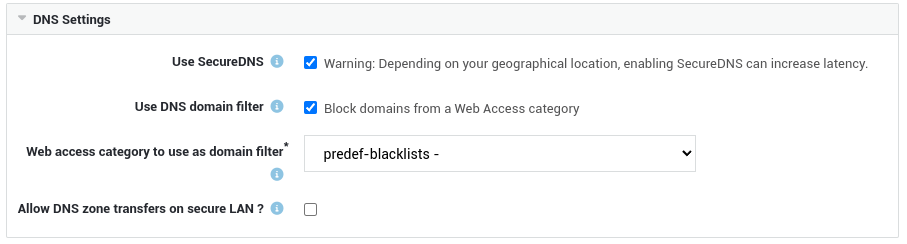
AXS Guard's DNS security protects users from inadvertently accessing malware, ransomware, malicious domains, botnet infrastructure and more. It is an essential component of cybersecurity.
For optimal security, we recommend enabling this feature and directing all DNS traffic in your network to AXS Guard. This will prevent any potential security gaps and enhance overall protection.
Note that it is essential to activate this feature first, then proceed to Network => General to customize the available options.
DNS services on the Internet
- If you don't intend to use AXS Guard as your DNS server or its DNS security feature and wish to allow clients to use DNS services on the Internet, you must assign the dynamic
fwd-dnsfirewall policy to the appropriate users, groups and/or computers. - If application control is activated on your system, ensure that DNS traffic is also allowed.
LDAP Synchronization & Authentication
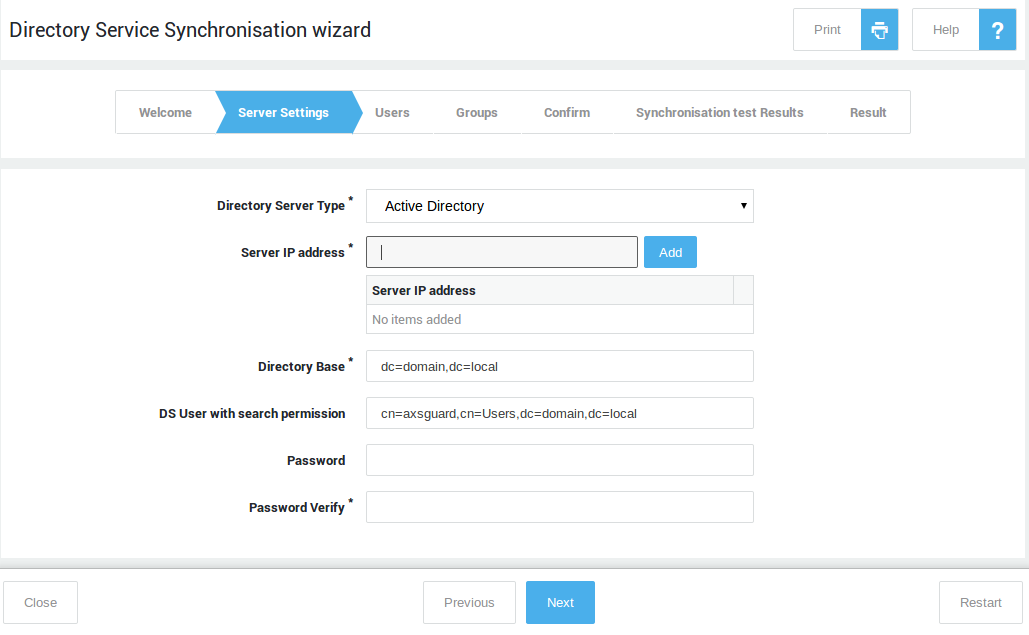
The AXS Guard directory services component allows you to import users and groups by establishing an LDAP connection with a directory server, such as Microsoft Active Directory.
Users & groups allow you to easily organize and manage individual AXS Guard access privileges, and facilitate the recording and recognition of individual user actions (logging & reporting).
LDAP synchronization and authentication also gives you the ability to consolidate user information and reduces the number of distinct user databases to be managed.
Combined with the AXS Guard SSO utility in Domain Mode, users are automatically authenticated against AXS Guard once they successfully sign in to your domain, and their AXS Guard access privileges are automatically enforced.
Log in to the AXS Guard appliance and start the LDAP synchronization wizard to automatically import and synchronize your Active Directory users and groups.
Computers
By registering computers on AXS Guard, you can assign access privileges at the host level. This means access privileges are linked to a static IP address rather than a user.
It should be noted that assigning security policies at the computer level is only appropriate for servers and devices with a static IP address that have specific access requirements, such as Windows servers that need access to update servers on the Internet.
Host-level access should always be restricted to the bare minimum; user authentication is recommended for optimal security, reporting and logging. Always remember that sloppy configurations can lead to vulnerable environments.
Internet Access
Considerations
Access to the Internet is blocked by default. Your workflow to connect users to the Internet will vary, depending on whether or not you choose to use certain AXS Guard security features for Internet access. The following combinations are possible:
| AXS Guard Features | Configuration Focus |
|---|---|
| Web access combined with application control. | Proxy server, application control and firewall (Firewall configuration is required for devices which don't connect to the Internet via the AXS Guard proxy). |
| Web access without application control. | Proxy server and firewall. |
| Application control without web access. | Application control and firewall. |
| No web access and no application control. | Firewall only. |
Proxy Server
Note
Skip this section if you do not intend to use the AXS Guard proxy server for Internet access.
Access to the Internet is blocked by default. To allow users to access the Internet, your must appropriately configure the AXS Guard proxy server.
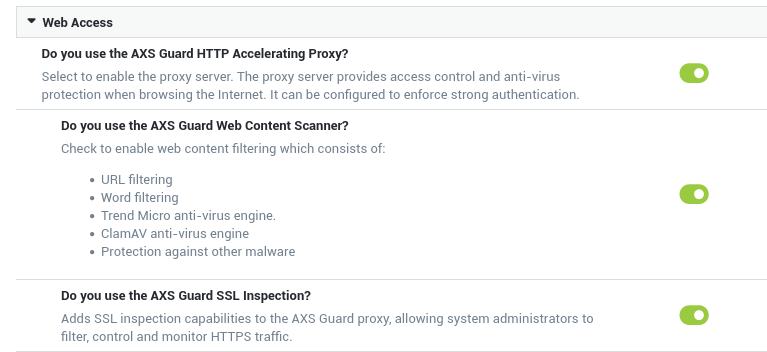
The AXS Guard proxy server adds an additional layer of security between your internal network and the Internet. It can securely relay requests from computers and devices in your network, acting as a buffer against cybersecurity threats. See the software section on this site for additional information about AXS Guard proxy features.
AXS Guard supports WPAD, which is a convenient method for system administrators to automatically configure client machines to use a proxy server. Client connection settings must be configured to automatically detect proxy settings in order to discover the IP address of the AXS Guard proxy server and use it without additional configuration. Also see the WPAD Quick Setup Guide on this site. Client browsers can also be configured manually, but this is less convenient and time-consuming.
To use the AXS Guard proxy server, you must activate the web access features under System => Feature Activation.
Important
- The use of SSL inspection and the DNS security feature are also highly recommended.
- For users and devices that don't use the proxy server, the AXS Guard firewall must be configured accordingly, as it blocks access to the Internet by default.
- The factory default application control policy only allows HTTP(S) and DNS traffic and must be reconfigured to allow access to certain services on the Internet, e.g. social media.
Preconfigured web access filters are present for easy configuration. We recommend using the predef-no-porn filter at the group level for best results.

Quick Proxy Test
- Create a new computer on AXS Guard.
- Assign the
predef-no-pornfilter to the new computer. -
Log in to the computer and run the following
curlcommand to test the proxy server:curl -I -x http://192.168.250.254:3128 http://www.example.comor
curl -I -x http://192.168.250.254:3128 http://www.example.com -U axsguard_user:axsguard_password
The second curl example simulates user authentication for web access. Either command should return a 200 response code:
HTTP/1.1 200 OK
Accept-Ranges: bytes
Cache-Control: max-age=604800
Content-Type: text/html; charset=UTF-8
Date: Mon, 20 Feb 2023 10:56:32 GMT
ETag: "3147526947"
Expires: Mon, 27 Feb 2023 10:56:32 GMT
Last-Modified: Thu, 17 Oct 2019 07:18:26 GMT
Server: ECS (dcb/7EEC)
Vary: Accept-Encoding
X-Cache: HIT
Content-Length: 1256
Age: 595782
Warning: 113 squid/4.16 "This cache hit is still fresh and more than 1 day old"
X-Cache: HIT from axsguard.nias.one
Connection: keep-alive
Application Control
Note
Skip this section if you do not intend to use application control for Internet access.
Application control refers to the process of managing and controlling network traffic related to the execution of certain software programs and access to applications on the Internet. This can include allowing certain applications and protocols to be used while blocking others, e.g. Facebook, Twitter, etc.
Its goal is to increase network security and efficiency by limiting the network resources consumed by unnecessary or resource-intensive programs.
The system default application control policy allows HTTP(S) and DNS traffic.
Application control is only available on systems with a standard or enterprise software bundle. It must be activated under System => Feature Activation.
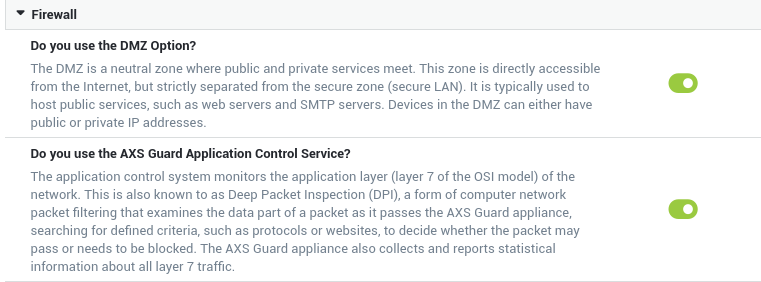
Please note that this feature also affects the behavior of the AXS Guard proxy server, firewall and VPN services. See the application control guide for additional information and guidance on policy assignment.
For users and devices that don't use the proxy server, the AXS Guard firewall must also be reconfigured, as it blocks access to the Internet by default.
Quick Application Control Test
- Create a new computer on AXS Guard.
-
Add the dynamic
fwd-webfirewall policy to the computer created in step 1. If you are using DNS services on the Internet, make sure to also add thefwd-dnspolicy.
-
Log in to the computer and run the following
curlcommands for a quick test:curl -I https://www.example.comcurl -I https://www.twitter.com
HTTPS should not be blocked and the curl command should return a 200 response code for www.example.com:
HTTP/2 200
content-encoding: gzip
accept-ranges: bytes
age: 357299
cache-control: max-age=604800
content-type: text/html; charset=UTF-8
date: Tue, 21 Feb 2023 07:16:58 GMT
etag: "3147526947"
expires: Tue, 28 Feb 2023 07:16:58 GMT
last-modified: Thu, 17 Oct 2019 07:18:26 GMT
server: ECS (dcb/7EA7)
x-cache: HIT
content-length: 648
Twitter is blocked by the factory default policy and should return the following response:
curl: (35) OpenSSL SSL_connect: Connection reset by peer in connection to www.twitter.com:443
Firewall Configuration
About
Network traffic towards the Internet is blocked by default and must be explicitly allowed by a system administrator.
The AXS Guard firewall monitors and controls incoming and outgoing network traffic based on predetermined security rules and policies.
The firewall is the first line of defense in a network security strategy, as it governs traffic between various network zones.
Allowing Access to the Internet
In order to allow users to surf the Internet in environments where the AXS Guard proxy server is not used, system administrators are required to configure the firewall accordingly:
- Go to
Users & Groups => Groupsand select the appropriate group. - Select the Firewall tab.
- Add the dynamic
fwd-webpolicy to the selected group and save the configuration.
Users will be able to browse the Internet once they are successfully authenticated against AXS Guard.
Quick Firewall Test
- Create a new computer on AXS Guard.
-
Assign the
fwd-webfirewall policy to this computer. If you are using DNS services on the Internet, make sure to also add thefwd-dnspolicy. -
Log in to the computer and run the following
curlcommand for a quick test:curl -I http://www.example.com
The curl command should return a 200 response code:
HTTP/1.1 200 OK
Content-Encoding: gzip
Accept-Ranges: bytes
Age: 417993
Cache-Control: max-age=604800
Content-Type: text/html; charset=UTF-8
Date: Mon, 20 Feb 2023 12:36:37 GMT
Etag: "3147526947"
Expires: Mon, 27 Feb 2023 12:36:37 GMT
Last-Modified: Thu, 17 Oct 2019 07:18:26 GMT
Server: ECS (dcb/7EA2)
X-Cache: HIT
Content-Length: 648
Points of Interest
Cyberthreats are becoming more numerous and sophisticated. Minimizing the damage that a cyberattack can cause to a network requires monitoring and threat prevention on various levels.
That's why AXS Guard is equipped with an advanced firewall that does more than just block set types of traffic; it provides additional safeguards, such as firewall authentication, GeoIP filtering, IP blacklisting and brute-force attack protection, which can be combined with intrusion prevention and intrusion detection and DNS security, features that identify and prevent malicious activity such as hacking attempts, malware distribution and other types of cyberthreats.
With firewall authentication, you can easily verify the identity of users who are attempting to access resources on your network. Firewall authentication also offers the advantage of granular access control, which enables network administrators to exercise more precise control over access to specific network resources or services.
User authentication is an important aspect of AXS Guard security because it helps to ensure that only authorized users are able to access network resources, and that unauthorized users are blocked.
General E-mail Settings
Content Scanning and E-mail Server Features are both enabled
Some company-wide e-mail settings must be configured so the AXS Guard e-mail system functions correctly. For additional information, see the e-mail documentation on this site.
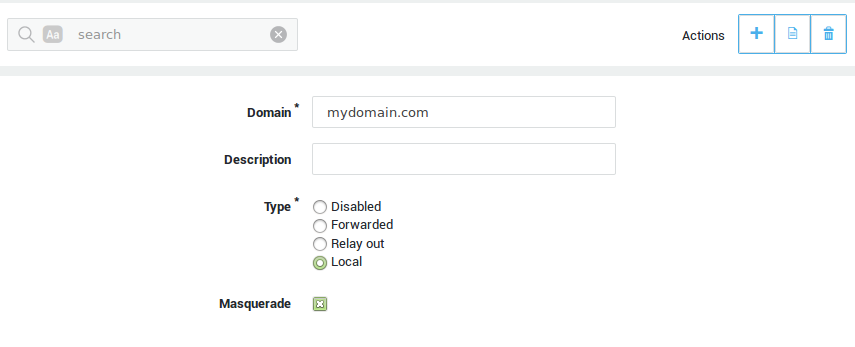
To configure the AXS Guard e-mail system:
-
Navigate to E-mail > Domains and click on Add New.
-
Enter the domain as specified under System > General, using lower cases.
-
Enter a description (optional) for the domain.
-
Select local as the type.
-
Save your configuration.
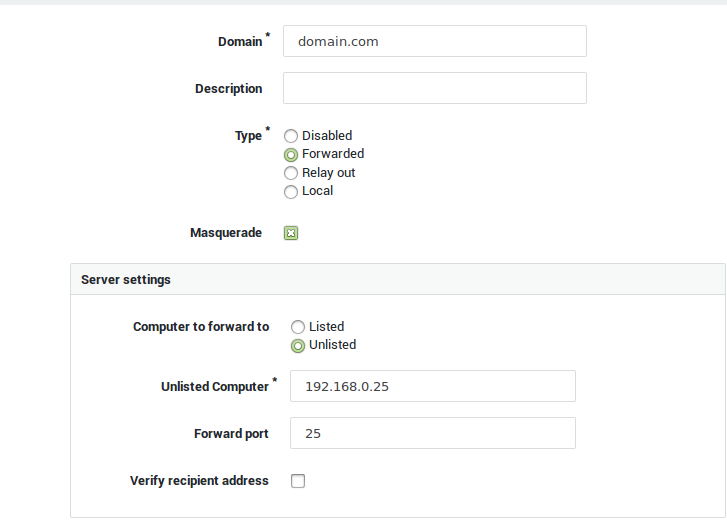
Content Scanning Feature enabled, E-mail Server Feature disabled
The following instructions are only relevant if the AXS Guard Content Scanning Feature is enabled and when the e-mail server is disabled (i.e. when a separate e-mail server is available in your secure LAN, e.g. a Microsoft Exchange Server).
-
Navigate to E-mail > Domains and click on Add New.
-
Enter the system domain as entered under System > General.
-
Enter a description for the domain (optional field).
-
Select Forwarded as the type.
-
Select Unlisted computer in the Server Settings.
-
Enter the hostname or IP address of the e-mail server in your secure LAN. The hostname must be resolvable.
-
Enter the port number (Forward Port) and save your configuration.
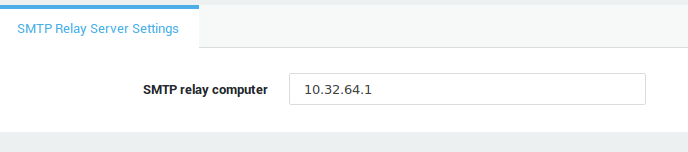
Content Scanning and E-mail Server Features are both disabled
The following instructions are only relevant if the AXS Guard Content Scanning and E-mail Server Features are both disabled. This scenario allows system e-mails to be transmitted to another MTA in the secure LAN or to the SMTP server of your ISP.
-
Navigate to E-mail > Server.
-
Enter the hostname or IP address of an SMTP relay server. The hostname must be resolvable.
-
Save your configuration.
Authentication
To secure access to your network and applications, AXS Guard offers a selection of various strong user authentication and 2FA options.
One-time passwords are more secure than user-created passwords, which can be weak or reused across multiple accounts. One-time passwords can fully replace classic passwords or can be used in addition to them in order to add another layer of security.
Strong authentication provides several benefits, including:
- Increased security: Strong authentication methods, such as two-factor authentication, can help prevent unauthorized access to sensitive information and network resources.
- Reduced risk of fraud: By requiring multiple forms of authentication, strong authentication can make it more difficult for malicious parties to gain access to sensitive information and network resources.
- Compliance: Strong authentication can help organizations meet regulatory requirements for data security (GDPR).
- Convenience: Strong authentication can provide a more convenient and user-friendly experience compared to traditional, single-factor authentication methods. Passwords can be hard to remember, are often forgotten and can lead to password fatigue, while one-time passwords are easily generated with a mobile device.
- Better access control: Strong authentication can help organizations control who has access to sensitive information.
For additional information about AXS Guard authentication capabilities and configuration instructions, see the authentication manual on this site.
Other AXS Guard Features
See the relevant configuration instructions in the product manuals section of this site:
| Feature Group | Manuals |
|---|---|
| VPN | IPsec, XAUTH, SSTP, PPTP, L2TP, OpenVPN, PAX, Remote Workspace |
| Networking | Internet Redundancy, Bandwidth Management, Public DNS |
| Security | Reverse Proxy, IDS & IPS |
| Personal AXS Guard | Server-side and client-side configuration of PAX hardware. |
| High Availability | High availability ensures that a system or service remains operational and accessible even in the event of hardware failures, software errors, or other disruptions. |
Support
If you encounter a problem
If you encounter a problem with AXS Guard, follow the steps below:
-
Check the troubleshooting section of the feature-specific manual.
-
Check the knowledge base on this site for information about special configurations.
-
If no solution is available in any of the above sources, contact your AXS Guard vendor.
Contact Information
(+32) 15-504-400
support@axsguard.com