AXS Guard Single Sign-On (SSO) Tool Manual
Introduction
About this Document
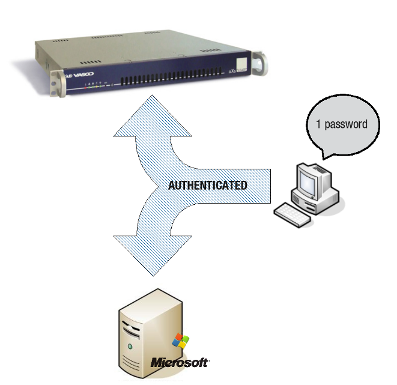
The AXS Guard Single Sign-On (SSO) Tool securely and transparently authenticates users on a LAN-connected client PC with the AXS Guard appliance, granting them firewall and web access based on their user credentials (identity-based firewalling).
This manual serves as a reference for technical personnel and system administrators. It explains the installation, configuration, and usage of the SSO Tool.
Examples Used in This Guide
All AXS Guard setup and configuration examples in this guide require advanced administrator privileges. Some options may not be available if logged in as a regular administrator or a user with lower access privileges.
As software development and documentation are ongoing processes, the screenshots shown in this guide may slightly deviate from the current user interface.
Concepts and Features
Overview
Topics covered in this chapter include:
-
Supported Operating Systems
-
Features and Advantages of the SSO Tool
-
Purpose and Concepts of SSO
-
Installation Modes
-
Special Cases Involving Terminal Servers
Supported Operating Systems
The AXS Guard SSO Tool can be installed on:
-
Microsoft Windows: Windows 10 or later.
-
Mac: Yosemite or later (
x86_64andarm64architectures are both supported as of version 3.0). -
Linux: 64-bit distributions.
Key Features of the SSO Tool
-
Provides seamless, strong, and secure two-factor authentication
-
Quick and easy installation
-
Supports Domain and Workgroup modes
-
Automatically configures browser settings on Windows clients
-
Notifies users about available software updates
-
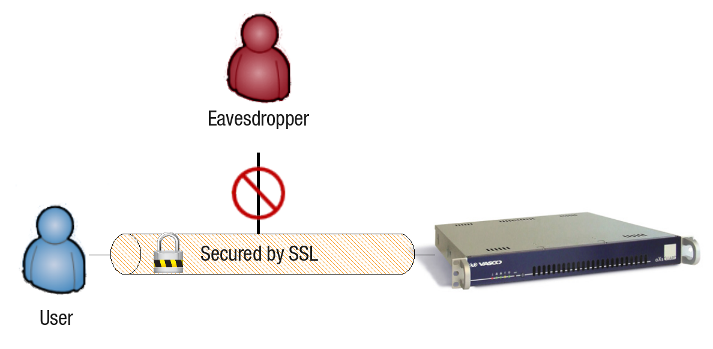
Ensures secure communication over SSL
Seamless Authentication
The SSO Tool enables users to authenticate securely and automatically against AXS Guard. Once authenticated, users are granted appropriate access rights according to their AXS Guard profile configuration.
Installation Modes
The SSO Tool can be installed in one of two modes:
Domain Mode
Select Domain Mode when installing on Windows clients that are members of an on-prem Windows Domain or joined to Entra ID (Azure AD). Users are automatically authenticated against AXS Guard after logging in to their on-prem domain or Entra ID. The domain must be registered on AXS Guard.
Important
This mode applies only to Windows clients. For successful authentication, the AXS Guard username must match the Active Directory or Entra ID username.
Workgroup Mode
Select this mode for non-domain Windows computers or Linux and Mac workstations. This mode:
- Supports user profiles to accommodate different users or locations.
- Allows credentials to be stored in profiles to mimic domain mode (optional).
- Supports two-factor authentication with OATH or DIGIPASS tokens (recommended).
Important
Do not store passwords in a profile when using OATH or DIGIPASS authentication.
SSL Communication
The SSO Tool uses SSL to secure communications between client PCs and the AXS Guard appliance, protecting sensitive information like user credentials.
Proxy Auto-Configuration
The SSO Tool can automatically adjust the user's proxy settings after authentication and clear them after logout, suspend, or shutdown. This feature is only supported on Windows workstations.
Automatic Updates
The SSO Tool periodically checks for updates by connecting to the AXS Guard appliance and notifies users accordingly.

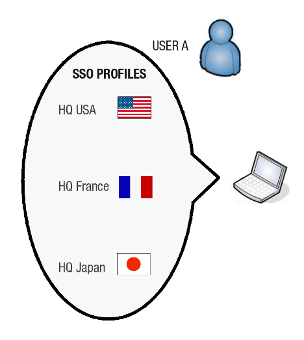
User Profiles
Each SSO configuration is stored within a user profile. To support different users or locations, multiple profiles can be set up on a computer. Importantly, the SSO Tool will automatically detect the user's current location and activate the corresponding profile.
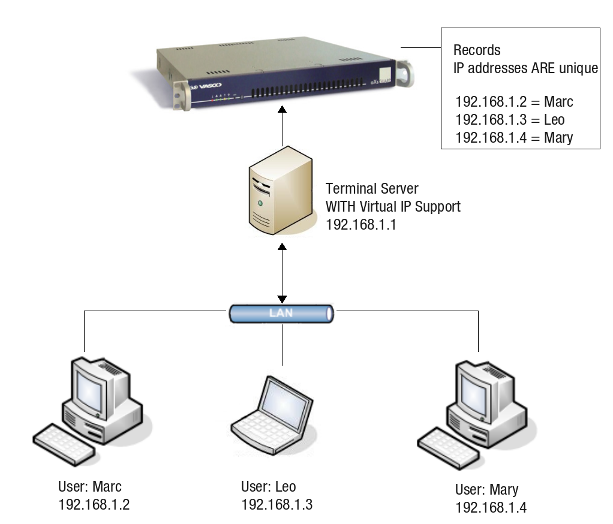
SSO with Terminal Servers
Without Virtual IP Support
The SSO Tool cannot be used on Terminal Servers that lack Virtual IP address support, as each user must have a unique IP address. Older Citrix Metaframe Presentation Servers fall into this category.
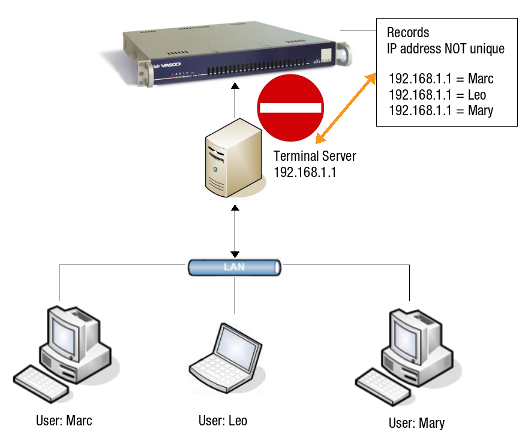
With Virtual IP Support
Citrix Metaframe Presentation Server (version 4.0 and higher) and MS Terminal Server can assign unique Virtual IP addresses to each user, allowing AXS Guard to differentiate users.
Installation and Configuration
Overview
-
Verify your AXS Guard firewall configuration.
-
Allow and link firewall and web access authentication.
-
Register your Windows or Entra ID domain on the AXS Guard appliance.
-
Configure the authentication policy for the SSO tool.
-
Download, install and configure the SSO tool for your OS.
Firewall Configuration
Verify that the sec-auth firewall rule is present and activated within the stat-sec firewall policy on AXS Guard.
- Log in to your AXS Guard appliance.
- Navigate to Firewall > Policies > Static.
-
Verify the
stat-secpolicy, as shown below.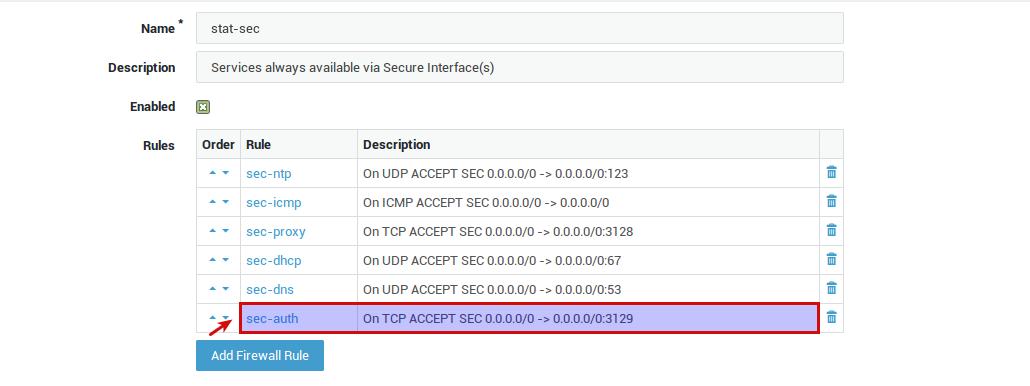
SSO Authentication Settings
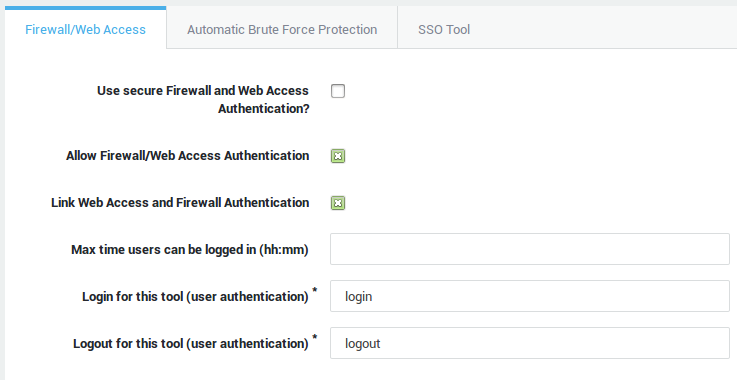
Linked Authentication
- Log in to your AXS Guard appliance.
- Navigate to Authentication > General.
- Allow and link firewall and web access authentication.
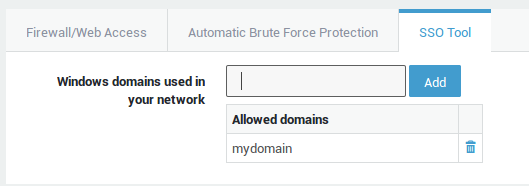
Domain Settings
Skip this section if your clients are not joined to a Windows or Entra ID (Azure AD) domain.
- Navigate to Authentication > General and select the SSO Tool tab.
- Add your Windows or Entra ID domain.
-
Save your configuration.
| Field | Description |
|---|---|
Windows domains used in your network |
On-prem AD: Enter the Windows domain name (NetBIOS domain) that users use to log in to their workstations. For example, if your Windows domain is Entra ID: Enter the Entra ID domain, e.g. In hybrid environments, only enter your on-premises Windows domain. |
Authentication Policy
-
Go to Authentication > Services.
-
Select Firewall and Web Access.
-
Select the desired authentication policy.
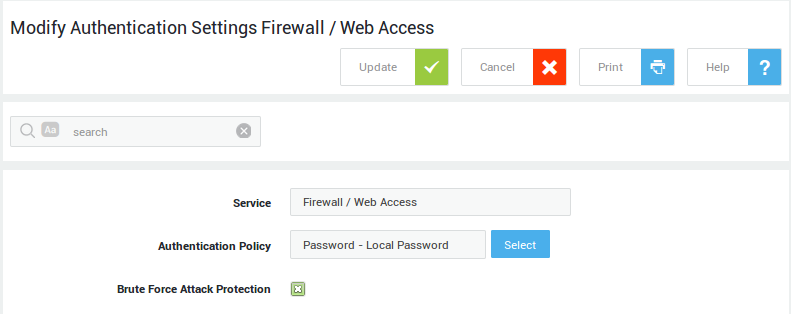
| Field | Description |
|---|---|
Service |
The AXS Guard service to be configured. This field cannot be edited. |
Authentication Policy |
The authentication policy determines how users must authenticate to access the service. Go to Authentication > Advanced > Policy for an overview of policies configured on your system. |
Brute Force Attack Protection |
Enable to protect the selected service against brute-force attacks as configured under Authentication > General. |
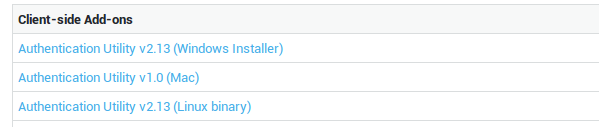
Downloading the SSO Tool
-
Log in to the Cyber Resilience Portal.
-
Navigate to the Download Center.
-
Select the appropriate installer for your OS.
Windows Installation
Upgrade Instructions
Important
- If you are upgrading from version 1.0 to version 2.0 or later, you must uninstall the old version before upgrading. If you are upgrading from version 2.13 to 2.14, administrator credentials are always required to install the SSO tool, even for a per-user installation.
- Ensure to fully exit the SSO tool prior to an upgrade or removal.
- As of version 2.0, the SSO tool automatically attempts to remove previous versions when you start the installation procedure.
Available software upgrades are announced via the release notes and automated messages in the Windows system tray.
Install Options
Several options are available to install the SSO tool:
-
Silent installation: Deploy the SSO tool with Active Directory (by creating an mst transform file for the msi installer) or by using the msi installer in a Windows login script. Additionally, the SSO tool offers an alternative installation method through Microsoft Intune. For comprehensive guidance on this automated deployment option, please consult the relevant Microsoft documentation.
-
Local, system-wide installation: Requires administrator privileges on the local machine and installs the SSO Tool for all users on the system.
-
Local, non-privileged user installation: Does not require administrator privileges on the local machine and installs the SSO Tool only for the user who is logged in to the system.
Silent Installation
With Active Directory
To deploy the SSO tool via a Group Policy, you have to
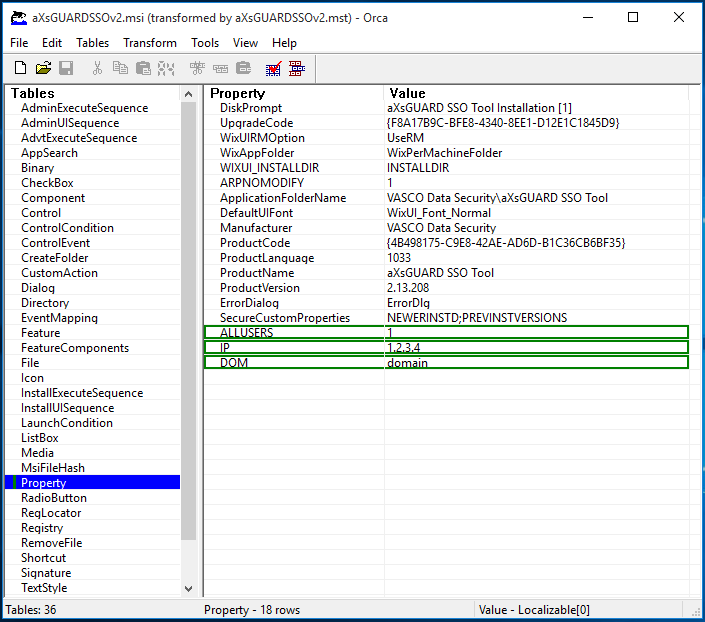
create a customized msi installer. You also have to option to create
an .mst (msi transform) file for the .msi installer. See the knowledge base section on this site for step-by-step instructions.
A customized msi installer can be created with the included msi
configuration tool for the SSO installer. This program
automatically creates an msi installer adapted to your network
environment based on the configured settings. As an alternative, you can
create an mst transform file with
Orca,
a database table editor for creating and editing Windows Installer
packages and merging modules.
-
Extract the SSO zip file.
-
Run the
configureMsiexecutable. -
Configure the correct settings for your network environment.
-
Click on `Configure Installer when finished.
-
Deploy the resulting
msifile via a Group Policy.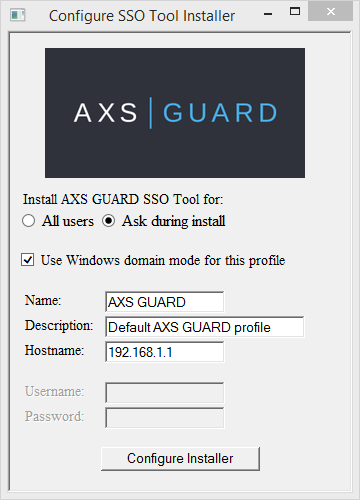
| Property | Values |
|---|---|
ALLUSERS |
Set this value to |
NAM |
Create a new profile with this name. |
DESC |
Create a new profile with this description. |
IP |
Create a new profile with this AXS Guard IP address. Use the IP address or hostname of the primary secure LAN device of the AXS Guard appliance, e.g. |
DOM |
The windows domain, e.g. |
USR |
Create a default profile with this username (optional for domain mode). |
PWD |
The password to be set in the default profile (optional for domain mode). |
With a Login Script
Administrators can install the SSO tool silently by adding the following line to the Windows login script of a client:
msiexec /i "\\\\<server>\\<path>\\<to>\\<SSO>\\sso_setup.msi" /q USR=%username% DOM=<domainname> IP=<ip-axsguard> ALLUSERS=" "
Local System Install
-
Log in to the Windows client with administrator privileges.
-
Extract the SSO zip file to the location of your choice.
-
Double-click on the msi installer to start the installation.
-
Read and accept the terms in the license agreement.
-
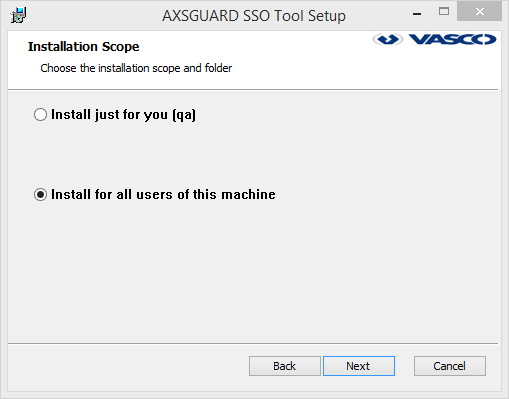
Check Install for all users of this machine as shown in the image below.
-
Configure the default profile settings.
Important
You will be asked to create a default user profile. If you wish to keep profiles from a previous installation, select No.
User-Level Install
For non-privileged users, the SSO tool can only be installed for their individual Windows account. Follow the system-wide installation steps, but select Install just for you when prompted.
Important
The msi installer will ask for administrator credentials if it detects a previous version of the SSO tool on the system. Administrative privileges are required to uninstall versions prior to 2.14.
macOS Installation
-
Download the SSO tool.
-
Open/mount the DMG file.
-
Drag and drop the .app bundle into your "Applications" folder.
Linux Installation
-
Download the SSO tool.
-
Extract the
.tgzarchive into your home directory. -
You can run the SSO tool in one of two ways:
- Open a terminal, navigate to the extraction folder, then start the SSO tool:
./AXSGUARDSSO_64. - Use your mouse to open the folder where you extracted the files, then double-click
AXSGUARDSSO_64to start the SSO tool.
- Open a terminal, navigate to the extraction folder, then start the SSO tool:
Versions prior to 3.0
Older Linux binaries are compiled with gcc and require wxWidgets to run. Check the documentation of your Linux distribution for installation instructions.
Ubuntu example: sudo apt-get install libwxgtk3.0-dev
Configuration & Use
User Profiles
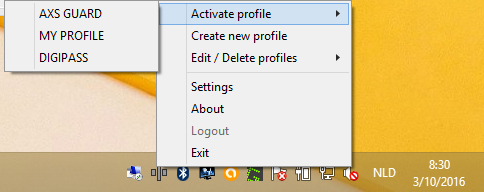
Right-clicking on the tray icon will show a context menu allowing a user to activate, create, delete or edit a user profile. Other menu options include logging off from AXS Guard and stopping the SSO tool. A user can create different user profiles.
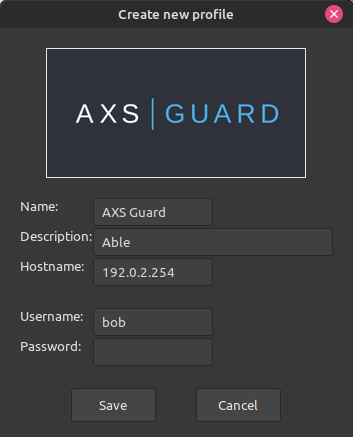
Creating a Profile
-
Right-click on the tray icon.
-
Select Create new profile.
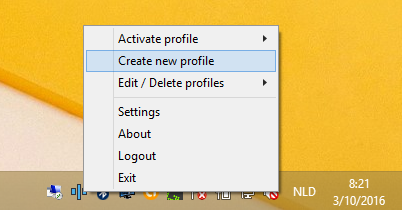
-
Enter the profile settings and save.
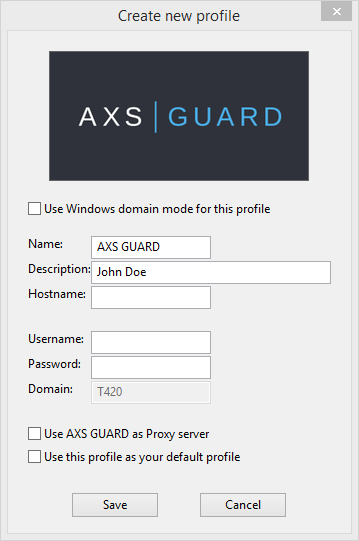
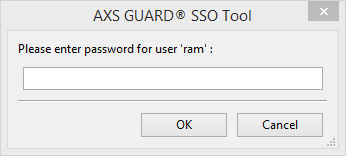
There are three scenarios in which the password field should be left blank:
- Windows Domain Mode: The username and password fields are non-editable by the user, as authentication occurs against the Windows Domain controller or Entra ID.
- Workgroup Mode: If your company policy prohibits the storage of AXS Guard passwords, users will be prompted to enter their password each time it's required.
-
OATH or DIGIPASS Authentication: For AXS Guard systems enforcing OATH or DIGIPASS authentication for firewall and web access, a password window will appear whenever the user needs to enter a one-time password.
Field |
Description |
|---|---|
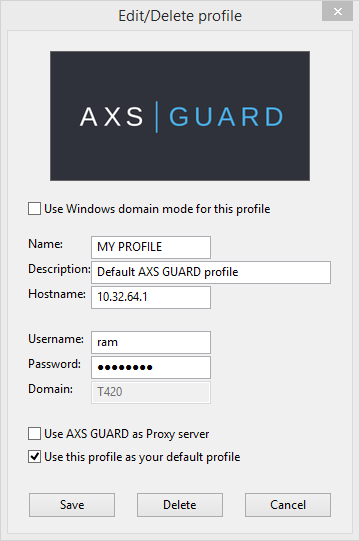
Use Windows Domain Mode for this profile |
|
Name |
The label of the user profile. |
Description |
An optional description for the user profile. |
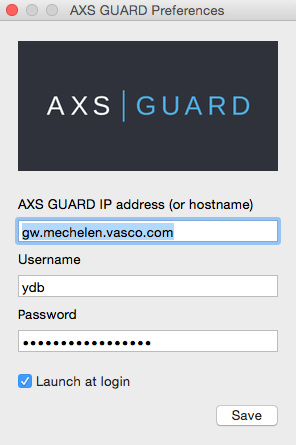
Hostname |
Enter the hostname or the secure LAN IP address of your AXS Guard appliance. The SSO tool will attempt to auto-complete this address by resolving the default hostname, |
Username (Workgroup Mode only) |
Enter the AXS Guard username. |
Password (Workgroup Mode only) |
Enter the AXS Guard password of the user. Leave blank if you are enforcing OATH or DIGIPASS authentication for firewall and web access. |
Use AXS Guard as proxy server |
Check to automatically adjust the proxy configuration of the user's Windows client. If enabled, the user’s browser will connect to the Internet through the AXS Guard proxy server. This option is not supported on Mac and Linux workstations. |
Use this profile as your default profile |
The default profile will activate automatically each time the SSO tool is started. |
Profile Activation
To manually log in with a specific profile, users must select Activate profile from the tray icon menu. A list of available profiles will appear, with the currently active profile marked.
-
Right-click on the tray icon to display the context menu.
-
Select Activate profile.
-
Click on the desired user profile.
Profile Management
The Edit/Delete profiles option lets you modify or remove user profiles. To edit or delete a user profile:
-
Right-click on the tray icon.
-
Select Edit/Delete profiles.
-
Select the desired profile.
- Modify the settings and click on the Save button.
- Click on the Delete button to remove the user profile.
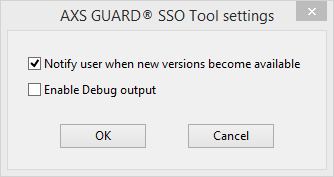
Tool Options
-
Right-click the tray icon.
-
Click on Settings.
-
Adjust the settings as needed and click on OK to save them.
| Field | Description |
|---|---|
Notify user when new versions becomes available |
If enabled, users are automatically notified via the system tray when a new version of the SSO tool is available. This option is enabled by default. |
Enable profile autodetection |
Automatically selects the correct user profile based on the client's IP address when connecting to different AXS Guard appliances, eliminating the need for manual switching. The SSO tool resolves the client's hostname and matches the resulting IP address with configured profile IP addresses. The profile that exhibits the highest degree of correspondence (i.e., the most matching criteria) will be automatically activated. This option is enabled by default. |
Enable Debug output |
Enables debug output to a logfile named |
Mac-Specific Configuration
Configuring the SSO tool on macOS is similar to Windows, but it does not support domain mode or proxy auto-configuration.
Linux-Specific Configuration
Configuring the SSO tool on Linux is similar to Windows, but it does not support domain mode or proxy auto-configuration.
Troubleshooting
Connection to server failed
If you encounter the following error message:
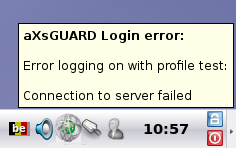
Verify the following:
- Verify the AXS Guard LAN IP address in the profile by right-clicking the system tray icon and selecting edit.
- Attempt to ping the AXS Guard LAN IP address.
- If the ping fails, check network connectivity:
- Ensure the computer is physically connected to the LAN.
- Verify if the network cables are securely connected.
- If necessary, replace the network cable and try pinging again.
-
Verify that the
sec-authfirewall rule is present and activated within thestat-secfirewall policy on AXS Guard (navigate to Firewall > Policies > Static >stat-sec, as shown below).
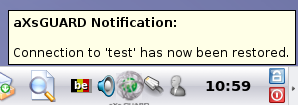
If the error occurs because of a temporary network outage, the SSO tool will notify the user as soon as the connection is restored:
Unknown user or password invalid
If the following error message appears when logging in:
- Verify the configured allowed Microsoft domains in the AXS Guard Administrator Tool. Ensure this field is empty if your network doesn't use specific domains (Workgroup Mode).
- Confirm that the entered username and password combination is correct and valid within the AXS Guard user list.
- Edit the user profile.
- Verify that the correct username is entered.
- Re-enter the corresponding password.
- Save the profile.
- Reactivate the profile.
Login not allowed from domain or computer
If the following error message appears when logging in:
Verify the following:
-
Check the Microsoft domain settings on the AXS Guard appliance and make sure they match the domain as configured in your profile.
-
Verify that you are logged into the Windows domain, and not with a local account. For Workgroup Mode, no domain should be configured in the AXS Guard Administrator Tool.
Running the SSO Tool in Linux throws an error
The following information only applies to versions older than 3.0. We recommend installing the latest version for the best experience and security.
./AXSGUARDSSOv2_64: error while loading shared libraries: libwx_gtk2u_adv-3.0.so.0: cannot open shared object file: No such file or directory
(1.9.3)[~] user@linux: $ ldd ./AXSGUARDSSOv2_64
        linux-vdso.so.1 =>  (0x00007ffc7dd9a000)
        libssl.so.1.0.0 => /lib/x86_64-linux-gnu/libssl.so.1.0.0 (0x00007fdd4a74b000)
        libcrypto.so.1.0.0 => /lib/x86_64-linux-gnu/libcrypto.so.1.0.0 (0x00007fdd4a36f000)
        libwx_gtk2u_adv-3.0.so.0 => not found
        libwx_gtk2u_html-3.0.so.0 => not found
        libwx_gtk2u_core-3.0.so.0 => not found
        libwx_baseu-3.0.so.0 => not found
        libwx_baseu_net-3.0.so.0 => not found
        libstdc++.so.6 => /usr/lib/x86_64-linux-gnu/libstdc++.so.6 (0x00007fdd4a068000)
        libm.so.6 => /lib/x86_64-linux-gnu/libm.so.6 (0x00007fdd49d62000)
        libgcc_s.so.1 => /lib/x86_64-linux-gnu/libgcc_s.so.1 (0x00007fdd49b4c000)
        libpthread.so.0 => /lib/x86_64-linux-gnu/libpthread.so.0 (0x00007fdd4992d000)
        libc.so.6 => /lib/x86_64-linux-gnu/libc.so.6 (0x00007fdd49568000)
        libdl.so.2 => /lib/x86_64-linux-gnu/libdl.so.2 (0x00007fdd49364000)
        /lib64/ld-linux-x86-64.so.2 (0x000055e7d3c1c000)
The Linux binary requires wxWidgets (version 3.0 or later) to run. Check the documentation of your Linux distribution for installation intructions. The Linux binary is compiled with gcc 4.9 and will not work with wxWidgets libraries that have been compiled with gcc 5.
VPN disconnects due to AXS Guard SSO tool
The unexpected disconnection of active VPN sessions while the AXS Guard SSO tool is running is a known issue. It occurs when the SSO tool on a VPN client automatically attempts to authenticate the user against AXS Guard through a VPN tunnel for which the user is already authenticated.
This second authentication attempt causes the termination of the active VPN session. The issue can be resolved by creating a static firewall policy to prevent VPN disconnect issues on AXS Guard.
Support
If you encounter a problem
If you encounter a problem with AXS Guard, follow the steps below:
-
Check the troubleshooting section of the feature-specific manual.
-
Check the knowledge base on this site for information about special configurations.
-
If no solution is available in any of the above sources, contact your AXS Guard vendor.
Contact Information
(+32) 15-504-400
support@axsguard.com