AXS One VPN Server
Introduction
About AXS One
AXS One is a next-generation secure access solution built upon the high-performance WireGuard architecture. Unlike traditional VPNs that provide broad, perimeter-based network entry, AXS One adopts a Zero Trust Network Access (ZTNA) model, operating on the principle of "never trust, always verify", requiring an explicit trust approval by a system administrator before any endpoint can establish a connection.
By leveraging an encrypted WireGuard-based peer-to-peer overlay, client connectivity is not only lightning-fast but also context-aware. Beyond strong authentication and administrator authorization, AXS One also integrates rigorous security posture checks to ensure that every admin-approved endpoint meets specific corporate security standards.
Context-Sensitive Help
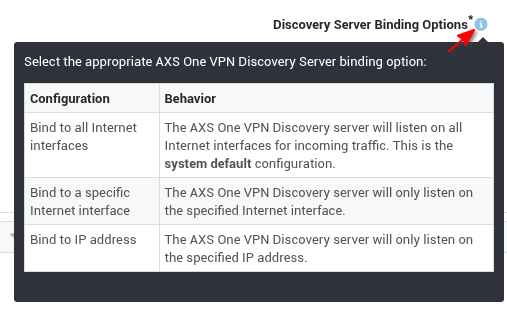
This document provides system administrators and IT professionals with the required steps to set up a minimal, basic configuration of the AXS One VPN server. To assist with the setup process, context-sensitive help is available directly within the interface; simply click the blue i icon located next to any configuration field for detailed descriptions and requirements.
Connectivity Modes
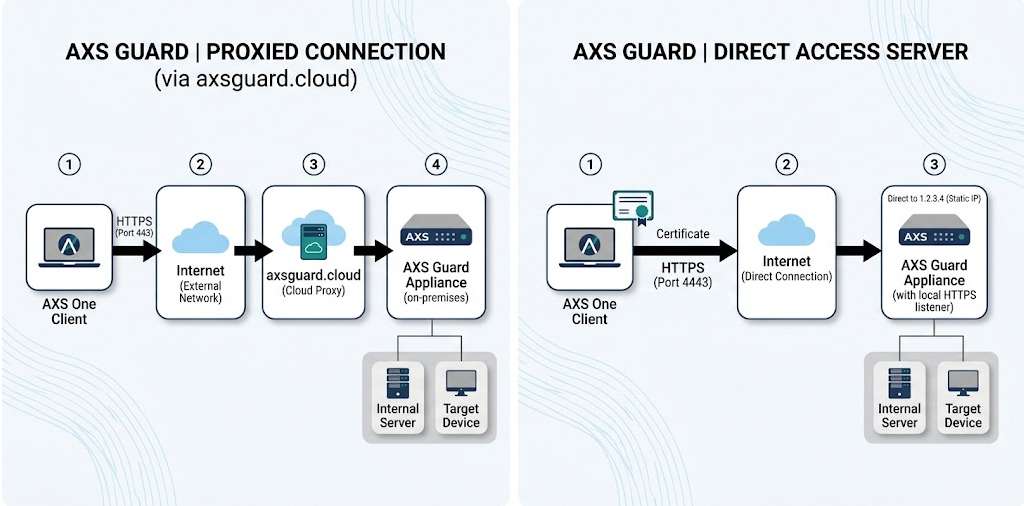
By default, management and configuration traffic between AXS One clients and the AXS Guard appliance is securely proxied through the AXS Guard Cloud (Appliance Proxy). This means no public certificate, public DNS record, or direct Internet reachability is required on the appliance for this purpose.
Alternatively, system administrators can enable the Local Access Server, which allows management and configuration traffic to be routed directly to the appliance instead of routing it through the AXS Guard Cloud. This is entirely optional. If enabled, the Local Access Server Requirements apply.
WireGuard Tunnel Traffic
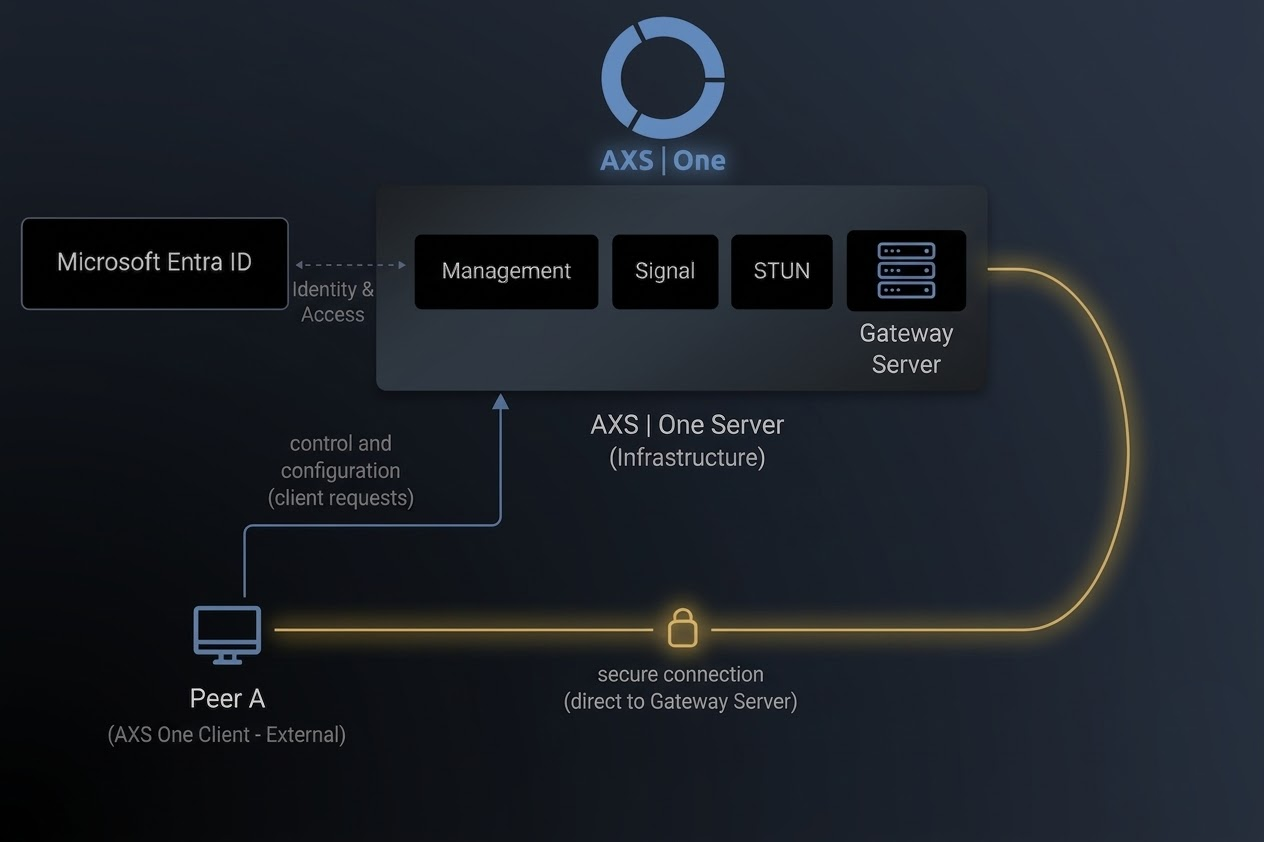
Regardless of which connectivity mode is used for management traffic, the actual WireGuard VPN traffic always passes directly between AXS One clients and the AXS Guard appliance. The Local Access Server settings only affect how clients reach the management & control plane, not the VPN data path itself. This means the AXS Guard appliance must always be reachable from the Internet on the VPN port configured under Connection Settings, even when using the default Appliance Proxy mode.
Local Access Server Requirements
Optional Feature
The following requirements only apply when using the Local Access Server. See the section about Connectivity Modes.
Internet Reachability
The AXS One VPN server and its subcomponents must be reachable from the public Internet to allow remote peers to establish a tunnel. This requires that the server is accessible via a routable public IP address.
Public DNS Record
To allow users to establish a VPN connection via the local access server, you need a public DNS record (A record) that points to the server's public IP address. Refer to your DNS provider's documentation for specific instructions on creating an A record.
Server Certificate
The domain name of the access server must be secured by a valid certificate signed by a recognized commercial Certificate Authority (CA). Please note that the AXS One VPN client will, by default, reject self-signed certificates or those issued by an untrusted CA.
The Private CA Approach (Self-Signed)
In the world of Zero Trust Network Access (ZTNA) and modern VPNs, the identity of the gateway is the foundation of the entire connection. While you can use a private CA to sign the server certificate, the industry standard pushes for public, commercial CAs to solve a very specific problem: Universal Trust.
- Why Public CAs are the Standard: When a server uses a certificate from a public, commercial Certificate Authority (like DigiCert or Let’s Encrypt), it is leveraging a pre-existing "Circle of Trust."
- Pre-installed Root Stores: Operating systems (Windows, macOS, Linux, iOS, Android) and browsers come with a built-in list of trusted public CAs.
- Zero-Touch Validation: Because the client already knows and trusts the public CA, it can immediately verify the server's identity without any manual configuration.
- Security Compliance: Many ZTNA brokers and modern browsers strictly enforce policies like Certificate Transparency (CT) and Revocation checks (OCSP/CRL), which are managed automatically by public CAs but often neglected in private setups.
The Private CA Approach (Self-Signed)
Using a private or self-signed CA is supported, but it changes the deployment from "plug-and-play" to a manual configuration task.
When using a private CA, the client’s device has no idea who that CA is. When the AXS One client attempts to connect, the handshake will fail because it assumes the connection is being intercepted by an attacker (a Man-in-the-Middle attack).
The Requirement: Importing the CA Certificate
To make it work, system administrators must manually bridge that trust gap:
- Export the Root CA: System administrators must obtain the Root CA certificate file from the private issuing authority.
- Distribute to Clients: This certificate must be imported into the Trusted Root Certification Authorities store on every single end-user device.
- Scalability Issues: While this is easy for one person, in an enterprise context, this usually requires an MDM (Mobile Device Management) tool or Group Policy (GPO) to push the certificate to hundreds of machines.
Note: If the client doesn't have the private CA certificate installed, the AXS One VPN client will block the connection entirely to maintain the Zero Trust posture, as an unverified identity is treated the same as a compromised one.
Pre-Configuration
Feature Activation
- Log in to your AXS Guard appliance.
- Navigate to Feature Activation > VPN.
-
Enable the AXS One VPN feature and update your configuration.

Certificate Import
Notice
The following steps are only required if you choose to enable the Local Access Server. Skip this section if you are using the default Appliance Proxy connectivity mode.
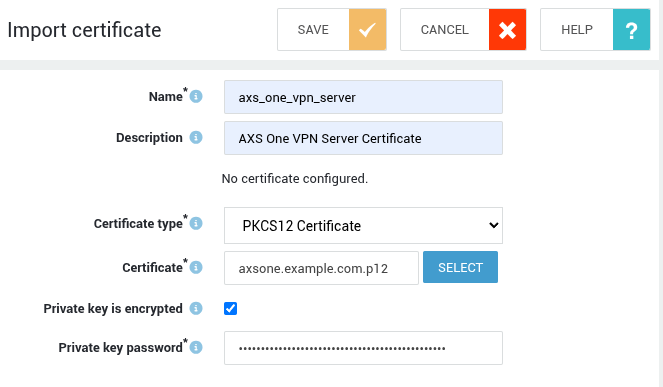
- Navigate to PKI > Certificates.
- Click on the Import button to import your server certificate.
-
Enter the required information and click on the Save button.
Server Configuration
Connection Settings
- Navigate to VPN > AXS One VPN > Server.
- Enable the AXS One VPN Server.
- Enable Trusted Clients for strict posture checks (recommended).
- Enter the Outgoing IP for your organization.
-
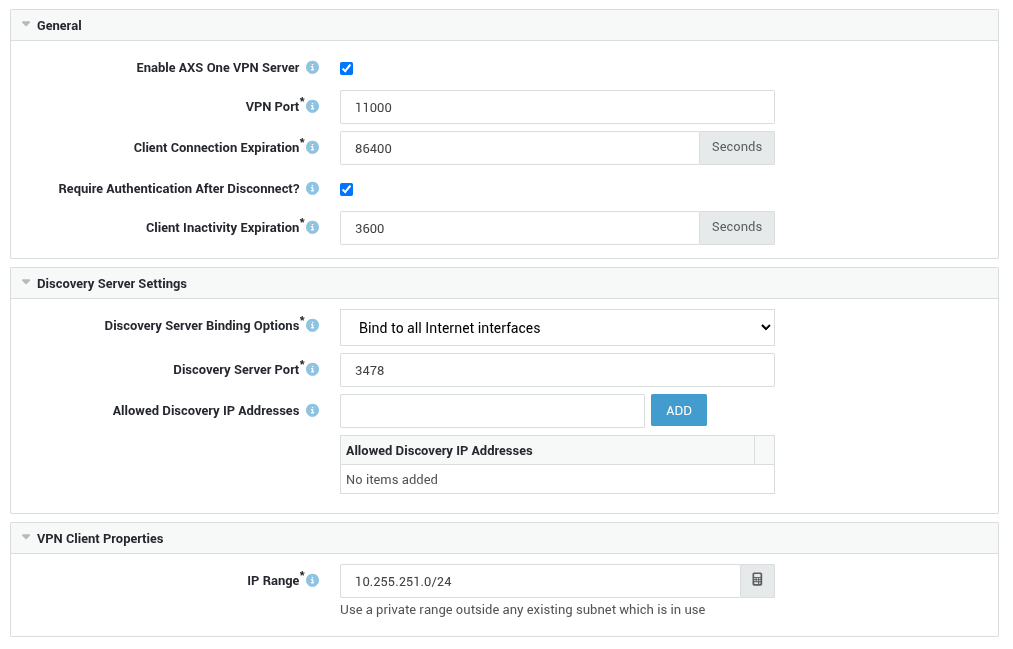
Use the default connection settings, as shown in the example below.
-
Under VPN Client Properties, review the following fields:
Field Description Management URL Read-only field showing the URL that must be configured on AXS One clients to reach the management server. Its value depends on whether the Local Access Server is enabled: with the default Appliance Proxy mode, this is https://<license-number>.axsone.axsguard.cloud; if the Local Access Server is enabled, this shows the hostname (FQDN) configured there instead.IP Range The private IP subnet used to assign internal VPN addresses to connecting clients. Use a private range outside any existing subnet which is in use. Each client is assigned a unique IP address from this range, so its size determines the maximum number of clients that can be configured. Once an address has been assigned to a client, it remains reserved for that client only, whether or not the client is currently connected.
Push-to-Client Configuration
- Select the Push-to-Client configuration tab.
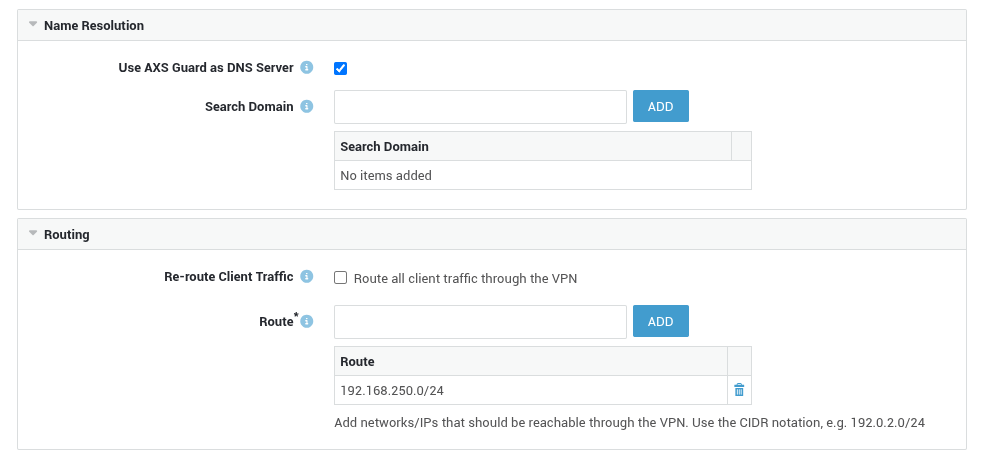
- Add the networks that should be reachable through the VPN, using the CIDR notation.
-
Proceed to the next tab.
Local Access Server
Optional Feature
Enabling the Local Access Server is optional; see Connectivity Modes for details. If left disabled, management traffic is routed through the AXS Guard Cloud (Appliance Proxy) instead, and the steps below can be skipped.
- Select the Local Access Server tab.
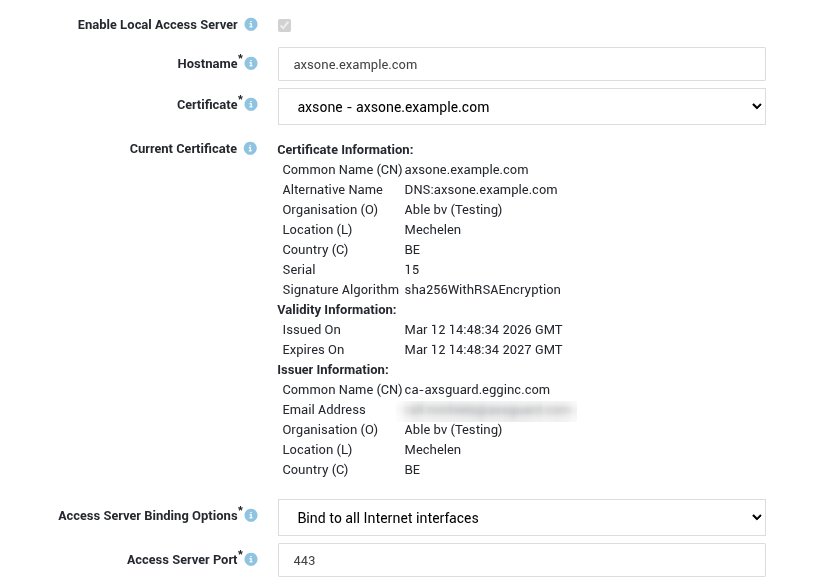
- Enable the local access server.
- Enter the hostname that matches your server certificate and public DNS record.
- Select the server certificate that you previously imported.
- Enter the desired Access Server Port .
-
Save your configuration.
GeoIP Restrictions
Local Access Server Only
- GeoIP restrictions, as described below, are only relevant if you have enabled the Local Access Server option and apply to the Access Server Port used for management & control plane traffic. If you use the default Appliance Proxy connectivity mode, this section does not apply, since no management port is exposed to the Internet in that case.
- GeoIP filtering requires a comfort or premium threat intelligence license and must be activated under System > Feature Activation before use.
About
Since the AXS One Local Access Server must be reachable from the public Internet (see Internet Reachability), its exposed Access Server Port is a potential target for scanning, brute-force attacks and other exploitation attempts originating from anywhere in the world.
To reduce this attack surface, it is recommended to restrict inbound access to the AXS One Local Access Server port to countries or regions where your organization has legitimate remote users, such as home offices, traveling employees, or branch locations. Connection attempts from all other regions should be blocked before they ever reach the authentication or posture-check layer.
This is achieved using the AXS Guard GeoIP filtering feature.
Recommended Approach
Rather than applying a global GeoIP filter, which blocks traffic system-wide across all AXS Guard services, it is recommended to scope the restriction specifically to the AXS One VPN server endpoint using a granular GeoIP configuration. This avoids unintentionally restricting other publicly-reachable services, such as mail or the reverse proxy, that may need to remain accessible from a broader set of regions.
To configure a granular GeoIP restriction for AXS One:
- Navigate to Firewall > Rules > Towards.
- Click Add New to create a custom rule.
- Configure the rule as follows:
- Device In:
Internet - Destination Port: the Access Server Port that you configured for AXS One.
- Source List: select the GeoIP list(s) corresponding to the countries or regions that should be allowed.
- Target:
Accept
- Device In:
- Save the rule, then add it to a static policy positioned above the default deny policy (e.g.
stat-int). See Reordering Static Policies for guidance on rule and policy order. - Update your configuration.
Connection attempts to the AXS One server from countries not included in the source list will be dropped by the system's default zero-trust policy, without ever reaching the authentication server.
Tip
Periodically review connection attempts under Firewall > Logs or the AXS One Server Logs to confirm that only expected regions are connecting, and adjust the allowed country list as your organization's remote workforce evolves.
Granting VPN Access
User access to AXS One is not granted by default; system administrators must explicitly enable access for each user or group.
| Configuration Level | Access Scope | Implementation Logic |
|---|---|---|
| Group Level | Bulk Access | Enable at this level to grant access to all group members. |
| User Level | Selective Access | Only necessary if the user's group lacks access but the individual requires it. |
| Default State | No Access | Access is restricted until an administrator explicitly enables one of the above. |
Group-level Access
- Navigate to Users & Groups > Groups.
- Select the appropriate group.
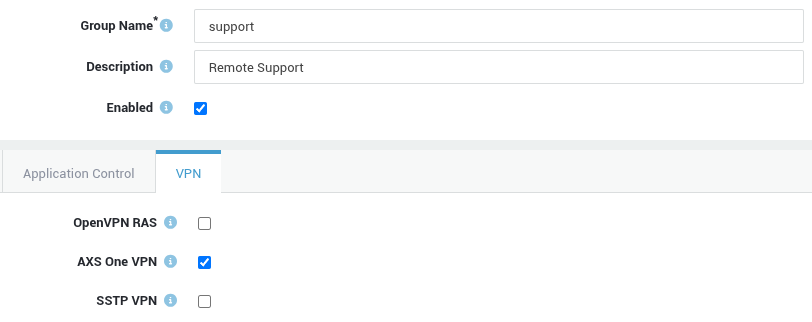
- Select the VPN tab and enable the AXS One VPN option.
-
Update your configuration.
User-level Access
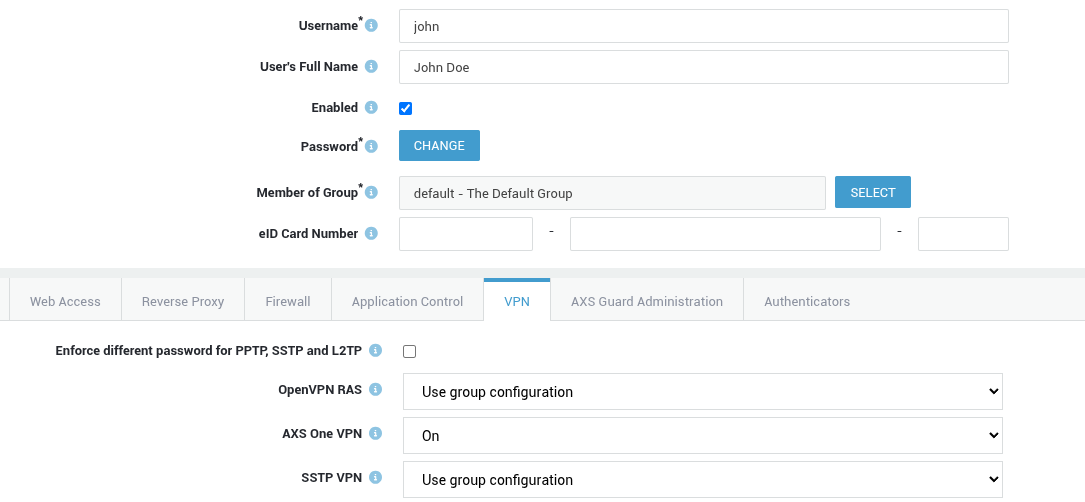
- Navigate to Users & Groups > Users.
- Select the appropriate user.
- Select the VPN tab and set the AXS One VPN option to on (select group configuration if the user's group already has access).
-
Update your configuration.
Firewall & Application Control
In a secure VPN architecture, firewall and application control policies serve as crucial mechanisms for enforcing the Principle of Least Privilege (PoLP). Rather than granting broad network access, these controls restrict remote users to the specific IP addresses, ports, services and verified applications that are essential to their roles. System administrators should implement appropriate firewall and application control policies to eliminate unnecessary lateral movement and reduce the attack surface. This allows potential threats to be contained within a narrow, monitored channel should an incident arise.
Group-level Settings
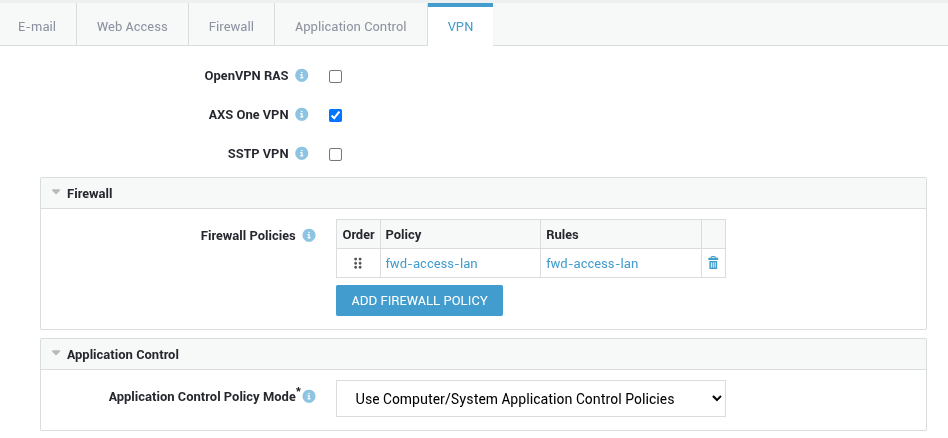
- Navigate to Users & Groups > Groups.
- Select the appropriate group.
- Select the VPN tab to add the appropriate firewall and application control policies.
-
Update your configuration.
User-level Settings
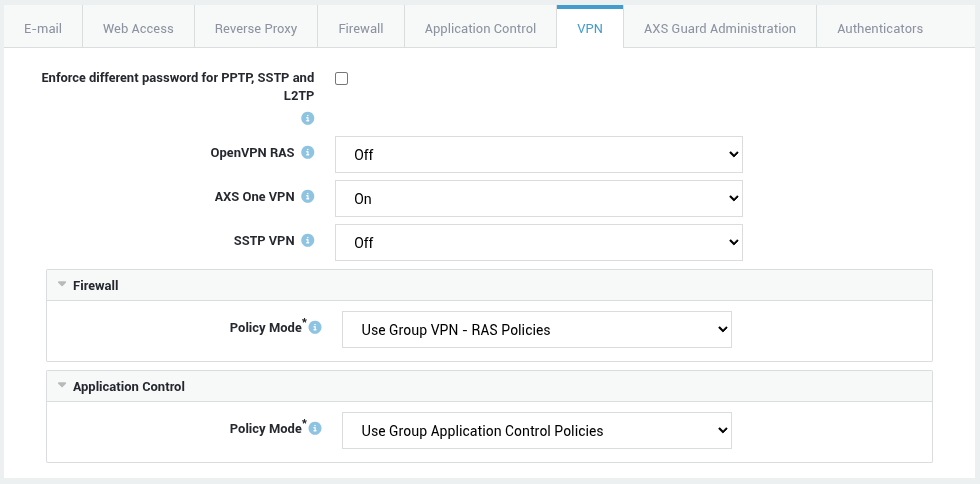
- Navigate to Users & Groups > Users.
- Select the appropriate user.
- Select the VPN tab to configure user-specific firewall and application control policies (for example, to override the user's default group policies when custom access is required).
-
Update your configuration.
User Authentication Policy
- Navigate to Authentication > Services.
- Click on the AXS One VPN service.
- Configure the appropriate authentication policy (strong authentication is required for this service).
- Make sure to enable brute-force attack protection.
-
Update your configuration.

System Status
From the Services page, system administrators can verify the health of individual AXS One VPN server components and use the Restart function for troubleshooting or maintenance.
- Navigate to System > Status > Services.
-
Search for
axsone.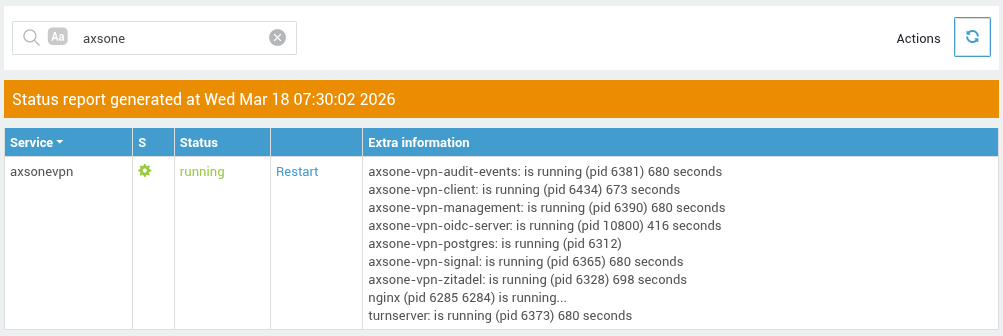
Clients
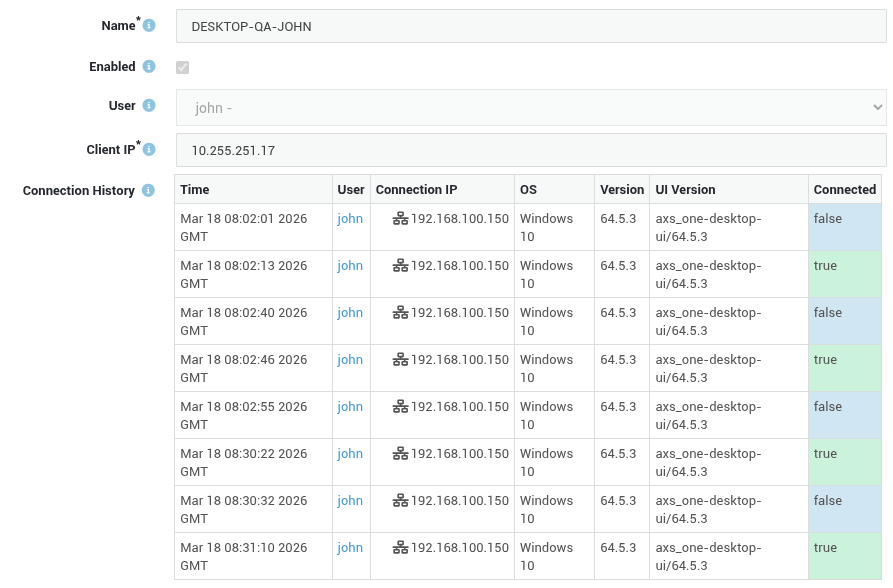
The clients page provides a high-level overview of active and past user sessions. It logs the machine name, username, internal and external IP addresses, and a timestamp for the last connection event. Additionally, it mentions whether clients are trusted or not.
Trusting a Client
Trusted Clients
The following steps are only required if the Enable Trusted Clients option is enforced in the server configuration.
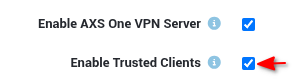
With trusted clients enabled, system administrators must explicitly trust endpoints before they can connect to the corporate network. This can only be done after a user successfully establishes a connection with the AXS One client. Trust only needs to be granted once per new client, on its first connection attempt. After initial approval, the client can freely reconnect anytime without admin intervention.
-
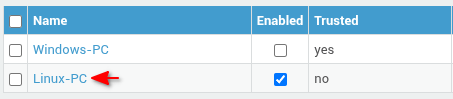
Navigate to VPN > AXS One VPN > Clients.

-
Click on the name of the machine to be trusted.
-
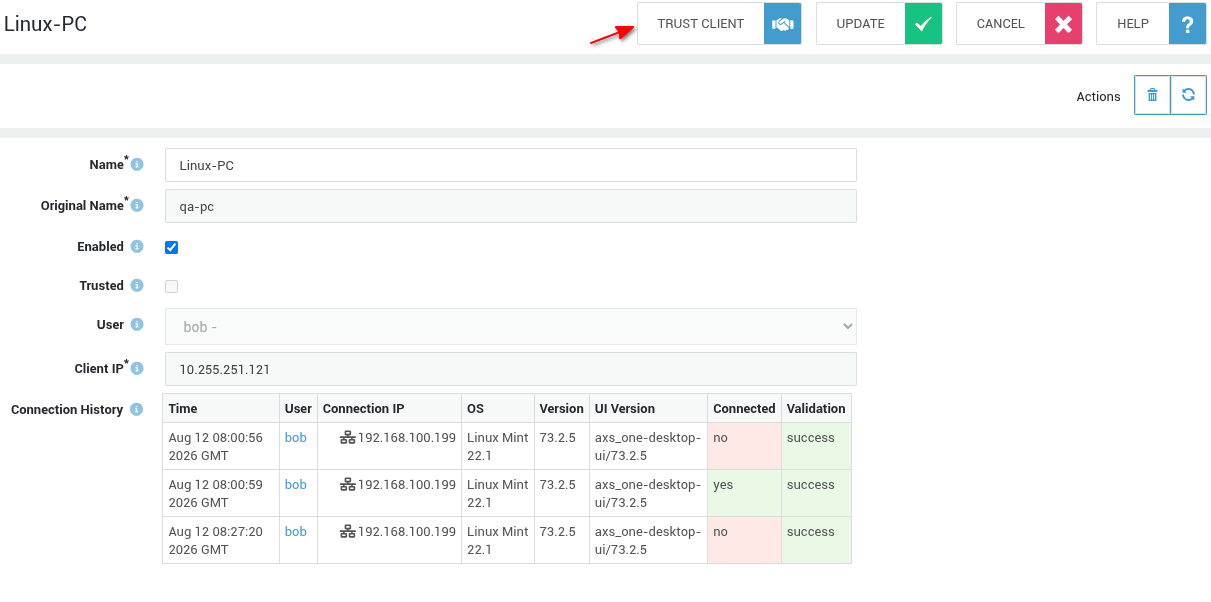
Click on the Trust Client button.
-
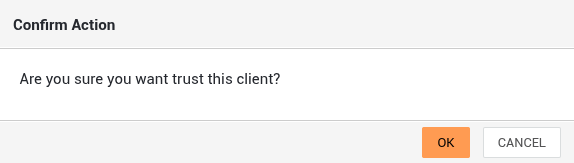
Click OK to confirm.
Connection History
-
Navigate to VPN > AXS One VPN > Clients.

-
Click on a machine name to view its connection history.
Client Status
The client status page provides real-time monitoring of active sessions, specifically highlighting the status column to confirm successful connectivity. A green connected status indicates an active, healthy link between the client and the server. Additionally, system administrators can disconnect users directly via this page if needed.

Authentication Status
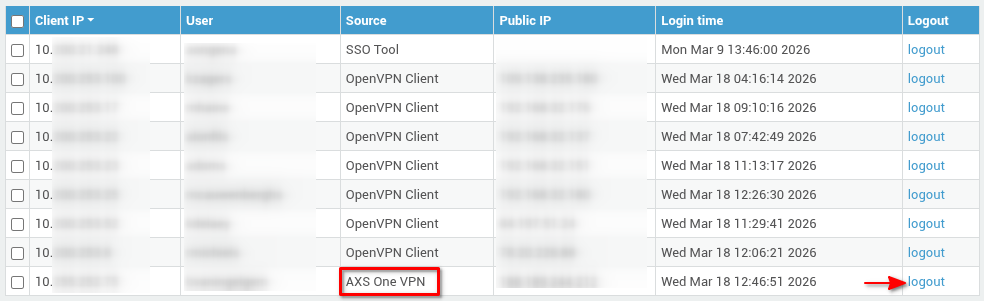
The authentication status page allows administrators to view all active users and log them out remotely.
- Navigate to Authentication > Status > Authenticated Users > Firewall, Proxy & VPN.
-
Click on the logout link to log out a user.
Server Logs
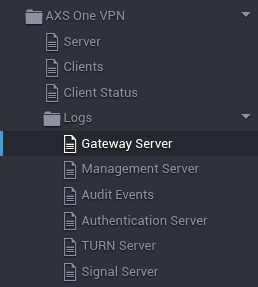
- Navigate to VPN > AXS One VPN > Logs.
-
Select the desired log type.
-
Click on the appropriate date to inspect the logs.

Client Summary
Parsed logs containing a summary of the client login, connect, disconnect flow. These logs are aggregated from the different AXS One VPN subservices, filtered and parsed to show the most important steps in the login, connect, disconnect flow for each client.
The following log actions can occur:
| Action | Explanation |
|---|---|
| Login Success | The user was successfully authenticated. |
| Login Failed | There was a failed authentication attempt for the given user. This can be due to invalid credentials or an authentication error. Make sure that AXS One VPN is enabled for the user or group if a user cannot login successfully. |
| Registered | A new client connected for the first time to the AXS One VPN server. The client was registered to a user, assigned an VPN IP address, and a new client record entry was created for this client. |
| Up | The client is successfully connected and authenticated against the management server. There is no working VPN tunnel yet. |
| Down | The client has disconnected from the management server. The VPN tunnel is, or will be closed. |
| Reachable | The server is able to communicate with the client. VPN tunnel path discovery will begin shortly. |
| Connecting | The client is searching for a working VPN tunnel path. VPN traffic is only possible after this path is found and working. |
| Configured | The client has found a valid direct VPN tunnel path to the server. The server is configured to use this path for the VPN connection to the client. |
| Relayed | The VPN connection with the client will go through the Relay server as fallback to a direct connection. This is because a direct connection is not possible or not yet found. The Gateway server will keep trying to find a direct connection to upgrade to. |
| Connected | The first VPN handshake is received, the client has a successful VPN connection with the server. |
| Connection Lost | VPN handshake timeout, indicating that the current VPN tunnel path does no longer work. The Gateway server will try to find another path to the client. |
| Disconnected | The client VPN tunnel disconnected. The client and server will attempt to configure a new VPN tunnel automatically if the client is still up and has a valid session. |
| Expired | The authenticated user session for this client has expired. The user will need to reauthenticate to restore the VPN tunnel. |
| Logout | The user was logged out from the server by an administrator. The user will need to reauthenticate to restore the VPN tunnel. |
| Unauthorized | The user was authenticated successfully but is not authorized to set up a VPN tunnel with this client. This can be because the user does not have the required permissions, or because the client is already registered to another user. |
| Untrusted | The client is successfully authenticated but the AXS One VPN server denies the VPN connection because the specific client is untrusted or disabled. This log line will appear if the client is disabled or if the Enable Trusted Clients option is enabled in the AXS One VPN server settings and the client is not yet marked as trusted. It indicates that an administrator needs to manually trust or enable this client before it can set up a VPN connection with the server. |
| Trusted | The client is marked as trusted and is enabled. This log line will appear on the first successful connection if the Enable Trusted Clients option is disabled or when an administrator manually trusts or enables a client from the clients settings page. |
| Non-Compliant | The client is successfully authenticated but the AXS One VPN server denies the VPN connection because the validation checks on the client fail. The log line will often include a hint to which validation check fails. This log line will only appear if the Enable Client Validation Checks option is enabled and configured in the AXS One VPN settings. |
| Blocked | The client was unable to set up a VPN connection with the server. There is no VPN traffic possible for this client. This mostly happens due to networking issues that can be caused by various factors such as problematic routing config and firewalling blocking somewhere on the path between the client and server. |
| Start | The AXS One VPN server has started. |
| Shutdown | The AXS One VPN server has shutdown, clients will no longer be able to connect. |
Normal connection flow
A normal connection flow looks like this:
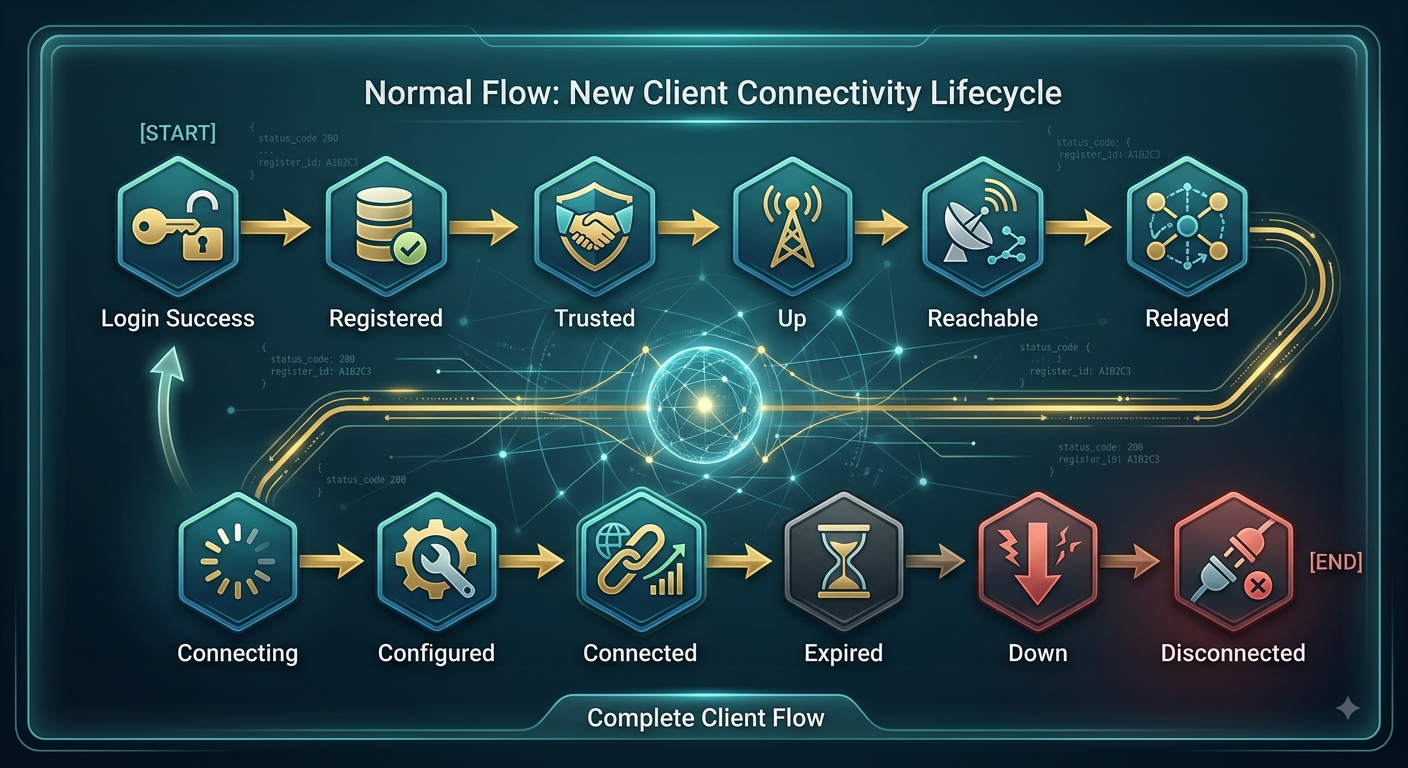
A new connection will always first be relayed while the Gateway server searches for a direct VPN tunnel path to the client.
Tip
Verify that the client is trusted and enabled if a client becomes Up but never tries to set up a VPN connection.
Gateway Server
The Gateway Server is a specialized AXS One client running on the appliance, configured as an Exit Node. While it functions as a client, it is the central hub allowed to connect to all other clients. These logs document the connection setup phase specifically for this node. They are the primary tool for verifying if external clients are successfully establishing a path to the Exit Node.
| Event Category | Example Log Message | Description |
|---|---|---|
| Service Lifecycle | starting AXS One service |
The Exit Node daemon is launching and initializing local resources. |
| System Check | system supports advanced routing |
Verifies kernel capabilities (eBPF) required to route traffic for other clients. |
| Management Sync | connected to the Signal Service stream |
Confirms the Exit Node has checked in with the Management Server for policy updates. |
| ICE Negotiation | sending offer / received offer |
The process of allowing external peers to find a path to this Exit Node. |
| Interface Setup | Netbird engine started... 10.255.251.1/24 |
The virtual WireGuard interface is created on the appliance. |
| Connection Success | connection succeeded with offer session |
Confirms a peer has successfully shook hands with this Exit Node. |
| WireGuard Status | first wg handshake detected |
Validates that encrypted data is successfully flowing between a client and the Exit Node. |
| Health Monitoring | Dump stat: Status: Connected |
A periodic summary of active peer connections and relay usage. |
WireGuard
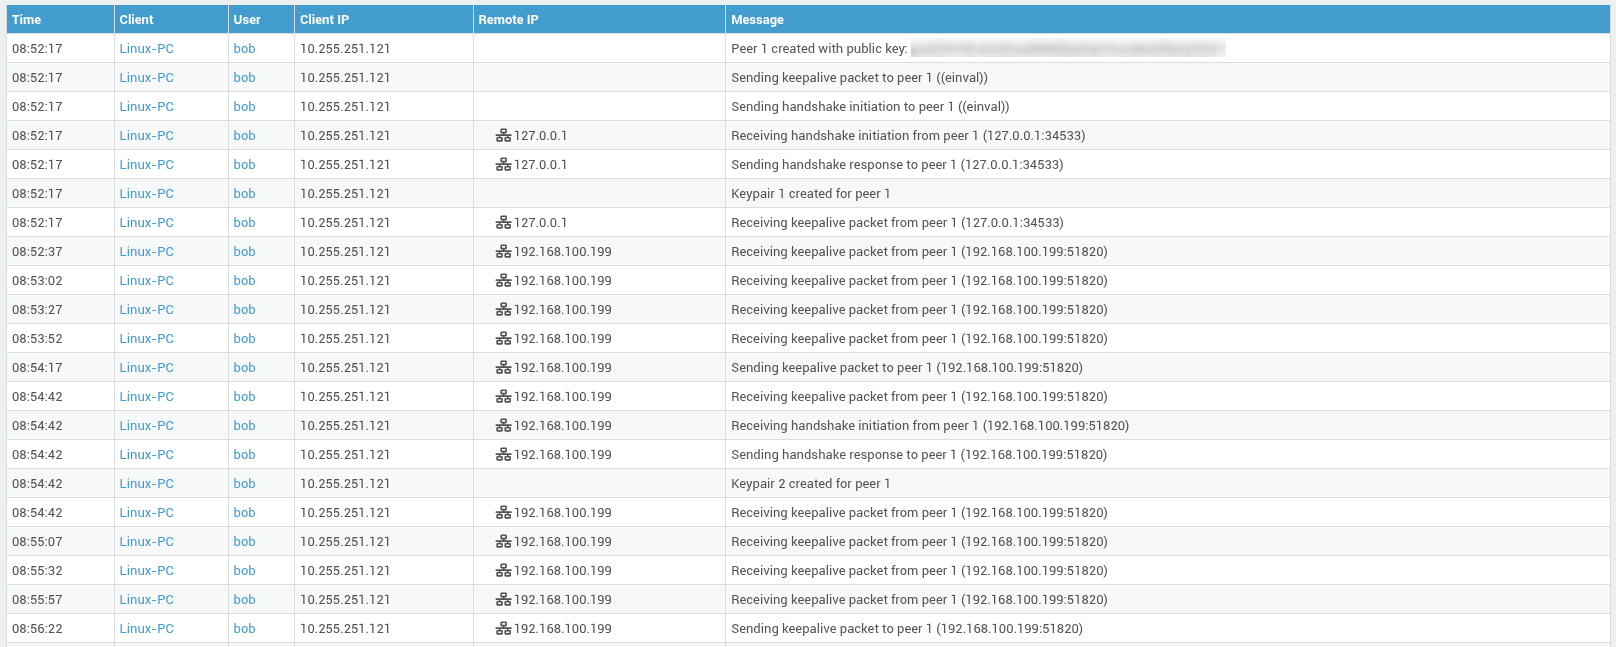
Parsed WireGuard logs. These logs contain VPN tunnel updates for connected AXS One VPN clients.
Management Server
The Management Server acts as the Control Plane and Authorization Engine. It does not perform authentication (that is handled by the Authentication Server), but it dictates Authorization: telling clients which peers they are allowed to see, providing their WireGuard configurations, and managing network policies.
| Event Category | Example Log Message | Description |
|---|---|---|
| Database Init | using SQLite store engine |
Initializing the database that stores network policies and peer configurations. |
| Schema Migration | No migration needed for accounts |
Checks if the database structure matches the current software version. |
| IdP Integration | warmed up IDP cache with 1 entries |
Synchronizing user identities from the Auth Server to apply access rules. |
| API Activity | request GET /api/users took 4 ms |
Records administrative changes made via the dashboard or CLI. |
| Audit Logging | "operation":"setupkey.add" |
A JSON record of state changes (e.g., creating keys) for compliance. |
| IP Allocation | Got ip check if it is reserved: 10.255.251.17 |
Authorization: Assigning a specific internal VPN IP to a registered peer. |
| Peer Lifecycle | Login request from peer [...] |
Tracks when a client attempts to join and checks if they are authorized to do so. |
| Policy Tracking | saving peer status [...] is connected: true |
Updates the dashboard to reflect which peers are currently authorized and online. |
| Key Management | PAT usage in last minute: 1 unique tokens |
Monitoring the use of Access Tokens for programmatic control. |
Audit Events
The audit event logs provide a high-fidelity, JSON-structured record of every significant administrative and state change. While Management logs show background processes, audit logs focus on the "Who, What, and When" for security monitoring.
| Operation | Description | Key Meta-Data Captured |
|---|---|---|
| personal.access.token.* | Lifecycle of PATs used for API automation. | Token name and associated user ID. |
| network.resource.* | Addition or removal of specific network subnets. | Resource name, type, and network ID. |
| network.router.* | Changes to routing nodes (Exit Nodes) directing traffic. | Peer ID acting as the router. |
| policy.update | Changes to access control rules between client groups. | The specific policy name. |
| setupkey.* | Creation/revocation of keys for automated registration. | Key type and truncated value. |
| user.join | Triggered when a new IdP user logs in for the first time. | Unique account ID and target user ID. |
| peer.user.add | Official registration of a new device/node. | FQDN, internal IP, and source IP. |
| peer.group.add | Assigning a peer to a group (defining access levels). | Peer FQDN and Group Name. |
| peer.status.update | Real-time connectivity changes (online/offline). | Connection status and last seen timestamp. |
Authentication Server
Powered by Zitadel, this is the Identity Provider (IdP). These logs focus strictly on the Identity Layer—ensuring that the user or machine is who they claim to be before the Management server grants them access.
| Event Category | Example Log Message | Description |
|---|---|---|
| System Banner | zitadel |
Startup logs showing version and core TLS/Console configurations. |
| Service Config | External Secure : true |
Confirms the IdP is correctly recognizing the HTTPS proxy. |
| Token Verification | decrypt access token |
Validating the JWT (JSON Web Token) provided by a client. |
| Auth Failure | error="invalid token" |
A security event: an expired or unauthorized attempt to authenticate. |
| Health Monitoring | Health Check URL : .../debug/healthz |
Verification that the identity service is responsive. |
Relay Server
The Relay service is a separate process that forwards encrypted traffic between a client and the Gateway Server when a direct peer-to-peer tunnel cannot be established, typically because of a strict or symmetric NAT, CGNAT, or blocked UDP ports.
| Event Type | Example Log Message | Description |
|---|---|---|
| Advertised Endpoint | server will be available on: rel://axsone.example.com:444 |
The relay address and port handed to clients. Clients connect using the rel:// scheme. |
| Transport Selection | Not starting QUIC listener: valid TLS config is required |
Informational, not an error. The QUIC transport is skipped when no TLS configuration is present and WebSocket is used instead. |
| Listener Setup | WS server listening address: 192.168.100.211:444 |
The WebSocket listener is bound. One line is logged per bound address. |
| Health Monitoring | starting healthcheck server on: http://localhost:9000/health |
A local health endpoint used by the appliance to verify the service is responsive. Not reachable externally. |
| Metrics | running metrics server: :9090/metrics |
The metrics endpoint used for monitoring relay activity. |
| Client Connection | WS client connected from: 192.168.100.199:51328 |
A WebSocket connection has been accepted, before the peer identifies itself. |
| Peer Registration | [peer_id: sha-r2s7nqtc...] peer connected from: 192.168.100.199:51328 |
The peer has identified itself and can now send and receive relayed traffic. |
| Peer Disconnect | [peer_id: sha-r2s7nqtc...] peer exited gracefully |
A clean teardown, for example because the client disconnected or the session was upgraded to a direct tunnel. |
| Service Shutdown | close connection with all peers / WS listener stopped |
The relay is stopping or restarting, for instance after a configuration update or a restart from the Services page. All relayed sessions are dropped. |
Signal Server
The Signal Server is the "matchmaker." It uses WebSockets to help peers exchange connection metadata (IPs and ICE candidates). While it identifies peers by their keys to route signals, it does not manage WireGuard keys (that is the Management Server's job).
| Event Type | Details Captured | Description |
|---|---|---|
| Service Start | running HTTP server... |
The server is ready to facilitate "matchmaking" between peers. |
| Peer Registration | registering new peer |
A client has connected to the Signal server to announce its presence. |
| Peer Identification | peer registered [Key...] |
The server identifies the peer via its public key to route signaling data to it. |
| Peer Connected | streamID 177381... |
A persistent WebSocket is open; the peer can now receive "where are you" requests. |
| Stream Closing | peer stream closing |
The signaling link is cut (e.g., app closed or lost Wi-Fi). |
| Peer Deregistered | peer deregistered [Key...] |
The peer is removed from the "active" list and is now unreachable for signaling. |
STUN Server
The STUN (Session Traversal Utilities for NAT) server allows clients to discover their own public-facing IP address and port, which is what makes a direct peer-to-peer tunnel possible in the first place. It does not relay VPN traffic; that function is handled by the separate relay service.
| Event Type | Example Log Message | Description |
|---|---|---|
| System Init | Coturn Version 4.7.0 |
Version information during the boot sequence. |
| Network Config | Listener address: 192.168.100.211 |
The IP and port where the server listens for STUN requests. |
| Security/Cipher | TLS 1.3 supported |
Encryption standards available to the service. |
Support
If you encounter a problem
If you encounter any issues with AXS One VPN, don't hesitate to reach out to our technical support department.
Contact Information
(+32) 15-504-400
support@axsguard.com