Server-Side Configuration
Introduction
In this chapter, we explain how to configure the AXS Guard VPN server, so that PAX units can automatically download their configuration and establish a connection with corporate HQ.
The configuration steps must be executed in the provided order. Note that the AXS Guard CA must be initialized to configure the PAX server.
Feature Activation
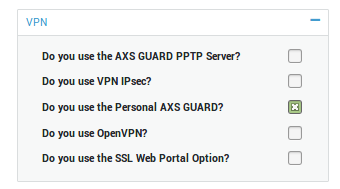
To access the PAX menu, the PAX feature must be activated on your AXS Guard appliance.
-
Log in to the AXS Guard appliance.
-
Navigate to System > Feature Activation
-
Expand the VPN tree.
-
Enable the Personal AXS Guard feature and update your configuration.
Server and Client Certificates
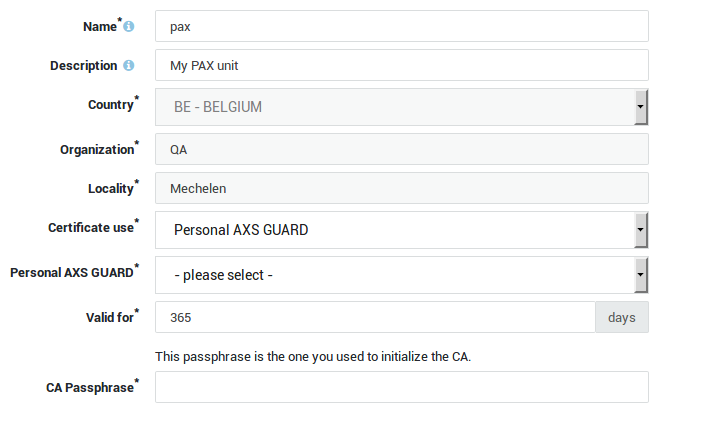
Use the AXS Guard built-in CA to issue PAX client and server certificates. See the AXS Guard PKI manual for a detailed explanation of the PKI feature. Go to PKI > Certificates to issue client and server certificates.
Important
Certificates issued by commercial CAs are not recommended, as explained in Central Management and PKI.
Connection Settings
- Log in to the AXS Guard appliance as an administrator.
- Go to VPN > PAX > Server.
- Configure the VPN server as explained below.
Network Settings
Option |
Description |
|---|---|
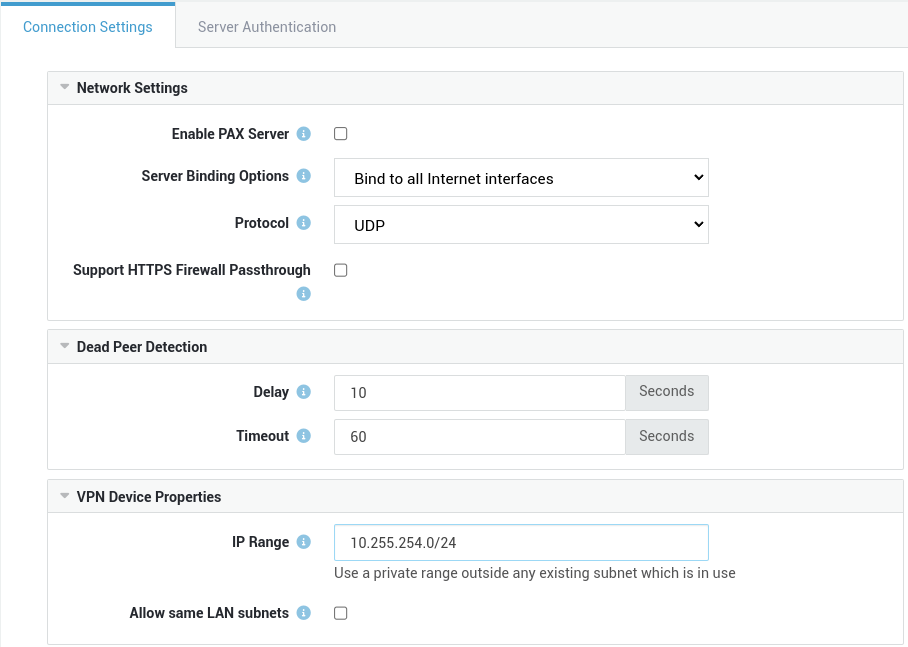
Enable PAX Server |
Enables and starts the PAX server. |
Server Binding Options |
Select the appropriate server binding option. See the context-sensitive help on the appliance for additional information. The PAX server will bind to all Internet interfaces by default, but it can also be configured to bind to a specific Internet interface or IP address. |
Protocol |
PAX units rely on the OpenVPN protocol and use UDP Port 1194 by default to establish VPN connections with the AXS Guard VPN server. TCP is also supported. |
Support HTTPS Firewall Passthrough |
Allows PAX units to connect to TCP port 443 as a fallback mechanism when sitting behind a firewall which is beyond your control and where UDP traffic on port 1194 is blocked. In case TCP is selected, the |
Dead Peer Detection
Option |
Description |
|---|---|
Delay |
The number of seconds between keep-alive checks. 10 seconds is the system default. |
Timeout |
If the client does not reply to the PAX server within the specified period, the connection will be reset. 60 seconds is the system default. |
VPN Device Properties
Option |
Description |
|---|---|
IP Range |
The range of IP addresses that is distributed to the PAX clients. Use the CIDR notation, e.g. 10.255.254.0/24. Make sure the range is not used elsewhere in your network to avoid routing issues. |
Allow same LAN subnets |
If enabled, PAX units can be configured with the same Remote LAN IP / Subnet. During the configuration of such units, an additional subnet needs to be specified. |
Server Authentication
-
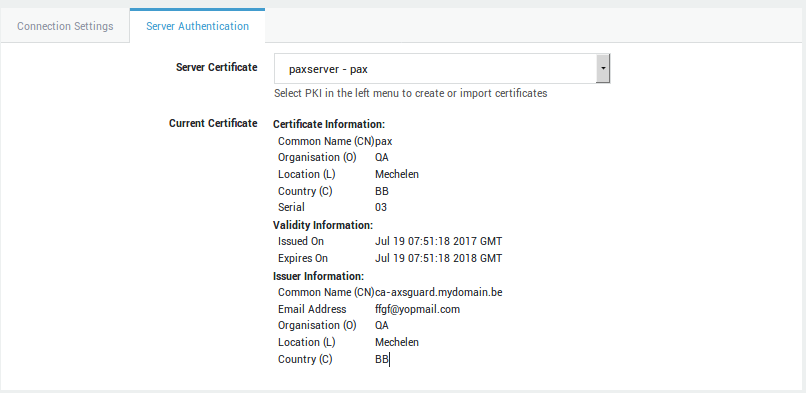
Select the server authentication tab.
-
Configure the certificate as explained in the table below.
Option |
Description |
|---|---|
Server Certificate |
Select the server certificate for the PAX server. Go to PKI > Certificates to create or import a server certificate. |
Current Certificate |
Shows the certificate details of the selected server certificate. |
Adding PAX Clients
-
Go to VPN > PAX > Clients.
-
Click on Add New and enter the settings as explained below.
-
Save your configuration.
Important
- Go to PKI > Certificates to generate a client certificate before your add a PAX client.
- Certain configuration tabs will only appear if the corresponding option has been enabled.
General Settings
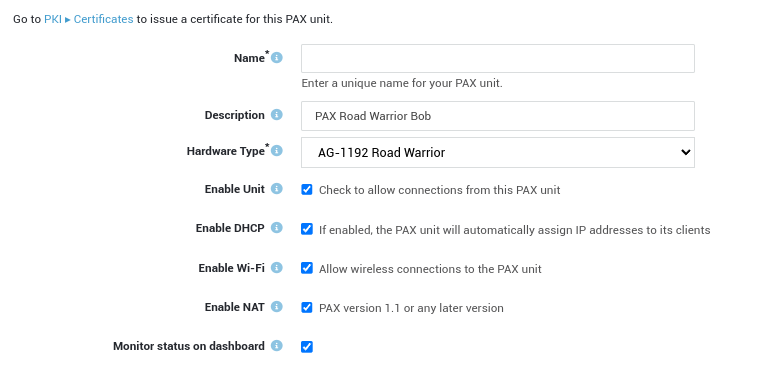
Option |
Description |
|---|---|
Name |
Enter a unique name for the PAX unit. The name will appear in the PAX client overview. |
Description |
Enter a description for the unit, e.g. the name of the owner or the location of the PAX unit. Descriptions are optional, but useful if you have a lot of clients to manage. Even though this is an optional field, we recommend using a sensible name to facilitate the configuration and management of your PAX units. The description will also appear in the PAX client overview. |
Hardware Type |
Select the hardware type of the PAX unit. 4 types are available:
Each type has its own hardware specifications. |
Enable Unit |
Check to allow incoming connections from the PAX unit. Uncheck to prevent the unit from connecting to and accessing your network. |
Enable DHCP |
Check this option to enable the DHCP server on the PAX unit. If enabled, the PAX will automatically assign IP addresses to its clients in the specified range. |
Enable Wi-Fi |
Check this option to allow wireless connections to the PAX unit. |
Enable NAT |
Check this option to configure NAT rules for the PAX unit, e.g. to forward traffic to certain ports or IP addresses of computers connected to the LAN of the PAX unit. This option is disabled by default. |
Monitor status on dashboard |
Select this option to allow system administrators to monitor the PAX unit via the system administration dashboard. |
PAX Administration
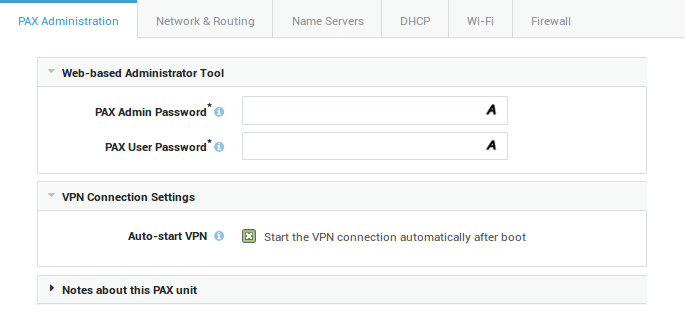
Option |
Description |
|---|---|
PAX Admin Password |
This password is required to access the web-based administrator tool of the PAX unit to configure essential settings, such as the client certificate, the certificate passphrase and the IP address or FQDN of the corporate AXS GUARD appliance. |
PAX User Password |
Enter a password for user access to the web-based administrator tool of the PAX unit. Access will be limited to (re)connecting or disconnecting the VPN. |
Auto-start VPN |
This option is enabled by default. If checked, the VPN connection is established automatically when powering on the PAX unit. If unchecked, the VPN needs to be started manually by logging in to administrator tool of the PAX unit. |
Require User Authentication |
This option is disabled by default. If enabled, the PAX unit will restrict VPN connectivity to the users listed in the next field. We highly recommend to enable this option to protect your network against unauthorized access in case a PAX Road Warrior unit is lost or stolen. Lost or stolen units should be disabled ASAP and have their certificates revoked. Go to Authentication > Services to configure the authentication policy of the PAX server. |
Restrict to Users |
List of users who are authorized to establish a VPN connection after successful authentication. If no specific user is selected, all users listed under Users & Groups > Users will be allowed to establish a VPN connection, which is the system default configuration. |
Notes |
Use this field to enter important notes and general information about the PAX unit. This is an optional field. |
Network & Routing Options
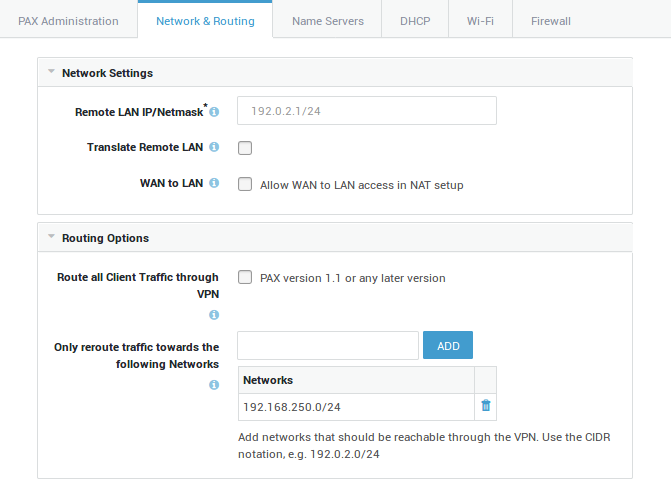
Option |
Description |
|---|---|
Remote LAN IP/Netmask |
Enter the LAN IP and subnet mask of the PAX unit. Use the CIDR notation, e.g. 192.0.2.1/24. Use this IP address to log in to the web-based administrator tool of the PAX unit. |
Translate Remote LAN |
Translate the remote LAN to a different IP subnet. Enable this option if you want to use the same subnet for multiple PAX units, for example:
In the example above, clients in the LAN of the PAX unit all have an IP address in the 192.168.1.0/24 range. When connecting from HQ to machines in the LAN of the PAX unit, you must replace |
HQ Subnet |
Subnet to which the LAN of the unit is translated. Use this subnet to connect to the LAN of the unit from HQ. |
WAN to LAN |
Enable this option if the WAN interface of the PAX unit is connected to one of the main router’s LAN ports, a.k.a. cascading. In this case, the WAN interface of the PAX unit will be assigned an IP address in a private range by the main router. By default, computers that are connected to the LAN of the main router will not be able to communicate with computers in the LAN of the PAX unit and vice versa because they are part of separate networks. Enable this option to allow such communications. If enabled, you must add the LAN network(s) of the main router to allow communications between the separate LAN segments. Use the CIDR notation to add a network, e.g. 192.0.2.0/24. |
Source Network |
This field is only available if you enabled the WAN to LAN option. Add WAN networks that are allowed to connect to the LAN of the PAX unit. Use the CIDR notation, e.g. 192.0.2.0/24 |
Route all Client Traffic through VPN |
If enabled, all client traffic, including Internet traffic, will be routed over the VPN connection. If you disable this option, you will need to add the corporate networks that should be reachable by the clients in the LAN of the PAX. |
Only reroute traffic towards the following Networks |
Add the corporate network(s) that should be available through the VPN connection. Use the CIDR notation, e.g. 192.0.2.0/24 This option is disabled by default. |
VLAN Configuration
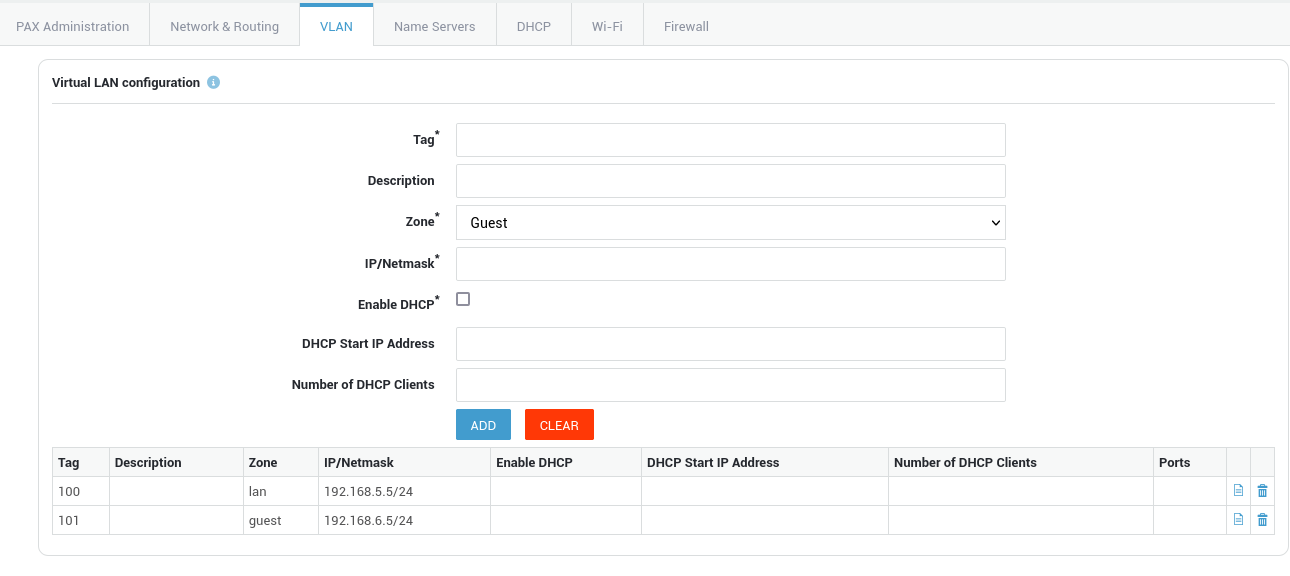
| Option | Description |
|---|---|
| Tag | The VLAN identifier, also known as a VLAN ID or VLAN tag, is a 12-bit identifier that is added to an Ethernet frame header to indicate which virtual local area network (VLAN) the frame belongs to. Specify a number between 10 and 65536.It's important to note that the range of VLAN IDs that are allowed can vary depending on the specific networking equipment and configuration being used. Some switches may have further VLAN ID restrictions, so it's always a good idea to consult the documentation for your specific networking equipment to determine the range of VLAN IDs that are supported. |
| Description | Provide an optional description for the VLAN, e.g. Guest network. |
| Zone | Select the zone the VLAN will operate in: LAN or Guest. The default LAN zone has VPN and WAN access, whereas access of the Guest zone is limited to WAN only. |
| IP/Netmask | Use the CIDR notation to specify a network address for a VLAN, e.g. 192.0.2.1/24. |
| Enable DHCP | Allows the PAX unit to act as a DHCP server for the configured VLAN. |
| DHCP Start IP Address | The first IP address of the DHCP address range to be assigned to DHCP clients in the VLAN. |
| Number of DHCP Clients | The number of hosts to be allowed in the specified DHCP address range. |
| Ports | The physical ports with which the VLAN device is associated. |
Name Servers
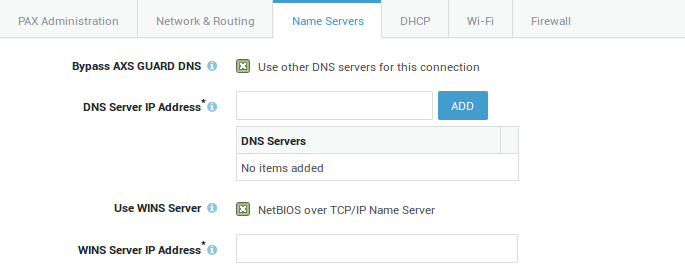
Option |
Description |
|---|---|
Bypass AXS GUARD DNS |
Leave this option unchecked to use the AXS GUARD appliance as the primary DNS server for VPN connections. Enable to use other DNS servers, e.g. a Microsoft DNS server in the corporate network. This option is disabled by default. Also see the section about DNS scenarios. |
DNS Server IP Address |
Enter the IP address of the DNS server to be used for the VPN connection. Multiple DNS servers can be added. |
Use WINS Server |
Enable to enter the IP address of the WINS server in the corporate network. WINS (Windows Internet Name Server) is Microsoft’s implementation of the NetBIOS Name Service(NBNS), a name server and service for NetBIOS computer names. This option is disabled by default. |
WINS Server IP Address |
Enter the IP address of the WINS server in your corporate network. |
Important
When the VPN connection is down, PAX clients will fall back to their own DNS configuration, e.g. the DNS server of the ISP.
DHCP Options
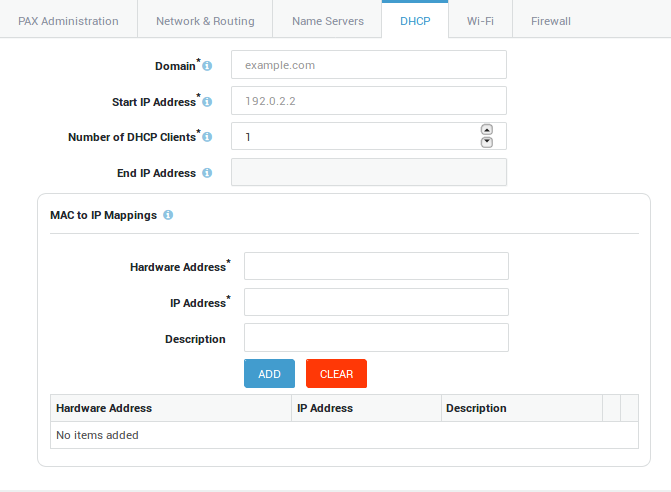
Option |
Description |
|---|---|
Domain |
Enter the domain suffix of the corporate network, e.g. example.com. This suffix is automatically appended to unqualified hostnames in DNS queries. For example, a DNS query for myhost will return the IP of myhost.example.com. |
Start IP Address |
Enter the first IP address of the DHCP address pool to be assigned to PAX clients, e.g. 192.0.2.2. |
Number of DHCP Clients |
Enter or select the number of IP addresses to be made available in the DHCP address pool. |
End IP Address |
Shows the last IP address of the DHCP address pool based on your selection. |
MAC to IP Mappings |
Forces the DHCP server of the PAX to assign a specific IP address of the DHCP address pool to a specific PAX client. This provides extra security, as VPN access will be restricted to the specified client(s), rather than allowed to all PAX clients with a valid IP.
|
Wi-Fi Options
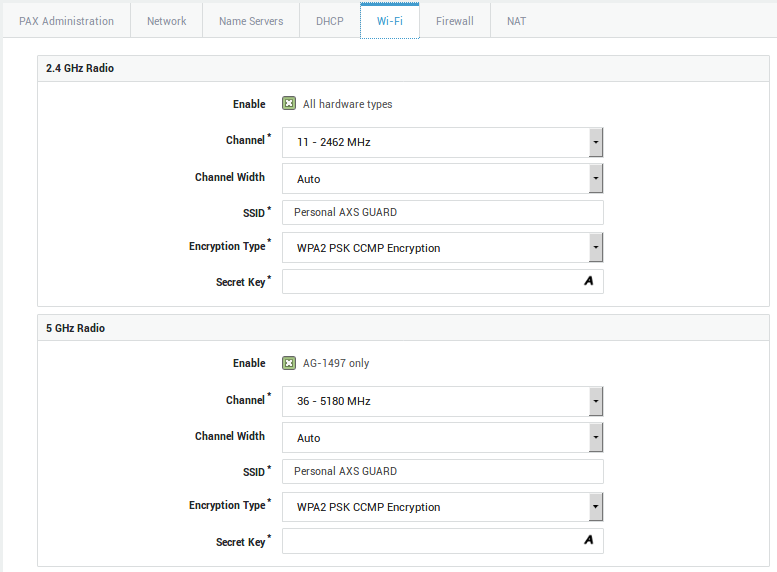
Option |
Description |
|---|---|
Enable |
Check to enable Wi-Fi. Note that hardware restrictions apply. |
Channel |
Wireless networks based on the 802.11b and 802.11g standards transmit their signal in a narrow radio frequency range of 2.4 GHz. The 2.4 GHz Wi-Fi signal range is divided into a number of smaller bands or "channels," similar to television channels. Select the desired Wi-Fi channel (1-13). The same channel should be configured on the client. Be advised that depending on your country or region, the use of some channels may be restricted. In the US, channels 1-11 are allowed, whereas in most of European countries, channels 1-13 can be used. In Spain however, only channels 10 and 11 are allowed. Wireless networks based on the 802.11a standards operate on a different 5 GHz band. The band is also divided into channels, but is much more restricted and regulated. Select the desired Wi-Fi channel (36, 40, 44, 48, 149, 153, 157, 161 or 165), in accordance with FCC and local regulations. |
Channel Width |
Select the channel width to be used by the wireless radio controller. Normally, a width of 20MHz is used, as specified in the 802.11abg standards. The wireless-n specification however, allows to bond neighboring channels into a larger band, increasing the maximum data rate. In order to achieve 150 Mbps and more, a channel width of 40 MHz is required. Use the auto select option to automatically choose the maximum available bandwidth. Busy wireless networks or overcapacity of the radio band may prevent channel bonding from being used at all. |
SSID |
The SSID (Service Set Identifier) is the name of the wireless network to be broadcasted by the PAX unit. All wireless devices attempting to communicate with the PAX must use this SSID. Windows clients equipped with a wireless network interface usually detect this SSID automatically. |
Encryption Type |
The encryption to be used for the wireless communication between the clients and the PAX unit. The list starts with the strongest variant and ends with the weakest variant (WEP). WPA2 Enterprise CCMP Encryption is the system default. Supported Types:
|
Secret Key |
The secret passphrase to be be entered on the client(s) to connect to the wireless network. The passphrase is hidden by default when entered. Click on A to view the password as you type. If you selected WEP encryption, a secret key of at least 26 characters is recommended. |
Firewall Policies
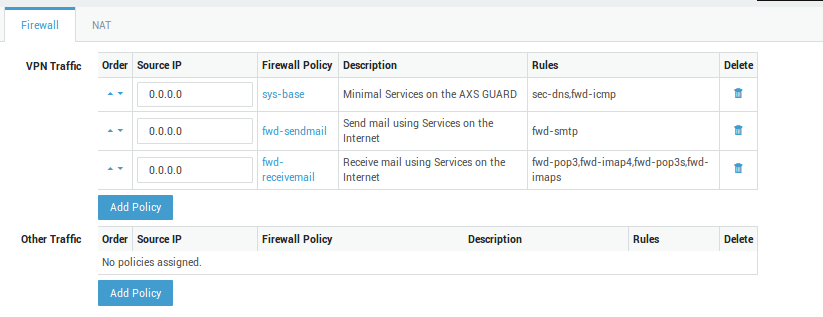
Option |
Description |
|---|---|
VPN Traffic |
Firewall policies which govern access to corporate and other networks which are accessible through the VPN. Go to Firewall > Policies for an overview of available policies or to add new policies. If application control is enabled on your system, make sure to allow access to protocols and applications needed by your VPN users. The system policy blocks all traffic by default, including SSL traffic. |
Other Traffic |
Firewall policies which apply outside the VPN connection, i.e. access to the Internet or other networks which are not accessible through the VPN. This option is not available if all client traffic is routed through the VPN (See the Route all Client Traffic through VPN option under the Network tab. Go to Firewall > Policies for an overview of available policies or to add new policies. |
Important
Only the following firewall policies can be selected for the PAX unit:
- Outside Tunnel Firewall Policies: only
fwd-dynamicpolicies (i.e. dynamic policies containing rules of the type through AXS Guard are valid. These policies define access to services on the Internet when the VPN tunnel is down. - Tunnel Firewall Policies: only
fwd-dynamicandsec-dynamicpolicies can be selected. Thefwd-policies define access through the corporate AXS Guard appliance towards its secure LAN, its DMZ zone and optionally the Internet. Thesec-dynamicpolicies allow access to services running on the corporate AXS Guard appliance. Firewall rights can be restricted to a specific IP address or range. Use the CIDR notation to specify a range, e.g.10.0.0.0/24. Additionally, an IP address can be assigned to a specific client in the secure LAN of the PAX unit, based on its MAC address and the DHCP options configured for the PAX unit. - Any dynamic firewall policy not mentioned above is not suitable to configure a PAX unit.
- Incoming and outgoing network devices specified in the
fwd-dynamicpolicies do not apply to PAX units.
Network Address Translation
Automated NAT
- Enable Auto NAT-T.
- Select the desired NAT type.
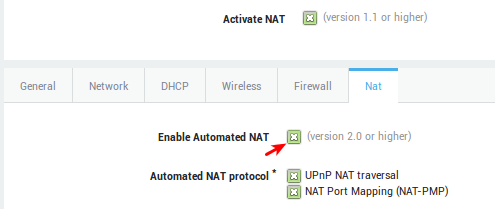
NAT Type |
Description |
|---|---|
Enable Automated NAT (PAX version 2.0 or later) |
Allows you to select the automated NAT protocols if checked. |
UPnP NAT Traversal |
(Universal Plug’n’Play) enables programs running on a host to automatically configure port forwarding on the PAX. UPnP basically allows a program to open ports that are necessary for its operation, without any warning or intervention from the system administrator. For this reason, there is a security risk associated with enabling UPnP on the PAX. Technically, a worm or malware could use this function to compromise your LAN’s security. It is therefore recommended to manually configure port forwarding whenever possible and disable UPnP. However, in some cases dynamic port forwarding may be required if manual port forwarding becomes impractical. |
NAT Port Mapping (NAT-PMP) |
NAT-PMP is a protocol similar to UPnP and is supported by a vast number of Windows and Linux applications. |
DNAT and Port Forwarding
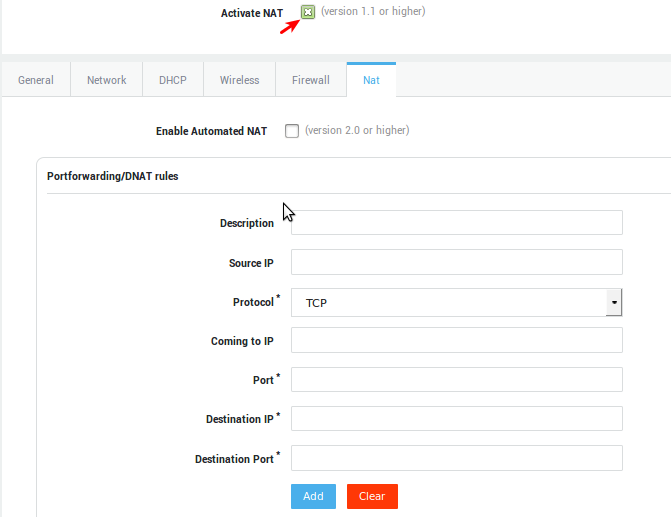
Parameter |
Description |
|---|---|
Description |
A description for the new NAT rule, e.g. mail. |
Source IP |
The Source IP or subnet to be matched. Use the CIDR notation to specify a subnet. If left empty, the rule applies to any source IP. |
Protocol |
The protocol to be matched. Select the appropriate protocol from the drop-down list (TCP or UDP). |
Coming to IP |
The destination IP to be matched. Leave this field empty if you have a public IP address that is dynamically assigned by your ISP. |
Port |
Enter the port number to be matched, e.g. 25 (for SMTP traffic). |
Destination IP |
The IP address of the host to which matching traffic must be forwarded. Only one IP address may be entered, e.g. |
Destination Port |
Traffic will be forwarded to the specified port. |
Control Buttons |
|
SNAT and Masquerading
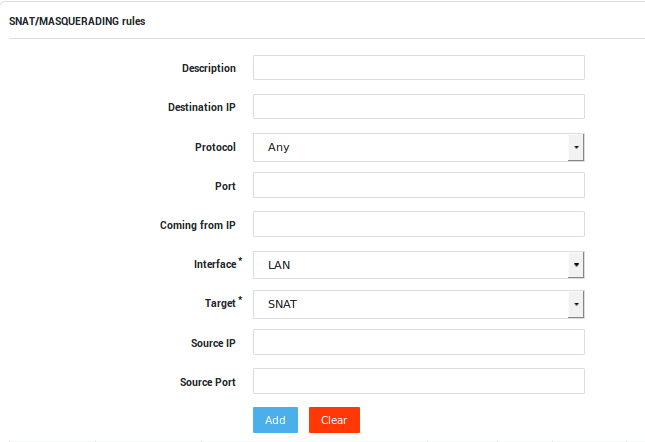
Parameter |
Description |
|---|---|
Description |
A description for the new NAT rule, e.g. ssh. |
Destination IP |
SNAT will be performed for any packet that matches this destination IP or network. Use the CIDR notation to specify a network, e.g. 192.168.0.1/24. If left empty, SNAT will be performed for all outgoing traffic. |
Protocol |
The protocol to be matched. Select the appropriate protocol from the drop-down list (TCP, UDP or Any). |
Port |
The port of the destination device / network that must be matched. |
Coming from IP |
SNAT will only be applied if network packets contain the specified source address, e.g. |
Interface |
LAN / WAN. The network device that handles the traffic to be SNATed or Masqueraded. |
Target |
Select the appropriate action for matching traffic, i.e. SNAT or Masquerade. |
Source IP |
The source IP in the packets will be replaced with the source IP specified here. |
Source Port |
The source port in the packets will be replaced with the source port specified here. |
Control Buttons |
|
Application Control
Important
The steps below are only required if the application control feature is enabled on your AXS Guard appliance.
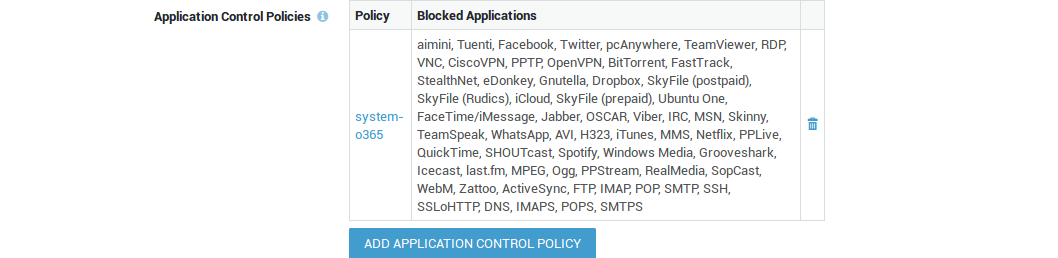
System administrators should unblock protocols and applications which must be accessible via the VPN tunnel, e.g. social media. The following protocols are allowed by the factory default application control policy: HTTP, HTTPS and DNS. All other traffic is blocked by default.
PAX clients which are configured to access the Internet via the AXS Guard proxy server are subject to the web access application control policy. Go to Web Access > Proxy Server to configure the application policy for the proxy server.
-
Go to Application Control > General
-
Add the desired application control policies.
-
Update your configuration.
Authentication Policy
The authentication policy determines how users must authenticate to establish a VPN connection (PAX Road Warrior only).
-
Go to Authentication > Services.
-
Select the Personal AXS Guard service.
-
Select the desired authentication policy, e.g. DIGIPASS.
-
Update your configuration.
